
- Make a Java File Executable using JAR Command
- Make a Java File Executable using IDE
- Make a Java File Executable using External Tools and Libraries

This tutorial introduces how to convert a Java program to an executable jar file in Java and also lists some example codes to understand the topic.
In Java, to create an executable JAR file, we can use several ways such as:
jarcommand- IDE (Eclipse, IntelliJ IDEA)
- Some tools like javapackager, WinRun4J, packr, JSmooth, JexePack, InstallAnywhere, Launch4j, etc.
Make a Java File Executable using JAR Command
We will start with a simpler method that requires just a single command that we need to run via a terminal. We will use compiled Java file, so make sure to compile the file first. Then, we will open the terminal, write the following command, and hit enter.
jar -cvf jarfile.jar MainJavaFile.class
Here, jar is the command.
-cvf is a flag that represents copy, verbose, file, respectively.
jarfile.jar is the name of the JAR file that we want to create.
MainJavaFile is the main Java file that will be used as a source file.
After executing this command, it creates a JAR file that contains a menifest.mf file. It is a special file that contains information about the files packaged in a JAR file.
We need to open this and provide a main-class execution path, like:
Main-class: packageName.MainJavaFile
Write this line to the file, save and quit, and execute this command to run the JAR file in the terminal.
It will run the Java code and display the output to the console or open a new window if the JAR file belongs to a graphical application such as swing or JavaFX.
Make a Java File Executable using IDE
We can use any IDE to create JAR file from a Java file. Here, we will use Eclipse IDE to create JAR. It includes the following steps.
-
Go to File menu and select Export
-
Select Runnable JAR file
-
Select Java file from Launch Configuration dropdown
-
Select Location to store the JAR, and
-
Execute the JAR
To create JAR using Elipse IDE, follow the above steps, and you will get the JAR.
Apart from these solutions, you can use several other tools such as:
javapackager
It is a standard tool provided by Oracle and can be used to perform tasks related to packaging Java and JavaFX applications. We can use the -createjar command of this tool to create a JAR.
WinRun4j
WinRun4j is a java launcher for windows. It is an alternative to javaw.exe and provides several benefits. It uses an INI file for specifying classpath, main class, vm args, etc. It uses additional JVM args for more flexible memory use. We can use it to make a JAR runnable for Windows compatible.
packr
This tool is available at GitHub and can be easily used to packages your JAR, assets, and a JVM for distribution on Windows, Linux, and macOS. packr is most suitable for GUI applications. We can use it to create JAR files.
Launch4j
It is a cross-platform tool for wrapping Java applications as JARs in lightweight Windows executables. It is possible to set runtime options, like the initial/max heap size.

Fat jars are a good way to package java applications, whether they are command-line programs or GUIs. However, a jar differs from other executables: instead of the regular ./app.jar, it must be invoked using java -jar app.jar. This is ok, but not ideal.
It is not a given though: Spring Boot is able to generate executable jars, that is jars that can be executed using the direct syntax ./app.jar like any other executable binary. How do they pull this off? And, more importantly, how can we apply the same logic to any jar ? Let’s find out!
why not a native executable 😐 ?
An even better way is to create a real native executable using GraalVM, which directly embeds a tiny Virtual Machine, so it can run even on machines that do not have a JRE installed. However, this process is tedious and has limitations… It won’t work for any codebase ! If you assume all your users will have a JRE, this solution is way easier.
The magic behind executable jars
The actual magic involved is pretty straight-forward and based on a little-known fact about the Zip format. From the .ZIP format wiki page:
The .ZIP file format allows for a comment containing up to 65,535 (216−1) bytes of data to occur at the end of the file after the central directory […]
This allows arbitrary data to occur in the file both before and after the ZIP archive data, and for the archive to still be read by a ZIP application. A side-effect of this is that it is possible to author a file that is both a working ZIP archive and another format, provided that the other format tolerates arbitrary data at its end, beginning, or middle.
Since JAR is a variant of ZIP, it works for them as well. It means it is possible to append a bash script, acting like a launcher, at the beginning of a jar file without corrupting it.
This is exactly what Spring Boot does. Take any executable Spring Boot jar (for example bbdata-api-*.jar), and run head on it. You should see:
head -n 10 /tmp/bbdata-api-2.0.0-alpha.jar
#!/bin/bash
#
#    .   ____          _            __ _ _
#   /\ / ___'_ __ _ _(_)_ __  __ _
#  ( ( )___ | '_ | '_| | '_ / _` |
#   \/  ___)| |_)| | | | | || (_| |  ) ) ) )
#    '  |____| .__|_| |_|_| |___, | / / / /
#   =========|_|==============|___/=/_/_/_/
#   :: Spring Boot Startup Script ::
#
Enter fullscreen mode
Exit fullscreen mode
Turning a jar into an executable (with one bash command !)
With this trick in mind, turning any jar into an executable jar is as easy as running those two commands (see this gist for a variant):
# Append a basic launcher script to the jar
cat
  <(echo '#!/bin/sh')
  <(echo 'exec java -jar $0 "$@"')
  <(echo 'exit 0')
  original.jar > executable.jar

# Make the new jar executable
chmod +x executable.jar
Enter fullscreen mode
Exit fullscreen mode
And it works on all unix like systems including Linux, MacOS, Cygwin, and Windows Linux subsystem !
Making executable jars using Gradle
Now that the process is understood, writing a Gradle Task for it is easy.
Custom Gradle Task
First, we need to define a new custom task in build.gradle.kts:
abstract class ExecutableJarTask: DefaultTask() {
    // This custom task will prepend the content of a
    // bash launch script at the beginning of a jar,
    // and make it executable (chmod +x)

    @org.gradle.api.tasks.InputFiles
    var originalJars: ConfigurableFileTree =
      project.fileTree("${project.buildDir}/libs") { include("*.jar") }

    @org.gradle.api.tasks.OutputDirectory
    var outputDir: File = project.buildDir.resolve("bin") // where to write the modified jar(s)

    @org.gradle.api.tasks.InputFile
    var launchScript: File = project.rootDir.resolve("launch.sh") // script to prepend

    @TaskAction
    fun createExecutableJars() {
        project.mkdir(outputDir)
        originalJars.forEach { jar ->
            outputDir.resolve(jar.name).run {
                outputStream().use { out ->
                    out.write(launchScript.readBytes())
                    out.write(jar.readBytes())
                }
                setExecutable(true)
                println("created executable: $path")
            }
        }
    }
}
Enter fullscreen mode
Exit fullscreen mode
This task extends gradle’s DefaultTask (Kotlin DSL), and takes three arguments:
- the list of «normal» jars that need to be made executable (
build/libs/*.jarby default), - the directory where to output the transformed jars (
binby default), - the bash launch script to prepend, which needs to exist ! (
<project_root>/launch.shby default).
Then, the job is straightforward: for each jar found in inputJars, execute the equivalent of the cat and chmod commands outlined earlier, but in Kotlin.
Note that the jars will keep the same name, so ensure the outputDirectory doesn’t match the input directory (or the jar will be corrupted). If you don’t like this, adapt the script accordingly.
Invoking the custom task
We now need to register this new task, so it can be invoked from the command line. We also want it to run after the task creating the jars. If you use the built-in jar task for the latter, this will do:
tasks.register<ExecutableJarTask>("exec-jar") {
    dependsOn("jar") // "jar" task should have run prior to it
}
Enter fullscreen mode
Exit fullscreen mode
With this, you can now use:
./gradlew exec-jar
Enter fullscreen mode
Exit fullscreen mode
If you want to customize the task, for example, change the path to the launch script:
tasks.register<ExecutableJarTask>("exec-jar") {
    dependsOn("jar")
    // customise directly here
    launchScript = project.rootDir.resolve("bin/launcher.sh")
}
Enter fullscreen mode
Exit fullscreen mode
Done !
An example launch script
Based on Spring Boot’s script, I personally use the following launch script, which should run fine on all supported platforms:
#!/bin/sh
[[ -n "$DEBUG" ]] && set -x

# Find Java (cf: spring-boot launcher)
if [[ -n "$JAVA_HOME" ]] && [[ -x "$JAVA_HOME/bin/java" ]]; then
    javaexe="$JAVA_HOME/bin/java"
elif type -p java > /dev/null 2>&1; then
    javaexe=$(type -p java)
elif [[ -x "/usr/bin/java" ]];  then
    javaexe="/usr/bin/java"
else
    echo "Unable to find Java"
    exit 1
fi

# run jar
exec $javaexe -jar $0 "$@"
exit 0
Enter fullscreen mode
Exit fullscreen mode
Note the exit 0 at the end: this is very important if your jar has a finite runtime (vs a Spring Boot server application). Indeed, without it, your jar will run and exit, then bash will try to execute whatever is found after the exec line (that is, the zipped content of the jar) and will exit with an error.
Written with ♡ by derlin
If you are a Java programmer then you know what is the purpose of the JAR file, but for those who are unaware, the JAR file is deliverables of Java application. Just like C and C++ applications produce EXE files, Java produces JAR files. In other words, A JAR (Java Archive) file is a ZIP format file that bundles Java classes into a single unit, it may contain all the resources needed by Java application as well. There are mainly two types of the JAR file in Java: Library JAR (normal JAR) files: JARs which are reusable libraries like Apache commons JAR file, guava.jar itself, or even JDBC drivers like ojdbc6_g.jar. There is another type as well, Executable JAR files: JARs which can be executed as standalone Java applications.
The main difference between normal and executable JAR file is that later contains a manifest file, which specifies a main-class entry. When you run that JAR file, Java starts your application by reading that main-class entry, because you need the main method to execute Java programs.
I had earlier shared steps to create a JAR file from the command prompt, which if you have not read, go read it. You will learn about the basics of the JAR command, which comes with JDK, manifest file, and different attributes of the manifest file.
In this tutorial, we will learn how to make/create/export both library and executable JAR files in Eclipse IDE. Why it’s important to know creating executable JAR in Eclipse because it’s one of the most used tools by Java programmers.
Once you know the steps, you export your Java program as a JAR file in a second or two. After creating an executable JAR file, you can follow these steps to run the Java program from the JAR file in the command line.
Steps to Create Executable JAR file in Eclipse
A picture is worth more than a thousand words, that’s why I have provided all steps by taking screenshots. You can quickly learn how to create executable JAR for your Java application in Eclipse, by just looking at these screenshots. They are arranged from start to end. This means the first image is for the first step and the last image is for the last step.
By the way, if your application is dependent upon some other JAR files e.g. third-party library, then don’t need to include them inside JAR. All you need to do is include them inside your Java Classpath. Java is smart enough to pick classes from those JAR.
Also remember to include the main method or entry point of your Java program, while creating executable JAR, as you can not run a Java program without the main method, as discussed here.
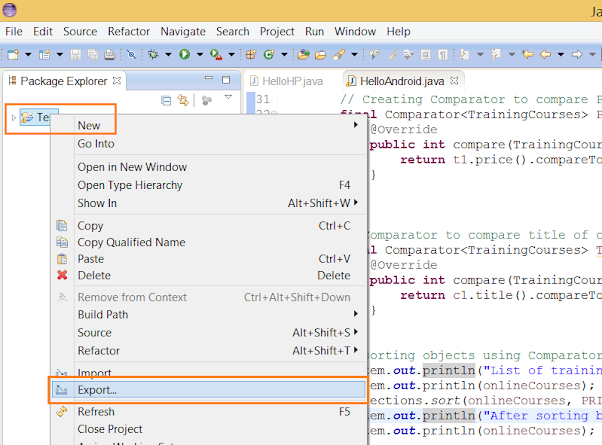
Step 1
Select your project and click on the Export option.
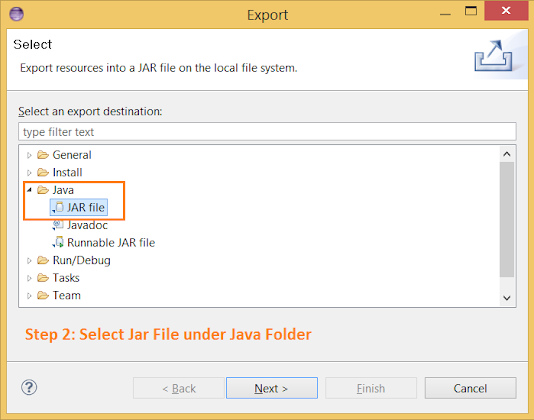
Step 2
Choose Java and select JAR file for exporting
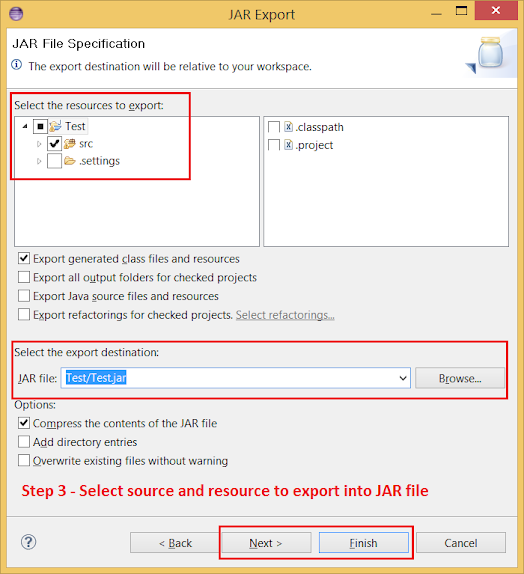
Step 3
Now select the source and resources you want to export into a JAR file. After selecting the src folder and any resource, select the destination folder, where you want your JAR file to be created. Also, don’t forget to check the option «compress the content of JAR file». This will reduce the size of the executable JAR file. If you want you can finish the process in this step, but you can also go one step further to save these instructions of executable JAR file creation for future use.
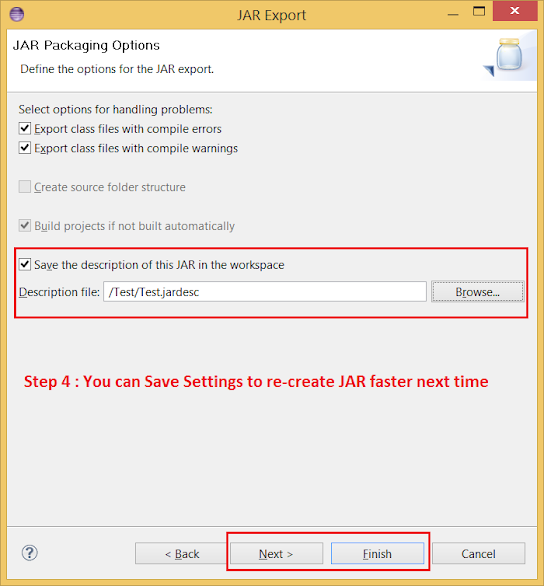
Step 4
In this step, you can save all instructions into a «JAR description» file for future use. This will create a description file e.g. Test.jardesc in the chosen folder.
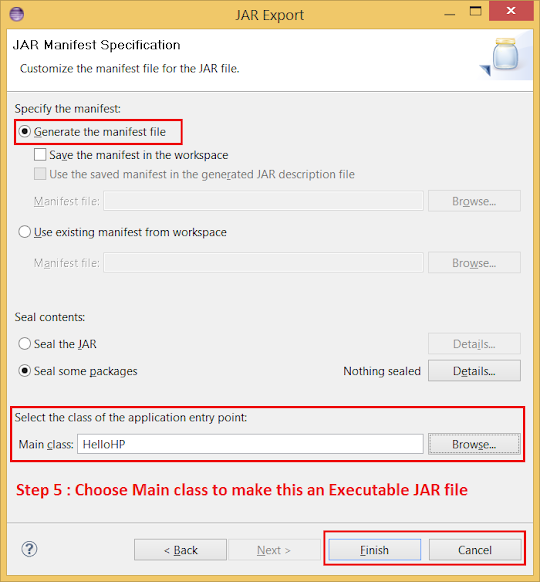
Step 5
This is an important step because you are going to generate the manifest file, don’t forget to choose the main class. This is important to make your JAR an executable JAR file. Remember the main method is the entry point of any Java application.
Step 6
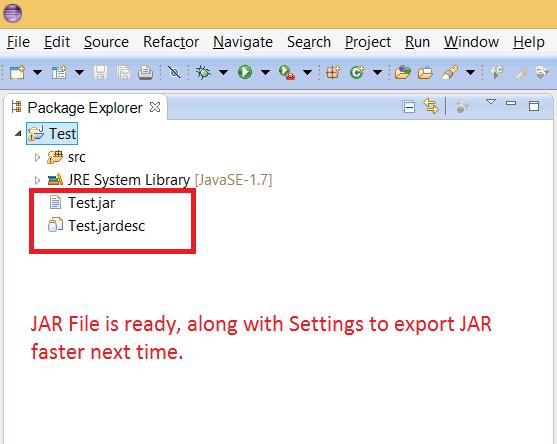
You are done with creating an executable JAR file. Now you can go to the target folder, which you have chosen in previous steps to see both the JAR file as well .jardesc file to recreate the JAR file again and again. This time you don’t need to include main class as well, as those are already included.
Step 7
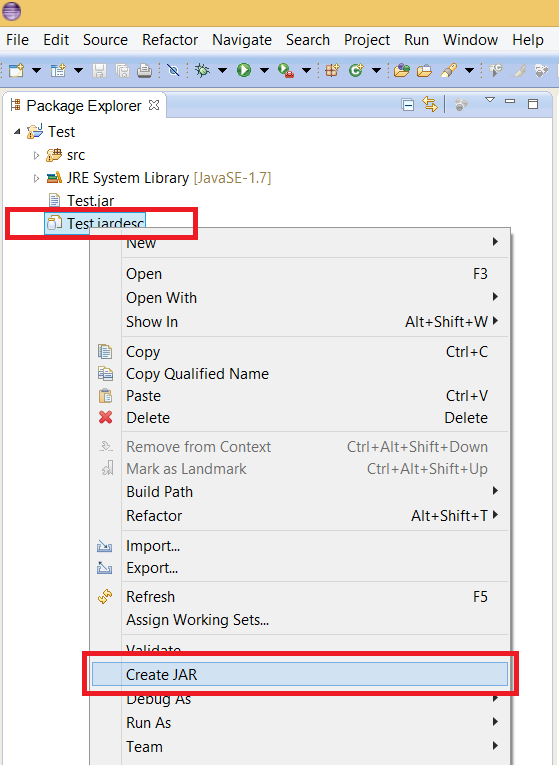
After making code changes, if you want to create a new JAR file, you don’t need to go through all previous steps. This time, just select your JAR description file and say «create JAR», a right click menu option in Eclipse. This will create another JAR file in same folder. You can double check timestamp of JAR file.
That’s all about How to create or make an Executable JAR file in Eclipse IDE. By following these steps you can export your Java program as executable JAR, which allows you to share your program with your user, client, and anyone who wants to take a look. I strongly suggest saving instructions to export the JAR file, so that you don’t need to run through all these steps again and again. Next time, when you update your code, just click on your jardesc file and your JAR file will be ready in a blink.