Learn to get your Ethernet & WiFi working properly again
by Milan Stanojevic
Milan has been enthusiastic about technology ever since his childhood days, and this led him to take interest in all PC-related technologies. He’s a PC enthusiast and he… read more
Published on October 10, 2022
Reviewed by
Vlad Turiceanu

Passionate about technology, Windows, and everything that has a power button, he spent most of his time developing new skills and learning more about the tech world. Coming… read more
- The DNS server not responding error in Windows 10 will prevent you from browsing the Internet.
- If the DNS server isn’t responding in Windows 10, you can try changing the server manually.
- You can also reconfigure your connection to fix this discomforting error.
- Installing the latest drivers can be also a great solution for this problem.
XINSTALL BY CLICKING THE DOWNLOAD FILE
This software will repair common computer errors, protect you from file loss, malware, hardware failure and optimize your PC for maximum performance. Fix PC issues and remove viruses now in 3 easy steps:
- Download Restoro PC Repair Tool that comes with Patented Technologies (patent available here).
- Click Start Scan to find Windows issues that could be causing PC problems.
- Click Repair All to fix issues affecting your computer’s security and performance
- Restoro has been downloaded by 0 readers this month.
The DNS server is a crucial component of the Internet. Unfortunately, DNS issues on Windows 10 are prevalent, with a few users reporting a DNS server is not responding error message on their PCs.
If you want to access any Internet website, you must first access the DNS server. After the DNS server receives your request, you’ll be directed to the desired website.
If the error persists, use the additional troubleshooting methods listed below to learn how to fix the DNS server in Windows 10.
What causes a DNS server not to respond?
There are various reasons for the DNS server not responding error messages. It can be caused by issues with your DNS settings or some problems with your PC.
Below are some of the common causes:
- Outdated or faulty drivers
- Issues with DNS server address
- Antivirus interference
- Outdated router firmware
How do I fix the DNS server not responding Windows 10 error?
What to do if the DNS server is not responding Windows 10? The quickest fix is to change the DNS server settings manually. Then disable your firewall, reset your router and test the connection again.
- What causes a DNS server not to respond?
- How do I fix the DNS server not responding Windows 10 error?
- 1. Change the DNS server manually
- 2. Enter your MAC address manually
- 2.1. Locate the physical address of your PC
- 2.2. Configure your network connection
- 3. Install the latest drivers
- 3.1. Update your drivers manually
- 3.2. Update drivers automatically
- 4. Disable your antivirus and firewall
- 5. Update your router’s firmware
- 6. Use the netsh command
- 7. Restart your modem
- 8. Start your PC in Safe Mode
- 9. Disable Microsoft Virtual WiFi Miniport Adapter
- 10. Disable Internet Protocol Version 6
- 11. Disable all additional connections
- 12. Check for third-party applications
- 13. Change the DNS address on your router
- 14. Reset your router
- 15. Turn off the peer-to-peer update feature
- 16. Wait for your ISP to fix the problem
- 17. Fix Comcast DNS server not responding
- What can I do if Windows 11 DNS server is not responding?
- Is it safe to flush DNS cache?
- How do I find my DNS server?
- How do you check if DNS is working?
1. Change the DNS server manually
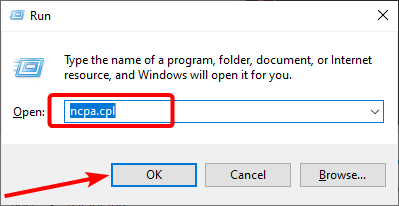
- Press Windows key + R, type ncpa.cpl, and click the OK button.

- Right-click your network and choose Properties.

- Select Internet Protocol Version 4 (TCP/IPv4) and click the Properties button.

- Now, select the Use the following DNS server addresses option.
- Set the Preferred DNS server to 8.8.8.8. and the Alternate DNS server to 8.8.4.4.
- You can also use 208.67.222.222 as Preferred and 208.67.220.220 as the Alternate DNS server.
- After you’re done, click OK to save the changes.

- Optional: Disconnect from the Internet and connect back again.


When you try to access a particular website, you’ll automatically connect to your ISP’s DNS server.
However, it can happen that your DNS server is not available. If that’s the case, you’ll see the DNS server is not responding error on Lenovo and other PCs.
One way to fix this problem is to change your DNS server to OpenDNS or Google DNS. This is a simple procedure that you can perform it by following the steps above.
After changing the DNS server, check if the problem is resolved. You should be able to browse the Internet without any issues.
Remember that changing your DNS server might make your Internet connection a bit slower depending on your location, so you might want to experiment with different servers.
2. Enter your MAC address manually
2.1. Locate the physical address of your PC
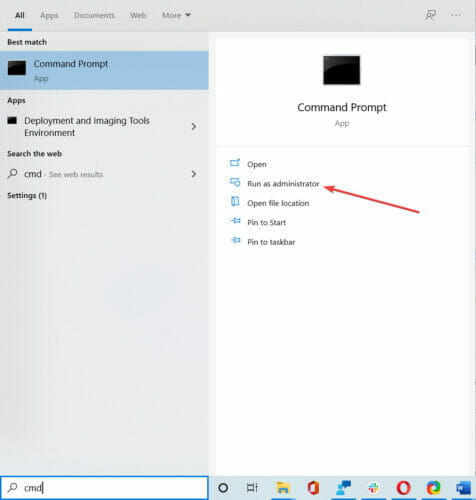
- Type cmd in the search tab and click on Run as administrator under Command Prompt.

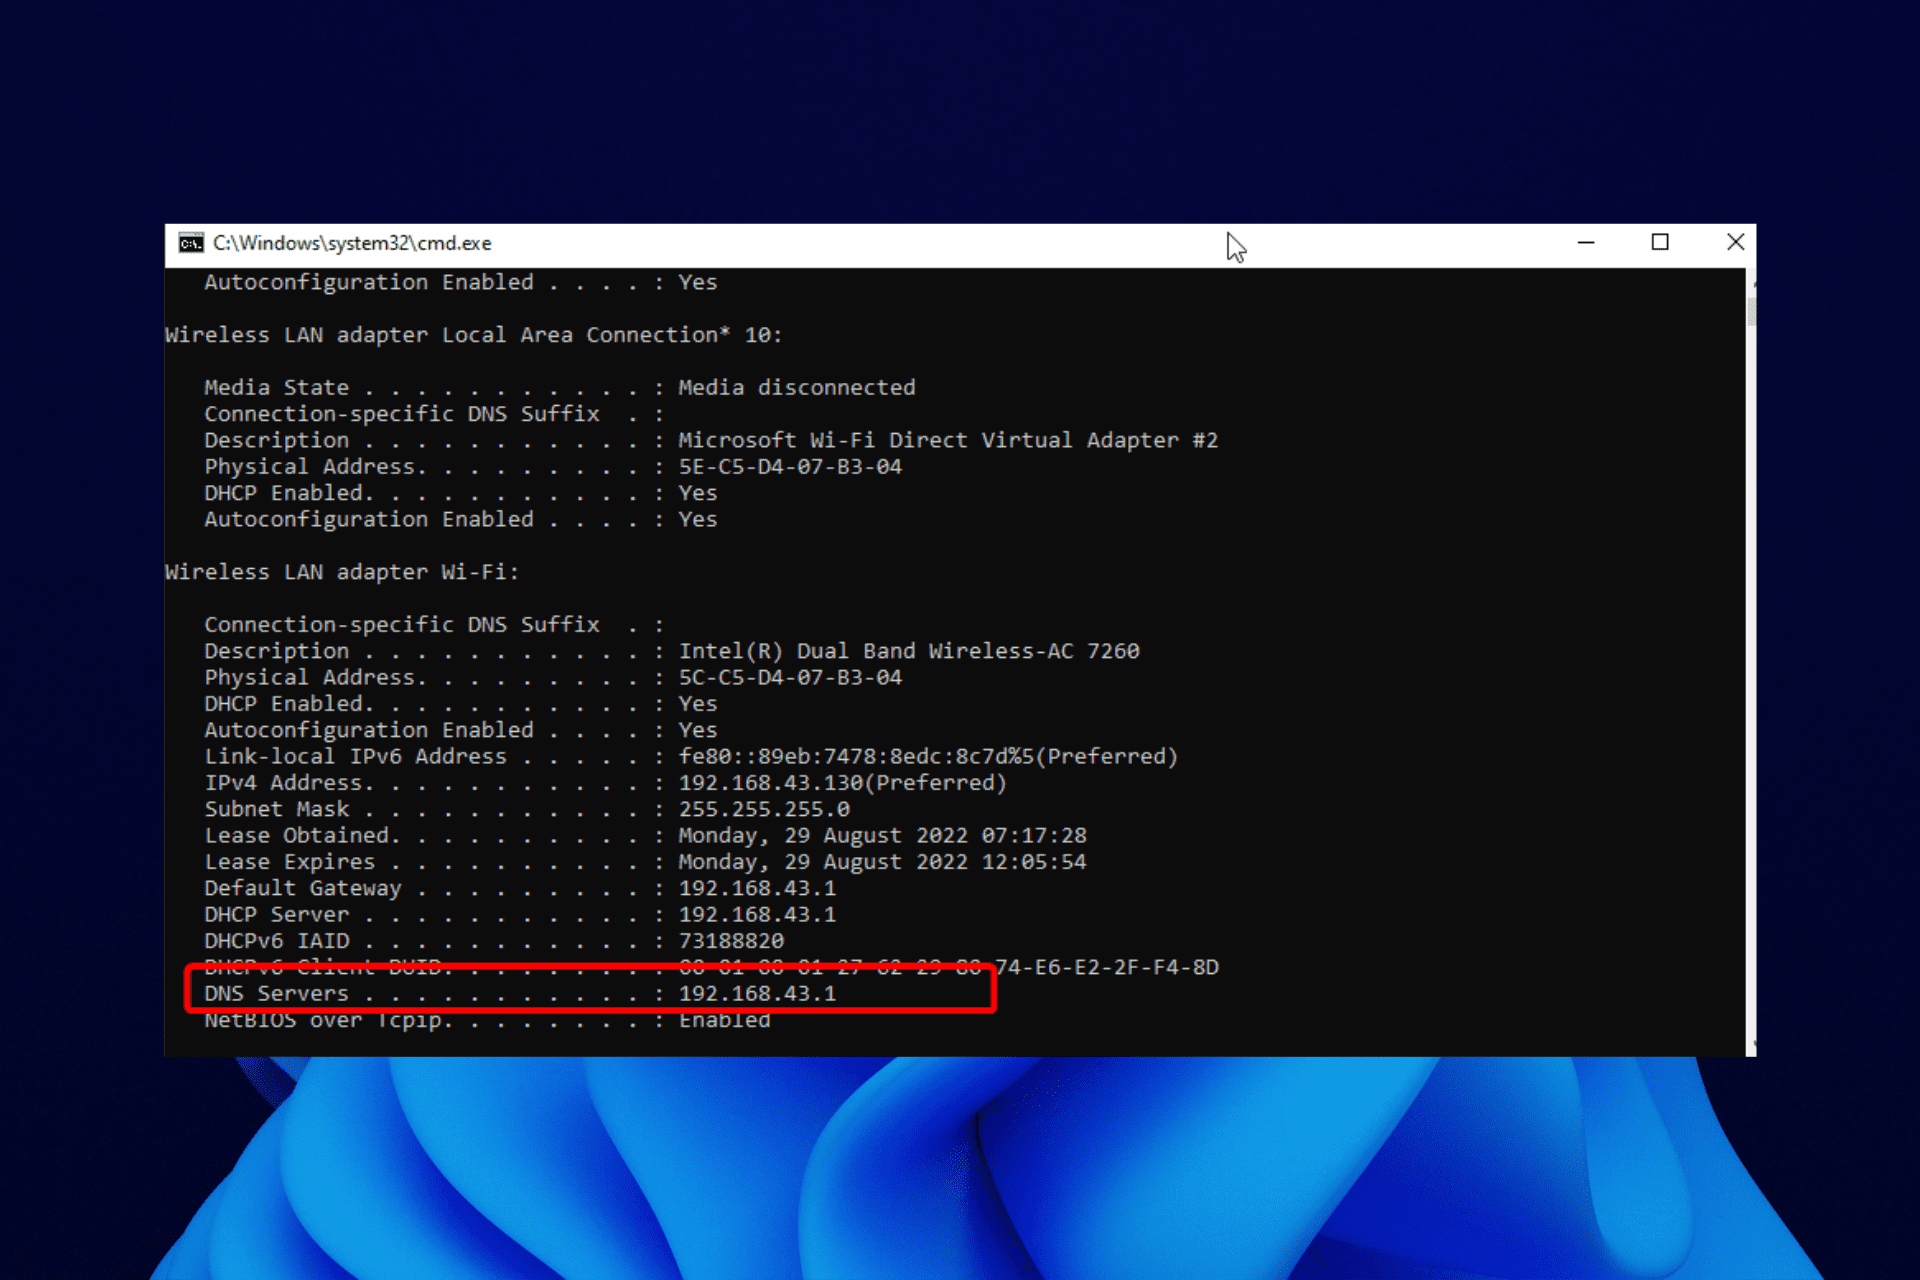
- Enter ipconfig /all and press Enter.

- Locate the Physical Address and write it down.
- Close Command Prompt.


2.2. Configure your network connection
- Open the Network Connections window.
- Locate your connection and open its properties.
- When the Properties window opens, click on Configure.

- Go to the Advanced tab and select Network Address from the Property list.
- Now select Value and enter the MAC address you got from Command Prompt (Be sure not to enter any dashes while entering your MAC address).

- Click OK to save the changes.


According to users, you can sometimes have DNS failure simply by manually entering your network adapter’s MAC address.
This is a simple procedure. To enter your MAC address, you need to find it first. To do that, follow the steps above.
Users report that this solution works best after switching to Google DNS or OpenDNS, so be sure to try it.
If you need to change your MAC address, you can use one of these MAC address changer tools.
3. Install the latest drivers
3.1. Update your drivers manually
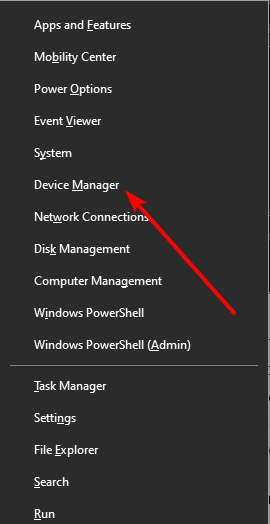
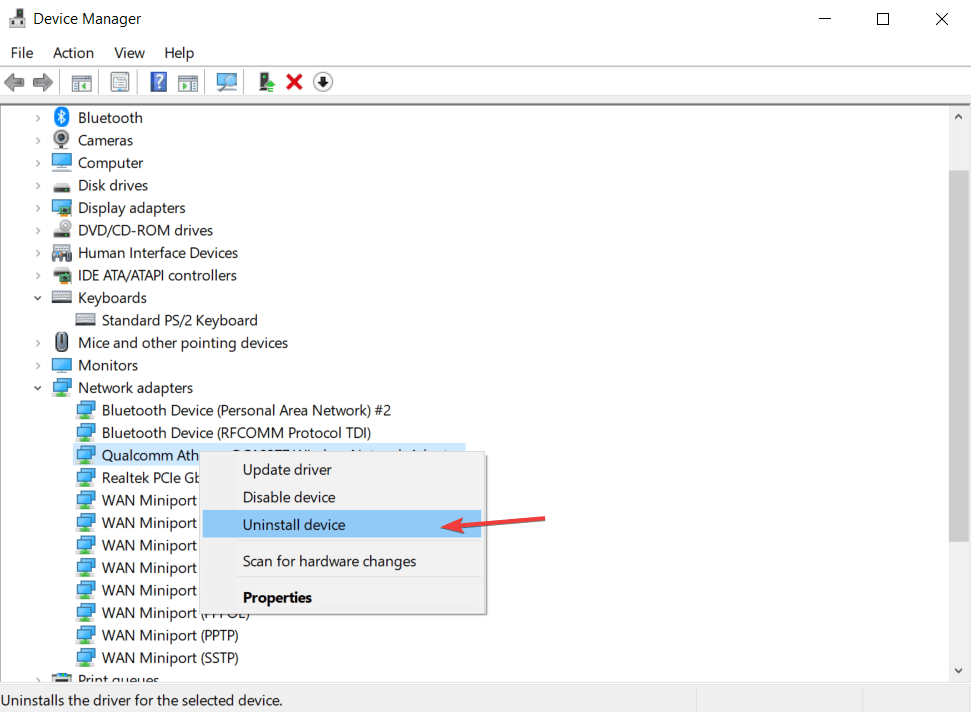
- Press Windows key + X and choose Device Manager from the list.

- When Device Manager opens, locate your network adapter, right-click on it and choose Uninstall.

- If available, click on Delete driver software for this device, followed by Uninstall.

- After you delete the driver, restart your PC.
- When your PC restarts, the default network driver will be installed.

Your network adapter relies on drivers to work correctly, and if you have any problems with it, it might be due to your drivers.
To fix DNS server errors on Windows 10, you need to visit your network adapter manufacturer’s website, download the latest drivers and install them on your PC.
If you can’t access the Internet at all, it might be caused by the DNS server not being unavailable, so download the drivers on a different device and install them on your PC.
Some users also recommend uninstalling your network drivers before installing the new drivers.
3.2. Update drivers automatically
Downloading drivers manually can cause damage to your computer in case you download the wrong version. We strongly suggest doing it automatically by using a third-party tool.
The tool recommended below is exceptionally light and will automatically repair or update your drivers in just a few seconds and in just one go. You only need to invest a few clicks, and the problem will disappear.
⇒ Get Driverfix
4. Disable your antivirus and firewall
Antivirus and firewall solutions are necessary to protect your PC from malicious users, but sometimes your antivirus and firewall can interfere with your Internet connection.
To fix DNS server connection issues on Windows 10, try temporarily disabling your antivirus and firewall client.
Remember that your PC will still be protected by Windows Defender even if you disable your antivirus, so there’s no need to worry about your safety.
If your antivirus or firewall client was causing this issue, be sure to change its configuration or switch to a different client.
Users reported that Bitdefender Total Security could sometimes cause this problem to appear. If you’re using Bitdefender, you need to go to Firewall settings and disable the Block Internet connection sharing option.
After that, the problem should be resolved. Users reported that Avast could also cause this problem. To fix it, open Avast settings and disable the Secure DNS option.
You can also try disabling the firewall on your router. This is a bit advanced and potentially dangerous solution, so keep that in mind. By disabling your router’s firewall, your PC will be completely vulnerable.
If you decide to do that, temporarily disable your router’s firewall and check if that fixes the problem.
If the problem was your firewall, you need to turn it back on again and check your firewall configuration for the source of the problem.
To see how to disable your router’s firewall, be sure to check its instruction manual.
5. Update your router’s firmware
A few users reported that DNS servers might not respond while using wireless networks like WiFi. However, you can fix that simply by updating your router’s firmware.
We must warn you that this is an advanced process, so you must be extra cautious to avoid causing damage.
Before updating your router’s firmware, you must back up its settings. We advise you to check your instruction manual to see how to update the firmware correctly.
If your DNS server is not responding on WiFi/wireless, you may also want to check the channels you’re using.
6. Use the netsh command
- Open Command Prompt as administrator.
- Type the commands below and press Enter after each:
netsh int ip resetnetsh winsock resetipconfig /flushdnsipconfig /renew - After all the commands are executed, restart your computer.
According to users, you can fix DNS failure simply by running a few commands from Command Prompt. To do that, follow the steps above.
You’ll reset your IP and clear the DNS cache by performing these commands, so be sure to try this method.
7. Restart your modem
One way to fix the DNS server not responding error on Windows 10 is by restarting your modem. To do that, press the power button on your modem to turn it off.
Some PC issues are hard to tackle, especially when it comes to corrupted repositories or missing Windows files. If you are having troubles fixing an error, your system may be partially broken.
We recommend installing Restoro, a tool that will scan your machine and identify what the fault is.
Click here to download and start repairing.
Wait 30 seconds and press the power button again to turn it on. Wait until the modem turns on entirely and check if the problem persists.
8. Start your PC in Safe Mode
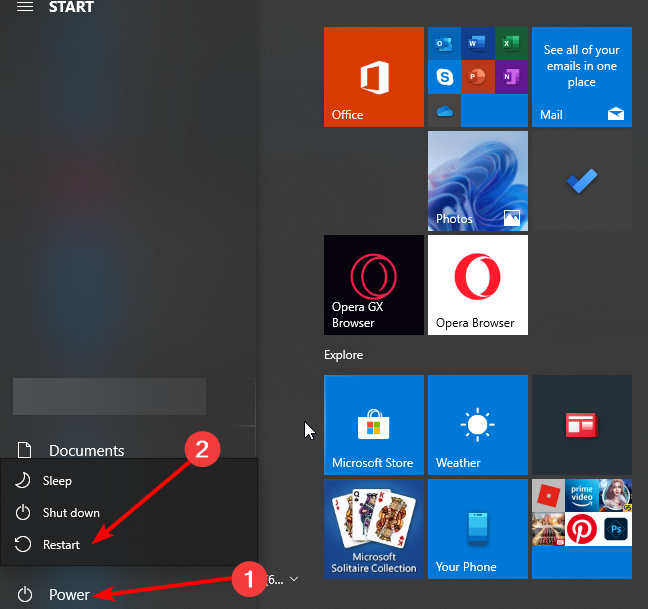
- Open the Start Menu and click the Power button.
- Hold down the Shift key on your keyboard and click Restart.

- Choose Troubleshoot.
- Select Advanced options, select Startup Settings, and click the Restart button.
- When your PC restarts, you’ll see a list of options available. Select Safe Mode with Networking by pressing F5 on the keyboard.
- Safe Mode will now start.
Sometimes third-party applications such as antivirus or VPN can interfere with your Internet connection.
To fix the DNS server not responding error on Windows 10, try accessing the Internet from Safe Mode.
If you’re not familiar, Safe Mode is a special mode in Windows that runs only with essential software and drivers.
When Safe Mode starts, check if your network connection is working. If there are no problems with your Internet connection in Safe Mode, third-party software interferes with your network connection.
You need to find and remove the problematic application from your PC to fix this issue.
9. Disable Microsoft Virtual WiFi Miniport Adapter
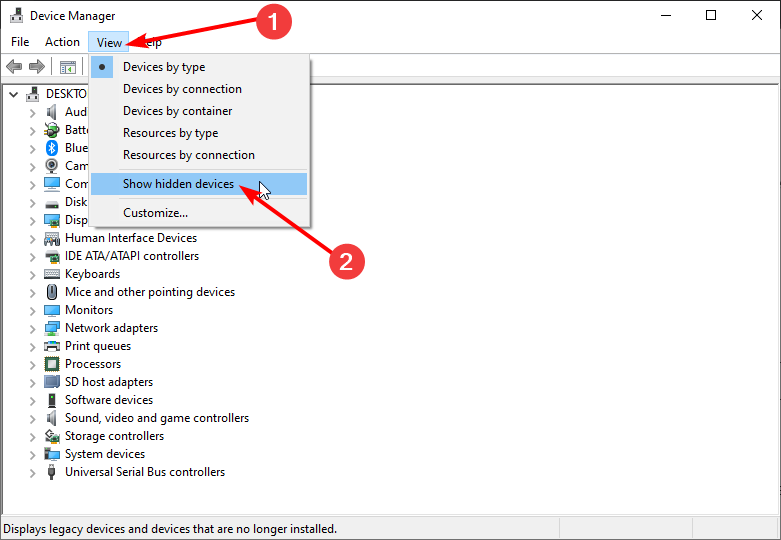
- Open Device Manager.
- When Device Manager opens, go to View and select Show hidden devices.

- Locate Microsoft Virtual W-iFi Miniport Adapter, right-click it, and choose Disable. Repeat this step for all available Virtual Miniport Adapters.
- After you’re done, close Device Manager and check if the problem is resolved.
If the DNS server is not responding on WiFi connections, the problem might be caused by Microsoft Virtual WiFi Miniport Adapter. To fix this issue, you need to find and disable these adapters.
10. Disable Internet Protocol Version 6
- Open Network Connections.
- Right-click your connection and choose Properties.
- Now, locate Internet Protocol Version 6 (TCP/IPv6) and unmark it.

- Click the OK button to save changes.

There are two types of IP addresses, v4 and v6. If your DNS server is not responding on your PC, you might be able to fix it by disabling Internet Protocol Version 6.
Disabling IPv6 won’t affect your computer negatively, but hopefully, it should fix the problem with the DNS server.
11. Disable all additional connections
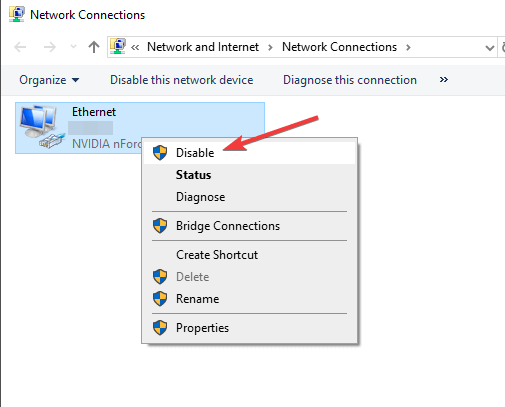
- Open the Network Connections window.
- Right-click the connection that you want to disable.
- Choose Disable from the menu.

You might have multiple connections on your PC, which can sometimes cause DNS server issues while using WiFi connections.
To fix this issue, you need to disable those connections from the Network Connections window.
12. Check for third-party applications
Some third-party applications can affect your DNS and cause this problem to appear. Users reported that their DNS changes automatically to a specific address.
The problem was caused by a third-party application called ColdTurkey.
After disabling or uninstalling the problematic application, the DNS server is not responding error was resolved entirely.
Remember that almost any network-related or security application can interfere with your DNS, so keep a close eye on all installed applications.
- 5 Ways to Flush DNS in Windows 10 Without Admin Rights
- How to Fix The Network Security Key Isn’t Correct on Windows
- How to Completely Flush & Reset DNS on Windows 11
- WiFi Shows No Internet But Internet Works: 11 Easy Solutions
- This WiFi Uses An Older Security Standard: Quick Fixes
13. Change the DNS address on your router
According to users, you might be able to fix this problem by setting a different DNS address on your router. To do that, you need to access your router’s configuration page and look for the DNS setting.
Change the DNS server to Google DNS or OpenDNS and check if the problem is resolved. For detailed instructions on how to change your DNS, be sure to check your router’s instruction manual.
14. Reset your router
Your router configuration can sometimes cause DNS problems to appear. If the DNS server is not responding on the router, you need to reset your device to default settings.
To do that, you need to open your router’s configuration page and select the Reset option.
You can export your configuration if you want, so you don’t have to configure wireless networks again.
Another way to reset your router is to hold the reset button on it for a few seconds. Both methods work the same, and you should use the one you’re most comfortable with.
If you’re unsure how to reset your router, check your instruction manual for step-by-step instructions.
15. Turn off the peer-to-peer update feature
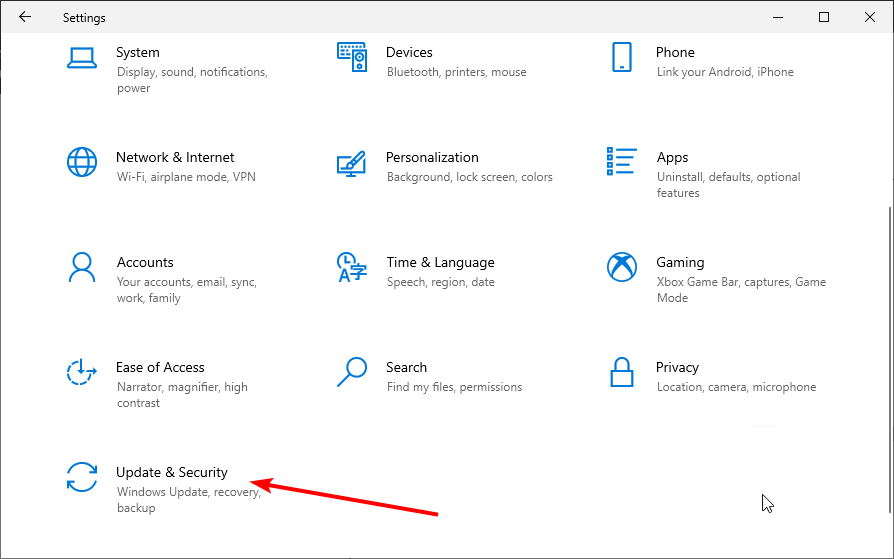
- Open the Settings app by pressing the Windows key + I.
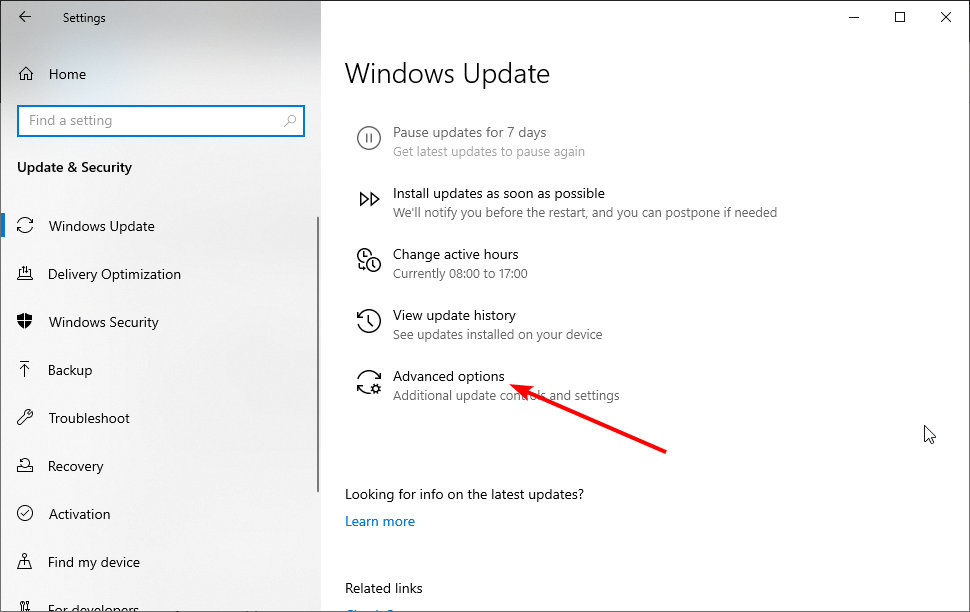
- Navigate to the Update & security section.

- Click on Advanced options.

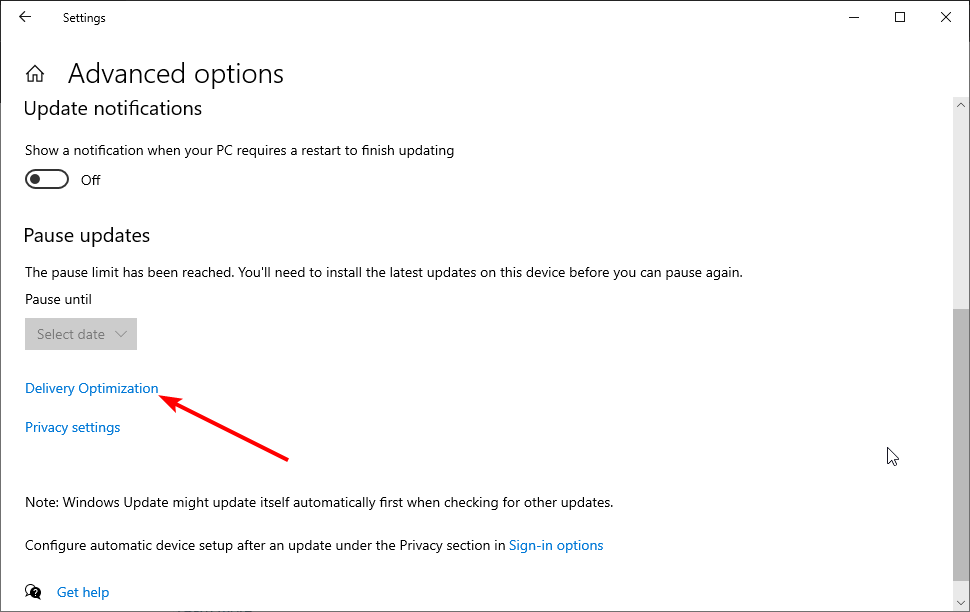
- Click the Delivery optimization option.
- Toggle the switch for Allow downloads from other PCs backward to set it Off.
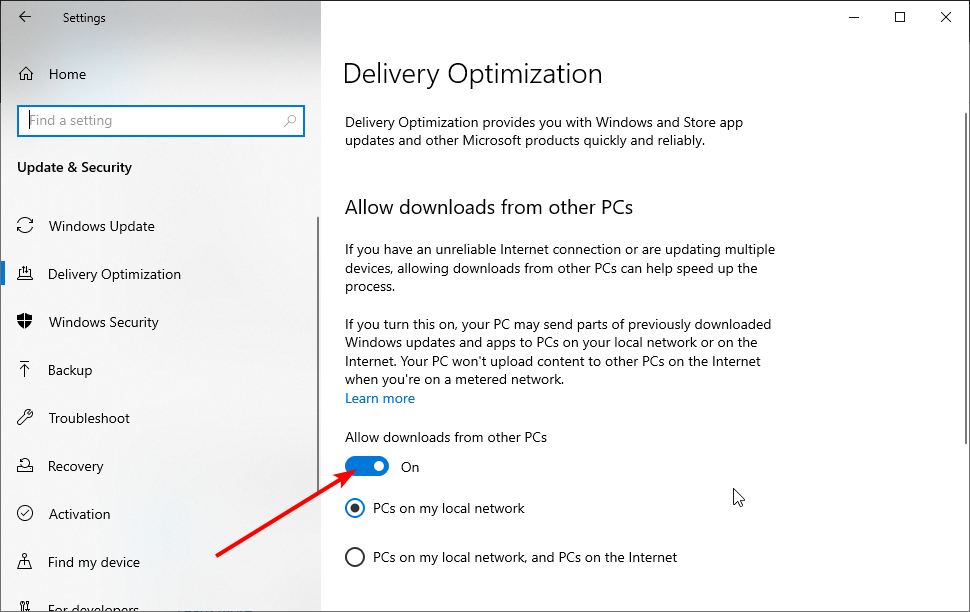
Windows 10 has a great feature that allows you to download updates using peer-to-peer technology.
This feature allows you to download Windows updates directly from other users in your area.
This is a valuable and innovative feature, but it seems that this feature can sometimes cause DNS failure. One potential solution for DNS problems is to disable this feature.
After turning this feature off, check if the problem with the DNS server is resolved.
16. Wait for your ISP to fix the problem
Sometimes DNS server is not responding error can be caused by your ISP. Your ISP might have some problems, so you might have to wait a few hours while your ISP resolves technical difficulties.
The DNS server is not responding error will prevent you from accessing the Internet, but you should be able to fix it by using one of our solutions.
17. Fix Comcast DNS server not responding
We noticed many reports about the Comcast DNS server not responding when users try to get online using WiFi.
To fix this issue as quickly as possible, go to the GW GUI, select Troubleshooting and then Reset/Restore Gateway. Reset your WiFi router and check if the problem persists.
What can I do if Windows 11 DNS server is not responding?
The DNS server is not responding on Windows 11 issue is caused by issues with antivirus and drivers. Also, it might be caused by problems with your DNS server address.
You can fix the issue effectively by applying the solutions listed guide.
Is it safe to flush DNS cache?
Any invalid addresses, whether they are obsolete or have been altered, will be removed by clearing the DNS server. It’s also crucial to remember that clearing the cache has no unfavorable consequences.
So yes, if you are wondering how safe it is, it is indeed safe.
- 5 Ways to Flush DNS in Windows 10 Without Admin Rights
- How to Fix The Network Security Key Isn’t Correct on Windows
- How to Completely Flush & Reset DNS on Windows 11
- WiFi Shows No Internet But Internet Works: 11 Easy Solutions
How do I find my DNS server?
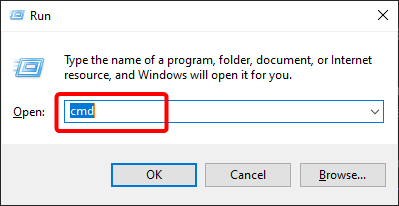
- Press the Windows key + R to open the Run utility.
- Type cmd and hit Enter.
- Type the command below and press Enter:
ipconfig/all - Look for DNS servers from the list.


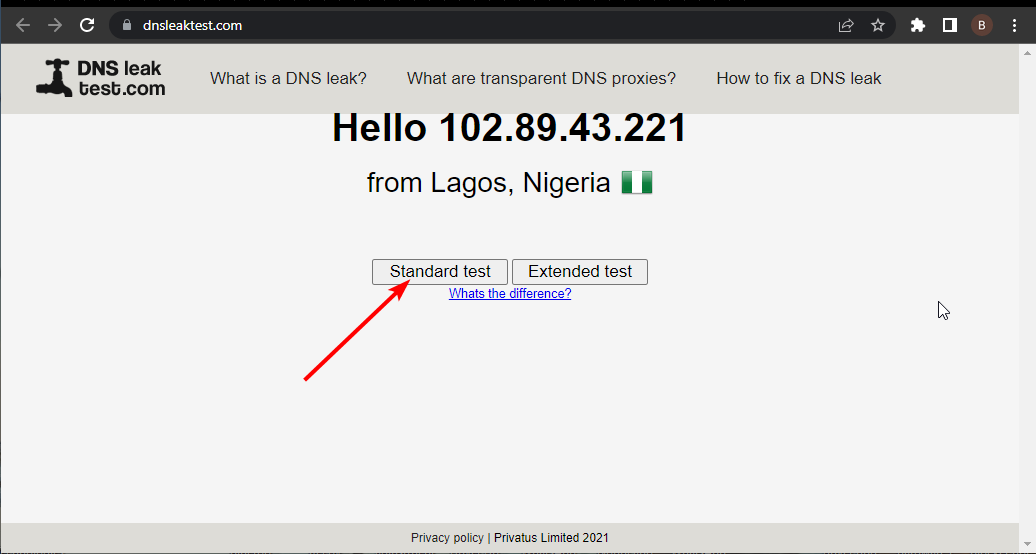
How do you check if DNS is working?
- Go to the DNS leak test website.
- Click the Standard test button.

- Check the ISP column if it contains the correct DNS.

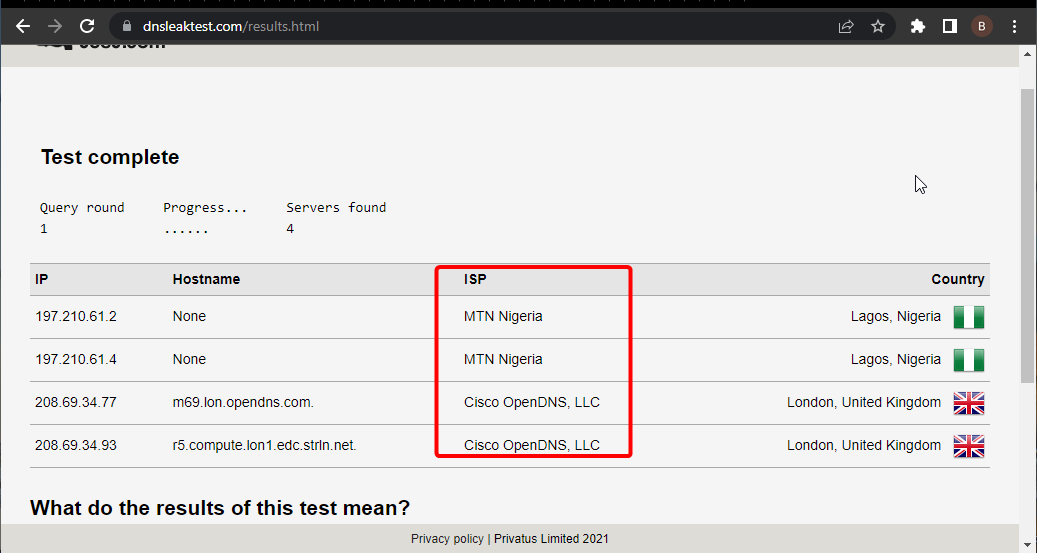
If the DNS shown on the site above is correct, it means your DNS is working perfectly. Using Command Prompt as admin, you can also check whether your DNS server is working.
You only need to run the command below: nslookup <client name> <server IP address>
Note that you need to replace the client name and server IP address with the correct value. If the command returns Request to server timed out or No response from server, your DNS server is probably not working.
That’s it! We hope you fixed the DNS server not responding error on Windows 10 by using one of our solutions.
If you face other issues like the DNS server unavailable error on Windows 11, check our detailed guide to fix it quickly.
Do you have other suggestions or thoughts regarding the DNS not responding Windows 10 issue? Write them in a comment below.
![]()
Newsletter
Learn to get your Ethernet & WiFi working properly again
by Milan Stanojevic
Milan has been enthusiastic about technology ever since his childhood days, and this led him to take interest in all PC-related technologies. He’s a PC enthusiast and he… read more
Published on October 10, 2022
Reviewed by
Vlad Turiceanu
Passionate about technology, Windows, and everything that has a power button, he spent most of his time developing new skills and learning more about the tech world. Coming… read more
- The DNS server not responding error in Windows 10 will prevent you from browsing the Internet.
- If the DNS server isn’t responding in Windows 10, you can try changing the server manually.
- You can also reconfigure your connection to fix this discomforting error.
- Installing the latest drivers can be also a great solution for this problem.
XINSTALL BY CLICKING THE DOWNLOAD FILE
This software will repair common computer errors, protect you from file loss, malware, hardware failure and optimize your PC for maximum performance. Fix PC issues and remove viruses now in 3 easy steps:
- Download Restoro PC Repair Tool that comes with Patented Technologies (patent available here).
- Click Start Scan to find Windows issues that could be causing PC problems.
- Click Repair All to fix issues affecting your computer’s security and performance
- Restoro has been downloaded by 0 readers this month.
The DNS server is a crucial component of the Internet. Unfortunately, DNS issues on Windows 10 are prevalent, with a few users reporting a DNS server is not responding error message on their PCs.
If you want to access any Internet website, you must first access the DNS server. After the DNS server receives your request, you’ll be directed to the desired website.
If the error persists, use the additional troubleshooting methods listed below to learn how to fix the DNS server in Windows 10.
What causes a DNS server not to respond?
There are various reasons for the DNS server not responding error messages. It can be caused by issues with your DNS settings or some problems with your PC.
Below are some of the common causes:
- Outdated or faulty drivers
- Issues with DNS server address
- Antivirus interference
- Outdated router firmware
How do I fix the DNS server not responding Windows 10 error?
What to do if the DNS server is not responding Windows 10? The quickest fix is to change the DNS server settings manually. Then disable your firewall, reset your router and test the connection again.
- What causes a DNS server not to respond?
- How do I fix the DNS server not responding Windows 10 error?
- 1. Change the DNS server manually
- 2. Enter your MAC address manually
- 2.1. Locate the physical address of your PC
- 2.2. Configure your network connection
- 3. Install the latest drivers
- 3.1. Update your drivers manually
- 3.2. Update drivers automatically
- 4. Disable your antivirus and firewall
- 5. Update your router’s firmware
- 6. Use the netsh command
- 7. Restart your modem
- 8. Start your PC in Safe Mode
- 9. Disable Microsoft Virtual WiFi Miniport Adapter
- 10. Disable Internet Protocol Version 6
- 11. Disable all additional connections
- 12. Check for third-party applications
- 13. Change the DNS address on your router
- 14. Reset your router
- 15. Turn off the peer-to-peer update feature
- 16. Wait for your ISP to fix the problem
- 17. Fix Comcast DNS server not responding
- What can I do if Windows 11 DNS server is not responding?
- Is it safe to flush DNS cache?
- How do I find my DNS server?
- How do you check if DNS is working?
1. Change the DNS server manually
- Press Windows key + R, type ncpa.cpl, and click the OK button.
- Right-click your network and choose Properties.
- Select Internet Protocol Version 4 (TCP/IPv4) and click the Properties button.
- Now, select the Use the following DNS server addresses option.
- Set the Preferred DNS server to 8.8.8.8. and the Alternate DNS server to 8.8.4.4.
- You can also use 208.67.222.222 as Preferred and 208.67.220.220 as the Alternate DNS server.
- After you’re done, click OK to save the changes.
- Optional: Disconnect from the Internet and connect back again.
When you try to access a particular website, you’ll automatically connect to your ISP’s DNS server.
However, it can happen that your DNS server is not available. If that’s the case, you’ll see the DNS server is not responding error on Lenovo and other PCs.
One way to fix this problem is to change your DNS server to OpenDNS or Google DNS. This is a simple procedure that you can perform it by following the steps above.
After changing the DNS server, check if the problem is resolved. You should be able to browse the Internet without any issues.
Remember that changing your DNS server might make your Internet connection a bit slower depending on your location, so you might want to experiment with different servers.
2. Enter your MAC address manually
2.1. Locate the physical address of your PC
- Type cmd in the search tab and click on Run as administrator under Command Prompt.
- Enter ipconfig /all and press Enter.
- Locate the Physical Address and write it down.
- Close Command Prompt.
2.2. Configure your network connection
- Open the Network Connections window.
- Locate your connection and open its properties.
- When the Properties window opens, click on Configure.
- Go to the Advanced tab and select Network Address from the Property list.
- Now select Value and enter the MAC address you got from Command Prompt (Be sure not to enter any dashes while entering your MAC address).
- Click OK to save the changes.
According to users, you can sometimes have DNS failure simply by manually entering your network adapter’s MAC address.
This is a simple procedure. To enter your MAC address, you need to find it first. To do that, follow the steps above.
Users report that this solution works best after switching to Google DNS or OpenDNS, so be sure to try it.
If you need to change your MAC address, you can use one of these MAC address changer tools.
3. Install the latest drivers
3.1. Update your drivers manually
- Press Windows key + X and choose Device Manager from the list.
- When Device Manager opens, locate your network adapter, right-click on it and choose Uninstall.
- If available, click on Delete driver software for this device, followed by Uninstall.
- After you delete the driver, restart your PC.
- When your PC restarts, the default network driver will be installed.
Your network adapter relies on drivers to work correctly, and if you have any problems with it, it might be due to your drivers.
To fix DNS server errors on Windows 10, you need to visit your network adapter manufacturer’s website, download the latest drivers and install them on your PC.
If you can’t access the Internet at all, it might be caused by the DNS server not being unavailable, so download the drivers on a different device and install them on your PC.
Some users also recommend uninstalling your network drivers before installing the new drivers.
3.2. Update drivers automatically
Downloading drivers manually can cause damage to your computer in case you download the wrong version. We strongly suggest doing it automatically by using a third-party tool.
The tool recommended below is exceptionally light and will automatically repair or update your drivers in just a few seconds and in just one go. You only need to invest a few clicks, and the problem will disappear.
⇒ Get Driverfix
4. Disable your antivirus and firewall
Antivirus and firewall solutions are necessary to protect your PC from malicious users, but sometimes your antivirus and firewall can interfere with your Internet connection.
To fix DNS server connection issues on Windows 10, try temporarily disabling your antivirus and firewall client.
Remember that your PC will still be protected by Windows Defender even if you disable your antivirus, so there’s no need to worry about your safety.
If your antivirus or firewall client was causing this issue, be sure to change its configuration or switch to a different client.
Users reported that Bitdefender Total Security could sometimes cause this problem to appear. If you’re using Bitdefender, you need to go to Firewall settings and disable the Block Internet connection sharing option.
After that, the problem should be resolved. Users reported that Avast could also cause this problem. To fix it, open Avast settings and disable the Secure DNS option.
You can also try disabling the firewall on your router. This is a bit advanced and potentially dangerous solution, so keep that in mind. By disabling your router’s firewall, your PC will be completely vulnerable.
If you decide to do that, temporarily disable your router’s firewall and check if that fixes the problem.
If the problem was your firewall, you need to turn it back on again and check your firewall configuration for the source of the problem.
To see how to disable your router’s firewall, be sure to check its instruction manual.
5. Update your router’s firmware
A few users reported that DNS servers might not respond while using wireless networks like WiFi. However, you can fix that simply by updating your router’s firmware.
We must warn you that this is an advanced process, so you must be extra cautious to avoid causing damage.
Before updating your router’s firmware, you must back up its settings. We advise you to check your instruction manual to see how to update the firmware correctly.
If your DNS server is not responding on WiFi/wireless, you may also want to check the channels you’re using.
6. Use the netsh command
- Open Command Prompt as administrator.
- Type the commands below and press Enter after each:
netsh int ip resetnetsh winsock resetipconfig /flushdnsipconfig /renew - After all the commands are executed, restart your computer.
According to users, you can fix DNS failure simply by running a few commands from Command Prompt. To do that, follow the steps above.
You’ll reset your IP and clear the DNS cache by performing these commands, so be sure to try this method.
7. Restart your modem
One way to fix the DNS server not responding error on Windows 10 is by restarting your modem. To do that, press the power button on your modem to turn it off.
Some PC issues are hard to tackle, especially when it comes to corrupted repositories or missing Windows files. If you are having troubles fixing an error, your system may be partially broken.
We recommend installing Restoro, a tool that will scan your machine and identify what the fault is.
Click here to download and start repairing.
Wait 30 seconds and press the power button again to turn it on. Wait until the modem turns on entirely and check if the problem persists.
8. Start your PC in Safe Mode
- Open the Start Menu and click the Power button.
- Hold down the Shift key on your keyboard and click Restart.
- Choose Troubleshoot.
- Select Advanced options, select Startup Settings, and click the Restart button.
- When your PC restarts, you’ll see a list of options available. Select Safe Mode with Networking by pressing F5 on the keyboard.
- Safe Mode will now start.
Sometimes third-party applications such as antivirus or VPN can interfere with your Internet connection.
To fix the DNS server not responding error on Windows 10, try accessing the Internet from Safe Mode.
If you’re not familiar, Safe Mode is a special mode in Windows that runs only with essential software and drivers.
When Safe Mode starts, check if your network connection is working. If there are no problems with your Internet connection in Safe Mode, third-party software interferes with your network connection.
You need to find and remove the problematic application from your PC to fix this issue.
9. Disable Microsoft Virtual WiFi Miniport Adapter
- Open Device Manager.
- When Device Manager opens, go to View and select Show hidden devices.
- Locate Microsoft Virtual W-iFi Miniport Adapter, right-click it, and choose Disable. Repeat this step for all available Virtual Miniport Adapters.
- After you’re done, close Device Manager and check if the problem is resolved.
If the DNS server is not responding on WiFi connections, the problem might be caused by Microsoft Virtual WiFi Miniport Adapter. To fix this issue, you need to find and disable these adapters.
10. Disable Internet Protocol Version 6
- Open Network Connections.
- Right-click your connection and choose Properties.
- Now, locate Internet Protocol Version 6 (TCP/IPv6) and unmark it.
- Click the OK button to save changes.
There are two types of IP addresses, v4 and v6. If your DNS server is not responding on your PC, you might be able to fix it by disabling Internet Protocol Version 6.
Disabling IPv6 won’t affect your computer negatively, but hopefully, it should fix the problem with the DNS server.
11. Disable all additional connections
- Open the Network Connections window.
- Right-click the connection that you want to disable.
- Choose Disable from the menu.
You might have multiple connections on your PC, which can sometimes cause DNS server issues while using WiFi connections.
To fix this issue, you need to disable those connections from the Network Connections window.
12. Check for third-party applications
Some third-party applications can affect your DNS and cause this problem to appear. Users reported that their DNS changes automatically to a specific address.
The problem was caused by a third-party application called ColdTurkey.
After disabling or uninstalling the problematic application, the DNS server is not responding error was resolved entirely.
Remember that almost any network-related or security application can interfere with your DNS, so keep a close eye on all installed applications.
- 5 Ways to Flush DNS in Windows 10 Without Admin Rights
- How to Fix The Network Security Key Isn’t Correct on Windows
- How to Completely Flush & Reset DNS on Windows 11
- WiFi Shows No Internet But Internet Works: 11 Easy Solutions
13. Change the DNS address on your router
According to users, you might be able to fix this problem by setting a different DNS address on your router. To do that, you need to access your router’s configuration page and look for the DNS setting.
Change the DNS server to Google DNS or OpenDNS and check if the problem is resolved. For detailed instructions on how to change your DNS, be sure to check your router’s instruction manual.
14. Reset your router
Your router configuration can sometimes cause DNS problems to appear. If the DNS server is not responding on the router, you need to reset your device to default settings.
To do that, you need to open your router’s configuration page and select the Reset option.
You can export your configuration if you want, so you don’t have to configure wireless networks again.
Another way to reset your router is to hold the reset button on it for a few seconds. Both methods work the same, and you should use the one you’re most comfortable with.
If you’re unsure how to reset your router, check your instruction manual for step-by-step instructions.
15. Turn off the peer-to-peer update feature
- Open the Settings app by pressing the Windows key + I.
- Navigate to the Update & security section.
- Click on Advanced options.
- Click the Delivery optimization option.
- Toggle the switch for Allow downloads from other PCs backward to set it Off.
Windows 10 has a great feature that allows you to download updates using peer-to-peer technology.
This feature allows you to download Windows updates directly from other users in your area.
This is a valuable and innovative feature, but it seems that this feature can sometimes cause DNS failure. One potential solution for DNS problems is to disable this feature.
After turning this feature off, check if the problem with the DNS server is resolved.
16. Wait for your ISP to fix the problem
Sometimes DNS server is not responding error can be caused by your ISP. Your ISP might have some problems, so you might have to wait a few hours while your ISP resolves technical difficulties.
The DNS server is not responding error will prevent you from accessing the Internet, but you should be able to fix it by using one of our solutions.
17. Fix Comcast DNS server not responding
We noticed many reports about the Comcast DNS server not responding when users try to get online using WiFi.
To fix this issue as quickly as possible, go to the GW GUI, select Troubleshooting and then Reset/Restore Gateway. Reset your WiFi router and check if the problem persists.
What can I do if Windows 11 DNS server is not responding?
The DNS server is not responding on Windows 11 issue is caused by issues with antivirus and drivers. Also, it might be caused by problems with your DNS server address.
You can fix the issue effectively by applying the solutions listed guide.
Is it safe to flush DNS cache?
Any invalid addresses, whether they are obsolete or have been altered, will be removed by clearing the DNS server. It’s also crucial to remember that clearing the cache has no unfavorable consequences.
So yes, if you are wondering how safe it is, it is indeed safe.
- 5 Ways to Flush DNS in Windows 10 Without Admin Rights
- How to Fix The Network Security Key Isn’t Correct on Windows
- How to Completely Flush & Reset DNS on Windows 11
- WiFi Shows No Internet But Internet Works: 11 Easy Solutions
How do I find my DNS server?
- Press the Windows key + R to open the Run utility.
- Type cmd and hit Enter.
- Type the command below and press Enter:
ipconfig/all - Look for DNS servers from the list.
How do you check if DNS is working?
- Go to the DNS leak test website.
- Click the Standard test button.
- Check the ISP column if it contains the correct DNS.
If the DNS shown on the site above is correct, it means your DNS is working perfectly. Using Command Prompt as admin, you can also check whether your DNS server is working.
You only need to run the command below: nslookup <client name> <server IP address>
Note that you need to replace the client name and server IP address with the correct value. If the command returns Request to server timed out or No response from server, your DNS server is probably not working.
That’s it! We hope you fixed the DNS server not responding error on Windows 10 by using one of our solutions.
If you face other issues like the DNS server unavailable error on Windows 11, check our detailed guide to fix it quickly.
Do you have other suggestions or thoughts regarding the DNS not responding Windows 10 issue? Write them in a comment below.
![]()
Newsletter
Рекомендуем: Как настроить в Windows 10 — Службу DNS Cloudflare 1.1.1.1
Если вы не можете подключиться к сети в Windows 10, а диагностика сетей Windows сообщает что: «DNS-сервер не отвечает», вот как это исправить.
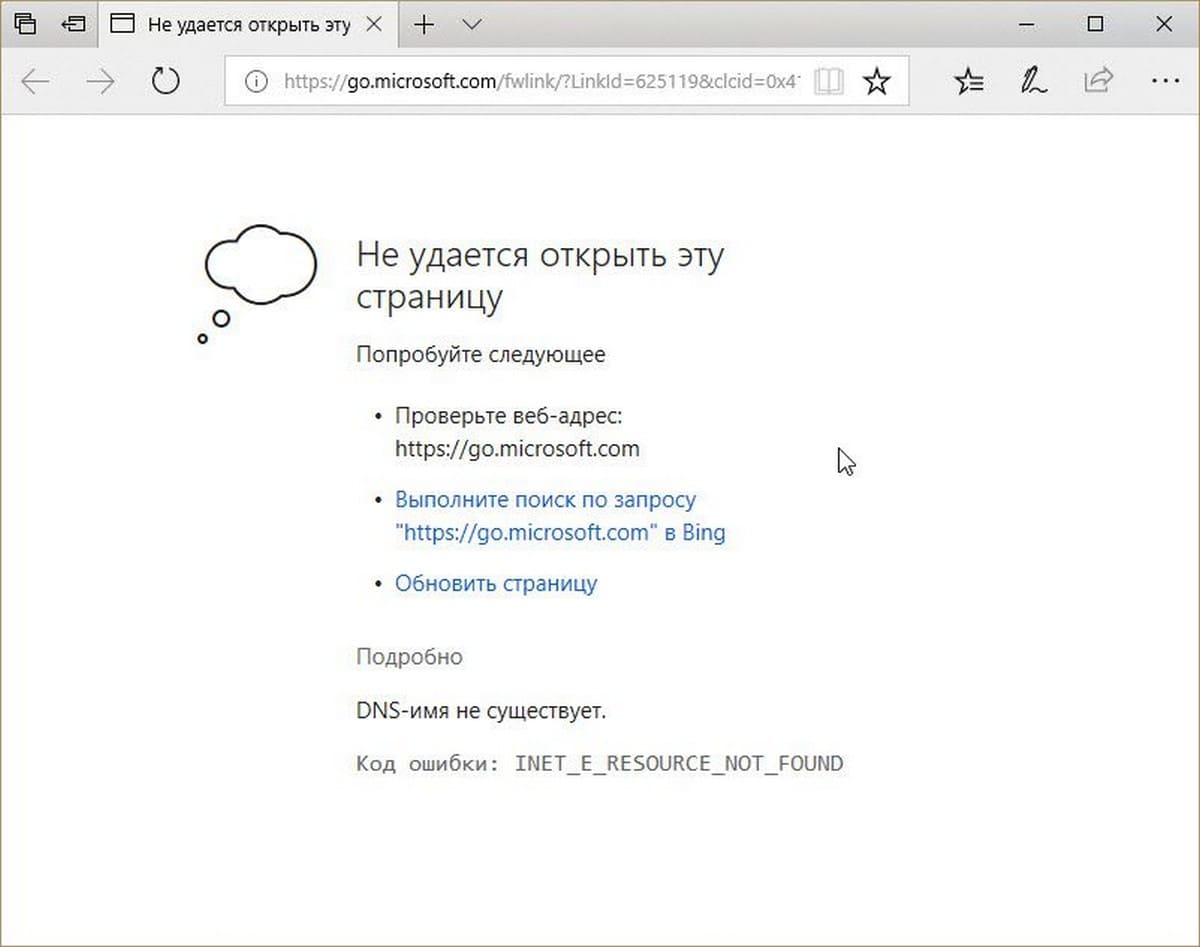
Одной из ошибок Windows 10, связанных с подключением к интернету, является ошибка: «DNS-сервер не отвечает». При попытке открыть любой сайт, вы увидите ошибку:
«Не удается найти DNS-адрес сервера» «Код ошибки: INET_E_RESOURCE_NOT_FOUND».
Проблема эта вызвана сбоем в работе DNS-сервера (Англ.Domain Name System — система доменных имён), который отвечает за перенаправленные IP-адреса на доменный адрес любого сайта.
Таким образом, если ваш компьютер не может связаться с DNS- сервером, на вашем устройстве не будет работать Интернет. В этой статье рассмотрим способы решения проблемы если вы не можете подключиться к сети, где DNS играет ключевую роль.
Недавно, на рабочем компьютере с Windows 10 Pro, я столкнулся с проблемой при подключении к Интернету. Чтобы устранить эту проблему, запустил Диагностику сетей Windows (Network Diagnostics), и Средство устранения неполадок сетевого адаптера, в обоих случаях результат диагностики был одинаковым:
- Не удается найти DNS-адрес сервера
- Windows не удается связаться с устройством или ресурсом (основной DNS-сервер).
- Устройство или ресурс не отвечает на запросы.
Поскольку средство устранения неполадок обнаружило проблему, но не смогло ее исправить, вам необходимо это сделать вручную. Если вы также столкнулись с этой проблемой, проверьте, помогут ли вам следующие рекомендации:
Как исправить: Не удается найти DNS-адрес сервера в Windows 10
Способ 1
- Выключите и включите маршрутизатор (роутер), или перезагрузите его, подождав несколько секунд, посмотрите, есть ли у вас сообщение о ошибке DNS.
- Удалите конфигурацию IP-адресов и обновите текущую конфигурацию DHCP, Обновите IP-адреса для сетевых адаптеров, очистите DNS кэш — выполнив следующие команды по очереди:
ipconfig /release
ipconfig /flushdns
ipconfig /renew
Закройте командную строку и перезагрузите систему.
- Сбросьте настройки сети по умолчанию.
Если проблема осталась, следующий способ может помочь вам.
Способ 2
Изменение настроек DNS в Windows 10
1. Нажмите Win + R, чтобы открыть окно команды Выполнить, введите ncpa.cpl и нажмите Ок.
2. В окне «Сетевые подключения» выберите основной сетевой адаптер, кликните на нем правой кнопкой мыши, выберите «Свойства».
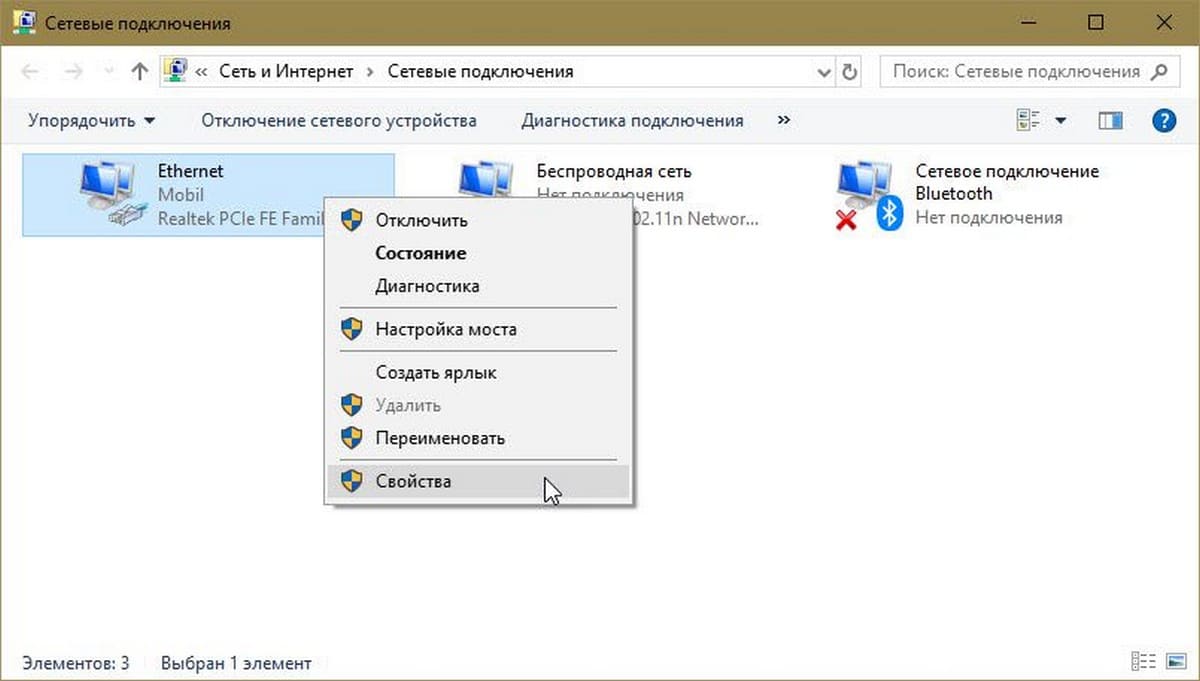
3. Затем на странице свойств выберите «Протокол версии 4 (TCP / IPv4)» и нажмите «Свойства».
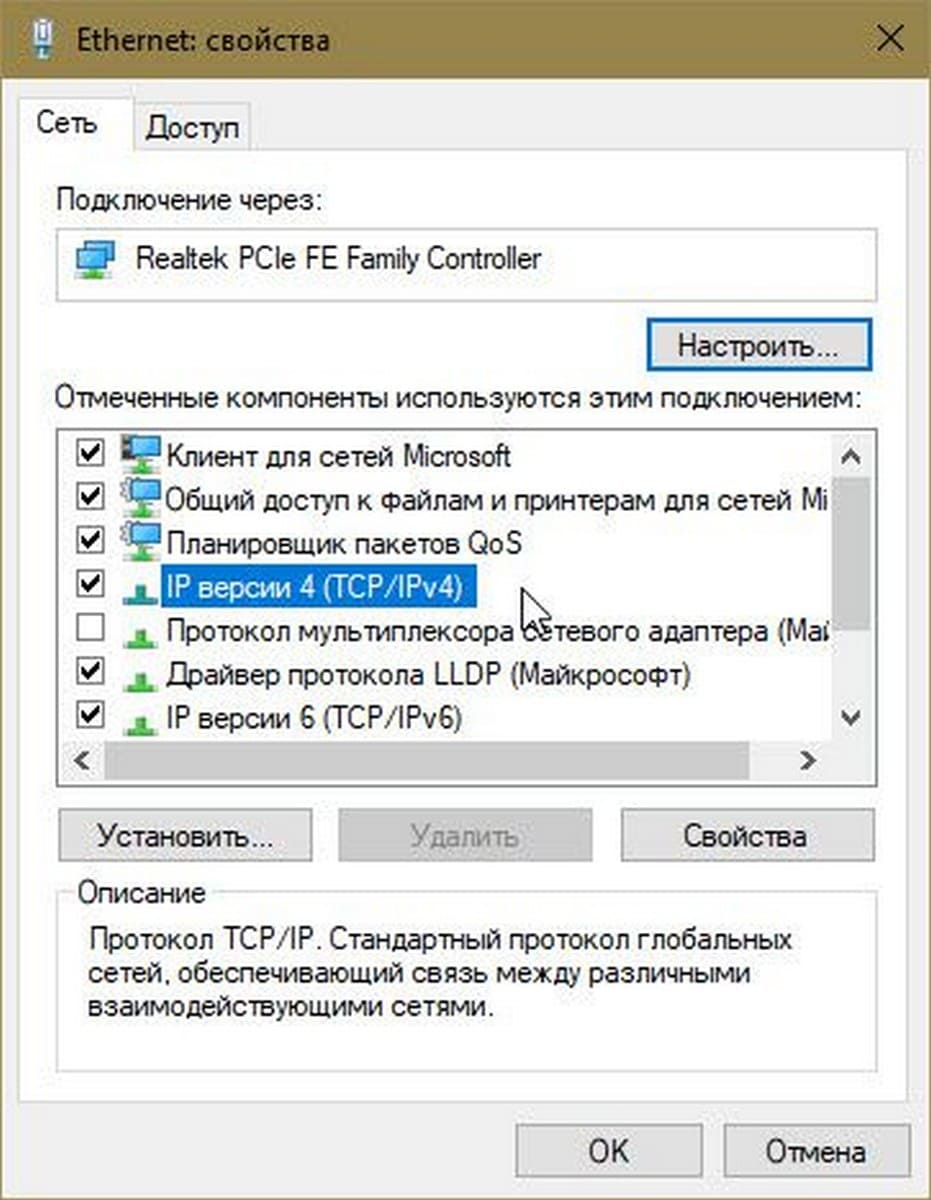
4. Наконец, на странице свойств протокола IP версии 4 (TCP / IPv4) — выберите «Использовать следующие адреса DNS-серверов» и введите
«Предпочитаемый DNS-сервер» как 8.8.8.8
«Альтернативный DNS-сервер» как 8.8.4.4
Эти значения DNS-сервера Google. Вместо DNS-сервера Google, вы можете использовать адрес сервера OpenDNS.
Для этого используйте соответствующие значения для предпочтительного DNS-сервера как 208.67.222.222 и альтернативный DNS-сервер как 208.67.220.220.
Нажмите «ОК», и настройки будут сохранены. Таким образом, проблема с сетью, с которой вы столкнулись, должна быть решена.
Надеюсь это поможет!
Рекомендуем: Сеть и подключение к Интернет — проблемы в Windows 10, 8/7
DNS-сервер является важнейшим компонентом Интернета . К сожалению, немногие пользователи сообщили, что DNS-сервер не отвечает на сообщения об ошибках на ПК с Windows 10 , поэтому сегодня мы собираемся показать вам, как решить эту проблему.
Если вы хотите получить доступ к любому веб-сайту в Интернете, вам сначала необходимо получить доступ к DNS- серверу. После того как DNS-сервер получит ваш запрос, вы будете перенаправлены на нужный веб-сайт.
Что делать, если DNS-сервер не отвечает Windows 10? Самое быстрое решение — изменить настройки DNS-сервера вручную. Затем отключите брандмауэр, перезагрузите маршрутизатор и снова проверьте соединение.
Если проблема не устранена, используйте дополнительные методы устранения неполадок, перечисленные ниже.
Как исправить ошибку DNS-сервера на Windows 10?
- Изменить DNS-сервер вручную
- Введите свой MAC-адрес вручную
- Установите последние версии драйверов
- Отключите антивирус и брандмауэр
- Обновите прошивку вашего роутера
- Используйте команду netsh
- Перезагрузите модем
- Запустите свой компьютер в безопасном режиме
- Отключить адаптер виртуального мини-порта Microsoft WiFi
- Отключить интернет-протокол версии 6
- Отключить все дополнительные подключения
- Проверьте сторонние приложения
- Измените адрес DNS на вашем роутере
- Сбросить ваш роутер
- Отключить функцию однорангового обновления
- Подождите, пока ваш провайдер решит проблему
Мы много писали о проблемах DNS раньше. Добавьте эту страницу в закладки, если она понадобится вам позже.
1. Изменить DNS-сервер вручную
Когда вы пытаетесь получить доступ к определенному веб-сайту, вы автоматически подключаетесь к DNS-серверу вашего провайдера.
Однако может случиться так, что ваш DNS-сервер недоступен. Если это так, вы увидите, что DNS-сервер не отвечает на сообщение об ошибке.
Одним из способов решения этой проблемы является изменение вашего DNS-сервера на OpenDNS или Google DNS. Это довольно простая процедура, и вы можете выполнить ее, выполнив следующие действия:
- Откройте Сетевые подключения . Вы можете сделать это, нажав Windows Key + X на клавиатуре и выбрав опцию Сетевые подключения .

- Найдите ваше сетевое подключение, щелкните его правой кнопкой мыши и выберите « Свойства» в меню.
- Когда откроется окно « Свойства» , выберите « Протокол Интернета версии 4 (TCP / IPv4)» и нажмите кнопку « Свойства» .
- Теперь выберите Использовать следующую опцию адресов DNS-серверов .
- В качестве предпочитаемого DNS-сервера введите 8.8.8.8 . Что касается альтернативного DNS-сервера , вам нужно ввести 8.8.4.4 . При желании вы также можете использовать 208.67.222.222 в качестве Preffered и 208.67.220.220 в качестве альтернативного DNS-сервера .
- После того, как вы закончите, нажмите OK, чтобы сохранить изменения.
- Необязательно: отключитесь от Интернета и подключитесь снова


После изменения DNS-сервера проверьте, решена ли проблема.
Имейте в виду, что изменение вашего DNS-сервера может замедлить подключение к Интернету в зависимости от вашего местоположения, поэтому вы можете поэкспериментировать с разными серверами.
2. Введите свой MAC-адрес вручную
По словам пользователей, иногда вы можете выйти из строя DNS, просто введя MAC-адрес вашего сетевого адаптера вручную.
Это простая процедура, и для того, чтобы ввести свой MAC-адрес, сначала нужно его найти. Для этого выполните следующие действия:
- Нажмите клавишу Windows + X и выберите Командная строка (Admin) .

- Когда откроется командная строка , введите ipconfig / all и нажмите Enter .
- Список информации теперь появится. Найдите физический адрес и запишите его.
- Закрыть командную строку .

Теперь, когда вы знаете свой MAC-адрес, вам нужно настроить сетевое соединение. Для этого выполните следующие действия:
- Откройте окно « Сетевые подключения» . Найдите ваше соединение и откройте его свойства.
- Когда откроется окно « Свойства» , нажмите « Настроить» .
- Перейдите на вкладку « Дополнительно » и выберите « Сетевой адрес» в списке свойств .
- Теперь выберите Value и введите MAC-адрес, который вы получили из командной строки. Не вводите тире при вводе MAC-адреса.
- Нажмите OK, чтобы сохранить изменения.


Пользователи сообщают, что это решение лучше всего работает после перехода на Google DNS или OpenDNS, поэтому обязательно попробуйте его.
Нужно изменить свой MAC-адрес? Это проще, чем вы думаете, с помощью одного из этих инструментов смены MAC-адресов!
3. Установите последние версии драйверов
Ваш сетевой адаптер использует драйверы для правильной работы, и если у вас есть какие-либо проблемы с ним, это может быть связано с вашими драйверами.
Чтобы исправить, что DNS-сервер не отвечает на ошибку в Windows 10, вам необходимо зайти на сайт производителя сетевого адаптера, загрузить последние версии драйверов и установить их на свой ПК.
Если вы вообще не можете получить доступ к Интернету, это может быть вызвано тем, что DNS-сервер недоступен, поэтому загрузите драйверы на другое устройство и установите их на свой ПК.
Некоторые пользователи также рекомендуют удалить ваши сетевые драйверы перед установкой новых драйверов. Для этого выполните следующие действия:
- Нажмите Windows Key + X и выберите Диспетчер устройств из списка.

- Когда откроется диспетчер устройств , найдите сетевой адаптер, щелкните его правой кнопкой мыши и выберите « Удалить» .
- Откроется диалоговое окно подтверждения. Если доступно, установите флажок « Удалить программное обеспечение драйвера для этого устройства» и нажмите « Удалить» .
- После удаления драйвера перезагрузите компьютер.
- Когда ваш компьютер перезагрузится, будет установлен сетевой драйвер по умолчанию. Проверьте, решена ли проблема.
- Если проблема все еще сохраняется, установите последние версии драйверов для вашего сетевого устройства и проверьте, решает ли это проблему.


Узнайте, как обновить драйверы, как настоящий техник, с этим полным руководством!
Обновлять драйверы автоматически
Загрузка драйверов вручную может привести к повреждению вашего компьютера, если вы скачали не ту версию. Мы настоятельно рекомендуем сделать это автоматически с помощью инструмента Tweakbit Driver Updater .
Этот инструмент одобрен Microsoft и Norton Antivirus. После нескольких испытаний наша команда пришла к выводу, что это лучшее автоматизированное решение. Ниже вы можете найти краткое руководство, как это сделать.
- Загрузите и установите TweakBit Driver Updater
-
 После установки программа начнет сканирование вашего компьютера на наличие устаревших драйверов автоматически. Driver Updater проверит установленные вами версии драйверов по своей облачной базе данных последних версий и порекомендует правильные обновления. Все, что вам нужно сделать, это дождаться завершения сканирования.
 -
 По завершении сканирования вы получите отчет обо всех проблемных драйверах, найденных на вашем ПК. Просмотрите список и посмотрите, хотите ли вы обновить каждый драйвер по отдельности или все сразу. Чтобы обновить один драйвер за раз, нажмите ссылку «Обновить драйвер» рядом с именем драйвера. Или просто нажмите кнопку «Обновить все» внизу, чтобы автоматически установить все рекомендуемые обновления.

Примечание. Некоторые драйверы необходимо устанавливать в несколько этапов, поэтому вам придется нажимать кнопку «Обновить» несколько раз, пока не будут установлены все его компоненты.


Отказ от ответственности : некоторые функции этого инструмента не являются бесплатными.
4. Отключите антивирус и брандмауэр

Антивирус и брандмауэр необходимы, если вы хотите защитить свой компьютер от злонамеренных пользователей, но иногда ваш антивирус и брандмауэр могут мешать подключению к Интернету.
Чтобы исправить, что DNS-сервер не отвечает на сообщения в Windows 10, попробуйте временно отключить антивирус и клиент брандмауэра.
Имейте в виду, что ваш компьютер по-прежнему будет защищен Защитником Windows, даже если вы отключите антивирус, поэтому вам не нужно беспокоиться о вашей безопасности.
Если ваш антивирус или клиент брандмауэра вызывал эту проблему, обязательно измените его конфигурацию или переключитесь на другой клиент.
Пользователи сообщают, что антивирус Bitdefender Total Security может иногда вызывать эту проблему. Если вы используете Bitdefender, вам нужно перейти в настройки брандмауэра и отключить опцию Блокировать общий доступ к интернет-соединению .
После этого проблема должна быть решена. Пользователи сообщили, что Avast также может вызвать эту проблему. Чтобы это исправить, просто откройте настройки Avast и отключите опцию Secure DNS .
Вы также можете попробовать отключить брандмауэр на своем маршрутизаторе. Это немного сложное и потенциально опасное решение, так что имейте это в виду. Отключив межсетевой экран вашего маршрутизатора, ваш компьютер будет полностью уязвим.
Если вы решите сделать это, просто временно отключите брандмауэр вашего маршрутизатора и проверьте, устраняет ли это проблему.
Если проблема была в брандмауэре, вам нужно снова включить его и проверить конфигурацию брандмауэра на предмет источника проблемы.
Чтобы узнать, как отключить межсетевой экран вашего маршрутизатора, обязательно ознакомьтесь с его инструкцией по эксплуатации.
Будьте в безопасности в Интернете с лучшими антивирусными инструментами для просмотра!
5. Обновите прошивку вашего роутера

Немногие пользователи сообщили, что DNS-сервер не отвечает при использовании беспроводной сети. Однако это можно исправить, просто обновив прошивку маршрутизатора . Мы должны предупредить вас, что это продвинутый процесс, поэтому вы должны быть особенно осторожны, чтобы не нанести ущерб.
Перед обновлением прошивки вашего роутера обязательно сделайте резервную копию его настроек. Чтобы узнать, как правильно обновить прошивку, советуем проверить руководство пользователя.
6. Используйте команду netsh

По словам пользователей, вы можете исправить сбой DNS, просто запустив несколько команд из командной строки. Для этого выполните следующие действия:
- Откройте командную строку от имени администратора .
- Когда откроется командная строка, введите:
- netsh int ip reset
- netsh winsock reset
- ipconfig / flushdns
- ipconfig / renew
- После того, как все команды выполнены, перезагрузите компьютер.
Выполнив эти команды, вы сбросите свой IP и очистите кэш DNS, поэтому обязательно попробуйте этот метод.
7. Перезагрузите модем

Один из способов исправить ошибку DNS-сервера в Windows 10 — перезагрузить модем. Для этого просто нажмите кнопку питания на модеме, чтобы выключить его.
Подождите 30 секунд и снова нажмите кнопку питания, чтобы включить его. Дождитесь полного включения модема и проверьте, сохраняется ли проблема.
8. Запустите компьютер в безопасном режиме

Иногда сторонние приложения, такие как антивирус или инструменты VPN , могут создавать помехи вашему интернет-соединению.
Чтобы исправить ошибку DNS-сервера, не отвечающую на Windows 10, обязательно попробуйте выйти в Интернет из безопасного режима .
Если вы не знакомы, безопасный режим — это специальный режим в Windows, который работает только с базовым программным обеспечением и драйверами. Чтобы войти в безопасный режим в Windows 10, вам необходимо выполнить следующие шаги:
- Откройте меню «Пуск» и нажмите кнопку питания . Удерживая клавишу Shift на клавиатуре, нажмите « Перезагрузить» .
- Вы увидите три доступных варианта. Выберите Устранение неполадок .
- Выберите « Дополнительные параметры»> «Параметры запуска» и нажмите кнопку « Перезагрузить» .
- Когда ваш компьютер перезагрузится, вы увидите список доступных опций. Выберите безопасный режим с сетью , нажав F5 на клавиатуре.
- Безопасный режим теперь запустится.
Когда безопасный режим запускается, проверьте, работает ли ваше сетевое соединение. Если в безопасном режиме нет проблем с подключением к Интернету, это означает, что стороннее программное обеспечение мешает подключению к сети.
Чтобы решить эту проблему, вам нужно найти и удалить проблемное приложение с вашего ПК.
9. Отключите адаптер виртуального мини-порта Microsoft WiFi
Если DNS-сервер не отвечает на соединение WiFi, проблема может быть вызвана переходником мини-порта Microsoft Virtual WiFi. Чтобы решить эту проблему, вам нужно найти и отключить эти адаптеры.
Вы можете сделать это, выполнив следующие действия:
- Откройте диспетчер устройств .
- Когда откроется диспетчер устройств , перейдите в « Просмотр» и выберите « Показать скрытые устройства» .

- Найдите Microsoft Virtual WiFi Miniport Adapter , щелкните его правой кнопкой мыши и выберите « Отключить». Повторите этот шаг для всех доступных виртуальных адаптеров минипорта.
- После этого закройте Диспетчер устройств и проверьте, устранена ли проблема.

USB-адаптер Wi-Fi не распознается вашим компьютером? Нет проблем, есть решение для этого!
10. Отключить интернет-протокол версии 6
Существует два типа IP-адресов : v4 и v6. Если у вас DNS-сервер не отвечает на ваш ПК, вы можете исправить ошибку, отключив Internet Protocol Version 6.
Это довольно просто, и для этого вам нужно выполнить следующие шаги:
- Откройте Сетевые подключения.
- Щелкните правой кнопкой мыши ваше соединение и выберите Свойства .
- Теперь найдите Интернет-протокол версии 6 (TCP / IPv6) и отключите его.

- Нажмите кнопку ОК , чтобы сохранить изменения.

Отключение IPv6 не окажет негативного влияния на ваш компьютер, но, надеюсь, это решит проблему с DNS-сервером.
11. Отключите все дополнительные подключения
На вашем компьютере может быть доступно несколько подключений, что иногда может приводить к тому, что DNS-сервер не отвечает при использовании проблемы с подключением WiFi.
Чтобы решить эту проблему, вам необходимо отключить эти подключения в окне «Сетевые подключения».
- Просто откройте окно « Сетевые подключения» и отключите все подключения, кроме активного сетевого подключения.
- Для этого просто щелкните правой кнопкой мыши соединение, которое вы хотите отключить, и выберите « Отключить» в меню.

12. Проверьте на сторонние приложения
Некоторые сторонние приложения могут повлиять на ваш DNS и вызвать эту проблему. Пользователи сообщили, что их DNS автоматически меняется на определенный адрес.
Видимо, проблема была вызвана сторонним приложением под названием ColdTurkey.
После отключения или удаления проблемного приложения DNS-сервер не отвечает, ошибка полностью устранена.
Имейте в виду, что почти любое сетевое приложение или приложение безопасности может создавать помехи вашему DNS, поэтому внимательно следите за всеми установленными приложениями.
13. Измените адрес DNS на вашем роутере
По словам пользователей, вы можете решить эту проблему, установив другой DNS-адрес на вашем маршрутизаторе. Для этого вам нужно зайти на страницу конфигурации вашего роутера и посмотреть настройки DNS.
Измените DNS-сервер на Google DNS или OpenDNS и проверьте, решена ли проблема. Для получения подробных инструкций о том, как изменить свой DNS, обязательно ознакомьтесь с инструкцией по эксплуатации вашего роутера.
14. Перезагрузите свой роутер

Конфигурация вашего маршрутизатора может иногда вызывать проблемы с DNS. Чтобы исправить ошибку DNS-сервера, не отвечающую на Windows 10 , вам нужно сбросить настройки маршрутизатора по умолчанию.
Для этого вам нужно открыть страницу конфигурации вашего роутера и выбрать опцию «Сброс».
При желании вы также можете экспортировать свою конфигурацию, чтобы вам больше не приходилось настраивать беспроводные сети.
Другой способ сбросить настройки маршрутизатора — удерживать кнопку сброса на нем в течение нескольких секунд. Оба метода работают одинаково, и вы должны использовать тот, который вам удобнее всего.
Если вы не уверены, как сбросить настройки маршрутизатора, ознакомьтесь с инструкциями по пошаговым инструкциям.
15. Отключите функцию однорангового обновления
Windows 10 поставляется с отличной функцией, которая позволяет загружать обновления Windows с помощью одноранговой технологии.
По сути, эта функция позволяет загружать обновления Windows напрямую от других пользователей в вашем регионе.
Это полезная и инновационная функция, но иногда кажется, что эта функция может вызвать сбой DNS. Одним из возможных решений проблем DNS является отключение этой функции.
Для этого выполните следующие действия:
- Откройте приложение «Настройки », нажав клавишу Windows + I.
- Перейдите в раздел « Обновление и безопасность » и нажмите « Дополнительные параметры» .

- Нажмите на Выбрать, как доставляются обновления .

- Убедитесь, что для Обновления из нескольких мест установлено значение Выкл.


После отключения этой функции проверьте, решена ли проблема с DNS-сервером.
16. Подождите, пока ваш провайдер решит проблему
Иногда DNS-сервер не отвечает, ошибка может быть вызвана вашим провайдером. У вашего интернет-провайдера могут быть некоторые проблемы, поэтому вам, возможно, придется подождать несколько часов, пока ваш интернет-провайдер решит технические проблемы.
DNS-сервер не отвечает, ошибка не позволит вам получить доступ к Интернету, но вы сможете исправить это с помощью одного из наших решений.
ЧИТАЙТЕ ТАКЖЕ:
- Вот что нужно сделать, если DNS-сервер недоступен
- Ошибка выполнения сервера Ошибка обозревателя файлов [EXPERT FIX]
- Нарушение данных облачного сервера Microsoft предоставляет данные миллионов
Примечание редактора: этот пост был первоначально опубликован в ноябре 2016 года и с тех пор обновлен для свежести и точности.
400 — Bad Request (Некорректный запрос)
«Плохой запрос». Этот ответ означает, что сервер не понимает… Читать далее
Подробнее
401 — Unauthorized (Не авторизован)
«Неавторизовано». Для получения запрашиваемого ответа нужна … Читать далее
Подробнее
402 — Payment Required (Необходима оплата)
«Необходима оплата». Этот код ответа зарезервирован для буду… Читать далее
Подробнее
403 — Forbidden (Запрещено)
«Запрещено». У клиента нет прав доступа к содержимому, поэто… Читать далее
Подробнее
404 — Not Found (Не найдено)
«Не найден». Сервер не может найти запрашиваемый ресурс. Код… Читать далее
Подробнее
405 — Method Not Allowed (Метод не поддерживается)
«Метод не разрешен». Сервер знает о запрашиваемом методе, но… Читать далее
Подробнее
406 — Not Acceptable (Неприемлемо)
Этот ответ отсылается, когда веб сервер после выполнения ser… Читать далее
Подробнее
407 — Proxy Authentication Required (Необходима аутентификация прокси)
Этот код ответа аналогичен коду 401, только аутентификация т… Читать далее
Подробнее
408 — Request Timeout (Истекло время ожидания)
Ответ с таким кодом может прийти, даже без предшествующего з… Читать далее
Подробнее
409 — Conflict (Конфликт)
Этот ответ отсылается, когда запрос конфликтует с текущим со… Читать далее
Подробнее
410 — Gone (Удалён)
Этот ответ отсылается, когда запрашиваемый контент удален с … Читать далее
Подробнее
411 — Length Required (Необходима длина)
Запрос отклонен, потому что сервер требует указание заголовк… Читать далее
Подробнее
412 — Precondition Failed (Условие ложно)
Клиент указал в своих заголовках условия, которые сервер не … Читать далее
Подробнее
413 — Request Entity Too Large (Полезная нагрузка слишком велика)
Размер запроса превышает лимит, объявленный сервером. Сервер… Читать далее
Подробнее
414 — Request-URI Too Long (URI слишком длинный)
URI запрашиваемый клиентом слишком длинный для того, чтобы с… Читать далее
Подробнее
415 — Unsupported Media Type (Неподдерживаемый тип данных)
Медиа формат запрашиваемых данных не поддерживается сервером… Читать далее
Подробнее
416 — Requested Range Not Satisfiable (Диапазон не достижим)
Диапозон указанный заголовком запроса Range не может бы… Читать далее
Подробнее
417 — Expectation Failed (Ожидание не удалось)
Этот код ответа означает, что ожидание, полученное из заголо… Читать далее
Подробнее
418 — I’m a teapot (Я — чайник)
I’m a teapot — Этот код был введен в 1998 году как одна из т… Читать далее
Подробнее
419 — Authentication Timeout (not in RFC 2616) (Обычно ошибка проверки CSRF)
Authentication Timeout (not in RFC 2616) — Этого кода нет в … Читать далее
Подробнее
420 — Enhance Your Calm (Twitter) (Подождите немного (Твиттер))
Возвращается Twitter Search и Trends API, когда клиент отпра… Читать далее
Подробнее
421 — Misdirected Request (Неверный запрос)
Misdirected Request — запрос был перенаправлен на сервер, не… Читать далее
Подробнее
422 — Unprocessable Entity (Необрабатываемый экземпляр)
Запрос имел правильный формат, но его нельзя обработать из-з… Читать далее
Подробнее
423 — Locked (Заблокировано)
Целевой ресурс из запроса заблокирован от применения к нему … Читать далее
Подробнее
424 — Failed Dependency (Невыполненная зависимость)
Не удалось завершить запрос из-за ошибок к предыдущем запрос… Читать далее
Подробнее
425 — Too Early (Слишком рано)
Too Early — сервер не готов принять риски обработки «ранней … Читать далее
Подробнее
426 — Upgrade Required (Необходимо обновление)
Указание сервера, клиенту, обновить протокол. Заголовок отве… Читать далее
Подробнее
428 — Precondition Required (Необходимо предусловие)
Precondition Required — сервер указывает клиенту на необходи… Читать далее
Подробнее
429 — Too Many Requests (Слишком много запросов)
Too Many Requests — клиент попытался отправить слишком много… Читать далее
Подробнее
430 — Would Block (Будет заблокировано)
Код состояния 430 would Block — это код, который сервер мог … Читать далее
Подробнее
431 — Request Header Fields Too Large (Поля заголовка запроса слишком большие)
Request Header Fields Too Large — Превышена допустимая длина… Читать далее
Подробнее
434 — Requested host unavailable (Запрашиваемый адрес недоступен)
Сервер к которому вы обратились недоступен… Читать далее
Подробнее
444 — No Response (Nginx) (Нет ответа (Nginx))
Код ответа Nginx. Сервер не вернул информацию и закрыл соеди… Читать далее
Подробнее
449 — Retry With (Повторить с…)
Retry With — возвращается сервером, если для обработки запро… Читать далее
Подробнее
450 — Blocked by Windows Parental Controls (Microsoft) (Заблокировано родительским контролем Windows (Microsoft))
Расширение Microsoft. Эта ошибка возникает, когда родительск… Читать далее
Подробнее
451 — Unavailable For Legal Reasons (Недоступно по юридическим причинам)
Unavailable For Legal Reasons — доступ к ресурсу закрыт по ю… Читать далее
Подробнее
499 — Client Closed Request (Клиент закрыл соединение)
Нестандартный код состояния, представленный nginx для случая… Читать далее
Подробнее
|
746 / 648 / 44 Регистрация: 14.05.2011 Сообщений: 1,197 |
|
|
1 |
|
|
26.11.2012, 21:28. Показов 15828. Ответов 8
Возникла такая проблема. Дома имеется две выделенные интернет-линии разных провайдеров. Так-же есть роутер Asus RT-N 10B1. В одной сети соединение через него устанавливается без проблем. В другой при настройке выдаётся такая ошибка : Состояние соединения Как можно исправить эту ошибку? Провайдер давать какую либо информацию по настройкам отказался ввиду того, что это не тот роутер, который выдают они.
0 |

|
1187 / 917 / 367 Регистрация: 02.09.2012 Сообщений: 2,793 |
|
|
27.11.2012, 01:46 |
2 |
|
Предположу, что вам выдается частный адрес: 10.209… маршрутизация которого в Интернет невозможна, поэтому гугловский публичный ДНС действительно будет недоступен. Вообще, вы представили мало информации, нарисуйте схему где, как вы подключаетесь с указанием устройств и адресов их интерфейсов, чтобы точно можно было сказать, что делать.
1 |
|
746 / 648 / 44 Регистрация: 14.05.2011 Сообщений: 1,197 |
|
|
27.11.2012, 18:39 [ТС] |
3 |
|
grgdvo,
0 |
|
7175 / 3234 / 80 Регистрация: 17.06.2009 Сообщений: 14,164 |
|
|
27.11.2012, 21:12 |
4 |
|
Дома имеется две выделенные интернет-линии разных провайдеров Схема сети какая ? Предположу, что вам выдается частный адрес: 10.209… маршрутизация которого в Интернет невозможна, поэтому гугловский публичный ДНС действительно будет недоступен Естественно понятно что для подключения используется NAT
1 |
|
746 / 648 / 44 Регистрация: 14.05.2011 Сообщений: 1,197 |
|
|
27.11.2012, 21:18 [ТС] |
5 |
|
odip,
0 |
|
7175 / 3234 / 80 Регистрация: 17.06.2009 Сообщений: 14,164 |
|
|
27.11.2012, 21:36 |
6 |
|
Чтобы подключиться надо знать точные параметры настройки (протокол подключения, IP, netmask, gateway, dns, прочее) Так как я не знаю ваши параметры настройки, то это пожалуй все Может быть вы перепутали параметры настройки и пытаетесь подключиться к провайдеру 2 с параметрами от провайдера 1
1 |
|
746 / 648 / 44 Регистрация: 14.05.2011 Сообщений: 1,197 |
|
|
27.11.2012, 21:40 [ТС] |
7 |
|
odip,
0 |
|
Модератор
4954 / 2311 / 141 Регистрация: 27.06.2011 Сообщений: 9,167 |
|
|
28.11.2012, 07:06 |
8 |
|
Только что выяснил, его провайдер делает привязку по МАС адресу. Вот и ответ сами же сказали, тем более, что Вы
Да вообще-то перед новым подключением резетил Соответственно выставленный мак адрес мог сбиться от нужного.
0 |

|
7175 / 3234 / 80 Регистрация: 17.06.2009 Сообщений: 14,164 |
|
|
28.11.2012, 07:55 |
9 |
|
Теперь вот склоняюсь к мысли перепрошить для надёжности Если версия не изменится то перепрошивать не имеет никакого смысла
0 |
DNS или система доменных имен — это децентрализованная система именования, которая идентифицирует компьютеры, серверы и другие ресурсы, к которым есть доступ в Интернете. Это в основном помогает идентифицировать компьютер и входящий трафик. Однако вы можете столкнуться с некоторыми ошибками, если ваш компьютер не может подключиться к DNS-серверу.
Если вы получаете сообщение об ошибке «DNS-сервер не отвечает» в Windows 11, не паникуйте. DNS все еще является относительно новой системой, и время от времени на нее могут влиять ошибки. Просто следуйте приведенным ниже исправлениям, и ваша система снова заработает в кратчайшие сроки. Проверять Как исправить ошибку DNS-сервера, которая не отвечает, чтобы вернуться в онлайн.
Есть много причин, по которым вы можете столкнуться с такой ошибкой. В большинстве случаев компьютер не может установить подключение к Интернету. Иногда Windows ошибочно идентифицирует проблемы, связанные с сетью, как проблемы с DNS, хотя в некоторых случаях они вызваны сторонним приложением, мешающим вашему соединению.
Какой бы ни была причина, вы можете попробовать приведенные ниже исправления, чтобы устранить ошибку «DNS-сервер не отвечает» в Windows 11.
Важное напоминание: Прежде чем приступать к каким-либо исправлениям, убедитесь, что у вас есть работающее подключение к Интернету. Как упоминалось ранее, это обычно вызвано проблемами, связанными с сетью, поэтому лучше сразу исключить эту причину. Если у вас есть проблемы с Интернетом, сначала устраните их, прежде чем выполнять все эти шаги.
1. Отключите стороннее антивирусное приложение.
Если на вашем компьютере установлено стороннее антивирусное приложение, например Avast AVG или McAfee, это может быть причиной появления этой ошибки. Иногда его настройки могут мешать работе вашей сети и вызывать различные ошибки, например, проблемы с DNS.
Чтобы проверить, не является ли это причиной проблемы, приостановите работу стороннего антивирусного приложения и проверьте, есть ли у вас проблема с DNS-сервером. Если ваше интернет-соединение работает нормально, скорее всего, в этом виновато приложение, и вам следует рассмотреть другие способы защиты вашего компьютера.
Вы можете полностью удалить его и использовать встроенное приложение безопасности в Windows 11, Microsoft Defender Или дождитесь нового обновления Windows 11 и посмотрите, решит ли оно эту проблему. Проверять Лучшие бесплатные приложения для защиты от вирусов и безопасности в Интернете.
2. Очистить DNS
Это самый популярный способ исправить большинство проблем с DNS, особенно если это связано с неправильными настройками вашего устройства. Вот как очистить и обновить DNS в Windows 11.
- Откройте диалоговое окно «Выполнить», нажав и удерживая клавиши Win + R. затем введите CMD И нажмите Enter , чтобы открыть командную строку.
- В командной строке введите следующую команду и нажмите Enter реализовать это.
ipconfig /flushdns
- Затем введите следующую команду и нажмите Enter.
ipconfig /registerdns
- Затем введите следующее и нажмите Enter.
ipconfig /release
- Затем введите следующую команду и нажмите Enter.
ipconfig /renew
- Наконец, введите следующее и нажмите Enter.
netsh winsock reset
После того, как вы ввели все команды, перезагрузите компьютер. Это должно исправить ошибку DNS, вызванную неправильной конфигурацией. Если проблема не устранена, попробуйте следующие исправления. Проверять Как исправить ошибку DNS-сервера, не отвечающего на запросы в Windows.
3. Измените данные DNS на компьютере с Windows.
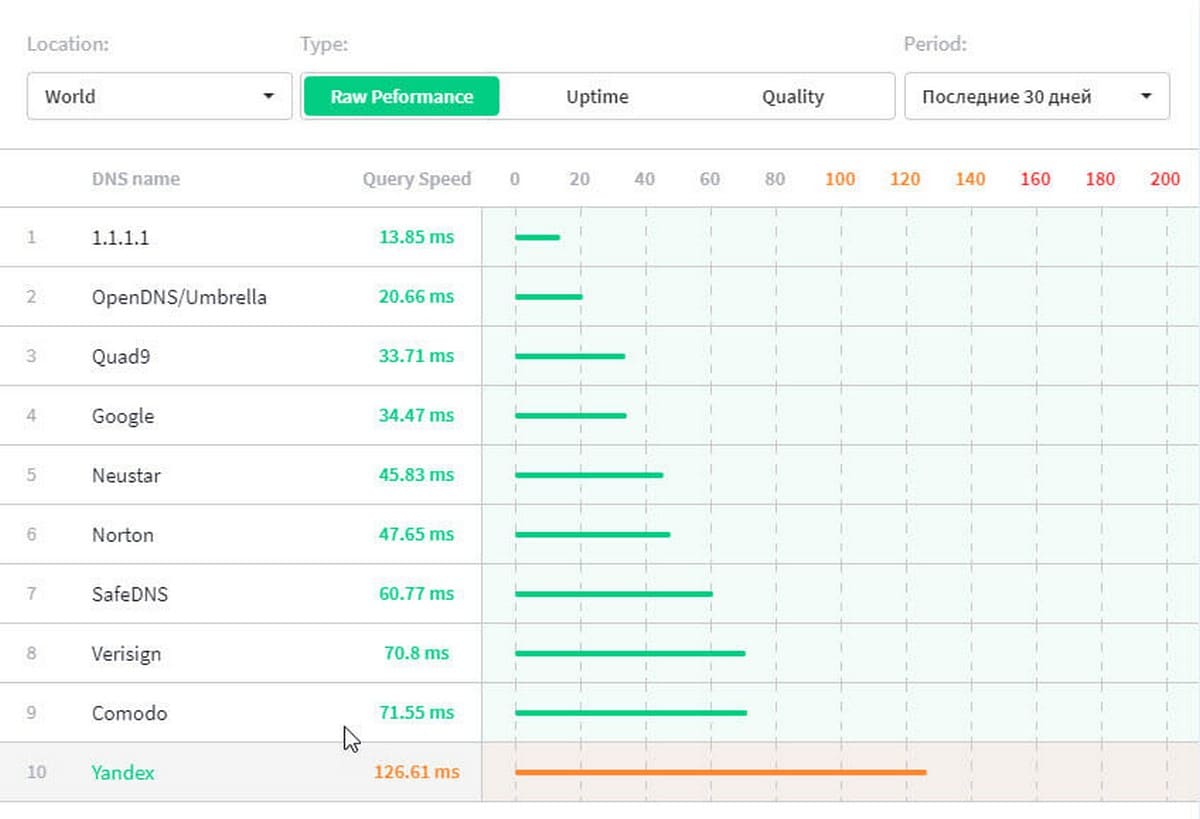
В некоторых случаях использование DNS по умолчанию вашего сетевого провайдера может вызвать проблемы в вашей системе. Если вы еще не изменили используемые данные, мы рекомендуем переключиться на бесплатного провайдера DNS. Вы можете изменить его в настройках маршрутизатора или в настройках сетевого адаптера вашего компьютера. Вот некоторые бесплатные поставщики DNS и адресов, которые вы можете использовать:
- Google: 8.8.8.8 | 8.8.4.4
- Главная страница OpenDNS: 208.67.222.222 | 208.67.220.220
- Cloudflare: 1.1.1.1 | 1.0.0.1
- Альтернативный DNS: 76.76.19.19 | 76.223.122.150
- AdGuard DNS: 94.140.14.14 | 94.140.15.15
- Quad9: 9.9.9.9 | 149.112.112.112
Следуйте приведенным ниже инструкциям, чтобы изменить настройку DNS на ПК с Windows 11:
- Нажмите и удерживайте клавишу. Windows + I Открыть «Настройки».
- В приложении «Настройки» коснитесь «Сеть и Интернет» -> Wi-Fi -> Свойства устройства.
- В разделе «Установить DNS-сервер» нажмите Выпуск.
- В разделе «Изменить настройки DNS» выберите руководство по эксплуатации из раскрывающегося меню.
- В зависимости от выбранного поставщика DNS включите переключатель IP4 или IPV6.
- После этого введите Public DNS Тот, который вы выбрали в разделе Preferred DNS. Затем введите адрес в разделе «Альтернативный DNS».
- Если доступно шифрование, выберите его из опции. Затем нажмите Сохранить.
- Теперь у вас есть новая настройка DNS на вашем компьютере. Проверьте ошибку и посмотрите, работает ли ваша система нормально.
4. Обновите драйверы.
Если вы хотите быстро обновить основные драйверы вашего компьютера, вы можете загрузить и использовать бесплатное средство обновления драйверов для Windows. Однако, если вам не нравится устанавливать другие приложения на свой компьютер, вы можете обновить их вручную, используя настройки Windows. Следуй этим шагам:
- Откройте настройки, нажав и удерживая клавишу . Windows + I.
- Далее коснитесь Центр обновления Windows , затем нажмите кнопку. Проверить обновления.
- Наконец, установите все доступные обновления и перезагрузите систему.
- После включения компьютера проверьте, появляется ли у вас та же ошибка.
Проверять Как найти и заменить старые драйверы Windows.
5. Загрузитесь в безопасном режиме.
Если вы все еще сталкиваетесь с проблемой даже после выполнения всех шагов по устранению неполадок, перечисленных выше, лучше всего перезагрузить компьютер в безопасном режиме. В безопасном режиме Windows запустит только основные настройки и удалит все настройки, которые могут вызывать ошибку. Вот как загрузиться в безопасном режиме.
- Откройте меню «Пуск» и щелкните значок «Выполнить».
- Затем нажмите и удерживайте клавишу . Shift И нажмите Перезагрузить.
- В параметрах восстановления коснитесь найди ошибки и исправь их.
- Затем нажмите «Дополнительные параметры».
- В дополнительных параметрах выберите Параметры запуска.
- После этого нажмите Перезагрузить.
- После этого нажмите 5 или же F5 Перезагрузить компьютер в безопасном режиме с сетью. Это также позволит вам получить доступ к Интернету даже в безопасном режиме.
- После перезагрузки компьютера в безопасном режиме проверьте Интернет, чтобы убедиться, что проблема не устранена. Если нет, то возможно, что причиной ошибки DNS, с которой вы столкнулись, является стороннее приложение или служба, которую вы используете. К сожалению, нет автоматического способа точно определить виновника. Вы должны вручную удалить или отключить приложение одно за другим, чтобы проверить, что вызывает проблему. Начните с удаления последних установленных приложений.
Проверять Как добавить параметр «Безопасный режим» в контекстное меню в Windows 11.
Лучший опыт работы с Windows 11
Ошибка «DNS-сервер не отвечает» может быть неприятной и тревожной, особенно когда вы пытаетесь получить доступ к важным страницам и настройкам в вашей системе Windows 11. Есть много причин, по которым вы можете столкнуться с этой проблемой, но не паникуйте. Вы можете легко решить проблему, даже если вы не очень техничны. Теперь вы можете просмотреть Некоторые из самых больших проблем Windows 11, которые Microsoft должна исправить.