
Typescript Custom Error



Extend native Error to create custom errors
ts-custom-error is a tiny (~500 bytes of minified & gzipped Javascript) package providing a CustomError class and a customErrorFactory function to easily extends native Error in node and evergreen browsers.
It’s written in Typescript and try to offer the best development and debug experiences: bundled in Javascript with Typescript definition files, map files and bundled js files for various environments: transpiled to es5 with commonjs, module and umd exports, the umd bundle is also available minified for easy import in browsers.
Why
Because extending native Error in node and in browsers is tricky
class MyError extends Error {
	constructor(m) {
		super(m)
	}
}
doesn’t work as expected in ES6 and is broken in Typescript.
Use CustomError class
Simply extends and call super in you custom constructor.
import { CustomError } from 'ts-custom-error'

class HttpError extends CustomError {
	public constructor(
		public code: number,
		message?: string,
	) {
		super(message)
	}
}

...

new HttpError(404, 'Not found')
You may want more advanced contructor logic and custom methods, see examples
Use customErrorFactory factory
Custom error contructor returned by the factory pass the same unit tests as Class constructor.
Factory still allows custom logic inside constructor:
import { customErrorFactory } from 'ts-custom-error'

const HttpError = customErrorFactory(function HttpError (code: number, message= '') {
	this.code = code
	this.message = message
})

...

new HttpError(404, 'Not found')
Custom Error from customErrorFactory can:
- Be called as a simple function
HttpError(404, 'Not found')
- Extend any native Error, using the second optional argument
import { customErrorFactory } from 'ts-custom-error'

const ValidationError = customErrorFactory(function ValidationError (message= 'Invalid parameter') {
	this.message = message
}, TypeError)
Known limitations
Minification and transpilation mangle custom Error names.
Unexpected results are:
- Minified identifiers in place of custom Error name in Stacktrace
- Wrong error recognition where using errors name (bad practice) instead of
instanceof
You may fix this behaviour by:
- Using uglifyjs options
--mangle 'except=["MyError"]'(need to specify all custom error names) or--keep_fnames/--keep_classnames(nothing to specify but your bundle size will be larger) - Setting explicitly error name:
import { CustomError } from 'ts-custom-error'

class MyError extends CustomError {
	constructor() {
		super()
		// Set name explicitly as minification can mangle class names
		Object.defineProperty(this, 'name', { value: 'MyError' })
	}
}
import { customErrorFactory } from 'ts-custom-error'

const MyError = customErrorFactory(function MyError () {
	// Set name explicitly as minification can remove function expression names
	Object.defineProperty(this, 'name', { value: 'MyError' })
})
Usefull development commands
- Watch source changes and run corresponding unit tests
- Run all unit tests
- Get coverage report
- Format staged code and run commitizen (enforce commit message convention)
Automate all the things
⚠️ This project is mainly a pet project and its first purpose is to be a playground for various external services and tools:
- opinionated code style mostly inspired from standardjs
- automatic code formating with prettier
- code quality analysis by codeclimate & CodeQL
- automated continuous integration on travis github actions & Dependabot
- automated semantic versioning with changelog generation and release deployment on npm and github thanks to semantic-release
Licence
Starting version 3.0.0 this project is under MIT licence, there are no code change between version 2.2.2 and version 3.0.0 but changing licence was considered as a breaking change. All versions < 3.0.0 are under WTFPL.
Similar packages

Мы продолжаем серию публикаций адаптированного и дополненного перевода "Карманной книги по TypeScript«.
Другие части:
- Часть 1. Основы
- Часть 2. Типы на каждый день
- Часть 3. Сужение типов
- Часть 4. Подробнее о функциях
- Часть 5. Объектные типы
- Часть 6. Манипуляции с типами
- Часть 7. Классы
- Часть 8. Модули
Обратите внимание: для большого удобства в изучении книга была оформлена в виде прогрессивного веб-приложения.
Члены класса (class members)
Вот пример самого простого класса — пустого:
class Point {}
Такой класс бесполезен, поэтому давайте добавим ему несколько членов.
Поля (fields)
Поле — это открытое (публичное) и доступное для записи свойство класса:
class Point {

  x: number

  y: number

}

const pt = new Point()

pt.x = 0

pt.y = 0
Аннотация типа является опциональной (необязательной), но неявный тип будет иметь значение any.
Поля могут иметь инициализаторы, которые автоматически запускаются при инстанцировании класса:
class Point {

  x = 0

  y = 0

}

const pt = new Point()

// Вывод: 0, 0

console.log(`${pt.x}, ${pt.y}`)
Как и в случае с const, let и var, инициализатор свойства класса используется для предположения типа этого свойства:
const pt = new Point()

pt.x = '0'

// Type 'string' is not assignable to type 'number'.

// Тип 'string' не может быть присвоен типу 'number'
--strictPropertyInitialization
Настройка strictPropertyInitialization определяет, должны ли поля класса инициализироваться в конструкторе.
class BadGreeter {

  name: string

  // Property 'name' has no initializer and is not definitely assigned in the constructor.

  // Свойство 'name' не имеет инициализатора и ему не присваивается значения в конструкторе

}

class GoodGreeter {

  name: string

  constructor() {

    this.name = 'привет'

  }

}
Обратите внимание, что поля классов должны быть инициализированы в самом конструкторе. TS не анализирует методы, вызываемые в конструкторе, для обнаружения инициализации, поскольку производный класс может перезаписать такие методы, и члены не будут инициализированы.
Если вы намерены инициализировать поле вне конструктора, можете использовать оператор утверждения определения присвоения (definite assignment assertion operator, !):
class OKGreeter {

  // Не инициализируется, но ошибки не возникает

  name!: string

}
readonly
Перед названием поля можно указать модификатор readonly. Это запретит присваивать полю значения за пределами конструктора.
class Greeter {

  readonly name: string = 'народ'

  constructor(otherName?: string) {

    if (otherName !== undefined) {

      this.name = otherName

    }

  }

  err() {

    this.name = 'не ok'

    // Cannot assign to 'name' because it is a read-only property.

    // Невозможно присвоить значение свойству 'name', поскольку оно является доступным только для чтения

  }

}

const g = new Greeter()

g.name = 'тоже не ok'

// Cannot assign to 'name' because it is a read-only property.
Конструкторы (constructors)
Конструкторы класса очень похожи на функции. Мы можем добавлять в них параметры с аннотациями типа, значения по умолчанию и перегрузки:
class Point {

  x: number

  y: number

  // Обычная сигнатура с «дефолтными» значениями

  constructor(x = 0, y = 0) {

    this.x = x

    this.y = y

  }

}

class Point {

  // Перегрузки

  constructor(x: number, y: string)

  constructor(s: string)

  constructor(xs: any, y?: any) {

    // ...

  }

}
Однако, между сигнатурами конструктора класса и функции существует несколько отличий:
-
Конструкторы не могут иметь параметров типа — это задача возлагается на внешнее определение класса, о чем мы поговорим позже
-
Конструкторы не могут иметь аннотацию возвращаемого типа — всегда возвращается тип экземпляра класса
super
Как и в JS, при наличии базового класса в теле конструктора, перед использованием this необходимо вызывать super():
class Base {

  k = 4

}

class Derived extends Base {

  constructor() {

    // В ES5 выводится неправильное значение, в ES6 выбрасывается исключение

    console.log(this.k)

    // 'super' must be called before accessing 'this' in the constructor of a derived class.

    // Перед доступом к 'this' в конструкторе или производном классе необходимо вызвать 'super'

    super()

  }

}
В JS легко забыть о необходимости вызова super, в TS — почти невозможно.
Методы (methods)
Метод — это свойство класса, значением которого является функция. Методы могут использовать такие же аннотации типа, что и функции с конструкторами:
class Point {

  x = 10

  y = 10

  scale(n: number): void {

    this.x *= n

    this.y *= n

  }

}
Как видите, TS не добавляет к методам ничего нового.
Обратите внимание, что в теле метода к полям и другим методам по-прежнему следует обращаться через this. Неквалифицированное название (unqualified name) в теле функции всегда будет указывать на лексическое окружение:
let x: number = 0

class C {

  x: string = 'привет'

  m() {

    // Здесь мы пытаемся изменить значение переменной `x`, находящейся на первой строке, а не свойство класса

    x = 'world'

    // Type 'string' is not assignable to type 'number'.

  }

}
Геттеры/сеттеры
Классы могут иметь акцессоры (вычисляемые свойства, accessors):
class C {

  _length = 0

  get length() {

    return this._length

  }

  set length(value) {

    this._length = value

  }

}
TS имеет несколько специальных правил, касающихся предположения типов в случае с акцессорами:
-
Если
setотсутствует, свойство автоматически становитсяreadonly -
Параметр типа сеттера предполагается на основе типа, возвращаемого геттером
-
Если параметр сеттера имеет аннотацию типа, она должна совпадать с типом, возвращаемым геттером
-
Геттеры и сеттеры должны иметь одинаковую видимость членов (см. ниже)
Если есть геттер, но нет сеттера, свойство автоматически становится readonly.
Сигнатуры индекса (index signatures)
Классы могут определять сигнатуры индекса. Они работают также, как сигнатуры индекса в других объектных типах:
class MyClass {

  [s: string]: boolean | ((s: string) => boolean)

  check(s: string) {

    return this[s] as boolean

  }

}
Обычно, индексированные данные лучше хранить в другом месте.
Классы и наследование
Как и в других объектно-ориентированных языках, классы в JS могут наследовать членов других классов.
implements
implements используется для проверки соответствия класса определенному interface. При несоответствии класса интерфейсу возникает ошибка:
interface Pingable {

  ping(): void

}

class Sonar implements Pingable {

  ping() {

    console.log('пинг!')

  }

}

class Ball implements Pingable {

// Class 'Ball' incorrectly implements interface 'Pingable'. Property 'ping' is missing in type 'Ball' but required in type 'Pingable'.

// Класс 'Ball' некорректно реализует интерфейс 'Pingable'. Свойство 'ping' отсутствует в типе 'Ball', но является обязательным в типе 'Pingable'

  pong() {

    console.log('понг!')

  }

}
Классы могут реализовывать несколько интерейсов одновременно, например, class C implements A, B {}.
Предостережение
Важно понимать, что implements всего лишь проверяет, соответствует ли класс определенному интерфейсу. Он не изменяет тип класса или его методов. Ошибочно полагать, что implements изменяет тип класса — это не так!
interface Checkable {

  check(name: string): boolean

}

class NameChecker implements Checkable {

  check(s) {

    // Parameter 's' implicitly has an 'any' type.

    // Неявным типом параметра 's' является 'any'

    // Обратите внимание, что ошибки не возникает

    return s.toLowercse() === 'ok'

          // any

  }

}
В приведенном примере мы, возможно, ожидали, что тип s будет определен на основе name: string в check. Это не так — implements не меняет того, как проверяется тело класса или предполагаются его типы.
Также следует помнить о том, что определение в интерфейсе опционального свойства не приводит к созданию такого свойства:
interface A {

  x: number

  y?: number

}

class C implements A {

  x = 0

}

const c = new C()

c.y = 10

// Property 'y' does not exist on type 'C'.

// Свойства с названием 'y' не существует в типе 'C'
extends
Классы могут расширяться другими классами. Производный класс получает все свойства и методы базового, а также может определять дополнительных членов.
class Animal {

  move() {

    console.log('Moving along!')

  }

}

class Dog extends Animal {

  woof(times: number) {

    for (let i = 0; i < times; i++) {

      console.log('woof!')

    }

  }

}

const d = new Dog()

// Метод базового класса

d.move()

// Метод производного класса

d.woof(3)
Перезапись методов
Производный класс может перезаписывать свойства и методы базового класса. Для доступа к методам базового класса можно использовать синтаксис super. Поскольку классы в JS — это всего лишь объекты для поиска (lookup objects), такого понятия как «супер-поле» не существует.
TS обеспечивает, чтобы производный класс всегда был подтипом базового класса.
Пример «легального» способа перезаписи метода:
class Base {

  greet() {

    console.log('Привет, народ!')

  }

}

class Derived extends Base {

  greet(name?: string) {

    if (name === undefined) {

      super.greet()

    } else {

      console.log(`Привет, ${name.toUpperCase()}`)

    }

  }

}

const d = new Derived()

d.greet()

d.greet('читатель!')
Важно, чтобы производный класс следовал контракту базового класса. Помните, что очень часто (и всегда легально) ссылаться на экземпляр производного класса через указатель на базовый класс:
// Создаем синоним для производного экземпляра с помощью ссылки на базовый класс

const b: Base = d

// Все работает

b.greet()
Что если производный класс не будет следовать конракту базового класса?
class Base {

  greet() {

    console.log('Привет, народ!')

  }

}

class Derived extends Base {

  // Делаем этот параметр обязательным

  greet(name: string) {

  // Property 'greet' in type 'Derived' is not assignable to the same property in base type 'Base'. Type '(name: string) => void' is not assignable to type '() => void'.

  // Свойство 'greet' в типе 'Derived' не может быть присвоено одноименному свойству в базовом типе 'Base'...

    console.log(`Привет, ${name.toUpperCase()}`)

  }

}
Если мы скомпилируем этот код, несмотря на ошибку, такой «сниппет» провалится:
const b: Base = new Derived()

// Не работает, поскольку `name` имеет значение `undefined`

b.greet()
Порядок инициализации
Порядок инициализации классов может быть неожиданным. Рассмотрим пример:
class Base {

  name = 'базовый'

  constructor() {

    console.log('Меня зовут ' + this.name)

  }

}

class Derived extends Base {

  name = 'производный'

}

// Вывод: 'базовый', а не 'производный'

const d = new Derived()
Что здесь происходит?
Порядок инициализации согласно спецификации следующий:
-
Инициализация полей базового класса
-
Запуск конструктора базового класса
-
Инициализация полей производного класса
-
Запуск конструктора производного класса
Это означает, что конструктор базового класса использует собственное значение name, поскольку поля производного класса в этот момент еще не инициализированы.
Наследование встроенных типов
В ES2015 конструкторы, неявно возвращающие объекты, заменяют значение this для любого вызова super. Для генерируемого конструктора важно перехватывать потенциальное значение, возвращаемое super, и заменять его значением this.
Поэтому подклассы Error, Array и др. могут работать не так, как ожидается. Это объясняется тем, что Error, Array и др. используют new.target из ES6 для определения цепочки прототипов; определить значение new.target в ES5 невозможно. Другие компиляторы, обычно, имеют такие же ограничения.
Для такого подкласса:
class MsgError extends Error {

  constructor(m: string) {

    super(m)

  }

  sayHello() {

    return 'Привет ' + this.message

  }

}
вы можете обнаружить, что:
-
методы объектов, возвращаемых при создании подклассов, могут иметь значение
undefined, поэтому вызовsayHelloзавершится ошибкой -
instanceofсломается между экземплярами подкласса и их экземплярами, поэтому (new MsgError())instanceof MsgErrorвозвращаетfalse
Для решения данной проблемы можно явно устанавливать прототип сразу после вызова super.
class MsgError extends Error {

  constructor(m: string) {

    super(m)

    // Явно устанавливаем прототип

    Object.setPrototypeOf(this, MsgError.prototype)

  }

  sayHello() {

    return 'Привет ' + this.message

  }

}
Тем не менее, любой подкласс MsgError также должен будет вручную устанавливать прототип. В среде выполнения, в которой не поддерживается Object.setPrototypeOf, можно использовать __proto__.
Видимость членов (member visibility)
Мы можем использовать TS для определения видимости методов и свойств для внешнего кода, т.е. кода, находящегося за пределами класса.
public
По умолчанию видимость членов класса имеет значение public. Публичный член доступен везде:
class Greeter {

  public greet() {

    console.log('Привет!')

  }

}

const g = new Greeter()

g.greet()
Поскольку public является дефолтным значением, специально указывать его не обязательно, но это повышает читаемость и улучшает стиль кода.
protected
Защищенные члены видимы только для подклассов класса, в котором они определены.
class Greeter {

  public greet() {

    console.log('Привет, ' + this.getName())

  }

  protected getName() {

    return 'народ!'

  }

}

class SpecialGreeter extends Greeter {

  public howdy() {

    // Здесь защищенный член доступен

    console.log('Здорово, ' + this.getName())

  }

}

const g = new SpecialGreeter()

g.greet() // OK

g.getName()

// Property 'getName' is protected and only accessible within class 'Greeter' and its subclasses.

// Свойство 'getName' является защищенным и доступно только в классе 'Greeter' и его подклассах
Раскрытие защищенных членов
Производные классы должны следовать контракту базового класса, но могут расширять подтипы базового класса дополнительными возможностями. Это включает в себя перевод protected членов в статус public:
class Base {

  protected m = 10

}

class Derived extends Base {

  // Модификатор отсутствует, поэтому значением по умолчанию является `public`

  m = 15

}

const d = new Derived()

console.log(d.m) // OK
Обратите внимание, что в производной классе для сохранения «защищенности» члена необходимо повторно указывать модификатор protected.
Доступ к защищенным членам за пределами иерархии классов
Разные языки ООП по-разному подходят к доступу к защищенным членам из базового класса:
class Base {

  protected x: number = 1

}

class Derived1 extends Base {

  protected x: number = 5

}

class Derived2 extends Base {

  f1(other: Derived2) {

    other.x = 10

  }

  f2(other: Base) {

    other.x = 10

    // Property 'x' is protected and only accessible through an instance of class 'Derived2'. This is an instance of class 'Base'.

    // Свойство 'x' является защищенным и доступно только через экземпляр класса 'Derived2'. А это — экземпляр класса 'Base'

  }

}
Java, например, считает такой подход легальным, а C# и C++ нет.
TS считает такой подход нелегальным, поскольку доступ к x из Derived2 должен быть легальным только в подклассах Derived2, а Derived1 не является одним из них.
private
Частные члены похожи на защищенные, но не доступны даже в подклассах, т.е. они доступны только в том классе, где они определены.
class Base {

  private x = 0

}

const b = new Base()

// Снаружи класса доступ получить нельзя

console.log(b.x)

// Property 'x' is private and only accessible within class 'Base'.

class Derived extends Base {

  showX() {

    // В подклассе доступ получить также нельзя

    console.log(this.x)

    // Property 'x' is private and only accessible within class 'Base'.

  }

}
Поскольку частные члены невидимы для производных классов, производный класс не может изменять их видимость:
class Base {

  private x = 0

}

class Derived extends Base {

  // Class 'Derived' incorrectly extends base class 'Base'. Property 'x' is private in type 'Base' but not in type 'Derived'.

  // Класс 'Derived' неправильно расширяет базовый класс 'Base'. Свойство 'x' является частным в типе 'Base', но не в типе 'Derived'

  x = 1

}
Доступ к защищенным членам между экземплярами
Разные языки ООП также по-разному подходят к предоставлению доступа экземплярам одного класса к защищенным членам друг друга. Такие языки как Java, C#, C++, Swift и PHP разрешают такой доступ, а Ruby нет.
TS разрешает такой доступ:
class A {

  private x = 10

  public sameAs(other: A) {

    // Ошибки не возникает

    return other.x === this.x

  }

}
Предостережение
Подобно другим аспектам системы типов TS, private и protected оказывают влияние на код только во время проверки типов. Это означает, что конструкции вроде in или простой перебор свойств имеют доступ к частным и защищенным членам:
class MySafe {

  private secretKey = 12345

}

// В JS-файле...

const s = new MySafe()

// Вывод 12345

console.log(s.secretKey)
Для реализации «настоящих» частных членов можно использовать такие механизмы, как замыкания (closures), слабые карты (weak maps) или синтаксис приватных полей класса (private fields, #).
Статические члены (static members)
В классах могут определеяться статические члены. Такие члены не связаны с конкретными экземплярами класса. Они доступны через объект конструктора класса:
class MyClass {

  static x = 0

  static printX() {

    console.log(MyClass.x)

  }

}

console.log(MyClass.x)

MyClass.printX()
К статическим членам также могут применяться модификаторы public, protected и private:
class MyClass {

  private static x = 0

}

console.log(MyClass.x)

// Property 'x' is private and only accessible within class 'MyClass'.
Статические члены наследуются:
class Base {

  static getGreeting() {

    return 'Привет, народ!'

  }

}

class Derived extends Base {

  myGreeting = Derived.getGreeting()

}
Специальные названия статических членов
Изменение прототипа Function считается плохой практикой. Поскольку классы — это функции, вызываемые с помощью new, некоторые слова нельзя использовать в качестве названий статических членов. К таким словам относятся, в частности, свойства функций name, length и call:
class S {

  static name = 'S!'

  // Static property 'name' conflicts with built-in property 'Function.name' of constructor function 'S'.

  // Статическое свойство 'name' вступает в конфликт со встроенным свойством 'Function.name' функции-конструктора 'S'

}
Почему не существует статических классов?
В некоторых языках, таких как C# или Java существует такая конструкция, как статический класс (static class).
Существование этих конструкций обусловлено тем, что в названных языках все данные и функции должны находиться внутри классов; в TS такого ограничения не существует, поэтому в статических классах нет никакой необходимости.
Например, нам не нужен синтаксис «статического класса», поскольку обычный объект (или функция верхнего уровня) прекрасно справляются с такими задачами:
// Ненужный «статический» класс

class MyStaticClass {

  static doSomething() {}

}

// Альтернатива 1

function doSomething() {}

// Альтернатива 2

const MyHelperObject = {

  dosomething() {},

}
Общие классы (generic classes)
Классы, подобно интерфейсам, могут быть общими. Когда общий класс инстанцируется с помощью new, его параметры типа предполагаются точно также, как и при вызове функции:
class Box<Type> {

  contents: Type

  constructor(value: Type) {

    this.contents = value

  }

}

const b = new Box('Привет!')

    // const b: Box<string>
В классах, как и в интерфейсах, могут использоваться ограничения дженериков и значения по умолчанию.
Параметр типа в статических членах
Следующий код, как ни странно, является НЕлегальным:
class Box<Type> {

  static defaultValue: Type

  // Static members cannot reference class type parameters.

  // Статические члены не могут ссылаться на типы параметров класса

}
Запомните, что типы полностью удаляются! Во время выполнения существует только один слот Box.defaultValue. Это означает, что установка Box<string>.defaultValue (если бы это было возможным) изменила бы Box<number>.defaultValue, что не есть хорошо. Поэтому статические члены общих классов не могут ссылаться на параметры типа класса.
Значение this в классах во время выполнения кода
TS не изменяет поведения JS во время выполнения. Обработка this в JS может показаться необычной:
class MyClass {

  name = 'класс'

  getName() {

    return this.name

  }

}

const c = new MyClass()

const obj = {

  name: 'объект',

  getName: c.getName,

}

// Выводится 'объект', а не 'класс'

console.log(obj.getName())
Если кратко, то значение this внутри функции зависит от того, как эта функция вызывается. В приведенном примере, поскольку функция вызывается через ссылку на obj, значением this является obj, а не экземпляр класса.
TS предоставляет некоторые средства для изменения такого поведения.
Стрелочные функции
Если у вас имеется функция, которая часто будет вызываться способом, приводящим к потере контекста, имеет смысл определить такое свойство в виде стрелочной функции:
class MyClass {

  name = 'класс'

  getName = () => {

    return this.name

  }

}

const c = new MyClass()

const g = c.getName

// Выводится 'класс'

console.log(g())
Это требует некоторых компромиссов:
-
Значение
thisбудет гарантированно правильным во время выполнения, даже в коде, не прошедшем проверки с помощьюTS -
Будет использоваться больше памяти, поскольку для каждого экземпляра класса будет создаваться новая функция
-
В производном классе нельзя будет использовать
super.getName, поскольку отсутствует входная точка для получения метода базового класса в цепочке прототипов
Параметры this
При определении метода или функции начальный параметр под названием this имеет особое значение в TS. Данный параметр удаляется во время компиляции:
// TS

function fn(this: SomeType, x: number) {

  /* ... */

}

// JS

function fn(x) {

  /* ... */

}
TS проверяет, что функция с параметром this вызывается в правильном контексте. Вместо использования стрелочной функции мы можем добавить параметр this в определение метода для обеспечения корректности его вызова:
class MyClass {

  name = 'класс'

  getName(this: MyClass) {

    return this.name

  }

}

const c = new MyClass()

// OK

c.getName()

// Ошибка

const g = c.getName

console.log(g())

// The 'this' context of type 'void' is not assignable to method's 'this' of type 'MyClass'.

// Контекст 'this' типа 'void' не может быть присвоен методу 'this' типа 'MyClass'
Данный подход также сопряжен с несколькими органичениями:
-
Мы все еще имеем возможность вызывать метод неправильно
-
Выделяется только одна функция для каждого определения класса, а не для каждого экземпляра класса
-
Базовые определения методов могут по-прежнему вызываться через
super
Типы this
В классах специальный тип this динамически ссылается на тип текущего класса:
class Box {

  contents: string = ''

  set(value: string) {

  // (method) Box.set(value: string): this

    this.contents = value

    return this

  }

}
Здесь TS предполагает, что типом this является тип, возвращаемый set, а не Box. Создадим подкласс Box:
class ClearableBox extends Box {

  clear() {

    this.contents = ''

  }

}

const a = new ClearableBox()

const b = a.set('привет')

  // const b: ClearableBox
Мы также можем использовать this в аннотации типа параметра:
class Box {

  content: string = ''

  sameAs(other: this) {

    return other.content === this.content

  }

}
Это отличается от other: Box — если у нас имеется производный класс, его метод sameAs будет принимать только другие экземпляры этого производного класса:
class Box {

  content: string = ''

  sameAs(other: this) {

    return other.content === this.content

  }

}

class DerivedBox extends Box {

  otherContent: string = '?'

}

const base = new Box()

const derived = new DerivedBox()

derived.sameAs(base)

// Argument of type 'Box' is not assignable to parameter of type 'DerivedBox'. Property 'otherContent' is missing in type 'Box' but required in type 'DerivedBox'.
Основанные на this защитники типа
Мы можем использовать this is Type в качестве возвращаемого типа в методах классов и интерфейсах. В сочетании с сужением типов (например, с помощью инструкции if), тип целевого объекта может быть сведен к более конкретному Type.
class FileSystemObject {

  isFile(): this is FileRep {

    return this instanceof FileRep

  }

  isDirectory(): this is Directory {

    return this instanceof Directory

  }

  isNetworked(): this is Networked & this {

    return this.networked

  }

  constructor(public path: string, private networked: boolean) {}

}

class FileRep extends FileSystemObject {

  constructor(path: string, public content: string) {

    super(path, false)

  }

}

class Directory extends FileSystemObject {

  children: FileSystemObject[]

}

interface Networked {

  host: string

}

const fso: FileSystemObject = new FileRep('foo/bar.txt', 'foo')

if (fso.isFile()) {

  fso.content

  // const fso: FileRep

} else if (fso.isDirectory()) {

  fso.children

  // const fso: Directory

} else if (fso.isNetworked()) {

  fso.host

  // const fso: Networked & FileSystemObject

}
Распространенным случаем использования защитников или предохранителей типа (type guards) на основе this является «ленивая» валидация определенного поля. В следующем примере мы удаляем undefined из значения, содержащегося в box, когда hasValue проверяется на истинность:
class Box<T> {

  value?: T

  hasValue(): this is { value: T } {

    return this.value !== undefined

  }

}

const box = new Box()

box.value = 'Gameboy'

box.value

// (property) Box<unknown>.value?: unknown

if (box.hasValue()) {

  box.value

  // (property) value: unknown

}
Свойства параметров
TS предоставляет специальный синтаксис для преобразования параметров конструктора в свойства класса с аналогичными названиями и значениями. Это называется свойствами параметров (или параметризованными свойствами), такие свойства создаются с помощью добавления модификаторов public, private, protected или readonly к аргументам конструктора. Создаваемые поля получают те же модификаторы:
class Params {

  constructor(

    public readonly x: number,

    protected y: number,

    private z: number

  ) {

    // ...

  }

}

const a = new Params(1, 2, 3)

console.log(a.x)

        // (property) Params.x: number

console.log(a.z)

// Property 'z' is private and only accessible within class 'Params'.
Выражения классов (class expressions)
Выражения классов похожи на определения классов. Единственным отличием между ними является то, что выражения классов не нуждаются в названии, мы можем ссылаться на них с помощью любого идентификатора, к которому они привязаны (bound):
const someClass = class<Type> {

  content: Type

  constructor(value: Type) {

    this.content = value

  }

}

const m = new someClass('Привет, народ!')

// const m: someClass<string>
Абстрактные классы и члены
Классы, методы и поля в TS могут быть абстрактными.
Абстрактным называется метод или поле, которые не имеют реализации. Такие методы и поля должны находится внутри абстрактного класса, который не может инстанцироваться напрямую.
Абстрактные классы выступают в роли базовых классов для подклассов, которые реализуют абстрактных членов. При отсутствии абстрактных членов класс считается конкретным (concrete).
Рассмотрим пример:
abstract class Base {

  abstract getName(): string

  printName() {

    console.log('Привет, ' + this.getName())

  }

}

const b = new Base()

// Cannot create an instance of an abstract class.

// Невозможно создать экземпляр абстрактного класса
Мы не можем инстанцировать Base с помощью new, поскольку он является абстрактным. Вместо этого, мы должны создать производный класс и реализовать всех абстрактных членов:
class Derived extends Base {

  getName() {

    return 'народ!'

  }

}

const d = new Derived()

d.printName()
Обратите внимание: если мы забудем реализовать абстрактных членов, то получим ошибку:
class Derived extends Base {

  // Non-abstract class 'Derived' does not implement inherited abstract member 'getName' from class 'Base'.

  // Неабстрактный класс 'Derived' не реализует унаследованный от класса 'Base' абстрактный член 'getName'

  // Забыли про необходимость реализации абстрактных членов

}
Сигнатуры абстрактных конструкций (abstract construct signatures)
Иногда нам требуется конструктор класса, создающий экземпляр класса, производный от некоторого абстрактного класса.
Рассмотрим пример:
function greet(ctor: typeof Base) {

  const instance = new ctor()

  // Cannot create an instance of an abstract class.

  instance.printName()

}
TS сообщает нам о том, что мы пытаемся создать экземпляр абстрактного класса. Тем не менее, имея определение greet, мы вполне можем создать абстрактный класс:
// Плохо!

greet(Base)
Вместо этого, мы можем написать функцию, которая принимает нечто с сигнатурой конструктора:
function greet(ctor: new () => Base) {

  const instance = new ctor()

  instance.printName()

}

greet(Derived)

greet(Base)

/*

  Argument of type 'typeof Base' is not assignable to parameter of type 'new () => Base'.

    Cannot assign an abstract constructor type to a non-abstract constructor type.

*/

/*

  Аргумент типа 'typeof Base' не может быть присвоен параметру типа 'new () => Base'.

    Невозможно присвоить тип абстрактного конструктора типу неабстрактного конструктора

*/
Теперь TS правильно указывает нам на то, какой конструктор может быть вызван — Derived может, а Base нет.
Отношения между классами
В большинстве случаев классы в TS сравниваются структурно, подобно другим типам.
Например, следующие два класса являются взаимозаменяемыми, поскольку они идентичны:
class Point1 {

  x = 0

  y = 0

}

class Point2 {

  x = 0

  y = 0

}

// OK

const p: Point1 = new Point2()
Также существуют отношения между подтипами, даже при отсутствии явного наследования:
class Person {

  name: string

  age: number

}

class Employee {

  name: string

  age: number

  salary: number

}

// OK

const p: Person = new Employee()
Однако, существует одно исключение.
Пустые классы не имеют членов. В структурном отношении такие классы являются «супертипами» для любых других типов. Так что, если мы создадим пустой класс (не надо этого делать!), вместо него можно будет использовать что угодно:
class Empty {}

function fn(x: Empty) {

  // С `x` можно делать что угодно

}

// OK!

fn(window)

fn({})

fn(fn)
Облачные серверы от Маклауд быстрые и безопасные.
Зарегистрируйтесь по ссылке выше или кликнув на баннер и получите 10% скидку на первый месяц аренды сервера любой конфигурации!

I really enjoy the idea of having custom Error types in JavaScript. And, I really like the idea of wrapping one error inside of another error, creating nested Russian-doll-style objects as exceptions bubble up to the surface of the application. But, as much as JavaScript is super dynamic, the constraints of TypeScript make this a bit harder. As such, I wanted to experiment with sub-classing the native Error object in TypeScript, specifically with an ES5 transpilation target.
Run this demo in my JavaScript Demos project on GitHub.
To be clear, if your browser / JavaScript runtime supports ES6, extending the native Error object becomes a trivial matter because ES6 now supports the extension of native Constructors. But, ES6 support hasn’t landed in all of the browsers, especially some of the slightly older ones; so, I still use ES5 as my transpilation target in System.js. And, since ES5 doesn’t support the simplified Class syntax, extending the Error object in ES5 means manually adjusting the Prototype chain.
Of course, in TypeScript, we can use the simplified Class syntax instead of mucking with the Prototype because TypeScript takes care of those details behind the scenes during the transpilation process. Unfortunately, this still doesn’t work with native constructors like Error and Array. As such, we have to apply a little more elbow grease to get custom errors working in TypeScript and ES5.
After a few mornings of trial-and-error, the solution that I came up with is to use a «hacky intermediary Class» that blurs the lines between TypeScript’s syntactic sugar and the actual JavaScript implementation of prototypal inheritance. With this approach, the custom Error Sub-Class doesn’t extend «Error» directly, but rather, extends «ErrorSubclass». This ErrorSubclass then takes care of writing up the prototype chain, capturing the stacktrace, and ensuring proper TypeScript type validation.
Let’s take a look at this intermediary ErrorSubclass:
interface ErrorSubclass extends Error {
	// Here, we are defining an interface - ErrorSubclass - that shares the same name as
	// our class. In TypeScript, this allows us to define aspects of the Class that we
	// don't actually have to implement in the class definition. In this case, we're
	// using the interface to tell TypeScript that ErrorSubclass extends Error even
	// though our class definition doesn't use "extends". We're doing this here so that
	// TypeScript doesn't try to implement the extends on the class itself - we're going
	// to do it explicitly with the .prototype.
}

// I am a "hacky" class that helps extend the core Error object in TypeScript. This
// class uses a combination of TypeScript and old-school JavaScript configurations.
class ErrorSubclass {

	public name: string;
	public message: string;
	public stack: string;

	// I initialize the Error subclass hack / intermediary class.
	constructor( message: string ) {

		this.name = "ErrorSubclass";
		this.message = message;

		// CAUTION: This doesn't appear to work in IE, but does work in Edge. In
		// IE, it shows up as undefined.
		this.stack = ( new Error( message ) ).stack;

	}

}

// CAUTION: Instead of using the "extends" on the Class, we're going to explicitly
// define the prototype as extending the Error object.
ErrorSubclass.prototype = <any>Object.create( Error.prototype );
The first thing you might notice here is that we have an Interface and a Class that both use the same identifier, ErrorSubclass. This is a feature of TypeScript that allows us to declare an interface for a class that doesn’t necessarily implement said interface «cleanly.» In this case, we’re telling TypeScript that our ErrorSubclass extends the Error interface; but, as you can see, our actual ErrorSubclass definition doesn’t extend Error. Instead, we’re explicitly setting the prototype of our ErrorSubclass to extend the prototype of the Error constructor.
NOTE: This is the basic approach to Custom Errors outlined in the Mozilla Developer Network (MDN).
The interface, in this case, allows for better Type validation in TypeScript itself, such as allowing a sub-class to be auto-cast to a super-class. And, the explicit prototype chain then allows for things like «instanceof» to work with both the sub-class and the super-class (Error).
CAUTION: We can only monkey with the prototype chain in this case because our ErrorSublcass defines no public methods. If it defined a public method, our attempt to explicitly set the prototype chain would break the class definition.
Once we have this hybrid TypeScript / JavaScript class definition in place, we can then subclass the Error object using the «extends» concept in our custom error TypeScript classes. To see this in action, let’s create a custom AppError class that builds on the Error object — by extending ErrorSubclass — adding additional reporting properties.
In the following demo, we’re going to throw an Error object. Then, we’re going to catch it and wrap it in a custom Error sub-class — AppError — which we’ll then rethrow:
// NOTE: If you browser supports ES6, you can simply "extends Error". But, not all
// browsers support ES6 class definitions yet.

interface ErrorSubclass extends Error {
	// Here, we are defining an interface - ErrorSubclass - that shares the same name as
	// our class. In TypeScript, this allows us to define aspects of the Class that we
	// don't actually have to implement in the class definition. In this case, we're
	// using the interface to tell TypeScript that ErrorSubclass extends Error even
	// though our class definition doesn't use "extends". We're doing this here so that
	// TypeScript doesn't try to implement the extends on the class itself - we're going
	// to do it explicitly with the .prototype.
}

// I am a "hacky" class that helps extend the core Error object in TypeScript. This
// class uses a combination of TypeScript and old-school JavaScript configurations.
class ErrorSubclass {

	public name: string;
	public message: string;
	public stack: string;

	// I initialize the Error subclass hack / intermediary class.
	constructor( message: string ) {

		this.name = "ErrorSubclass";
		this.message = message;

		// CAUTION: This doesn't appear to work in IE, but does work in Edge. In
		// IE, it shows up as undefined.
		this.stack = ( new Error( message ) ).stack;

	}

}

// CAUTION: Instead of using the "extends" on the Class, we're going to explicitly
// define the prototype as extending the Error object.
ErrorSubclass.prototype = <any>Object.create( Error.prototype );


// ----------------------------------------------------------------------------------- //
// ----------------------------------------------------------------------------------- //


interface AppErrorOptions {
	message: string;
	detail?: string;
	extendedInfo?: string;
	code?: string;
	rootError?: any;
}

class AppError extends ErrorSubclass {

	public name: string;
	public detail: string;
	public extendedInfo: string;
	public code: string;
	public rootError: any;


	// I initialize the AppError with the given options.
	constructor( options: AppErrorOptions ) {

		super( options.message );

		this.name = "AppError";
		this.detail = ( options.detail || "" );
		this.extendedInfo = ( options.extendedInfo || "" );
		this.code = ( options.code || "" );
		this.rootError = ( options.rootError || null );

	}


	// ---
	// PUBLIC METHODS.
	// ---


	// I am here to ensure that public methods can work with a Class that extends an
	// object that extends Error.
	public testPublicMethod() : string {

		return( "Public method exists on the Error sub-class." );

	}

}


// ----------------------------------------------------------------------------------- //
// ----------------------------------------------------------------------------------- //


try {

	throw( new Error( "Boom!" ) );

// NOTE: The value in a catch() block has an implicit ANY type and cannot be given a more
// specific type annotation. This makes sense because there's no way to consistently know
// the root cause of an error at compile time.
} catch ( error ) {

	logError( <Error>error );

	try {

		// Wrap the caught error in a custom AppError.
		throw(
			new AppError({
				message: "Something went horribly wrong!",
				detail: "You crossed the streams!",
				code: "gb",
				rootError: error
			})
		);

	} catch ( nestedError ) {

		// NOTE: Using TypeScript to cast the "any" type in the catch-block to an
		// explicit AppError. This way, we can see if the AppError correctly fits into
		// the "Error" type expected by the logError() function.
		logError( <AppError>nestedError );

		// Test to make sure the public method works (ie, that inheritance worked
		// without screwing up the concrete class).
		console.info( nestedError.testPublicMethod() );

	}

}


// ----------------------------------------------------------------------------------- //
// ----------------------------------------------------------------------------------- //


// I log the given error object to the console.
function logError( error: Error ) : void {

	group( "Log Error" );
	console.log( "Error instance: ", ( error instanceof Error ) );
	console.log( "AppError instance: ", ( error instanceof AppError ) );
	console.log( "Message: " + error.message );

	// If we're dealing with an AppError, we can output additional properties.
	// --
	// NOTE: In TypeScript, this IF-expression is known as a "Type Guard", and will
	// tell TypeScript to treat the "error" value as an instance of "AppError" for the
	// following block, which is great because we will get the extra type-protection
	// for the values on the AppError class.
	if ( error instanceof AppError ) {

		console.log( "Detail: " + error.detail );
		console.log( "Extended Info: " + error.extendedInfo );
		console.log( "Code: " + error.code );
		console.log( "Root Error: " + error.rootError.message );

	}

	// NOTE: The .stack property is only populated in IE 10+ AND, even then, only when
	// an error instance is thrown. Also, it looks like this might not get populated on
	// sub-classes in
	console.log( error.stack );
	groupEnd();

}


// ----------------------------------------------------------------------------------- //
// ----------------------------------------------------------------------------------- //


// I safely define a "console.group()" method, which is not available in some IE.
function group( name: string ) : void {

	console.group
		? console.group( name )
		: console.log( "- - - [ " + name + " ] - - - - - - - - - - - - - -" )
	;

}


// I safely define a "console.groupEnd()" method, which is not available in some IE.
function groupEnd() : void {

	console.groupEnd
		? console.groupEnd()
		: console.log( "- - - [ END ] - - - - - - - - - - - - - -" )
	;

}
As you can see, our AppError class uses pure TypeScript, extending the ErrorSubclass «intermediary class» that we discussed above. But, there a number of more subtle details that are worth pointing out.
First, we pass (and down-cast) both the core <Error> object and our custom <AppError> object to a method that expects an argument of type Error. This demonstrates that TypeScript sees AppError as a true subclass of the Error object, thanks to the «interface hack» that we used when defining the intermediary ErrorSubclass.
Second, the instanceof operator works as expected with both the Error and the AppError instances. This works because we explicitly set the prototype chain in our intermediary ErrorSubclass definition.
Third, we can use instanceof within the log-method to create what’s known as a Type Guard in TypeScript. If we branch our logic using instanceof, TypeScript is smart enough to know that the scope of said IF-block should treat the value as the tested class Type. This way, we actually get the full power of type-safety even though our log-method parameter was defined according to the super-class.
Anyway, when we run this code, we get the following output:
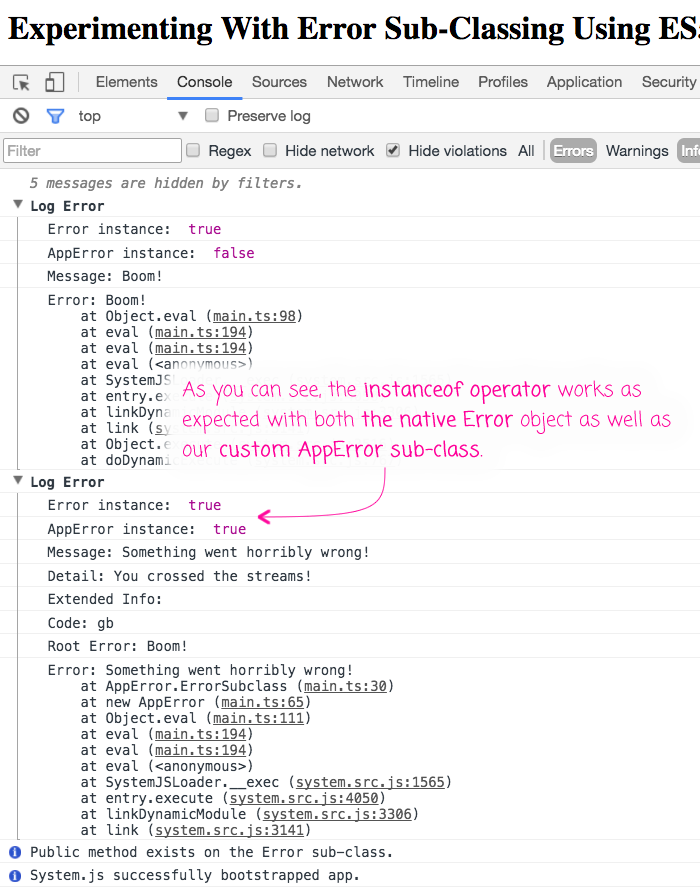
As you can see, we were able to subclass the core Error object in TypeScript with an ES5 transpilation target. This was only possible because of the intermediary ErrorSubclass class that blurred the line between TypeScript and ES5 / JavaScript. This might seem like a lot of work; but, think about it — now that we have the ErrorSubclass defined, any other custom Error object should be trivial to create.
The one thing that seems to break with custom Error objects — regardless of TypeScript — is the .stack property in IE. It looks like IE won’t populate this property (even in IE10+) until Microsoft switches over to the Edge browser.
To be clear, this is just the solution that I came up with for extending the core Error object in TypeScript — it’s not necessary the best solution. It was just a bunch of trial-and-error. The nice thing about it, though, is that when you want to upgrade to an ES6-compliant runtime, you just need to replace «extends ErrorSubclass» with «extends Error» and everything else should just work.
Want to use code from this post?
Check out the license.
1. Introduction to the topic
1.1. Overview
Error handling is pain. You can get pretty far without handling errors correctly, but the bigger the application, the bigger the problems you’re going to face. To really take your API building to the next level, you should tackle the challenge head-on. Error handling is a broad subject, and it can be done in many ways, depending on the application, technologies and more. It’s one of those things that are easy to understand, but hard to fully grasp.
1.2. What we’ll be doing
In this article, we’re going to explain a beginner-friendly way of handling errors in Node.js + Express.js API with TypeScript. We are going to explain what an error is, different types of errors that can crop up and how to handle them in our application. Here are some of the things we’ll be doing in the next chapters:
- learning what “error handling” really is and the types of errors that you’ll encounter
- learning about the Node.js
Errorobject and how can we use it - learning how to create custom error classes and how they can help us develop better APIs and Node applications
- learning about Express middleware and how to use them to handle our errors
- learning how to structure the error information and present it to the consumer and developer
1.3. Prerequisites
DISCLAMER! This article assumes you already know some stuff. Even though this is beginner-friendly, here’s what you should know to get the most out of this article:
- working knowledge of Node.js
- working knowledge of Express.js (routes, middleware and such)
- basics of TypeScript (and classes!)
- basics of how an API works and is written using Express.js
Okay. We can begin.
2. What is error handling and why do you need it?
So what exactly is “error handling” really?
Error handling (or exception handling) is the process of responding to the occurrence of errors (anomalous/unwanted behaviour) during the execution of a program.
Why do we need error handling?
Because we want to make bug fixing less painful. It also helps us write cleaner code since all error handling code is centralized, instead of handling errors wherever we think they might crop up. In the end — the code is more organized, you repeat yourself less and it reduces development and maintenance time.
3. Types of errors
There are two main types of errors that we need to differentiate and handle accordingly.
3.1. Operational Errors
Operational errors represent runtime problems. They are not necessarily “bugs”, but are external circumstances that can disrupt the flow of program execution. Even though they’re not errors in your code, these situations can (and inevitably will) happen and they need to be handled. Here are some examples:
- An API request fails for some reason (e.g., the server is down or the rate limit is exceeded)
- A database connection cannot be established
- The user sends invalid input data
- system ran out of memory
3.2. Programmer errors
Programmer errors are the real “bugs” and so, they represent issues in the code itself. As mistakes in the syntax or logic of the program, they can be only resolved by changing the source code. Here are some examples of programmer errors:
- Trying to read a property on an object that is not defined
- passing incorrect parameters in a function
- not catching a rejected promise
4. What is a Node error?
Node.js has a built-in object called Error that we will use as our base to throw errors. When thrown, it has a set of information that will tell us where the error happened, the type of error and what is the problem. The Node.js documentation has a more in-depth explanation.
We can create an error like this:
const error = new Error('Error message');
Enter fullscreen mode
Exit fullscreen mode
Okay, so we gave it a string parameter which will be the error message. But what else does this Error have? Since we’re using typescript, we can check its definition, which will lead us to a typescript interface:
interface Error {
    name: string;
    message: string;
    stack?: string;
}
Enter fullscreen mode
Exit fullscreen mode
Name and message are self-explanatory, while stack contains the name, message and a string describing the point in the code at which the Error was instantiated. This stack is actually a series of stack frames (learn more about it here). Each frame describes a call site within the code that lead to the error being generated. We can console.log() the stack,
console.log(error.stack)
Enter fullscreen mode
Exit fullscreen mode
and see what it can tell us. Here’s an example of an error we get when passing a string as an argument to the JSON.parse() function (which will fail, since JSON.parse() only takes in JSON data in a string format):

As we can see, this error is of type SyntaxError, with the message “Unexpected token A in JSON at position 0”. Underneath, we can see the stack frames. This is valuable information we as a developer can use to debug our code and figure out where the problem is — and fix it.
5. Writing custom error classes
5.1. Custom error classes
As I mentioned before, we can use the built-in Error object, as it gives us valuable information.
However, when writing our API we often need to give our developers and consumers of the API a bit more information, so we can make their (and our) life easier.
To do that, we can write a class that will extend the Error class with a bit more data.
class BaseError extends Error {
  statusCode: number;

  constructor(statusCode: number, message: string) {
    super(message);

    Object.setPrototypeOf(this, new.target.prototype);
    this.name = Error.name;
    this.statusCode = statusCode;
    Error.captureStackTrace(this);
  }
}
Enter fullscreen mode
Exit fullscreen mode
Here we’re creating a BaseError class that extends the Error class. The object takes a statusCode (HTTP status code we will return to the user) and a message (error message, just like when creating Node’s built-in Error object).
Now we can use the BaseError instead of Node’s Error class to add the HTTP status code.
// Import the class
import { BaseError } from '../utils/error';

const extendedError = new BaseError(400, 'message');
Enter fullscreen mode
Exit fullscreen mode
We will use this BaseError class as our base for all our custom errors.
Now we can use the BaseError class to extend it and create all our custom errors. These depend on our application needs. For example, if we’re going to have authentication endpoints in our API, we can extend the BaseError class and create an AuthenticationError class like this:
class AuthenticationError extends BaseError {}
Enter fullscreen mode
Exit fullscreen mode
It will use the same constructor as our BaseError, but once we use it in our code it will make reading and debugging code much easier.
Now that we know how to extend the Error object, we can go a step further.
A common error we might need is a “not found” error. Let’s say we have an endpoint where the user specifies a product ID and we try to fetch it from a database. In case we get no results back for that ID, we want to tell the user that the product was not found.
Since we’re probably going to use the same logic for more than just Products (for example Users, Carts, Locations), let’s make this error reusable.
Let’s extend the BaseError class but now, let’s make the status code default to 404 and put a “property” argument in the constructor:
class NotFoundError extends BaseError {
  propertyName: string;

  constructor(propertyName: string) {
    super(404, `Property '${propertyName}' not found.`);

    this.propertyName = propertyName;
  }
}
Enter fullscreen mode
Exit fullscreen mode
Now when using the NotFoundError class, we can just give it the property name, and the object will construct the full message for us (statusCode will default to 404 as you can see from the code).
// This is how we can use the error
const notFoundError = new NotFoundError('Product');
Enter fullscreen mode
Exit fullscreen mode
And this is how it looks when it’s thrown:

Now we can create different errors that suit our needs. Some of the most common examples for an API would be:
- ValidationError (errors you can use when handling incoming user data)
- DatabaseError (errors you can use to inform the user that there’s a problem with communicating with the database)
- AuthenticationError (error you can use to signal to the user there’s an authentication error)
5.2. Going a step further
Armed with this knowledge, you can go a step further. Depending on your needs, you can add an errorCode to the BaseError class, and then use it in some of your custom error classes to make the errors more readable to the consumer.
For example, you can use the error codes in the AuthenticationError to tell the consumer the type of auth error. A01 can mean the user is not verified, while A02 can mean that the reset password link has expired.
Think about your application’s needs, and try to make it as simple as possible.
5.3. Creating and catching errors in controllers
Now let’s take a look at a sample controller (route function) in Express.js
const sampleController = (req: Request, res: Response, next: NextFunction) => {

  res.status(200).json({
    response: 'successfull',
    data: {
      answer: 42
    }
  });
};
Enter fullscreen mode
Exit fullscreen mode
Let’s try to use our custom error class NotFoundError. Let’s use the next() function to pass our custom error object to the next middleware function that will catch the error and take care of it (don’t worry about it, I’ll explain how to catch errors in a minute).
const sampleController = async (req: Request, res: Response, next: NextFunction) => {

    return next(new NotFoundError('Product'))

  res.status(200).json({
    response: 'successfull',
    data: {
      answer: 42
    }
  });
};
Enter fullscreen mode
Exit fullscreen mode
This will successfully stop the execution of this function and pass the error to the next middleware function. So, this is it?
Not quite. We still need to handle errors we don’t handle through our custom errors.
5.4. Unhandled mistakes
For example, let’s say you write a piece of code that passes all syntax checks, but will throw an error at runtime. These mistakes can happen, and they will. How do we handle them?
Let’s say you want to use the JSON.parse() function. This function takes in JSON data formated as a string, but you give it a random string. Giving this promise-based function a string will cause it to throw an error! If not handled, it will throw an UnhandledPromiseRejectionWarning error.

Well, just wrap your code inside a try/catch block, and pass any errors down the middleware line using next() (again, I will explain this soon)!
And this really will work. This is not a bad practice, since all errors resulting from promise-based code will be caught inside the .catch() block. This has a downside though, and it’s the fact that your controller files will be full of repeated try/catch blocks, and we don’t want to repeat ourselves. Luckily, we do have another ace up our sleeve.
5.5. handleAsync wrapper
Since we don’t want to write our try/catch blocks in every controller (route function), we can write a middleware function that does that once, and then apply it on every controller.
Here’s how it looks:
const asyncHandler = (fn: any) => (req: Request, res: Response, next: NextFunction) => Promise.resolve(fn(req, res, next)).catch(next);
Enter fullscreen mode
Exit fullscreen mode
It may look complicated at first, but it’s just a middleware function that acts as a try/catch block with next(err) inside the catch(). Now, we can just wrap it around our controllers and that’s it!
const sampleController = asyncHandler(async (req: Request, res: Response, next: NextFunction) => {
  JSON.parse('A string');

  res.status(200).json({
    response: 'successfull',
    data: {
      something: 2
    }
  });
});
Enter fullscreen mode
Exit fullscreen mode
Now, if the same error is thrown, we won’t get an UnhandledPromiseRejectionWarning, instead, our error handling code will successfully respond and log the error (once we finish writing it, of course. Here’s how it will look like):


6. How do I handle errors?
Okay, we learned how to create errors. Now what?
Now we need to figure out how to actually handle them.
6.1. Express middlewares
An express application is essentially a series of middleware function calls. A middleware function has access to the request object, the response object, and the next middleware function.
Express with route each incoming request through these middlewares, from the first down the chain, until the response is sent to the client. Each middleware function can either pass the request to the next middleware with the next() function, or it can respond to the client and resolve the request.
Learn more about Express middleware here.
6.2. Catching errors in Express
Express has a special type of middleware function called “Error-handling middleware”. These functions have an extra argument err. Every time an error is passed in a next() middleware function, Express skips all middleware functions and goes straight to the error-handling ones.
Here’s an example on how to write one:
const errorMiddleware = (error: any, req: Request, res: Response, next: NextFunction) => {
  // Do something with the error
  next(error); // pass it to the next function
};
Enter fullscreen mode
Exit fullscreen mode
6.3. What to do with errors
Now that we know how to catch errors, we have to do something with them. In APIs, there are generally two things you should do: respond to the client and log the error.
6.3.1. errorReponse middleware (responding to the client)
Personally, when writing APIs I follow a consistent JSON response structure for successful and failed requests:
// Success
{
    "response": "successfull",
    "message": "some message if required",
    "data": {}
}

// Failure
{
    "response": "error",
      "error": {
        "type": "type of error",
        "path": "/path/on/which/it/happened",
        "statusCode": 404,
        "message": "Message that describes the situation"
      }
}
Enter fullscreen mode
Exit fullscreen mode
And now we’re going to write a middleware that handles the failure part.
const errorResponse = (error: any, req: Request, res: Response, next: NextFunction) => {
  const customError: boolean = error.constructor.name === 'NodeError' || error.constructor.name === 'SyntaxError' ? false : true;

  res.status(error.statusCode || 500).json({
    response: 'Error',
    error: {
      type: customError === false ? 'UnhandledError' : error.constructor.name,
      path: req.path,
      statusCode: error.statusCode || 500,
      message: error.message
    }
  });
  next(error);
};
Enter fullscreen mode
Exit fullscreen mode
Let’s examine the function. We first create the customError boolean. We check the error.constructor.name property which tells us what type of error we’re dealing with. If error.constructor.name is NodeError (or some other error we didn’t personally create), we set the boolean to false, otherwise we set it to true. This way we can handle known and unknown errors differently.
Next, we can respond to the client. We use the res.status() function to set the HTTP status code and we use the res.json() function to send the JSON data to the client. When writing the JSON data, we can use the customError boolean to set certain properties. For instance, if the customError boolean is false, we will set the error type to ‘UnhandledError’, telling the user we didn’t anticipate this situation, otherwise, we set it to error.constructor.name.
Since the statusCode property is only available in our custom error objects, we can just return 500 if it’s not available (meaning it’s an unhandled error).
In the end, we use the next() function to pass the error to the next middleware.
6.3.2. errorLog middleware (logging the error)
const errorLogging = (error: any, req: Request, res: Response, next: NextFunction) => {
  const customError: boolean = error.constructor.name === 'NodeError' || error.constructor.name === 'SyntaxError' ? false : true;

  console.log('ERROR');
  console.log(`Type: ${error.constructor.name === 'NodeError' ? 'UnhandledError' : error.constructor.name}`);
  console.log('Path: ' + req.path);
  console.log(`Status code: ${error.statusCode || 500}`);
  console.log(error.stack);
};
Enter fullscreen mode
Exit fullscreen mode
This function follows the same logic as the one before, with a small difference. Since this logging is intended for developers of the API, we also log the stack.
As you can see, this will just console.log() the error data to the system console. In most production APIs logging is a bit more advanced, logging to a file, or logging to an API. Since this part of the API building is very application-specific, I didn’t want to dive in too much. Now that you have the data, choose what approach works best for your application and implement your version of logging. If you’re deploying to a cloud-based deploying service like AWS, you will be able to download log files by just using the middleware function above (AWS saves all the console.log()s).
7. You can handle errors now.
There you go! That should be enough to get you started with handling errors in a TypeScript + Node.js + Express.js API workflow. Note, there’s a lot of room for improvement here. This approach is not the best, nor the fastest, but is pretty straightforward and most importantly, forgiving, and quick to iterate and improve as your API project progresses and demands more from your skills. These concepts are crucial and easy to get started with, and I hope you’ve enjoyed my article and learned something new.
Here’s a GitHub repository I made so you can get the full picture: (coming soon)
Think I could’ve done something better? Is something not clear? Write it down in the comments.
Anyone else you think would benefit from this? Share it!
Get in touch: Telegram, Linkedin, Website
Thank you 🙂