Could someone tell me what I’m doing wrong?»
«bold» has never been an HTML element («b» is the closest match).
HTML should contain structured content; publisher CSS should suggest styles for that content. That way user agents can expose the structured content with useful styling and navigational controls to users who can’t see your suggested bold styling (e.g. users of search engines, totally blind users using screen readers, poorly sighted users using their own colors and fonts, geeky users using text browsers, users of voice-controlled, speaking browsers like Opera for Windows). Thus the right way to make text bold depends on why you want to style it bold. For example:
-
Want to distinguish headings from other text? Use heading elements («h1» to «h6») and suggest a bold style for them within your CSS («h1, h2, h3, h4, h5, h6 {font-weight: bold;}».
-
Want to embolden labels for form fields? Use a «label» element, programmatically associate it with the the relevant «select», «input» or «textarea» element by giving it a «for» attribute matching an «id» attribute on the target, and suggest a bold style for it within your CSS («label {font-weight: bold;»}).
-
Want to embolden a heading for a group of related fields in a form, such as a group of radio choices? Surround them with a «fieldset» element, give it a «legend» element, and suggest a bold style for it within your CSS («legend {font-weight: bold;}»).
-
Want to distinguish a table caption from the table it captions? Use a «caption» element and suggest a bold style for it within your CSS («caption {font-weight: bold;}»).
-
Want to distinguish table headings from table data cells? Use a «th» element and suggest a bold style for it within your CSS («th {font-weight: bold;}»).
-
Want to distinguish the title of a referenced film or album from surrounding text? Use a «cite» element with a class («cite class=»movie-title»), and suggest a bold style for it within your CSS («.movie-title {font-weight: bold;}»).
-
Want to distinguish a defined keyword from the surrounding text defining or explaining it? Use a «dfn» element and suggest a bold style for it within your CSS («dfn {font-weight: bold;}»).
-
Want to distinguish some computer code from surrounding text? Use a «code» element and suggest a bold style for it within your CSS («code {font-weight: bold;}»).
-
Want to distinguish a variable name from surrounding text? Use a «var» element and suggest a bold style for it within your CSS («var {font-weight: bold;}»).
-
Want to indicate that some text has been added as an update? Use an «ins» element and suggest a bold style for it within your CSS («ins {font-weight: bold;}»).
-
Want to lightly stress some text («I love kittens!»)? Use an «em» element and suggest a bold style for it within your CSS (e.g. «em {font-weight: bold;}»).
-
Want to heavily stress some text, perhaps for a warning («Beware the dog!«)? Use a «strong» element and suggest a bold style for it within your CSS (e.g. «strong {font-weight: bold;}»).
… You get the idea (hopefully).
Can’t find an HTML element with the right semantics to express /why/ you want to make this particular text bold? Wrap it in a generic «span» element, give it a meaningful class name that expresses your rationale for distinguishing that text («<span class=»lede»>Let me begin this news article with a sentence that summarizes it.</span>), and suggest a bold style for it within your CSS («.lede {font-weight: bold;»}. Before making up your own class names, you might want to check if there’s a microformat (microformats.org) or common convention for what you want to express.
CSS свойство font-weight устанавливает начертание шрифта. Некоторые шрифты доступны только в нормальном или полужирном начертании.
Интерактивный пример
Синтаксис
font-weight: normal;
font-weight: bold;

/* Relative to the parent */
font-weight: lighter;
font-weight: bolder;

font-weight: 100;
font-weight: 200;
font-weight: 300;
font-weight: 400;
font-weight: 500;
font-weight: 600;
font-weight: 700;
font-weight: 800;
font-weight: 900;

/* Global values */
font-weight: inherit;
font-weight: initial;
font-weight: unset;
Значения
normal-
Нормальное начертание. То же, что и
400. bold-
Полужирное начертание. То же, что и
700. lighter-
Изменяет начертание относительно насыщенности родительского элемента (сверхтонкое начертание).
bolder-
Изменяет начертание относительно насыщенности родителя элемента (сверхжирное начертание).
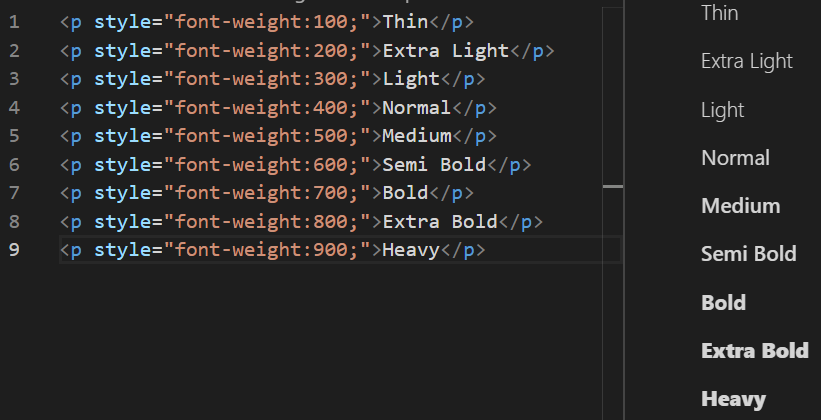
100,200,300,400,500,600,700,800,900-
Цифровые значения насыщенности шрифтов, которые позволяют задавать больше, чем нормальное и полужирное начертание.
Недоступность заданного значения
Если заданное цифровое значение насыщенности недоступно, для определения толщины отображаемого шрифта используется следующий алгоритм:
- Если задано значение выше
500, будет использовано первое доступное более жирное начертание (если такого не окажется, то первое доступное более светлое). - Если задано значение менее
400, будет использовано первое доступное более светлое начертание (если такого не окажется, то первое доступное более жирное). - Если задано значение
400, будет применено500. Если500недоступно, то будет использован алгоритм для подбора значений менее400. - Если задано значение
500, будет применено400. Если400недоступно, то будет использован алгоритм для подбора значений менее400.
Это означает, что для шрифтов, которые предоставляют только normal и bold начертания, 100-500 normal, и 600-900 bold.
Значение относительных весов
Когда используется жирнее или светлее, следующая таблица используется для вычисления абсолютного веса элемента:
| наследуемое значение | жирнее |
светлее |
|---|---|---|
| 100 | 400 | 100 |
| 200 | 400 | 100 |
| 300 | 400 | 100 |
| 400 | 700 | 100 |
| 500 | 700 | 100 |
| 600 | 900 | 400 |
| 700 | 900 | 400 |
| 800 | 900 | 700 |
| 900 | 900 | 700 |
Определение веса имени
Значения от 100 до 900, примерно, соответствуют следующим распространённым именам насыщенности:
| Значение | Общее название |
|---|---|
100 |
Тонкий (Волосяной) Thin (Hairline) |
200 |
Дополнительный светлый (Сверхсветлый) Extra Light (Ultra Light) |
300 |
Светлый Light |
400 |
Нормальный Normal |
500 |
Средний Medium |
600 |
Полужирный Semi Bold (Demi Bold) |
700 |
Жирный Bold |
800 |
Дополнительный жирный (Сверхжирный) Extra Bold (Ultra Bold) |
900 |
Чёрный (Густой) Black (Heavy) |
Интерполяция
Значения font-weight интерполируются с помощью дискретных шагов (кратные 100). Интерполяция происходит в действительном пространстве чисел и превращается в целое число путём округления до ближайшего числа, кратного 100, со значениями посредине между кратными 100 округлёнными в сторону положительной бесконечности.
Формальный синтаксис
font-weight =
<font-weight-absolute> | (en-US)
bolder | (en-US)
lighter<font-weight-absolute> =
normal | (en-US)
bold | (en-US)
<number [1,1000]>
Примеры
HTML
<p>
  Alice was beginning to get very tired of sitting by her sister on the
  bank, and of having nothing to do: once or twice she had peeped into the
  book her sister was reading, but it had no pictures or conversations in
  it, 'and what is the use of a book,' thought Alice 'without pictures or
  conversations?'
</p>

<div>I'm heavy<br/>
  <span>I'm lighter</span>
</div>
CSS
/* Назначение тексту элемента <p> жирного начертания. */
p {
  font-weight: bold;
}

/* Назначение тексту элемента <div> жирности, которая больше на два уровня,
чем normal, но все ещё меньше, чем стандартный bold. */
div {
 font-weight: 600;
}

/* Назначение тексту элемента <span> жирности,
которая на один уровень меньше, чем у его родителя. */
span {
  font-weight: lighter;
}
Result
Спецификации
| Specification |
|---|
| CSS Fonts Module Level 4 # font-weight-prop |
| Начальное значение | normal |
|---|---|
| Применяется к | все элементы. Это также применяется к ::first-letter и ::first-line. |
| Наследуется | да |
| Обработка значения | ключевое слово или числовое значение, с bolder и lighter, трансформируемися в действительное значение |
| Animation type | жирность шрифта |
Совместимость браузеров
BCD tables only load in the browser
Сделать текст насыщенным можно как в разметке, так и в стилях. Рассмотрим, как изменить насыщенность текста с помощью CSS, и узнаем, в чём плюсы этого метода.
Как выделить текст в CSS
Определите, какой участок текста необходимо выделить и используйте CSS-свойство font-weight, которое отвечает за толщину шрифта.
Часто встречающиеся значения:
400илиnormal— обычный шрифт, значение по умолчанию;700илиbold— полужирный шрифт.
Например:
<p class="boldtext">Красота текста — это не только хороший дизайн
и качественный контент, но и правильная вёрстка текста,
и единообразие. Под единообразием мы имеем в виду, что редакция выработала общее представление о строчной вёрстке текста
и придерживается его.</p>
.boldtext {
font-weight: 700;
} 👉 Красота текста — это не только хороший дизайн и качественный контент, но и правильная вёрстка текста, и единообразие.
Под единообразием мы имеем в виду, что редакция выработала общее представление о строчной вёрстке текста и придерживается его.
Весь текст, размеченный классом boldtext, станет жирным.
Свойство font-weight может принимать одно из девяти числовых вариантов насыщенности:
- 100: Thin;
- 200: Extra Light (Ultra Light);
- 300: Light;
- 400: Normal;
- 500: Medium;
- 600: Semi Bold (Demi Bold);
- 700: Bold;
- 800: Extra Bold (Ultra Bold);
- 900: Black (Heavy).
Все эти числовые значения задают степень толщины шрифта от самого тонкого до самого толстого.
Но в большинстве системных шрифтов есть только два варианта толщины: обычный normal (400) и полужирный bold (700). Поэтому остальные значения свойства используются реже.
Кроме числовых значений, у font-weight есть ещё два относительных значения: bolder и lighter. Они делают шрифт жирнее и тоньше, чем текущее или унаследованное значение.

Выделение отдельных предложений и слов
Чтобы выделить отдельные фразы или слова жирным шрифтом, нужные участки текста разметьте отдельными тегами с использованием классов. Например:
<p>Как и многие языки программирования, медиавыражения
 <span class="bold">поддерживают логические операторы</span>, поэтому мы можем комбинировать выражения.</p>
И затем в стилях пропишите:
.bold {
  font-weight: 700;
}
Теперь все слова, обёрнутые в тег span с классом bold, станут жирными.
👉 Как и многие языки программирования, медиавыражения поддерживают логические операторы, поэтому мы можем комбинировать выражения
Эффективно и доступно
Что, если весь жирный текст сразу разметить в файле HTML? Для этого же есть специальные теги <strong> и <b>.
Теги <b> и <strong> используют в особых случаях, при этом важно знать несколько моментов:
- Тег
<b>предназначен для выделения текста с целью привлечения к нему внимания, но без придания ему особой важности. Использовать его нужно только в случае, когда остальные теги выделения не подходят. - Тег
<strong>указывает на важность отмеченного текста и используется для выделения предупреждений или части документа, которую пользователь должен увидеть раньше остального.
В каких случаях предпочтительно использовать свойство font-weight:
- Для совместной работы над проектом. Если кто-то из команды захочет изменить стиль текста, ему не придётся искать и изменять каждый элемент HTML. Нужно будет просто изменить стили шрифтов в CSS.
- Для обеспечения доступности. Скринридер при чтении сайта учитывает насыщенность шрифта. Скринридер выделяет слова с тегом
<strong>интонационно, в отличие от простого выделения с помощью<b>. Если чтение с интонацией не нужно, а важно лишь расставить визуальные акценты в тексте, то лучше использовать свойствоfont-weight.
Ещё по теме
- Как подключить и оптимизировать нестандартные шрифты
- Как убрать подчёркивание ссылок
- Как сделать список без точек в HTML
Could someone tell me what I’m doing wrong?»
«bold» has never been an HTML element («b» is the closest match).
HTML should contain structured content; publisher CSS should suggest styles for that content. That way user agents can expose the structured content with useful styling and navigational controls to users who can’t see your suggested bold styling (e.g. users of search engines, totally blind users using screen readers, poorly sighted users using their own colors and fonts, geeky users using text browsers, users of voice-controlled, speaking browsers like Opera for Windows). Thus the right way to make text bold depends on why you want to style it bold. For example:
-
Want to distinguish headings from other text? Use heading elements («h1» to «h6») and suggest a bold style for them within your CSS («h1, h2, h3, h4, h5, h6 {font-weight: bold;}».
-
Want to embolden labels for form fields? Use a «label» element, programmatically associate it with the the relevant «select», «input» or «textarea» element by giving it a «for» attribute matching an «id» attribute on the target, and suggest a bold style for it within your CSS («label {font-weight: bold;»}).
-
Want to embolden a heading for a group of related fields in a form, such as a group of radio choices? Surround them with a «fieldset» element, give it a «legend» element, and suggest a bold style for it within your CSS («legend {font-weight: bold;}»).
-
Want to distinguish a table caption from the table it captions? Use a «caption» element and suggest a bold style for it within your CSS («caption {font-weight: bold;}»).
-
Want to distinguish table headings from table data cells? Use a «th» element and suggest a bold style for it within your CSS («th {font-weight: bold;}»).
-
Want to distinguish the title of a referenced film or album from surrounding text? Use a «cite» element with a class («cite class=»movie-title»), and suggest a bold style for it within your CSS («.movie-title {font-weight: bold;}»).
-
Want to distinguish a defined keyword from the surrounding text defining or explaining it? Use a «dfn» element and suggest a bold style for it within your CSS («dfn {font-weight: bold;}»).
-
Want to distinguish some computer code from surrounding text? Use a «code» element and suggest a bold style for it within your CSS («code {font-weight: bold;}»).
-
Want to distinguish a variable name from surrounding text? Use a «var» element and suggest a bold style for it within your CSS («var {font-weight: bold;}»).
-
Want to indicate that some text has been added as an update? Use an «ins» element and suggest a bold style for it within your CSS («ins {font-weight: bold;}»).
-
Want to lightly stress some text («I love kittens!»)? Use an «em» element and suggest a bold style for it within your CSS (e.g. «em {font-weight: bold;}»).
-
Want to heavily stress some text, perhaps for a warning («Beware the dog!«)? Use a «strong» element and suggest a bold style for it within your CSS (e.g. «strong {font-weight: bold;}»).
… You get the idea (hopefully).
Can’t find an HTML element with the right semantics to express /why/ you want to make this particular text bold? Wrap it in a generic «span» element, give it a meaningful class name that expresses your rationale for distinguishing that text («<span class=»lede»>Let me begin this news article with a sentence that summarizes it.</span>), and suggest a bold style for it within your CSS («.lede {font-weight: bold;»}. Before making up your own class names, you might want to check if there’s a microformat (microformats.org) or common convention for what you want to express.
В HTML жирный текст можно сделать несколькими способами. К ним относятся:
- Тег <b>;
- Тег <strong>;
- CSS-свойство font-weight.
Поговорим о каждом из вариантов выделения текста по порядку.
Жирный текст: тег <b>
Тег b HTML применяется следующим образом:
<b>Конструктор сайтов "Нубекс"</b>Для тега <b> обязательно наличие закрывающего </b>, и ему доступны универсальные атрибуты (такие как class, id, title и т.д.)
Хотя валидность тега b и не осуждается спецификацией HTML, более актуальным в использовании является тег strong, давайте разберемся почему.
Жирный текст: тег <strong>
Согласно спецификации HTML, тег b служит для выделения текста жирным шрифтом. В отличие от него, тег strong HTML служит для выделения важных фраз, слов, которые являются ключевыми для данной страницы.
Этот тег имеет весомое значение при ранжировании страниц в поисковой выдаче, поэтому он широко используется в продвижении сайтов и при SEO-оптимизации. Поисковые системы учитывают текст, заключенный в теги <strong></strong>, и помечают его именно как важный.
Используется тег strong аналогичным образом:
<strong>Конструктор сайтов "Нубекс"</strong>Вы можете заметить, что внешне применение тегов <b> и <strong> совсем не отличается (поскольку все современные браузеры интерпретируют их практически одинаково), но семантические различия в коде для поисковых систем, всё-таки, имеют место быть. Поэтому большинство SEO-оптимизаторов рекомендуют использовать тег strong.
Жирный текст при помощи CSS
Мы уже отмечали важность тега strong при поисковом продвижении, но что делать в случае, если нужно выделить большое количество текста жирным (но текст не нужно помечать для поисковиков как важный), или необходимо управлять степенью «жирности» шрифта? В таких случаях используется CSS-свойство font-weight. Применяется оно следующим образом:
<!DOCTYPE html>
<html>
 <head>
  <meta charset="utf-8">
  <title>Жирный текст с помощью CSS - "Нубекс"</title>
  <style>
   .nubex1 {
    font-weight: bold;
   }
   .nubex2 {
    font-weight: bolder;
   }
   .nubex3 {
    font-weight: 600;
   }
  </style>
 </head>
 <body>
  <center>
   <p>Наши сайты - это, действительно, <span class="nubex1">огромный шаг</span> в веб-разработке.</p>
   <p>Мы делаем по-настоящему <span class="nubex2">качественные</span> сайты.</p>
   <p>Доверьтесь нам, и мы вас <span class="nubex3">не подведем</span>.</p>
  </center>
 </body>
</html>
Значениями bolder и lighter можно задать степень жирности больше (или меньше), чем у родителя. Числовым значением (100-900) можно задать степень жирности.
![]()
Download Article
![]()
Download Article
HTML makes it easy to bold text, and there are several tags you can learn if you want more options. Better yet, you can take a few minutes to learn some basic CSS and add it directly to your HTML document. This is quicker than adding a whole CSS stylesheet, and will give you more control over exactly how thick the bolded text displays.
-

1
<strong>Use the strong tag</strong>. In HTML5, the preferred standard, the strong tag is recommended for important text. This is almost always displayed as bold text in browsers.
- Place the text you want bolded in between these tags: <strong>bold text here</strong>.
-
2
Use heading tags instead when appropriate. «Headings» are usually placed at the top of the web page or at the beginning of a new section. Usually, headings are displayed as bold and larger than the regular font, but this can vary. There are six different heading tags, from <h1> to <h6>. Follow these guidelines when using them:
- The h1 tag, written <h1>Your Heading Here</h1> is the most important heading, typically the largest text at the top of the page.
- <h2>The h2 tag</h2> is for the second most important heading, and so on down to <h6>h6, the smallest</h6>.
- Use these sparingly, only to organize your page.[1]
Users should be able to skim the headings quickly and find the topic they’re looking for. - When creating subheadings, move down just one level at a time. In other words, don’t skip from <h1> to <h3>. This helps the HTML page preserve its formatting when transferred to another format.[2]
Advertisement
-
3
<b>Use the b tag as a last resort</b>. The <b> tag is still supported in HTML5, but <strong> is preferred in most situations. Use the <b> tag only when the text should be bolded for stylistic reasons, not to add emphasis. Examples include key words or vocabulary words in a passage, or product names in a review.[3]
- As with most tags, <b>place the affected text between a start tag and an end tag</b>.


Advertisement
-
1
Understand when to use CSS. CSS is a more powerful and consistent way to style your web page. This makes it the ideal way to determine how your page looks, while HTML is designed to determine what your page means. It’s completely fine to use HTML tags when you want to emphasize important text, but CSS will give you more close control over the visual appearance of your bold text.
- Try opening a basic HTML page with different browsers, and you might notice differences in the display. CSS tells the browser exactly how to display text altered by a given tag, to minimize the amount of variation.
-
2
Add a <span> tag to your text. If you don’t know CSS yet, using «inline CSS» is a good way to get started. While you can use this to alter tags such as <p> or <h1>, sometimes you’ll want to change text that’s not already between tags.[4]
In this case, place the text between <span></span> tags. This has no effect on its own, but gives us something to work with. Here’s the example we’ll be using:- <span>I learned how to make this text bold with inline CSS.</span>
-
3
Add the style attribute. HTML attributes are written directly in the tag, inside the < >brackets. The style attribute is necessary to insert CSS into the HTML tag, so we’ll insert style= into the span tag:
- <span style=>I learned how to make this text bold with inline CSS.</span>
- There’s no reason to add the style attribute without specifying any styles. We’re just taking this one step at a time to make it easy to follow.
-
4
Add the font-weight property. CSS properties are added as part of the style attribute. In our case, we’ll use the font-weight property, which determines how thick to draw the font. This single property can be used to display bold (extra-thick) text, thin text, or even specify that the text should be displayed with normal thickness. Add «font-weight: « after the = sign, like this:
- <span style=»font-weight: «>I learned how to make this text bold with inline CSS.</span>
- Again, this is unfinished and won’t do anything by itself.
- Don’t forget the quotation marks before and after font-weight:.
-
5
Add the bold value. The only thing we need to do now is add a value for font-weight, between the font-weight: and the final quotation mark. There are quite a few options for different amounts of «boldness,» but the value bold is the easiest to use :[5]
- <span style=»font-weight:bold»>I learned how to make this text bold with inline CSS.</span>
-
6
Experiment with other values. CSS gives you many more options than HTML, so you don’t need to feel constricted. Here are several alternatives to the «bold» value:[6]
- <span style=»font-weight:bolder»>«Bolder» text will always be thicker than the parent element.</span> For example, if you make an entire paragraph «bold,» then use «bolder» on an individual sentence inside that paragraph, it will be even thicker.
- <span style=»font-weight:normal»>«Normal» text will be displayed as normal even if the span is inside a bold tag.</span>
- <span style=»font-weight:900″>You can instead use a number from 100 to 900 to specify thickness. 400 is normal text, while bold text uses a thickness of 700 by default.</span>[7]


Advertisement
Add New Question
-
Question
How do I change the image size?

Acute Viral
Community Answer
Try adding a width and/or height attribute in the image tag. I would recommend using one or the other so your image doesn’t get squashed or stretched.
-
Question
How do I make one letter bold?
You can select the letter with a span element and set the span element to apply a bold face.
Ask a Question
200 characters left
Include your email address to get a message when this question is answered.
Submit
Advertisement
-
When using the font-weight property in CSS, only use numerical values that are multiples of 100. Values that are in between will be rounded up.[8]
-
An embedded or external CSS sheet is an even better way to bold text, since it allows you to alter and easily change an entire document at once.
-
Each font only has certain «font weights» available. When using CSS, the closest available font weight to the specified amount is used. This means you won’t always see a difference between two thicker than normal font weights.
Thanks for submitting a tip for review!
Advertisement
About This Article
Thanks to all authors for creating a page that has been read 82,406 times.
Is this article up to date?
![]()
Download Article
![]()
Download Article
HTML makes it easy to bold text, and there are several tags you can learn if you want more options. Better yet, you can take a few minutes to learn some basic CSS and add it directly to your HTML document. This is quicker than adding a whole CSS stylesheet, and will give you more control over exactly how thick the bolded text displays.
-
1
<strong>Use the strong tag</strong>. In HTML5, the preferred standard, the strong tag is recommended for important text. This is almost always displayed as bold text in browsers.
- Place the text you want bolded in between these tags: <strong>bold text here</strong>.
-
2
Use heading tags instead when appropriate. «Headings» are usually placed at the top of the web page or at the beginning of a new section. Usually, headings are displayed as bold and larger than the regular font, but this can vary. There are six different heading tags, from <h1> to <h6>. Follow these guidelines when using them:
- The h1 tag, written <h1>Your Heading Here</h1> is the most important heading, typically the largest text at the top of the page.
- <h2>The h2 tag</h2> is for the second most important heading, and so on down to <h6>h6, the smallest</h6>.
- Use these sparingly, only to organize your page.[1]
Users should be able to skim the headings quickly and find the topic they’re looking for. - When creating subheadings, move down just one level at a time. In other words, don’t skip from <h1> to <h3>. This helps the HTML page preserve its formatting when transferred to another format.[2]
Advertisement
-
3
<b>Use the b tag as a last resort</b>. The <b> tag is still supported in HTML5, but <strong> is preferred in most situations. Use the <b> tag only when the text should be bolded for stylistic reasons, not to add emphasis. Examples include key words or vocabulary words in a passage, or product names in a review.[3]
- As with most tags, <b>place the affected text between a start tag and an end tag</b>.
Advertisement
-
1
Understand when to use CSS. CSS is a more powerful and consistent way to style your web page. This makes it the ideal way to determine how your page looks, while HTML is designed to determine what your page means. It’s completely fine to use HTML tags when you want to emphasize important text, but CSS will give you more close control over the visual appearance of your bold text.
- Try opening a basic HTML page with different browsers, and you might notice differences in the display. CSS tells the browser exactly how to display text altered by a given tag, to minimize the amount of variation.
-
2
Add a <span> tag to your text. If you don’t know CSS yet, using «inline CSS» is a good way to get started. While you can use this to alter tags such as <p> or <h1>, sometimes you’ll want to change text that’s not already between tags.[4]
In this case, place the text between <span></span> tags. This has no effect on its own, but gives us something to work with. Here’s the example we’ll be using:- <span>I learned how to make this text bold with inline CSS.</span>
-
3
Add the style attribute. HTML attributes are written directly in the tag, inside the < >brackets. The style attribute is necessary to insert CSS into the HTML tag, so we’ll insert style= into the span tag:
- <span style=>I learned how to make this text bold with inline CSS.</span>
- There’s no reason to add the style attribute without specifying any styles. We’re just taking this one step at a time to make it easy to follow.
-
4
Add the font-weight property. CSS properties are added as part of the style attribute. In our case, we’ll use the font-weight property, which determines how thick to draw the font. This single property can be used to display bold (extra-thick) text, thin text, or even specify that the text should be displayed with normal thickness. Add «font-weight: « after the = sign, like this:
- <span style=»font-weight: «>I learned how to make this text bold with inline CSS.</span>
- Again, this is unfinished and won’t do anything by itself.
- Don’t forget the quotation marks before and after font-weight:.
-
5
Add the bold value. The only thing we need to do now is add a value for font-weight, between the font-weight: and the final quotation mark. There are quite a few options for different amounts of «boldness,» but the value bold is the easiest to use :[5]
- <span style=»font-weight:bold»>I learned how to make this text bold with inline CSS.</span>
-
6
Experiment with other values. CSS gives you many more options than HTML, so you don’t need to feel constricted. Here are several alternatives to the «bold» value:[6]
- <span style=»font-weight:bolder»>«Bolder» text will always be thicker than the parent element.</span> For example, if you make an entire paragraph «bold,» then use «bolder» on an individual sentence inside that paragraph, it will be even thicker.
- <span style=»font-weight:normal»>«Normal» text will be displayed as normal even if the span is inside a bold tag.</span>
- <span style=»font-weight:900″>You can instead use a number from 100 to 900 to specify thickness. 400 is normal text, while bold text uses a thickness of 700 by default.</span>[7]
Advertisement
Add New Question
-
Question
How do I change the image size?
Acute Viral
Community Answer
Try adding a width and/or height attribute in the image tag. I would recommend using one or the other so your image doesn’t get squashed or stretched.
-
Question
How do I make one letter bold?
You can select the letter with a span element and set the span element to apply a bold face.
Ask a Question
200 characters left
Include your email address to get a message when this question is answered.
Submit
Advertisement
-
When using the font-weight property in CSS, only use numerical values that are multiples of 100. Values that are in between will be rounded up.[8]
-
An embedded or external CSS sheet is an even better way to bold text, since it allows you to alter and easily change an entire document at once.
-
Each font only has certain «font weights» available. When using CSS, the closest available font weight to the specified amount is used. This means you won’t always see a difference between two thicker than normal font weights.
Thanks for submitting a tip for review!
Advertisement
About This Article
Thanks to all authors for creating a page that has been read 82,406 times.
Is this article up to date?
 Сегодняшней публикацией начинаю цикл статей про жирные шрифты. Изначально думал разместить все нюансы и вопросы по теме в одном месте, но информации оказалось слишком много. Лучше воспринимать ее постепенно. Поэтому перед тем, как перейти к разным обзорам шрифтов для создания фотошоп иллюстраций рассмотрю вопросы, связанные с версткой. Подборки фонтов найдете тут: интересные жирные, разные bold и русские толстые шрифты.
Сегодня расскажу как сделать слова жирным шрифтом на сайте с помощью HTML и CSS. Такое оформление используется когда вам нужно выделить определенную информацию на странице. Причем речь идет не только о заголовках, но и о простых словах, фразах в тексте. Реализовывается это достаточно просто.
Для выделения определенного текста жирным используются специальные HTML теги — <b> и <strong>. Например следующий код:
<p>Обычный текст.</p>
<p><b>Жирный текст</b>.</p>
<p><strong>Жирный текст strong</strong>.</p>
На выходе дает такую картинку:

Последние два варианта визуально выглядят одинаково, однако они между собой немного отличаются. Тег <b> задает простое стилистическое выделение слова жирным шрифтом, тогда как <strong> добавляет при этом некое семантическое «усиленное» (важное) значение. То есть последняя строка — это не просто жирный текст, а какая-то важная информация. В принципе, для поисковиков рекомендуют использовать именно <strong>.
Вы также можете встретить прописанный в HTML жирный шрифт с помощью стилей:
<p style="font-weight:bold">Пример жирного текста.</p>
<p>Пример текста с <span style="font-weight:bold">жирным</span> словом.</p>
На сайте это отображается так:

Не смотря на то, что код жирного текста для HTML работает корректно, так делать не следует. Все стили оформления должны быть вынесены в CSS файл. Поэтому в примере выше вы должны были для тегов <p> и <span> указать соответствующий класс, а затем прописать его оформление в таблице стилей. Такие вот правила оформления кода. Поэтому для жирного шрифта в HTML используйте тег <strong>.
Жирный текст на CSS
Дабы сделать в CSS жирный шрифт используется свойство font-weight. С его помощью указывается «насыщенность» фрагмента текста. Значения могут быть от 100 до 900, но наиболее часто используемые это:
- bold (жирный) — 700 по умолчанию;
- normal (обычный) — 400 по умолчанию.
Есть также варианты значений bolder и lighter, которые меняют шрифт в зависимости от родителя на более или менее жирный соответственно.
Чтобы задать жирный текст в CSS нужно тому или иному элементу задать какой-то стиль, например:
<p>Обычный текст с <span class="my-bold-font">жирным выделением</span> по центру.</p>
Далее в CSS стилях вы определяете для него жирность вместе с другими свойствами по типу подчеркивания текста и т.п.:
. my-bold-font {
    color: black;
    font-weight: 700;
 }
Либо можно написать:
. my-bold-font {
    color: black;
    font-weight: bold;
 }
Разницы нет никакой. Кстати, если говорить о HTML теге <strong>, то для него по умолчанию прописан такой стиль:
strong {
    font-weight: bold;
}
Тут хотелось отметить один небольшой нюанс, который мне рассказали на курсах верстки — если вы создаете для какого-то элемента новый класс, то желательно использовать более-менее «понятное название». Например, в примере выше стиль class=»my-bold-font» выглядит логичнее чем class=»new-font», т.к. можно отчасти понять его назначение. Это плюс для тех, кто будет смотреть и использовать вашу верстку в дальнейшем.
В следующей статье расскажу про интересные жирные шрифты, которые мне удалось найти.
В этой статье будут рассмотрены способы форматирования текста с помощью различных CSS свойств.
Жирность текста (font-weight)
С первого взгляда свойство font-weight дублирует тег <b>. То есть делает текст жирным. Но не спешите с выводами, потому что это свойство может различать градации жирного. Для этого у него есть несколько значений:
- normal — нормальная жирность шрифта (то есть нет жирного)
- bold — текст будет выделен жирным
- bolder — текст будет жирнее, чем жирность текста у родительского элемента
- lighter — текст будет менее жирным, чем текст у родительского элемента
Приведём пример:
Тише, <span style="font-weight: bold;">мыши</span>, кот на крыше.Получится такой результат:
Тише, мыши, кот на крыше.
Помимо эти названий свойство font-weight может принимать численные значения: 100, 200, 300, 400 и т.д. до 900. Чем больше цифра — тем жирнее текст. Нормальный текст без выделения жирным соответствует цифре 400. Выделенный жирным текст соответствует цифре 700.
Далеко не у всех шрифтов есть весь набор градаций жирного. Обычно используются только два: bold и normal варианты. Поэтому в таких ситуациях какую цифру ни ставь, все равно получишь только 2 варианта жирности. Но через CSS можно подключить шрифты (указать адреса файлов), в которых будет все остальные градации жирности.
Курсив (font-style)
Курсив можно получить с помощью тега <i>. Но ещё и через свойство font-style со значением italic.
Приведём пример:
Тише, <span style="font-style: italic;">мыши</span>, кот на крыше.Получится такой результат:
Тише, мыши, кот на крыше.
Чтобы сделать из курсива нормальный шрифт, используйте «font-style: normal;»
Размер шрифта (font-size)
Через CSS свойство font-size можно задать размер шрифта. Это свойство может принимать несколько единиц измерений. Перечислим их в порядке убывания популярности использования:
- px — пикселы,
- % — проценты (от размера шрифта родительского элемента)
- em — высота шрифта элемента (единица — это сто процентов от размера шрифта родительского элемента),
- pt — пункты (по сути пиксели, но в пропорции 12pt = 16px)
- текстовые названия размеров: xx-small, x-small, smal, medium, large, x-large, xx-large
- ex — высота символа х (единица — это сто процентов),
Приведём пример использования. Постараемся сделать примерно одинаковый размер шрифта, используя все возможные единицы измерений:
Тише, <span style="font-size: 18px;">мыши</span>, кот на крыше.
Тише, <span style="font-size: 130%;">мыши</span>, кот на крыше.
Тише, <span style="font-size: 1.3em;">мыши</span>, кот на крыше.
Тише, <span style="font-size: large;">мыши</span>, кот на крыше.
Тише, <span style="font-size: 14pt;">мыши</span>, кот на крыше.
Тише, <span style="font-size: 2.2ex;">мыши</span>, кот на крыше.
Получится такой результат:
Тише, мыши, кот на крыше.
Тише, мыши, кот на крыше.
Тише, мыши, кот на крыше.
Тише, мыши, кот на крыше.
Тише, мыши, кот на крыше.
Тише, мыши, кот на крыше.
Тише, мыши, кот на крыше.
Красная строка (text-indent)
Наверное, вы уже заметили, что HTML не воспринимает пробелы. То есть если в HTML коде поставить сотню пробелов между словами, а потом открыть этот HTML файл в браузере, то пробелы заменятся на один. Из-за этого и нет возможности сделать красную строку в абзаце. Но на помощь приходит CSS свойство text-indent, которое может сделать этот отступ. Значение этого свойства задаются в пикселях. Приведём пример:
<div style="text-indent: 40px;">
   Тише, мыши, кот на крыше,<br>
   а котята ещё выше.
</div>
В браузере будет показано так:
Тише, мыши, кот на крыше,
а котята ещё выше.