|
|
Needs Updating |

Contents
-
Ubuntu Time Management
-
Changing the Time Zone
- Using the GUI
- Using the Command Line (terminal)
- Using the Command Line (unattended)
-
Time Synchronization using NTP
- Using the GUI
- Command Line ntpd
-
Changing NTP Time Servers
- Using the GUI
- ntpd
- Command Line ntpdate
- ntpdate
-
Multiple Boot Systems Time Conflicts
-
Make Windows use UTC
- Reversing the change
-
Make Linux use ‘Local’ time
- Pre-Ubuntu 15.04 systems (e.g. Ubuntu 14.04 LTS):
- Ubuntu 15.04 systems and above (e.g. Ubuntu 16.04 LTS):
-
Make Windows use UTC
-
Troubleshooting
- Is NTP installed?
-
Which configuration file is it using?
- How do I configure NTP to use DHCP
- Is NTP running?
- Which servers are you using?
- Can these servers be resolved?
- Can these servers be reached?
- What’s NTP up to?
- Why does NTP keep resetting/failing?
-
Changing the Time Zone
Ubuntu Time Management
This page gives useful information about the way that Ubuntu manages time by changing the timezone, setting up synchronization using Network Time Protocol (NTP), and adjusting servers.
Changing the Time Zone
This section shows you how to accomplish this task using either the Graphical User Interface (GUI) or by using the command line (terminal).
Using the GUI
Perhaps the most user friendly way to change the time zone of your Ubuntu system is to use the Graphical User Interface (GUI).
-
Click on the System menu on the top panel, go into the Administration sub-menu, and click on Time and Date.
- Click on the currently selected time zone to bring up the selection map.
-
- Click in the general area of your location on the time zone map, the map will zoom in.
-
-
Select the closest city then choose Close
-


Using the Command Line (terminal)
Using the command line, you can use sudo dpkg-reconfigure tzdata.
-
Open a terminal window by going to Applications>Accessories>Terminal
-
sudo dpkg-reconfigure tzdata
- Follow the directions in the terminal.
-
The timezone info is saved in /etc/timezone — which can be edited or used below
Using the Command Line (unattended)
- Find out the long description for the timezone you want to configure.
-
Save this name to /etc/timezone
-
run sudo dpkg-reconfigure —frontend noninteractive tzdata:
$ echo "Australia/Adelaide" | sudo tee /etc/timezone
Australia/Adelaide
$ sudo dpkg-reconfigure --frontend noninteractive tzdata

Current default time zone: 'Australia/Adelaide'
Local time is now:      Sat May  8 21:19:24 CST 2010.
Universal Time is now:  Sat May  8 11:49:24 UTC 2010.
This can be scripted if required.
Time Synchronization using NTP
This page describes methods for automatically keeping your computer’s time accurate. This is extremely useful for servers, and is also recommended for desktop machines.
Network Time Protocol (NTP) is a UDP/IP protocol for synchronizing time over a network connection. Basically a client requests the current time from a server, and then uses the servers response to set its own clock.
Beyond this simple description, there is a lot of complexity. There are multiple tiers of NTP servers, with the tier one NTP servers connected to atomic clocks (often via GPS), and tier two and three servers spreading the load of actually handling requests across the internet. The client software is a lot more complex than you might think as it has to factor communication delays, and adjust the time in a way that does not affect the other processes that run on the system. Luckily all that complexity is hidden from the user.
Using the GUI
This is how to enable NTP time synchronization using the GUI (Graphical User Interface).
-
Click on the System menu on the top panel, go into the Administration sub-menu, and click on Date and Time.
-
Select the configuration option Keep synchronized with Internet servers
-
- You may get a dialog box informing you that NTP support has to be installed.
-
-
After selecting Install NTP Support it will download the needed files.
-
-
You are now finished and you can click Close or you can customize the NTP servers (default is ntp.ubuntu.com) that your computer uses to synchronize with by choosing Select Servers.
-


Command Line ntpd
ntpdate is a bit of a blunt instrument as it can only adjust the time once a day in one big correction. The ntp daemon ntpd is far more subtle as it calculates the drift of your system clock and continuously adjusts it in small increments. Using ntpd there are no large corrections that could lead to inconsistent logs for instance. The cost is a little processing power and memory, but for a modern system this is negligible.
To setup ntpd in versions of Ubuntu 7.04 and higher
sudo apt-get install ntp
To set up ntpd pre Ubuntu 7.04:
sudo apt-get install ntp-simple
Changing NTP Time Servers
In both cases above, your system will use Ubuntu’s NTP server at ntp.ubuntu.com by default. This is OK, but you might want to use several servers to increase accuracy and resilience, and you may want to use time servers that are geographically closer to you.
Using the GUI
-
Click on the System menu on the top panel, go into the Administration sub-menu, and click on Date and Time.
- You may have to enter your password to continue.
-
-
Select Configure Servers
-
- Enable the box next to your choice of server(s) or add your own.
-


ntpd
-
Change the contents of /etc/ntp.conf to include additional server lines:
server ntp.ubuntu.com
server pool.ntp.org
Command Line ntpdate
ntpdate is no longer installed by default on Ubuntu. The file /etc/cron.daily/ntpdate also does not exist anymore
ntpdate, if installed, will run it once at boot time to set up your time according to Ubuntu’s NTP server. However, a system’s clock is likely to drift considerably between reboots if the time between reboots is long. In that case it makes sense to correct the time occasionally. The easiest way to do this is to get cron to run it every day. With your favorite editor, create (needs sudo) a file /etc/cron.daily/ntpdate containing:
 #!/bin/sh
 ntpdate ntp.ubuntu.com
Make sure that you make this new file executable:
sudo chmod 755 /etc/cron.daily/ntpdate
ntpdate
-
Change the contents of /etc/cron.daily/ntpdate to add the pooled ntp servers:
ntpdate ntp.ubuntu.com pool.ntp.org
You may notice pool.ntp.org in the examples above. This is a really good idea which uses round-robin DNS to return an NTP server from a pool, spreading the load between several different servers. Even better, they have pools for different regions — I am in New Zealand, so I use nz.pool.ntp.org instead of pool.ntp.org. Look at http://www.pool.ntp.org/ for more details.
You can also Google for NTP servers in your region, and add these to your configuration. To test that a server works, just type sudo ntpdate ntp.server.name and see what happens.
Multiple Boot Systems Time Conflicts
Operating systems store and retrieve the time in the hardware clock located on your motherboard so that it can keep track of the time even when the system does not have power. Most operating systems (Linux/Unix/Mac) store the time on the hardware clock as UTC by default, though some systems (notably Microsoft Windows) store the time on the hardware clock as the ‘local’ time. This causes problems in a dual boot system if both systems view the hardware clock differently.
The advantage of having the hardware clock as UTC is that you don’t need to change the hardware clock when moving between timezones or when Daylight Savings Time (DST) begins or ends as UTC does not have DST or timezone offsets.
Changing Linux to use local time is easier and more reliable than changing Windows to use UTC, so dual-boot Linux/Windows systems tend to use local time.
Since Intrepid (8.10), UTC=yes is default.
Make Windows use UTC
Note: This method was not initially supported on Windows Vista and Server 2008, but came back with Vista SP2, Windows 7, Server 2008 R2 and Windows 8/8.1.
To make MS Windows calculate the time from the hardware clock as UTC.
-
Create a file named WindowsTimeFixUTC.reg with the following contents and then double click on it to merge the contents with the registry:
Windows Registry Editor Version 5.00

[HKEY_LOCAL_MACHINESYSTEMCurrentControlSetControlTimeZoneInformation]
     "RealTimeIsUniversal"=dword:00000001
Note: Windows Time service will still write local time to the RTC regardless of the registry setting above on shutdown, so it is handy to disable Windows Time service with this command (if time sync is still required while in Windows use any third-party time sync solution):
sc config w32time start= disabled
Reversing the change
You can create a file with the following contents and then double-click it to merge in the original changes, as above:
Windows Registry Editor Version 5.00

[HKEY_LOCAL_MACHINESYSTEMCurrentControlSetControlTimeZoneInformation]
     "RealTimeIsUniversal"=-
If Windows Time service was disabled, enable it again with the command:
sc config w32time start= demand
Make Linux use ‘Local’ time
To tell your Ubuntu system that the hardware clock is set to ‘local’ time:
Pre-Ubuntu 15.04 systems (e.g. Ubuntu 14.04 LTS):
- edit /etc/default/rcS
- add or change the following section
# Set UTC=yes if your hardware clock is set to UTC (GMT)
UTC=no
Ubuntu 15.04 systems and above (e.g. Ubuntu 16.04 LTS):
- open a terminal and execute the following command
timedatectl set-local-rtc 1
Troubleshooting
Is NTP installed?
Run dpkg-query —list ntp* and look for ntp-simple (pre 7.04) or ntp. The ntpdate and ntp-doc packages may also be useful.
Which configuration file is it using?
By default NTP uses /etc/ntp.conf. If /etc/ntp.conf.dhcp exists then the NTP daemon assumes you’re using DHCP to redefine the NTP settings and it uses that file instead.
How do I configure NTP to use DHCP
Your DHCP server must be configured to supply NTP servers (man dhcpd.conf may be helpful).
Your client must be configured to use the supplied NTP servers. To do this, add ntp-servers to the request (or even require) line in /etc/dhcp3/dhclient.conf. You may wish to use the default and prepend features as well to provide default/additional NTP servers. Please see man dhclient.conf and man dhcp-options for details.
Is NTP running?
NTP most commonly ‘fails’ if it cannot resolve the servers in its configuration file at startup (this can happen if DNS isn’t available during boot). Also, if NTP is unable to keep the local clock reasonably accurate it gives up and terminates (see below).
Try sudo /etc/init.d/ntp status to check if NTP is running, and sudo /etc/init.d/ntp restart to restart it if necessary.
I have various systems on unreliable networks so I use a simple script to bounce NTP if needed:
$ cat /etc/cron.hourly/BOUNCE-NTP
#!/bin/sh

/usr/bin/ntpq -np | /bin/grep '^*' > /dev/null || ( /usr/bin/ntpq -np ; /etc/init.d/ntp restart )
Which servers are you using?
Run grep ^server /etc/ntp.conf or grep ^server /etc/ntp.conf.dhcp to figure out which servers you’re trying to use
If your network or ISP have an NTP server they should be listed here. Failing that, try ntp.ubuntu.com and/or the NTP pool servers (http://www.pool.ntp.org/). 3 or 4 servers is plenty, and don’t use a server without permission (see http://en.wikipedia.org/wiki/NTP_vandalism).
Can these servers be resolved?
If host $servername fails then you may have DNS issues that need to be fixed ($servername is the name of a server listed in your configuration file, see above).
Can these servers be reached?
If ntptrace $servername fails then you may have routing/firewall issues that need to be fixed ($servername is the name of a server listed in your configuration file, see above). NTP uses UDP port 123, make sure these packets can are properly NAT-ed through your gateway if necessary.
What’s NTP up to?
ntpq —numeric —peers
—numeric removes the DNS lookups. You can leave it off, but don’t be surprised if the resolved names don’t match names in the ntp.conf file.
Ideally you want a * and a few +’s in the fist column and a reach of 377 (see http://www.ntp.org/ntpfaq/NTP-s-trouble.htm#Q-MON-REACH)
delay is in milliseconds. It should be < 1 for local network servers, < 10 for ISP servers over DSL and ideally < 100 for wireless. offset is in milliseconds and is the current best guess of the time difference between your system and the server. The smaller the better! jitter is an estimate the the local clock frequency error. The smaller the better. If it’s consistently high then your system may be drifting (see below)
Why does NTP keep resetting/failing?
NTP attempts to fix your local clock to keep accurate time. If your local clock drifts too fast (usually HW problems or IRQ lockups or somesuch) then NTP either keeps resetting your clock or gives up and terminates. Fix the drift problem and NTP will behave.
В статье мы разберёмся с тем, как настроить время в Linux. Посмотрим текущее время, укажем часовой пояс и настроим синхронизацию времени.
Чтобы посмотреть текущее время на вашем сервере linux воспользуйтесь командой date:
alex@ubu:~$ date
Ср 13 июл 2022 13:40:27 UTC
В выводе мы видим не только дату и время, но также и часовой пояс. Сейчас вместо часового пояса используется UTC.
Также можно использовать другую команду – timedatectl:
alex@s-ubu:~$ timedatectl
               Local time: Ср 2022-07-20 07:56:41 UTC
           Universal time: Ср 2022-07-20 07:56:41 UTC
                 RTC time: Ср 2022-07-20 07:56:41
                Time zone: UTC (UTC, +0000)
System clock synchronized: yes
              NTP service: active
          RTC in local TZ: no
Без опций она покажет текущее время, часовой пояс, а также другую информацию связанную с синхронизацией времени. Например в примере выше видно что время успешно синхронизуется (System clock synchronized: yes) и синхронизация настроена (NTP service: active).
С помощью этой же утилиты (timedatectl) мы будем настраивать часовой пояс и следить за синхронизацией времени, об этом чуть ниже.
Настройка часового пояса
Вообще часовой пояс в системе определяется файлом /etc/localtime, который является символьной ссылкой (про ссылки я уже писал):
alex@ubu:~$ ls -l /etc/localtime
lrwxrwxrwx 1 root root 27 апр 21 01:01 /etc/localtime -> /usr/share/zoneinfo/Etc/UTC
Можно вручную отредактировать эту ссылку и указать нужный часовой пояс:
alex@ubu:~$ sudo ln -sf /usr/share/zoneinfo/Europe/Moscow /etc/localtime
Или воспользоваться утилитой timedatectl:
alex@ubu:~$ sudo timedatectl set-timezone Europe/Moscow
Если вас не устраивает выбранный мною часовой пояс, то можете посмотреть список поддерживаемых часовых поясов так:
alex@ubu:~$ timedatectl list-timezones
Проверим время и часовой пояс:
alex@ubu:~$ timedatectl
               Local time: Ср 2022-07-13 16:50:39 MSK
           Universal time: Ср 2022-07-13 13:50:39 UTC
                 RTC time: Ср 2022-07-13 13:50:39
                Time zone: Europe/Moscow (MSK, +0300)
System clock synchronized: yes
              NTP service: active
          RTC in local TZ: no
Как видим, часовой пояс уже изменился на Europe/Moscow (MSK, +0300).
Синхронизация времени
В настоящее время очень важно чтобы часы на ваших серверах были синхронизированы. Очень много систем полагаются на время, например:
- если часы на сервере kerberos и клиенте расходятся более чем на 5 минут, то клиенты не смогут пройти проверку подлинности на сервере;
- в различных финансовых системах транзакции должны выполняться в надлежащем порядке, поэтому серверы выполняющую эту работу должны быть строго синхронизированы по времени;
- правильное время также нужно для выполнения автоматизированный задач;
- системные журналы также полагаются на время.
Получение списка NTP серверов по DHCP
Если ваш сервер получает сетевые настройки по dhcp, то он может получить список NTP серверов (серверов времени для синхронизации). Это настраивается в файле /etc/dhcp/dhclient.conf. В строке request мы определяем что хотим получать от сервера dhcp. И здесь может быть указан параметр ntp-servers:
alex@ubu:~$ cat /etc/dhcp/dhclient.conf
# часть текста пропустил
request subnet-mask, broadcast-address, time-offset, routers,
        domain-name, domain-name-servers, domain-search, host-name,
        dhcp6.name-servers, dhcp6.domain-search, dhcp6.fqdn, dhcp6.sntp-servers,
        netbios-name-servers, netbios-scope, interface-mtu,
        rfc3442-classless-static-routes, ntp-servers;
# часть текста пропустил
Само собой, вы получите список ntp-серверов, только в том случае если ваш dhcp сервер их распространяет.
Служба синхронизации времени
В системах работающих на systemd работает специальная служба синхронизации времени systemd-timesyncd.service. Можем посмотреть её статус:
alex@ubu:~$ systemctl status systemd-timesyncd.service
● systemd-timesyncd.service - Network Time Synchronization
     Loaded: loaded (/lib/systemd/system/systemd-timesyncd.service; enabled; vendor preset: enabled)
     Active: active (running) since Wed 2022-07-13 17:08:06 MSK; 23s ago
       Docs: man:systemd-timesyncd.service(8)
   Main PID: 399 (systemd-timesyn)
     Status: "Initial synchronization to time server 192.168.0.16:123 (192.168.0.16)."
      Tasks: 2 (limit: 2241)
     Memory: 1.3M
        CPU: 63ms
     CGroup: /system.slice/systemd-timesyncd.service
             └─399 /lib/systemd/systemd-timesyncd
Видим что синхронизация идет с сервером по адресу 192.168.0.16. У меня этот адрес прилетел по dhcp.
Обратите внимание, что служба эта стартует по запросу и останавливается после синхронизации времени!
Давайте выключим получение ntp серверов по dhcp:
alex@ubu:~$ sudo nano /etc/dhcp/dhclient.conf
# в этой строке удалите опцию ntp-servers
request subnet-mask, broadcast-address, time-offset, routers,
        domain-name, domain-name-servers, domain-search, host-name,
        dhcp6.name-servers, dhcp6.domain-search, dhcp6.fqdn, dhcp6.sntp-servers,
        netbios-name-servers, netbios-scope, interface-mtu,
        rfc3442-classless-static-routes;
Вы можете использовать следующий пул серверов времени для синхронизации – https://www.pool.ntp.org/zone/ru. Укажем первый сервер из этого пула в конфиге /etc/systemd/timesyncd.conf:
alex@ubu:~$ sudo nano /etc/systemd/timesyncd.conf
[Time]
NTP=0.ru.pool.ntp.org
FallbackNTP=ntp.ubuntu.com
RootDistanceMaxSec=5
PollIntervalMinSec=32
PollIntervalMaxSec=2048
В конфиге используются следующие опции:
- NTP – укажите 1 или несколько ntp серверов. Если хотите указать несколько серверов, разделяйте их пробелами;
- FallbackNTP – укажите 1 или несколько резервных ntp серверов;
- RootDistanceMaxSec – максимальное время в секундах, за которое пакет от сервера эталонного времени должен доходить до сервера к которому мы подлкючены;
- PollIntervalMinSec и PollIntervalMaxSec – минимальный и максимальный интервалы синхронизаций времени. Вначале используется минимальный интервал, а затем он увеличивается если система видит что локальное время со временем ntp-сервера не расходится.
После правки перезапустите службу синхронизаций времени:
alex@ubu:~$ sudo systemctl restart systemd-timesyncd.service
Дополнительно можно посмотреть информацию по синхронизации времени с помощью следующей команды:
alex@ubu:~$ timedatectl timesync-status
       Server: 91.209.94.10 (0.ru.pool.ntp.org)
Poll interval: 34min 8s (min: 32s; max 34min 8s)
         Leap: normal
      Version: 4
      Stratum: 2
    Reference: 3EE70662
    Precision: 1us (-25)
Root distance: 4.012ms (max: 5s)
       Offset: -5.502ms
        Delay: 11.084ms
       Jitter: 2.886ms
 Packet count: 7
    Frequency: +15,118ppm
Здесь мы видим адрес ntp-сервера, а также какой интервал синхронизации (34min 8s) использовался последний раз.
То-есть служба синхронизации времени systemd-timesyncd.service будет запускаться и останавливаться сейчас примерно раз в 34 минуты. Поэтому если увидите, что служба в состоянии loaded и inactive, не пугайтесь. По логам видно что она периодически запускается:
alex@ubu:~$ systemctl status systemd-timedated
○ systemd-timedated.service - Time & Date Service
     Loaded: loaded (/lib/systemd/system/systemd-timedated.service; static)
     Active: inactive (dead)
       Docs: man:systemd-timedated.service(8)
             man:localtime(5)
             man:org.freedesktop.timedate1(5)

июл 19 15:54:24 s-ubu systemd[1]: systemd-timedated.service: Deactivated successfully.
июл 19 15:55:41 s-ubu systemd[1]: Starting Time & Date Service...
июл 19 15:55:41 s-ubu systemd[1]: Started Time & Date Service.
июл 19 15:56:35 s-ubu systemd[1]: systemd-timedated.service: Deactivated successfully.
июл 19 16:05:45 s-ubu systemd[1]: Starting Time & Date Service...
июл 19 16:05:45 s-ubu systemd[1]: Started Time & Date Service.
июл 19 16:06:15 s-ubu systemd[1]: systemd-timedated.service: Deactivated successfully.
июл 19 16:28:42 s-ubu systemd[1]: Starting Time & Date Service...
июл 19 16:28:42 s-ubu systemd[1]: Started Time & Date Service.
июл 19 16:30:17 s-ubu systemd[1]: systemd-timedated.service: Deactivated successfully.
Из вывода:
- Deactivated successfully – служба останавливается;
- Starting Time & Date Service… – служба стартует;
- Started Time & Date Service – служба стартовала;
- и так по кругу.
Ещё один способ задать часовой пояс
С помощью команды dpkg-reconfigure tzdata также можно задать часовой пояс:
alex@ubu:~$ sudo dpkg-reconfigure tzdata
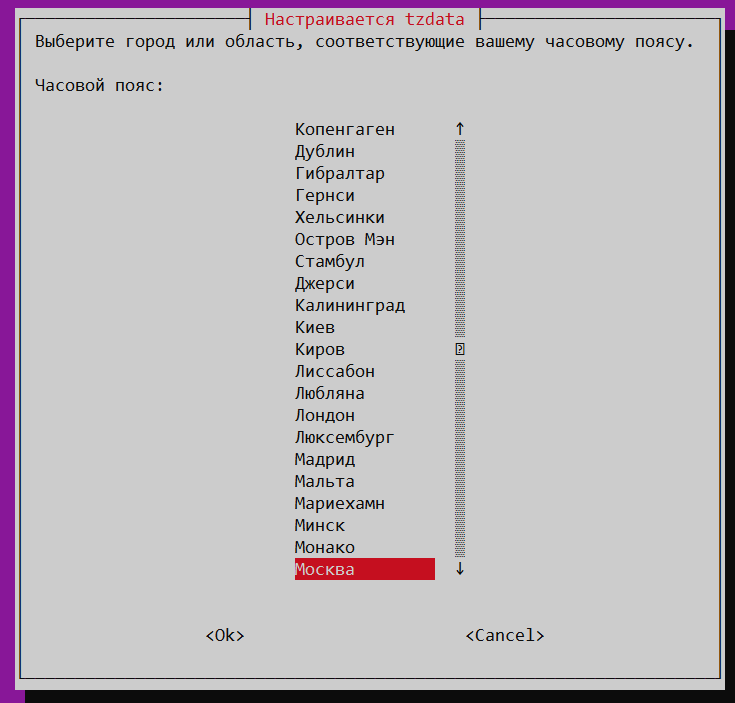
После выполнения вы можете использовать псевдографический интерфейс для настройки часового пояса. Вначале выберите географический район:
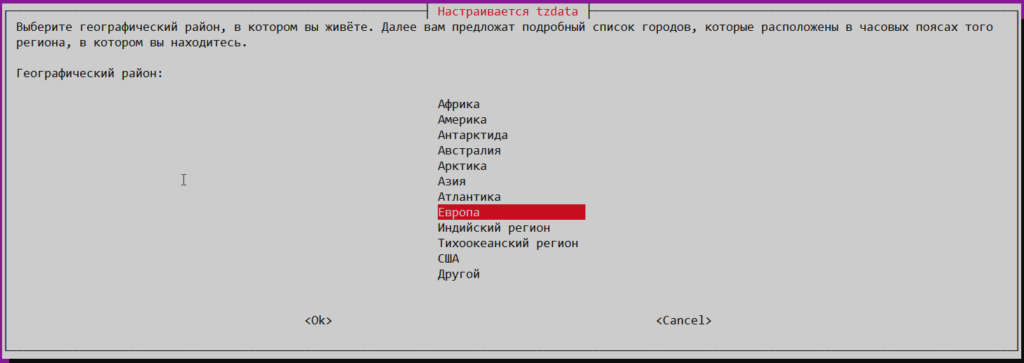
Затем город:
Итог
Теперь вы знаете как настроить время на сервере Debian или Ubuntu. Мы научились устанавливать часовой пояс и настраивать синхронизации времени с ntp серверами.
Узнали про следующие команды:
- date – покажет текущую дату, время и часовой пояс;
- timedatectl – покажет тоже самое что и date + синхронизуется ли время;
- timedatectl list-timezones – покажет список поддерживаемых часовых поясов;
- timedatectl set-timezone Europe/Moscow – установить часовой пояс Europe/Moscow;
- timedatectl timesync-status – покажет с какими ntp-серверами синхронизуется время и как часто;
- dpkg-reconfigure tzdata – установить часовой пояс.
Познакомились с файлами:
- /etc/localtime – является символической ссылкой и содержит информацию о текущем часовом поясе;
- /etc/dhcp/dhclient.conf – настройки dhcp-клиента, который умеет запрашивать ntp-сервера для синхронизации времени;
- /etc/systemd/timesyncd.conf – настройки службы синхронизации времени.
Узнали про службу синхронизации времени:
- systemd-timedated.service – стартует по запросу, а после синхронизации времени отключается до следующей синхронизации.
Сводка

Имя статьи
Дата, время и часовой пояс в Linux
Описание
В статье мы разберёмся с тем, как настроить время в Linux. Посмотрим текущее время, укажем часовой пояс и настроим синхронизацию времени
Время является важным аспектом в системах Linux, особенно в критически важных службах, таких как задания cron.
Наличие правильного времени на сервере гарантирует, что сервер работает в здоровой среде, которая состоит из распределенных систем и поддерживает точность на рабочем месте.
В этой статье мы сконцентрируемся на том, как установить время / дату / часовой пояс и синхронизировать часы сервера с вашим компьютером с Ubuntu Linux.
Проверьте текущее время
Вы можете проверить текущее время и дату, используя команду date и timedatectl.
Эти команды могут быть выполнены прямо из терминала от обычного пользователя или от суперпользователя.
Команды удобны, полезность двух команд ощутима, когда вы хотите исправить неправильное время из командной строки.
Использование команды date
Войдите в систему как пользователь root и используйте команду следующим образом:
$ date
Вывод:
Вт фев 5 15:16:04 MSK 2019
Вы также можете использовать ту же команду, чтобы проверить дату 2 дня назад
$ date --date="2 days ago"
Использование команды timedatectl
Для проверки состояния времени в вашей системе, а также текущих настроек времени, используйте команду timedatectl, как показано далее:
# timedatectl
или
# timedatectl status
Изменение времени
Мы используем timedatectl для изменения системного времени в формате HH: ММ: ss.
HH обозначает час в 24-часовом формате, MM обозначает минуты, а SS – секунды.
Для установки времени на 09:08:07 используйте команду следующим образом (используя timedatectl)
# timedatectl set-time 09:08:07
Используя команду date
Изменение времени означает, что все системные процессы выполняются в одно и то же время, при этом рабочий стол и сервер работают одновременно.
Из командной строки используйте команду date следующим образом:
# date +%T -s "10:13:13"
Где,
• 10: час (hh)
• 13: минута (мм)
• 13: Второй (ss)
Чтобы изменить локаль на AM или PM, используйте %p в следующем формате.
# date +%T%p -s "6:10:30AM"
# date +%T%p -s "12:10:30PM"
Изменение даты
Как правило, вы хотите, чтобы ваша системная дата и время устанавливались автоматически.
Если по какой-либо причине вам необходимо изменить его вручную с помощью команды date, мы можем использовать эту команду:
# date –set=”20140125 09:17:00”
Он установит текущую дату и время вашей системы на «25 января 2014 года» и «09: 17: 00 AM».
Обратите внимание, что для этого у вас должна быть привилегия root.
Вы можете использовать timedatectl, чтобы установить время и дату соответственно.
Допустимый формат: ГГГГ-ММ-ДД, ГГГГ представляет год, ММ – месяц в двух цифрах, а ДД – день в двух цифрах.
Чтобы изменить дату на 15 января 2019 года, вы должны использовать следующую команду
# timedatectl set-time 20190115
Создать пользовательский формат даты
Чтобы создать собственный формат даты, используйте знак плюс (+)
$ date +”Day : %d Month : %m Year : %Y”
Day: 05 Month: 12 Year: 2013
$ date +%D
12/05/13
Формат %D соответствует формату год / месяц / день.
Вы также можете указать название дня, если хотите.
Вот некоторые примеры :
$ date +”%a %b %d %y”
Fri 06 Dec 2013
$ date +”%A %B %d %Y”
Friday December 06 2013
$ date +”%A %B %d %Y %T”
Friday December 06 2013 00:30:37
$ date +”%A %B-%d-%Y %c”
Friday December-06-2013 12:30:37 AM WIB
Отобразить список / изменить часовые пояса
Изменение часового пояса имеет решающее значение, если вы хотите, чтобы все синхронизировалось с сетевым протоколом времени.
Первое, что нужно сделать, это составить список всех часовых поясов региона, используя опцию list-часовой пояс или grep, чтобы упростить понимание команды:
# timedatectl list-timezones
Приведенная выше команда представит прокручиваемый формат.

Рекомендуемый часовой пояс для серверов – UTC, поскольку он не имеет летнего времени.
Если вы знаете, определенные часовые пояса установите его, используя имя с помощью следующей команды
# timedatectl set-timezone America/Los_Angeles
Для отображения часового пояса выполните:
# timedatectl | grep "Time"
Установите Local-RTK
Часы реального времени (RTC), которые также называются аппаратными часами, не зависят от операционной системы и продолжают работать, даже когда сервер выключен.
Используйте следующую команду:
# timedatectl set-local-rtc 0
Кроме того, следующая команда для местного времени
# timedatectl set-local-rtc 1
Проверить / изменить время CMOS
Аккумулятор CMOS компьютера автоматически синхронизирует время с системными часами, если CMOS работает правильно.
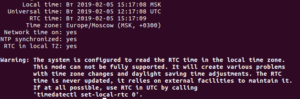
Используйте команду hwclock, чтобы проверить дату CMOS следующим образом
# hwclock
![]()
Для синхронизации даты CMOS с системной датой используйте следующий формат
# hwclock –systohc
Правильное время для вашей среды Linux очень важно, потому что от этого зависят многие операции.
Такие операции включают в себя регистрацию событий и cron jobs.
Также, это важно для работы в домене.
Мы надеемся, что вы нашли эту статью полезной.
Introduction
Modern operating systems detect and synchronize time using NIST (National Institute of Standards and Technology) time servers. NIST operates an atomic clock that neither gains nor loses a second in 300 million years.
However, you may find that your system needs to be synchronized with NIST time servers properly.
This guide shows you how to check and change Ubuntu’s time, date, and timezone.

Prerequisites
- Some operations may require sudo or root privileges
- The command line/terminal window (Ctrl-Alt-T)
Using timedatectl to Control the System Time and Date
Most modern Linux distributions such as Fedora, Debian, Ubuntu, Arch, CentOS v.7.x+, and other Unix-based systems provide the timedatectl utility. This command allows you to control and edit time and date settings using the command line.
Display Current Date and Time with timedatectl
To display the current time and date information, use the command:
timedatectl
The output provides local time, universal time, and the timezone and informs you if the synchronization process is enabled.
Sync Time to NIST Atomic Clock
Set the Ubuntu system to synchronize to the NIST atomic clock with the following command:
timedatectl set-ntp yesTo adjust the time and date manually, turn off NTP synchronizing with:
timedatectl set-ntp noNote: NTP stands for Network Time Protocol.
How to Change the Time
To set the time to your specifications, use the following command:
timedatectl set-time 21:45:53The time format is HH:MM:SS (Hours, Minutes, Seconds). Ensure the automatic time synchronization is off to enable changes.
How to Change the Date
Use the same command to define the date on the system:
timedatectl set-time 2019-04-10The date format is YYYY-MM-DD (Year, Month, and Day).
How to Set a Timezone in Ubuntu
The timedatectl command additionally allows you to synchronize your systems with a time zone of your choosing. To change the time zone, follow the steps below:
1. To list the names of the time zones, use:
timedatectl list-timezones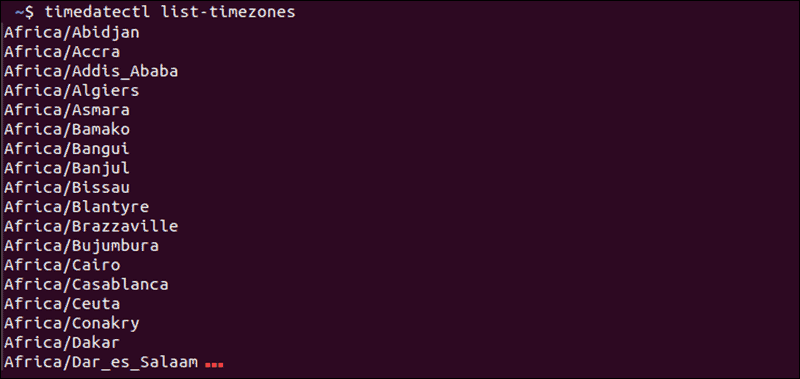
2. Find the location closest to you, then enter the following:
timedatectl set-timezone Region/Location3. Replace Region/Location with a name from the time zone list.
The time zone list is extensive. Filter the list by keyword by piping the grep command:
timedatectl list-timezones | grep keywordSubstitute keyword for any keyword you wish, such as America, Asia, or New_York. If you get an error, double-check your spelling and make sure that you are using capital letters correctly.
How to Set Universal Time (UTC) in Ubuntu
UTC stands for Coordinated Universal Time and appears in scientific calculations and synchronizing between time zones across the globe. Synchronize your system with the following command:
timedatectl set-timezone UTCThere is no immediate output; however, you can check the applied settings with timedatectl.
Note: GMT and Zulu Time are often used to refer to UTC. They are equivalent terms when fractions of a second are not relevant.
How to Sync Hardware Clock
RTC stands for Real-Time Clock, another name for the hardware clock the computer. The system has a tiny quartz crystal and a battery that keeps time when the system disconnects from a network.
Set Hardware Clock to Sync to Local Timezone
To have the Real-Time Clock synchronize to your local time zone, enter:
timedatectl set-local-rtc 1You may get an error in this mode, since updating the hardware clock to the local time zone is unsupported.
Set the Hardware Clock to Sync with UTC
Set the hardware clock to synchronize with UTC by entering the following command:
timedatectl set-local-rtc 0As with the previous command, there is no confirmation that the change has applied. Verify the change manually with the timedatectl command.
Set Time, Date Timezone in Ubuntu Older Versions From Command Line
Older Ubuntu versions may not support the timedatectl command. Find out how to check the Ubuntu version.
There are alternative commands to display and adjust system time setting from a command line. Use the commands listed below:
- To display the date and time of the operating system, use:
date- Change the date of the operating system by typing:
sudo date -s "YY-MM-DD HH:MM:SS"Replace YY-MM-DD with Year-Month-Day, and HH:MM:SS with Hour:Minute:Second. You can set just the date or only the time, depending on your needs.
- Display the time kept by the hardware clock (RTC) with any of the following commands:
sudo hwclock -ror
sudo hwclock --showor
sudo hwclock --show --verboseNote: Some versions may not support the --verbose option, and it may not work on a virtual machine. The hardware clock may not hold the same time as the operating system.
- Display the RTC time in UTC format:
sudo hwclock --show --utc- Change the time kept by the RTC:
sudo hwclock --set --date "MM/DD/YY HH:MM:SS"- Set OS time based on the hardware clock (RTC):
sudo hwclock --hctosysThis command tells the system to set the HC (hardware clock) to SYS (system):
- Set the RTC based on the operating system time:
sudo hwclock --systohcUse this command to reverse the previous process.
Conclusion
This guide showed you how to set the time, date, and time zone on your Ubuntu system. Setting the system to synchronize with NTP is typically the best course of action.