From Eco — English Wiki
Jump to:navigation, search
Server Configuration can be done either through the server GUI or by directly editing configuration files. The latter option is only recommended for advanced users. Many aspects of the world, items, and player settings can be changed in this way.
This configuration guide is based on player tests and crowd-sourcing. No information in this guide has been confirmed by SLG.
Basic server configuration[edit | edit source]
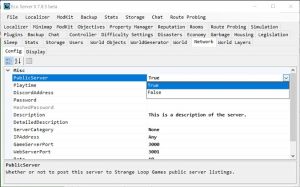
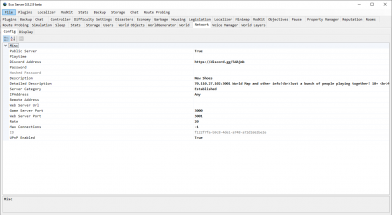
Setting a server’s public status to «True» and adding a server description, both done in the Config tab of the Network plugin.
The most common and important server configurations can be made through the server GUI. Each tab in the server window will have at least 1 sub-tab. Usually, there will be at least 2 sub-tabs: Display and Config. The Display tab shows relevant information and stats about that plugin (each tab represents a server plugin).
Opening the Config tab in each plugin will present a list of options that can be changed through drop-down menus or collections (look for the arrow or breadcrumbs on the right) or direct data entry.
Common configurations[edit | edit source]
Below is a guide to the most commonly configured settings that can be changed through the server GUI.
Server Listing Settings[edit | edit source]
Network > Config
Make server public/private[edit | edit source]
- Public Server — Set to True to have the server listed in the Eco client server browser.
Set playtime table[edit | edit source]
- Playtime — This is automatically filled in if you created the server in the Eco client and made a Timetable (schedule of preferred playtimes). If this is blank, the best way to fill it in is to “Set Playtime” through the Game Menu (
Esc), and copy and paste the data from playtime.eco.- On Windows 10, this file will be found at Users > [username] > AppData > LocalLow > StrangeLoopGames > Eco. Adding a timetable helps the server show up more prominently in the server browser.
- Playtime (Version 0.8.3.x) — You declare the playtime in the network.eco file. Here is an example:
-
"Playtime": "110000011111111122222222 110000011111111122222222 110000011111111122222222 110000011111111122222222 111110011111111122222222 221110012222222222222222 221110012222222222222222", - 1=Sometimes, 2= Regular, 0=Rarely.
- Each line here represents a day. Remove all spaces and linebreaks when adding it to the config. If it contains and spaces or linebreaks it will cause issues with the display of the server in the server list.
-
Set server Discord[edit | edit source]
- Discord Address — Adding the unique ID of a Discord server (after the “discord.gg/”) will provide a link to the Discord server from the tutorial.
Set server password[edit | edit source]
- Password — Set a password for the server, or leave this blank to not require a password. Players on the whitelist will not have to enter a password.
Set server name[edit | edit source]
- Description — Sets the name of your server in the client server browser. Text markup can be used to add color or modify the appearance of the text.
Set server description[edit | edit source]
- DetailedDescription — Sets the long-form description of your server when people click on it in the server browser. Adding this description helps the server show up more prominently in the browser.
Set server category[edit | edit source]
- ServerCategory — Choose from 1 of 4 categories that will show up when players first click on “New Game” in the Eco client. Selecting a category makes it much more likely new players will join your server. Strings available for this option are:
- None
- Beginner
- Established
- BeginnerHard
- Strange
For more information, see the Server Browser page.
Sleep Settings[edit | edit source]
Sleep > Config
- Allow Fast Forward — Enable or disable sleep. This defaults to “False” on public servers and “True” on local servers. Enabling sleep is not recommended on larger servers or public servers. Players can use this to accelerate voting for laws, and some things are not 100% simulated during sleep. Use it at your own risk.
- Sleep Time Pass Multiplier — Maximum multiplier applied to time while sleeping
- Time to Reach Maximum Time Rate — Time it takes to reach Sleep Time Pass Multiplier
XP/Specialty Progression Speed[edit | edit source]
Difficulty Settings > Config
- Collaboration Preset — Change collaboration settings to adjust how quickly players gain skill points. Sticking with the collaboration presets is recommended.
- Specialty Cost Multiplier — Adjusts the required amount of XP required to reach the next star using a multiplier based on the following baseline values 0, 20, 50, 100, 200, 400, 800, 1600 after the 8th each stars baseline is 1600).
- Skill Gain Multiplier — Adjusts the rate of skill points gained over time from food and housing.
- Specialty Experience Divisor — Reduces experience rate based on number of specialties learned. Has no effect as of Beta 8.0.1.
- Specialty Experience PerLevel — Experience required to level up each specialty tier.
- Craft Resource Multiplier — Adjusts the amount of materials required to craft a recipe. Note: Effective maximum of 4.5 in vanilla game. Values higher than 4.5 cannot produce workstations from a single tent stockpile.
- Craft Time Multiplier — Adjusts the amount of time that a recipe takes to craft.
- Player Experience per Specialty — Gives player XP for improving at your chosen field. Note: This is not recommended for public servers because it essentially means that those in front will generally get further in front.
- Unlearn Refund Rate — Obsolete as of Beta 8.0. Has no effect.
- End Game Craft Cost — Includes two options, «Normal and «Expensive» which will alter the crafting costs for the Laser and Computer Lab. Does not affect work orders in process.
Meteor Settings[edit | edit source]
Disasters > Config
- Create Meteor — Enable or disable meteor. Changing from True to False while world is running will destroy the meteor. Changing from False to True while world is running will have disastrous consequences. If you wish to enable the meteor, regenerate the world first.
- Meteor Impact Days — Number of real-life days until meteor makes impact, counting from the date/time the server was first started. To time the meteor impact precisely decimal points seem to be allowed (thus allowing you to align the meteor impact to a desired hour/minute). Editing this setting may require server restart or regeneration to take effect.
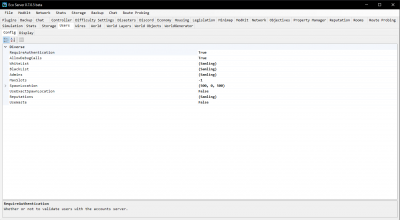
User Settings[edit | edit source]
Users > Config
- Require Authentication — True/False. Validates users with Eco servers. Set to True by default. False has unknown effects and is not recommended.
- Allow Debug Calls — True/False. Allows debug calls to be made to the webserver. Unknown effect.
- White List — Whitelist selected players. Enter each individual player ID. Press
Enterbetween each ID. - Black List — Blacklist selected players. Enter each individual player ID. Press
Enterbetween each ID. - Admins — Give selected players full admin rights. Enter each individual player ID. Press
Enterbetween each ID. Having an admin online helps the server show up more prominently in the server browser.
Note: Whitelist, Blacklist, and Admins all use player IDs. Use the /whois command to see their ID. You will need to enter the proper ID when editing these lists manually.
Use the SLG ID unless the user is a Steam-only user.
| SLG only account | use SLG ID |
| Steam only account | use STEAMID64 |
| SLG + Steam linked account | use SLG ID |
You are able to use the player’s name when running the corresponding commands from inside the game.
- Reputations — Manage reputation tiers and change their titles (this can be fun on a themed server!).
- Unstuck Disable Time — Sets (in seconds) the
/unstuckcooldown to prevent exploits. AdminCommandsLoggingLevel— Sets the level of logging that happens when an admin invokes admin commands. There are four different levels:None— No logging and no notification is given.LogFile— Log to file.LogFileAndNotifyAdmins— Log to file and notifies the all admins connected to the server.LogFileAndNotifyEveryone— Log to file and notifies the all users connected to the server.
UseExactSpawnLocation— Toggles rather exact spawn location should be used for new players, or if the spawn location should be automatically changed dynamically to where there is wild food to gather. Default set to false.
World Generation Settings[edit | edit source]
WorldGenerator > Config
Note: Settings that affect world size, shape, and contents will not take effect until the world is re-generated)
Change World Seed[edit | edit source]
- Seed — Change the randomly generated seed that the world generation is based off.
Note: If you want to duplicate a world off of a seed, you need to match the WorldGenerator.eco settings for that world. This is easy if you just replace your WorldGenerator.eco with a copy of the file from the generated server (the file must have been unchanged since the server was generated). All the random values are generated off the seed, but within ranges defined by the config, so you need both if you want the same end result.
Change World Size[edit | edit source]
- Dimensions — Changes the size of the world. The X and Y values must be the same and divisible by 4. However, not all worlds with dimensions that follow these rules will be stable.
NOTE: The server (EcoServer32.exe) that is bundled with the Eco game client can only run worlds up to 100×100. To run larger worlds, the server must be downloaded separately, through Steam or the SLG website.
Below are the current recommendations for world sizes. Worlds built outside these recommendations may experience playability, performance, and stability issues that are outside the capabilities of SLG support staff:
- (72,72) — 0.52 km2 — This is the default size, recommended for singleplayer and coop games.
- (100,100) — 1 km2 — This is the maximum size the 32-bit Server (executed by Singleplayer) can handle and the recommended size for small public servers. (Used by official servers to create a challenge-focused experience, despite them being medium to large sized)
- (140,140) — 1.96 km2 — This is the recommended size for medium to large public servers.
- (160,160) — 2.56 km2 — The biggest size supported by Strange Loop Games, recommended for the biggest public servers out there. (Used by official server White-Tiger)
The following world sizes are known to be stable on servers with an above average performance, but are not recommended to be used, given they will not allow any meaningful impact on Ecology. Strange Loop Games does not guarantee to provide support for worlds of this size.
- (172,172) — 2.96 km2
- (200,200) — 4 km2
The following world sizes can be stable on servers and for clients that are both having strong to extremely strong performance, but are not recommended to be used, given they will not allow any meaningful impact on Ecology and are not suitable for the vast majority of use cases. Strange Loop Games does not provide support for worlds of these sizes and does not guarantee to take bug reports that involve worlds of these sizes.
- (224,224) — 5.02 km2
- (240,240) — 5.76 km2
- (248,248) — 6.15 km2
- (272,272) — 7.4 km2
- (296,296) — 8.76 km2
- (300,300) — 9 km2
- (360,360) — 12.6 km2
- (400,400) — 16 km2
Worlds over 400×400 may be possible to generate without the server crashing, but are extremely likely to be unstable, even with the most performant hardware available on clients and the server. Strange Loop Games does generally not provide any support nor take bug reports for worlds with such sizes.
Change World Shape[edit | edit source]
- WaterLevel — Sea level height.
- Height — Maximum height of terrain.
Player Spawn Location[edit | edit source]
- Spawn Location — Set new player spawn location coordinates.
- Use Exact Spawn Location — Set to True to spawn players at exactly the same coordinates. Defaults to False, which spawns players in a flat area nearby.
Editing config files (advanced)[edit | edit source]
Editing config files can allow for more detailed changes. You can alter world generation, potentially drastically, in many ways. Player starting items can be added or removed. Objects can be edited and have their storage space changed.
Before you begin editing[edit | edit source]
Before making any changes, make sure you create backups for each configuration file. You should save copies of your edited config files as well, because patches can overwrite your changes.
To make changing the files easier, consider using an editor like Notepad++.
When updating a server, you will want to manually edit the new config files with all your edits, so make sure you document every config change. You can use a text comparison tool to find differences in configs if you are unsure about changes.
Some changes require additional steps to take effect as intended:
- Changes in the area of world generation require a complete restart of the world.
- Changes in EcoSim.eco are accepted when the server is restarted. However, the new values will only occur in newly planted / grown plants and trees.
- Changes in the full range of mods require the deletion of «Eco.Mods.dll» to take effect.
Note: This configuration guide is based on player tests and crowd-sourcing. No information in this guide has been confirmed by SLG.
List of configuration files[edit | edit source]
The standard configuration files are located in EcoEco_DataServerconfigs
Many of the settings found within these files can also be edited through the server GUI. Generally, each configuration file has a tab in the server GUI that corresponds to it. Clicking on each particular setting in the GUI will explain what the setting does at the bottom of the window.
Backup.eco[edit | edit source]
Controls whether to keep backup save files, and how often to create them.
Difficulty.eco[edit | edit source]
Many of these settings were made obsolete with version 0.8.0.0, but may remain in the config files. See also EcoSim.eco for the base skill gain rate.
| Setting | Default | Options | Description |
|---|---|---|---|
CollaborationPreset
|
MediumCollaboration
|
|
Change collaboration settings to adjust how quickly players gain skill points. |
SpecialtyCostMultiplier
|
1.0
|
Lower = faster star progression. | |
SkillGainMultiplier
|
1.0
|
Higher = quicker XP. | |
SpecialtyExperiencePerLevel
|
25.0
|
Higher = longer. | |
CraftResourceModifier
|
1.0
|
Modifies how many resources players need for crafting | |
CraftTimeMultiplier
|
1.0
|
Modifies the crafting time | |
PlayerExperiencePerSpecialtyExperience
|
0.0
|
||
EndgameCraftCost
|
Normal
|
|
The following presets are available by default:
| No Collaboration (0-3 players) | |
|---|---|
| Specialty Cost Multiplier | 0.1 |
| Skill Gain Multiplier | 5 |
| Specialty Experience Divisor | 20 |
| Specialty Experience Per Level | 25 |
| Unlearn Refund Rate | 0.5 |
| Craft Resource Modifier | 0.5 |
| Craft Time Multiplier | 0.5 |
| Player Experience Per Specialty | 0 |
| End Game Craft Cost | Normal |
| Low Collaboration (3-10 players) | |
|---|---|
| Specialty Cost Multiplier | 0.5 |
| Skill Gain Multiplier | 2 |
| Specialty Experience Divisor | 20 |
| Specialty Experience Per Level | 25 |
| Unlearn Refund Rate | 0.5 |
| Craft Resource Modifier | 1 |
| Craft Time Multiplier | 1 |
| Player Experience Per Specialty | 0 |
| End Game Craft Cost | Normal |
| Medium Collaboration (10-30 players) | |
|---|---|
| Specialty Cost Multiplier | 1 |
| Skill Gain Multiplier | 1 |
| Specialty Experience Divisor | 20 |
| Specialty Experience Per Level | 25 |
| Unlearn Refund Rate | 0.5 |
| Craft Resource Modifier | 1 |
| Craft Time Multiplier | 1 |
| Player Experience Per Specialty | 0 |
| End Game Craft Cost | Normal |
| High Collaboration (30+ players) | |
|---|---|
| Specialty Cost Multiplier | 2 |
| Skill Gain Multiplier | 1 |
| Specialty Experience Divisor | 20 |
| Specialty Experience Per Level | 25 |
| Unlearn Refund Rate | 0.5 |
| Craft Resource Modifier | 1 |
| Craft Time Multiplier | 1 |
| Player Experience Per Specialty | 0 |
| End Game Craft Cost | Expensive |
Disasters.eco[edit | edit source]
File use to configure the meteor.
| Setting | Default | Options | Description |
|---|---|---|---|
CreateMeteor
|
true
|
|
Defines if there is a meteor or not. |
MeteorImpactDays
|
30.0
|
Number of days before meteor. Real time defined. |
EcoSim.eco[edit | edit source]
Contains settings for atmosphere, pollution rates (e.g. from tailings) and sea level rise, as well as biome definitions and simulation interactions like rainfall.
Also sets configurations for the time multiplier, day & night length and the base skill gain rate.
TimeMultAn optional multiplier to make game time (including crafting, simulations, etc.) run faster or slower.TimeOfDayScaleAdjusts the speed at which the day/night cycle runs, as a value of X seconds per real-world second. Does not affect simulation speed.BaseSkillGainRateThe default experience gain for all players, regardless of their other sources of experience points and difficulty settings.
Localization.eco[edit | edit source]
File use to configure language.
Language(default : «English») Defines the language.EnglishEnglishFrenchFrançaisGermanDeutsch
Maintenance.eco[edit | edit source]
Auto Shutdow HourSpecifies what UTC hour of the day automatic shutdown should occur. The is best paired with systems that automatically restart the serverAuto Shutdow MessageSpecifies the message to be sent when the automatic shutdown occurs.
ModKit.eco[edit | edit source]
Controls mod loading.
WhitelistEnabledWhether to use a whitelist to select mods to load. If disabled, all listed mods will be loaded.WhitelistWhich mods to load when whitelist is enabled.LiveUpdateUnityFilesWhether to check for unity file updates continuously, e.g. when switching mods around for testing.PreserveGeneratedModsAssemblyControls if the Eco.Mods.dll assembly is saved on server start.
Network.eco[edit | edit source]
File use to configure networking.
PublicServer(default : false) Defines if other players can see server.PlaytimeSee #Set_playtime_table.DiscordAddressInvite link ID for a Discord server (the ID after the “discord.gg/”).PasswordDefines if a server’s password.DescriptionDefines the name of the server.DetailedDescriptionDefines the server’s description.ServerCategorySee #Set_server_category.IPAddress(default : Any) Internal server IP-address the server should bind to.RemoteAddress(default : ) Public/external IP-address and port number needed to reach the server. Can be a domain name, but still has to have the external game server port. Examples"10.1.1.1:3000/","gs2.play.eco:3000/".GameServerPort(default : 3000) Port to join server.WebServerPort(default : 3001) Web application port.WebServerUrl(default : ) Public/external web sever URL. Examples"http://10.1.1.1:3001","http://gs2.play.eco:3001"RateThe network rate used to communicate between server and client.- A low rate will cause slow updates in the world.
- A high rate will risk lost packets and thus desync, as the network protocol uses UDP connections which does not retransmit lost packets.
- Actual meaning of this value is unknown.
MaxConnections(default : -1) Maximum number of concurrent players (-1 no limits).UPnPEnabled(default : true)
Pause.eco[edit | edit source]
PausedPauses the game world when true.UnpauseAtFirstLoginAllows newly created worlds to be paused until someone joins them for the first time.
Profanity.eco[edit | edit source]
Contains a list of offensive words (including such offenders as ‘commie’ and ‘shinola’), presumably for chat protection.
Rooms.eco[edit | edit source]
EmptyBlocksCountAsWindowsDisable to require window blocks for windows.WallBlocksPerWindowDefines how many wall blocks are needed for each empty window or door block.
Sleep.eco[edit | edit source]
This file is used to configure the Sleep feature. It is default disabled for dedicated servers, and enabled for local servers.
AllowFastForward(default depends on server type) will allow players to use beds to fast-forward time.SleepTimePassMultiplier(defaulted to «500») defines the maximum fast-forward speed.TimeToReachMaximumTimeRate(defaulted «10») defines how long the windup time is to reach that maximum fast-forward speed.
Stats.eco[edit | edit source]
Controls reading and writing statistics information to the stats database. Disabling these will cause issues with the web interface.
Storage.eco[edit | edit source]
File use to configure world’s saves.
SaveNameThe name of the worldSaveFrequency(default : «60») Time between saves.CleanupFilesOnExceptions(default : false) Defines if we clean files when exceptions occured.StorageDirectory(default : «Storage») Defines the name of the directory where saves files is stored.
Users.eco[edit | edit source]
Contains user controls like whitelisted and blacklisted players, who has admin privileges and the various titles players get through reputation. Also contains settings for how food plants are spawned around new players when they first join.
MaxRepFromOnePersonThe most positive reputation a player can receive from one other player.MinRepFromOnePersonThe most negative reputation a player can receive from one other player.WhiteListUsers who can enter the server without inputting a password.BlackListUsers who are denied entry to the server.AdminsUsers with admin privileges, able to use admin commands.ReputationsA list of titles given to users with corresponding reputation levels, and the color of those titles in hexcode.UnStuckDisableTimeA cooldown for using the unstuck command, to prevent abuse.AdminCommandsLoggingLevel— Sets the level of logging that happens when an admin invokes admin commands. There are four different levels:None— No logging and no notification is given.LogFile— Log to file.LogFileAndNotifyAdmins— Log to file and notifies the all admins connected to the server.LogFileAndNotifyEveryone— Log to file and notifies the all users connected to the server.
UseExactSpawnLocationSee User Settings.SpawnLocationWhere new players will be placed in the world. Written in X, Y and Z coordinates.
IgnoreVersionMismatch Controls if clients with a different version to the server should be allowed to connect. Defaults to false, and is used for Debug purposes only as it will likely result in strange behaviour if changed.
World.eco[edit | edit source]
WorldTickCPUMaxDetermines how much of any CPU core can be used by the server. Defaults to 25%, and should supposedly not be set higher than 75%.
WorldGenerator.eco[edit | edit source]
File use to configure world’s generator. Settings here will only take effect when generating a new world.
SeedDetermines the randomizer seed used for world generation. Two identical config files with the same seed will generate identical worlds. Identical config files with different seeds will generate similar (i.e. based on the same parameters) but different worlds.DimensionsBoth values must be equal, and must be multiples of 4 (or the server won’t launch). Larger world will be more resistant to pollution and have more natural resources. These values correspond to tens of meters (not blocks), so the default 72×72 world is 720 meters in each direction, or 0.52 km2. See also Server Configuration#Change World Size.WaterLevelAt which height level the water’s surface is. Defaults to a multiple of 4. Other values (e.g. 62 instead of the default 60) will cause water to reach only partially up the side of blocks. If that is a problem is unknown.HeightThe maximum world terrain elevation, probably.
LandPercentageRangean upper and lower bound for how much of the world can be made into landmass during world generation. Anything that isn’t land will be made into ocean. Keep in mind that more land will mean more vegetation and animals, which may shift the difficulty of the game as these affect pollution outcomes and available resources.CoastlineSizeSize of land coast (beach)ShallowOceanSizeUnknown, may be related to how much shallow water surrounds landmasses.BiomePercentHow much of the landmass will be of a certain biome type, adjustable for each kind of biome (e.g. WarmForestPercent). Uses a decimal value rather than percentages in the config file. The sum of these values must add up to less than a hundred percent so that the remainder can be made into grasslands.NumContinentsRangeDetermines how many continents may be created. Set max and min values to the same (e.g. 2) to ensure exactly that many continents are generated.ContinentAvoidRangeHow far apart continents will be. Unknown what the values actually mean.IslandPercentHow much of the world (or remaining ocean, maybe) will be dotted with islands.NumSmallIslandsRangeDetermines the number of islands. Combined with IslandPercent, determines the size and number of islands present.IslandAvoidRangeDetermines how far from other landmasses islands will be generated. Unknown what the values actually mean.NumBiomeOne setting for each type (e.g. NumRainforests, etc.), determining how many will be generated. Combine with BiomePercent to make, for example, many small or fewer large such biomes.LakeSizeRangeRange of how many blocks the lakes will take up.NumLakesRangeRange of how many lakes canspawn.NumRiversRangeRange of how many rivers can spawn.RiverAvoidanceDistance between the spawned rivers.RiverWidthWidth of the River in blocks.MaxElevationOceanDistanceUnknown.ElevationPowerUnknown.AutoScaleUnknown.AutoScaleExponentUnknown.SaveTerrainImageCreates a biomes.png image in the server folder after worldgen if set to true.
WorldObjects.eco[edit | edit source]
Controls world object tick (update) behavior. This may be connected to when world object check to see if their stats have changed, and thus update their appearance.
For example, as of 0.8, fertilizing crops requires waiting for (or forcing) a tick update for the new soil statistics to show up when using a soil sampler.
TargetTickDeltaTimeMSTime between world object ticks, in milliseconds. Defaults to 0, which makes it variable. Appears to target a 10 minute interval when variable.ParallelWorldObjectTicksAn experimental feature that allows parallel (as opposed to sequential) world object ticks. May increase performance at the cost of stability.
Содержание
- [RU] Запускаем сервер Eco Global Survival Game для игры с друзьями!
- Overview
- Русскоязычное сообщество Eco Global Survival Game ВКонтакте.
- Вступление.
- Запуск.
- Обновления.
- Дополнительно.
- Полезные ссылки.
- ECO | Server Configuration Print
- Setting Up a Server (advanced)
- Contents
- Starting up your Eco server. [ edit | edit source ]
- Configuring your Eco server. [ edit | edit source ]
- Setting up the network. [ edit | edit source ]
- Setting up the firewall on your server. [ edit | edit source ]
- Forwarding your router ports. [ edit | edit source ]
- Troubleshooting errors and issues. [ edit | edit source ]
[RU] Запускаем сервер Eco Global Survival Game для игры с друзьями!
Overview
Данное руководство поможет вам создать свой сервер для игры с друзьями!Все дополнительные вопросы задавайте в нашей группе в специальной теме по данному вопросу – https://vk.com/topic-157589343_37586245
Русскоязычное сообщество Eco Global Survival Game ВКонтакте.
Получать первым переводы обновлений на русский язык.
Найти друзей, товарищей и единомышленников.
Найти русский сервер для постоянной игры.
Решить свою проблему, попросить совета и просто пообщаться:
Можно в нашей группе русскоязычных игроков ВК: [link]
Вступление.
Для запуска сервера Eco через Steam, вы должны иметь игру в Steam.
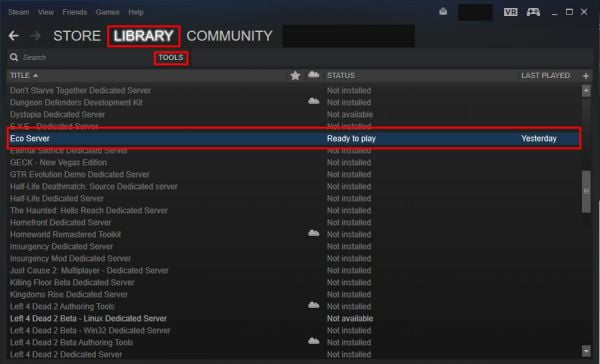
Для начала вы должны скачать и установить сервер. Для этого заходим в сам Steam =>
Библиотека => Инструменты. Там находим “Eco Server” и устанавливаем его себе на
компьютер.
Сервер устанавливается в SteamsteamappscommonEco Server.
Запуск.
Сервер должен быть запущен как и любая другая игра через Steam.
Как и любая игра – если вы его недавно запускали, он появится в “последних запущенных
играх”.
Так же вы можете запустить сервер вручную через EcoServer.exe в папке с игрой.
Обновления.
Сервер Eco, установленный через Steam будет обновляться автоматически как и любая
другая игра.
Так же как и любую другую игру у вас есть возможность запустить более раннюю версию
сервера.
(Выбрав сервер в библиотеке Steam => Инструменты => Правой кнопкой мыши по серверу и
“Свойства” – далее выбрать нужную версию.
‼ Будьте внимательны – обновление сервера в Steam не сотрёт мир, но может сбросить
конфигурации сервера. ‼
Дополнительно.
Чтобы запустить сервер, нужно просто запустить файл EcoServer.exe в папке с игрой или
сделать это через Steam.
При первом запуске сервера – идет создание мира и это может занять некоторое время, это
нормально.
Полезные ссылки.
↘ Команды администратора сервера – [link]
↘ Настройки сервера под себя (Рейты/размер мира/и др.) – [link]
↘ Русскоязычная группа ВКонтакте – [link]
Источник
ECO | Server Configuration Print
It’s easy to configure your Pingperfect ECO Server. Just follow the steps below.
- Open the ‘Configuration Files’ section from your control panel.
- Select the ‘Configuration Editor’ option next to ‘Network.eco’
- Refer to the Configuration settings below and change the respective settings where you need to do so in order to configure your server to your desires.
Server visible in serverlist? //Tick to enable, untick to disable, Ticked means Public server, Unticked means Private server.
Servername Eco Server //Server name, exactly as it will be displayed in the in-game server browser.
Password //Server password, when set, must be entered by anyone who wants to join the server.
DiscordAddress https://discord.gg/discord // Must be the full discord URL. Leave blank if you don’t wish to use the option.
Maximum Players 1 //Maximum players connected at any one time — if you increase this higher than the player slots you have purchased, your server will stop working.
Detailed Description //Server description, as it will be shown in the in-game server browser
Server Category //Beginner, Established, BeginnerHard or Strange
Edit Playtime T his may cause your server to not show correctly in the server list //Change this to edit the playtime of the server.
ID a5620c9c-3c6b-4d1c-9102-641c70ace5c0 //Do not change, will stop your server from operating correctly.
Passport 2cea1490-f45f-4308-b02b-a55785c76322 // Do not change, will stop your server from operating correctly.
Looking for a game server host known for brilliant 24/7 customer support and quality hardware?
Источник
Setting Up a Server (advanced)
Contents
Starting up your Eco server. [ edit | edit source ]
Welcome to the advanced guide. [ edit | edit source ]
Welcome to the advanced guide on how to set up your Eco Server and how to troubleshoot issues. Right now I am using the 0.7.05 beta. After launching your server successfully, a secondary window will open where all the following settings can be changed to your liking. If you have any questions or need additional help, then feel free to reach out to us at our Eco Discord server.
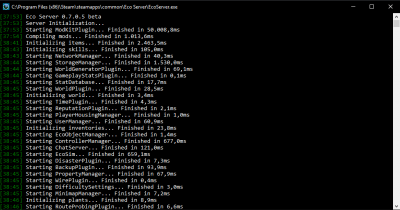
The first thing that will happen after you launch your server is this CMD opening. You can see the loading progress and any potential errors here.
Finding the config window. [ edit | edit source ]
After the initial core has loaded you will get a second window — this is where all the awesome settings above can be changed.
Changing the world generation settings. [ edit | edit source ]
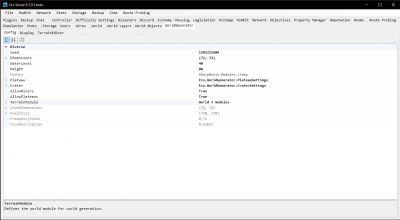
You can change the world size, seed and many other options on how your world will be generated in the WorldGenerator / Config tab.
Only certain world sizes are known to be stable.
Editing general permissions and settings. [ edit | edit source ]
You can whitelist and blacklist users by their steam id or slg id in the Users / Config tab. To find an id for an existing player on your server, from in game you can use commands ‘/whoami’ and ‘/whois username’. You can also add admins in the same way.
Editing maxslots has changed to network [ edit | edit source ]
Editing MaxSlots has been moved to Network and is now called Max Connections
This determins how many users are allowed to connect to your server at a given time. Setting it to -1 will make it unlimited.
Configuring your Eco server. [ edit | edit source ]
This window will automatically open once you start your CMD.
Changing the default ports. [ edit | edit source ]
First of all, Eco servers default ports are 3000 for the Game connection and 3001 for the Web connection. You can change the default ports by going to the network tab and then select the config tab.
Connecting to your server. [ edit | edit source ]
You will need to find the IP that the server uses by going to Network / Display. Your external IP will be shown here. You can also optionally find your Public IPv4 via https://www.whatismyip.com/. Let’s say that IP is 33.45.189.180. If you wish to manually connect to the server, you would have to type 33.45.189.180:3000 (3001 if using a version older than 0.7.4) — this is also called your game port. All server communication goes (by default) through the 3000 port — (game port). When adding your server to the client list you need to use the web port — this is used in voting for laws and so on.
Setting your server to public or private. [ edit | edit source ]
There is a setting under network / config called PublicServer. You can set this setting to True if you wish for the server to be shown in the public list. If you wish for your server to only be accessable for people on your network, you can set this setting to False. You can also password protect your server by typing in a password in the tab right below PublicServer.
Setting your server name. [ edit | edit source ]
You can set your server name in the Description tab in the network / config tab. You can type in your server name here — for example «Bexs Super Nice Server«.
Backing up your server. [ edit | edit source ]
There is a small tab right beside Plugins called Backup. Go here, and you can change the backup frequency as well as how many backups the server should keep.
Detecting NAT settings. [ edit | edit source ]
For servers on or above 0.7.4:
As of 0.7.4 the server software uses NAT punchthrough and as such the server should always be able to punch through your firewalls, if this is not the case please contact support.
On version 0.7.4+ the network setting for NAT has been removed.
For servers below version [0.7.4]:
If true, the server will attempt to detect a NAT and create UPnP port mappings, allowing for easier external connections without manual port forwarding. This setting is recommended keeping as True. If UPnP auto portforwarding is not working as expected with Eco NAT, it is recommended that you turn this off by setting it to False and manually port forwarding all your ports instead.
Disasters settings. [ edit | edit source ]
Do you want to smash your world in a few days or disable it completely? Fear not! You can disable this by going to the Disasters tab and setting CreateMeteor to False if you don’t wish any meteors to crush your world at all. If you, however, want it to spawn, you will have to set it to True. You can set the impact day by editing the (by default) 30 to a custom day of your choise.
Checking if your ports are open. [ edit | edit source ]
For servers above [0.7.4]:
You should not have to port forward as NAT Punchthrough should be able to ensure the ports are open.
Though if this is not the case please follow the statement for 0.7.4+ servers.
For servers below [0.7.4]:
You will need to open all the ports in your router and firewall for your server to be publicly accessable unless you have NAT set to true. There is an advanced guide on how to open down below. You can also check out the extensive guide on how to portforward your router at https://portforward.com/. You will then be met with a console status window (don’t close this one or your server will shut down).
Folders and where to find them. [ edit | edit source ]
Your folder structure should look like this:
Main Folder / Builds — Here you can find your server exe.
Configs — Here you can find all your configs in .json text format.
Logs — Here you will find all your server logs.
Mods — All your mods are located here. This is also where you install your mods.
Storage — This is where the world data and user data is saved — If you want to reset your world and user data, simply delete all content in here.
WebClient — This is where the files for the law system web server are stored.
Setting up the network. [ edit | edit source ]
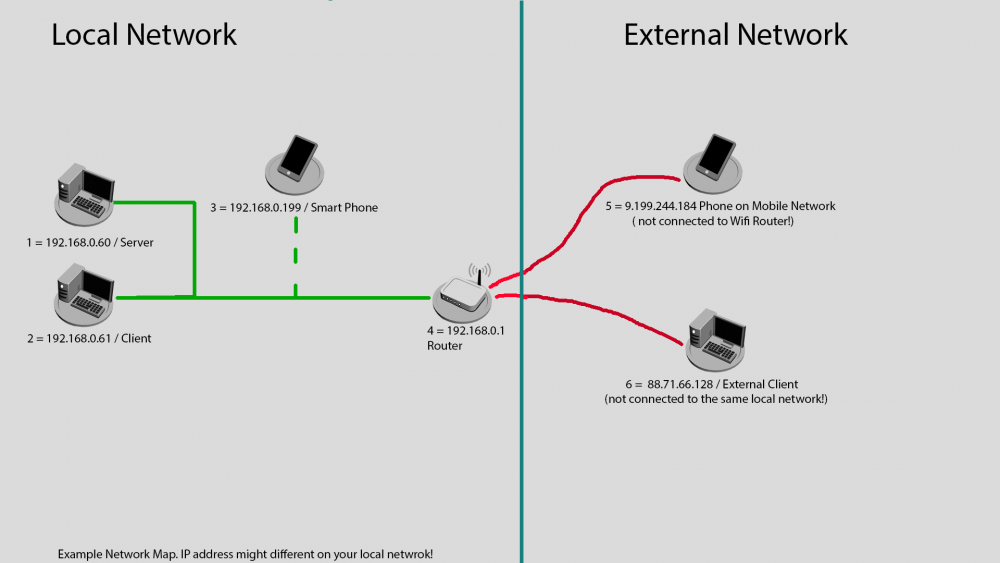
The map above is to help visualizing where we are on the network. Hosting a private server just for yourself only requires adding your Eco server to the Windows firewall — while public or private servers that other players outside of your home should have access to require configuration of your router. Since routers have different configuration methods and pages I’m unable to cover those but I will give an example on standard ASUS routers that are very simple. You will need to google how to forward ports on your own router.
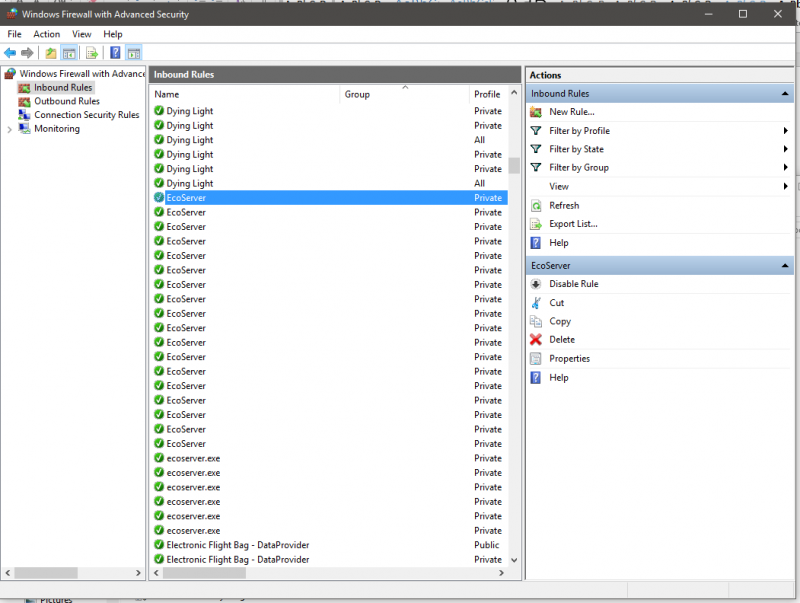
Setting up the firewall on your server. [ edit | edit source ]
Third party Antivirus software and/or firewalls might still block ports even if you open them — Please configure those software or disable them as needed.
You will need to configure and open some ports before you publicly can start the Eco server.
You can find your firewall options in your control panel (on newer version of windows you can just hit the windows button and search for the firewall application).

When opening the Advanced Firewall settings you are met with a screen that has a lot of rules by default. Please select the “Inbound Rules” and click the “New Rule…” button.
This will open a wizard. Here you should select that the new rule should be a port rule (Note that selecting the program later might cause issues when updating the server).

You should select TCP on the next page and give the rule a specific port range. This means if you need to open port 3000 and 3001 you should write 3000 – 3001 (see below).

On the next screen you select what to do with these ports. Here you should let the default “Allow the connection” stay and click to the next screen.

For the next screen let all items remain checked (All of them should be selected by default).

Finally you need you need to name your rule. Good naming practice now, will make it much easier to find the correct rule later; should you need to make adjustments.

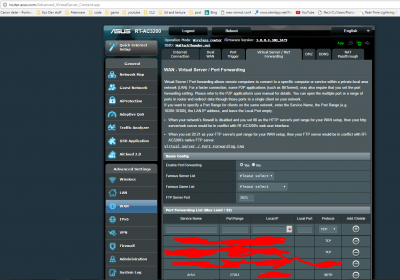
Forwarding your router ports. [ edit | edit source ]
To give other people access to your server you need to tell your router how to handle incoming request from certain ports that come from an external computer.
On an Asus router you can find these settings under Wan -> Virtual Server / Port Forwarding. ( I censored my own setup to keep my server secure but this should give some idea). First of all you need to set a name (Service name). The next item is the port range, on my router I would write 3000:3001 to give it the right range. Next item is the local IP — this should be your server IP. Leave the local port blank.
Troubleshooting errors and issues. [ edit | edit source ]
Insufficient rights. [ edit | edit source ]
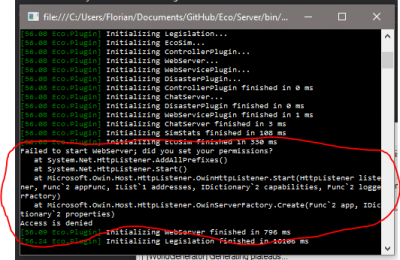
- If you are meet with the error message on launch, your server has insufficient rights and cant host the web UI. You can easily fix that by running the server as Administrator.
- Normally if you did the above as described you should now have a server that people could access. If not, you need to troubleshoot to find out where the issue is.
In case the webserver just wont start, it could be that your current user has not enough rights configured to create a webserver.
Try the following command in an elevated console (with admin rights)
Replace «Everyone» with either your domain and user, or the locale-dependant equivalent (e.g. for german it is «Jeder»).
Unable to connect to the server. [ edit | edit source ]
- Check if your server is running properly. You can do this by opening your browser and typing in Localhost:3001.
- If your unable to see the your eco server site you might need to start the server as an administrator. Other possible issue can also be an outdated .net installation.
Its recommended to have at least .net 4.6.2 or higher. You can download .net 4.6.2 from here https://www.microsoft.com/en-us/download/details.aspx?id=53344 - Repeat the same thing but from a different computer or phone that is connected via cable or WiFi to the same local network. You will need to write the server address this time in your local browser instead of local host. In our case I would write 192.168.0.60:3000.
Unable to find the server. [ edit | edit source ]
- If you are unable to see the Eco server status page you have not opened your local firewall. Remember that antiviruses like AVG, Kaspersky etc. running on your computer that host the Eco server may still block your ports. Most antivirus programs allow configuring exceptions for games and other applications from their settings. Another cause could also be that you have not configured the right ports (in the future you might also need to open UDP ports instead of only TCP ports).
- So far so good. Most likely your local network is now working properly but other people can’t still see your server. First of all check if you can access the server page again. For this you need a device or computer that is not connected to your local network. You also need to know your external IP address. You can find your external IP address by visiting for example whatsmyip.org from any device or computer on your local network. For example, if your external IP address is 77.77.77.56. I should try to connect via my external phone or computer with the web browser to the address 77.77.77.56:3000.
Unable to find the server. [ edit | edit source ]
- If you are able to connect but you cant see the server in the server browser you might have forgotten to set your server in the server configuration to public. This can be done via the Eco Server GUI under Network/Config/ServerIsPublic set to true. If you are unable to access the eco server status site from an external Device, you have most likely miss configurated your router and need to reconfigure or restart your router. There is not a lot more to this actually. In most cases it is this simple.
DS-Lite tunnel issues. [ edit | edit source ]
- One last thing. It seems that some people got a DS-Lite tunnel or other similar on there router, this unfortunately will make it impossible to to host a Eco server since open ports wont be forwarded in this network configuration. You can try to ask your ISP to give you a normal ipv4 address instead of an ipv6 tunnel with a shared ipv4 address by several customers like DS-Lite does.
Additional help and support. [ edit | edit source ]
If you have additional questions or issues please search and post on the Official Eco Forums and if your issue is still unresolved, send an email to [email protected] or join our Eco Discord server.
Источник
Содержание
- Запускаем собственный сервер Eco
- Требования к системе и окружению.
- 1) Белый (выделенный) статический IP адрес.
- 2) Выделенная машина для сервера.
- 3) Активный администратор.
- Необходимое для доступности сервера извне.
- 1) Наличие доступа сервера в сеть интернет.
- 2) При использовании роутера, сделана переадресация портов на сервер.
- 3) При использовании межсетевого экранабрандмауерафайрвола, к серверу Eco разрешён доступ.
- Скачивание файлов сервера.
- 1) Установить из Steam
- 2.а) Скачать с официального сайта Strange Loop Games
- 2.б) Скачать с хранилища SLG на Amazon’е
- 3) Скачать из Steam с использованием SteamCMD
- Setting Up a Server
- Contents
- Server Through Steam [ edit | edit source ]
- Installing [ edit | edit source ]
- Running [ edit | edit source ]
- Updating [ edit | edit source ]
- Server Through SteamCMD [ edit | edit source ]
- Installing [ edit | edit source ]
- Manually [ edit | edit source ]
- With a bat file [ edit | edit source ]
- Server Without Steam [ edit | edit source ]
- Installing [ edit | edit source ]
- Running [ edit | edit source ]
- Updating [ edit | edit source ]
- Configuring [ edit | edit source ]
- Configuration Notes [ edit | edit source ]
- Server Folder Breakdown [ edit | edit source ]
- Eco Server UI [ edit | edit source ]
- Commands [ edit | edit source ]
- Server UI Notes [ edit | edit source ]
- Connecting to your server [ edit | edit source ]
- LAN [ edit | edit source ]
- Getting others to connect to your server [ edit | edit source ]
- Troubleshooting [ edit | edit source ]
- NAT and Network Settings [ edit | edit source ]
- Anti-Virus / Firewall [ edit | edit source ]
- For Further Help [ edit | edit source ]
Запускаем собственный сервер Eco
Требования к системе и окружению.
1) Белый (выделенный) статический IP адрес.
(Что такое белыйвыделенный IP https://clck.ru/JNb5A)
Да, благодаря некоторым махинациям, Эко может работать и вообще без белого адреса. но ценой этого станет увеличение задержки (пинга) и большее количество разрывов связипроблем с подключением.
Статический адрес имеет минимальный приоритет, т.к. при наличии связи с мастерсервером новый адрес будет незаметно подтянут с него и все ссылки в избранномистории останутся рабочими.
2) Выделенная машина для сервера.
Это не обязательно должен быть сервер специально под Эко, но запускать серверную часть (разумеется если вы планируете что то большее чем «сервер на часик с друзьями») на домашнем ПК… Достаточно странно.
Запустили торрент и у всех игроков начались проблемы, в итоге такие сервера простаивают пустыми.
В целом, для 6-10 активных игроков достаточно следующего.
2-3GB свободной RAM (оперативной памяти), SSD со свободным местом под сохранения и резервные копии хотя бы в 10-15гб (что бы не было подвисания при автосохранении), свободная мощность процессора (из относительно современных) в 2-3GHz и пару потоков.
На сервере должна быть более-менее современная операционная система Windows (хотя бы W7+ или новее), запуск под Unix системами возможен, но сопряжён с таким количеством танцев с бубном что выходит далеко за рамки этой статьи.
3) Активный администратор.
Игроки не любят днями ждать прихода администратора, который всё починит. Именно поэтому если вы хотите популярный и оживлённый сервер… Вам придётся за ним следить.
Хотелось бы заметить, что «АА» (Admin Abuse, читерство при помощи админских прав) в Эко достаточно легко замечается игроками и такие сервера пустеют очень быстро. Если играете на сервере — играйте честно.
Необходимое для доступности сервера извне.
1) Наличие доступа сервера в сеть интернет.
(Я понимаю что для большинства читающих, этот пункт выглядит тупо, но я уже не один раз получал вопросы вида «я запустил сервер на не подключенной никуда машине, почему к нему никто подключится не может?»)
2) При использовании роутера, сделана переадресация портов на сервер.
По умолчанию, сервер Eco использует порты 3000 UDP и 3001 TCP
За более подробной информацией, обращайтесь к инструкции по вашему роутеру.
Например для роутеров Zuxel Keenetic пример можно посмотреть здесь — https://help.keenetic.com/hc/ru/articles/360000360760
3) При использовании межсетевого экранабрандмауерафайрвола, к серверу Eco разрешён доступ.
По умолчанию, сервер Eco использует порты 3000 UDP и 3001 TCP
За более подробной информацией, обращайтесь к инструкциям используемого вами программного обеспечения.
Например для брандмауера Windows, пример настройки можно посмотреть здесь — https://ru.wargaming.net/support/ru/products/wot/article/15259/
Скачивание файлов сервера.
Есть три возможных варианта.
1) Установить из Steam
«Библиотека → Инструменты → Eco Server»
Обратите внимание, вам понадобится запущенный на серверной машине клиент Steam, с осуществлённым входом в учетную запись на которой куплена Eco.
Соответственно играть под этой учётной записью с другого компьютера у вас не получится.
Запускаем через кнопку «Запустить» в Steam или через Eco ServerEcoServer.exe в папке куда ваш Steam скачивает игры.
2.а) Скачать с официального сайта Strange Loop Games
(нужен аккаунт на котором Eco куплена напрямую на сайте или связанный с учётной записью Steam на которой куплена Eco) → открываем https://accounts.strangeloopgames.com/home нажимаем «LOGIN» вводим данные своей учётной записи strange loop games, оказываемся в личном кабинете. Нас интересует секция «Options → Eco Download -> «желаемая версия» (например 0.8.3) → Server»
Обновлять придётся руками.
2.б) Скачать с хранилища SLG на Amazon’е
Скачанный архив извлекаем туда где у нас будет храниться серверная часть.
Непринципиально, но желательно что бы путь был как можно короче, не имел пробелов и не-латинских символов в пути (делайте C:Server или D:Server, не ошибётесь).
Запускаем EcoServer.exe в папке куда извлекли содержимое архива.
3) Скачать из Steam с использованием SteamCMD
Этот способ не требует авторизации. (Обратите внимание, утилита SteamCMD управляется через команды консоли или командные файлы .bat.)
Рассмотрим настройку с 0. (Готовые архивы в конце этой секции.)
Для начала, заходим на официальную страницу SteamCMD → скачиваем и разархивируем в C:Server (напомню, непринципиально, но желательно что бы путь был как можно короче, не имел пробелов и не-латинских символов в пути, делайте C:Server или D:Server, не ошибётесь).
Обратите внимание, все консольные команды, приводятся в работоспособном виде. Работа с консолью требует внимательности, система НЕ БУДЕТ додумывать за вас или исправлять опечатки.
Для начала запустим и обновим SteamCMD
Вызываем консоль (Пуск → выполнить → CMD), вводим
(Та папка куда мы разархивировали скачанный steamcmd.)
(Запускаем непосредственно SteamCMD для обновления)
Когда обновление закончится, в окне консоли вы увидите строку
Указывая что мы будем работать без определённой учетной записи.
После успешной авторизации (вы увидите 2 строчки с ОК в окне консоли)
Вводим
Разумеется вы можете изменить желаемую директорию (в примере — ecoserver), желательно без пробелов, обязательно только на латинице.
Этой командой мы обновляем файлы выделенного сервера, если их нет — скачиваем.
После завершения вы можете увидеть надпись
В консольном окне.
Теперь серверная часть установлена в папку C:Serverecoserver и вы можете видеть исполняемый файл сервера EcoServer.exe
Через SteamCMD можно выполнять обновление серверной части (разумеется когда сервер остановлен), командой
Так же эта команда восстановит файлы сервера например после неудачного ковыряния.
Теперь можно набрать
В окне консоли для правильного завершения работы с SteamCMD.
Как ранее было обещано, вот готовые варианты архивов, содержащих командные файлы.
Источник
Setting Up a Server
| Accuracy | Spot checked |
| Depth | Basic |
| Readability | Acceptable |
Eco servers are relatively easy to get running, and there are a couple of ways to set one up.
If you own the game through Steam, you can get the server files and run the server through Steam. If you have a Strange Loop Games account, you can download the server files directly through Eco’s website.
There are many server hosting companies that offer to host for Eco servers if you don’t want to or can’t run an Eco server on your computer.
Contents
Server Through Steam [ edit | edit source ]
Installing [ edit | edit source ]
To run an Eco server through Steam, you must also own the game on Steam.
First, download and install the server. To do this, go to Steam -> Library -> Tools. There should be an entry in there called «Eco Server». Installing this will provide you with a copy of an Eco server that you can launch through Steam. The server is installed to:
Running [ edit | edit source ]
The server can be launched like any other Steam game. It will show up in your recently played games if it has been run recently, or it can be launched through the Tools section of your Steam library.
You are also able to navigate to the server’s install location and launch EcoServer.exe manually.
Updating [ edit | edit source ]
Eco Servers installed through Steam will update automatically just like any other Steam game.
To use other versions besides the current release, you can opt into «betas» like other Steam games. This can be done by viewing the server in your Steam Library -> Tools, right-clicking the server and selecting the properties, click the «Betas» tab, and selecting a different version from the drop-down.
If the drop-down menu has no options available, leave the code blank in the box below the drop-down and click «Check Code». You might need to close out of the properties window and re-open it to see the betas list after entering the blank code.
Updating a Steam server will not wipe the world, but may wipe configurations. Make sure you back up your configuration files before updating.
Server Through SteamCMD [ edit | edit source ]
Installing [ edit | edit source ]
Another way to install the Eco Server is to download it through SteamCMD. Steam WIKI article about steamCMD
Download steamCMD, unpack and launch it.
Manually [ edit | edit source ]
Guide to downloading the server manually through SteamCMD: Double Click the steamcmd.exe Wait until it finishes updating and deploying SteamCMD Once loaded login by typing in:
Set the install directory by typing:
This will install the server in a subdirectory within the SteamCMD directory called «Eco_Server». Finally to download the server itself type:
This will download the server. Or when you want to update the server will start downloading the latest version overwriting all the files of the downloaded server.
(Please make sure you do not run your server from the same directory just in case you decide to use this method to update and forget to back up your data.)
With a bat file [ edit | edit source ]
If you want to use a batch file (.bat) make a batch file and put one of the following codes into the file. These commands assume the .bat file is located inside the SteamCMD directory or pointing towards it.
These commands will automatically download the eco-server and place it in a folder named «Eco Server». (Inside the SteamCMD folder). Please copy the new folder and the server data in it to the location you want to host your server from.
When needing to update that server just run the .bat file again and it will update the base game server files inside the SteamCMD then you can follow the other update instructions to update your game server.
Do not run the downloaded server inside the SteamCMD folder itself. You want to keep that version as a backup and reference to an unedited server.
Server Without Steam [ edit | edit source ]
Installing [ edit | edit source ]

To run a server locally without Steam, you first need to grab the server files from Strange Loop Game’s website under «Account». This requires you to sign in to your SLG account and to have purchased Eco through that account or a linked Steam account. On the account page, there is a section that lists the current version of Eco and the current staging release with download links for both. Clicking on the «Server» link for the version you want will download a .zip file of the server.
When the server is done downloading, move the .zip file to wherever you want to install the server. It is recommended to install the server into an empty folder. When you have the .zip file in the location where you want to install the server, unzip it using whichever compression program you prefer (common programs include WinRar, 7-zip, and WinZip).
At this point, your install folder should have a handful of folders with various files and the EcoServer.exe. You are now able to run your server but to make the server publicly visible, you need to do port forwarding. The process for port forwarding is different for different routers, and there are plenty of detailed tutorials on how to this process around the internet. The ports you need to open are 3000 UDP and 3001 TCP.
IMPORTANT If you are installing a dedicated server on the same computer you have or will be running the client from, Network.eco will need to use 2 different ports other then 3000 and 3001. [Example = 4000 and 4001] Port Forward these two new ports.
Running [ edit | edit source ]
To run the server, you just have to launch the EcoServer.exe file in the server’s install.
The first time the server is run it may take a while for the world to generate. This is normal. Some settings, such as the world’s size, can make this a longer or shorter wait. The main server UI won’t appear until the world is done generating and loading.
Updating [ edit | edit source ]
Updating the server must be done manually. This will require you to go back to SLG’s website and download the new version of the server files. You can replace the older version of the server files with the newer version’s files. But if you want to keep the same world and the same configuration settings, you have to make sure not to overwrite those files (the Storage and Configs folders).
It is a good idea to always back up your server files before updating. That way you can revert to the old version if the install gets messed up or if there is some issue with the new version.
See Updating a Server for more details on updating your server manually.
Configuring [ edit | edit source ]
There are tons of options for configuring your server and your playing experience. You can edit these options by directly changing the files in the Configs folder of the server with any text editor. But doing the edits manually, you will need to restart the server to see the changes in-game. Most of these configurations can be changed from the server UI as well, and changes made in the UI don’t require a restart from the server.
If you are going to be playing on the same PC as the PC you are hosting the server from please change your ports to something else. The recommended ports are:
— Game Server Port: 4000 UDP (or UDP/TCP)
— Web Server Port: 4001 TCP (or UDP/TCP)
See Setting Up a Server (advanced) for more details on configuring your server.
Configuration Notes [ edit | edit source ]
- Edits to WorldGenerator.eco require a server wipe to take effect.
- Whitelisting allows whitelisted players to ignore the requirement for a password but for whitelisting to work you must set a password.
- When changing the map size keep the map values divisible by 4 or risk severe issues.
- When changing map height and depth you will have to do the maths to keep issues away, it is not recommended.
- When setting up whitelists/admins you must use either an SLG id or Steam64 id, just writing the username does not work. Here is a link to find your steam64id: http://www.steam64.com
Server Folder Breakdown [ edit | edit source ]
- Configs — Files in this folder contain the configurable settings for the server. You can edit any of the .eco files with a text editor but be careful doing so. Keep in mind none of your edits here will take effect unless you restart your game server (Turn it off and on again.)
- doc — Contains a single file with definitions for the webserver.
- Logs — This folder only appears if you’ve installed a mod that has crashed. It contains mod crash logs.
- Dump — Contains crash dump files for when the server crashes.
- Mods — Contains server game data. This is also the folder where you should place any mods you’ve made or downloaded.
- Storage — This folder contains a backups folder, a file named «Game.db» and a file named «Game.eco». This is where your current game saves is. When wiping the server data/map this is where you will have to go.
- Web Client — The web server files are found here.
Eco Server UI [ edit | edit source ]
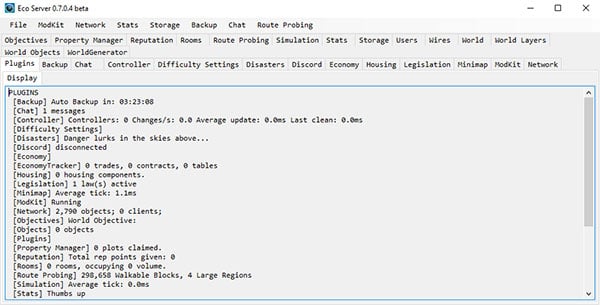
The server UI provides access to a wide variety of configuration options. Changes made to config options in the UI will apply to the server without needing to restart the server. However, with any changes you make (such as adding an admin), you must click «File» and «Save» or else you will lose the changes upon reloading the server.
If you are renting a server through a server hosting company, you most likely do not have access to the default server UI. These companies usually provide a custom UI or other options for easily editing the server’s configs.
Commands [ edit | edit source ]
See Chat Commands for a complete list of commands that are available to both admins and regular users in a default server.
Server UI Notes [ edit | edit source ]
(Please do check the normal configuration notes too.)
1. Changing world generator settings won’t take effect until you wipe and regenerate the map. This includes map sizes.
2. When making a change to your settings through the Server UI remember to click on file -> save to save the edit to the config files.
Connecting to your server [ edit | edit source ]
LAN [ edit | edit source ]
When first attempting to connect to your server, make sure it is running, then enter your game and visit the server browser.
Your server should appear in the server list under «LAN». If the server is public, you should be able to see it in the server browser.
Note: The latest server versions don’t require you to forward your ports, but server versions before 0.7.4 require manual port forwarding. If you are using an older server version you will have to manually forward.
Getting others to connect to your server [ edit | edit source ]
NOTE: Before giving others your IP please check that your server is visible with either of these websites:
Default ports to check are: 3000-UDP and 3001-TCP (Unless you changed them in the config phase.)
Gameport needs UDP and web port needs TCP (Both can be used for each if you want).
3000-TCP might be used when downloading mods from the server, but this is not totally confirmed.
Navigate to https://www.whatismyip.com/ and grab your public IP.
Now add the server’s configured game port at the end. (Game Port not Web Port) It should look something like this: xxx.xx.xx.xx:3000
For example: 290.94.93.89:3000
Now that you have the server address. Give that to your friends and they should be able to connect if you’ve set up the server correctly.
Troubleshooting [ edit | edit source ]
See Setting Up a Server (advanced) for more details on server troubleshooting.
NAT and Network Settings [ edit | edit source ]
(NOTE: NAT Punchthrough has been added since version 0.7.4 of the server and NAT based settings have been removed)
You can view the NAT settings for your server in the Network tab of the server UI. When the Network tab is clicked (tab, not the menu option at the top of the UI) it will show 3 tabs, Config, Display, and Graphs. The Display tab will show the status of NAT, and the Config tab will allow you to enable or disable auto-detection for NAT.
The Network option in the top menu of the server UI has a button to refresh NAT. This will cause the server to recheck the NAT and can potentially solve some NAT issues.
Anti-Virus / Firewall [ edit | edit source ]
Some Anti-Virus solutions will block your server from talking and subsequently prevent players from seeing it online.
Either allow the game ports to function through the Anti-Virus.
When it comes to firewalls and NAT your router may not be working correctly with NAT or not have it at all so you may have to manually port forward your ports. On both your pc firewall and the router. See Setting Up a Server (advanced) for more details.
For Further Help [ edit | edit source ]
Join the Discord Server and visit the #server-help channel for support.
Источник
Eco is a Global Survival Game available on Steam and from this website: www.strangeloopgames.com/eco/
The server software is written in C# and works with limitations on Linux via Mono. The client software does work on Linux, but is not currently listed as supported on Steam (you can install via Steam on Linux however).
I assume that you have a docker host server available (if not there are Chef recipes and Chef bootstrapping scripts on my GitHub account). Server configuration options and port forwarding are not covered.
Updates
Since I originally wrote this, the Eco server now crashes with the lastest version of mono (5.16), but now only works with mono version 5.14. The game port (default 3000) was changed from TCP to UDP.
VirtualBox & Vagrant (aka easy-mode)
Warning: This is still a work in progress, and I’ll probably move this into a repo and link to it from here. Skip to the next section if you do not have VirtualBox and Vagrant installed, otherwise:
curl -O https://raw.githubusercontent.com/stevepraski/edc-box/master/eco-docker/Vagrantfile
vagrant up
Unless I’ve already fixed it by now, you will have to «vagrant ssh» into the box and re-start the eco-server container, as it currently exits after first starting (possibly because it detects that I dropped in an easy mode configuration file):
vagrant ssh
docker start eco-server
docker logs ecoserver
The code and storage for the server is outside of vagrant in the local «eco» folder that was created.
Eco Server Creation
- First create a volume container. We will leverage/abuse this volume container as the only persistent part of the Eco server.
docker volume create eco-data
- Bring up a disposible utility docker container and attach it to the volume. You can use any debian based container for this.
docker pull mono:5.14
docker run -v eco-data:/opt/eco --rm -it mono:5.14 bash
- Inside the docker container, fetch and unzip the server software
cd /opt/eco
apt-get update && apt-get install -y unzip curl vim
curl -O https://s3-us-west-2.amazonaws.com/eco-releases/EcoServer_v0.7.8.6-beta.zip
unzip  EcoServer_v0.7.8.6-beta.zip
### if needed, edit configuration files now ###
# vi Configs/Network.eco
exit
- Bring up a new container to actually run the Eco server. Note the «-t» option; for some reason a pseudo terminal is necessary)
docker run -v eco-data:/opt/eco -t -p 3000:3000/udp -p 3001:3001 --name ecoserver --restart always -d mono:5.14 sh -c "cd /opt/eco && mono EcoServer.exe -nogui"
- Look at the logs, waiting for world generation to complete. Exit the log follower, and fix your terminal
docker logs -f ecoserver
^d
reset
Eco Server Management
To change configuration options, stop the server, and attach a disposible container to the eco-data volume, just like we did for installation (to avoid re-installing your favourite editor or vim, I would suggest building a docker image for this purpose), edit the files in «/opt/eco/Configs/», exit the container and start the server. For debugging, you can have both containers attached to the same volume container, but you will need to restart the server before changes take effect.
docker stop ecoserver
docker run -v eco-data:/opt/eco --rm -it ubuntu bash
docker start ecoserver