If a commit message contains unclear, incorrect, or sensitive information, you can amend it locally and push a new commit with a new message to GitHub. You can also change a commit message to add missing information.
Rewriting the most recent commit message
You can change the most recent commit message using the git commit --amend command.
In Git, the text of the commit message is part of the commit. Changing the commit message will change the commit ID—i.e., the SHA1 checksum that names the commit. Effectively, you are creating a new commit that replaces the old one.
Commit has not been pushed online
If the commit only exists in your local repository and has not been pushed to GitHub.com, you can amend the commit message with the git commit --amend command.
-
On the command line, navigate to the repository that contains the commit you want to amend.
-
Type
git commit --amendand press Enter. -
In your text editor, edit the commit message, and save the commit.
-
You can add a co-author by adding a trailer to the commit. For more information, see «Creating a commit with multiple authors.»
-
You can create commits on behalf of your organization by adding a trailer to the commit. For more information, see «Creating a commit on behalf of an organization»
-
The new commit and message will appear on GitHub.com the next time you push.
You can change the default text editor for Git by changing the core.editor setting. For more information, see «Basic Client Configuration» in the Git manual.
Amending older or multiple commit messages
If you have already pushed the commit to GitHub.com, you will have to force push a commit with an amended message.
We strongly discourage force pushing, since this changes the history of your repository. If you force push, people who have already cloned your repository will have to manually fix their local history. For more information, see «Recovering from upstream rebase» in the Git manual.
Changing the message of the most recently pushed commit
- Follow the steps above to amend the commit message.
- Use the
push --force-with-leasecommand to force push over the old commit.$ git push --force-with-lease origin EXAMPLE-BRANCH
Changing the message of older or multiple commit messages
If you need to amend the message for multiple commits or an older commit, you can use interactive rebase, then force push to change the commit history.
-
On the command line, navigate to the repository that contains the commit you want to amend.
-
Use the
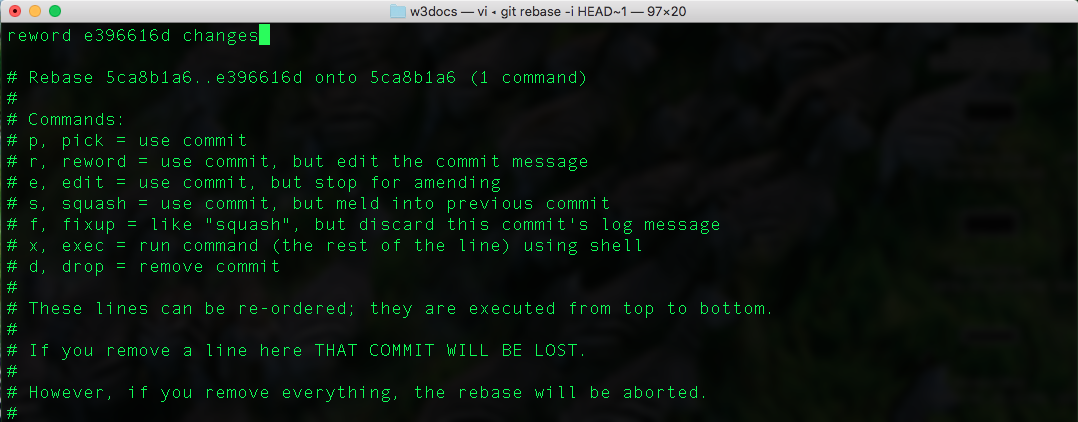
git rebase -i HEAD~ncommand to display a list of the lastncommits in your default text editor.# Displays a list of the last 3 commits on the current branch $ git rebase -i HEAD~3The list will look similar to the following:
pick e499d89 Delete CNAME pick 0c39034 Better README pick f7fde4a Change the commit message but push the same commit. # Rebase 9fdb3bd..f7fde4a onto 9fdb3bd # # Commands: # p, pick = use commit # r, reword = use commit, but edit the commit message # e, edit = use commit, but stop for amending # s, squash = use commit, but meld into previous commit # f, fixup = like "squash", but discard this commit's log message # x, exec = run command (the rest of the line) using shell # # These lines can be re-ordered; they are executed from top to bottom. # # If you remove a line here THAT COMMIT WILL BE LOST. # # However, if you remove everything, the rebase will be aborted. # # Note that empty commits are commented out -
Replace
pickwithrewordbefore each commit message you want to change.pick e499d89 Delete CNAME reword 0c39034 Better README reword f7fde4a Change the commit message but push the same commit. -
Save and close the commit list file.
-
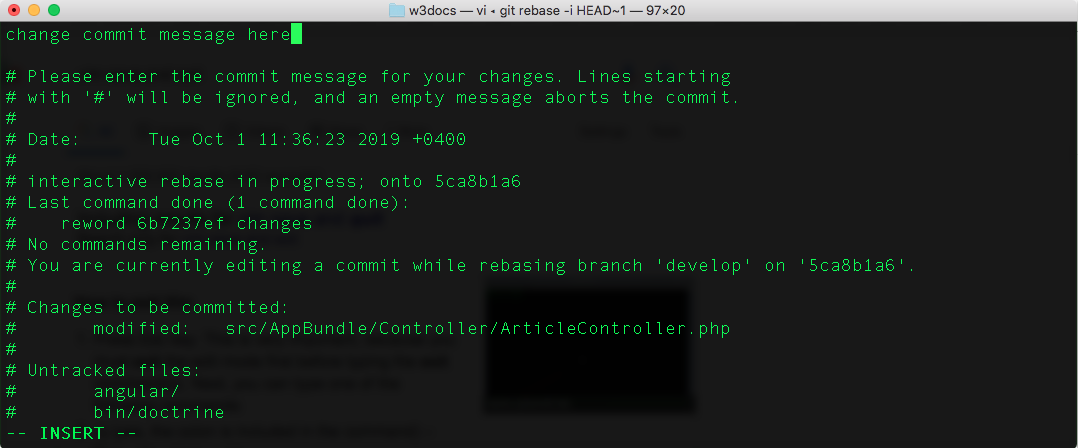
In each resulting commit file, type the new commit message, save the file, and close it.
-
When you’re ready to push your changes to GitHub, use the push —force command to force push over the old commit.
$ git push --force origin EXAMPLE-BRANCH
For more information on interactive rebase, see «Interactive mode» in the Git manual.
As before, amending the commit message will result in a new commit with a new ID. However, in this case, every commit that follows the amended commit will also get a new ID because each commit also contains the id of its parent.
If you have included sensitive information in a commit message, force pushing a commit with an amended commit may not remove the original commit from GitHub. The old commit will not be a part of a subsequent clone; however, it may still be cached on GitHub and accessible via the commit ID. You must contact GitHub Support with the old commit ID to have it purged from the remote repository.
Further reading
- «Signing commits»
Перевод проекта First Aid Git от команды HTML Academy.
Поговорим о решении проблем с Git.
Восстановление накопленных изменений
В том случае, если изменения, внесённые пользователем, находятся в режиме накопления, применить их к ветке можно с помощью команды git stash apply. Также можно запустить git diff — эта команда поможет выявить различия. Для того, чтобы затем избавиться от накопленных данных, нужно запустить команду:
Если существует более одного накопления, найти нужное можно с помощью команды:
git stash list затем можно применить его, воспользовавшись его индексом:
Необходимо учитывать, что отсчёт индексов ведётся от нуля.
Восстановление удалённого тега
В том случае, если необходимо восстановить случайно удалённый тег, начать можно с его поиска:
git fsck --unreachable | grep tagПосле того, как нужный тег найден, его следует восстановить:
git update-ref refs/tags/название-тегаВосстановление удалённого файла
Если вы случайно удалили файл, его можно быстро восстановить:
Если требуется восстановить файл из конкретной временной точки истории коммитов, следует узнать хеш нужного коммита и запустить команду:
git checkout $commit~1 myfile.txtВосстановление удалённой ветки
С помощью комманды git reflog можно узнать хеш (SHA1) последнего коммита в удалённой ветке. Скопируйте этот хеш и используйте в команде:
После этого восстановить удалённую ветку можно будет вот такой командой:
git checkout -b <название-ветки>Изменение сообщения коммита перед его отправкой
Изменить сообщение коммита можно с помощью команды git commit --amend, она откроет редактор, в котором можно будет внести необходимые поправки в последнее сообщение.
Сообщение можно изменить и напрямую с помощью команды
git commit --amend -m "Новое прекрасное сообщение"Изменение сообщения коммита после его отправки
В данном случае процесс занимает два шага. Сначала нужно изменить сообщение с помощью комманды git commit --amend, а затем перезаписать историю коммитов локальной ветки: git push <remote> <branch> --force
Предупреждение: подобная насильная перезапись может привести к потери коммитов из внешней ветки, если с ней давно не было синхронизации, соблюдайте осторожность.
Использование алиасов команд в командной строке
Устали каждый раз печатать git status? Этой команде можно присвоить простой алиас, который проще и быстрее вбивать в git.
git config --global alias.st status— теперь нужно писать только git st
Можно пойти дальше и присвоить алиасы более сложным командам:
git config --global alias.logme 'log -p --author=Rob'Теперь алиас git logme будет выводить все наши коммиты.
Коммит в неправильную ветку
Нужно переключиться на новую ветку, которую вы забыли предварительно создать:
git checkout -b название-новой-ветки.А затем переключиться к оригинальной ветке:
git checkout название-оригинальной-ветки…и «откатиться» до последнего коммита, который нужно сохранить.
Чтобы это сделать, можно воспользоваться командой git log и сохранить хеш (SHA1) последнего коммита, который нужно оставить.. Например, это a31a45c.
Теперь его нужно сбросить: git reset --hard a31a45c и отправить получившийся результат.
Предупреждение: Убедитесь в том, что никто не отправлял коммиты в оригинальную ветку во время выполнения вышеописанных процедур, в противном случае эти изменения будут потеряны!
Обновление конкретного подмодуля
Чтобы обновить конкретный подмодуль в репозитории, нужно добавить путь к подмодулю:
git submodule update --remote --merge <path>Откат к конкретному коммиту в истории
Если вас не очень беспокоят изменения в локальном репозитории, то можно «откатиться» к конкретному коммиту в истории с помощью команды:
Эта команда установит HEAD на конкретный коммит. Также можно воспользоваться хешем коммита.
Отмена коммита до публикации изменений
Если вы сделали коммит, который впоследствии понадобилось отредактировать или полностью стереть, поможет команда git reset.
git reset HEAD~1 # отменить последний коммит, сохранить изменения
git reset --hard HEAD~1 # отменить последний коммит, стереть изменения
Будьте осторожны используя второй вариант, поскольку изменения ваших локальных файлов будут потеряны.
Чтобы сохранить сообщение коммита, наберите: :
Отмена коммита после отправки его в master-репозиторий
Рассмотрим процедуру возврата одного или нескольких коммитов, которые нужно стереть из удалённой ветки. Обозначить конкретный коммит можно с помощью его хеша:
Отмена только коммита, который является вторым после последнего:
Простая отмена последнего коммита:
Отмена локальных изменений файлов
Простейшим способом избавиться от нежелательных изменений для файлов и папок является восстановление состояния последнего коммита. Сделать это можно с помощью специальной команды:
Кроме того, можно восстановить конкретный путь к файлу:
git checkout -- путь-до-файлаОтображение всех коммитов одного файла
Если вы хотите просмотреть все коммиты с изменениями конкретного файла, воспользуйтесь командой git log --follow -p -- myfile
Аргумент —follow позволяет вывести все изменения над файлом, даже если в процессе работы он был переименован.
Если опустить опцию -p, то система выведет только сообщения коммитов, но не их содержимое.
Отображения числа коммитов от каждого участника
Хотите узнать, сколько коммитов сделал каждый участник команды?
Эта команда выведет список, отсортированный в порядке убывания количества коммитов: git shortlog -s -n
Отобразить коммиты, содержащие удалённые файлы
Узнать, в каких коммитах содержатся удалённые файлы, можно с помощью команды:
git log --diff-filter=D --summaryОна покажет список коммитов, в которых удалялись файлы.
Отсортировать коммиты по автору
Чтобы вывести список коммитов, отфильтрованных по автору, следует воспользоваться следующей командой:
git log --author="Имя автора"Очистка всех скрытых состояний
Очистить все скрытые состояния можно следующей командой:
Переименование локальной и удалённой ветки
Предложим, у вас есть ветка «fix-bug25», которую вы захотели переименовать в «hotfix-users». Прежде всего, нужно будет изменить локальную ветку:
git branch -m fix-bug25 hotfix-usersА затем — удалённую ветку: переименовать её напрямую нельзя, поэтому нужно будет её удалить, и затем опубликовать заново уже с новым именем. Прежде чем приступать к этим процедурам, следует убедиться, что никто из членов команды не работает с этой веткой! Удаляем ветку: git push origin :fix-bug25
А теперь заново публикуем её с новым именем: git push origin hotfix-users
Переименование тега
Чтобы переименовать существующий тег:
git tag новое-название-тега старое-название-тега
git tag -d старое-название-тега
git push origin :refs/tags/старое-название-тега
git push --tags
Перестать отслеживать существующие файлы
Если вы хотите перестать отслеживать файлы, которые уже есть в репозитории, но при этом желаете сохранить его локально, осуществите коммит изменений и запустите команду:
Она удалит изменённые файлы из зоны подготовленных файлов (staging area). Затем нужно запустить команду:
и отправить изменения.
Подготовка удалённых файлов
Чтобы подготовить к коммиту файлы и папки, которые были удалены локально, можно использовать специальную команду:
Если требуется подготовить только используемый в данный момент путь, воспользуйтесь командой
Поиск конкретного сообщения во всех коммитах
Чтобы найти конкретный текст сообщения коммита, соответствующий регулярному выражению, нужно воспользоваться командой
Пометить конфликтующий файл, как разрешённый
Чтобы пометить один или несколько конфликтующих файлов, как разрешённые, чтобы их можно было нормально изменять, воспользуйтесь командой:
Затем можно запустить git commit, чтобы разрешить конфликты и опубликовать изменения.
Просмотр всех неотправленных коммитов
Чтобы просмотреть все коммиты, которые ещё не были отправлены в соответствующие ветки, воспользуйтесь следующей командой:
git log --branches --not --remotesКроме того, можно использовать:
git log origin/master..HEADПросмотр старой ревизии файла
Существует возможность просмотреть содержимое файла в конкретный момент времени в прошлом. Для этого нужно использовать команду:
git show commitHash:myfile.txtПубликация локальной ветки для удалённого редактирования
Если вы создали локальную ветку, и хотите, чтобы другие пользователи могли с ней работать, воспользуйтесь командой:
git push -u origin название-моей-новой-веткиТеперь они тоже смогут вносить изменения в эту ветку.
Сброс локальной ветки до состояния удалённой
В том случае, если отсутствуют изменения, которые необходимо сохранить, сбросить локальную ветку до состояния удалённой можно с помощью двух простых команд.
Прежде всего нужно получить свежие обновления из удалённой ветки:
git fetch название-удалённой-ветки.
А затем нужно сообщить git, что локальную ветку следует «откатить» до состояния удалённой:
git reset --hard origin/название-локальной-ветки.
При наличии коммита, который нужно сохранить, перед сбросом нужно создать новую ветку и произвести коммит: git commit -m «Обновление»
git branch название-новой-веткиСинхронизировать ветку с master-репозиторием
Чтобы синхронизировать последние изменения в репозитории master (или с любой другой веткой, с которой вы работали) необходимо «перебазировать» локальную ветку. Предположим, вы работаете над веткой foobar:
А затем осуществляете «перебазирование»:
После этого будут применены коммиты origin из master. После разрешения конфликтов процесс можно продолжить с помощью команды git rebase —continue. Теперь можно продолжать работу над своей веткой или осуществить её слияние (merge) с главным репозиторием.
Слияние локальных изменений с другой веткой
Это можно сделать прямо в процессе стандартного слияния (merge). Вам стоит сохранить историю слияний используя флаг —no-ff, что означает no fast forward.
Перейдите в ветку, в которую будут вливаться изменения, убедитесь в её актуальности и запустите процесс:
git merge <другая-ветка> --no-ffЗатем появится сообщение о коммите merge X into Y branch, после чего вы можете смело запушить ваше слияние.>
Совмещение двух и более коммитов
Здесь нам понадобится произвести интерактивное перебазирование. Если перебазирование происходит относительно master-ветки, то начать следует с команды git rebase -i master. Однако, если перебазирование происходит не относительно ветки, то нужно будет перебазироваться относительно HEAD.
Если есть необходимость в совмещении двух последних коммитов, можно использовать команду
После её ввода появятся инструкции по выбору коммитов. В том случае, если необходимо совместить все коммиты с первым старейшим коммитом, то в первой строке нужно написать pick, а для всех остальных коммитов изменить букву на f. Подробнее здесь
Совмещение коммитов по конкретной функции для добавления в ветку релиза
Если вы решите совместить и опубликовать коммиты, то возникнет новый коммит в ветке релиза, поэтому история ветки конкретной функции останется неизменной.
Ниже представлен пример того, как достичь подобного эффекта:
git fetch origin
git checkout [release-branch]
git rebase origin/[release-branch]
git merge —squash —no-commit [feature-branch]
git commit -m 'Merge X into Y'
В конечном итоге останется только один коммит в ветке релиза, а история изменений в ветке разработки конкретной функции останется нетронутой.
Подробнее о ветках функций
Создание новой ветки с изменениями текущей
Часто возникает ситуация, при которой пользователи начинают изменять файлы в ветке, чтобы что-то исправить, и лишь позднее вспоминают, что предварительно не создали новую ветку. К счастью, есть способ сделать это уже в процессе:
git checkout -b название-моей-новой-веткиЭта команда перенесёт файлы из текущей ветки в новую, которую потом уже можно «закоммитить».
Убрать файл из буфера
Чтобы убрать добавленный по ошибке файл из буфера, нужно воспользоваться простой командой:
git reset HEAD unlovedfile.txtУдаление внешней ветки
Если вы хотите удалить ветку, введите команду:
git push origin --delete название-веткиУдаление неотслеживаемых файлов и папок
Чтобы удалить неотслеживаемые файлы и папки из рабочей копии наберите следующую команду:
Чтобы в принципе удалить их:
Подсказка: чтобы увидеть, какие файлы являются лишними, перед их непосредственным удалением, наберите:
Удаление старых веток, стёртых из внешнего репозитория
Если ветка удалена из внешнего репозитория, её также можно стереть из локального репозитория с помощью команды
git-remote prune название-удалённой-ветки.Она удалит старую ветку под названием название-удалённой-ветки, которая уже была стёрта из внешнего репозитория, но всё ещё доступна локально в remotes/название-удалённой-ветки.
Удаление файла из git с сохранением его локальной копии
Для того, чтобы удалить файл из git, но сохранить его локально нужно использовать следующую команду:
git rm --cached myfile.txtБольше статей о Git
- Полезные команды для работы с Git
- Как работать с GitHub в большой команде
- Как бесплатно залить сайт на хостинг GitHub Pages
Changing the latest Git commit message
If the message to be changed is for the latest commit to the repository, then the following commands are to be executed:
-
git commit --amend -m "New message" -
git push --force repository-name branch-name
Note that using
--forceis not recommended unless you are absolutely sure that no one else has cloned your repository after the latest commit.
A safer alternative is to use:
git push --force-with-lease repository-name branch-name
Unlike --force, which will destroy any changes someone else has pushed to the branch, --force-with-lease will abort if there was an upstream change to the repository.
Changing older commit messages
If the message needs to be amended for an older commit, then the interactive rebase tool can be used:
- Navigate to the repository that contains the commit you want to amend and open a terminal window.
- Use the
git rebase -i HEAD~ncommand to display a list of the last nn commits in your default text editor. For example, the following command would display a list of the last three commits in your current branch:git rebase -i HEAD~3
The list would be similiar to
this:
pick e499d89 Delete CNAME
pick 0c39034 Better README
pick f7fde4a Change the commit message but push the same commit.

# Rebase 9fdb3bd..f7fde4a onto 9fdb3bd
#
# Commands:
# p, pick = use commit
# r, reword = use commit, but edit the commit message
# e, edit = use commit, but stop for amending
# s, squash = use commit, but meld into previous commit
# f, fixup = like "squash", but discard this commit's log message
# x, exec = run command (the rest of the line) using shell
#
# These lines can be re- ordered; they are executed from top to
bottom.
#
# If you remove a line here THAT COMMIT WILL BE LOST.
#
# However, if you remove everything, the rebase will be aborted.
#
# Note that empty commits are commented out
- Replace
pickwithrewordbefore each commit message that needs to be changed:pick e499d89 Delete CNAME reword 0c39034 Better README reword f7fde4a Change the commit message but push the same commit. - Save and close the commit list file.
- In each resulting commit file, type the new commit message, save the file, and close it.
- Force push the amended commits using
git push --force.
Many times, when working with Git, you may want to revise your local commit history.
One of the great things about Git is that it allows you to make decisions at the last possible moment.
You can decide what files go into which commits right before you commit with the staging area, you can decide that you didn’t mean to be working on something yet with git stash, and you can rewrite commits that already happened so they look like they happened in a different way.
This can involve changing the order of the commits, changing messages or modifying files in a commit, squashing together or splitting apart commits, or removing commits entirely — all before you share your work with others.
In this section, you’ll see how to accomplish these tasks so that you can make your commit history look the way you want before you share it with others.
|
Note |
Don’t push your work until you’re happy with it One of the cardinal rules of Git is that, since so much work is local within your clone, you have a great deal of freedom to rewrite your history locally. |
Changing the Last Commit
Changing your most recent commit is probably the most common rewriting of history that you’ll do.
You’ll often want to do two basic things to your last commit: simply change the commit message, or change the actual content of the commit by adding, removing and modifying files.
If you simply want to modify your last commit message, that’s easy:
The command above loads the previous commit message into an editor session, where you can make changes to the message, save those changes and exit.
When you save and close the editor, the editor writes a new commit containing that updated commit message and makes it your new last commit.
If, on the other hand, you want to change the actual content of your last commit, the process works basically the same way — first make the changes you think you forgot, stage those changes, and the subsequent git commit --amend replaces that last commit with your new, improved commit.
You need to be careful with this technique because amending changes the SHA-1 of the commit.
It’s like a very small rebase — don’t amend your last commit if you’ve already pushed it.
|
Tip |
An amended commit may (or may not) need an amended commit message When you amend a commit, you have the opportunity to change both the commit message and the content of the commit. On the other hand, if your amendments are suitably trivial (fixing a silly typo or adding a file you forgot to stage) such that the earlier commit message is just fine, you can simply make the changes, stage them, and avoid the unnecessary editor session entirely with: |
Changing Multiple Commit Messages
To modify a commit that is farther back in your history, you must move to more complex tools.
Git doesn’t have a modify-history tool, but you can use the rebase tool to rebase a series of commits onto the HEAD that they were originally based on instead of moving them to another one.
With the interactive rebase tool, you can then stop after each commit you want to modify and change the message, add files, or do whatever you wish.
You can run rebase interactively by adding the -i option to git rebase.
You must indicate how far back you want to rewrite commits by telling the command which commit to rebase onto.
For example, if you want to change the last three commit messages, or any of the commit messages in that group, you supply as an argument to git rebase -i the parent of the last commit you want to edit, which is HEAD~2^ or HEAD~3.
It may be easier to remember the ~3 because you’re trying to edit the last three commits, but keep in mind that you’re actually designating four commits ago, the parent of the last commit you want to edit:
Remember again that this is a rebasing command — every commit in the range HEAD~3..HEAD with a changed message and all of its descendants will be rewritten.
Don’t include any commit you’ve already pushed to a central server — doing so will confuse other developers by providing an alternate version of the same change.
Running this command gives you a list of commits in your text editor that looks something like this:
pick f7f3f6d Change my name a bit
pick 310154e Update README formatting and add blame
pick a5f4a0d Add cat-file

# Rebase 710f0f8..a5f4a0d onto 710f0f8
#
# Commands:
# p, pick <commit> = use commit
# r, reword <commit> = use commit, but edit the commit message
# e, edit <commit> = use commit, but stop for amending
# s, squash <commit> = use commit, but meld into previous commit
# f, fixup <commit> = like "squash", but discard this commit's log message
# x, exec <command> = run command (the rest of the line) using shell
# b, break = stop here (continue rebase later with 'git rebase --continue')
# d, drop <commit> = remove commit
# l, label <label> = label current HEAD with a name
# t, reset <label> = reset HEAD to a label
# m, merge [-C <commit> | -c <commit>] <label> [# <oneline>]
# .       create a merge commit using the original merge commit's
# .       message (or the oneline, if no original merge commit was
# .       specified). Use -c <commit> to reword the commit message.
#
# These lines can be re-ordered; they are executed from top to bottom.
#
# If you remove a line here THAT COMMIT WILL BE LOST.
#
# However, if you remove everything, the rebase will be aborted.
#
# Note that empty commits are commented out
It’s important to note that these commits are listed in the opposite order than you normally see them using the log command.
If you run a log, you see something like this:
$ git log --pretty=format:"%h %s" HEAD~3..HEAD
a5f4a0d Add cat-file
310154e Update README formatting and add blame
f7f3f6d Change my name a bit
Notice the reverse order.
The interactive rebase gives you a script that it’s going to run.
It will start at the commit you specify on the command line (HEAD~3) and replay the changes introduced in each of these commits from top to bottom.
It lists the oldest at the top, rather than the newest, because that’s the first one it will replay.
You need to edit the script so that it stops at the commit you want to edit.
To do so, change the word “pick” to the word “edit” for each of the commits you want the script to stop after.
For example, to modify only the third commit message, you change the file to look like this:
edit f7f3f6d Change my name a bit
pick 310154e Update README formatting and add blame
pick a5f4a0d Add cat-file
When you save and exit the editor, Git rewinds you back to the last commit in that list and drops you on the command line with the following message:
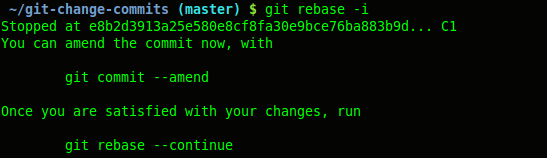
$ git rebase -i HEAD~3
Stopped at f7f3f6d... Change my name a bit
You can amend the commit now, with

       git commit --amend

Once you're satisfied with your changes, run

       git rebase --continue
These instructions tell you exactly what to do.
Type:
Change the commit message, and exit the editor.
Then, run:
This command will apply the other two commits automatically, and then you’re done.
If you change pick to edit on more lines, you can repeat these steps for each commit you change to edit.
Each time, Git will stop, let you amend the commit, and continue when you’re finished.
Reordering Commits
You can also use interactive rebases to reorder or remove commits entirely.
If you want to remove the “Add cat-file” commit and change the order in which the other two commits are introduced, you can change the rebase script from this:
pick f7f3f6d Change my name a bit
pick 310154e Update README formatting and add blame
pick a5f4a0d Add cat-file
to this:
pick 310154e Update README formatting and add blame
pick f7f3f6d Change my name a bit
When you save and exit the editor, Git rewinds your branch to the parent of these commits, applies 310154e and then f7f3f6d, and then stops.
You effectively change the order of those commits and remove the “Add cat-file” commit completely.
Squashing Commits
It’s also possible to take a series of commits and squash them down into a single commit with the interactive rebasing tool.
The script puts helpful instructions in the rebase message:
#
# Commands:
# p, pick <commit> = use commit
# r, reword <commit> = use commit, but edit the commit message
# e, edit <commit> = use commit, but stop for amending
# s, squash <commit> = use commit, but meld into previous commit
# f, fixup <commit> = like "squash", but discard this commit's log message
# x, exec <command> = run command (the rest of the line) using shell
# b, break = stop here (continue rebase later with 'git rebase --continue')
# d, drop <commit> = remove commit
# l, label <label> = label current HEAD with a name
# t, reset <label> = reset HEAD to a label
# m, merge [-C <commit> | -c <commit>] <label> [# <oneline>]
# .       create a merge commit using the original merge commit's
# .       message (or the oneline, if no original merge commit was
# .       specified). Use -c <commit> to reword the commit message.
#
# These lines can be re-ordered; they are executed from top to bottom.
#
# If you remove a line here THAT COMMIT WILL BE LOST.
#
# However, if you remove everything, the rebase will be aborted.
#
# Note that empty commits are commented out
If, instead of “pick” or “edit”, you specify “squash”, Git applies both that change and the change directly before it and makes you merge the commit messages together.
So, if you want to make a single commit from these three commits, you make the script look like this:
pick f7f3f6d Change my name a bit
squash 310154e Update README formatting and add blame
squash a5f4a0d Add cat-file
When you save and exit the editor, Git applies all three changes and then puts you back into the editor to merge the three commit messages:
# This is a combination of 3 commits.
# The first commit's message is:
Change my name a bit

# This is the 2nd commit message:

Update README formatting and add blame

# This is the 3rd commit message:

Add cat-file
When you save that, you have a single commit that introduces the changes of all three previous commits.
Splitting a Commit
Splitting a commit undoes a commit and then partially stages and commits as many times as commits you want to end up with.
For example, suppose you want to split the middle commit of your three commits.
Instead of “Update README formatting and add blame”, you want to split it into two commits: “Update README formatting” for the first, and “Add blame” for the second.
You can do that in the rebase -i script by changing the instruction on the commit you want to split to “edit”:
pick f7f3f6d Change my name a bit
edit 310154e Update README formatting and add blame
pick a5f4a0d Add cat-file
Then, when the script drops you to the command line, you reset that commit, take the changes that have been reset, and create multiple commits out of them.
When you save and exit the editor, Git rewinds to the parent of the first commit in your list, applies the first commit (f7f3f6d), applies the second (310154e), and drops you to the console.
There, you can do a mixed reset of that commit with git reset HEAD^, which effectively undoes that commit and leaves the modified files unstaged.
Now you can stage and commit files until you have several commits, and run git rebase --continue when you’re done:
$ git reset HEAD^
$ git add README
$ git commit -m 'Update README formatting'
$ git add lib/simplegit.rb
$ git commit -m 'Add blame'
$ git rebase --continue
Git applies the last commit (a5f4a0d) in the script, and your history looks like this:
$ git log -4 --pretty=format:"%h %s"
1c002dd Add cat-file
9b29157 Add blame
35cfb2b Update README formatting
f7f3f6d Change my name a bit
This changes the SHA-1s of the three most recent commits in your list, so make sure no changed commit shows up in that list that you’ve already pushed to a shared repository.
Notice that the last commit (f7f3f6d) in the list is unchanged.
Despite this commit being shown in the script, because it was marked as “pick” and was applied prior to any rebase changes, Git leaves the commit unmodified.
Deleting a commit
If you want to get rid of a commit, you can delete it using the rebase -i script.
In the list of commits, put the word “drop” before the commit you want to delete (or just delete that line from the rebase script):
pick 461cb2a This commit is OK
drop 5aecc10 This commit is broken
Because of the way Git builds commit objects, deleting or altering a commit will cause the rewriting of all the commits that follow it.
The further back in your repo’s history you go, the more commits will need to be recreated.
This can cause lots of merge conflicts if you have many commits later in the sequence that depend on the one you just deleted.
If you get partway through a rebase like this and decide it’s not a good idea, you can always stop.
Type git rebase --abort, and your repo will be returned to the state it was in before you started the rebase.
If you finish a rebase and decide it’s not what you want, you can use git reflog to recover an earlier version of your branch.
See Data Recovery for more information on the reflog command.
|
Note |
Drew DeVault made a practical hands-on guide with exercises to learn how to use |
The Nuclear Option: filter-branch
There is another history-rewriting option that you can use if you need to rewrite a larger number of commits in some scriptable way — for instance, changing your email address globally or removing a file from every commit.
The command is filter-branch, and it can rewrite huge swaths of your history, so you probably shouldn’t use it unless your project isn’t yet public and other people haven’t based work off the commits you’re about to rewrite.
However, it can be very useful.
You’ll learn a few of the common uses so you can get an idea of some of the things it’s capable of.
|
Caution |
|
Removing a File from Every Commit
This occurs fairly commonly.
Someone accidentally commits a huge binary file with a thoughtless git add ., and you want to remove it everywhere.
Perhaps you accidentally committed a file that contained a password, and you want to make your project open source.
filter-branch is the tool you probably want to use to scrub your entire history.
To remove a file named passwords.txt from your entire history, you can use the --tree-filter option to filter-branch:
$ git filter-branch --tree-filter 'rm -f passwords.txt' HEAD
Rewrite 6b9b3cf04e7c5686a9cb838c3f36a8cb6a0fc2bd (21/21)
Ref 'refs/heads/master' was rewritten
The --tree-filter option runs the specified command after each checkout of the project and then recommits the results.
In this case, you remove a file called passwords.txt from every snapshot, whether it exists or not.
If you want to remove all accidentally committed editor backup files, you can run something like git filter-branch --tree-filter 'rm -f *~' HEAD.
You’ll be able to watch Git rewriting trees and commits and then move the branch pointer at the end.
It’s generally a good idea to do this in a testing branch and then hard-reset your master branch after you’ve determined the outcome is what you really want.
To run filter-branch on all your branches, you can pass --all to the command.
Making a Subdirectory the New Root
Suppose you’ve done an import from another source control system and have subdirectories that make no sense (trunk, tags, and so on).
If you want to make the trunk subdirectory be the new project root for every commit, filter-branch can help you do that, too:
$ git filter-branch --subdirectory-filter trunk HEAD
Rewrite 856f0bf61e41a27326cdae8f09fe708d679f596f (12/12)
Ref 'refs/heads/master' was rewritten
Now your new project root is what was in the trunk subdirectory each time.
Git will also automatically remove commits that did not affect the subdirectory.
Changing Email Addresses Globally
Another common case is that you forgot to run git config to set your name and email address before you started working, or perhaps you want to open-source a project at work and change all your work email addresses to your personal address.
In any case, you can change email addresses in multiple commits in a batch with filter-branch as well.
You need to be careful to change only the email addresses that are yours, so you use --commit-filter:
$ git filter-branch --commit-filter '
        if [ "$GIT_AUTHOR_EMAIL" = "schacon@localhost" ];
        then
                GIT_AUTHOR_NAME="Scott Chacon";
                GIT_AUTHOR_EMAIL="schacon@example.com";
                git commit-tree "$@";
        else
                git commit-tree "$@";
        fi' HEAD
This goes through and rewrites every commit to have your new address.
Because commits contain the SHA-1 values of their parents, this command changes every commit SHA-1 in your history, not just those that have the matching email address.
Рабочий процесс в системе контроля версий git сводится к тому, что разработчик создает от ветки develop новую ветку для реализации конкретной задачи. Принято, что в ветке каждому коммиту соответствует более-менее логически законченная единица работы или же изменения, которые в будущем может потребоваться отменить.
Однако порой в спешке под конец рабочего дня разработчик может закоммититься с подписью вроде такой «WIP» или «TMP». В статье рассмотрим, как в git переименовать коммит. При этом возможны два основных случая — коммит является последним или коммит не является последним.
Переименование последнего коммита
На следующий день разработчик приходит на работу, просматривает изменения в ветке и вспоминает, что нужно изменить комментарий к коммиту. Для этого достаточно использовать команду git commit --amend -m "Новое название коммита".
Изменение комментария к не последнему коммиту
Допустим разработчик забыл с утра откорректировать название коммита, и в течение дня сделал ещё несколько коммитов. Тогда встаёт вопрос, как обновить комментарий, например для четвёртого коммита вглубь истории.
Итак, чтобы в git исправить комментарий такого коммита потребуется выполнить rebase в интерактивном режиме.
1. Сначала нужно посмотреть, на сколько коммитов назад находится тот коммит, которые нужно отредактировать. Для этого можно использоваться либо git log --oneline, либо консольный GUI для Git, например, tig.

Видим, что изменить комментарий нужно к коммиту «tmp», находящийся позади на четыре коммита относительно HEAD.
2. Теперь запускаем rebase в интерактивной режиме:
git rebase -i HEAD~5
3. В появившемся редакторе следует в строках коммитов изменить команду pick на reword.

Затем сохраняем файл и выходим.

4. Автоматически начнется ребейз и откроется файл редактирования коммита. Здесь необходимо ввести новую подпись к коммиту.


5. Остаётся сохранить и выйти. Теперь название коммита изменено.


Важно. Оба описанных способа приводят к изменению коммитов, а значит коммиты на сервере и в локальной ветке будут теперь отличаться. Поэтому запушить ветку так просто не получится — нужно использовать флаг --force.
git push --force
Однако, если работа в ветке ведётся несколькими разработчиками одновременно, тогда такой подход неприемлем.
Метки: Метки: git
Answer of @Mureinik is good but not understandable by newbie.
First method:
- If you only want to edit latest commit message, then you only need
git commit --amend, you would see:
<your existing commit mesage foo bar>

# Please enter the commit message fir your changes. Lines starting
# with # will be ignored, and an empty message aborts the commit.
#
# Date: Sat Aug 24 17:56:16 2019 +0800
#
# On branch is up to date with 'origin/master'.
#
# changes to be committed:
#       modified:   foo.py
#
- As you can see, commit message on top without any prefix of command such as
pick, this is already the edit page and you can direct edit the top message and save&quit, e.g.:
<your new correction commit message>

# Please enter the commit message for your changes. Lines starting
....
- Then do
git push -u origin master --forceor<how you push normally> --force. The key here is--force.
Second method:
-
You can see the commit hash by
git logor extract from the
repository url, example in my case is881129d771219cfa29e6f6c2205851a2994a8835 -
Then you can do
git rebase --interactive 881129d771219cfa29e6f6c2205851a2994a8835orgit rebase -i HEAD^(if the latest) -
You would see:
pick <commit hash> <your current commit message>

# Rebase 8db7e8b..fa20af3 onto 8db7e8b
#
# Commands:
#  p, pick = use commit
#  r, reword = use commit, but edit the commit message
#  e, edit = use commit, but stop for amending
#  s, squash = use commit, but meld into previous commit
#  f, fixup = like "squash", but discard this commit's log message
#  x, exec = run command (the rest of the line) using shell
#  d, drop = remove commit
#
# These lines can be re-ordered; they are executed from top to bottom.
#
# If you remove a line here THAT COMMIT WILL BE LOST.
#
# However, if you remove everything, the rebase will be aborted.
#
# Note that empty commits are commented out
- But if you see
noopthen you are probably typing wrong, e.g. if you dogit rebase -i 881129d771219cfa29e6f6c2205851a2994a88which missing^at the end, you better quit the editor without save and figure out the reason:
noop

# Rebase 8db7e8b..fa20af3 onto 8db7e8b
...
- If no
noopissue, then simply change the wordpicktoreword, other just remains (you don’t edit commit message at this point), e.g:
reword <commit hash> <your current commit message>

# Rebase 8db7e8b..fa20af3 onto 8db7e8b
#
# Commands:
#  p, pick = use commit
...
- Save&quit will see the edit page similar to method #1:
<your existing commit mesage foo bar>

# Please enter the commit message fir your changes. Lines starting
# with # will be ignored, and an empty message aborts the commit.
#
# Date: Sat Aug 24 17:56:16 2019 +0800
#
# interactive rebase in progress; onto b057371
# Last command done (1 command done):
#    reword d996ffb <existing commit message foo bar>
# No commands remaining.
# You are currently editing a commit while rebasing branch 'master' on 'b057371'.
#
# changes to be committed:
#       modified:   foo.py
#
- Edit the message on top, same like method #1 and save&quit, e.g:
<your new correction commit message>

# Please enter the commit message for your changes. Lines starting
....
- Again, same like method #1, do
git push -u origin master --forceor<how you push normally> --force. The key here is--force.
For more info please read the doc.
Many programmers underestimate the role of the commit message, while it is very important for managing the work. It helps other developers working on your project to understand the changes that you have made. So it must be as concrete, well-structured and clear as possible.
In this snippet, we will show you how to change your most recent commit message, as well as how to change any number of commit messages in the history.
Read on to see the options.
You can use --amend flag with the git commit command to commit again for changing the latest commit:
git commit --amend -m "New commit message"Running this will overwrite not only your recent commit message but, also, the hash of the commit. Note, that it won’t change the date of the commit.
It will also allow you to add other changes that you forget to make using the git add command:
git add more/changed/w3docs.txt
git commit --amend -m "message"
The -m option allows writing the new message without opening the Editor.
If you want to change the message of the commit that is already pushed to the server, you should force push it using the git push command with —force flag, otherwise, your push will be rejected.
Check out Force Pushing Local Changes to Remote for more details on how to force push your changes.
In this section, we will show you the steps to follow if you want to change multiple commit messages in the history.
Let’s assume that we want to take the 10 latest commit messages, starting from the HEAD.
Run Git Rebase in Interactive Mode
Firstly, you should run the git rebase in the interactive mode:
Type «Reword»
After the first step, the editor window will show up the 10 most recent commits. It will offer you to input the command for each commit. All you need to do is typing «reword» at the beginning of each commit you want to change and save the file. After saving, a window will open for each selected commit for changing the commit message.
Enter a New Commit Message
After the second step, an editor will open for each commit. Type a new commit message and save the file.
Check out Force Pushing Local Changes to Remote for more details on how to force push your changes.
It is not recommended to change a commit that is already pushed because it may cause problems for people who worked on that repository.
If you change the message of the pushed commit, you should force push it using the git push command with --force flag (suppose, the name of remote is origin, which is by default):
git commit --amend -m "New commit message."

git push --force origin HEAD
—force overwrites the remote branch on the basis of your local branch. It destroys all the pushed changes made by other developers. It refers to the changes that you don’t have in your local branch.
Here is an alternative and safer way to amend the last commit:
git push --force-with-lease origin HEAD—force-with-lease is considered a safer option that will not overwrite the work done on the remote branch in case more commits were attached to it (for instance, by another developer). Moreover, it helps you to avoid overwriting another developer’s work by force pushing.
The git add command is used for adding changes in the working directory to the staging area. It instructs Git to add updates to a certain file in the next commit. But for recording changes the git commit command should also be run. The git add and git commitcommands are the basis of Git workflow and used for recording project versions into the history of the repository. In combination with these two commands, the git status command is also needed to check the state of the working directory and the staging area.
The git push command is used to upload the content of the local repository to the remote repository. After making changes in the local repository, you can push to share the modification with other members of the team.
Git refuses your push request if the history of the central repository does not match the local one. In this scenario, you should pull the remote branch and merge it into the local repository then push again. The --force flag matches the remote repository’s branch and the local one cleaning the upstream changes from the very last pull. Use force push when the shared commits are not right and are fixed with git commit --amend or an interactive rebase. The interactive rebase is also a safe way to clean up the commits before sharing. The git commit --amend option updates the previous commit.
Изменение истории
Если это последняя фиксация, вы можете просто сделать это:
git commit --amend
Это вызывает редактор с последним сообщением фиксации и позволяет редактировать сообщение. (Вы можете использовать -m, если хотите стереть старое сообщение и использовать новый.)
Нажатие
И затем, когда вы нажимаете, сделайте следующее:
git push --force-with-lease <repository> <branch>
Или вы можете использовать «+»:
git push <repository> +<branch>
Или вы можете использовать --force:
git push --force <repository> <branch>
Будьте внимательны при использовании этих команд.
-
Если кто-то другой нажал изменения в одну ветвь, вы, вероятно, захотите избежать уничтожения этих изменений. Параметр
--force-with-leaseявляется самым безопасным, так как он будет прерван, если есть какие-либо восходящие изменения ( -
Если вы явно не укажете ветвь, Git будет использовать настройки push по умолчанию. Если ваша настройка по умолчанию «соответствует», вы можете одновременно уничтожить изменения на нескольких ветвях.
Вытягивание/выборка
Любой, кто уже вытащил, теперь получит сообщение об ошибке, и им нужно будет обновить (при условии, что они сами не вносят никаких изменений), выполнив что-то вроде этого:
git fetch origin
git reset --hard origin/master # Loses local commits
Будьте осторожны при использовании reset --hard. Если у вас есть изменения в ветке, эти изменения будут уничтожены.
Заметка об изменении истории
Уничтоженные данные на самом деле являются только старым сообщением фиксации, но --force не знает этого и с радостью удалит другие данные. Поэтому подумайте о --force как «Я хочу уничтожить данные, и я точно знаю, какие данные уничтожаются». Но когда уничтоженные данные фиксируются, вы можете часто восстанавливать старые коммиты из reflog — данные фактически потеряны, а не уничтожены (хотя потерянные синтаксические ошибки периодически удаляются).
Если вы не думаете, что уничтожаете данные, избегайте --force… могут произойти плохие вещи.
Вот почему --force-with-lease несколько безопаснее.
Это пост для тех, кто начинает работу с Git. Все, что здесь написано по частям можно найти в многочисленных простынях о Git на Хабре. Но я подумал, что неплохо было бы иметь отдельный предельно понятный топик, который бы гуглился по запросу «git изменение коммитов».
Изменение последнего коммита
Если вы что-либо недоглядели в последнем коммите, то отредактировать его не составит никакого труда. Все, что нужно это добавить изменения обычным образом:
git add .
Затем закоммитить изменения с параметром —amend (amend /əˈmɛnd/ — вносить поправки, исправлять, улучшать):
git commit --amend
Изменение названия последнего коммита
То же самое, с той лишь разницей что нет необходимости добавлять файлы в коммит. Просто укажите новое название:
git commit --amend -m "Новое название"
Изменение НЕ последнего коммита
Тут чуть посложнее, сделайте для начала два коммита, в моем примере они будут называться С1 и С2:

Для начала выполняем:
git rebase --interactive
# короткая версия: git rebase -i
Откроется редактор, в котором вы можете указать что хотите сделать:

Как видите, git rebase -i может послужить когда нужно
r rewordпереименовать коммитe editизменить коммитs squashсклеить два или больше коммитов (squash /skwɒʃ/ — втиснуть, сжимать, тыква )
)
 )
)
Рядом с коммитом С1 вместо pick впишите e для редактирования коммита или r для переименования. Сохранив файл, вы увидите подсказку от Git:
Разберемся подробнее что произошло. Мы переместились на коммит С1, «спрыгнув» с ветки master. Это можно проверить, запустив:
git branch
В ответ получим:
* (no branch, rebasing master)
  master
Дальше, как первой части поста где мы меняли последний коммит, делаем изменения и добавляем их:
git add .
и коммитим с параметром --amend:
git commit --amend
После успешного коммита, следуя подсказке (чуть выше на скриншоте), выполняем:
git rebase --continue
Тем самым мы возвратимся на ветку master с измененным коммитом, что и требовалось.
Пост получился короткий и, надеюсь, ясный. Commit early, commit often.