Файл hosts — текстовый документ, который содержит в себе информацию о домене и IP-адресе, который ему соответствует. Файл hosts появился во времена зарождения Интернета (ARPANET) и служил неким маршрутизатором, пока на замену ему не пришла служба DNS. Но до сих пор он не утратил важности и по-прежнему используется как инструмент, который обладает приоритетом перед обращением к DNS-серверам.
Зачем нужен файл hosts
Предположим: вы зарегистрировали домен и привязали его к Hosting Linux. Но чтобы увидеть сайт, вам нужно дождаться делегирования домена на DNS-серверы. В файле hosts вы можете указать ваш домен и IP-адрес хостинга, а затем открыть браузер и зайти на ваш сайт, не дожидаясь делегирования домена. Также с его помощью вы можете заблокировать на локальном компьютере доступ к определённому сайту, указав соответствующую запись.
Где находится файл hosts
Путь к папке, где лежит файл hosts, зависит от операционной системы, которая установлена на вашем компьютере:
- Windows XP, 2003, Vista, 7, 8, 10 — c:windowssystem32driversetchosts
- Linux, Ubuntu, Unix, BSD — /etc/hosts
- macOS — /private/etc/hosts
Редактировать файл etc hosts нужно от имени администратора, иначе вы не сможете сохранить внесённые изменения.
Как внести изменения в файл hosts
Ниже мы рассмотрим, как редактировать и как сохранить изменения в файле hosts. Важно открыть файл с правами администратора, иначе система не даст вам его сохранить. Выберите вашу операционную систему и следуйте инструкции или посмотрите видеоинструкцию:
Редактирование файла hosts в Windows 7
-
1.
Запустите Блокнот или любой другой редактор от имени администратора. Откройте Пуск, найдите нужный редактор, нажмите по нему правой кнопкой мыши и выберите Запуск от имени администратора:
Как отредактировать файл hosts
-
2.
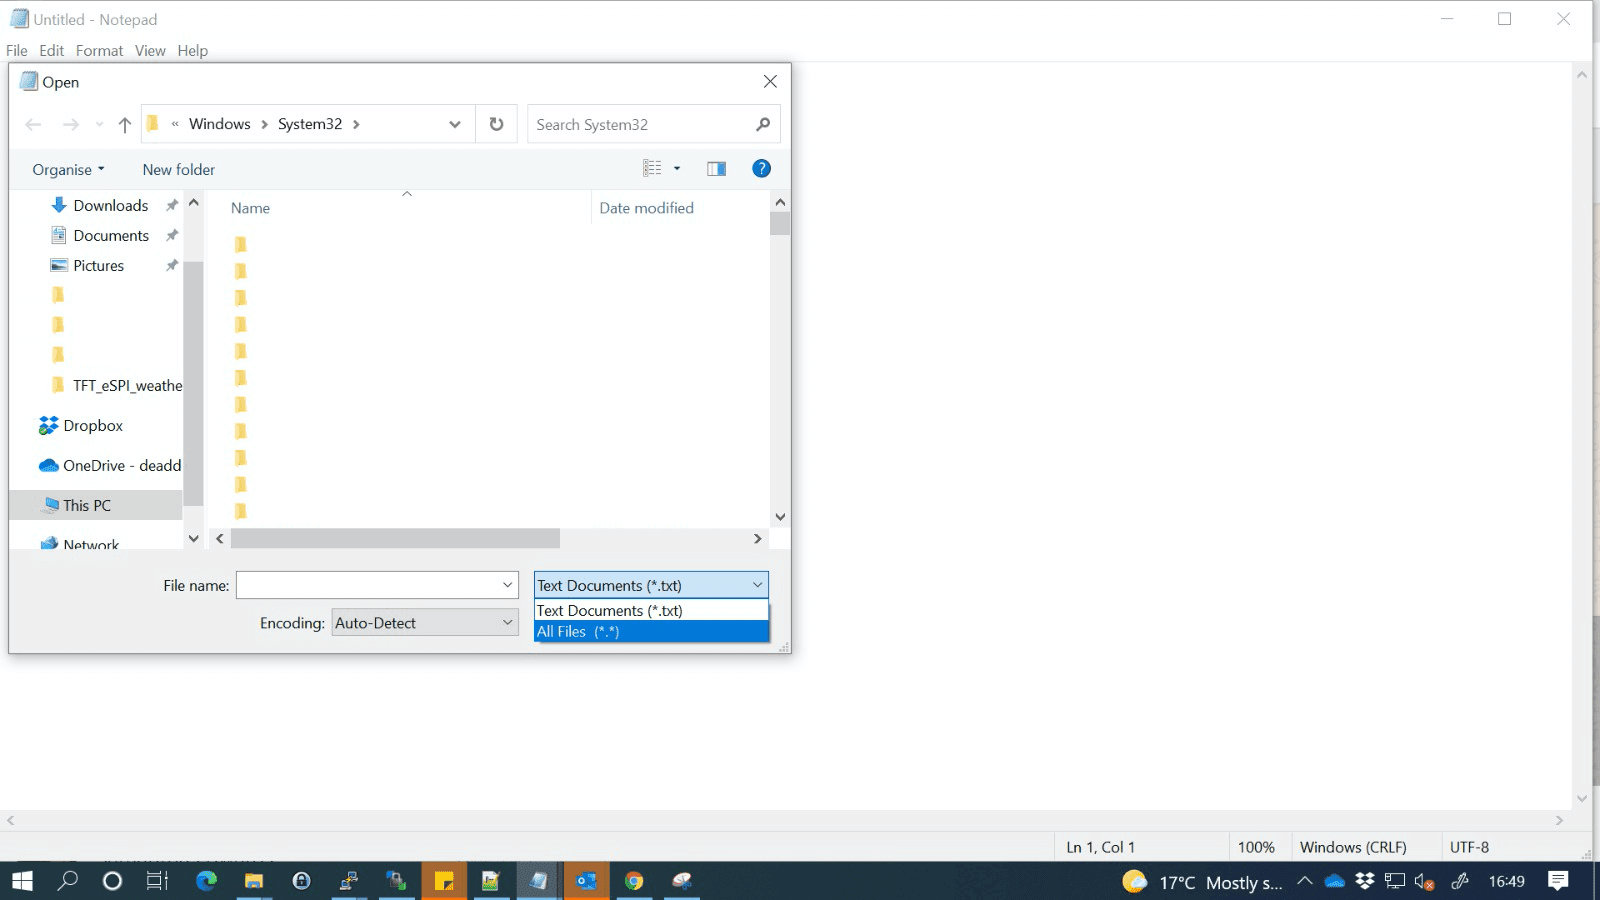
В меню «Файл» нажмите Открыть и перейдите в каталог, в котором расположен файл hosts. Измените тип файла на «Все файлы»:
-
3.
Выберите файл hosts и откройте его.
-
4.
Добавьте в конце файла необходимую запись в формате:
123.123.123.123 faq-reg.ru www.faq-reg.ruГде:
- 123.123.123.123 — IP-адрес вашего сервера или хостинга,
- faq-reg.ru — имя вашего домена.
-
5.
Сохраните изменения в файле.
Теперь вы можете открыть ваш сайт в браузере, не дожидаясь обновления DNS-серверов.
Редактирование файла hosts в Windows 8, 10
Чтобы изменить файл hosts в виндовс 10 (8), выполните следующие действия:
-
1.
Запустите Блокнот или любой другой редактор от имени администратора. Для этого найдите его в Пуске, нажмите по нему правой кнопкой мыши и выберите Запуск от имени администратора:
-
2.
В меню «Файл» нажмите Открыть и перейдите в каталог, где находится файл hosts . Измените тип файла на «Все файлы»:
-
3.
Выберите файл hosts и откройте его.
-
4.
Добавьте в конце файла необходимую запись в формате:
123.123.123.123 faq-reg.ru www.faq-reg.ruГде:
-
123.123.123.123 — IP-адрес вашего сервера или хостинга,
-
faq-reg.ru — имя вашего домена.
-
-
5.
Сохраните изменения в файле.
Теперь вы можете открыть ваш сайт в браузере, не дожидаясь обновления DNS-серверов.
Редактирование файла hosts в Linux, Unix
В Linux файл hosts находится в папке etc. Чтобы отредактировать его:
-
1.
Введите в терминал linux команду hosts:
-
2.
Добавьте в конце файла необходимую запись в формате:
123.123.123.123 faq-reg.ru www.faq-reg.ruГде:
-
123.123.123.123 — IP-адрес вашего сервера или хостинга,
-
faq-reg.ru — имя вашего домена.
-
-
3.
Сохраните изменения в файле.
Теперь вы можете открыть ваш сайт в браузере, не дожидаясь обновления DNS-серверов.
Файл hosts в Ubuntu редактируется так же, как и во всех Unix-системах.
Редактирование файла hosts в MacOS
Файл hosts в Mac OS расположен в каталоге: /private/etc/hosts. Чтобы изменить его:
-
1.
Запустите терминал с помощью горячих клавиш: Command (⌘) + T или через Spotlight.
-
2.
Введите команду:
Нажмите Enter:
-
3.
Добавьте в конце файла необходимую запись в формате:
123.123.123.123 faq-reg.ru www.faq-reg.ruГде:
-
123.123.123.123 — IP-адрес вашего сервера или хостинга,
-
faq-reg.ru — имя вашего домена.
-
-
4.
Сохраните изменения в файле.
Теперь вы можете открыть ваш сайт в браузере, не дожидаясь обновления DNS-серверов.
Видеосправка. Как изменить файл hosts
Также вы можете заблокировать определенный сайт через файл hosts, воспользовавшись инструкцией ниже:
Блокировка доступа к сайту через файл hosts
Доступ к сайту также можно ограничить для локального компьютера. Для этого укажите адрес страницы (домен) в файле hosts. Заблокировать IP нежелательного сайта не требуется. Блокировка осуществляется по локальному хосту с фиксированным IP (127.0.0.1):
-
1.
Откройте файл hosts от имени администратора на своём ПК.
-
2.
В указанной на скриншоте строке укажите IP-адрес 127.0.0.1 и через пробел адрес нежелательного сайта. Чтобы заблокировать несколько сайтов, повторите действие в следующей строке. В примере ниже в файле hosts отказано в доступе (заблокирован доступ) к сайтам «vk.com» и «youtube.com»:
-
3.
Сохраните изменения.
Готово! Доступ к сайтам будет ограничен на определенном ПК.
Оригинальный файл hosts и как его восстановить
Скачать содержимое файла hosts можно на разных ресурсах. Но мы не рекомендуем делать это, так как файл может быть заражен.
Файл hosts по умолчанию есть в каждой операционной системе, но он может быть скрыт для просмотра. Следуя инструкциям выше, вы сможете его открыть и отредактировать. Если вы удалили его, то просто создайте текстовый файл без расширения в нужной папке.
По умолчанию файл hosts выглядит следующим образом:
Для Windows
# Copyright (c) 1993-2006 Microsoft Corp.

#

# This is a sample HOSTS file used by Microsoft TCP/IP for Windows.
#
# This file contains the mappings of IP addresses to host names. Each
# entry should be kept on an individual line. The IP address should
# be placed in the first column followed by the corresponding host name.
# The IP address and the host name should be separated by at least one
# space.
#
# Additionally, comments (such as these) may be inserted on individual
# lines or following the machine name denoted by a '#' symbol.
#
# For example:
#
#      102.54.94.97     rhino.acme.com          # source server
#       38.25.63.10     x.acme.com              # x client host
# localhost name resolution is handle within DNS itself.
#       127.0.0.1       localhost
#       ::1             localhost
Для Linux
127.0.0.1       localhost

127.0.1.1      user

# The following lines are desirable for IPv6 capable hosts
::1     ip6-localhost ip6-loopback
fe00::0 ip6-localnet
ff00::0 ip6-mcastprefix
ff02::1 ip6-allnodes
ff02::2 ip6-allrouters
где user (во второй строке) — это имя вашего компьютера.
Для MacOS
##

# Host Database

#

# localhost is used to configure the loopback interface
# when the system is booting.  Do not change this entry.
##
127.0.0.1  localhost
255.255.255.255  broadcasthost
::1             localhost
Удалите текущее содержимое из файла hosts, вставьте текст по умолчанию и сохраните изменения.
Теперь вы знаете, как должен выглядеть файл hosts и как с ним работать.
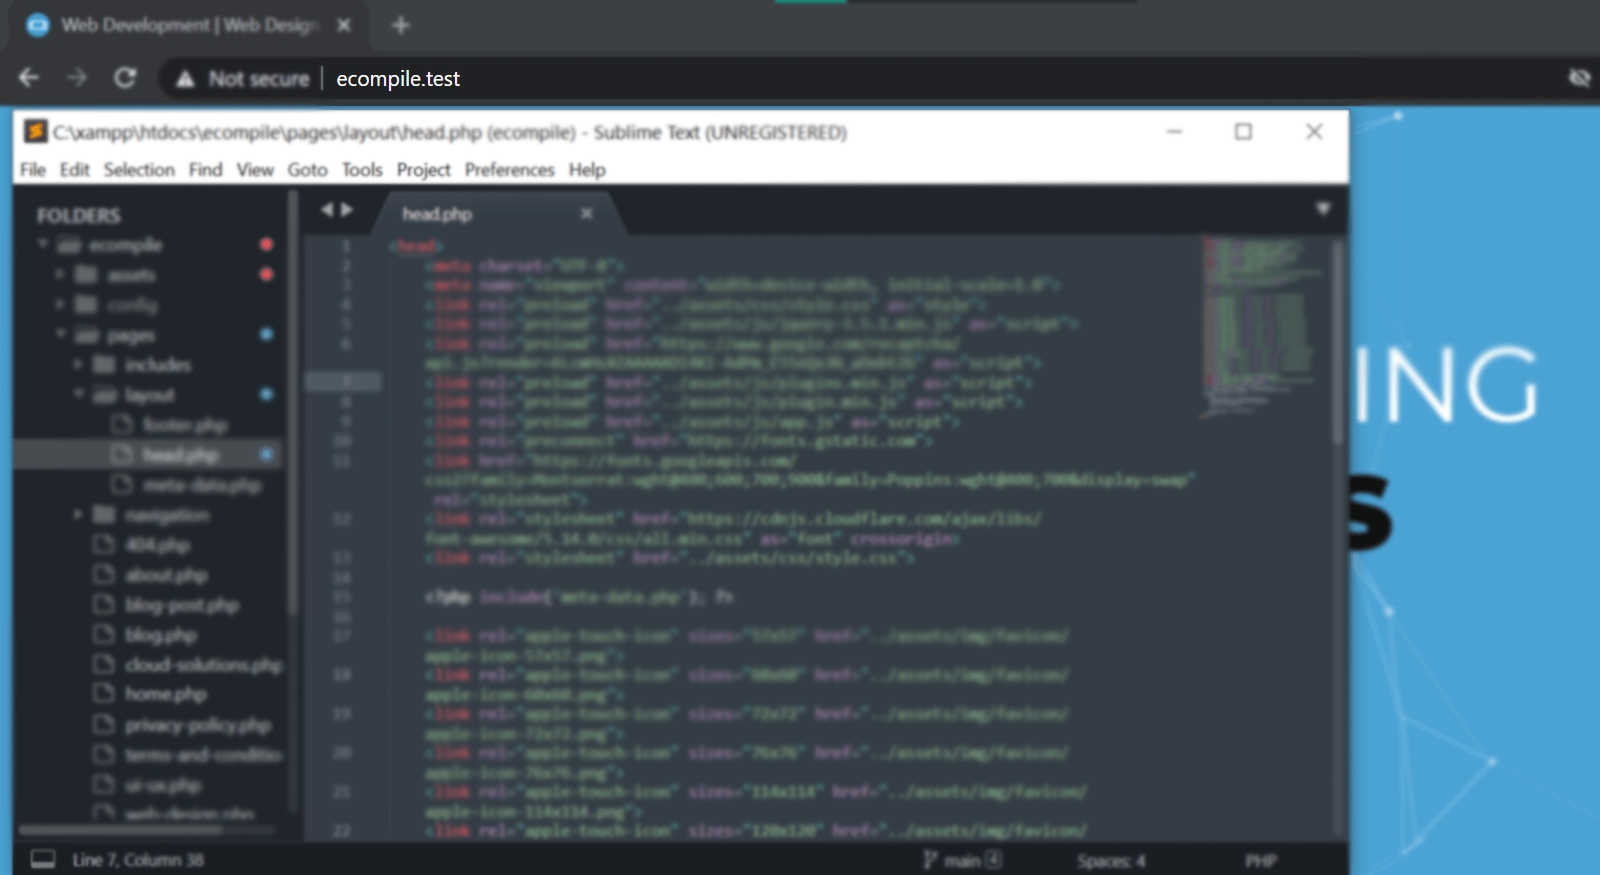
Want to access your website on a localhost via a domain name, say something like mywebsite.test? There are few benefits in doing so.
Updated: 21/01/2022
- — You can create shortened URLs to be able to access your local website easily
- — If your project is located in a subfolder, you could route the domain directly into the subfolder. For example, let’s say, your website is located at C:xampp/htdocs/folder/example/. Instead of typing the full url, you could route your custom domain to that specific subfolder.
- — You get the idea. There are a number of things you can accomplish better with this.
This process assumes you are running Windows 10 and XAMPP environment. It might work differently for other operating systems or different versions of those systems.
Step 1.
Open the directory below in file explorer:
C:WindowsSystem32driversetc
Step 2.
There you will find a file called «hosts». Double click on the file to open it. If it asks you to choose a program to open it, choose «Notepad» or your preferred text editor.
Step 3.
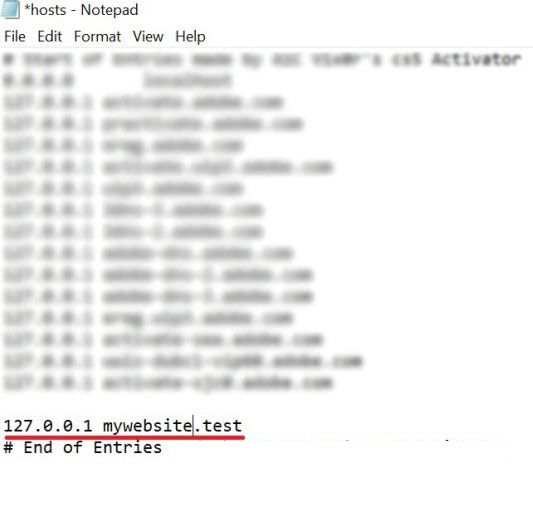
Scroll to the end of the file and add the following line:
127.0.0.1 example.test
Note:
- — Type in your local machine address(127.0.0.1) follow by the domain name. You can use any extension(.test .mywork .dev). Do not use common extensions (such as .com, .net, .io, etc), otherwise it will conflict with your access to other websites on internet.
Step 4.
Click Save(Shortcut for Windows is CTRL+S) to overwrite the changes to the file. In the «Save Type As» dropdown select ‘All Files’. There should be a popup window asking you if you want to replace the file. Click «Yes».
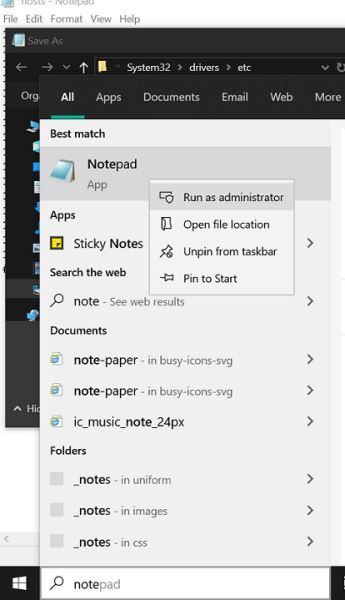
You could get a message prompt saying that you don’t have the right/administrator permissions to replace the file. If you do, Go to step 4.1 , if not skip to Step 5.
Step 4.1
In your windows startup search bar, type «notepad». Right click on notepad and run it as administrator.
Copy the full contents of hosts file that we previously opened in step 3. Paste the content into the notepad file that you opened as an administrator in step 4.1.
Click «Save As» on the new notepad. For «Save Type As» select ‘All Files’. Change the directory on the Save Popup Window to the following folder:
C:WindowsSystem32driversetc
You will see a file on top called «hosts». Select the file and it will prompt «file already exists, do you want to override the file?», to which you must select «Yes».
Step 5.
Open the follow directory
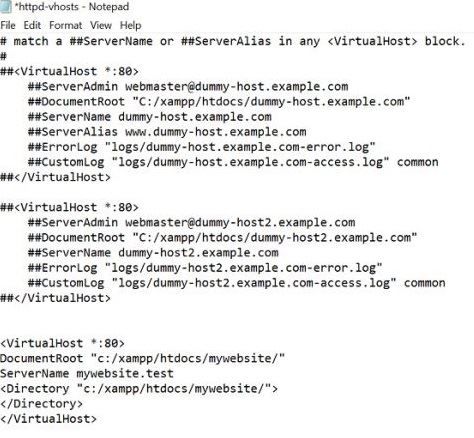
C:xamppapacheconfextra
Double click to open a file called «httpd-vhosts». If it asks you to choose a program to open it, choose Notepad.
Step 6.
Scroll to the bottom end of the file and add the following code:
	<VirtualHost *:80#62;
		ServerAdmin example.test
		DocumentRoot "C:/xampp/htdocs/foldername/"
		ServerName example.test
	</VirtualHost#62;
You should replace «c:/xampp/htdocs/example/«with location of your project. Example, if your project is in a subfolder then add the subfolder “ c:/xampp/htdocs/folder/subfolder/
ServerName (example.test) should also be replaced your chosen domain name. Note it must be the same domain name that you used in Step 3.
Next restart your xampp. (Stop & Start the apache service).
Type in your new domain name into the browser’s search bar and you are good to go.
Make your website 10x faster with WebP images

About the Author

Shavkat
Has been doing web design & development since early 2010s. Believes every website should serve a purpose. he is the founder and head of Development at Ecompile.
Here is how to change localhost to domain name in Windows 10. Have you ever thought about how to change or rename your localhost address with a domain name you like?. For me when I found that I can change localhost address to a domain. I was so excited to use my favourite domain name, instead of localhost. Have you decided to change your Localhost name to a specific domain name? Like many other developers and me. Here Is How to change your localhost address to your favourite domain name.
Here are two easy methods to change your Windows localhost address to the domain name.
Method One: Using Hosts file
Step – 1: Run your notepad or any other text editor as administrator. A dialogue box will pop up and ask you “Do you Want to Allow This App to Make Changes to Your Device?” Click Yes
Step – 2: From the Menu bar of Notepad go to File>open and open the following Directory
C:WindowsSystem32driversetc
Or go to MyComputer>Drive C>Windows>System32>Drivers>etc>
By default, you won’t be able to see the files located in them, etc. folder to see the existing files, Change the Document text to all files from the extension tab of notepad.
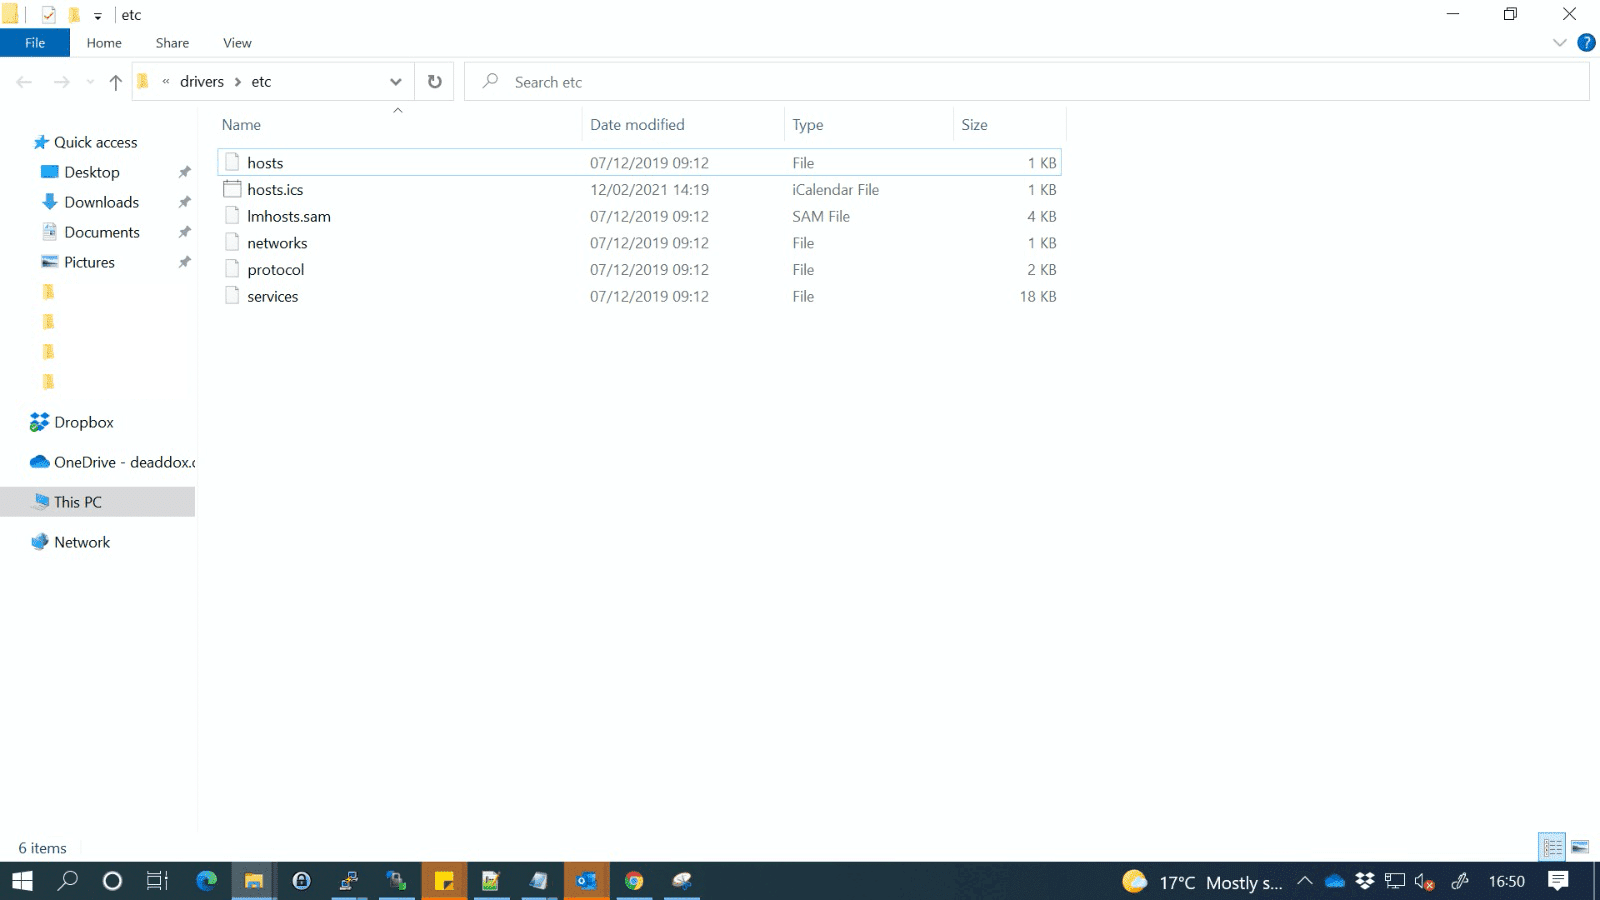
Once you changed the extension tab to all files, you will see the following files in the folder
hosts, Imhosts.sam, networks, protocol, services
Step – 3: Open the host’s file and write down your favourite domain name
After opening the “hosts” file that will look as below. Here you can add your favourite domain name with the same IP address as I have added the Dev.com with the IP of 127.0.0.1.
Note: you can add as many domains as you want to add.
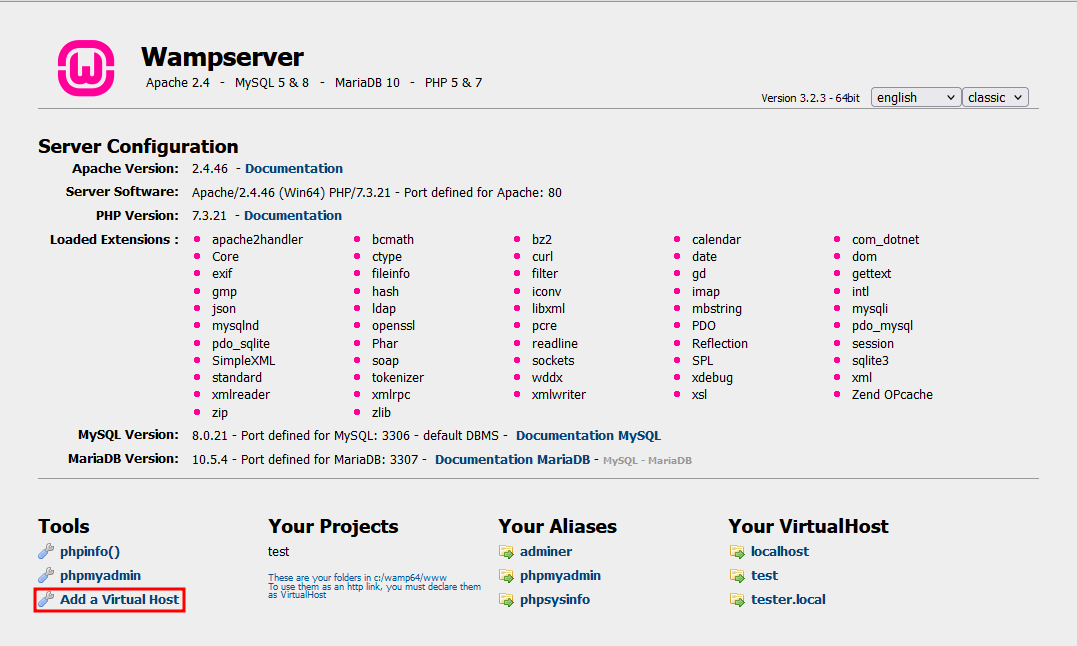
Method Two: Wamp Server Tools
This technique is a little bit easier than method one. To change your localhost to domain name all you need to do is run your wamp server and go to localhost page.
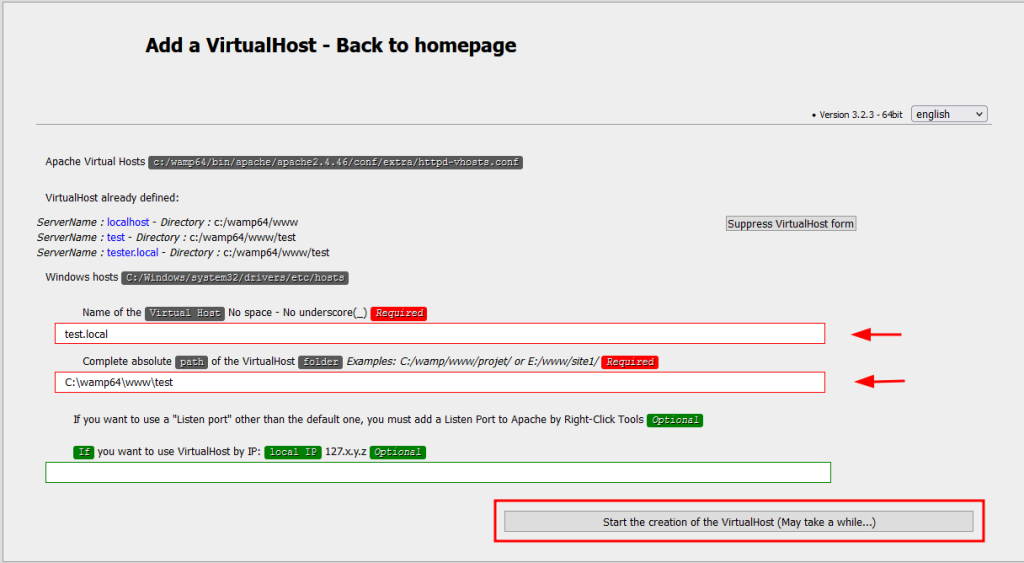
In the Localhost page, on the tool section, click on Add A Virtual Host then you will be guided to the following page.
Like the page, itself has the guide in the first input field write your domain name without space, Underscore and diacritical characters.
The second input field is optional; you can add an IP address, or leave it empty.
The third input field goes to the address of the wamp server which is common as below.
C:/wamp64/www or C:/wamp/www/
Once you are done with the above steps, click on the Start, the creation of the virtual host.
Then go to wamp and rightclick>tool>restartDNS that’s it. Now open your browser and type your domain name to open the localhost page.
Final word:
I know you, like me, and many other techies enjoy learning new things every day and to build up your skills, improve in your filed and have more grip on your passion.
This tutorial is for XAMPP 1.7.3 running under Windows XP with Service Pack 3. It may be similar for other version combinations, but no guarantee is made.
Assumes you have installed XAMPP. Instructions can be found here.
UPDATE 17-March-2012:If you are running Windows 7 (and possibly Vista) the default security settings prevent you from running applications with administrative privileges. This means that you won’t be able to save changes made to the hosts file.
For instructions on opening the hosts file for reading and writing please see this article.
Installing XAMPP allows you to develop, test, and play around with web server code on your local machine. You can configure and test out your website locally, instead of live somewhere on the web.
It does have the drawback that to access your website you have to type localhost/my-web-site, where my-web-site is actually the directory you installed your website in.
You can setup the Apache Server in XAMPP to serve up web pages as though they were actually located on www.my-web-site.com instead of localhost.
This is a two step process: first, you have to redirect the web site name to your computer; next, you get Apache to redirect the web site address to your installed directory.
Redirecting the Web Site to Your Computer
When you type a web site name into the URL field (say, www.google.com), your browser sends the name to a Domain Name Server that looks up the text name (www.google.com, for example) and returns the Internet Protocol (IP) address for it (74.125.39.104 is returned for www.google.com). Your browser then connects to IP address 74.125.39.104.
Before your browser queries the Domain Name Server, it first checks a file called hosts on your computer. If the requested web site name is found, it uses the IP address found in the file.
1) Locate your hosts file. In Windows XP, this file is located in C:WINDOWSsystem32driversetc:
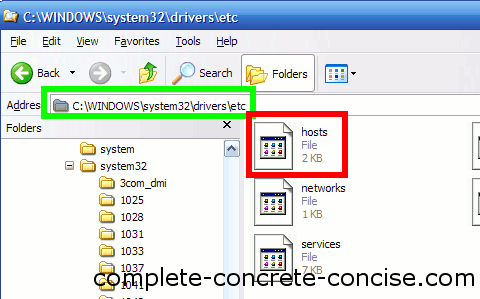
NOTE: Different versions of Windows may store the file in a different directory.
2) Open the file with a plain text editor (like Notepad++). Using a word processor, like Word, can mess up the file when you save it.
It is very likely that the file is empty, except for the default comment and examples (the section in the green box):
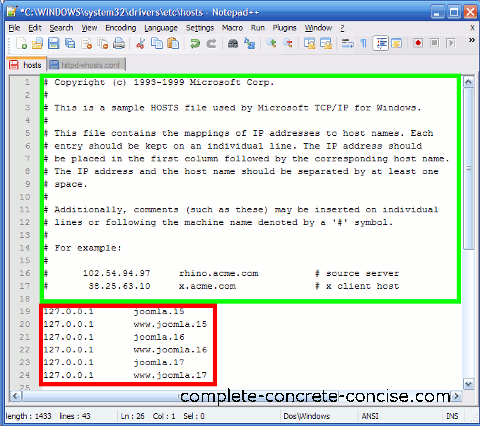
3) Add lines containing the domain name(s) and IP address to redirect to. See the section in the red box in the image above.
-
Each line must begin with the address 127.0.0.1 (this is the localhost address)
-
After the IP address, type the name of the domain you wish to redirect to this address. You may only enter 1 name per line.
-
Addresses like my-site.com and www.my-site.com are different and each need a separate line.
Your address does need to be a “valid” top level domain (i.e. .com, .net, .ca, .pl, etc). It just needs to be composed of letters (a-z), numbers (0-9), hyphens (- but not as the start or end of a name) and periods (.). In the examples above, I used .15, .16, and .17 as the top level domain (which are not valid top level domains).
You can redirect existing domains to your machine. If you entered the line: 127.0.0.1 google.com, then every time you typed google.com into your URL field, your browser would redirect the request to your machine instead of going to Google’s web site. NOTE: this redirection only happens on your computer – everyone else in the world will still go to Google’s home page.
You can also redirect (on your computer only) one website to another. For example, suppose you are boycotting Google, so you decide to redirect google.com to bing.com instead. You would do that by entering Bing’s IP address in your host file followed by the web site you want to resolve to that IP address: 195.57.152.178 google.com
4) Save the changes.
5) Restart your browser (if it was open when you made the change to your hosts file).
Getting Apache to Serve Your Web Site
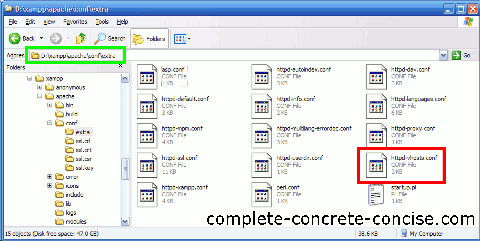
These instructions are for XAMPP 1.7.3. Other versions or XAMPP, or different Apache Server installations may have the files in different locations, or may even have the files named differently.
6) Locate the httpd-vhosts.conf file. For most XAMPP 1.7.3 installs this will be C:xamppapacheconfextra (in my case, I installed XAMPP on my D-drive, so the folder is D:xamppapacheconfextra):
7) Open the file using a plain text editor (like Notepad++). Using a Word processor, like Word, can mess up the file when you save:
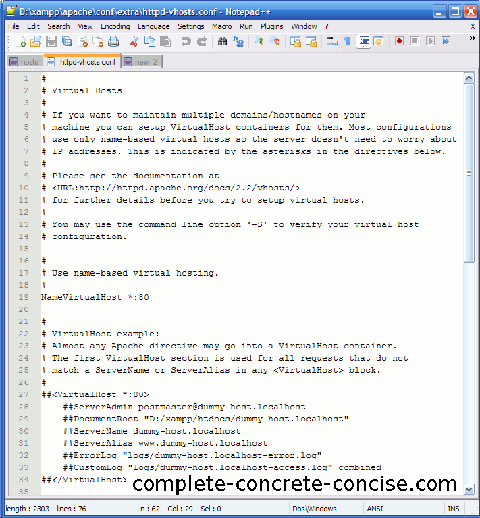
The file will contain some documentation and sample virtual hosts.
 Add, at the bottom of the file, new virtual hosts for each domain you added in step 3) above.
Each host will have the following form:
<VirtualHost *:80>
    ServerName www.joomla.16
    ServerAlias joomla.16
    DocumentRoot d:/xampp/htdocs/joomla16
</VirtualHost>
ServerName: following this label, add the name of the domain you added in step 3)
ServerAlias: following this label, you may add as many alternate domains (separated by spaces) as you like that are supposed to resolve to this virtual host. Remember that www.my-domain.com is different from my-domain.com, but, typically, you would want them to resolve to the same server.
DocumentRoot: following this label, add the path where your website is located. You can use an absolute path (as in the example above), or a relative path (but relative paths can be trickier to set up, so I prefer to use an absolute path).
9) Save the file.
10) Restart the Apache Server to have the change take effect. Do this by clicking on the Stop button on the XAMPP control panel and then clicking on the Start button. (You could also just reboot the computer, but that is overkill).
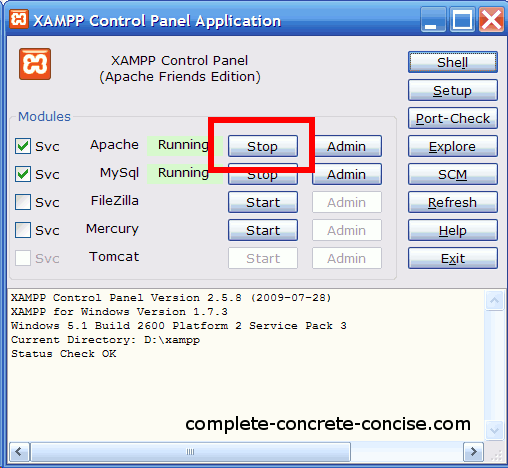
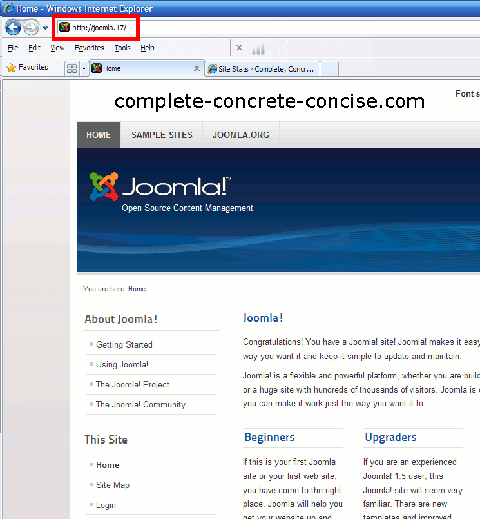
You should now be able to type the domain name into your URL field and go directly to your locally hosted web site:
For more information on configuring virtual hosts, you can read the documentation at the Apache Foundation here.
There is a lot more you can do with virtual hosts (such as adding an IP address).
Budget web hosting providers use virtual hosts to host multiple websites on the same server (and same IP address).
WINDOWS + WAMP решение
- Перейдите в C: wampbinapacheApache2.2.17conf, откройте файл httpd.conf и измените. …
- Перейдите к C: wampbinapacheApache2.2.17confextra. …
- Откройте файл hosts в C: / Windows / System32 / drivers / etc / и добавьте следующую строку (ничего не удаляйте) 127.0.0.1 myWebsite.local. …
- перезапустите ваш сервер.
13 апр. 2016 г.
Как мне изменить свой IP-адрес localhost в Windows 10?
Включение DHCP или изменение других настроек TCP / IP
- Выберите «Пуск», затем выберите «Параметры»> «Сеть и Интернет».
- Выполните одно из следующих действий: Для сети Wi-Fi выберите Wi-Fi> Управление известными сетями. …
- В разделе «Назначение IP-адреса» выберите «Изменить».
- В разделе «Изменить настройки IP» выберите «Автоматически (DHCP)» или «Вручную». …
- Когда вы закончите, выберите Сохранить.
Как изменить имя локального хоста в Windows 10?
Windows 10 и Windows 8
- Нажмите клавишу Windows.
- Введите Блокнот в поле поиска.
- В результатах поиска щелкните правой кнопкой мыши Блокнот и выберите Запуск от имени администратора.
- В Блокноте откройте следующий файл: c: WindowsSystem32Driversetchosts.
- Внесите необходимые изменения в файл.
- Выберите Файл> Сохранить, чтобы сохранить изменения.
23 юл. 2019 г.
Можем ли мы изменить имя локального хоста?
Имя по умолчанию для адреса локального компьютера называется «localhost». Следовательно, localhost — это адрес компьютера, на котором запущено приложение в сети. … IP-адрес локального хоста — «127.0. 0.1 ». Чтобы изменить имя локального хоста, вы должны отредактировать файл «Hosts» в Windows.
Как мне использовать свое доменное имя вместо IP-адреса?
Выполните следующие простые шаги:
- Войдите в свой менеджер домена (портал самообслуживания регистраторов вашего домена)
- Найдите диспетчер DNS.
- Выберите создание записи A.
- Установите запись A, выбрав имя поддомена и указав его на IP-адрес ваших игровых серверов, например. мой. (…
- Пожалуйста, дайте до 24 часов для распространения записи DNS.
Как мне получить доступ к своему доменному имени с localhost вместо моего веб-сайта?
Как получить доступ к сайту, используя доменное имя вместо localhost в…
- Откройте IIS (нажмите WIN + R, введите inetmgr в диалоговом окне и нажмите OK.…
- Разверните узел «Сервер» и щелкните папку «Сайты».
- Нажмите «Добавить веб-сайт» на панели «Действия». …
- Введите данные в окне «Добавить веб-сайт» следующим образом.
- Нажмите ОК, чтобы создать веб-сайт.
8 окт. 2014 г.
Не можете редактировать файл hosts в Windows 10?
Чтобы иметь возможность редактировать его, вы должны сначала отключить бит только для чтения:
- Откройте папку c: windowssystem32driversetc в вашем файловом менеджере;
- щелкните правой кнопкой мыши файл hosts;
- выберите Свойства;
- снимите галочку «Только для чтения»;
- нажмите Применить;
- нажмите «Продолжить» (чтобы выполнить действие с правами администратора).
Как мне вручную изменить свой IP-адрес в Windows 10?
Как найти и вручную назначить IP-адрес в Windows 10?
- Шаг 1. Откройте панель управления. Нажмите «Windows + R», появится окно «Выполнить».
- Шаг 2: Перейдите в Сетевые подключения. Перейдите в Сеть и Интернет> Центр управления сетями и общим доступом.
- Шаг 3: Найдите IP-адрес. Щелкните правой кнопкой мыши значок Ethernet и выберите «Состояние» в контекстном меню.
- Шаг 4: Установите IP-адрес.
2 февраля. 2019 г.
Могу ли я изменить свой локальный IP-адрес?
Android: в разделе «Настройки» нажмите «Беспроводные сети» и выберите свою сеть Wi-Fi. Затем нажмите «Изменить сеть», «Перейти к дополнительным параметрам» и измените IP-адрес.
Где находится файл Hosts в Windows 10?
Где находится файл Hosts?
- Windows 10 — «C: WindowsSystem32driversetchosts»
- Linux — «/ etc / hosts»
- Mac OS X — «/ private / etc / hosts»
29 окт. 2020 г.
Как мне найти имя моего локального хоста?
Используя командную строку
- В меню «Пуск» выберите «Все программы» или «Программы», затем «Стандартные», а затем — «Командная строка».
- В открывшемся окне в ответ на приглашение введите имя хоста. В результате в следующей строке окна командной строки будет отображаться имя хоста машины без домена.
18 ян. 2018 г.
Какая папка — localhost?
По умолчанию не существует такой вещи, как каталог localhost. Сначала вам нужно установить веб-сервер, а затем поместить свои файлы в каталог, указанный в конфигурации.
Как мне изменить мой локальный хост?
2. Проверьте свою установку.
- После установки XAMPP откройте его и просмотрите панель управления.
- Запустите Apache, щелкнув опцию «Пуск» службы Apache.
- Щелкните Проводник, чтобы увидеть файловую структуру вашего сервера localhost.
- Щелкните папку htdocs. …
- Создайте новую папку в htdocs, назовите ее my-site.
Как сделать мой локальный хост общедоступным?
7 ответов. Вы входите в конфигурацию своего маршрутизатора и перенаправляете порт 80 на IP-адрес LAN компьютера, на котором работает веб-сервер. Тогда любой за пределами вашей сети (но не вы внутри сети) сможет получить доступ к вашему сайту, используя ваш WAN IP-адрес (whatismyipcom). Есть несколько хороших бесплатных сервисов, которые позволят вам сделать то же самое.
Как мне указать на localhost?
Например, если ввести: ping localhost, будет выполнен пинг локального IP-адреса 127.0. 0.1 (адрес обратной связи). При настройке веб-сервера или программного обеспечения на веб-сервере 127.0. 0.1 используется для указания программы на локальный компьютер ».
You can configure your localhost to have a customized domain. You might want to do it to demonstrate a web application you might have developed on your local system. Or maybe you would like to maintain your own website on your computer. (Just for fun!)

Step 1: Download and install Server Stack.
To run your web application, you need to set up a web server. We are going to use WAMP in this tutorial (Download WAMP). After downloading the package, install it in your system. After the installation is complete, go to Start >> All Programs >> WampServer >> start WampServer. A new icon (Wamp) appears in the notification area. Wait for it to turn green.
Open up your browser and type in “localhost” in the address bar and hit Enter. If your installation was correct, you will see Wamp’s root webpage.
Step 2: Configure files to change localhost’s domain
For this part, you need to dig deep into the Windows directory and modify the “hosts” file. In the last line you need add the following:
127.0.0.1 mycustomdomain.com
This renames your localhost domain to “mycustomdomain.com”. Similarly, you can add your own custom domain name in place of “mycustomdomain.com”. Now, if you open mycustomdomain.com (or whatever domain name you set) on your browser, it launches Wamp server’s root webpage. For more information on how to modify the “hosts” file, see below.
Note: If your custom domain name matches with an existing website, your browser will open the localhost instead of the website while your local server is running.
Step 3: Preparing the Website to launch on your browser
Now you need to configure the home page for your custom domain. Left click on the WAMP icon in the notification area and click on “www directory”. This will take you to the local server’s root. Find the “index.php” file here and back it up in another location. This is Wamp’s default root webpage. Now copy the files of your own website and make sure you replace the default index.php file with your own index.php (or index.html).
Your website is now fully configured to run on localhost. Whenever you type your custom domain name on the browser’s address bar, you should see your own website running on localhost. (Keep WAMP Server on while browsing your website.)
How to modify / change the Windows Hosts file
The hosts file is a system configuration file that resides inside the Windows directory. The full path of the file is:
C:WindowsSystem32Driversetchosts
[It is assumed here that Windows is installed in Drive C]
This file is write-protected and hence you cannot edit or modify it directly. First you need to copy the file into another folder (not inside Windows directory). Open the copied file with Notepad. Make any changes you need to do and save the file. After changes have been saved, you can head back to the file’s original location (C:WindowsSystem32Driversetc) and replace the old hosts file with the modified one.
#How To #Web Apps #Web Designing
All posts on 7labs, including this one, are compliant with our Content Disclosure policy.
Domain names are always easy to remember and also give a professional look in local development instead of typing IP (127.0.0.1) or localhost and file directory.
By default while using local development server WAMP and XAMPP, you have to type localhost/{directory_of_web_application} or 127.0.0.1/{directory_of_web_application} in browser. In XAMPP/WAMP, there is no direct one-click method like in localWP to create a custom domain.
This tutorial will help you to create an easy-to-use custom domain URL in WAMP and XAMPP.
Let’s say you have your local application on localhost/mylocalapp. After following this tutorial you can access that application with mylocalapp.test or any domain name you would like.
Steps to convert localhost into a custom domain in XAMPP in Windows
To set up a custom domain in localhost we have to apply the change in three places: Setting local development in XAMPP & identifying directory, pointing a custom domain to local computer from Windows host file, and redirecting the domain to a specific application folder through VirtualHost.
Locate Application directory (folder)
Generally, application/website files are located inside htdocs in the main XAMPP folder. For localhost/mylocalapp directory C:/xampp/htdocs/mylocalapp.
Update Windows Host file
Now, Update the Windows host file to tell the local DNS to redirect your domain into your local computer (same Computer).
- Step 1: Go to C:WindowsSystem32driversetc and edit hosts file “as Administrator”. [ For that open, any text editor in administrator mode then navigate to hosts file.]
- Step 2: Add 127.0.0.1 and custom domain at the end of file.
127.0.0.1 mylocalapp.test mylocalapp.localYou can add as many domain names as you want by separating them with space. Or can add on each new line like: 127.0.0.1 mylocalapp.local
- Step 3: Save and close.
After getting a request on the same localhost server, let’s tell which application to execute on a particular domain request with a virtual host.
Update Apache virtual host.
Virtual host redirects a particular domain to a specific application file directory in the server.
- Step 1: Go to C:xamppapacheconfextra and open httpd-vhosts.conf file.
- Step 2: Add virtual host configuration for particular URL at the end of file.
<VirtualHost *:80>
    ServerName mylocalapp.test // URl to set
    ServerAlias mylocalapp.local // Another URl to open same Web App
    DocumentRoot C:/xampp/htdocs/mylocalapp // Application file directory (folder) in XAMPP localhost
</VirtualHost>
You can add multiple alias names (domain name) by separating with space or can add another ServerAlias line in the new line.
- Step 3: Save and close.
Now, your custom domain for local applications is ready.
Find More:
- 10 Best WordPress Themes for 2022.
- Top 10 Best Domain Registrars [2022]
Steps to convert localhost into a custom domain in WAMP in Windows
Now, we can easily add a custom domain in WAMP from Graphical Interface.
- After starting WAMP server, visit localhost in browser and click “Add a Virtual Host” on left bottom corner.
- Then, add custom domain in “Name of Virtual Host” field and your local application folder path in “VirtualHost folder” field. And, click on “Start the creation of the VirtualHost”.
- Now, restart the DNS server. Right click on WAMPserver icon on taskbar tray. Go to Tools and click on “Restart DNS”. Now your custom domain is configured an ready to use.
Why should you use .local & .test instead of .com domain in localhost?
When using already available domain extension suffixes like .com, .net, .dev, and more, there is a chance domain may already be registered and hosted on the internet and may conflict while browsing these real domains with your local setup.
So, it’s always better to use .local and .test in the local test environment as they are special-use domain names reserved by the IETF (Internet Engineering Task Force) for these scenarios and can’t be registered in the domain registrar.
If you have any confusion following this tutorial or any topics on Nil Tutorial, don’t hesitate to ask in the comment section. You can also reach me on Twitter.
The Domain Name System (DNS) is the key to locating a website on the Internet. With so much at stake, making changes to your DNS records can be a nerve-wracking experience.
Fortunately, there is a way to test DNS-related changes without editing your live records. By modifying your local hosts file, you can preview how your domains will function on a new server without putting your live site at risk.
In this post, we’ll explore what hosts files are and share some reasons why you may want to modify them. We’ll then show you how to edit hosts files on Windows 10. Let’s get started!
An Introduction to the Hosts File
A hosts file is a local plain text file that maps your server or hostnames to Internet Protocol (IP) addresses. Every time Windows 10 connects over a network using a hostname, it’ll refer to the hosts file. If Windows finds an entry in this file, then it’ll contact the specified server.
If it doesn’t find a relevant hostname, Windows 10 will resolve the hostname using a Domain Name Service (DNS). This is the process used to obtain the server IP address behind a domain name.
Each hosts file entry has its own line, with the numerical IP address, a space or a tab character, and finally the hostname or domain. Let’s look at an example of a hosts file entry:
120.0.0.0 example.com #Example
In the above example, the first section denotes the IP address where this request will be redirected to (120.0.0.0). The second section designates the location that we want to redirect a request from (example.com). The final section specifies a comment for this entry. We‘re using a hashtag to tell Windows 10 to ignore the comment when reading the local hosts file.
After adding the domain information, your system will resolve to the IP address you specified. In the above example, we’re associating the domain name example.com with the IP address 120.0.0.0.
It’s worth noting that some software employs its own techniques to look up hostnames. This means there’s always a chance that it may ignore the hosts file completely.
DNS is the key to locating a website. 🔑 With so much at stake, making changes to your DNS records can be a nerve-wracking experience. 😰 Learn how to safely modify your host files in this guide 👇Click to Tweet
What Happens When You Modify a Hosts File?
When you modify your hosts file, it causes your local machine to look directly at the IP address specified by you. For example, if you wanted to point mywebsite.com to the IP address 1.2.3.4.5, you’d add the following:
1.2.3.4.5 mywebsite.com
Now, every time you try to visit mywebsite.com, you’ll find yourself at 1.2.3.4.5 instead. By editing your hosts file, you can override the DNS for a domain on your specific machine only.
In this post, we’ll be focusing on opening your hosts file and adding individual entries. However, it is also possible to replace this file entirely. This can be an easy way to block malicious or spammy websites in bulk. There are even sites that have published ready-made lists of IP addresses associated with advertisements, hijackers, page counters, and other unwanted connections.
You can download one of these pre-prepared lists and copy/paste its contents into your existing hosts file. Alternatively, you might replace your native hosts file with the newly-downloaded file. If you do opt for the latter, then we recommend keeping a copy of your original file, just in case you encounter any strange behavior with its replacement.
Why You May Want To Modify the Windows 10 Hosts File
You can use your hosts file to test DNS-related changes without having to alter your DNS records. For example, imagine you’ve migrated to a new server. Before updating your DNS settings, it’s a good idea to verify how your domains will look and function on this new server.
However, if you enter your current domain name, then it’ll resolve to your old server. In this scenario, you can modify your hosts file to point the domain to the new server’s IP.
This file can also help test how your website looks on a different server when your DNS hasn’t propagated yet. At Kinsta we provide a temporary URL (sitename.kinsta.cloud), but this cannot mimic everything. For example, by default, a CDN won’t work on a temporary URL.
You can also use the hosts file to block certain websites. This can be useful for employers who want to ensure that their staff isn’t wasting time on unauthorized sites such as Facebook, Twitter, or YouTube.
While there are fewer technical ways to block access to unauthorized websites, many of these methods are relatively easy to reverse. For example, a tech-savvy child may have little problems bypassing parental controls, but modifying the hosts file requires a higher level of technical knowledge.
You might take this a step further and block all websites that serve up advertisements. If you map the addresses of all the major ad providers to an unused internal IP address, then Windows 10 will be unable to resolve these addresses. You can then enjoy the web, advertisement-free.
Finally, some malicious third parties may set up redirects by altering your hosts file. This is known as a hosts file hijack. If you’re encountering strange redirects, then it may be worth checking your hosts file for suspicious entries.
How To Make Firefox Honor the Windows 10 Hosts File
If you’re using Firefox for Windows, then Mozilla’s browser resolves IP addresses slightly differently compared to the other major browsers. By default, Firefox uses DNS-over-HTTPS (DoH).
This is a protocol for performing remote DNS resolution via HTTPS. With this setting enabled, Firefox will use the DOH server as the primary name resolver, rather than checking your local hosts file or DNS resolver.
As a result, the website displayed will always point to the IP address that the Internet deems authoritative for that domain. Even if you edit your hosts file, your changes won’t have any effect if the DoH server returns a working IP address.
There are plenty of great web browsers that are compatible with Windows 10 and that honor the hosts file out-of-the-box. However, if you want to stick with Mozilla Firefox, you can always disable DoH.
To start, select the Menu button in the Mozilla Firefox browser and go to Settings.
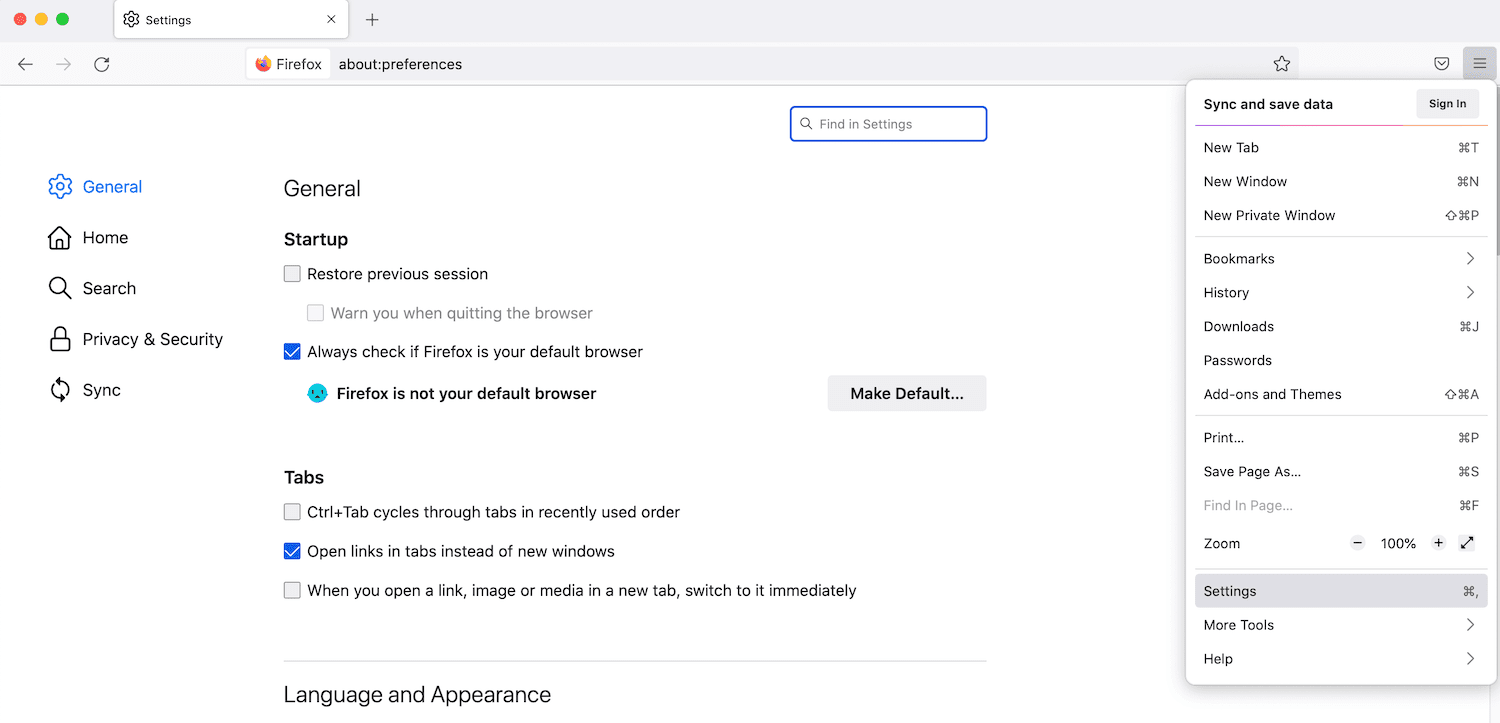
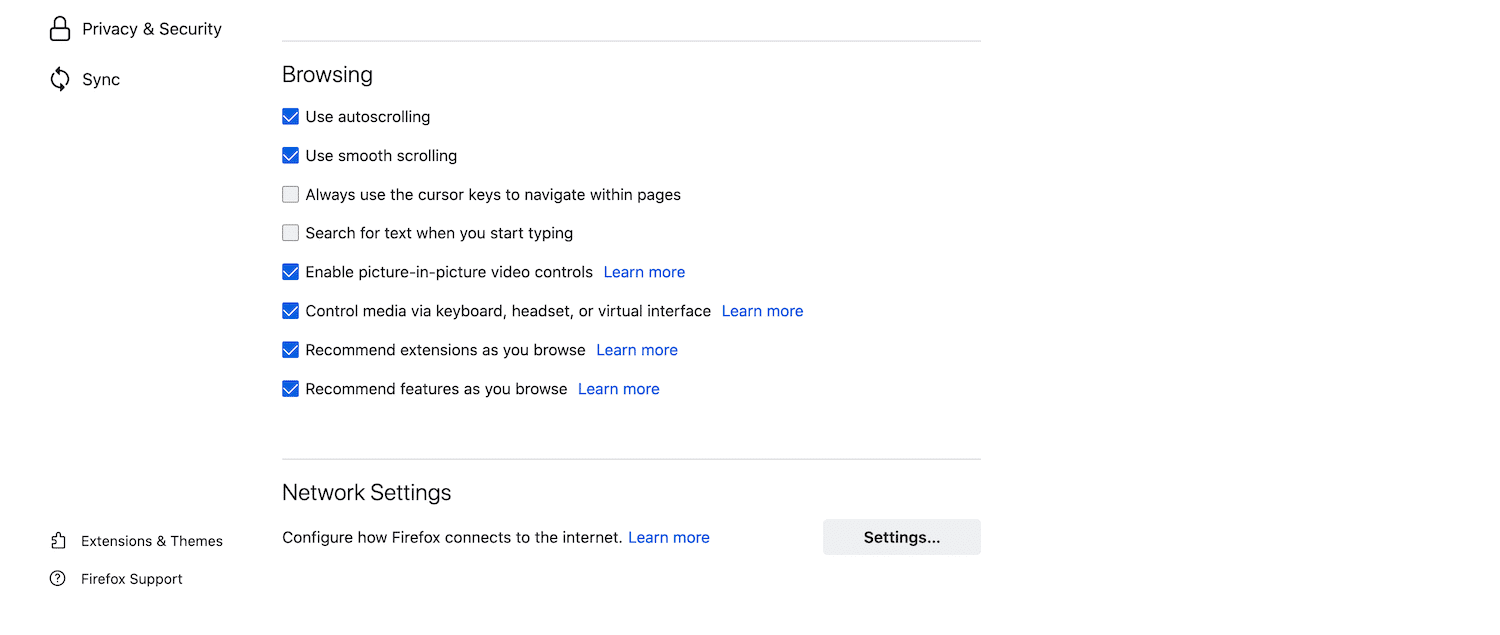
In the subsequent tab, make sure General is selected. Then, scroll to the Network Settings section and click on Settings.
In the popup that appears, scroll to Enable DNS over HTTPS. Then, uncheck the accompanying box.
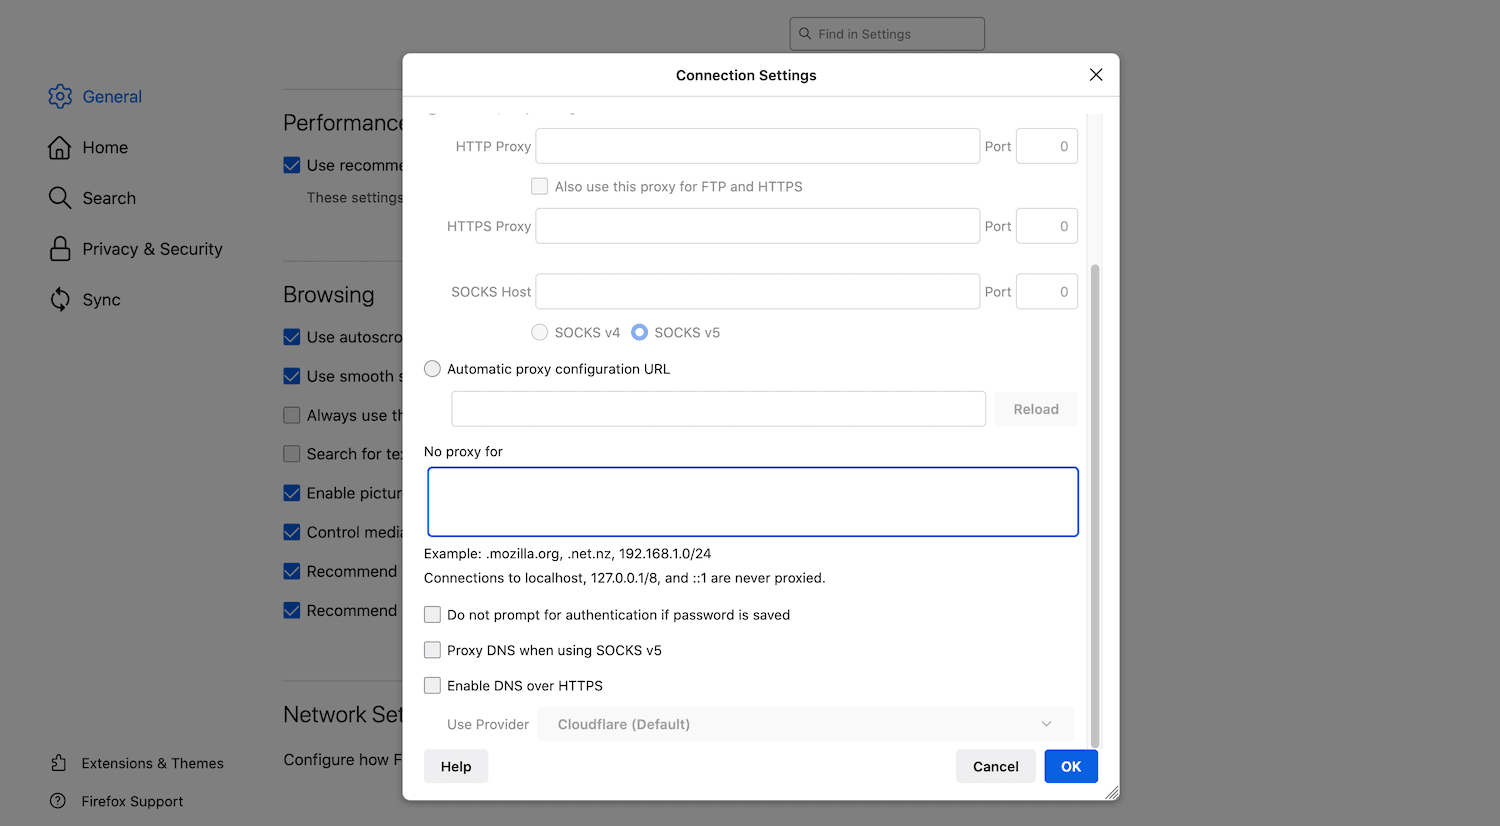
To save your changes, click on OK and then exit this window. From this point onwards, Firefox will honor any custom addresses that you add to your Windows 10 hosts file.
How To Edit Your Windows 10 Hosts File (In 3 Steps)
There are many reasons why you might need to edit this important file. Regardless of whether you want to block advertising networks, verify a new domain, or perform other DNS-related tests, the process will be exactly the same.
Let’s look at how to add custom addresses to the Windows 10 hosts file.
1. Find Your IP Address
Often, you’ll want to change how Windows 10 resolves the IP address of a site that you own. To make this modification, you’ll need to know your website’s IP address.
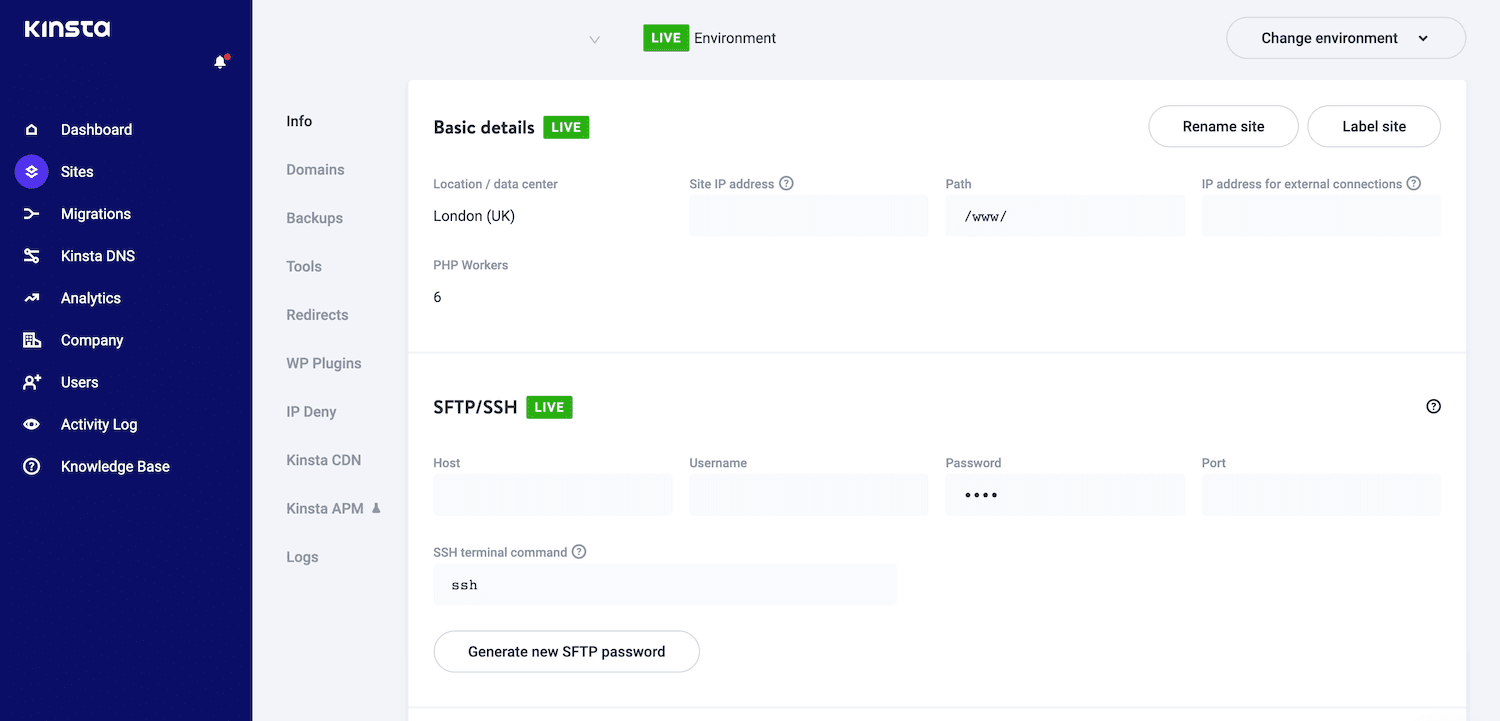
If you’re a Kinsta customer, you can retrieve this information easily using the MyKinsta dashboard.
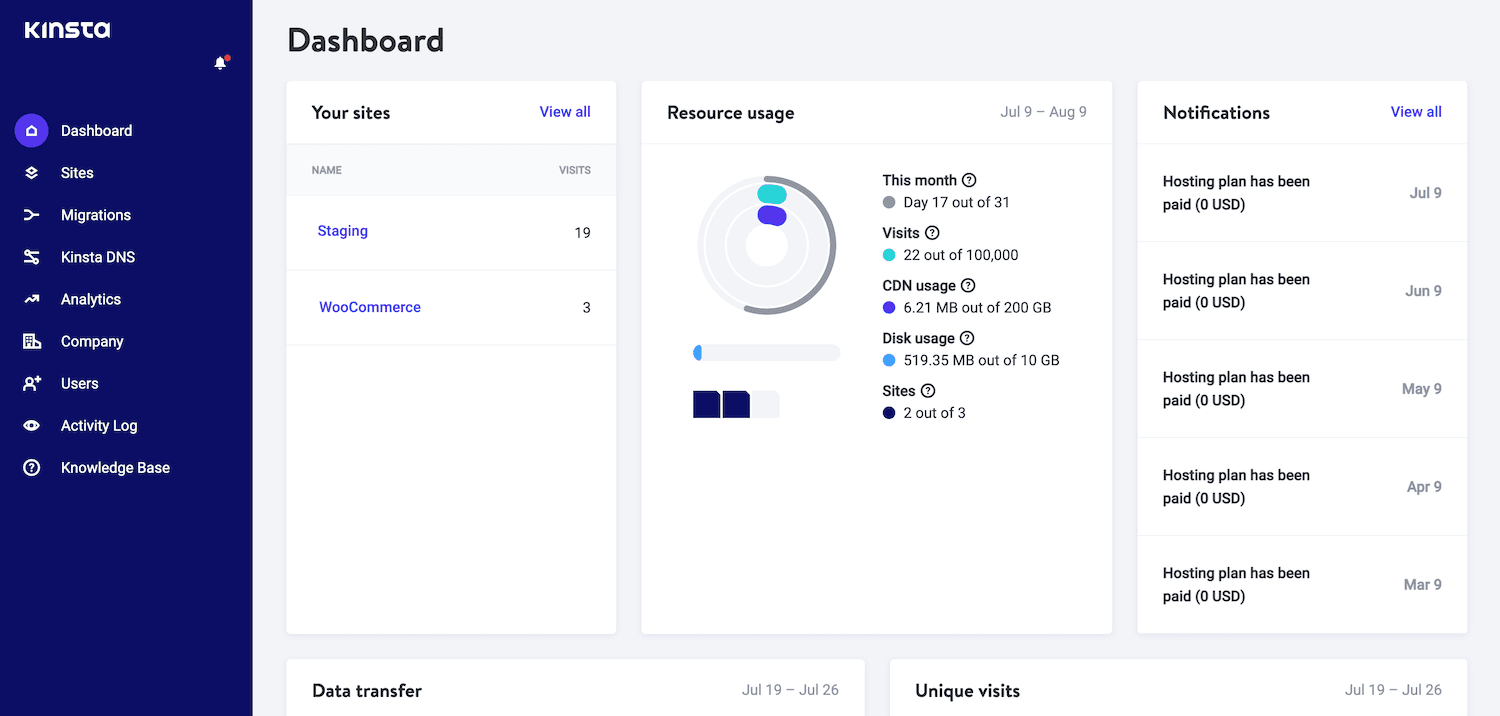
Find the domain that you want to work with and click on it. On the next screen, you’ll find some information about this domain, including your IP address.
Alternatively, you might want to modify how Windows 10 resolves a third-party IP address. You can retrieve any website’s IP address using tracert.
Tracert is typically used as a network diagnostic tool to help resolve network connectivity issues. However, you can also use it to trace the paths a data packet takes from its source to its destination, which will reveal the IP address of the destination website.
To launch tracert, click on the Start icon, then type command prompt into the search bar.
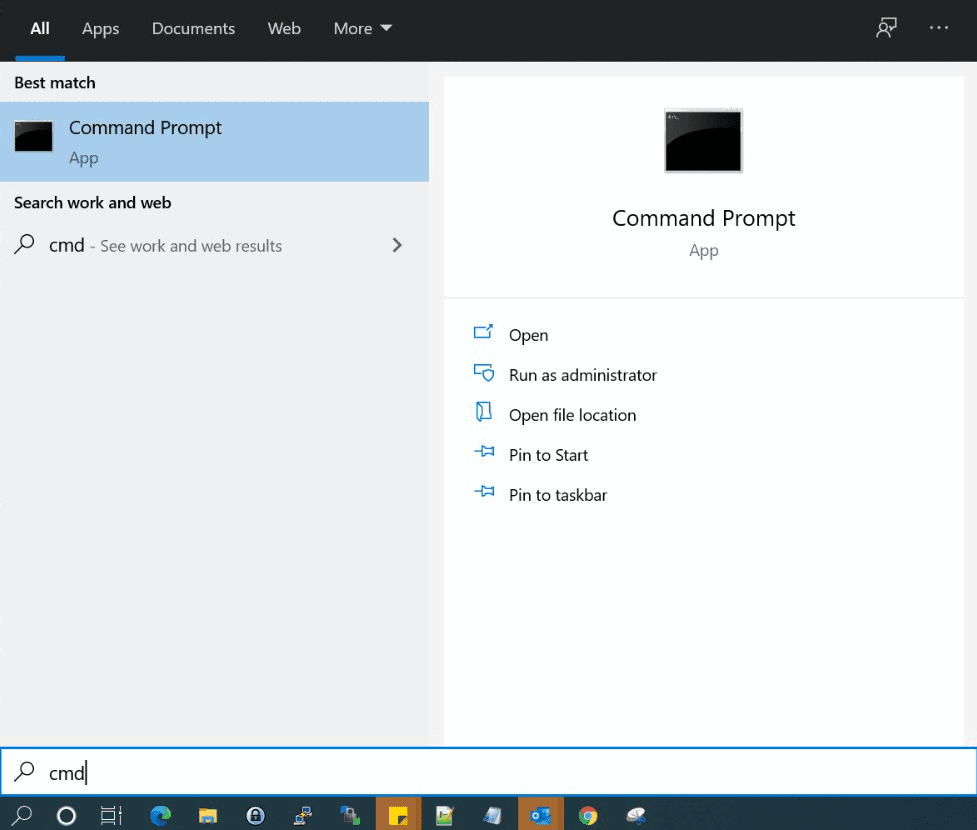
When the command prompt icon appears, give it a click. In the subsequent window, type tracert followed by the URL of the website in question, for example:
tracert website.com
Next, press the Enter key on your keyboard. The command prompt will then display the IP address of website.com in a bracket alongside the URL.
2. Run Notepad as an Administrator
In Windows XP and earlier, editing your hosts file was relatively straightforward. You could simply add an exception to your antivirus, open the hosts file in the Notepad application, and then make your changes.
However, Windows 10 added some security measures to prevent users from accidentally modifying this important file. This makes sense, as editing the hosts file could potentially make your favorite websites inaccessible. In the worst-case scenario, it might even make the Internet unusable on your machine.
In Windows 10, the hosts information is stored in a plain text file in the internal System32 folder. While you should have no problems opening this file, when you try to save your edits you might encounter the following error: “You don’t have permission to save in this location. Contact the administrator to obtain permission”.
If you want to save your changes, you’ll need administrator access. The quickest way to gain this is to use a text application that has elevated privileges. In this post, we’ll be using Notepad.
To start, press the Windows key and type Notepad into the search field.
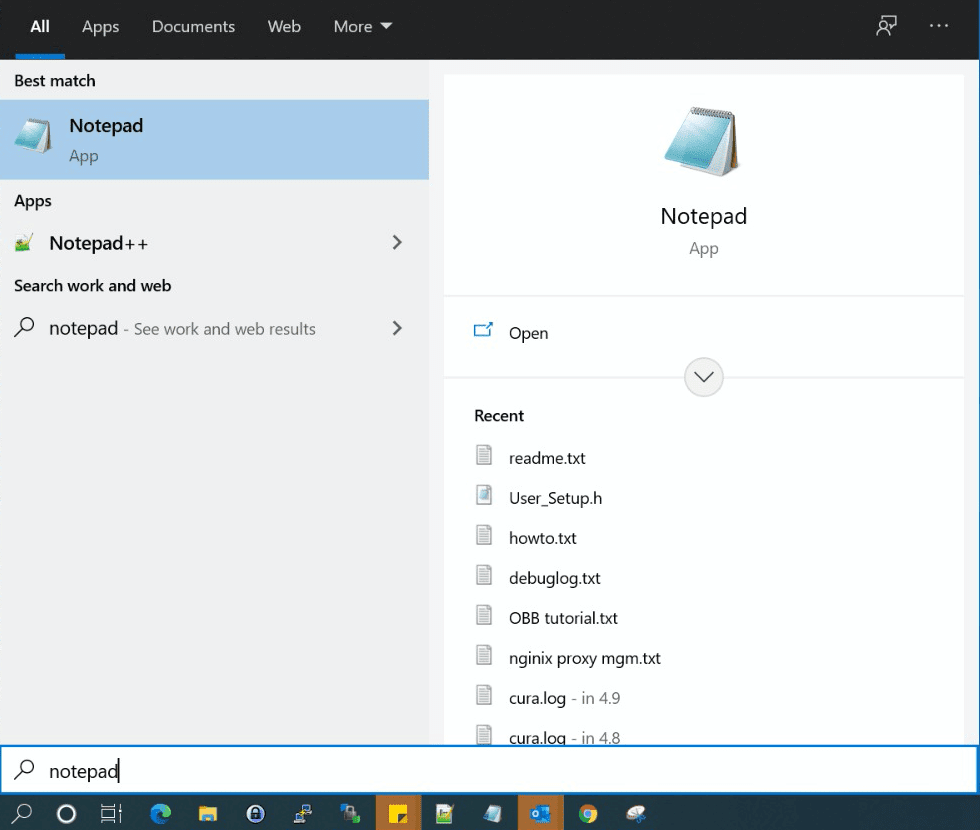
Next, right-click on Notepad and select Run as Administrator. Windows 10 will now ask whether you want to allow this application to make changes to your device. Select Yes.

This launches a privileged instance of the Notepad application. Note that you may be asked to enter an administrative password in order to re-authenticate yourself.
3. Make Your Changes
Once you have Notepad open in administrator mode, you’re ready to edit the hosts file. In the Notepad toolbar, select File > Open.
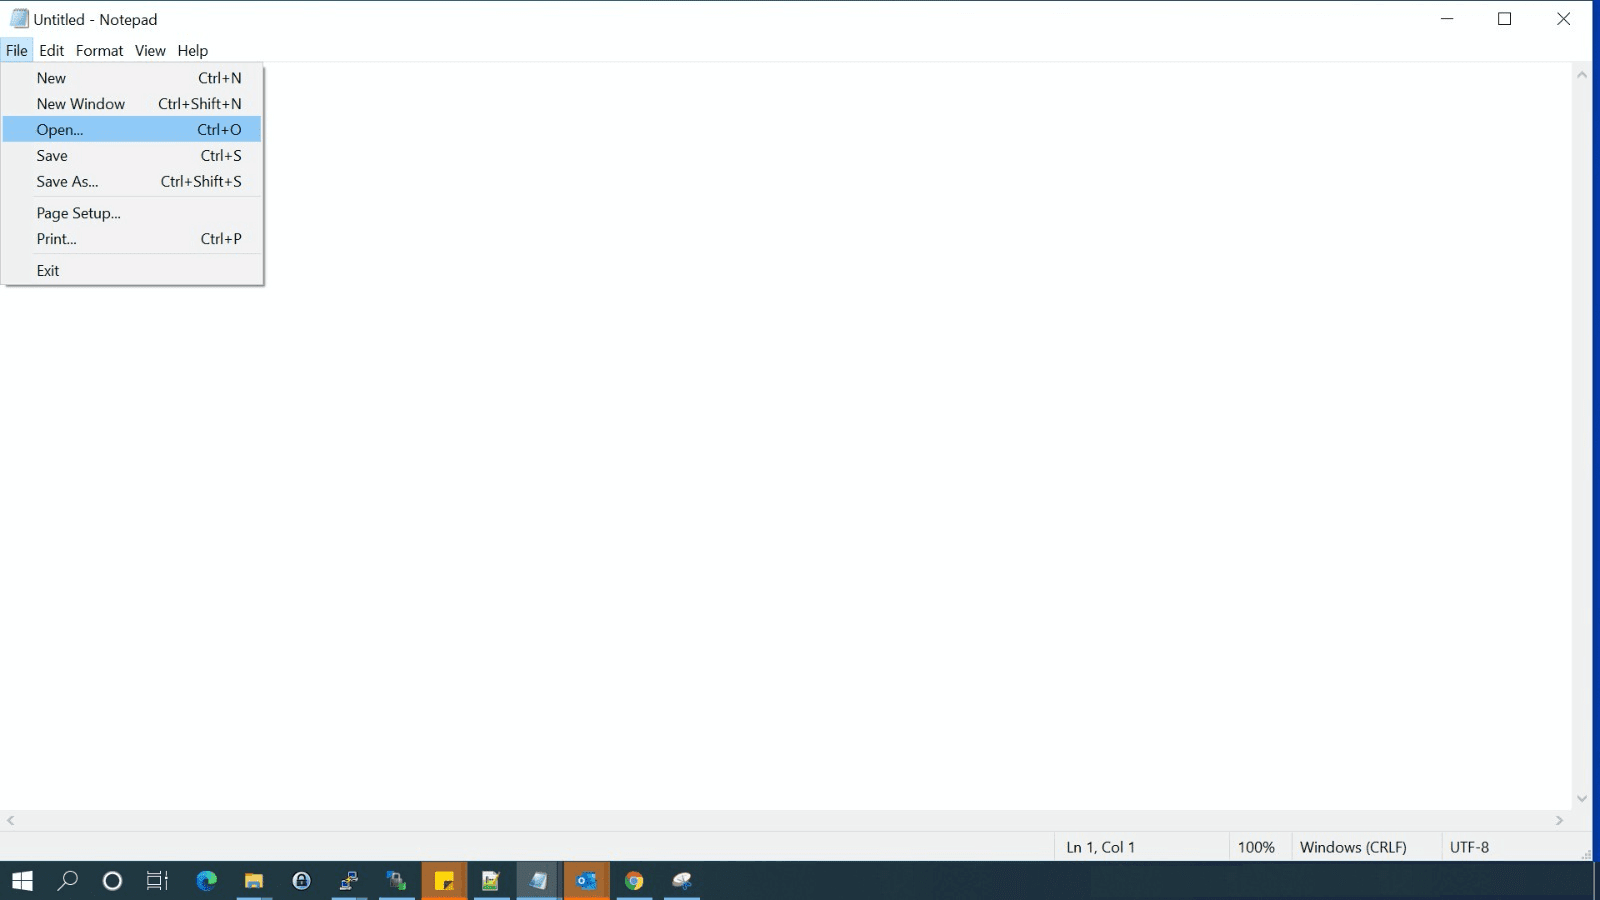
Then, navigate to C:WindowsSystem32driversetchosts. Alternatively, you can copy/paste this file path into the address bar and then press Enter.
If you don’t see the hosts file in your /etc directory, you may need to change the file filter type. In Notepad, open the File name dropdown and choose All Files.
Once you have the hosts file in your sights, you’re ready to edit. If this is your first time opening this file, you’ll see some text describing the file’s purpose and how to make modifications, for example:
# This file contains the mappings of IP addresses to host names. Each

# entry should be kept on an individual line. The IP address should

# be placed in the first column followed by the corresponding host name.

# The IP address and the host name should be separated by at least one

# space.
You can now add your custom IP address and hostname to the end of this file. If you’re adding multiple entries, remember to place each entry on a separate line. Once you’re happy with your changes, you can save and close the hosts file.
To make sure your computer recognizes your edits, it’s a good idea to flush the DNS cache. If you don’t currently have a command prompt window open, click on the Windows button and search for command prompt. In the subsequent window, type the following:
ipconfig /flushdnsTo flush the DNS cache, press the Enter key. Once this process is complete, Windows 10 should be using your new hosts file settings. Alternatively, restarting your computer should have the same effect.
How To Lock Your Hosts File on Windows 10
By default, you cannot edit the hosts file without administrator privileges. However, it isn’t impossible to acquire these privileges, especially for tech-savvy individuals.
If you’re worried about unauthorized edits, you can add an extra layer of security to your hosts file. For example, you might be using the hosts file to prevent staff from accessing social media sites and you’re concerned about them bypassing your restrictions. You might also be worried about hosts file hijack attacks.
In these scenarios, you might want to consider locking your hosts file. While this security precaution isn’t bullet-proof, it will dissuade third parties from tampering with the file.
To lock your hosts file, navigate to C:WindowsSystem32driversetchosts. Then, right-click on the file and select Properties.
In the Properties window, mark the hosts file as Read-only. This will lock the file and prevent anyone from modifying it.
If you want to remove this lock at any point, simply navigate back to the Properties window. You can then remove this Read-only restriction.
How To Reset Your Windows 10 Hosts File
You can always remove individual entries from your hosts file. Simply open the file in Notepad and delete the line in question.
However, sometimes you may need to revert your hosts file to its original state. For example, you might have made multiple adjustments to your file and don’t particularly want to unpick each of these changes manually. You may also be encountering strange redirects, which suggests that your hosts file has become corrupted.
To reset your hosts file back to its original state, open your File Explorer. In the address bar, either type or copy/paste the following:
%systemroot% system32driversetcThen, press the Enter key on your keyboard. At this point, we recommend renaming your original hosts file. This file will then serve as a backup, just in case you encounter any issues with your new hosts file.You may be required to take ownership of this file first, depending on how privileges are configured on your computer.
The next step is creating a new default hosts file. To achieve this, create a text file in the %WinDir%system32driversetc directory, and name this file hosts.
You can now copy/paste the text from Windows’ default hosts file, which is provided by Microsoft:
# Copyright (c) 1993-2009 Microsoft Corp.

#

# This is a sample HOSTS file used by Microsoft TCP/IP for Windows.

#

# This file contains the mappings of IP addresses to host names. Each

# entry should be kept on an individual line. The IP address should

# be placed in the first column followed by the corresponding host name.

# The IP address and the host name should be separated by at least one

# space.

#

# Additionally, comments (such as these) may be inserted on individual

# lines or following the machine name denoted by a '#' symbol.

#

# For example:

#

# 102.54.94.97 rhino.acme.com # source server

# 38.25.63.10 x.acme.com # x client host

# localhost name resolution is handled within DNS itself.

# 127.0.0.1 localhost

# ::1 localhost
Save this file. As always, you may need to reset your computer or flush your DNS cache in order for these changes to take effect.
Worried about testing DNS-related changes? 😅Don’t sweat it. 😄 Learn how to use your local hosts file to preview edits without putting your site at risk 👇Click to Tweet
Summary
Making changes to your DNS records can feel like a stressful endeavor. However, as we discussed in this article, you can safely test your local hosts file without putting your live records at risk. In Windows 10, you can do this by finding your IP address, running Notepad as an administrator, then making your changes.
If you enjoyed this tutorial, then you’ll love our support. All of our hosting plans include 24/7 support from our world-class WordPress developers and engineers. We can provide the help you need to succeed, regardless of whether it’s 2:00 a.m. or 2:00 p.m.
Get all your applications, databases and WordPress sites online and under one roof. Our feature-packed, high-performance cloud platform includes:
- Easy setup and management in the MyKinsta dashboard
- 24/7 expert support
- The best Google Cloud Platform hardware and network, powered by Kubernetes for maximum scalability
- An enterprise-level Cloudflare integration for speed and security
- Global audience reach with up to 35 data centers and 275 PoPs worldwide
Test it yourself with $20 off your first month of Application Hosting or Database Hosting. Explore our plans or talk to sales to find your best fit.
The Domain Name System (DNS) is the key to locating a website on the Internet. With so much at stake, making changes to your DNS records can be a nerve-wracking experience.
Fortunately, there is a way to test DNS-related changes without editing your live records. By modifying your local hosts file, you can preview how your domains will function on a new server without putting your live site at risk.
In this post, we’ll explore what hosts files are and share some reasons why you may want to modify them. We’ll then show you how to edit hosts files on Windows 10. Let’s get started!
An Introduction to the Hosts File
A hosts file is a local plain text file that maps your server or hostnames to Internet Protocol (IP) addresses. Every time Windows 10 connects over a network using a hostname, it’ll refer to the hosts file. If Windows finds an entry in this file, then it’ll contact the specified server.
If it doesn’t find a relevant hostname, Windows 10 will resolve the hostname using a Domain Name Service (DNS). This is the process used to obtain the server IP address behind a domain name.
Each hosts file entry has its own line, with the numerical IP address, a space or a tab character, and finally the hostname or domain. Let’s look at an example of a hosts file entry:
120.0.0.0 example.com #Example
In the above example, the first section denotes the IP address where this request will be redirected to (120.0.0.0). The second section designates the location that we want to redirect a request from (example.com). The final section specifies a comment for this entry. We‘re using a hashtag to tell Windows 10 to ignore the comment when reading the local hosts file.
After adding the domain information, your system will resolve to the IP address you specified. In the above example, we’re associating the domain name example.com with the IP address 120.0.0.0.
It’s worth noting that some software employs its own techniques to look up hostnames. This means there’s always a chance that it may ignore the hosts file completely.
DNS is the key to locating a website. 🔑 With so much at stake, making changes to your DNS records can be a nerve-wracking experience. 😰 Learn how to safely modify your host files in this guide 👇Click to Tweet
What Happens When You Modify a Hosts File?
When you modify your hosts file, it causes your local machine to look directly at the IP address specified by you. For example, if you wanted to point mywebsite.com to the IP address 1.2.3.4.5, you’d add the following:
1.2.3.4.5 mywebsite.com
Now, every time you try to visit mywebsite.com, you’ll find yourself at 1.2.3.4.5 instead. By editing your hosts file, you can override the DNS for a domain on your specific machine only.
In this post, we’ll be focusing on opening your hosts file and adding individual entries. However, it is also possible to replace this file entirely. This can be an easy way to block malicious or spammy websites in bulk. There are even sites that have published ready-made lists of IP addresses associated with advertisements, hijackers, page counters, and other unwanted connections.
You can download one of these pre-prepared lists and copy/paste its contents into your existing hosts file. Alternatively, you might replace your native hosts file with the newly-downloaded file. If you do opt for the latter, then we recommend keeping a copy of your original file, just in case you encounter any strange behavior with its replacement.
Why You May Want To Modify the Windows 10 Hosts File
You can use your hosts file to test DNS-related changes without having to alter your DNS records. For example, imagine you’ve migrated to a new server. Before updating your DNS settings, it’s a good idea to verify how your domains will look and function on this new server.
However, if you enter your current domain name, then it’ll resolve to your old server. In this scenario, you can modify your hosts file to point the domain to the new server’s IP.
This file can also help test how your website looks on a different server when your DNS hasn’t propagated yet. At Kinsta we provide a temporary URL (sitename.kinsta.cloud), but this cannot mimic everything. For example, by default, a CDN won’t work on a temporary URL.
You can also use the hosts file to block certain websites. This can be useful for employers who want to ensure that their staff isn’t wasting time on unauthorized sites such as Facebook, Twitter, or YouTube.
While there are fewer technical ways to block access to unauthorized websites, many of these methods are relatively easy to reverse. For example, a tech-savvy child may have little problems bypassing parental controls, but modifying the hosts file requires a higher level of technical knowledge.
You might take this a step further and block all websites that serve up advertisements. If you map the addresses of all the major ad providers to an unused internal IP address, then Windows 10 will be unable to resolve these addresses. You can then enjoy the web, advertisement-free.
Finally, some malicious third parties may set up redirects by altering your hosts file. This is known as a hosts file hijack. If you’re encountering strange redirects, then it may be worth checking your hosts file for suspicious entries.
How To Make Firefox Honor the Windows 10 Hosts File
If you’re using Firefox for Windows, then Mozilla’s browser resolves IP addresses slightly differently compared to the other major browsers. By default, Firefox uses DNS-over-HTTPS (DoH).
This is a protocol for performing remote DNS resolution via HTTPS. With this setting enabled, Firefox will use the DOH server as the primary name resolver, rather than checking your local hosts file or DNS resolver.
As a result, the website displayed will always point to the IP address that the Internet deems authoritative for that domain. Even if you edit your hosts file, your changes won’t have any effect if the DoH server returns a working IP address.
There are plenty of great web browsers that are compatible with Windows 10 and that honor the hosts file out-of-the-box. However, if you want to stick with Mozilla Firefox, you can always disable DoH.
To start, select the Menu button in the Mozilla Firefox browser and go to Settings.
In the subsequent tab, make sure General is selected. Then, scroll to the Network Settings section and click on Settings.
In the popup that appears, scroll to Enable DNS over HTTPS. Then, uncheck the accompanying box.
To save your changes, click on OK and then exit this window. From this point onwards, Firefox will honor any custom addresses that you add to your Windows 10 hosts file.
How To Edit Your Windows 10 Hosts File (In 3 Steps)
There are many reasons why you might need to edit this important file. Regardless of whether you want to block advertising networks, verify a new domain, or perform other DNS-related tests, the process will be exactly the same.
Let’s look at how to add custom addresses to the Windows 10 hosts file.
1. Find Your IP Address
Often, you’ll want to change how Windows 10 resolves the IP address of a site that you own. To make this modification, you’ll need to know your website’s IP address.
If you’re a Kinsta customer, you can retrieve this information easily using the MyKinsta dashboard.
Find the domain that you want to work with and click on it. On the next screen, you’ll find some information about this domain, including your IP address.
Alternatively, you might want to modify how Windows 10 resolves a third-party IP address. You can retrieve any website’s IP address using tracert.
Tracert is typically used as a network diagnostic tool to help resolve network connectivity issues. However, you can also use it to trace the paths a data packet takes from its source to its destination, which will reveal the IP address of the destination website.
To launch tracert, click on the Start icon, then type command prompt into the search bar.
When the command prompt icon appears, give it a click. In the subsequent window, type tracert followed by the URL of the website in question, for example:
tracert website.com
Next, press the Enter key on your keyboard. The command prompt will then display the IP address of website.com in a bracket alongside the URL.
2. Run Notepad as an Administrator
In Windows XP and earlier, editing your hosts file was relatively straightforward. You could simply add an exception to your antivirus, open the hosts file in the Notepad application, and then make your changes.
However, Windows 10 added some security measures to prevent users from accidentally modifying this important file. This makes sense, as editing the hosts file could potentially make your favorite websites inaccessible. In the worst-case scenario, it might even make the Internet unusable on your machine.
In Windows 10, the hosts information is stored in a plain text file in the internal System32 folder. While you should have no problems opening this file, when you try to save your edits you might encounter the following error: “You don’t have permission to save in this location. Contact the administrator to obtain permission”.
If you want to save your changes, you’ll need administrator access. The quickest way to gain this is to use a text application that has elevated privileges. In this post, we’ll be using Notepad.
To start, press the Windows key and type Notepad into the search field.
Next, right-click on Notepad and select Run as Administrator. Windows 10 will now ask whether you want to allow this application to make changes to your device. Select Yes.
This launches a privileged instance of the Notepad application. Note that you may be asked to enter an administrative password in order to re-authenticate yourself.
3. Make Your Changes
Once you have Notepad open in administrator mode, you’re ready to edit the hosts file. In the Notepad toolbar, select File > Open.
Then, navigate to C:WindowsSystem32driversetchosts. Alternatively, you can copy/paste this file path into the address bar and then press Enter.
If you don’t see the hosts file in your /etc directory, you may need to change the file filter type. In Notepad, open the File name dropdown and choose All Files.
Once you have the hosts file in your sights, you’re ready to edit. If this is your first time opening this file, you’ll see some text describing the file’s purpose and how to make modifications, for example:
# This file contains the mappings of IP addresses to host names. Each

# entry should be kept on an individual line. The IP address should

# be placed in the first column followed by the corresponding host name.

# The IP address and the host name should be separated by at least one

# space.
You can now add your custom IP address and hostname to the end of this file. If you’re adding multiple entries, remember to place each entry on a separate line. Once you’re happy with your changes, you can save and close the hosts file.
To make sure your computer recognizes your edits, it’s a good idea to flush the DNS cache. If you don’t currently have a command prompt window open, click on the Windows button and search for command prompt. In the subsequent window, type the following:
ipconfig /flushdnsTo flush the DNS cache, press the Enter key. Once this process is complete, Windows 10 should be using your new hosts file settings. Alternatively, restarting your computer should have the same effect.
How To Lock Your Hosts File on Windows 10
By default, you cannot edit the hosts file without administrator privileges. However, it isn’t impossible to acquire these privileges, especially for tech-savvy individuals.
If you’re worried about unauthorized edits, you can add an extra layer of security to your hosts file. For example, you might be using the hosts file to prevent staff from accessing social media sites and you’re concerned about them bypassing your restrictions. You might also be worried about hosts file hijack attacks.
In these scenarios, you might want to consider locking your hosts file. While this security precaution isn’t bullet-proof, it will dissuade third parties from tampering with the file.
To lock your hosts file, navigate to C:WindowsSystem32driversetchosts. Then, right-click on the file and select Properties.
In the Properties window, mark the hosts file as Read-only. This will lock the file and prevent anyone from modifying it.
If you want to remove this lock at any point, simply navigate back to the Properties window. You can then remove this Read-only restriction.
How To Reset Your Windows 10 Hosts File
You can always remove individual entries from your hosts file. Simply open the file in Notepad and delete the line in question.
However, sometimes you may need to revert your hosts file to its original state. For example, you might have made multiple adjustments to your file and don’t particularly want to unpick each of these changes manually. You may also be encountering strange redirects, which suggests that your hosts file has become corrupted.
To reset your hosts file back to its original state, open your File Explorer. In the address bar, either type or copy/paste the following:
%systemroot% system32driversetcThen, press the Enter key on your keyboard. At this point, we recommend renaming your original hosts file. This file will then serve as a backup, just in case you encounter any issues with your new hosts file.You may be required to take ownership of this file first, depending on how privileges are configured on your computer.
The next step is creating a new default hosts file. To achieve this, create a text file in the %WinDir%system32driversetc directory, and name this file hosts.
You can now copy/paste the text from Windows’ default hosts file, which is provided by Microsoft:
# Copyright (c) 1993-2009 Microsoft Corp.

#

# This is a sample HOSTS file used by Microsoft TCP/IP for Windows.

#

# This file contains the mappings of IP addresses to host names. Each

# entry should be kept on an individual line. The IP address should

# be placed in the first column followed by the corresponding host name.

# The IP address and the host name should be separated by at least one

# space.

#

# Additionally, comments (such as these) may be inserted on individual

# lines or following the machine name denoted by a '#' symbol.

#

# For example:

#

# 102.54.94.97 rhino.acme.com # source server

# 38.25.63.10 x.acme.com # x client host

# localhost name resolution is handled within DNS itself.

# 127.0.0.1 localhost

# ::1 localhost
Save this file. As always, you may need to reset your computer or flush your DNS cache in order for these changes to take effect.
Worried about testing DNS-related changes? 😅Don’t sweat it. 😄 Learn how to use your local hosts file to preview edits without putting your site at risk 👇Click to Tweet
Summary
Making changes to your DNS records can feel like a stressful endeavor. However, as we discussed in this article, you can safely test your local hosts file without putting your live records at risk. In Windows 10, you can do this by finding your IP address, running Notepad as an administrator, then making your changes.
If you enjoyed this tutorial, then you’ll love our support. All of our hosting plans include 24/7 support from our world-class WordPress developers and engineers. We can provide the help you need to succeed, regardless of whether it’s 2:00 a.m. or 2:00 p.m.
Get all your applications, databases and WordPress sites online and under one roof. Our feature-packed, high-performance cloud platform includes:
- Easy setup and management in the MyKinsta dashboard
- 24/7 expert support
- The best Google Cloud Platform hardware and network, powered by Kubernetes for maximum scalability
- An enterprise-level Cloudflare integration for speed and security
- Global audience reach with up to 35 data centers and 275 PoPs worldwide
Test it yourself with $20 off your first month of Application Hosting or Database Hosting. Explore our plans or talk to sales to find your best fit.