Обновлено 16.08.2021

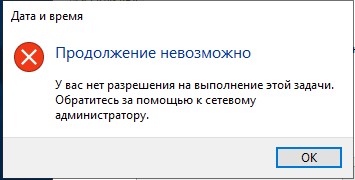
Добрый день! Уважаемые читатели и гости одного из крупнейших русскоязычных IT блогов Pyatilistnik.org. В прошлый раз мы с вами разобрали, как производится подключение к удаленному рабочему столу с ноутбука или компьютера, на котором установлена Windows 10. Идем дальше и поговорим про смену часовых поясов в Windows Server 2019, вроде простая вещь, но вы легко можете столкнуться с ситуацией, что имея административные права вы просто не можете это сделать с помощью штатных средств, получая ошибку «У вас нет разрешения на выполнение этой задачи. Обратитесь за помощью к сетевому администратору«.
Ошибка при изменении часового пояса в Windows Server 2019
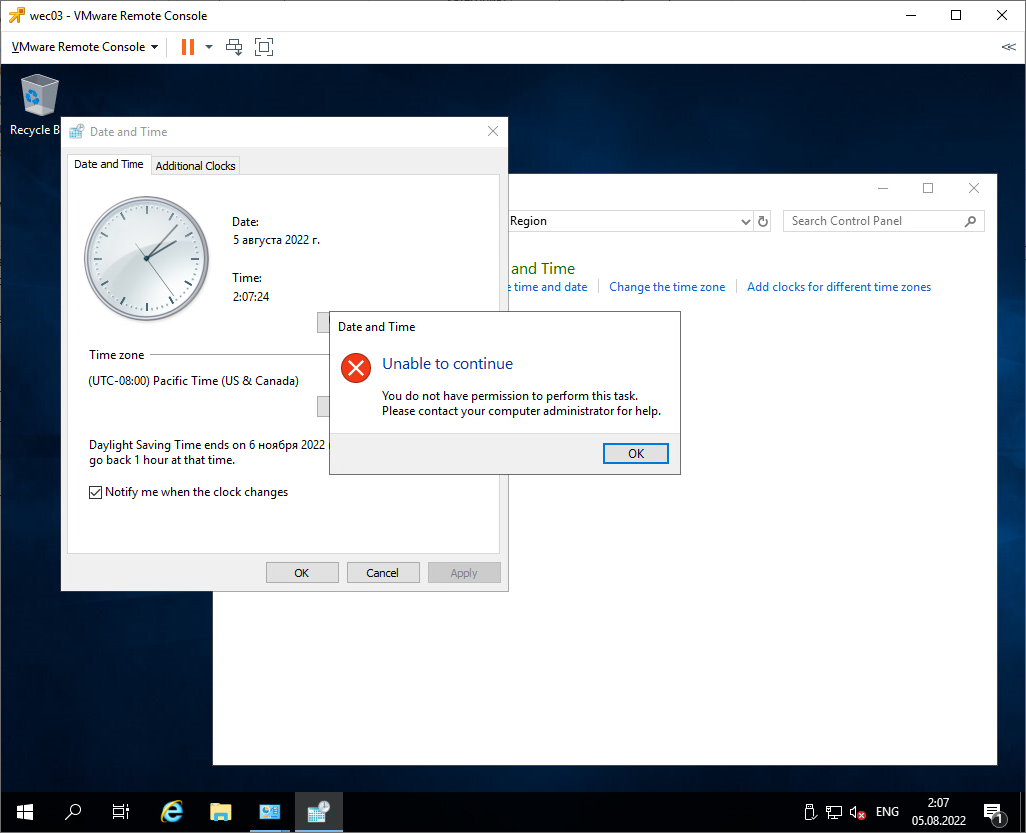
Случился со мной интересный случай, я развернул Windows Server 2019 на двух новых серверах Dell Power Edge R740, исправил на них ошибку в работе Nic Teaming и перешел к настройке кластера под MS SQL 2019. После того, как кластер был развернут я заметил, что по какой-то причине у меня на серверах отображается не правильное время, хотя в локальной сети есть NTP сервер. Я для быстроты настройки решил просто в ручном режиме выбрать нужный часовой пояс, но настройки почему-то не сохранялись, а при попытке их выбрать через оснастку «Дата и время» я получал ошибку:
You do not have permission to perform to perform this task. Contact your network administrator for help
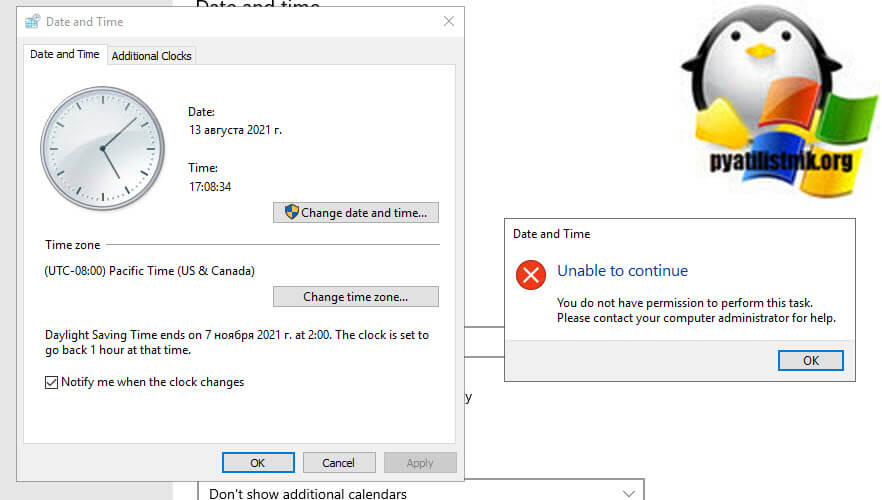
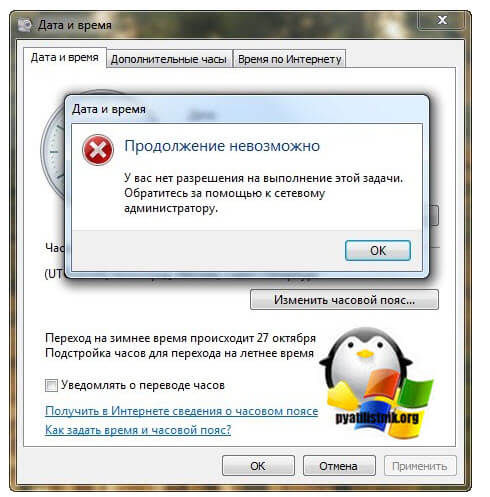
В русском варианте это звучит вот так:
«У вас нет разрешения на выполнение этой задачи. Обратитесь за помощью к сетевому администратору».
Самое интересное, что политик в явном виде на эти сервера не прилетало и я имел в системе полные, административные права. Давайте разбираться, как установить часовой пояс в Windows Server 2019 и выше.
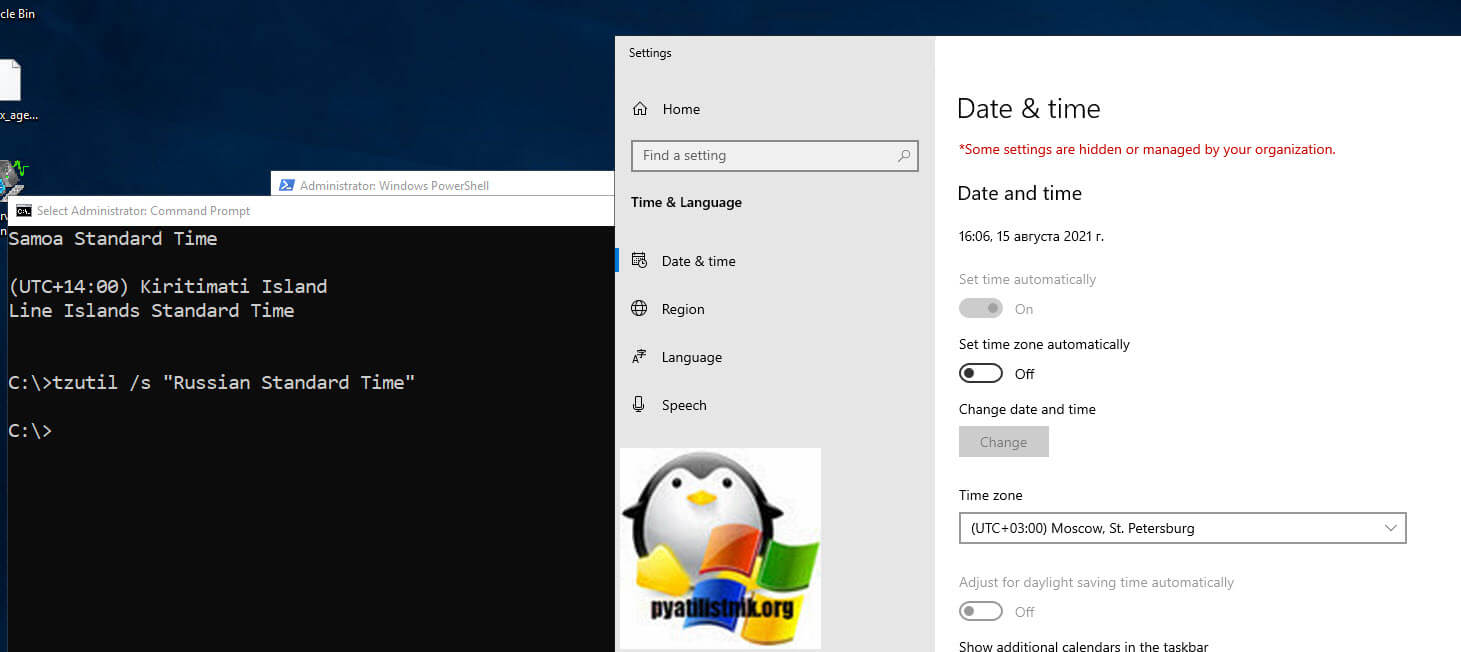
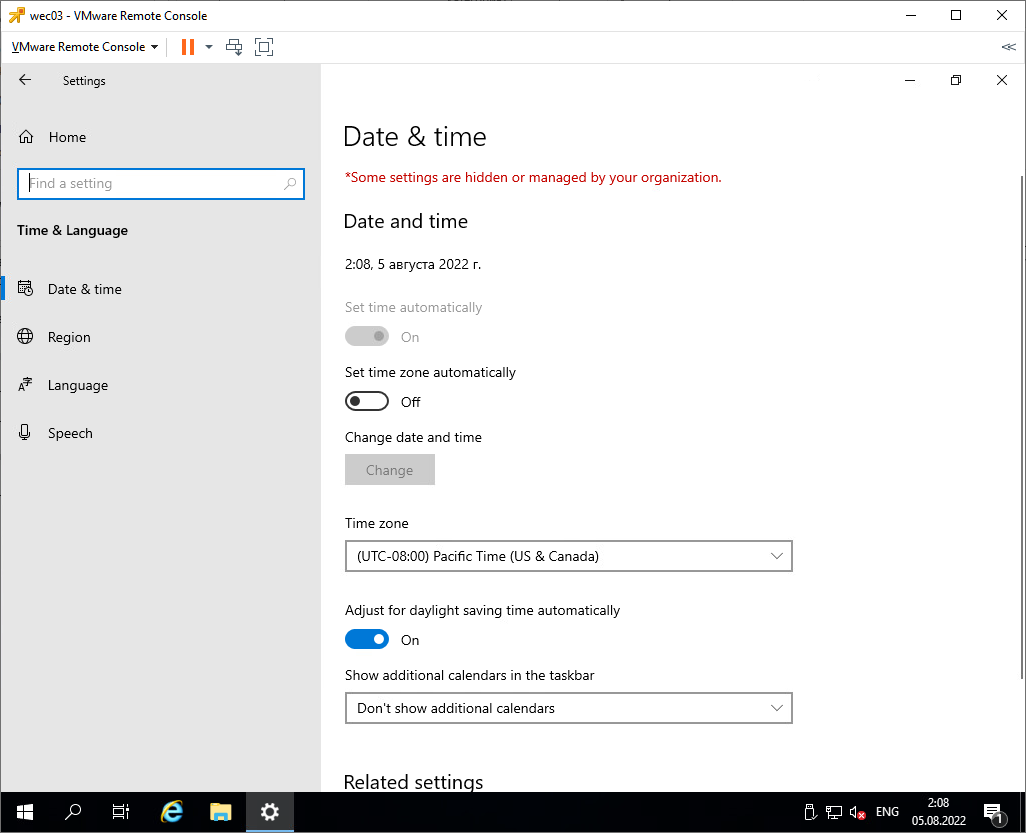
Настройка часового пояса через панель «Параметры Windows»
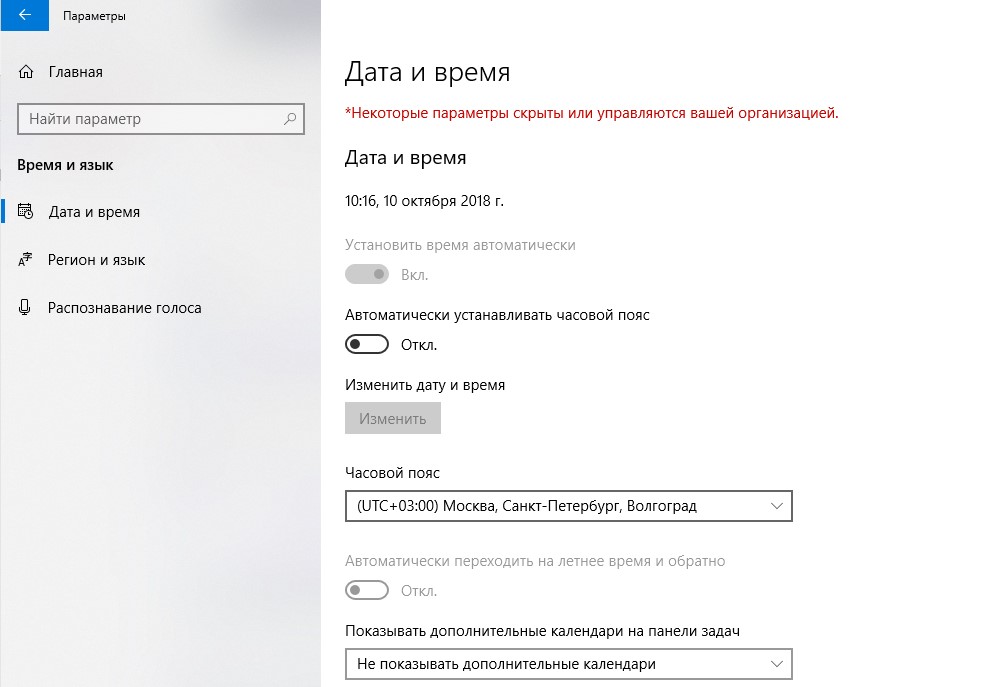
Самый базовый метод выбора нужного часового пояса, это через окно «Параметры Windows«, чтобы в него попасть просто нажмите одновременно клавиши Win и I.

Далее вы выбираете «Дата и время«, где в поле «Изменить дату и время» вы можете установить необходимый часовой пояс, но в моем случае, данная настройка просто не сохранялась, поэтому пришлось вернуться, к старому, проверенному методу.

Как поменять часовой пояс через классическую оснастку «Дата и время»
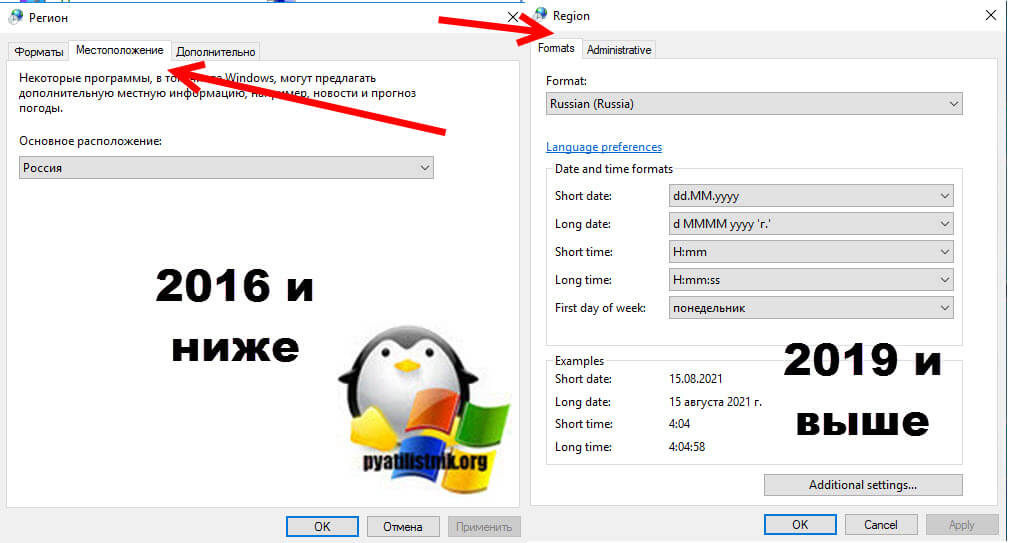
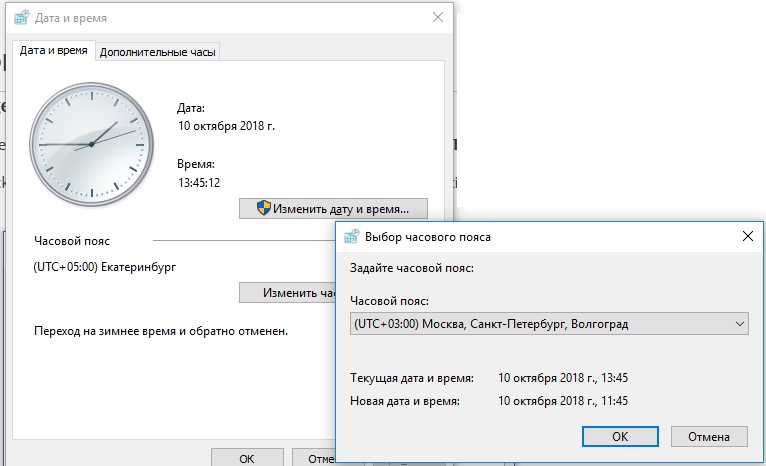
Второй рабочий метод позволяющий задать нужный часовой пояс и время, является вызов классического окна «Дата и время«, я буду использовать его потому, что в панели управления Windows Server 2019 исчезла вкладка «Местоположение«, которая помогала в нашей задаче.
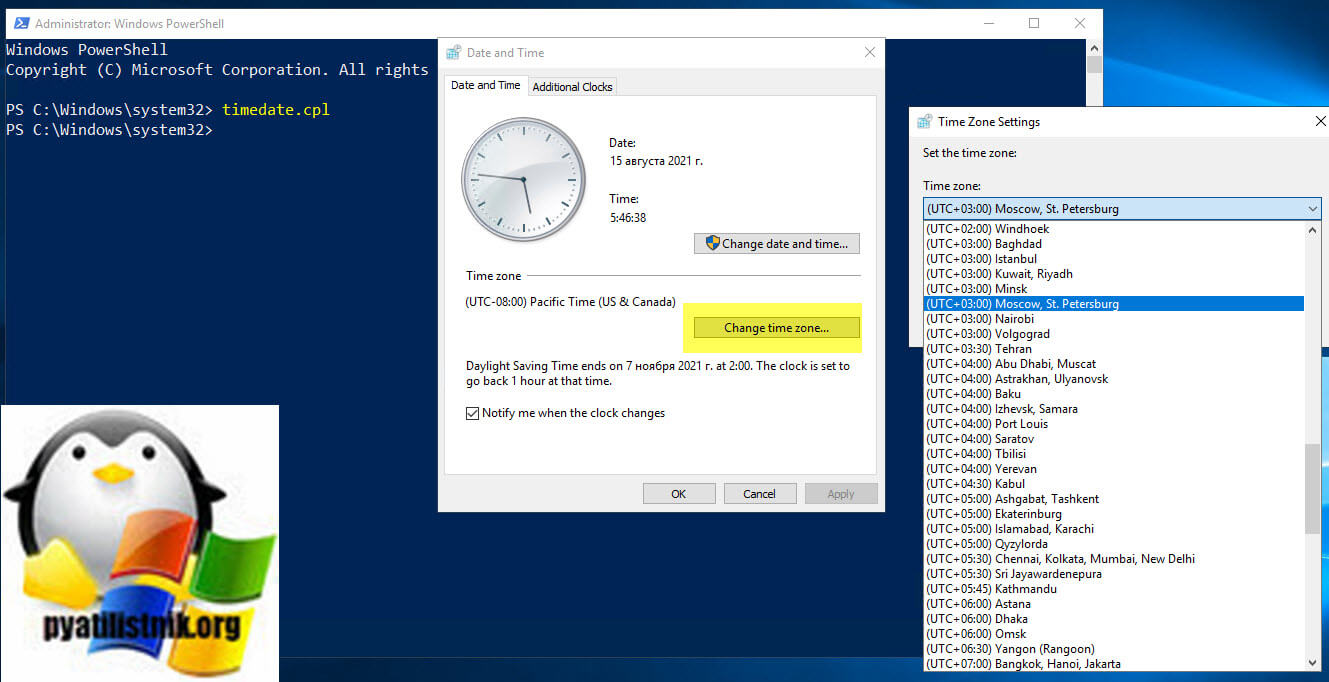
Откройте обязательно командную строку или оболочку PowerShell от имени администратора, чтобы не получать ошибку «У вас нет разрешения на выполнение этой задачи. Обратитесь за помощью к сетевому администратору» и введите команду:
В результате у вас будет классическое окно для установки даты и времени, которое Microsoft тщательно скрыло. Теперь выставите без проблем нужный вам часовой пояс.
Как настроить часовой пояс через командную строку
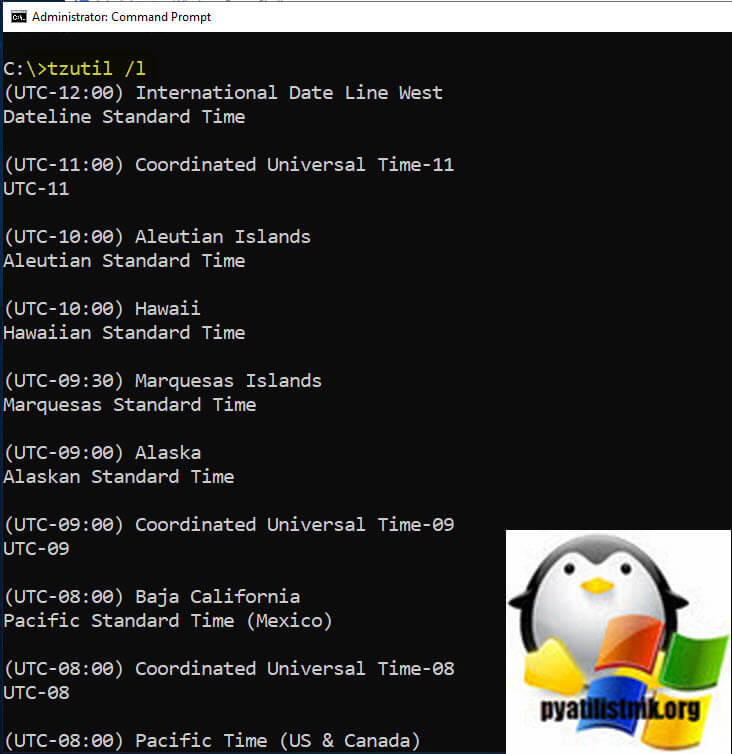
В командной строке есть утилита tzutil.exe, которая используется для изменения часового пояса. Ее использование относительно простое. Так же запустите командную строку в режиме администратора и введите:
В результате вы получите список доступных часовых поясов. Вам необходимо найти нужный, в моем случае, это «UTC+03:00) Moscow, St. Petersburg Russian Standard Time».
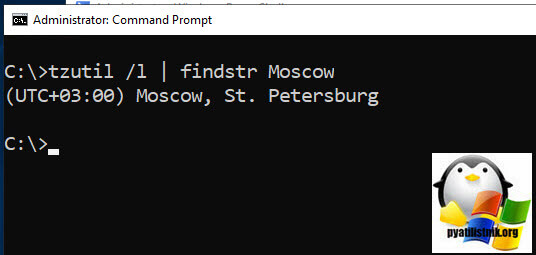
Кстати если вы точно знаете ключевое слово, то можете его использовать, например вот так:
tzutil /l | findstr Moscow
Кстати если добавите ключ _dstoff, то можно отключить переход на летнее время для конкретного пояса
Теперь установим данный часовой пояс в нашей Windows Server 2019.
tzutil /s «(Russian Standard Time»
Как настроить часовой пояс через PowerShell
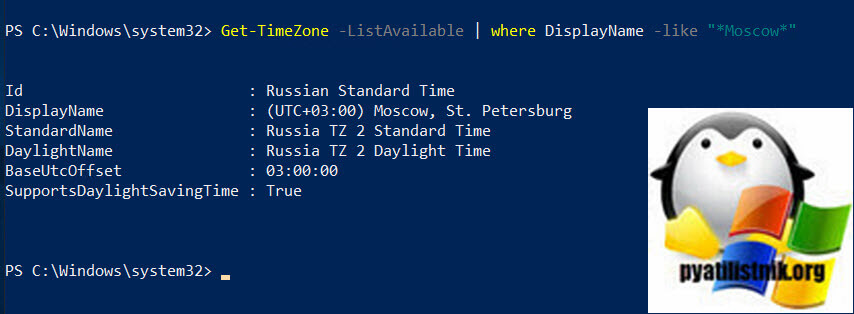
Давайте попробуем изменить часовой пояс через средства оболочки PowerShell. Для этой цели служат командлеты Get-TimeZone и Set-TimeZone. Давайте для начала найдем нужный нам часовой пояс, для этого введите:
Get-TimeZone -ListAvailable | where DisplayName -like «*Moscow*»
Как видим нужный нам часовой пояс имеет StandardName «Russia TZ 2 Standard Time».
Далее установим нужный нам часовой пояс, для этого вводим команду:
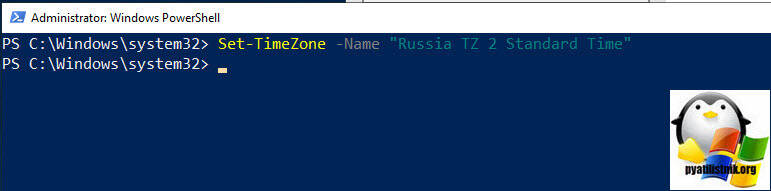
Set-TimeZone -Name «Russia TZ 2 Standard Time»
Можно и такой конструкцией:
Get-TimeZone -ListAvailable | ? DisplayName -like «*Moscow*» | Set-TimeZone
Настройка часового пояса через реестр Windows
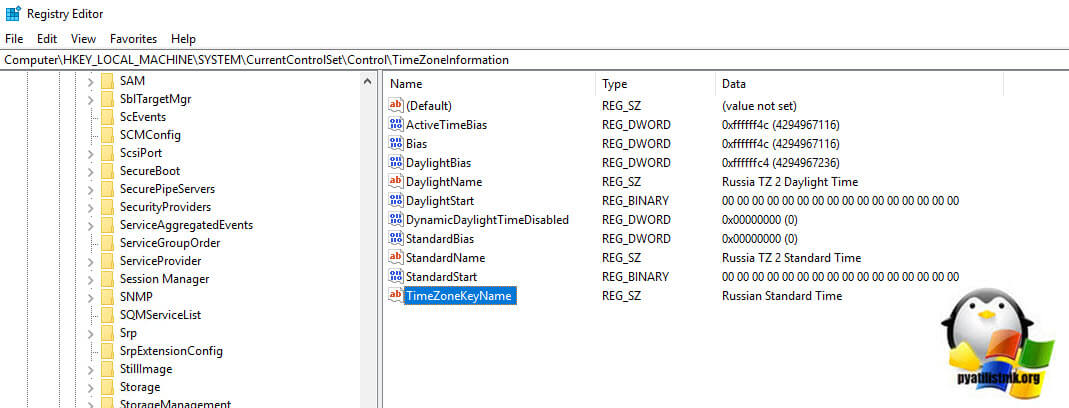
Давайте я еще покажу, что именно меняется в реестре, когда вы задаете нужный часовой пояс. В окне выполнить введите regedit, далее идем в ветку:
ComputerHKEY_LOCAL_MACHINESYSTEMCurrentControlSet ControlTimeZoneInformation
тут есть ключ «TimeZoneKeyName» с типом REG_SZ и значением, в моем примере, это московское время «Russian Standard Time».
Настройка часового пояса через групповую политику
Если вы захотите с помощью средств GPO настроить нужный часовой пояс на серверах с Windows Server 2019, то вам в политике просто нужно создать ключ реестра с нужным значением, который я описал выше. Если у вас на RDS ферме пользователи разных часовых поясов, то для их удобства вы можете брать время на RDSH хосты с их систем откуда они подключаются, для этого воспользуйтесь групповой политикой
«Разрешить перенаправление часового пояса (Конфигурация компьютера> Политики -> Административные шаблоны -> Компоненты Windows -> Службы удаленного рабочего стола -> Узел сеанса удаленного рабочего стола -> Перенаправление устройств и ресурсов (Allow time zone redirection (Computer Configuration > Policies -> Administrative Templates -> Windows Components -> Remote Desktop Services -> Remote Desktop Session Host -> Device and Resource Redirection)».
Так, что если вы видите в системе ошибку «У вас нет разрешения на выполнение этой задачи. Обратитесь за помощью к сетевому администратору», это еще не значит, что у вас нет прав. На этом у меня все, с вами был Иван Сёмин, автор и создатель IT портала Pyatilistrnik.org.

![]()
Поставил Windows Server 2019, попытался изменить часовой пояс, получил ошибку.
You do not have permission to perform this task.
Please contact your computer administrator for help
У начинающих системных администраторов при виде этой ошибки могут возникнуть приступы неудержимого смеха, беспричинной паники, или заторможенности. Дело в том, что системный администратор, видя совет обратиться к администратору компьютера, начинает рекурсивно обращаться сам к себе.
В программировании рекурсия, или рекурсивная функция — это такая функция, которая вызывает саму себя.
Бывалый системный администратор просто понимает, что операционная система предлагает найти ответ самому. И начинает действовать. Я вспоминаю, что компаний Microsoft с каждым новым обновлением переносит часть функционала в интерфейс Метро. Перехожу в настройки Windows из меню Пуск.

Time & Language. Date & Time.
Здесь тоже есть поле для изменения временной зоны. Меняю часовой пояс. Выхожу из меню настроек и понимаю, что часовой пояс не изменился. Винда просто пугает! Вот тут-то бывалый системный администратор тоже может зависнуть, захихикать или забыть как кликать мышкой. Это нормально, это одна из стратегий поведения при реакции на страх. Замереть, бежать или напасть. Бежать не от кого, нападать тоже не на кого, поэтому сисадмин находится в прострации и тупит.
Прострация — это понятие в медицине, означающие состояние эмоциональной опустошённости.
Но профессиональный системный администратор уже давно не боится винду. И начинает думать. Это естественное поведение системного администратора, сначала сделать, а если не получилось, то подумать. Я начинаю осмысливать текст первоначальной ошибки и понимаю, что прав не хватает. А прав тот, у кого больше прав. Правильно, нужно повысить права.
Запускаю командную строку от имени Администратора и выполняю команду:
timedate.cpl
CPL это сокращение от Control Panel. Вызывается окно управления датой и временем из панели управления. Снова пытаюсь изменить часовой пояс.
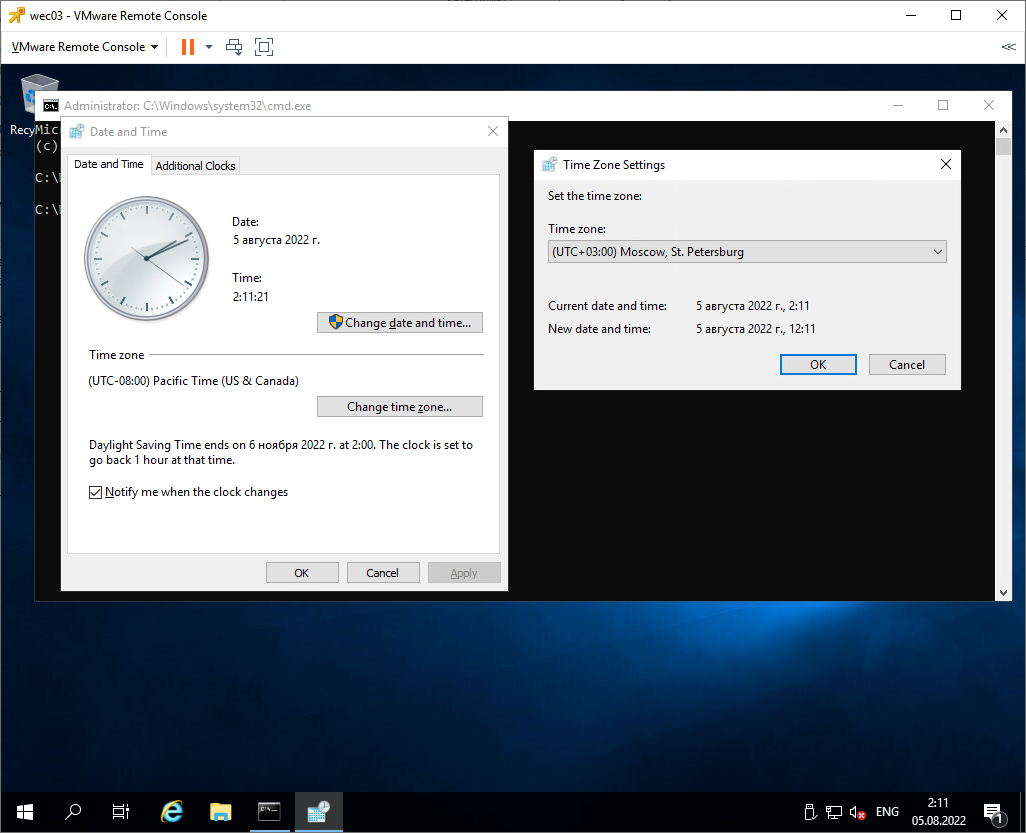
На этот раз временная зона успешно изменяется.
Сегодня мы с вами научились изменять часовой пояс в Windows Server 2019. И заодно узнали два новых термина: «рекурсия» и «прострация».
Содержание
- How to Configure NTP Server on Windows Server 2019
- NTP Server
- Installing and Configuring an NTP Server on Windows Server 2019
- Configuring NTP Server using Registry Editor
- Configuring NTP Server on Windows 2019 using Windows PowerShell
- Other useful commands
- Final take
- Windows Time service tools and settings
- Network port
- Using W32tm.exe
- Run W32tm.exe
- Set client to use two time servers
- Set client to sync time automatically from a domain source
- Check client time configuration
- Configure computer clock reset
- Example: System clock rate off by four minutes
- Example: System clock rate off by three minutes
- Using Local Group Policy Editor
- Windows registry reference
- Config entries
- Parameters entries
- NtpClient entries
- NtpServer entries
- Enhanced logging
- Group Policy Object settings
- Global Configuration Settings
- Windows NTP Client settings
- Related information
How to Configure NTP Server on Windows Server 2019
Network Time Protocol (NTP) runs on the Transport Layer port 123 UDP and enables accurate time synchronization for network computers. This irons out time inconsistencies on servers and clients during file logging or replication of server databases among other resources.
In this article, we’ll outline the process of installing, configuring, and querying an NTP server on Windows Server 2019.
NTP Server
NTP servers utilize the Network Time Protocol to send time signals to servers across the globe upon request. NTP servers use the Universal Time Coordinated (UTC) time source for time signal synchronization.
The main purpose of NTP servers is to provide time synchronization for servers and computer networks with other major network servers and clients across the globe. In turn, this streamlines communications and transactions all over the world.
Installing and Configuring an NTP Server on Windows Server 2019
The process of installing, configuring, and querying an NTP Server on Windows Server 2019 is quite straightforward.
Set the NTP service to Automatic option
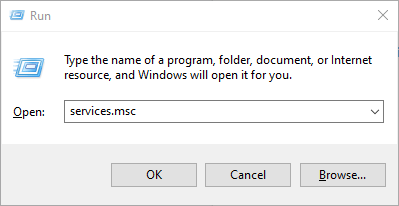
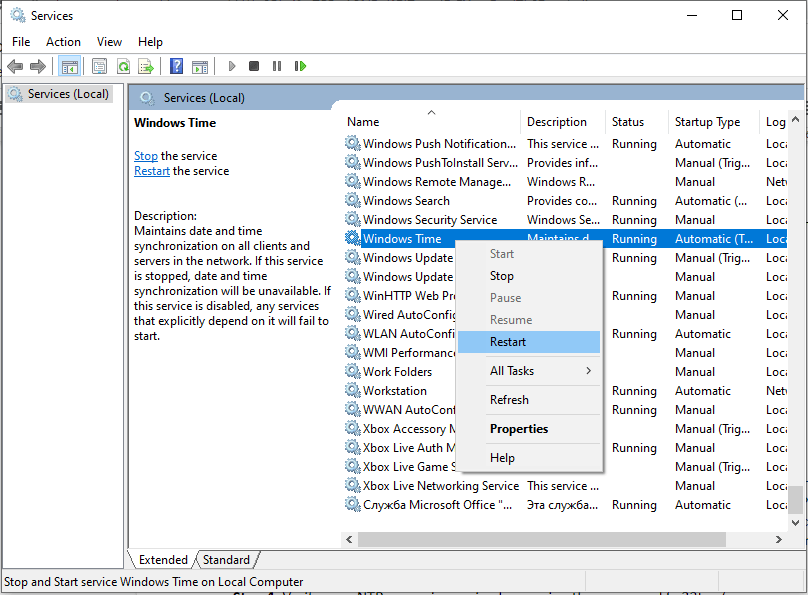
To start off, Hit Windows Key + R to launch the Run dialogue. Next, type services.msc and hit ENTER.
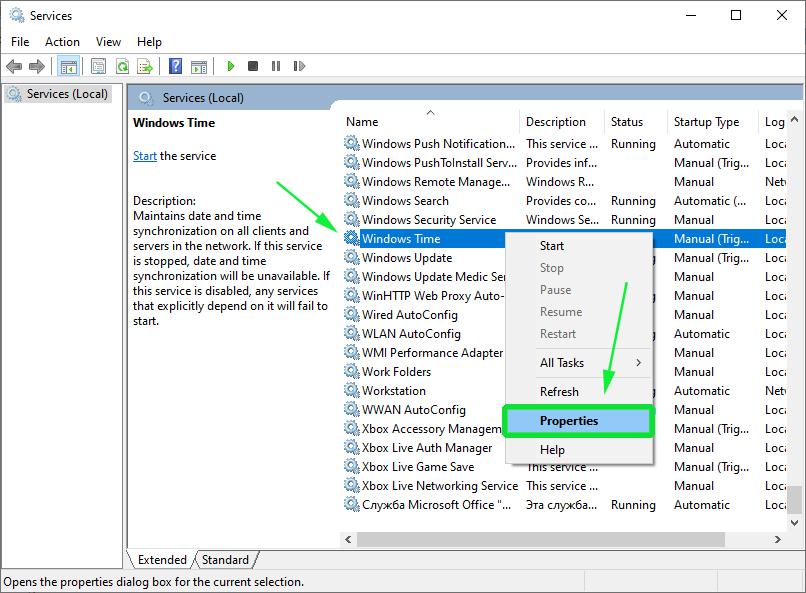
In the ‘Services’ window, locate the service ‘Windows Time’. Right-click and select the ‘Properties’ option as shown:
On the pop-up window, select the Startup type as ‘Automatic’.

Finally, click on ‘OK’ and then ‘Apply’.
Configuring NTP Server using Registry Editor
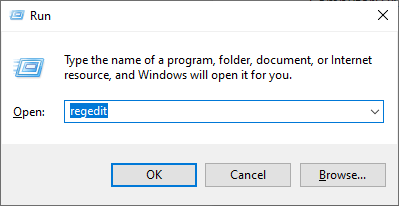
As before, launch the run dialogue by pressing Windows Key + R. Then type ‘regedit’ and hit ENTER.
The Registry editor will be launched as shown:
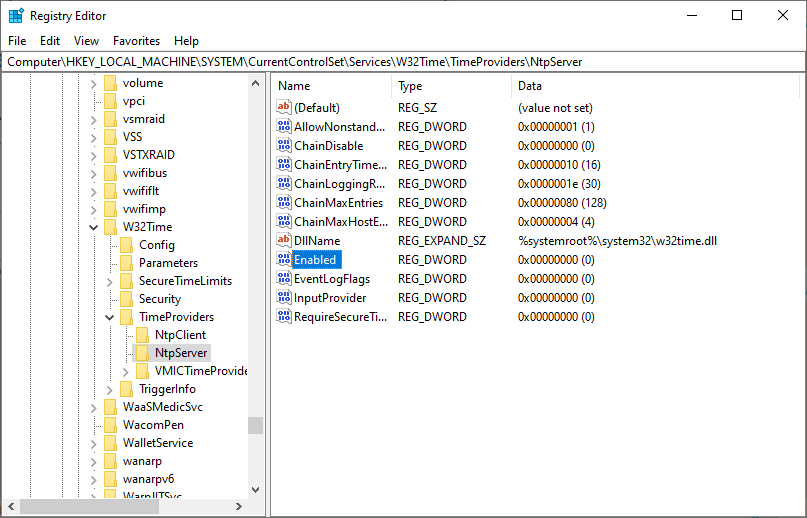
Navigate to the path shown below:
ComputerHKEY_LOCAL_MACHINESYSTEMCurrentControlSetServicesW32TimeTimeProvidersNtpServer
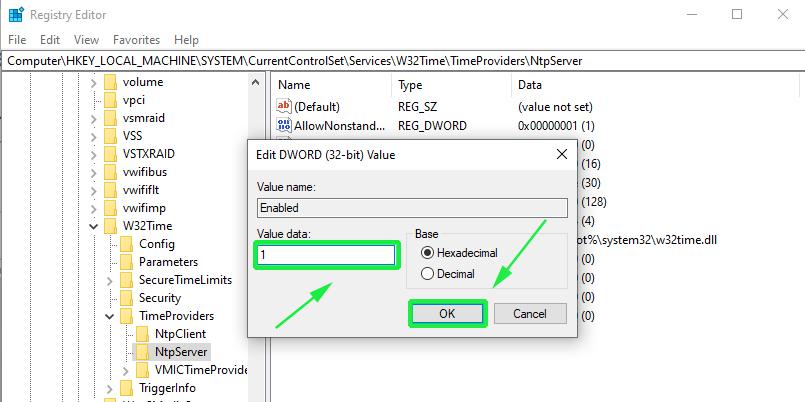
On the right pane, locate and double-click the ‘Enabled’ file as shown:
Set the Value data to 1 and click OK.
Next, follow this path.
Computer>HKEY_LOCAL_MACHINE>SYSTEM>CurrentControlSet>Services>W32Time>Config
At the right pane locate the ‘Announce Flags’ file.
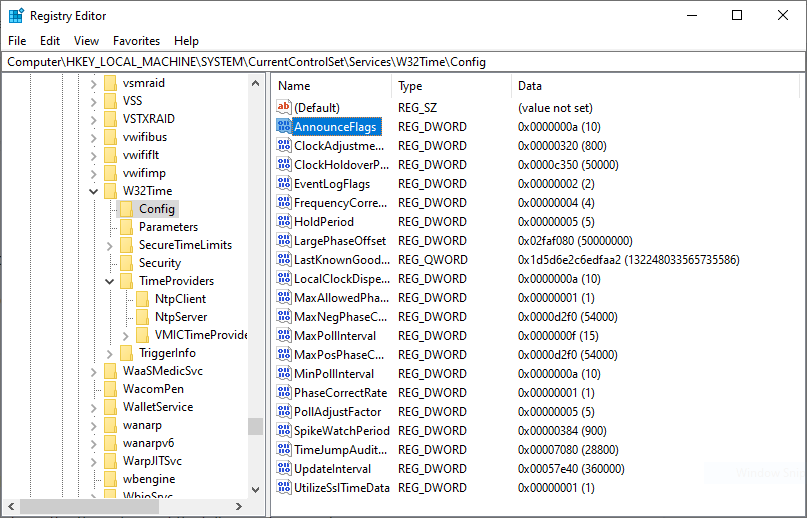
Double click on the file and set its value to 5 in the ‘Value Data’ section.
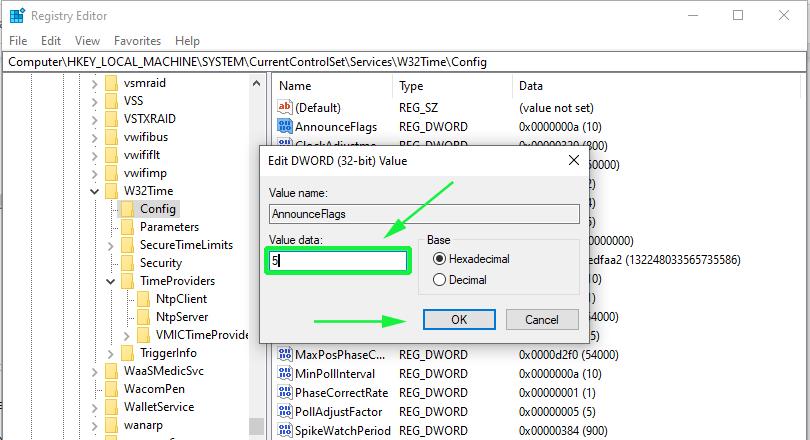
Finally, reboot the NTP server for the changes to take place. Head back to the services Window, right-click on ‘Windows Time’ and select ‘Restart’
Configuring NTP Server on Windows 2019 using Windows PowerShell
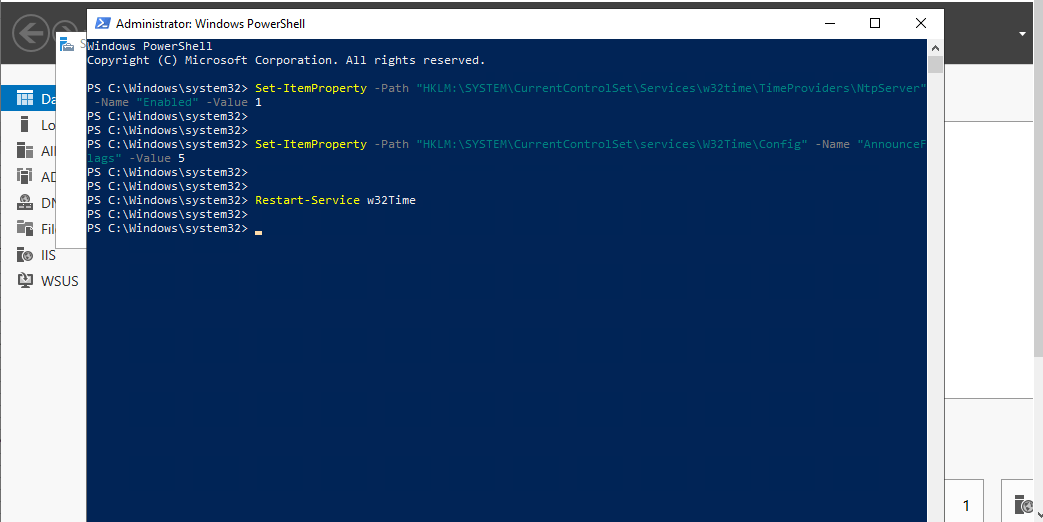
If you love working in Powershell, launch Powershell as Administrator and enable NTP server using the command:
Set-ItemProperty -Path “HKLM:SYSTEMCurrentControlSetServicesw32timeTimeProvidersNtpServer” -Name “Enabled” -Value 1
Next, configure Announce Flags value as shown:
Set-ItemProperty -Path “HKLM:SYSTEMCurrentControlSetservicesW32TimeConfig” -Name “AnnounceFlags” -Value 5
Finally, restart the NTP server using the command:
Restart-Service w32Time
Important Note: UDP port 123 must be open for the NTP server traffic to reach your Windows Server 2019. If the NTP servers are unreachable, you can check your firewall settings to fix this.
Other useful commands
- w32tm /query /configuration to check and shows the NTP server configuration.
- w32tm /query /peers for checking the list of NTP servers configured alongside their configuration status
- w32tm /resync /nowait to force-synchronize time with your NTP server.
- w32tm /query /source to show the source of the time.
- w32tm /query /status to reveal NTP time service status.
Final take
Now your Windows Server 2019 clock is synchronized with time the NTP server’s pool.ntp.org and works as NTP client. You can achieve full network and accompanying infrastructure time synchronization by synchronizing all network workstations, servers, routers, hubs, and switches.
Since NTP servers operate over the UDP protocol using TCP/IP, these network infrastructures must be working efficiently for effective NTP server operation. In case you want to make time servers on windows server 2019 hosted on a virtual machine, you should disable the virtual machine time synchronization settings and sync their time with the domain Windows Server 2019.
Источник
Applies to: Windows Server 2022, Windows Server 2019, Windows Server 2016, Windows Server 2012 R2, Windows Server 2012, Windows 10, Azure Stack HCI, versions 21H2 and 20H2
The Windows Time service (W32Time) synchronizes the date and time for all computers managed by Active Directory Domain Services (AD DS). This article covers the different tools and settings used to manage the Windows Time service.
By default, a computer that is joined to a domain synchronizes time through a domain hierarchy of time sources. However, if a computer has been manually configured to synchronize from a specific time source, perhaps because it was formerly not joined to a domain, you can reconfigure the computer to begin automatically sourcing its time from the domain hierarchy.
Most domain-joined computers have a time client type of NT5DS, which means that they synchronize time from the domain hierarchy. An exception to this is the domain controller, which functions as the primary domain controller (PDC) emulator operations master for the root forest domain. The PDC emulator operations master in turn is configured to synchronize time with an external time source.
You can achieve down to one-millisecond time accuracy in your domain. For more information, see Support boundary for high-accuracy time and see Accurate Time for Windows Server 2016.
Don’t use the Net time command to configure or set a computer’s clock time when the Windows Time service is running.
Also, on older computers that run Windows XP or earlier, the Net time /querysntp command displays the name of a Network Time Protocol (NTP) server with which a computer is configured to synchronize, but that NTP server is used only when the computer’s time client is configured as NTP or AllSync. This command has since been deprecated.
Network port
The Windows Time service follows the Network Time Protocol (NTP) specification, which requires the use of UDP port 123 for all time synchronization. Whenever the computer synchronizes its clock or provides time to another computer, it happens over UDP port 123. This port is exclusively reserved by the Windows Time service.
- If you have a computer with multiple network adapters (is multi-homed), you cannot enable the Windows Time service based on a network adapter.
- The Windows Time NTP client uses UDP port 123 for both source and destination sync requests. When using network filtering, be aware of the source port being used.
Using W32tm.exe
You can use the command-line tool W32tm.exe to configure Windows Time service settings and to diagnose computer time problems. W32tm.exe is the preferred command-line tool for configuring, monitoring, and troubleshooting the Windows Time service. W32tm.exe is included with Windows XP and later and Windows Server 2003 and later.
Membership in the local Administrators group is required to run W32tm.exe locally, while membership in the Domain Admins group is required to run W32tm.exe remotely.
Run W32tm.exe
- In the Windows search bar, enter cmd.
- Right-click Command Prompt, then select Run as administrator.
- At the command prompt, enter w32tm followed by the applicable parameter, as described below:
| Parameter | Description |
|---|---|
| /? | Displays the W32tm command-line help |
| /register | Registers the Windows Time service to run as a service and adds its default configuration information to the registry. |
| /unregister | Unregisters the Windows Time service and removes all of its configuration information from the registry. |
| /monitor [/domain: ] [/computers: [, [, . ]]] [/threads: ] | Monitors the Windows Time service.
/domain: Specifies which domain to monitor. If no domain name is given, or neither the /domain nor /computers option is specified, the default domain is used. This option might be used more than once. /computers: Monitors the given list of computers. Computer names are separated by commas, with no spaces. If a name is prefixed with a *, it is treated as a PDC. This option might be used more than once. /threads: Specifies the number of computers to analyze simultaneously. The default value is 3. The allowed range is 1-50. |
| /ntte | Converts a Windows NT system time (measured in 10 -7 -second intervals starting from 0h 1-Jan 1601) into a readable format. |
| /ntpte | Converts an NTP time (measured in 2 -32 -second intervals starting from 0h 1-Jan 1900) into a readable format. |
| /resync [/computer: ] [/nowait] [/rediscover] [/soft] | Tells a computer that it should resynchronize its clock as soon as possible, throwing out all accumulated error statistics.
/computer: : Specifies the computer that should resynchronize. If not specified, the local computer will resynchronize. /nowait: do not wait for resynchronization to occur; return immediately. Otherwise, wait for resynchronization to complete before returning. /rediscover: Redetects the network configuration and rediscovers network sources, then resynchronizes. /soft: Resynchronizes by using existing error statistics. This is used for compatibility purposes. |
| /stripchart /computer: [/period: ] [/dataonly] [/samples: ] [/rdtsc] | Displays a strip chart of the offset between this computer and another computer.
/computer: : The computer to measure the offset against. /period: : The time between samples, in seconds. The default is 2 seconds. /dataonly: Displays the data only, without graphics. /samples: : Collects samples, then stops. If not specified, samples will be collected until Ctrl+C is pressed. /rdtsc: For each sample, this option prints comma-separated values along with the headers RdtscStart, RdtscEnd, FileTime, RoundtripDelay, and NtpOffset instead of the text graphic.
|
| /config [/computer: ] [/update] [/manualpeerlist: ] [/syncfromflags: ] [/LocalClockDispersion: ] [/reliable:(YES|NO)] [/largephaseoffset: ]** | /computer: : Adjusts the configuration of . If not specified, the default is the local computer.
/update: Notifies the Windows Time service that the configuration has changed, causing the changes to take effect. /manualpeerlist: : Sets the manual peer list to , which is a space-delimited list of DNS or IP addresses. When specifying multiple peers, this option must be enclosed in quotes. /syncfromflags: : Sets what sources the NTP client should synchronize from. should be a comma-separated list of these keywords (not case sensitive):
/LocalClockDispersion: : Configures the accuracy of the internal clock that W32Time will assume when it can’t acquire time from its configured sources. /reliable:(YES|NO): Set whether this computer is a reliable time source. This setting is only meaningful on domain controllers.
/largephaseoffset: : sets the time difference between local and network time that W32Time will consider a spike. |
| /tz | Displays the current time zone settings. |
| /dumpreg [/subkey: ] [/computer: ] | Displays the values associated with a given registry key.
The default key is HKLMSystemCurrentControlSetServicesW32Time (the root key for the Windows Time service). /subkey: : Displays the values associated with subkey of the default key. /computer: : Queries registry settings for computer |
| /query [/computer: ] [/verbose] | Displays the computer’s Windows Time service information. This parameter was first made available for the Windows Time client in Windows Vista and Windows Server 2008.
/computer: : Queries the information of . If not specified, the default value is the local computer. /source: Displays the time source. /configuration: Displays the configuration of run time and where the setting comes from. In verbose mode, display the undefined or unused setting too. /peers: Displays a list of peers and their status. /status: Displays Windows Time service status. /verbose: Sets the verbose mode to display more information. |
| /debug > | Enables or disables the local computer Windows Time service private log. This parameter was first made available for the Windows Time client in Windows Vista and Windows Server 2008.
/disable: Disables the private log. /enable: Enables the private log.
/truncate: Truncate the file if it exists. |
Set client to use two time servers
To set a client computer to point to two different time servers, one named ntpserver.contoso.com and another named clock.adatum.com , type the following command at the command prompt, and then press ENTER:
Set client to sync time automatically from a domain source
To configure a client computer that is currently synchronizing time using a manually-specified computer to synchronize time automatically from the AD domain hierarchy, run the following:
Check client time configuration
To check a client configuration from a Windows-based client computer that has a host name of contosoW1 , run the following command:
The output of this command displays a list of W32time configuration parameters that are set for the client.
Windows Server 2016 has improved the time synchronization algorithms to align with RFC specifications. Therefore, if you want to set the local time client to point to multiple peers, we recommended that you prepare three or more different time servers.
If you have only two time servers, you should specify the Ntpserver UseAsFallbackOnly flag (0x2) to de-prioritize one of them. For example, if you want to prioritize ntpserver.contoso.com over clock.adatum.com , run the following command:
Additionally, you can run the following command and read the value of NtpServer in the output:
Configure computer clock reset
In order for W32tm.exe to reset a computer clock, it first checks the offset ( CurrentTimeOffset , also known as Phase Offset ) between the current time and the computer clock time to determine whether the offset is less than the MaxAllowedPhaseOffset value.
- CurrentTimeOffset ≤ MaxAllowedPhaseOffset : Adjust the computer clock gradually by using the clock rate.
- CurrentTimeOffset > MaxAllowedPhaseOffset : Set the computer clock immediately.
Then, to adjust the computer clock by using the clock rate, W32tm.exe calculates a PhaseCorrection value. This algorithm varies depending on the version of Windows:
Windows Server 2016 and later versions:
PhaseCorrection_raw = | CurrentTimeOffset | Г· (16 Г— PhaseCorrectRate Г— pollIntervalInSeconds )
MaximumCorrection = | CurrentTimeOffset | Г· ( UpdateInterval Г· 100)
PhaseCorrection = min( PhaseCorrection_raw , MaximumCorrection )
Windows Server 2012 R2 and earlier versions:
To get the SystemClockRate value, you can use the following command and convert it from seconds to clock ticks by using the formula of (seconds Г— 1,000 Г— 10,000):
PhaseCorrection = | CurrentTimeOffset | Г· ( PhaseCorrectRate Г— UpdateInterval )
All versions of Windows use the same final equation to check PhaseCorrection :
PhaseCorrection ≤ SystemClockRate ÷ 2
Windows Server 2019 and Windows 10 1809 have the same formula as [Windows Server 2016 and later versions] described above by applying cumulative updates from KB5006744 onwards.
These equations use PhaseCorrectRate , UpdateInterval , MaxAllowedPhaseOffset , and SystemClockRate measured in units of clock ticks. On Windows systems, 1 ms = 10,000 clock ticks.
MaxAllowedPhaseOffset is configurable in the registry. However, the registry parameter is measured in seconds instead of clock ticks.
To see the SystemClockRate and pollIntervalInSeconds values (measured in seconds), open a Command Prompt window and then run W32tm /query /status /verbose . This command produces output that resembles the following.
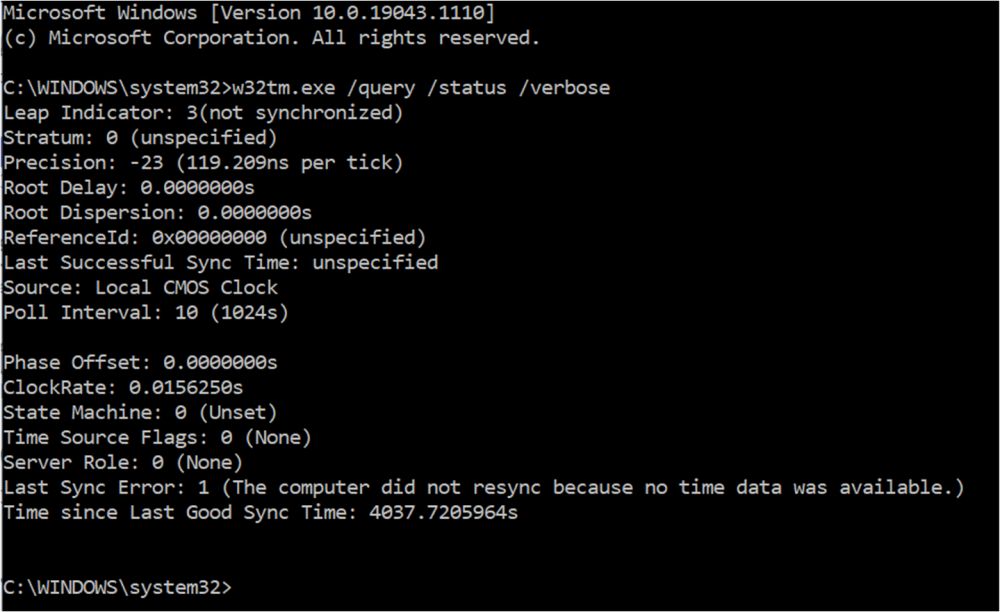
The output presents the poll interval in both clock ticks and in seconds. The equations use the value measured in seconds (the value in parentheses).
The output presents the clock rate in seconds. To see the SystemClockRate value in clock ticks, use the following formula:
( value in seconds ) Г— 1,000 Г— 10,000
For example, if SystemClockRate is 0.0156250 seconds, the value that the equation uses is 156,250 clock ticks. For full descriptions of the configurable parameters and their default values, see Config entries later in this article.
The following examples show how to apply these calculations for Windows Server 2012 R2 and earlier versions.
Example: System clock rate off by four minutes
Your computer clock time is 11:05 and the actual current time is 11:09:
UpdateInterval = 30,000 clock ticks
SystemClockRate = 156,000 clock ticks
MaxAllowedPhaseOffset = 10 min = 600 seconds = 600 Г— 1,000 Г— 10,000 = 6,000,000,000 clock ticks
| CurrentTimeOffset | = 4 min = 4 Г— 60 Г— 1,000 Г— 10,000 = 2,400,000,000 clock ticks
Is CurrentTimeOffset ≤ MaxAllowedPhaseOffset ?
AND does it satisfy the following equation?
(| CurrentTimeOffset | ÷ ( PhaseCorrectRate × UpdateInterval ) ≤ SystemClockRate ÷ 2)
Is 2,400,000,000 / (30,000 × 1) ≤ 156,000 ÷ 2
80,000 ≤ 78,000: FALSE
Therefore, W32tm.exe would set the clock back immediately.
In this case, if you want to set the clock back slowly, you would also have to adjust the values of PhaseCorrectRate or UpdateInterval in the registry to make sure that the equation result is TRUE.
Example: System clock rate off by three minutes
Your computer clock time is 11:05 and the actual current time is 11:08:
UpdateInterval = 30,000 clock ticks
SystemClockRate = 156,000 clock ticks
MaxAllowedPhaseOffset = 10 min = 600 seconds = 600 Г— 1,000 Г— 10,000 = 6,000,000,000 clock ticks
| CurrentTimeOffset | = 3 mins = 3 Г— 60 Г— 1,000 Г— 10,000 = 1,800,000,000 clock ticks
Is CurrentTimeOffset ≤ MaxAllowedPhaseOffset ?
AND does it satisfy the following equation?
(| CurrentTimeOffset | ÷ ( PhaseCorrectRate × UpdateInterval ) ≤ SystemClockRate ÷ 2)
(1,800,000,000) ÷ (1 × 30,000) ≤ 156,000 ÷ 2
In this case, the clock will be set back slowly.
Using Local Group Policy Editor
The Windows Time service stores several configuration properties as registry entries. You can use Group Policy Objects (GPOs) in Local Group Policy Editor to configure most of this information. For example, you can use GPOs to configure a computer to be an NTPServer or NTPClient, configure the time synchronization mechanism, or configure a computer to be a reliable time source.
Group Policy settings for the Windows Time service can be applied on Windows Server 2003, Windows Server 2003 R2, Windows Server 2008, and Windows Server 2008 R2 domain controllers and can be applied to computers running Windows Server 2003, Windows Server 2003 R2, Windows Server 2008, and Windows Server 2008 R2.
Windows stores the Windows Time service policy information in the Local Group Policy Editor under Computer ConfigurationAdministrative TemplatesSystemWindows Time Service . It stores configuration information that the policies define in the Windows registry, and then uses those registry entries to configure the registry entries specific to the Windows Time service. As a result, the values defined by Group Policy overwrite any pre-existing values in the Windows Time service section of the registry. Some of the preset GPO settings differ from the corresponding default Windows Time service registry entries.
For example, suppose you edit policy settings in the Time ProvidersConfigure Windows NTP Client policy. Windows loads these settings into the policy area of the registry under the following subkey:
Then Windows uses the policy settings to configure the related Windows Time service registry entries under the following subkey:
The following table lists the policies that you can configure for the Windows Time service, and the registry subkeys that those policies affect.
When you remove a Group Policy setting, Windows removes the corresponding entry from the policy area of the registry.
| Group Policy 1 | Registry locations 2, 3 |
|---|---|
| Global Configuration Settings | W32Time W32TimeConfig W32TimeParameters |
| Time ProvidersConfigure Windows NTP Client | W32TimeTimeProvidersNtpClient |
| Time ProvidersEnable Windows NTP Client | W32TimeTimeProvidersNtpClient |
| Time ProvidersEnable Windows NTP Server | W32TimeTimeProvidersNtpServer |
1 Category path: Computer ConfigurationAdministrative TemplatesSystemWindows Time Service
2 Subkey: HKLMSOFTWAREPoliciesMicrosoft
3 Subkey: HKLMSYSTEMCurrentControlSetServices
Windows registry reference
This information is provided as a reference for use in troubleshooting and validation. Windows registry keys are used by W32Time to store critical information. Don’t change these values. Modifications to the registry are not validated by the registry editor or by Windows before they are applied. If the registry contains invalid values, Windows may experience unrecoverable errors.
The Windows Time service stores information in the registry at the HKLMSYSTEMCurrentControlSetServicesW32Time path under the following subkeys:
In the following tables, «All versions» refers to Windows 7, Windows 8, Windows 10, Windows Server 2008 and Windows Server 2008 R2, Windows Server 2012 and Windows Server 2012 R2, Windows Server 2016, and Windows Server 2019.
Some of the parameters in the registry are measured in clock ticks and some are measured in seconds. To convert the time from clock ticks to seconds, use these conversion factors:
- 1 minute = 60 sec
- 1 sec = 1000 ms
- 1 ms = 10,000 clock ticks on a Windows system, as described at DateTime.Ticks Property.
For example, 5 minutes becomes 5 Г— 60 Г— 1000 Г— 10000 = 3,000,000,000 clock ticks.
Config entries
The Config subkey entries are located at HKLMSYSTEMCurrentControlSetServicesW32TimeConfig .
| Registry entry | Versions | Description |
|---|---|---|
| AnnounceFlags | All versions | Controls whether this computer is marked as a reliable time server. A computer is not marked as reliable unless it is also marked as a time server.
The default value for domain members is 10. The default value for stand-alone clients and servers is 10. |
| ChainDisable | Controls whether or not the chaining mechanism is disabled. If chaining is disabled (set to 0), a read-only domain controller (RODC) can synchronize with any domain controller, but hosts that do not have their passwords cached on the RODC will not be able to synchronize with the RODC. This is a boolean setting, and the default value is . | |
| ChainEntryTimeout | Specifies the maximum amount of time that an entry can remain in the chaining table before the entry is considered to be expired. Expired entries may be removed when the next request or response is processed. The default value is 16 (seconds). | |
| ChainLoggingRate | Controls the frequency at which an event that indicates the number of successful and unsuccessful chaining attempts is logged to the System log in Event Viewer. The default is 30 (minutes). | |
| ChainMaxEntries | Controls the maximum number of entries that are allowed in the chaining table. If the chaining table is full and no expired entries can be removed, any incoming requests are discarded. The default value is 128 (entries). | |
| ChainMaxHostEntries | Controls the maximum number of entries that are allowed in the chaining table for a particular host. The default value is 4 (entries). | |
| ClockAdjustmentAuditLimit | Windows Server 2016 Version 1709 and later versions; Windows 10 Version 1709 and later versions | Specifies the smallest local clock adjustments that may be logged to the W32time service event log on the target computer. The default value is 800 (parts per million — PPM). |
| ClockHoldoverPeriod | Windows Server 2016 Version 1709 and later versions; Windows 10 Version 1709 and later versions | Indicates the maximum number of seconds a system clock can nominally hold its accuracy without synchronizing with a time source. If this period of time passes without W32time obtaining new samples from any of its input providers, W32time initiates a rediscovery of time sources. Default: 7,800 seconds. |
| EventLogFlags | All versions | Controls which events that the time service logs.
The default value on domain members is 2. The default value on stand-alone clients and servers is 2. |
| FrequencyCorrectRate | All versions | Controls the rate at which the clock is corrected. If this value is too small, the clock is unstable and overcorrects. If the value is too large, the clock takes a long time to synchronize. The default value on domain members is 4. The default value on stand-alone clients and servers is 4.
Note |
| HoldPeriod | All versions | Controls the period of time for which spike detection is disabled in order to bring the local clock into synchronization quickly. A spike is a time sample indicating that time is off a number of seconds, and is received after good time samples have been returned consistently. The default value on domain members is 5. The default value on stand-alone clients and servers is 5. |
| LargePhaseOffset | All versions | Specifies that a time offset greater than or equal to this value in 10 -7 seconds is considered a spike. A network disruption such as a large amount of traffic might cause a spike. A spike will be ignored unless it persists for a long period of time. The default value on domain members is 50000000. The default value on stand-alone clients and servers is 50000000. |
| LastClockRate | All versions | Maintained by W32Time. It contains reserved data that is used by the Windows operating system, and any changes to this setting can cause unpredictable results. The default value on domain members is 156250. The default value on stand-alone clients and servers is 156250. |
| LocalClockDispersion | All versions | Controls the dispersion (in seconds) that you must assume when the only time source is the built-in CMOS clock. The default value on domain members is 10. The default value on stand-alone clients and servers is 10. |
| MaxAllowedPhaseOffset | All versions | Specifies the maximum offset (in seconds) for which W32Time attempts to adjust the computer clock by using the clock rate. When the offset exceeds this rate, W32Time sets the computer clock directly. The default value for domain members is 300. The default value for stand-alone clients and servers is 1. |
| MaxClockRate | All versions | Maintained by W32Time. It contains reserved data that is used by the Windows operating system, and any changes to this setting can cause unpredictable results. The default value for domain members is 155860. The default value for stand-alone clients and servers is 155860. |
| MaxNegPhaseCorrection | All versions | Specifies the largest negative time correction, in seconds, that the service makes. If the service determines that a change larger than this is required, it logs an event instead.
Note The default value for domain members is 0xFFFFFFFF (hexadecimal). The default value for domain controllers is 172,800 (48 hrs). The default value for stand-alone clients and servers is 54,000 (15 hrs). |
| MaxPollInterval | All versions | Specifies the largest interval, in log2 seconds, allowed for the system polling interval. A system must poll according to the scheduled interval, a provider can refuse to produce samples when requested to do so. The default value for domain controllers is 10. The default value for domain members is 15. The default value for stand-alone clients and servers is 15. |
| MaxPosPhaseCorrection | All versions | Specifies the largest positive time correction in seconds that the service makes. If the service determines that a change larger than this is required, it logs an event instead.
Note The default value for domain members is 0xFFFFFFFF (hexadecimal). The default value for domain controllers is 172,800 (48 hrs). The default value for stand-alone clients and servers is 54,000 (15 hrs). |
| MinClockRate | All versions | Maintained by W32Time. It contains reserved data that is used by the Windows operating system, and any changes to this setting can cause unpredictable results. The default value for domain members is 155860. The default value for stand-alone clients and servers is 155860. |
| MinPollInterval | All versions | Specifies the smallest interval, in log base 2 seconds, allowed for the system polling interval. A system does not request samples more frequently than this, a provider can produce samples at times other than the scheduled interval. The default value for domain controllers is 6. The default value for domain members is 10. The default value for stand-alone clients and servers is 10. |
| PhaseCorrectRate | All versions | Controls the rate at which the phase error is corrected. Specifying a small value corrects the phase error quickly, but might cause the clock to become unstable. If the value is too large, it takes a longer time to correct the phase error.
The default value on domain members is 1. The default value on stand-alone clients and servers is 7. Note |
| PollAdjustFactor | All versions | Controls the decision to increase or decrease the poll interval for the system. The larger the value, the smaller the amount of error that causes the poll interval to be decreased. The default value on domain members is 5. The default value on stand-alone clients and servers is 5. |
| RequireSecureTimeSyncRequests | Windows 8 and later versions | Controls whether or not the DC will respond to time sync requests that use older authentication protocols. If enabled (set to 1), the DC will not respond to requests using such protocols. This is a boolean setting, and the default value is . |
| SpikeWatchPeriod | All versions | Specifies the amount of time that a suspicious offset must persist before it is accepted as correct (in seconds). The default value on domain members is 900. The default value on stand-alone clients and workstations is 900. |
| TimeJumpAuditOffset | All versions | An unsigned integer that indicates the time jump audit threshold, in seconds. If the time service adjusts the local clock by setting the clock directly, and the time correction is more than this value, then the time service logs an audit event. |
| UpdateInterval | All versions | Specifies the number of clock ticks between phase correction adjustments. The default value for domain controllers is 100. The default value for domain members is 30,000. The default value for stand-alone clients and servers is 360,000.
Note |
| UtilizeSslTimeData | Windows versions later than Windows 10 build 1511 | Value of 1 indicates that W32Time uses multiple SSL timestamps to seed a clock that is grossly inaccurate. |
Parameters entries
The Parameters subkey entries are located at HKLMSYSTEMCurrentControlSetServicesW32TimeParameters .
| Registry entry | Versions | Description |
|---|---|---|
| AllowNonstandardModeCombinations | All versions | Indicates that non-standard mode combinations are allowed in synchronization between peers. The default value for domain members is 1. The default value for stand-alone clients and servers is 1. |
| NtpServer | All versions | Specifies a space-delimited list of peers from which a computer obtains time stamps, consisting of one or more DNS names or IP addresses per line. Each DNS name or IP address listed must be unique. Computers connected to a domain must synchronize with a more reliable time source, such as the official U.S. time clock.
There is no default value for this registry entry on domain members. The default value on stand-alone clients and servers is time.windows.com,0x1 . |
| ServiceDll | All versions | Maintained by W32Time. It contains reserved data that is used by the Windows operating system, and any changes to this setting can cause unpredictable results. The default location for this DLL on both domain members and stand-alone clients and servers is %windir%System32W32Time.dll. |
| ServiceMain | All versions | Maintained by W32Time. It contains reserved data that is used by the Windows operating system, and any changes to this setting can cause unpredictable results. The default value on domain members is SvchostEntry_W32Time. The default value on stand-alone clients and servers is SvchostEntry_W32Time. |
| Type | All versions | Indicates which peers to accept synchronization from:
The default value on domain members is NT5DS. The default value on stand-alone clients and servers is NTP. |
NtpClient entries
The NtpClient subkey entries are located at HKLMSYSTEMCurrentControlSetServicesW32TimeTimeProvidersNtpClient
| Registry entry | Version | Description |
|---|---|---|
| AllowNonstandardModeCombinations | All versions | Indicates that non-standard mode combinations are allowed in synchronization between peers. The default value for domain members is 1. The default value for stand-alone clients and servers is 1. |
| CompatibilityFlags | All versions | Specifies the following compatibility flags and values:
The default value for domain members is 0x80000000. The default value for stand-alone clients and servers is 0x80000000. |
| CrossSiteSyncFlags | All versions | Determines whether the service chooses synchronization partners outside the domain of the computer. The options and values are:
This value is ignored if the NT5DS value is not set. The default value for domain members is 2. The default value for stand-alone clients and servers is 2. |
| DllName | All versions | Specifies the location of the DLL for the time provider.
The default location for this DLL on both domain members and stand-alone clients and servers is %windir%System32W32Time.dll. |
| Enabled | All versions | Indicates if the NtpClient provider is enabled in the current Time Service.
The default value on domain members is 1. The default value on stand-alone clients and servers is 1. |
| EventLogFlags | All versions | Specifies the events logged by the Windows Time service.
The default value on domain members is 0x1. The default value on stand-alone clients and servers is 0x1. |
| InputProvider | All versions | Indicates whether to enable the NtpClient as an InputProvider, which obtains time information from the NtpServer. The NtpServer is a time server that responds to client time requests on the network by returning time samples that are useful for synchronizing the local clock.
Default value for both domain members and stand-alone clients is 1. |
| LargeSampleSkew | All versions | Specifies the large sample skew for logging, in seconds. To comply with Security and Exchange Commission (SEC) specifications, this should be set to three seconds. Events will be logged for this setting only when EventLogFlags is explicitly configured for 0x2 large sample skew. The default value on domain members is 3. The default value on stand-alone clients and servers is 3. |
| ResolvePeerBackOffMaxTimes | All versions | Specifies the maximum number of times to double the wait interval when repeated attempts to locate a peer to synchronize with fail. A value of zero means that the wait interval is always the minimum. The default value on domain members is 7. The default value on stand-alone clients and servers is 7. |
| ResolvePeerBackoffMinutes | All versions | Specifies the initial interval to wait, in minutes, before attempting to locate a peer to synchronize with. The default value on domain members is 15. The default value on stand-alone clients and servers is 15. |
| SpecialPollInterval | All versions | Specifies the special poll interval, in seconds, for manual peers. When the SpecialInterval 0x1 flag is enabled, W32Time uses this poll interval instead of a poll interval determined by the operating system. The default value on domain members is 3,600. The default value on stand-alone clients and servers is 604,800.
New for build 1703, SpecialPollInterval is contained by the MinPollInterval and MaxPollInterval Config registry values. |
| SpecialPollTimeRemaining | All versions | Maintained by W32Time. It contains reserved data that is used by the Windows operating system. It specifies the time, in seconds, before W32Time will resynchronize after the computer has restarted. Any changes to this setting can cause unpredictable results. The default value on both domain members and on stand-alone clients and servers is left blank. |
NtpServer entries
The NtpServer subkey entries are located at HKLMSYSTEMCurrentControlSetServicesW32TimeTimeProvidersNtpServer .
| Registry Entry | Versions | Description |
|---|---|---|
| AllowNonstandardModeCombinations | All versions | Indicates that non-standard mode combinations are allowed in synchronization between clients and servers. The default value for domain members is 1. The default value for stand-alone clients and servers is 1. |
| DllName | All versions | Specifies the location of the DLL for the time provider. The default location for this DLL on both domain members and stand-alone clients and servers is %windir%System32W32Time.dll . |
| Enabled | All versions | Indicates if the NtpServer provider is enabled in the current Time Service.
The default value on domain members is . The default value on stand-alone clients and servers is . |
| InputProvider | All versions | Indicates whether to enable the NtpClient as an InputProvider, which obtains time information from the NtpServer. The NtpServer is a time server that responds to client time requests on the network by returning time samples that are useful for synchronizing the local clock.
Default value for both domain members and stand-alone clients: 0 |
Enhanced logging
The following registry entries are not a part of the W32Time default configuration but can be added to the registry to obtain enhanced logging capabilities. The information logged to the System Event log can be modified by changing values for the EventLogFlags setting in the Group Policy Object Editor. By default, the Windows Time service logs an event every time that it switches to a new time source.
In order to enable W32Time logging, add the following registry entries:
| Entry | Versions | Description |
|---|---|---|
| FileLogEntries | All versions | Controls the number of entries created in the Windows Time log file. The default value is none, which does not log any Windows Time activity. Valid values are to 300. This value does not affect the event log entries normally created by Windows Time |
| FileLogName | All versions | Controls the location and file name of the Windows Time log. The default value is blank, and should not be changed unless FileLogEntries is changed. A valid value is a full path and file name that Windows Time will use to create the log file. This value does not affect the event log entries normally created by Windows Time. |
| FileLogSize | All versions | Controls the circular logging behavior of Windows Time log files. When FileLogEntries and FileLogName are defined, defines the size, in bytes, to allow the log file to reach before overwriting the oldest log entries with new entries. Please use 1000000 or larger value for this setting. This value does not affect the event log entries normally created by Windows Time. |
Group Policy Object settings
Group Policy settings are contained in the Global Configuration Settings and the Windows NTP Client Settings GPOs.
Global Configuration Settings
These are the global Group Policy settings and default values for the Windows Time service. These settings are contained in the Global Configuration Settings GPO in Local Policy Editor.
| Group Policy setting | Default value |
|---|---|
| AnnounceFlags | 10 |
| EventLogFlags | 2 |
| FrequencyCorrectRate | 4 |
| HoldPeriod | 5 |
| LargePhaseOffset | 1,280,000 |
| LocalClockDispersion | 10 |
| MaxAllowedPhaseOffset | 300 |
| MaxNegPhaseCorrection | 54,000 (15 hours) |
| MaxPollInterval | 15 |
| MaxPosPhaseCorrection | 54,000 (15 hours) |
| MinPollInterval | 10 |
| PhaseCorrectRate | 7 |
| PollAdjustFactor | 5 |
| SpikeWatchPeriod | 90 |
| UpdateInterval | 100 |
Windows NTP Client settings
These are the Windows NTP client settings and default values for the Windows Time service. These settings are contained in the Configure Windows NTP Client GPO in Local Group Policy Editor.
| Group Policy setting | Default value |
|---|---|
| NtpServer | time.windows.com , 0x1 |
| Type | NT5DS — Used for domain-joined computers NTP — Used for non-domain-joined computers |
| CrossSiteSyncFlags | 2 |
| ResolvePeerBackoffMinutes | 15 |
| ResolvePeerBackoffMaxTimes | 7 |
| SpecialPollInterval | 3,600 |
| EventLogFlags |
If you use Group Policy to set the NtpServer value as part of the Configure Windows NTP Client policy and apply it to a domain member, the Windows Time Service will not use the NtpServer Registry value. To view your NTP configuration, open a Command Prompt and run w32tm /query /configuration .
See RFC 1305 — Network Time Protocol of the Internet Engineering Task Force (IETF).
Источник
Часовой пояс (Time zone), наряду с временем и датой, это один из критический параметров компьютера. Для корректной работы Windows/прикладных программ и правильного отображения времени в системе, часовой пояс должен быть установлен в соответствии с географическим расположением компьютера. В этой статье мы рассмотрим, как изменить часовой пояс в Windows из графического интерфейса, командной строки, консоли PowerShell и с помощью групповых политик.
В Windows 10 и Windows Server 2019/2016 для настройки времени и часового пояса используется новое окно в приложении (Параметры/Settings). Вы можете установить часовой пояс из графического интерфейса, щелкнув правой кнопкой по значку часов в системном трее и выбрав пункт Adjust date/time (Настройка времени и даты). По умолчанию Windows пытается автоматически выбрать часовой пояс (включена опция Set time zone automatically/Автоматически устанавливать часовой пояс). Вы можете отключить эту опцию и задать нужный часовой пояс вручную, выбрав его в выпадающем списке.
Также вы можете вызвать классическое окно настройки времени в Windows, выполнив команду
timedate.cpl
.
Содержание:
- Назначаем права на изменение часового пояса в Windows
- Утилита TZUtil: изменить часовой пояса из командной строки Windows 10
- Управление часовым поясом в Windows из PowerShell
- Настройка часового пояса через GPO
- Ошибка при изменении часового пояса в Windows Server 2019
Назначаем права на изменение часового пояса в Windows
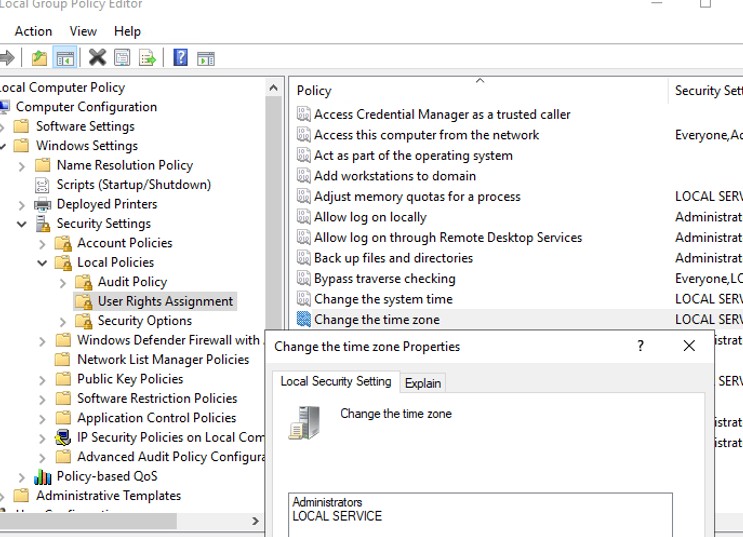
По-умолчанию смена часового пояса в Windows 10 не требует от пользователя наличия прав администратора (в отличии от смены времени/даты). Вы можете запретить пользователям менять часовой пояс с помощью локальной политики безопасности (Local Security Settings —
secpol.msc
). Интересующая нас настройка находится в разделе Security Settings -> Local Policy -> User Rights Assignment (Параметры безопасности -> Локальные политики -> Назначение прав пользователя). Политика называется Change the time zone (Изменение часового пояса). По умолчанию изменить часовой пояс в Windows 10 может сама система, администраторы и все пользователи. Чтобы запретить простым пользователям самим менять часовой пояс, необходимо удалить Users из списка учетных записей в этой политике.
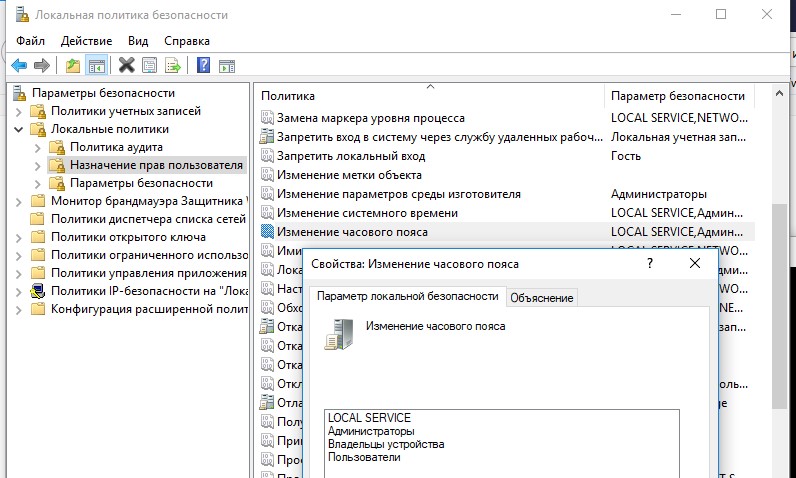
В Windows Server право на изменение часового пояса есть только у Local Service и администраторов.
Утилита TZUtil: изменить часовой пояса из командной строки Windows 10
Для смены часового пояса в Windows 11/10/8.1, Windows Server 2019/2016/2012 R2/ используется специальная утилита командной строки tzutil.exe (Windows Time Zone Utility), впервые появившаяся в Windows 7. Исполняемый файл утилиты хранится в каталоге
%WINDIR%System32
.
Разберемся с возможностями и особенностями использования утилиты TZUtil.
Откройте командную строку (
cmd.exe
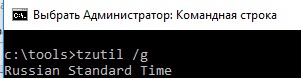
). Чтобы узнать текущий часовой пояс и его идентификатор (TimeZoneID), выполните команду:
tzutil /g
В данном примере Russian Standard Time это идентификатор текущего часового пояса:
Выведите список всех часовых поясов с их названием и идентификаторами:
tzutil /l
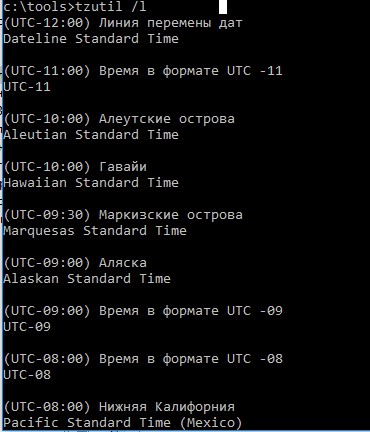
Dateline Standard Time
UTC-11
Aleutian Standard Time
Hawaiian Standard Time
Marquesas Standard Time
Alaskan Standard Time
UTC-09
UTC-08
Pacific Standard Time (Mexico)
Pacific Standard Time
US Mountain Standard Time
Mountain Standard Time
Mountain Standard Time (Mexico)
Central Standard Time (Mexico)
Canada Central Standard Time
Central America Standard Time
Central Standard Time
Easter Island Standard Time
SA Pacific Standard Time
Eastern Standard Time
Cuba Standard Time
Haiti Standard Time
US Eastern Standard Time
Turks And Caicos Standard Time
Eastern Standard Time (Mexico)
Paraguay Standard Time
Atlantic Standard Time
SA Western Standard Time
Venezuela Standard Time
Central Brazilian Standard Time
Pacific SA Standard Time
Newfoundland Standard Time
Tocantins Standard Time
E. South America Standard Time
Argentina Standard Time
 Greenland Standard Time
SA Eastern Standard Time
Montevideo Standard Time
Magallanes Standard Time
Bahia Standard Time
Saint Pierre Standard Time
UTC-02
Mid-Atlantic Standard Time
Azores Standard Time
Cape Verde Standard Time
UTC
GMT Standard Time
Morocco Standard Time
Greenwich Standard Time
W. Europe Standard Time
Central Europe Standard Time
Romance Standard Time
Central European Standard Time
W. Central Africa Standard Time
Sao Tome Standard Time
Jordan Standard Time
GTB Standard Time
Middle East Standard Time
FLE Standard Time
Namibia Standard Time
Syria Standard Time
Israel Standard Time
Egypt Standard Time
Kaliningrad Standard Time
E. Europe Standard Time
West Bank Standard Time
Libya Standard Time
South Africa Standard Time
Sudan Standard Time
Arabic Standard Time
Arab Standard Time
Belarus Standard Time
Russian Standard Time
E. Africa Standard Time
Turkey Standard Time
Iran Standard Time
Arabian Standard Time
Astrakhan Standard Time
Azerbaijan Standard Time
Caucasus Standard Time
Russia Time Zone 3
Mauritius Standard Time
Saratov Standard Time
Georgian Standard Time
Afghanistan Standard Time
West Asia Standard Time
Ekaterinburg Standard Time
Pakistan Standard Time
India Standard Time
Sri Lanka Standard Time
Nepal Standard Time
Central Asia Standard Time
Bangladesh Standard Time
Omsk Standard Time
Myanmar Standard Time
SE Asia Standard Time
Altai Standard Time
North Asia Standard Time
N. Central Asia Standard Time
Tomsk Standard Time
W. Mongolia Standard Time
China Standard Time
North Asia East Standard Time
Singapore Standard Time
W. Australia Standard Time
Taipei Standard Time
Ulaanbaatar Standard Time
North Korea Standard Time
Aus Central W. Standard Time
Tokyo Standard Time
Korea Standard Time
Transbaikal Standard Time
Yakutsk Standard Time
Cen. Australia Standard Time
AUS Central Standard Time
E. Australia Standard Time
Vladivostok Standard Time
West Pacific Standard Time
AUS Eastern Standard Time
Tasmania Standard Time
Lord Howe Standard Time
Magadan Standard Time
Bougainville Standard Time
Norfolk Standard Time
Sakhalin Standard Time
Central Pacific Standard Time
Russia Time Zone 10
Russia Time Zone 11
New Zealand Standard Time
UTC+12
Kamchatka Standard Time
Fiji Standard Time
Chatham Islands Standard Time
UTC+13
Tonga Standard Time
Samoa Standard Time
Line Islands Standard Time
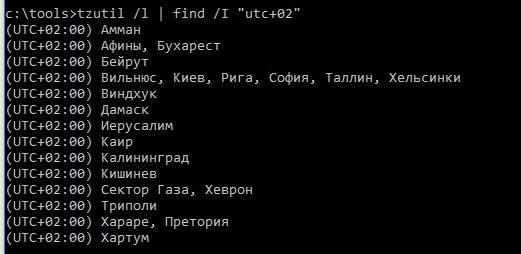
Если вы хотите быстро найти вывести все доступные часовые пояса, например, со сдвигом UTC +2, выполните команду:
tzutil /l | find /I "utc+02"
Чтобы изменить текущий часовой пояс (UTC+03:00) Москва, Санкт-Петербург, Волгоград – (Russian Standard Time) на (UTC+04:00) Ижевск, Самара (Russia Time Zone 3). Для этого нужно указать идентификатор часового пояса:
tzutil /s "Russia Time Zone 3"
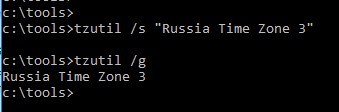
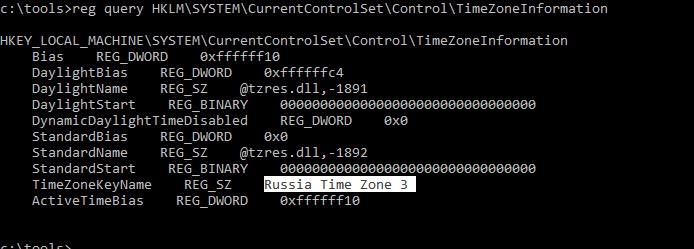
Текущий часовой пояс хранится в реестре Windows. Вы можете проверить, что он изменился так:
reg query HKLMSYSTEMCurrentControlSetControlTimeZoneInformation
Чтобы отключить переход на летнее время для конкретного пояса, нужно указать идентификатор часового пояса с суффиксом _dstoff, например
tzutil /s “Pacific Standard Time_dstoff”
Эта команда изменит часовой пояс компьютера и отключите сезонный перевод часов.
Вы можете вывести полную информацию о часовом поясе и настройках сезонного перевод часов так:
w32tm /tz
Часовой пояс: Текущий:TIME_ZONE_ID_UNKNOWN Сдвиг: -180мин (UTC=LocalTime+Bias)
[Зимнее время:"RTZ 2 (зима)" Сдвиг:0мин Дата:(не указано)]
[Летнее время:"RTZ 2 (лето)" Сдвиг:-60мин Дата:(не указано)]

В Windows XP и Windows Server 2003 для смены часового пояса из командной строки нужно было использовать такие команды:
RunDLL32.exe shell32.dll,Control_RunDLL timedate.cpl,,/Z Russian Standard Time
Или:
Control.exe TIMEDATE.CPL,,/Z Russian Standard Time
Управление часовым поясом в Windows из PowerShell
Получить настройки текущего часового пояса можно и в консоли PowerShell. Используйте команду:
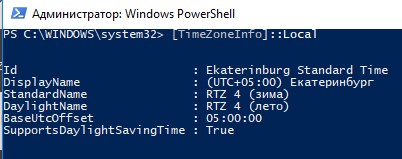
[TimeZoneInfo]::Local
Или
Get-TimeZone
Id                         : Ekaterinburg Standard Time
DisplayName                : (UTC+05:00) Екатеринбург
StandardName               : RTZ 4 (зима)
DaylightName               : RTZ 4 (лето)
BaseUtcOffset              : 05:00:00
SupportsDaylightSavingTime : True
В PowerShell вы можете просмотреть все возможные часовые пояса, доступные в Windows:
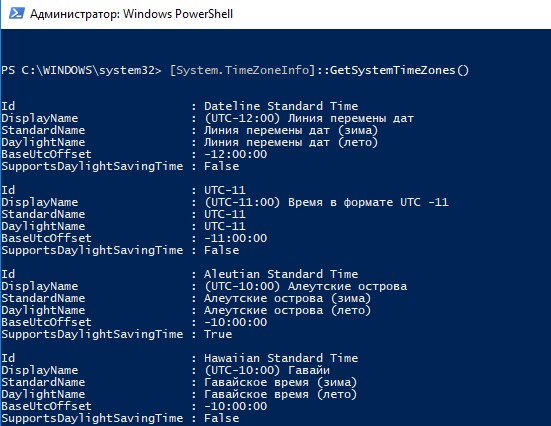
[System.TimeZoneInfo]::GetSystemTimeZones()
Или
Get-TimeZone -ListAvailable
Список часовых поясов довольно большой, чтобы найти название нужного часового пояса, воспользуйтесь фильтром:
Get-TimeZone -ListAvailable | Where-Object {$_.displayname -like "*Samara*"}
Или:
Get-TimeZone -ListAvailable | Where-Object {$_.Id -like "*Russ*"}

Можно вывести все часовые пояса в алфавитном порядке:
Get-TimeZone -ListAvailable | Select Id | Sort Id
Чтобы изменить текущий часовой пояс из PowerShell, выполните команду
Set-TimeZone -Name "Astrakhan Standard Time"
В этих примерах используется версия PowerShell 5.1, но они также работают и в более новых версиях.
Настройка часового пояса через GPO
Для централизованной настройки часового пояса на компьютерах в домене Active Directory вы можете использовать групповые политики. Готовой политики для настройки часового пояса в GPO нет. Чаще всего используются следующие два варианта настройки часового пояса через GPO: с помощью logon скрипта GPO и с помощью импорта настроек часового пояса в реестр.
Для задания часового пояса через логон скрипт GPO, можете использовать простейший PowerShell скрипт (подходит для всех версий Windows, вплоть до Windows XP и Windows Server 2003):
$tmZone = "Russian Standard Time"
$WinOSVerReg = Get-Item "HKLM:SOFTWAREMicrosoftWindows NTCurrentVersion"
$WinOSVer = $WinOSVerReg.GetValue("CurrentVersion")
if ($WinOSVer -GE 6){
tzutil.exe /s $tmZone
} Else {
$param = "/c Start `"Change tmZone`" /MIN %WINDIR%System32Control.exe TIMEDATE.CPL,,/Z "
$param += $tmZone
$proc = [System.Diagnostics.Process]::Start( "CMD.exe", $param )
}
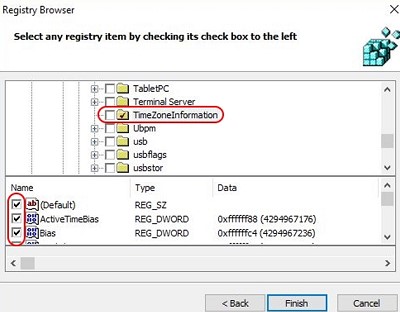
Другой способ настроек времени заключается в импорте содержимого ветки HKLMSYSTEMCurrentControlSetControlTimeZoneInformation с эталонного компьютера с настроенным временем на другие компьютеры через GPO. Процедура импорта ветки реестра через Group Policy Preferences описана в этой статье.
Выберите эту ветку целиком с помощью Registry Browser. В результате все настройки временной зоны будут импортированы в раздел редактора GPO (Computer Configuration -> Preferences -> Windows Settings -> Registry).
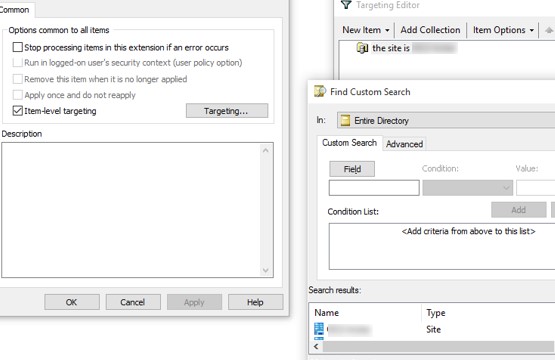
Если вы хотите использовать разные настройки временных зон для разных сайтов Acrive Directory, воспользуйтесь GPP Item Level Targeting. Привяжите настройки часового пояса к нужному сайту.
Если вы используете RDS инфраструктуру, и пользователи и сервера RDSH находятся в разных часовых поясах, то в RDP сессий пользователя будет отображаться время. Это не удобно. Вы можете перенаправить локальный часовой пояс пользователя в RDP сессию с помощью политики Allow time zone redirection (Computer Configuration > Policies -> Administrative Templates -> Windows Components -> Remote Desktop Services -> Remote Desktop Session Host -> Device and Resource Redirection.
Ошибка при изменении часового пояса в Windows Server 2019
В Windows Server 2019 RTM есть неприятный баг с настройкой часового пояса через графический интерфейс. Если вы попытаетесь изменить часовой пояс из панели Settings появится ошибка:
Date and time
Unable to continue. You do not have permission to perform this task. Please contact your computer administrator for help.
Продолжение невозможно. У вас нет разрешения на выполнение этой задачи. Обратитесь за помощью к сетевому администратору.
В первую очередь проверьте, что вы вошли под учетной записью с правами администратора, а в настройках локальной политики безопасности Change the time zone присутствует группа Administrators.
В качестве обходного решения в этом случае придется изменить часовой пояс из командной строки:
tzutil /l
tzutil /s "Russian Standard Time"
Или PowerShell:
GetTimeZone -ListAvailable|? DisplayName -like "*Moscow*"|Set-TimeZone
Если вы хотите изменить задать часовой пояс из графического интерфейса, можете воспользоваться старой консолью
timedate.cpl
(запустите ее из командной строки с правами администратора) или вызовите ее из Server Manager (Local Server -> Time zone).
In this article, we want to teach you How To Change the Time Zone on Windows Server 2019.
The term Time Zone can be used to describe several different things, but mostly it refers to the local time of a region or a country.
As you know, changing the Time Zone is important for people who use a variety of Windows services and provide that service on a network or Internet level.
In this guide, you will learn to change Time Zone with PowerShell.
Steps To Change Time Zone on Windows Server 2019 with PowerShell
To change the Time Zone with PowerShell, you need to open a PowerShell with Administrator access.
To do this, from your start menu type PowerShell and right-click on it, and select Run as an Administrator.
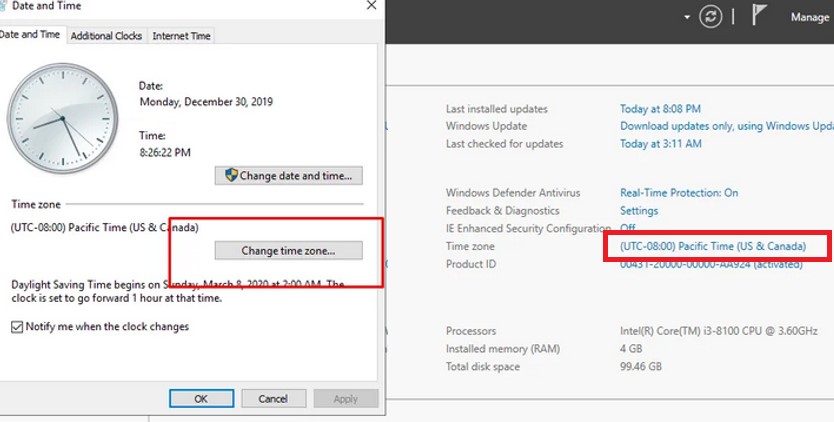
Check the Current Time Zone on Windows Server 2019
After you open your PowerShell on your Windows Server, run the following command to see your current Time Zone:
Get-TimeZone
In your output, you will see something similar to this:
Output
Id                         : Pacific Standard Time
DisplayName                : (UTC-08:00) Pacific Time (US & Canada)
StandardName               : Pacific Standard Time
DaylightName               : Pacific Daylight Time
BaseUtcOffset              : -08:00:00
SupportsDaylightSavingTime : True
List Available Time Zones on Windows Server 2019
Now you can use the following command to list the available Time Zones on your Windows Server:
Get-TimeZone -ListAvailable
In your output you will see:
Output
Id                         : Dateline Standard Time
DisplayName                : (UTC-12:00) International Date Line West
StandardName               : Dateline Standard Time
DaylightName               : Dateline Daylight Time
BaseUtcOffset              : -12:00:00
SupportsDaylightSavingTime : False

Id                         : UTC-11
DisplayName                : (UTC-11:00) Coordinated Universal Time-11
StandardName               : UTC-11
DaylightName               : UTC-11
BaseUtcOffset              : -11:00:00
SupportsDaylightSavingTime : False

Id                         : Aleutian Standard Time
DisplayName                : (UTC-10:00) Aleutian Islands
StandardName               : Aleutian Standard Time
DaylightName               : Aleutian Daylight Time
BaseUtcOffset              : -10:00:00
SupportsDaylightSavingTime : True
...
After viewing the list of available time zones and selecting the desired time zone, with the Set-TimeZone command you can set your Windows server time zone.
Set Time Zone
For example:
Set-TimeZone -Name “Canada Central Standard Time”
At this point, you can use the following command again to see your current Time Zone:
Get-TimeZone
In your output you will see that your Time Zone has been changed:
Output
Id                         : Canada Central Standard Time
DisplayName                : (UTC-06:00) Saskatchewan
StandardName               : Canada Central Standard Time
DaylightName               : Canada Central Daylight Time
BaseUtcOffset              : -06:00:00
SupportsDaylightSavingTime : False
Also, you can use different ways to change your Windows Time Zone like:
Change the Time Zone from the CMD, from the control panel, and from the setting.
Conclusion
At this point, you have successfully changed your Windows Server 2019 Time Zone.
Hope you enjoy it.
Maybe you will be interested in these articles:
Install and Configure Apache on Windows Server 2019.
How To Run Nginx on Windows Server 2019.