Is there a way to replace the ENTIRE contents of an iframe using Javascript (or Jquery)?
For example if my iframe had the following content…
blah outside of html
<html>
<head>
</head>
<body>
<h1> my title </h1>
</body>
</html>
blah outside of html
..It could all be replaced by your script 
The best that I’ve seen so far is this:
$(youriframe).contents().find('html').html('your content here');
but that still wouldn’t replace the content outside of the html tags. We have an interesting scenario where we must assure that ALL the content is replaced.
OR a new iframe with fresh content is created and simply replaces the previous iframe.
Please no comments about the src attribute.
asked Apr 26, 2011 at 0:14
![]()
4
The code works fine in Chrome or FireFox, but in IE8, nothing will be showed or the scroll bar in iframe won’t appear.
Tried this one:
var doc = document.getElementById(iframeId).contentWindow.document;
doc.open();
doc.write(iframeContent);
doc.close();
this works on my case, both ie8 and FF/chrome.
If i use Rachel’s method, the iframe content will be like this in all browsers:
<iframe>
    <html>
        <head>
        </head>
        <body>
        </body>
    </html>
</iframe>
![]()
answered Nov 30, 2012 at 2:41
![]()
YuCYuC
1,7473 gold badges19 silver badges22 bronze badges
I’m guessing that you’re not having problems with cross-site scripting in this instance… Have you had any luck using contentWindow? Something like this seems to work well enough for me:
iframe = document.getElementById('iframe_id');
iframe.contentWindow.document.open()
iframe.contentWindow.document.write(new_content_here);
Not my idea, found it here: Write elements into a child iframe using Javascript or jQuery
![]()
answered May 25, 2011 at 18:39
![]()
James AldayJames Alday
87312 silver badges23 bronze badges
1
I solved with this code:
$('#IframeID').contents().find("html").html(html);
Although this way you can work better in many of the cases, there will be more order:
$('#IframeID').contents().find("head").html(head);
$('#IframeID').contents().find("body").html(body);
So, you can play with head and body separately, and a bad change on body will not affect your head.
I tested on Chrome.
answered Mar 16, 2020 at 14:25
![]()
1
have a similar scenario, where I am generating a new iFrame with content from a different domain each time the row of a table is clicked.
To do this, I use jQuery AJAX and PHP. PHP looks at my MySQL table and gets the URL of the iFrame I want to load; it generates the HTML for an iFrame, and I use jQuery AJAX to replace that content.
My HTML looks something like this:
<div class="xFrame">
    <iframe id="xFrameWindow" name="xFrameWindow" src=""></iframe>
</div>
And my AJAX call looks like this:
function loadPage(record_id) {

    $.ajax({
        type: "POST",
        url: "php/ajax_handler.php",
        data: "action=makeIFrame&record_id=" + record_id,
        success: function(msg){
            $('.xFrame' ).html(msg);
        }
    });
}
The code replaces the HTML of the div that contains the iFrame with a new iFrame.
Hope this (or something similar) works for you.
answered May 1, 2011 at 21:32
![]()
1
Изменить содержание iframe (добавить стили, новые элементы, получать данные из формы и т.д.), можно двумя способами: используя свойство contentDocument, которое возвращает созданный элементом frame или iframe объект Document, или при помощи метода Window.postMessage().
Пример изменения фона страницы на red, открытой в iframe:
IFrame contentDocument
Политика безопасности браузеров запрещает доступ к содержимому документа из другого документа, если два документа не находятся в одном домене. Таким образом, можно манипулировать содержимым iframe, загруженным только с того же домена, что и родительская страница. Этот метод не будет работать, если вы попробуете открыть файл локально на компьютере, просто дважды по нему щелкнув ЛКМ. В общем, этот метод хорош для манипуляции с собственными фреймами на сайте.
IFrame contentDocument javascript
Вот пример кода на js — родительская страница:
<iframe id="myframe" src="iframe.html"></iframe>
<button id="btn" onclick="myFunction()">Добавить</button>
function myFunction() {
  var x = document.getElementById("myframe");
  var y = (x.contentWindow || x.contentDocument);
  if (y.document)y = y.document;
  var gg = y.getElementById("vid");
  y.head.innerHTML = "<style>body{background :red;border:4px solid green;}.ul{background:rgba(48, 120, 133,0.4);padding:15px;}.big{font-size:20px;}.small{font-size:14px;}</style>";
  gg.innerHTML = '<ul class="ul">Привет со страницы<li class="big">Очень большой привет</li><li class="small">Привет поменьше</li></ul>';
}
iframe.html:
<!DOCTYPE html>
<html>
<head>
<meta charset="utf-8">
<meta name="viewport" content="width=device-width, initial-scale=1">
</head>
<body>
<h2>Фрейм</h2>
<div id="vid"></div>
</body>
</html>
Этот код в работе:
IFrame contentDocument jQuery
Для доступа к элементам iframe с jQuery используется метод .contents() для доступа ко всем непосредственным потомкам iframe. В отличие от метода .children(), .contents() включает текстовые узлы и узлы комментариев, а также элементы HTML.
Этот же пример, но на jQuery:
<iframe id="myframe" src="iframe.html"></iframe>
<button id="FD">Добавить</button>
$('#FD').on('click', function() {
    let iframeHead = $('#myframe').contents().find('head');
	let iframeText = $('#myframe').contents().find('body');
    let iframeCSS = '<style>body{background :red;border:4px solid green;}.ul{background:rgba(48, 120, 133,0.4);padding:15px;}.big{font-size:20px;}.small{font-size:14px;}</style>';
	let iframeTextContent = '<ul class="ul">Привет из окна<li class="big">Очень большой привет</li><li class="small">Привет поменьше</li></ul>';
    $(iframeHead).append(iframeCSS);
	$(iframeText).html(iframeTextContent);
});
Обратите внимание на способ вставки элемента: в примере с JS мы используем .innerHTML=, что заменит полностью содержимое блока. Для добавления стилей используйте .innerHTML+= (с плюсом). То же самое и с jQuery: метод .append добавляет, а .html заменяет содержимое блока.
Обмен данными между IFrame и страницей при помощи Window.postMessage()
Позволяет создавать кроссдоменные запросы.
Отправить данные из iframe в родительское окно:
window.parent.postMessage(message, '*');
Отправить данные из родительского окна в iframe:
frameElem.contentWindow.postMessage(message, '*');
Отправлять можно пакет данных, предварительно кодированных в json:
const message = JSON.stringify({
    message: '<style>.body{...}</style>',
    message2: '<p>Hello<?p>',
});
window.parent.postMessage(message, '*');
Получение сообщений при помощи слушателя событий:
window.addEventListener("message", receiveMessage, false);
Вот рабочий пример обмена сообщениями между родительской страницей и встроенным iframe:
Window
index.html
<!DOCTYPE html>
<html>
<head>
<meta charset="utf-8">
<style>
#tmlPreviewPane, #tmlPreviewPane1 {
  position: relative;
  height: 50vh;
  overflow: auto;
  width:60%;
  margin-left:20%;
   border:1px solid grey;
}
#tmlPreviewPane iframe {
  position: absolute;
  top: 0;
  left: 0;
  width: 100%;
  height: 100%;
  border-width: 0;
  outline-width: 0;
}
.FD {display: block;background:#0b3f93;border:1px solid #0b3f93;border-radius:3px;box-shadow:0 0 5px rgba(0,0,0,0.4);padding:5px;text-align:center;color:white;margin-top:8px;margin-left:auto;margin-right:auto;}
#message {margin:15px;}
</style>
</head>
<body>
<div id="tmlPreviewPane">
  <iframe id="frame" src="iframe.html" ></iframe>
</div>
    <div id="tmlPreviewPane1">
        <h2>Window</h2>
        <button id="sendToIframe" type="button" class="FD">Send to iframe</button>
        <div id="message"></div>
    </div>

<script>
document.addEventListener('DOMContentLoaded', function() {
    const messageElem = document.getElementsByTagName('head')[0];
	 const textElem = document.getElementById('message');
    const frameElem = document.getElementById('frame');
    window.addEventListener('message', function(e) {
        const data = JSON.parse(e.data);
        messageElem.innerHTML += `${data.message}`;
		 textElem.innerHTML = `${data.message1}`;
    });
    document.getElementById('sendToIframe').addEventListener('click', function() {
        const message = JSON.stringify({
            message: '<style>body{background:blue;border:4px solid green;}.ul{background:rgba(48, 120, 133,0.4);padding:15px;}.big{font-size:20px;}.small{font-size:14px;}#inn{color:#910e2a;font-weight:bold;font-size:22px;}</style>',
			message1: '<ul class="ul">Привет из <span id="inn">DIV</span><li class="big">Очень большой привет</li><li class="small">Привет поменьше</li></ul>',
        });
        frameElem.contentWindow.postMessage(message, '*');
    });
});
</script>
</body>
</html>
iframe.html
<!DOCTYPE html>
<html>
<html lang="ru">
<head>
    <meta charset="UTF-8">
<style>
.FD {display: block;background:#0b3f93;border:1px solid #0b3f93;border-radius:3px;box-shadow:0 0 5px rgba(0,0,0,0.4);padding:5px;text-align:center;color:white;margin-top:8px;margin-left:auto;margin-right:auto;}
#message {margin:15px;}
</style>
</head>
<body>
	 <div>
        <h2>Iframe</h2>
        <button type="button" class="FD" id="sendToWindow">Send to window</button>
        <div id="message"></div>
    </div>
<script>
document.addEventListener('DOMContentLoaded', function() {
    const messageElem = document.getElementsByTagName('head')[0];
	const textElem = document.getElementById('message');

    window.addEventListener('message', function(e) {
        const data = JSON.parse(e.data);

        messageElem.innerHTML += `${data.message}`;
		 textElem.innerHTML = `${data.message1}`;
    });
    document.getElementById('sendToWindow').addEventListener('click', function() {
        const message = JSON.stringify({
            message: '<style>#tmlPreviewPane1{background:#910e2a; border:4px solid green;}.ul{background:rgba(48, 120, 133,0.4);padding:15px;}.big{font-size:20px;}.small{font-size:14px;}#inn{color:#0054fc;font-weight:bold;font-size:22px;}</style>',
			message1: '<ul class="ul">Привет из <span id="inn">iframe</span><li class="big">Очень большой привет</li><li class="small">Привет поменьше</li></ul>',
        });
        window.parent.postMessage(message, '*');
    });
});
</script>
</body>
</html>
Безопасность
Чтобы получать сообщения только из проверенного источника, его нужно указать в строке window.parent.postMessage(message, ‘*’), где вместо ‘*’ указываем имя домена, например, ‘https://www.babulya.com.ua/’ или для локального сервера ‘http://localhost/’. Также можно использовать обработчик, проверяющий источник, отбрасывающий все сообщение из источников, отличных от заданного:
window.addEventListener("message", function(event) {
  if (event.origin != 'http://exemple.com/') {
    return;
  }
});
Читайте больше по теме:
HTML CSS JS
CSS to iFrame: Как Изменить CSS в iFrame
Дата размещения статьи 03/10/2019 👁16816
CSS to iFrame: Как Изменить CSS в iFrame
Добавление CSS стилей на родительской странице не работает для тегов iFrame. Из данного руководства вы узнаете, как с помощью JavaScript изменить CSS стили в iFrame, а также как добавить новые (подключить с помощью link).
Пусть у нас есть iFrame с id = «iframeName».
<iframe id="iframeName" src="./iframe.html"></iframe>Чтобы добавить новые стили для содержимого iFrame, используем следующий JavaScript код:
window.onload = () => {
    let iframeName = document.getElementById("iframeName");
    let iframeContent = iframeName.contentDocument;
    iframeContent.body.innerHTML = iframeContent.body.innerHTML + "<style>.iframe-css{color: #d92909}</style>";
}
Используя jQuery:
$("#iframeName").on("load", () => {
    let iframeHead = $("#iframeName").contents().find("head");
    let iframeCSS = "<style>.iframe-css{color: #e91905}</style>";
    $(iframeHead).append(iframeCSS);
});
Если необходимо добавить в iFrame много CSS стилей, то данный подход не очень удобен. Рассмотрим, как можно подключить новые файлы стилей в теге <head>
Добавление CSS файлов в iFrame
Чтобы добавить новый файл, используем следующий код:
// Добавление css файла в IFRAME
window.onload = () => {
    // создаём новый тег "link" для iFrame и заполняем его "href", "rel" и "type"
    let iframeLink = document.createElement("link");

    iframeLink.href = "fileName.css"; // css файл для iFrame
    iframeLink.rel = "stylesheet";
    iframeLink.type = "text/css";

    // вставляем в [0] - индекс iframe
    frames[0].document.head.appendChild(iframeLink);
}
С помощью jQuery:
// Вставка CSS в iFrame link
$("#iframeName").on("load", () => {
    let iframeHead = $("#iframeName").contents().find("head"); // находим "head" iFrame
    let newLink = $("link"); // создаём тег "link" и далее заполняем атрибуты

    $("link").attr("href", "fileName.css");
    $("link").attr("rel", "stylesheet");
    $("link").attr("type", "text/css");

    $(iframeHead).append(newLink); // вставляем в наш iFrame
});
Таким образом мы создали тег <link> и затем заполнили его атрибуты. Теперь в этом CSS файле вы можете писать все необходимые стили для содержимого iFrame.
Данный способ работает, если iframe находится на вашем домене.
Клик вне элемента (блока) Яндекс Метрика API: Счётчик Просмотров
Надеюсь, вам понравилась данная информация. Если вам интересна тема web-разработки,
то можете следить за выходом новых статей в Telegram.
- JavaScript: Работа с Массивами
- Наличие Динамически Добавленного Элемента
- Стилизация Input File
- Предзагрузка Картинок — Предварительная Загрузка Изображений на JavaScript
- Стилизация Скролла
- События Формы
This tutorial will explain how to update / change / modify the existing Iframe element content and how to create dynamic iframe element with content using JavaScript.
Let’s start the tutorial. First we start with update iframe document content and later see how to create iframe on the go (Dynamically)
how to change the content of iframe dynamically?
Below tutorial will explain how to change iframe content dynamically and find the demo link and download the source code below.
Html Code
Copy below textbox in to your html page which has the content that goes into iframe content.
<textarea id="iframe1" name=code>
<!doctype html>
<html>
  <head>
    <meta charset=utf-8>
    <title>I'm loading inside existing iframe</title>
    <style>p {font-family: monospace;}</style>
  </head>
  <body>
    <p>I'm inside existing iframe document</p>
    <canvas id=pane width=200 height=100></canvas>
    <script>
      var canvas = document.getElementById('pane');
      var context = canvas.getContext('2d');

      context.fillStyle = 'rgb(250,0,0)';
      context.fillRect(10, 10, 55, 50);

      context.fillStyle = 'rgba(0, 0, 250, 0.5)';
      context.fillRect(30, 30, 55, 50);
    </script>
  </body>
</html>
</textarea>
Iframe Code
Copy the below iframe code into your html page.
<iframe id="iframePreview"></iframe>Update button
Copy below button code to your html page. Onclick will call the update javascript function which in below topic.
<button onclick="updateIframe()">Update</button>JavaScript function change the iframe content
Below JavaScript function will update and replace the iframe content.
function updateIframe() {
	var editorVal = document.getElementById("iframe1").value;
	var iframePreview = document.getElementById('iframePreview');
	var previewIframe =  iframePreview.contentDocument ||  iframePreview.contentWindow.document;
	previewIframe.open();
	previewIframe.write(editorVal);
	previewIframe.close();
};
Download Demo
Below tutorial will explain how to create iframe dynamically with content and find the demo link and download the source code below.
HTML Code
Copy the below textbox in to your html page which has the content that goes into dynamically created iframe content.
<textarea id="iframe2" name=code>
<!doctype html>
<html>
  <head>
    <meta charset=utf-8>
    <title>I'm inside dynamically created iframe</title>
    <style>p {font-family: monospace;}</style>
  </head>
  <body>
    <p>I'm inside created iframe document</p>
    <canvas id=pane width=200 height=100></canvas>
    <script>
      var canvas = document.getElementById('pane');
      var context = canvas.getContext('2d');

      context.fillStyle = 'rgb(250,0,0)';
      context.fillRect(10, 10, 55, 50);

      context.fillStyle = 'rgba(0, 0, 250, 0.5)';
      context.fillRect(30, 30, 55, 50);
    </script>
  </body>
</html>
</textarea>
Iframe wrapper
Copy the below code which will hold the dynamic iframe content which is created by the below JavaScript function (Next topic)
<div id="iframewrapper"></div>Create iframe element Dynamically
Below function will create the iframe element dynamically
function createIframe(){
    var text = document.getElementById("iframe2").value;
    var ifr = document.createElement("iframe");
    ifr.setAttribute("frameborder", "0");
    ifr.setAttribute("id", "iframeOutput");
    document.getElementById("iframewrapper").innerHTML = "";
    document.getElementById("iframewrapper").appendChild(ifr);
    var ifrw = (ifr.contentWindow) ? ifr.contentWindow : (ifr.contentDocument.document) ? ifr.contentDocument.document : ifr.contentDocument;
    ifrw.document.open();
    ifrw.document.write(text);
    ifrw.document.close();
};
Download Demo
iFrame is a very convenient way to display an external content on your webpage. However, it’s little bit complicate if you want to add additional or alter the existing CSS style. You cannot simply add CSS on the parent/wrapper page. In this tutorial, we’ll show you how to use JavaScript to inject CSS into iFrame.
In the snippet below, once everything was loaded, we’ll get the iFrame element by ID. Then get the contentDocument and inject our styles into iFrame using innerHTML.
window.onload = function() {
   let myiFrame = document.getElementById("myiFrame");
   let doc = myiFrame.contentDocument;
   doc.body.innerHTML = doc.body.innerHTML + '<style>/******* Put your styles here *******</style>';
}
Or you can do it with jQuery.
$("#myiFrame").on("load", function() {
  let head = $("#myiFrame").contents().find("head");
  let css = '<style>/********* Put your styles here **********</style>';
  $(head).append(css);
});
Example
For example, here is the 3D CSS Progressbar tutorial page that we want to add to ours using iframe.
<iframe id="myiFrame" width="1024px" height="768px" src="http://127.0.0.1:5501/bar"></iframe>
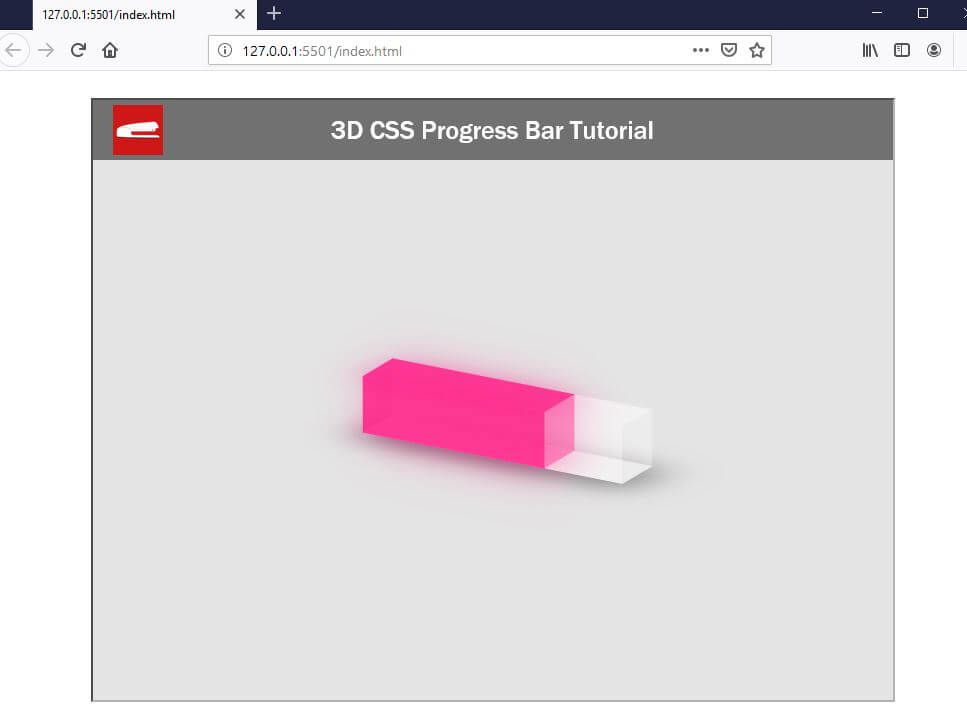
Suppose that we want to change the length of the progress bar to 45%. Unfortunately, we can’t do something like this from our parent CSS.
.bar {
   width: 45%; /* This will not work */
}
Let’s try using JavaScript. It’s important that you’ll need to wait until the iFrame was loaded before you can inject the CSS. In this case, we’ll put the code in onload event listener.
window.onload = function() {
  let frameElement = document.getElementById("myiFrame");
  let doc = frameElement.contentDocument;
  doc.body.innerHTML = doc.body.innerHTML + '<style>.bar {width:45%;}</style>';
}
Here is the result.
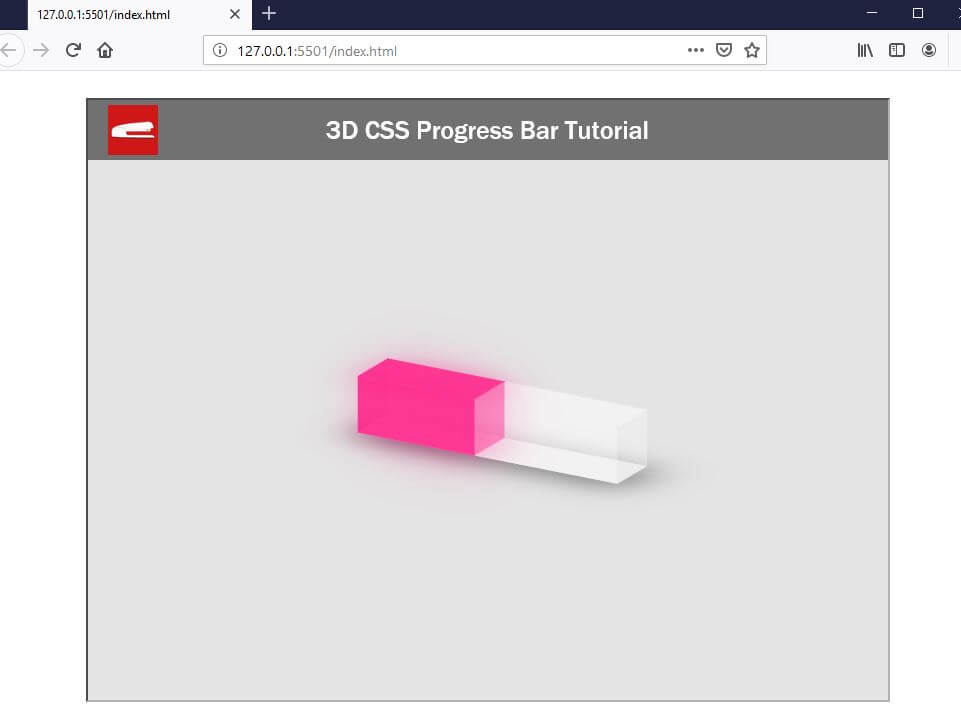
Adding CSS File to iFrame
You can add entire CSS file instead of injecting separated styles by creating link and add it to the iframe’s head.
window.onload = function() {
  let link = document.createElement("link");
  link.href = "style.css";      /**** your CSS file ****/
  link.rel = "stylesheet";
  link.type = "text/css";
  frames[0].document.head.appendChild(link); /**** 0 is an index of your iframe ****/
}
Note
This method does not work with cross domain content. You’ll need to set appropriate CORS header but it’s not recommended due to security risks.
Written By
На чтение 3 мин. Просмотров 1.4k. Опубликовано 06.07.2019
Содержание
- Понимание того, как IFrames работают в веб-дизайне
- Использование CSS для стилизации элемента IFRAME
- Стилизация содержимого Iframe
Понимание того, как IFrames работают в веб-дизайне
Когда вы встраиваете элемент в ваш HTML, у вас есть две возможности добавить к нему стили CSS:
-
Вы можете стилизовать сам
IFRAME
.
-
Вы можете оформить страницу внутри
IFRAME
(при определенных условиях).
Использование CSS для стилизации элемента IFRAME
Первое, что вы должны учитывать при оформлении ваших фреймов, это
IFRAME
-
сам. Хотя большинство браузеров включают в себя iframes без большого количества дополнительных стилей, все же будет хорошей идеей добавить некоторые стили, чтобы сохранить их согласованность. Вот некоторые стили CSS, которые я всегда включаю в свои iframes:
margin: 0;
-
отступ: 0;
-
border: none;
-
width: value ;
-
height: value ;
С
ширина
а также
высота
установите размер, который подходит для моего документа. Вот примеры фрейма без стилей и стиля с базовыми стилями. Как видите, эти стили в основном просто удаляют границу вокруг iframe, но они также гарантируют, что все браузеры отображают этот iframe с одинаковыми полями, отступами и размерами. HTML5 рекомендует использовать
переполнение
свойство удалять полосы прокрутки, но это не надежно. Так что если вы хотите удалить или изменить полосы прокрутки, вы должны использовать
прокрутка
атрибут на вашем iframe, а также. Чтобы использовать
прокрутка
атрибут, добавьте его как любой другой атрибут и затем выберите одно из трех значений:
да
,
нет
, или же
auto
,
да
говорит браузеру всегда включать полосы прокрутки, даже если они не нужны.
нет
говорит удалить все полосы прокрутки, нужно ли это или нет.
auto
по умолчанию и включает полосы прокрутки, когда они необходимы, и удаляет их, когда они не нужны. Вот как отключить прокрутку с помощью
Атрибут
 scrolling
: scrolling = "no" >
 Это iframe.
Чтобы отключить прокрутку в HTML5, вы должны использовать
переполнение
имущество. Но, как вы можете видеть в этих примерах, он еще не работает надежно во всех браузерах. Вот как вы можете включить прокрутку все время с помощью
 overflow
 property: style = "overflow: scroll;" >
 Это iframe.
невозможно полностью отключить прокрутку с помощью
переполнение
имущество. Многие дизайнеры хотят, чтобы их фреймы гармонировали с фоном страницы, на которой они находятся, чтобы читатели не знали, что фреймы даже есть. Но вы также можете добавить стили, чтобы выделить их. Настроить границы так, чтобы iframe показывался более легко, легко. Просто используйте
border
свойство стиля (или оно связано
border-top
,
border-right
,
border-left
, а также
 свойства border-bottom
) для оформления границ: iframe {
 border-top: # c00 1px dotted;
 border-right: # c00 2px dotted;
 border -left: # c00 2px с точками;
 border-bottom: # c00 4px с точками;
}
Но вы не должны останавливаться на прокрутке и границах для ваших стилей. Вы можете применить множество других стилей CSS к вашему iframe. В этом примере используются стили CSS3 для придания iframe тени, закругленных углов и поворота на 20 градусов.
 iframe {
 margin-top: 20px;
 margin-bottom: 30px;
 -moz-border-radius: 12px;
 -webkit-border-radius: 12px ;
 border-radius: 12px;
 -moz-box-shadow: 4px 4px 14px # 000;
 -webkit-box-shadow: 4px 4px 14px # 000;
 box -shadow: 4px 4px 14px # 000;
 -moz-transform: повернуть (20 градусов);
 -webkit-transform: повернуть (20 градусов);
 -o-преобразовать: повернуть (20deg) ;
 -ms-transform: поворот (20 градусов);
 фильтр: progid: DXImageTransform.Microsoft.BasicImage (вращение = .2);
}
Стилизация содержимого Iframe
Стилизация содержимого iframe аналогична стилизации любой другой веб-страницы. Но у вас должен быть доступ для редактирования страницы . Если вы не можете редактировать страницу (например, она находится на другом сайте).
Если вы можете редактировать страницу, то вы можете добавить внешнюю таблицу стилей или стили прямо в документ так же, как вы бы стилизовали любую другую веб-страницу на своем сайте.