
Размещаем программы и игры на новом накопителе, если место на системном диске подходит к концу.

Зачастую нам не хватает места на диске C, куда по умолчанию Windows 10 сохраняет программы. И приходится устанавливать приложения в хранилища, отличные от системного. В интернете гуляет трюк — правка в реестре, которая заставляет систему изменить место для установки по умолчанию. Однако имейте в виду: это может привести к системным ошибкам. Лучше воспользоваться более простыми способами.
Приложения из Microsoft Store
Программы из Microsoft Store можно запросто заставить устанавливаться не на системный, а на любой другой диск. Для этого откройте «Параметры» → «Система» → «Память устройства». Нажмите «Изменить место сохранения нового содержимого».
В появившемся окне в разделе «Новые приложения будут сохраняться здесь» выберите нужный диск и нажмите «Применить». Теперь все ваши программы из Microsoft Store будут устанавливаться в новое место.
Те программы же, что вы скачивали раньше, по‑прежнему будут находиться на диске C. Но их можно перенести вручную. Для этого откройте «Параметры» → «Приложения», выберите нужное и щёлкните «Переместить».
Учтите, это работает только с теми программами, что вы установили из Microsoft Store.
Кстати, когда вы пытаетесь загрузить из Microsoft Store большие приложения, например игры, магазин обязательно уточнит у вас, на какой диск их устанавливать.
Приложения со сторонних ресурсов
Будем откровенны: несмотря на все старания Microsoft, мы до сих пор редко скачиваем что‑то из их Store. Как правило, рядовой пользователь идёт на сайт разработчика программы, качает оттуда установщик и ставит приложение так же, как это делалось в старой доброй Windows 7.
В этом случае поменять место для программы совсем просто. Скачайте инсталлятор любого нужного вам приложения. Затем начните установку как обычно.
Когда инсталлятор предложит вам выбрать путь, нажмите «Обзор» (или Browse) и укажите диск и папку на нём, куда нужно поместить ваше приложение.
Как быть с уже установленными программами, которые переполняют системный диск? Можно вырезать папку с программой на диске С и скопировать её на новый носитель, а затем заменить пути к программе в меню «Пуск».
Но это теоретически также может привести к системным ошибкам. Поэтому самый надёжный способ — удалить программу через «Параметры» → «Приложения», а затем установить её заново на новый диск.
Игры
Игры занимают много места, и иногда это единственная причина покупки дополнительного ёмкого SSD. Чтобы изменить место установки проектов из Steam, сделайте следующее: нажмите «Steam» → «Настройки» → «Загрузки». Щёлкните кнопку «Папки библиотеки Steam».
Затем — «Добавить папку».
Выберите нужный диск и папку. При необходимости можно создать новую прямо в этом окне. Нажмите «Выбрать».
Затем щёлкните на вашу новую папку и выберите «Назначить папку по умолчанию».
Теперь все новые игры будут устанавливаться туда.
При необходимости можно перенести уже имеющиеся игры Steam на новый диск. Для этого закройте клиент и выйдите из него через меню в трее. Затем откройте папку с файлами Steam, по умолчанию C:Program FilesSteam. Удалите оттуда всё, кроме папок steamapps, userdata и файла Steam.exe.
Вырежьте и вставьте всю папку Steam на новое место, например D:GamesSteam. Затем запустите клиент из перенесённой папки и зайдите в свой аккаунт.
Пользователям Epic Games Store, GOG, а также тем, кто покупает игры на старых добрых дисках, подобный способ недоступен. Поэтому единственный выход для них — удалить игру, а затем установить заново на другой накопитель.
Читайте также 🧐
- 7 правил цифровой гигиены, за которые вы скажете себе спасибо
- 12 вещей, которые нужно сделать после установки Windows 10
- Как очистить Windows от мусора: 5 бесплатных инструментов

Скачиваемые приложения и дополнения сохраняются на диск, где располагаются установочные блоки операционной системы Виндовс. Чтобы изменить стандартные настройки, нужно знать, как изменить закрепленный путь установки программ режима по умолчанию в Windows 10 на более подходящий. Существует несколько способов изменить папку для сохранения файлов – с помощью корректировок внутренних процедур, сторонних утилит.
Изменение места сохранения файлов
Смена диска необходима в разных случаях. Например, когда на основном накопителе заканчивается свободное пространство или требуется редактирование установочных документов. Изменить настройки можно с помощью встроенных инструментов.

Этапы действий пользователя:
- открыть раздел «Параметры» (относится к характеристикам операционки, позволяет редактировать установленные значения);
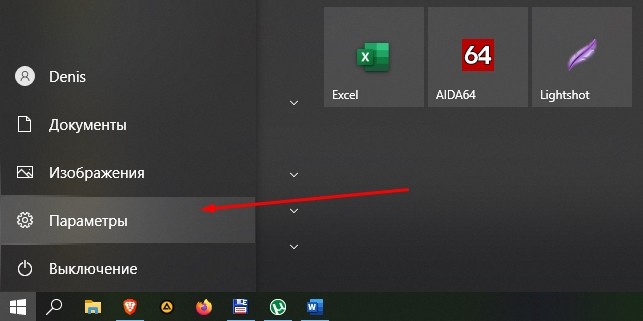
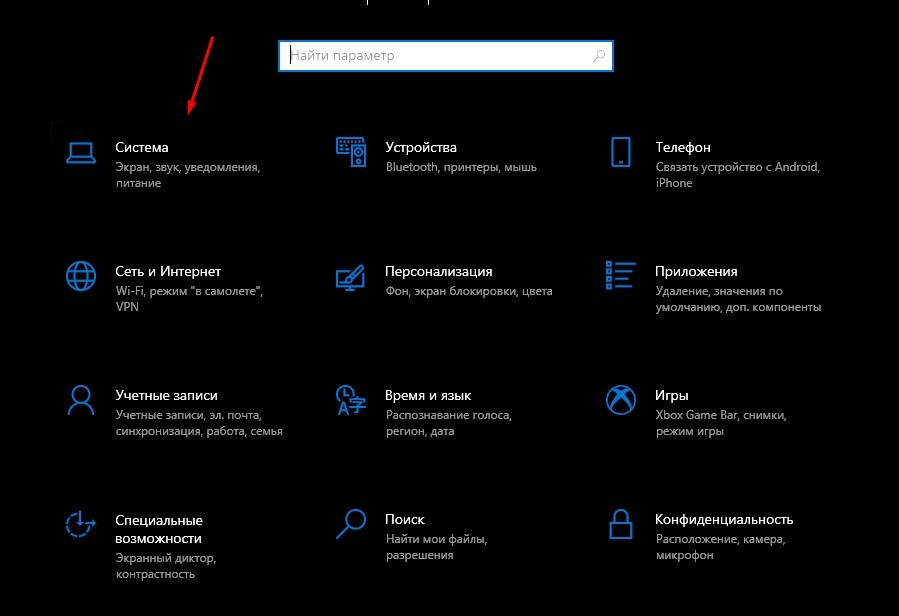
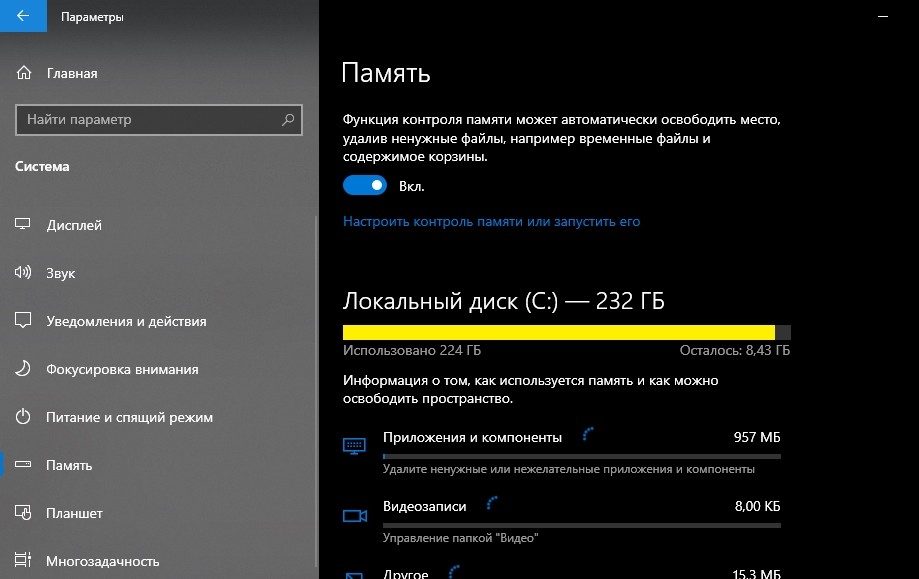
- перейти к подразделу «Система», затем – вкладка «Память устройства»;
- в правой части дополнительного рабочего окна кликнуть по строке «Изменить место сохранения нового содержимого»;
- на следующем шаге нужно перейти к пункту «Новые приложения сохранятся здесь», выбрать новое месторасположение.

После выполненных корректировок программы, приложения, отдельные софты будут сохраняться в папке, указанной на последнем этапе.
Внимание! Прежде чем вносить изменения в стандарты, закрепленные разработчиком операционки, нужно изучить представленные инструкции. Некоторые корректировки могут вызвать сбои и отдельные неполадки.
Изменение загружаемой операционной системы
Если требуется поменять настройки загрузки ОС десятой версии на начальной стадии, нужно выполнить несколько последовательных шагов:
- кликнуть по кнопке «Пуск» на Рабочем столе персонального компьютера (стационарного или портативного);
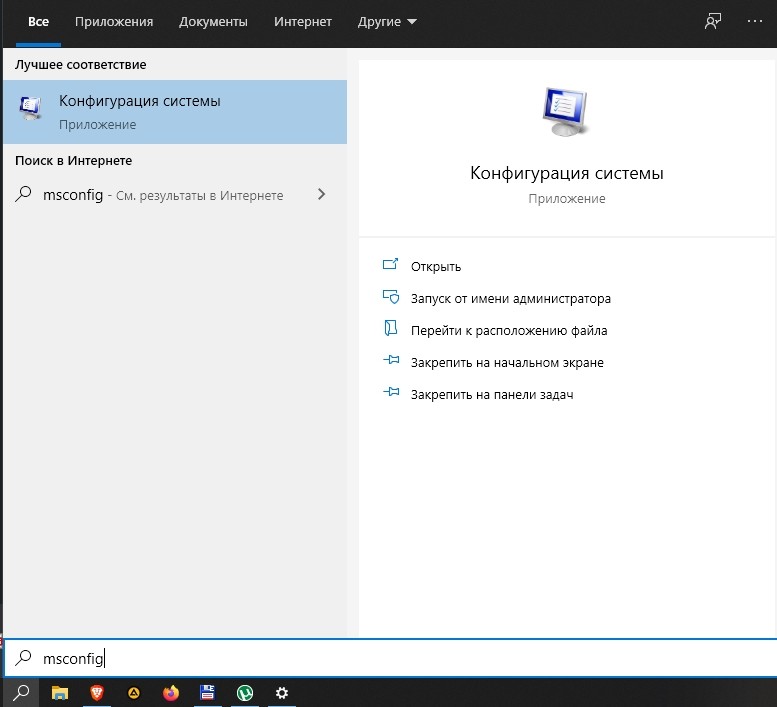
- впечатать сочетание символов «msconfig», подтвердить запрос клавишей «Enter» на клавиатуре;
- откроется дополнительное рабочее окно конфигурации операционной системы.
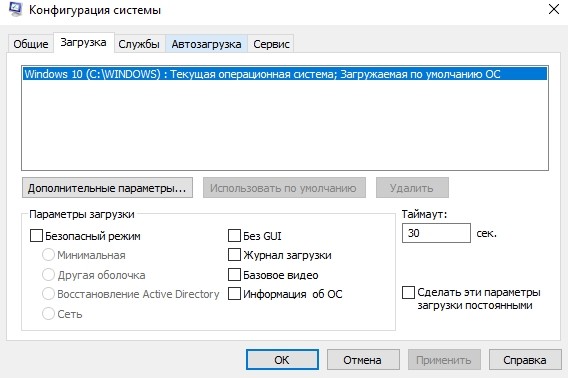
В последнем пункте нужно будет изменить некоторые параметры ОС, чтобы вновь загружаемые на ПК софты устанавливались в раздел, который нужен пользователю – это может быть встроенный диск, внешний носитель (например, флешка или съемный накопитель жесткого типа).
Приложения из Microsoft Store
Для изменения настроек, скачанных из магазина Виндовс, используют встроенный инструмент Редактор реестра. Инструкция:
- активировать необходимый раздел;
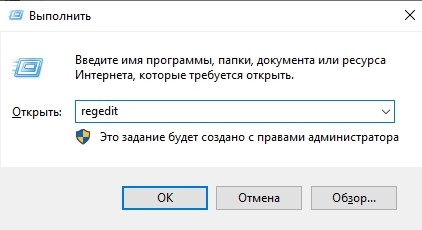
- откроется панель с двумя частями, в левой нужно перейти по пути: «Hkey_Local_Machine, Software, Microsoft, Windows, CurrentVersion»;
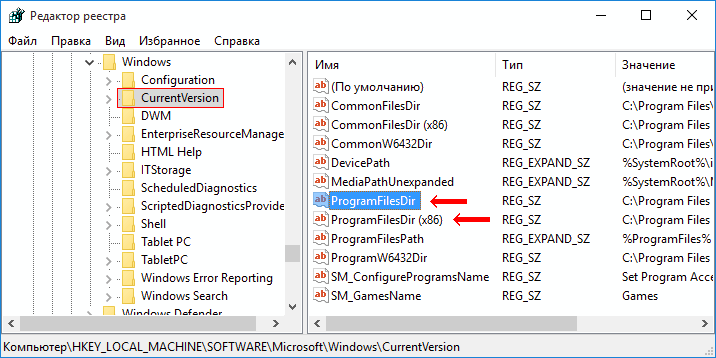
- в правой части выбрать пункты «ProgramFilesDir» и «ProgramFilesDir (x86)»;
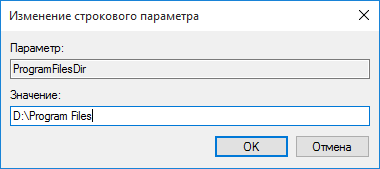
- каждый, по очереди, нужно раскрыть двойным щелчком левой клавиши мыши, в пункте «Значение» прописать обновленный путь к папке, куда следует сохранять скачиваемые из Microsoft Store утилиты.
Внести изменения нужно в каждом из указанных пунктов. Затем требуется осуществить принудительную перезагрузку персонального компьютера – нажать на кнопку «Пуск», затем – значок отключения, после – пункт «Перезагрузить».

Внимание! Работать в Редакторе файлового реестра необходимо с осторожностью. Если отредактировать значения других параметров, возникнут неполадки с операционкой, исправить которые будет сложно даже мастеру.
Изменение пути установки приложений, которые пользователь загружает на ПК, возможно. Инструкции несложные – подойдут начинающим юзерам. Важно внимательно следовать указанным этапам, корректно вводить команды. Редактор файлового реестра запускается только в крайнем случае.
Содержание
- Вариант 1: Изменение места сохранения файлов
- Вариант 2: Изменение загружаемой операционной системы
- Вопросы и ответы
Под «установкой диска D основным» понимается 2 разных задачи: сохранение всех файлов на этот диск или автоматическая загрузка второй операционной системы, установленной на D, при включении компьютера. Далее мы разберем оба варианта, а вы сразу же переходите к тому, который отражает ваш запрос.
Вариант 1: Изменение места сохранения файлов
Сейчас практически у всех пользователей жесткий диск разбит на два логических (C и D), либо этими буквами именуются действительно два разных накопителя. В обоих случаях, особенно в связке SSD + HDD, где твердотельный накопитель маленького объема, на системном диске C рано или поздно перестает хватать места для скачивания любых пользовательских файлов. Операционная система Windows 10 позволяет изменить их место сохранения на диск D. После этого критически важные обновления для ОС продолжат скачиваться на C, а вот все малозначимые и не влияющие на работоспособность Виндовс файлы начнут сохраняться на D.
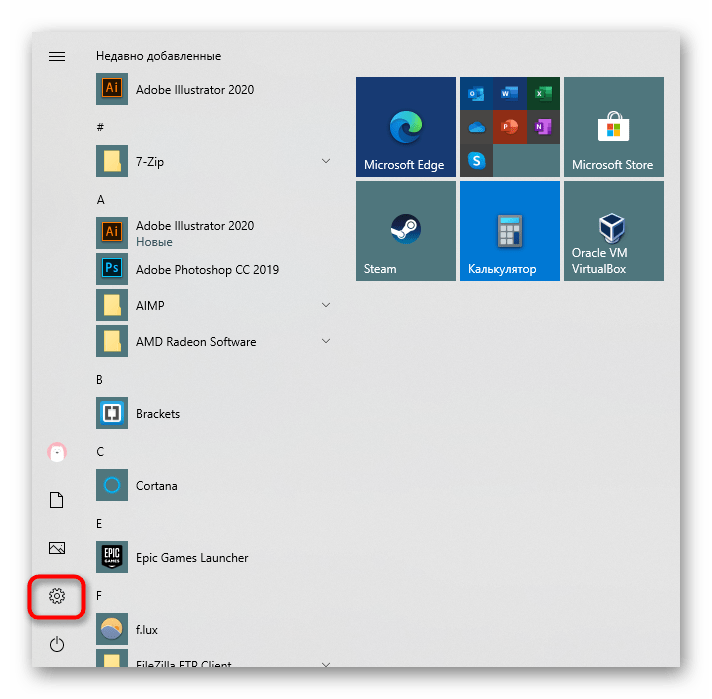
- Откройте «Пуск» и перейдите в «Параметры».
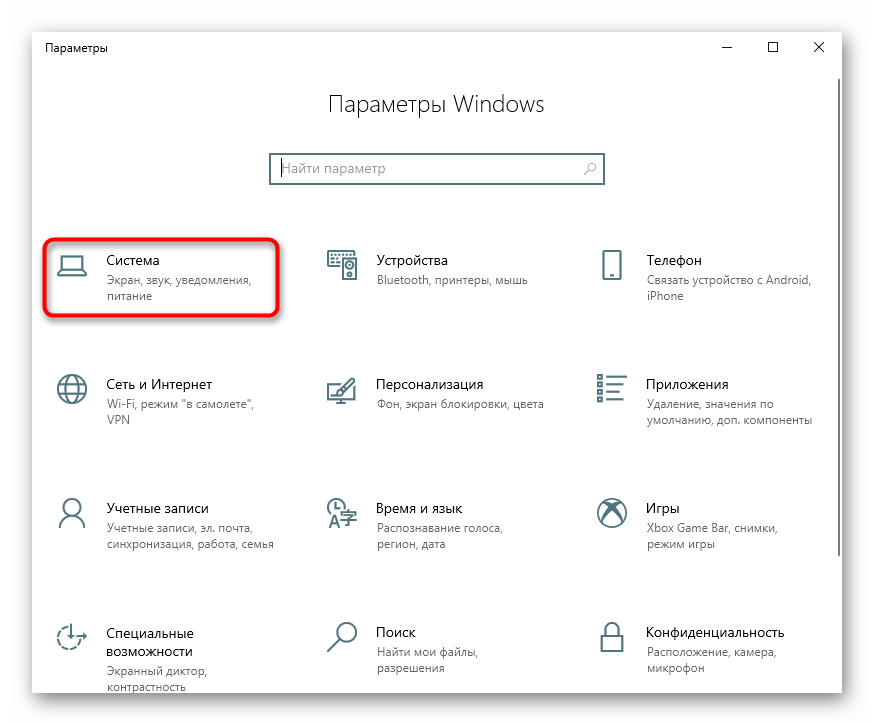
- Перейдите в первый же раздел «Система».
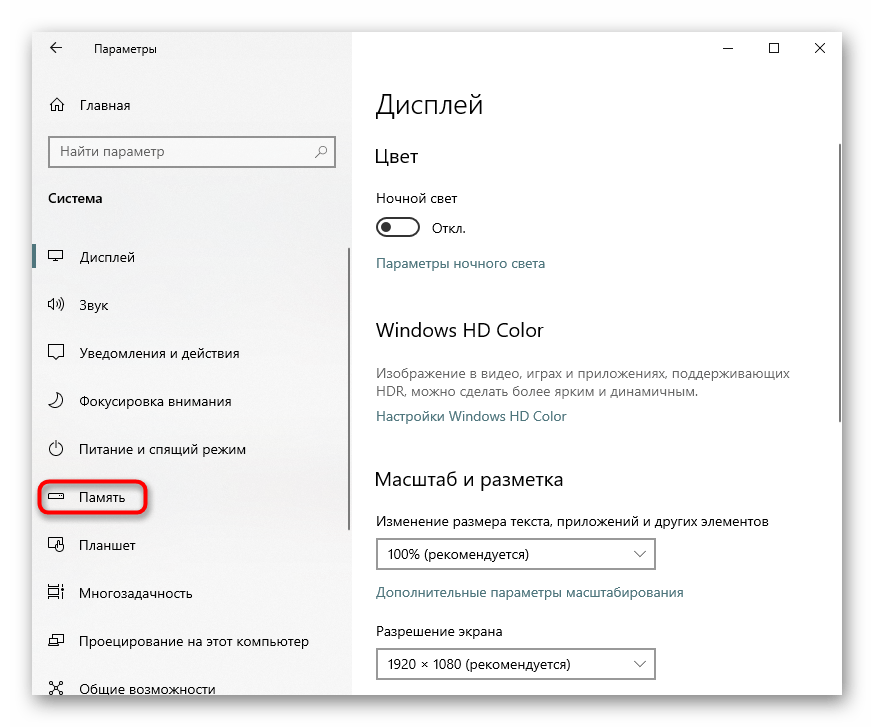
- Тут вам нужен подраздел «Память», находящийся на панели слева.
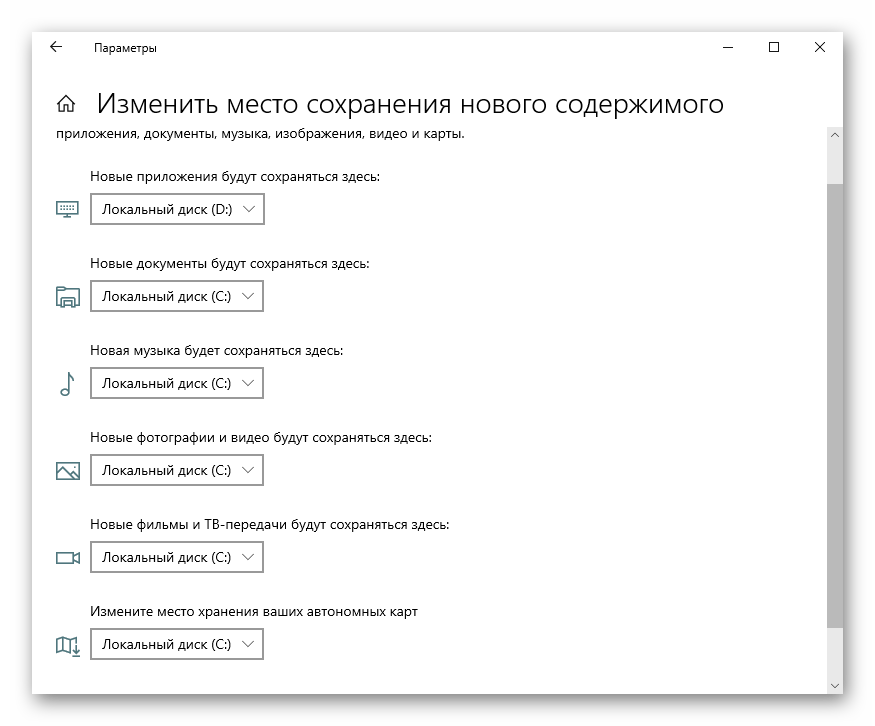
- Найдите кликабельную ссылку «Изменить место сохранения нового содержимого».
- Здесь представлен список всего, что можно переносить на диск D.
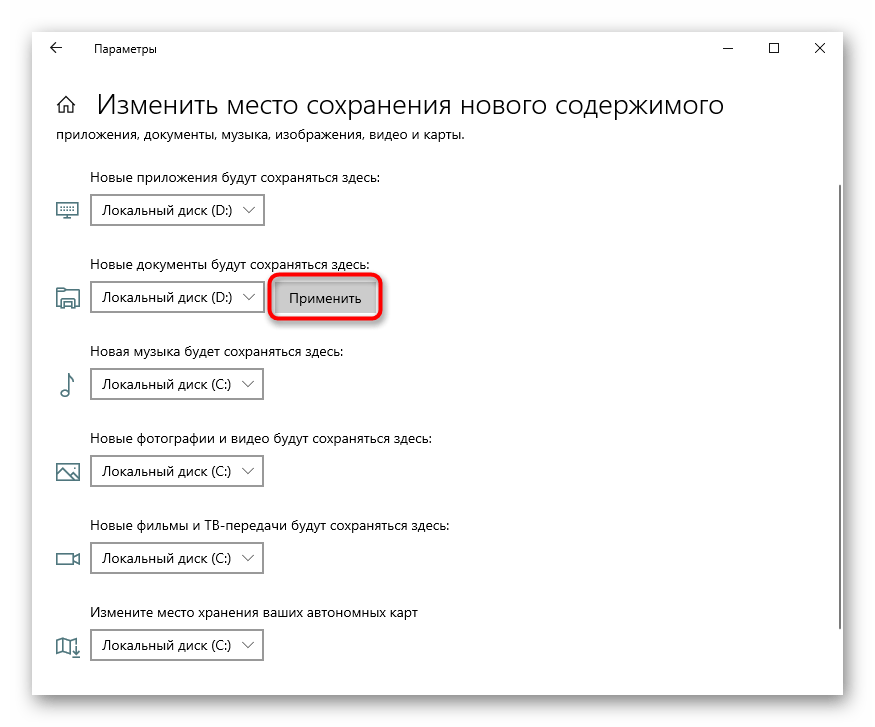
- Измените все или некоторые пункты, не забывая каждый раз нажимать «Применить». После этого окно можно просто закрыть.

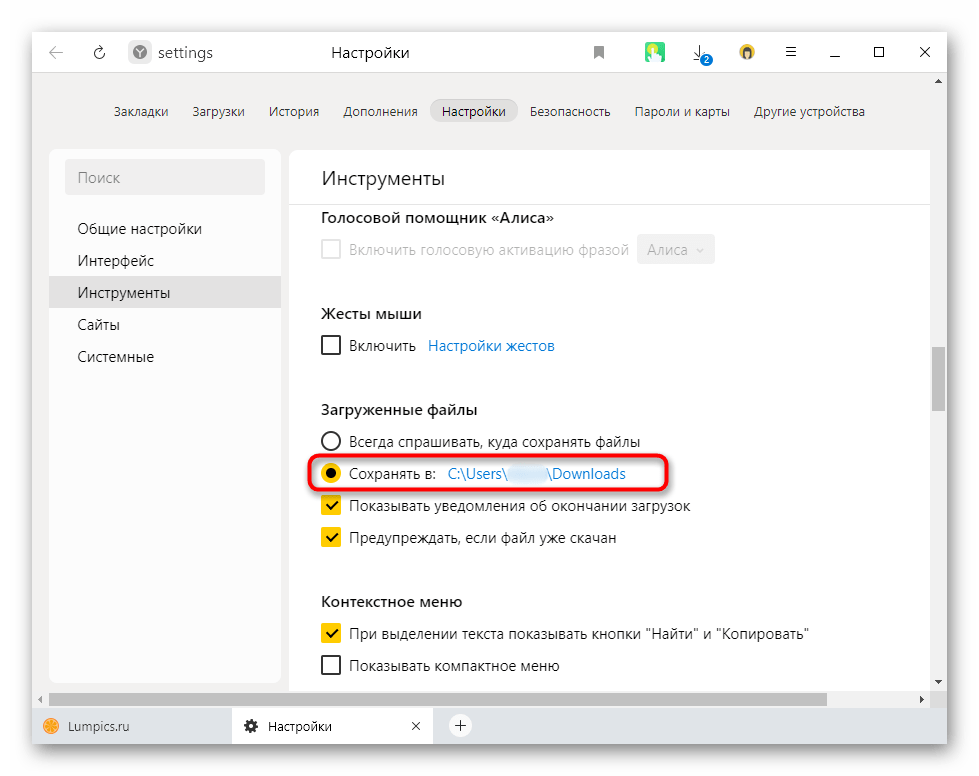
Но не забывайте, что это были только лишь основные настройки: многие программы, преимущественно браузеры, продолжат сохранять все в указанную ранее папку. Обычно это диск C, поэтому не забывайте зайти в настройки своего веб-обозревателя и изменить там путь, по которому происходит скачивание на ваш компьютер. То же самое касается торрент-клиентов, игровых клиентов и других приложений, подразумевающих загрузку.
Инструкция никак не повлияет на независимые установщики новых программ: по умолчанию они всегда будут предложить выполнить инсталляцию на диск C, поэтому вам каждый раз потребуется вручную менять путь. Изменить это на автоматический выбор D, к сожалению, получится только редактированием реестра.
Внимание! Не рекомендуем выполнять дальнейшие действия пользователям без опыта и без особой необходимости! Изменение параметра реестра может привести к нарушению работоспособности Windows и проблемам с запуском некоторых программ!
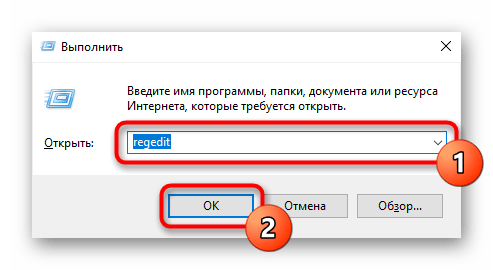
- Сочетанием клавиш Win + R вызовите окно «Выполнить»,где введите
regedit. Нажмите «ОК». - Скопируйте и вставьте в адресную строку следующий путь:
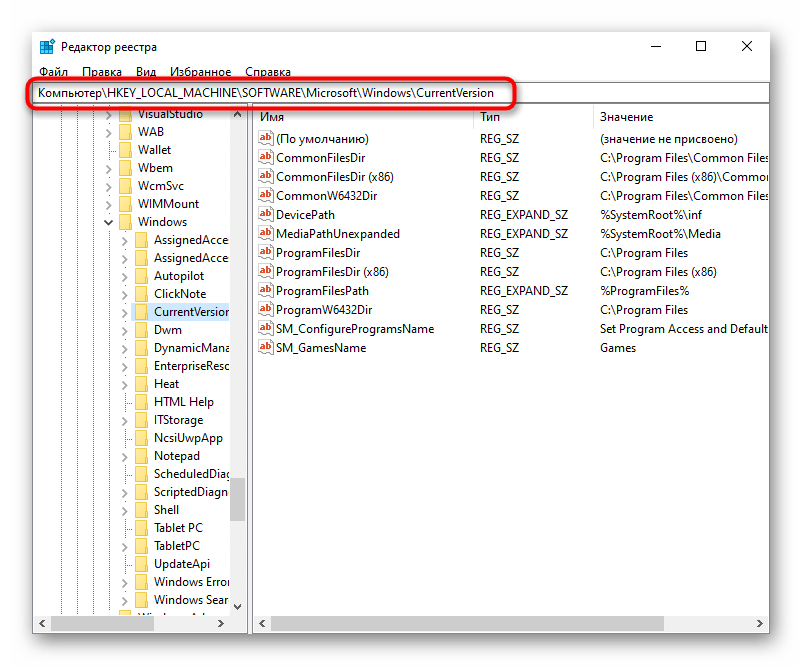
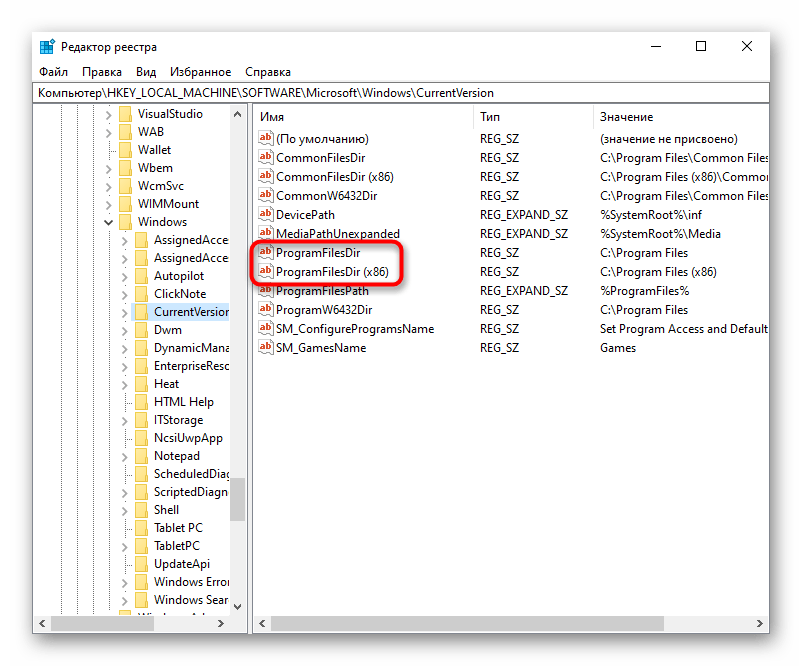
HKEY_LOCAL_MACHINESOFTWAREMicrosoftWindowsCurrentVersion, после чего нажмите Enter. - Сперва понадобится выбрать параметр «ProgramFilesDir», а потом — «ProgramFilesDir (x86)». Если система 32-битная, то редактироваться будет только последний параметр.
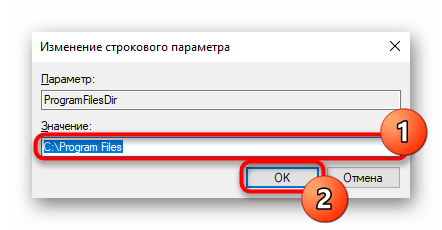
- Откройте его, кликнув дважды ЛКМ, и в поле «Значение» измените букву с C на D. В 64-битной системе то же самое понадобится проделать и со вторым параметром.
- Останется только перезагрузить компьютер для применения изменений.

Вариант 2: Изменение загружаемой операционной системы
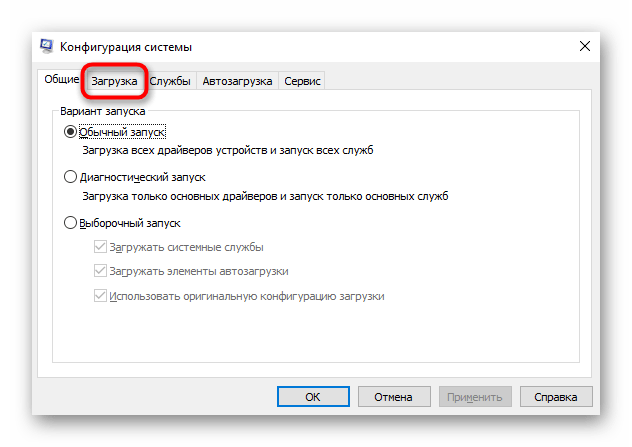
У некоторых юзеров, напротив, на два разных диска (C и D) установлены две операционные системы. И если из них по умолчанию загружается та, что установлена на диске С, это можно легко изменить через «Конфигурацию системы».
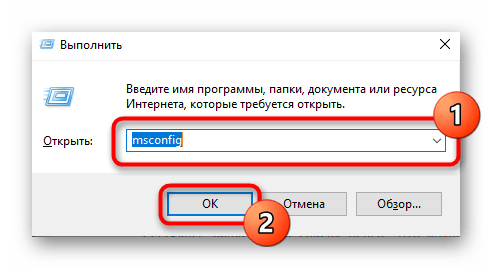
- Нажмите сочетание клавиш Win + R и впишите команду
msconfig, после чего кликните «ОК». - Переключитесь на вкладку «Загрузка».
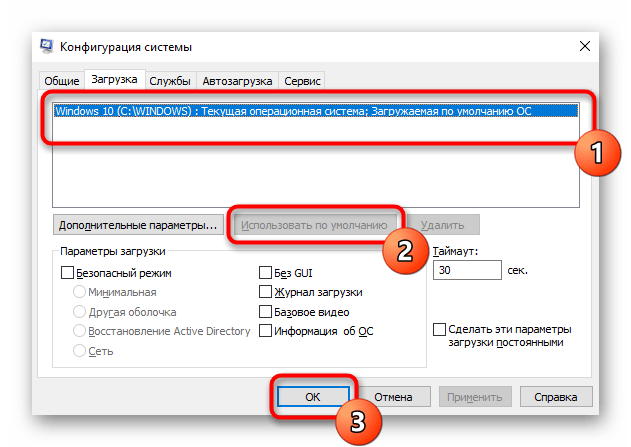
- Выделите ту ОС, что установлена на диске D, и нажмите кнопку «Использовать по умолчанию». Подтвердите изменения кнопкой «ОК».
- Перезапустите ПК.
Чтобы изменить загружаемую операционную систему и отключить уведомление о выборе ОС при включении компьютера, можно поступить несколько иначе.
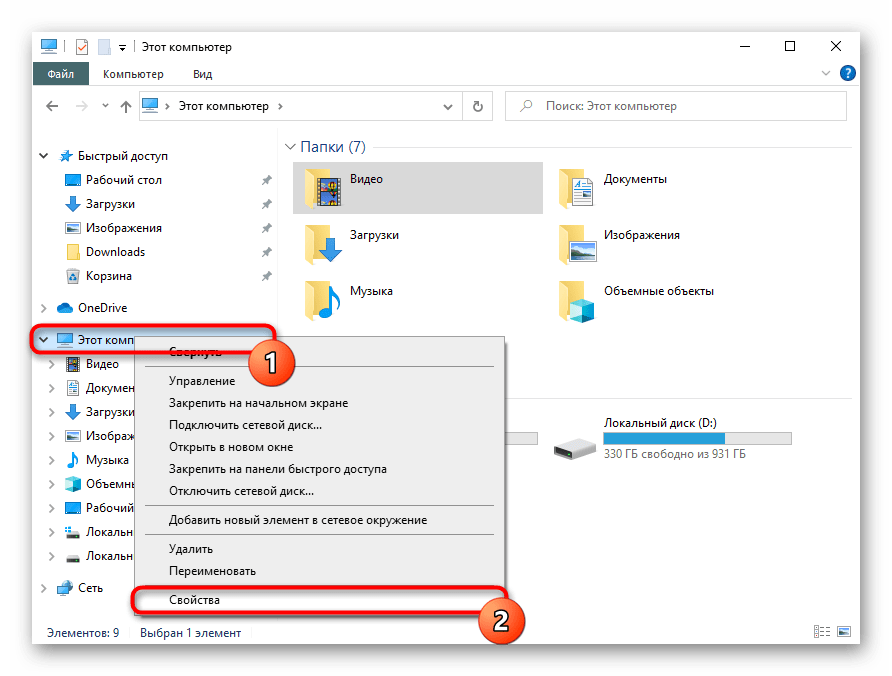
- Нажмите по ярлыку «Этот компьютер» правой кнопкой мыши и перейдите в «Свойства». Если его нет на рабочем столе, откройте «Проводник» и сделайте то же самое, воспользовавшись левой панелью.
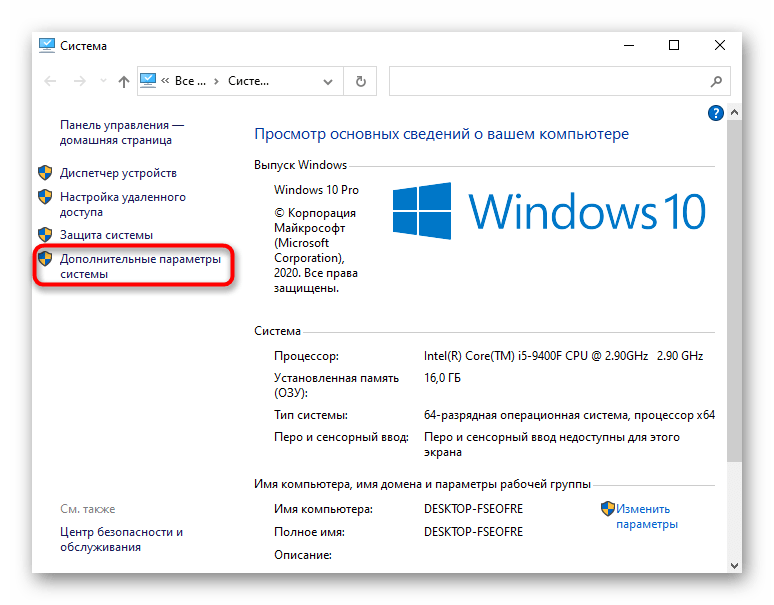
- Опять же, через левую панель переключитесь в «Дополнительные параметры системы».
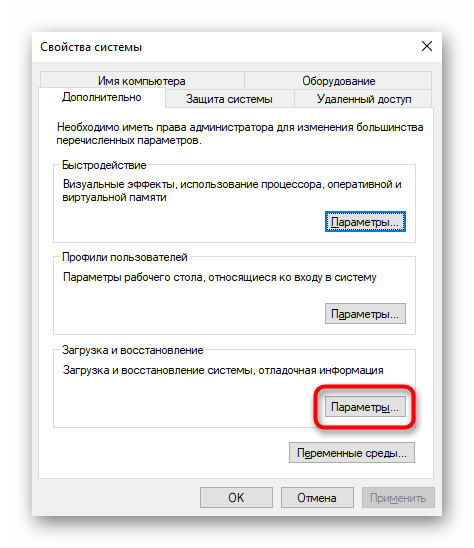
- На вкладке «Дополнительно», открытой по умолчанию, найдите блок «Загрузка и восстановление» и перейдите в «Параметры».
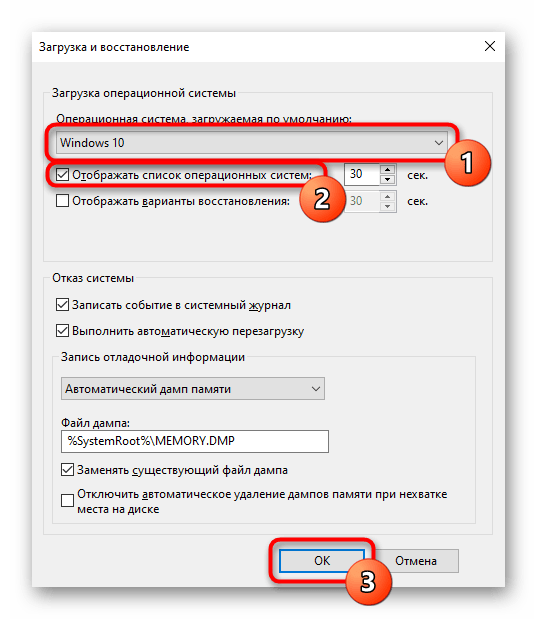
- Здесь через выпадающее меню измените ОС, загружаемую по умолчанию, на ту, что инсталлирована на диск D, а затем снимите галочку с пункта «Отображать список операционных систем». Сохраните изменения на «ОК». Они вступят в силу после перезагрузки ПК.
Еще статьи по данной теме:
Помогла ли Вам статья?
Расскажем о процессе смены пути автоматической установки программ с системного диска на любой другой, например, с «C:Program Files» на «D:Установленные программы». Данный способ работает в Windows XP, 7 и 8.
При разбивке жесткого диска часто те, кто проводят эту программную операцию, забывают о том, что времена малотребовательной Windows ХР, минималистичных программ и казуальных игр давно ушли в прошлое. Windows 7, 8/8.1, профессиональные программные пакеты и ресурсоемкие масштабные игры от именитых разработчиков требуют места на системном диска куда больше, нежели каких-то 3-5 Гб, которых еще несколько лет назад было вполне достаточно для полноценной работы с ПК.
Основательно решить эту проблему можно путем новой переразбивки жесткого диска — нужно урвать определенное количество гигабайт от несистемных разделов диска и передать их системному. Но это серьезная операция, требующая определённых навыков в работе, и вряд ли всем пользователям под силу сделать это самостоятельно. Более того, при неумелой переразбивке диска установленная операционная система может слететь и настанет необходимость в ее установке заново. Так что такую процедуру лучше доверить опытным пользователям.
Но если системный диск компьютера уже переполнен, самостоятельно решить эту проблему можно, попросту устанавливая игры и программы на другой диск – несистемный, где имеется вдоволь пространства. Поскольку все программы и игры по умолчанию устанавливаются на диск C, как правило, в папку «Program Files», сменить ее на папку, расположенную на несистемном диске, можно, выбрав другой, соответствующий путь в процессе инсталляции – например, «D:Установленные программыПапка установки конкретной программы». А чтобы каждый раз при установке очередной программы или игры вручную не прописывать свой путь установки, каталог автоматической инсталляции можно изменить — к примеру, с диска С на диск D.
Чтобы сменить путь автоматической установки программ и игр потребуется внести в реестр Windows кое-какие изменения.
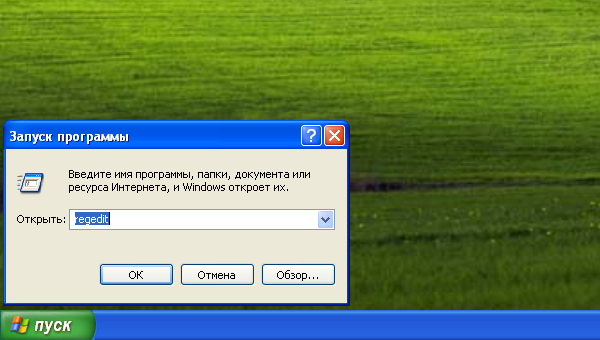
Чтобы попасть в редактор системного реестра Windows 7 необходимо в поисковую строку ввести «regedit» и перейти в редактор реестра. В Windows ХР нужно выбрать команду «Выполнить» из меню «Пуск» и ввести «regedit» в ее поле.
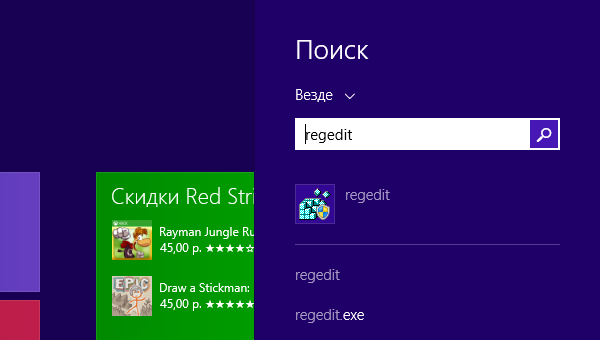
Пользователи Windows 8 могут воспользоваться поиском, появляющимся при наведении указателя мышки на углы правой стороны экрана, и ввести «regedit» в поле поисковой формы.
Откроется окно системного редактора, и здесь, в массе каталогов необходимо отыскать нужный, чтобы внести запланированные настройки. Идем по такому пути:
«HKEY_LOCAL_MACHINE» – «SOFTWARE» – «Microsoft» – «Windows» – «CurrentVersion»
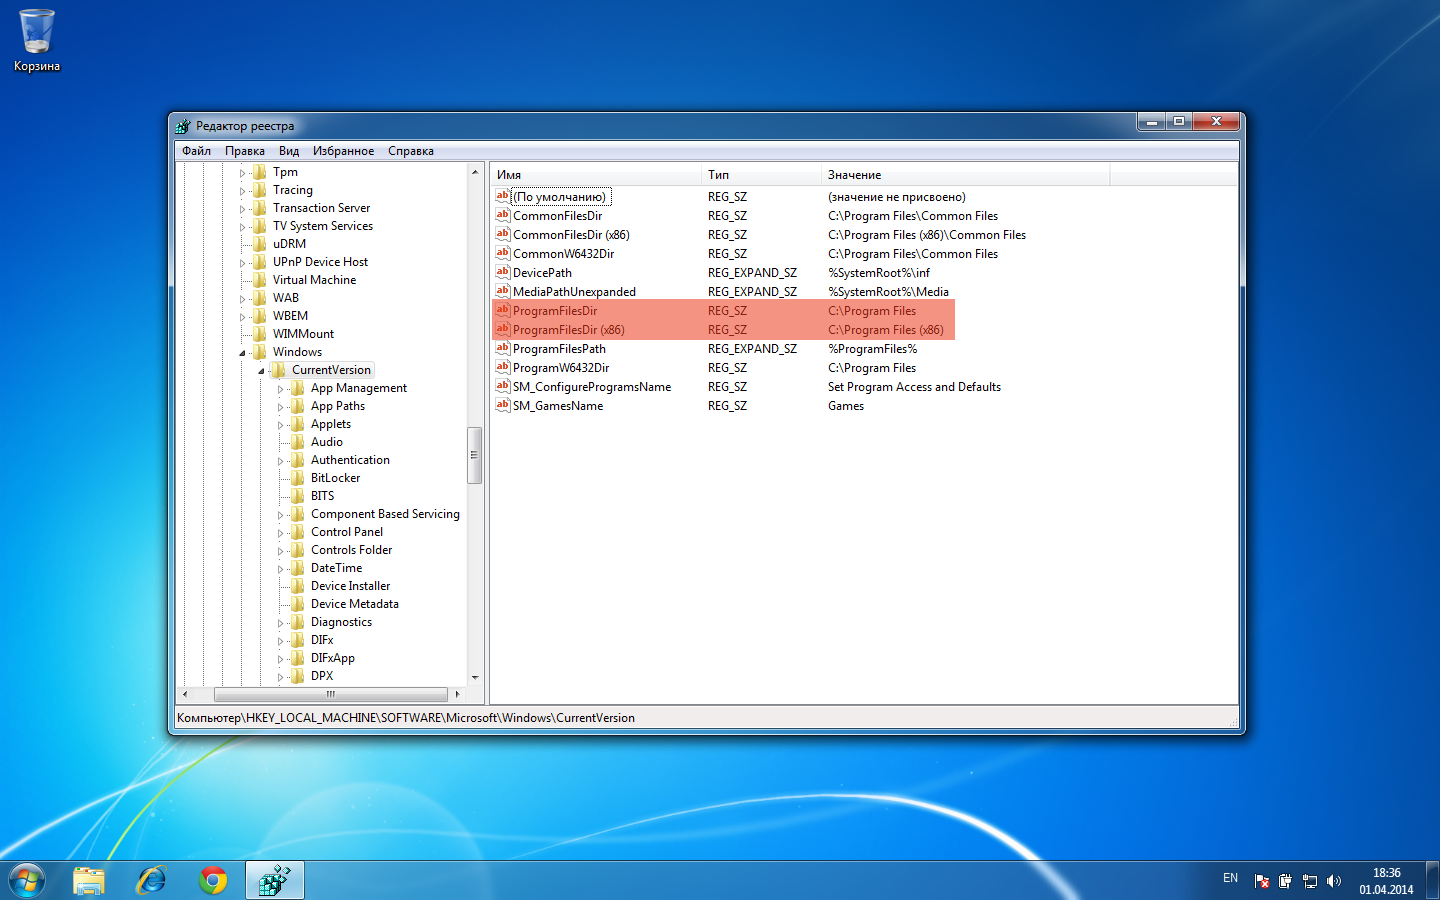
Нужный каталог найден, далее необходимо в правой части редактора реестра двойным кликом открыть параметр «ProgramFilesDir» или «ProgramFilesDir (x86)» — это и есть запись для автоматической установки программ и игр на тот или иной диск компьютера. И в большинстве случаев по умолчанию здесь стоит классический вариант значения — «C:Program Files».
Прежде чем установить новое значение для автоматической установки программ и игр на несистемный диск, необходимо на этом диске создать отдельную папку, которая будет эдаким аналогом «Program Files». Ее не обязательно называть «Program Files 2», это может быть любое название, лишь бы никто посторонний, у которого есть доступ к компьютеру, не подумал, что там хранятся ненужные файлы и не удалил эту папку.
Итак, если папка для установки программ и игр на несистемный диск уже создана, осталось только изменить значение параметра «ProgramFilesDir». Нужно убрать существующий вариант — «C:Program Files» — и ввести новый, например, «D:Установленные программы». Сделанные изменения, естественно, нужно сохранить – жмите «ОК».
Всё – редактор системного реестра можно закрывать и тестировать установку софта. По умолчанию программы и игры будут прописываться в только что назначенную папку.
Categories
- Transfer Programs from C Drive to D Drive
- Transfer Installed Software to New PC
- Transfer Files from Old PC to New PC
- Transfer Microsoft Office
- Find Office Product Key
- Move User Folder
- Move Google Chrome Bookmarks
- Complex Level: Easy
- Applies to: Switch and change the location of installed apps on Windows 11/10/8.1/8/7/XP and Vista, etc.
This page shows new Windows 11 users how to change where new content is saved in Windows 11, especially for applications like Office, Adobe software, and even some extremely huge games.
| Workable Solutions | Step-by-step Troubleshooting |
|---|---|
| Fix 1. Use App Migration Software | Try every USB port available; Determine you’re using USB 2.0 or 3.0…Full steps |
| Fix 2. Use Apps and Features | Step 1. Press Windows + I keys to open Windows settings, click on «system» and select «Apps and Features»….Full steps |
| Fix 3. Use CMD Command-Line | Step 1. Open your C drive and find out the app you want to move to another drive…Full steps |
| Fix 4. Using Registry Editor | Step 1. Press Windows + R keys to open the run dialog, type regedit, and click «OK»…Full steps |
Why Do You Want to Change the Location of an Installed Program in Windows 11
Though being designed with many new features such as a new user desktop centered Start menu and taskbar on Windows 11, Microsoft still keeps the most classic Windows system design in its newest operating system — Windows 11. All new content will automatically be saved and installed on the Local System C (This PC) Drive is still the same on Windows 11.
As a result, the C drive will soon get full with the following content:
- Downloaded content.
- Installed applications and software.
- Operating system.
- Personal folders, like Documents, Pictures.
- Desktop contents, etc.
How will you resolve this issue when the C drive gets full in Windows 11? You can turn to fix this issue in many ways, such as changing the default download location, moving user folders like Documents, Pictures, and Desktop to another drive, deleting useless large files, etc. Changing the location of installed programs in Windows 11 is also a very efficient way that helps to free up large space in the system C drive.
In this next part, we’ll discuss how and what method you can rely on for changing apps’ location in Windows 11 without any boot issue. Let’s see.
According to experienced and professional Windows administrators, we collect 4 efficient ways to move apps around Windows 11 successfully without losing any app data or boot issues. Let’s see:
- #1. Third-Party App Migration Software
- #2. Apps and Features Tool in Windows 11
- #3. CMD Command Line
- #4. Registry Editor
Among the 4 methods, which method suits you the most? Check the comparison table, and you’ll learn which method suits you the most:
| Comparison | App Migration Software | Apps and Features | CMD | Registry |
|---|---|---|---|---|
| Transfer Content |
|
|
|
|
| Difficulty Level | Easy | Easy | Medium | Complex |
From the comparison table, it’s clear that the third-party app migration software is the most comprehensive solution for Windows 11 users to change the location of installed applications. However, if you are looking for an easy and efficient method, you can’t miss Method 1. Let’s see how to migrate apps and change the install location of your programs in Windows 11 now.
#1. Change Location of Installed Programs in Windows 11 Using App Migration Software
Professional app migration software can directly help you move the C drive installed programs, software, and even games to another local drive on your computer without any boot issue. EaseUS Todo PCTrans, with its App Migration feature, is exactly what you need.
It allows you directly move multiple programs and apps from C drive to D or even a second hard drive at one time on your computer without losing any personal data or boot issue. Here are the detailed steps:
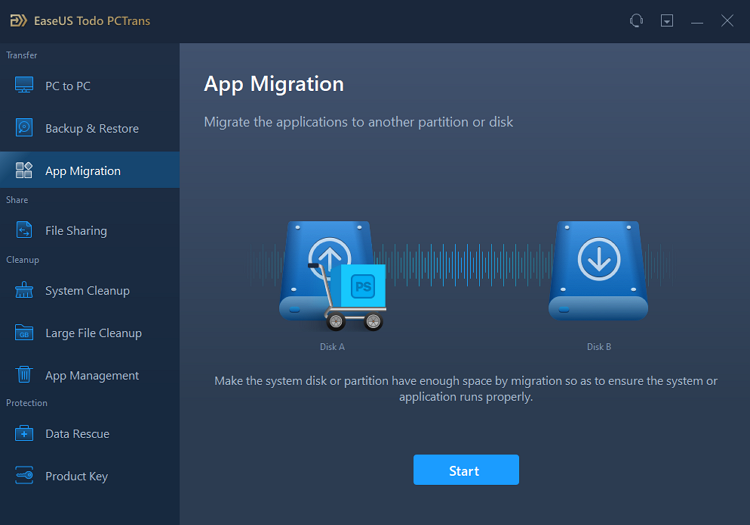
Step 1. Run EaseUS Todo PCTrans on your PC
Go to «App Migration» and click «Start» to continue.
Step 2. Select programs to move from C drive to another drive
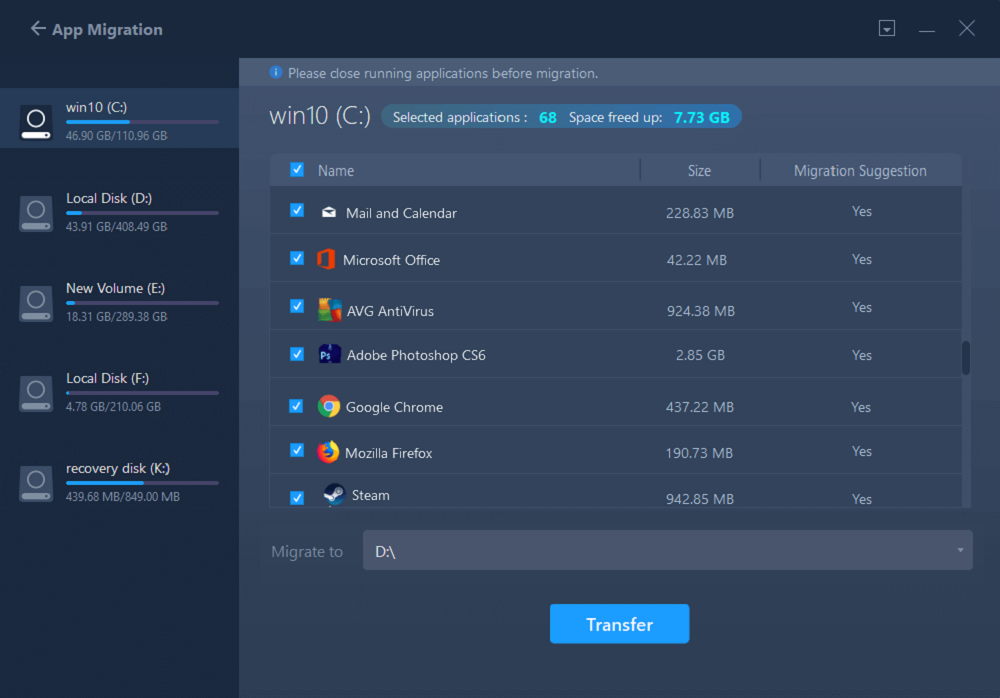
1. Tick the C drive and select programs (marked as «Yes») that you want to transfer.
2. Click the triangle icon to select another drive on your computer as the destination, and click «Transfer» to start the process.
Step 3. Finish the transferring
Wait patiently until the transferring process finishes and click «OK» to confirm.
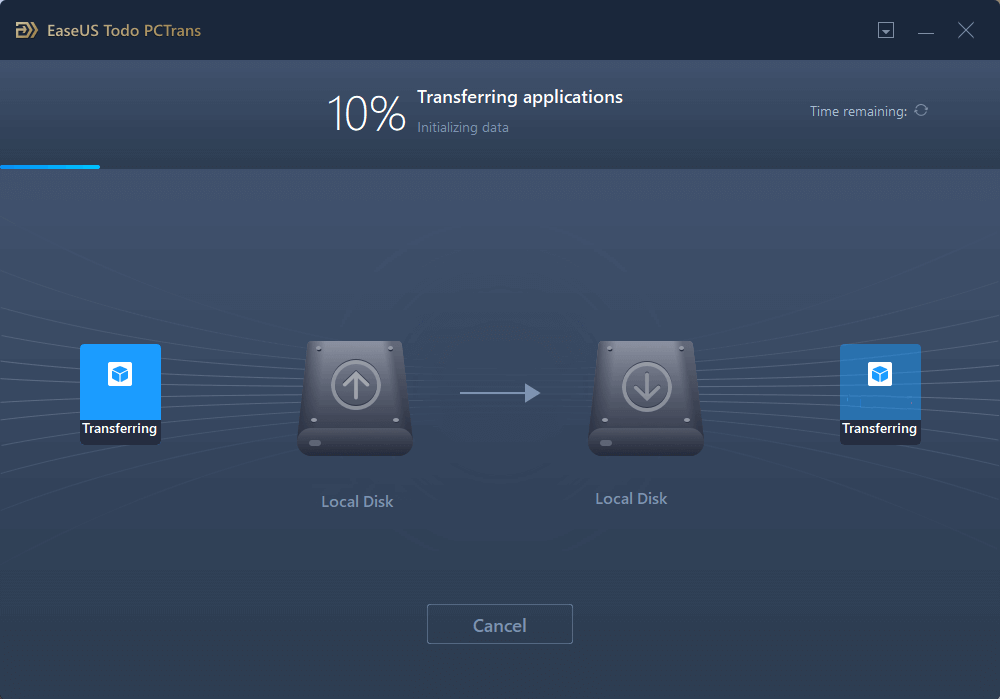
When it has done, you can restart PC if necessary. This will keep all changes on your PC and then you can run and programs from another hard drive without reinstallation.
Aside from this, you can also apply EaseUS Todo PCTrans to:
- Move apps from other drives to C drive
- Move the Desktop folder to another drive
- Transfer apps or programs to another computer
- Backup and rescue data and programs in computer
- More…
#2. Use Apps and Features Tool in Windows 11 to Change Location of Installed Programs
Apps and Features tool is a Windows built-in tool that helps change the location of some installed programs on Windows computers. Windows 11 users can also apply this tool to switch some C drive installed programs from C to other drives.
Here are the steps:
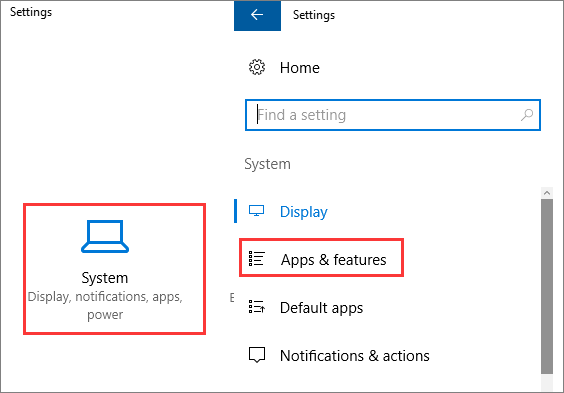
Step 1. Press Windows + I keys to open Windows settings, click on «system» and select «Apps and Features».
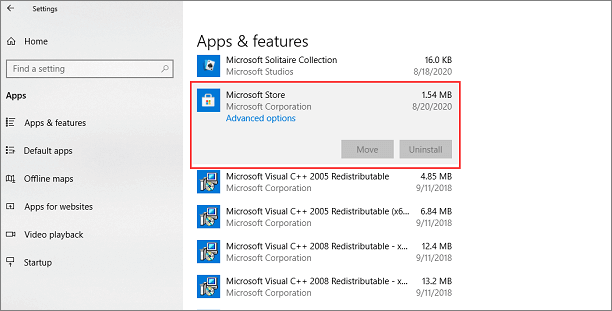
Step 2. Wait for the Apps and Feature to open, select the programs or application you’d like to transfer and click «Move».
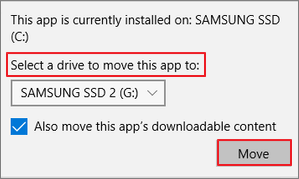
Step 3. Select the drive where you want to move the program to, such as D: drive.
Step 4. Click «Move» to confirm.
If you need to move several programs, you’ll need to repeat the process several times. For a more efficient way, you can totally trust EaseUS Todo PCTrans.
#3. Use CMD Command-Line to Move Apps Around Windows 11
Another efficient but more complex solution to move apps around Windows 11 is to run CMD command lines. To do so, you must be very careful while running the following steps on your PC.
Some experienced Windows administrators recommend that you create a restore point in Windows 11 if you face any issues while moving apps around Windows 11.
Here are steps to move apps around in Windows 11 using CMD:
Step 1. Open your C drive and find out the app you want to move to another drive.
Step 2. Create a text document, copy and paste the two command lines in the file:
- Robocopy «Source» «Destination» /sec /mov /e
- Mklink «Source» «Destination» /j
Replace the Source with the path location of the target program in your C drive.
Replace the Destination with the path where you want to move the app to on your PC.
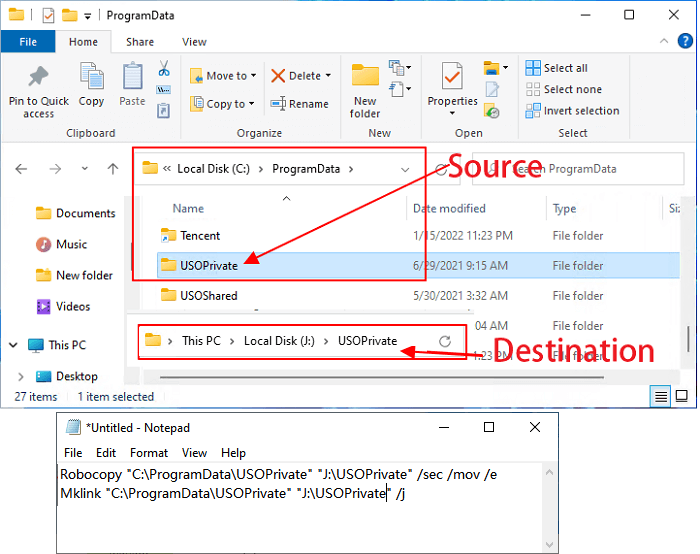
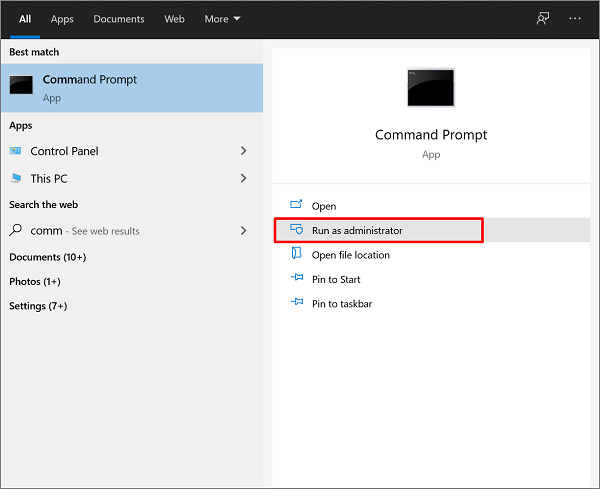
Step 3. Type cmd in the search box, right-click Command Prompt and select «Run as Administrator».
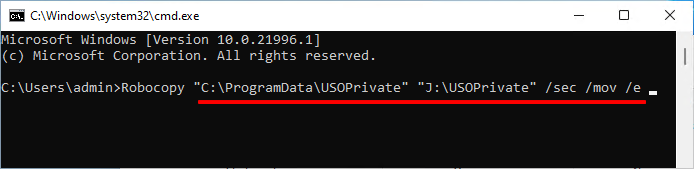
Step 4. Once the command prompt opens, type the first line in your text file and hit Enter:
- Robocopy «Source» «Destination» /sec /mov /e
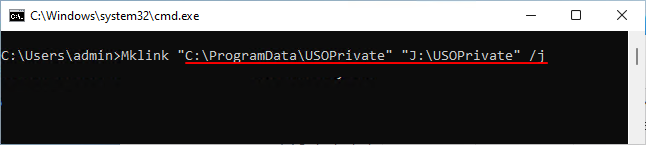
Step 5. Type the second line in the command prompt and hit Enter:
- Mklink «Source» «Destination» /j
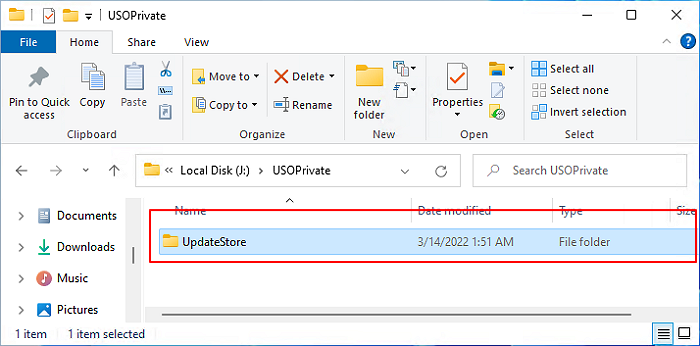
Wait for the process to complete. After this, you can open the target new drive and see if the selected app folder have been successfully moved here.
Note: You need to be very careful while running the command lines, and if any error occurs, it could be Windows that doesn’t allow you to do so. In this case, you should stop the operation and return to Method 1 for help.
#4. Change App Location from C to Other Drive in Windows 11 Using Registry Editor
The last workaround for moving apps from C to another drive in Windows 11 is using Registry Editor. And before you start, you should also confirm where you want to move the apps to.
Here are the steps:
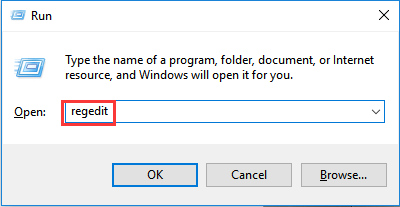
Step 1. Press Windows + R keys to open the run dialog, type regedit, and click «OK».
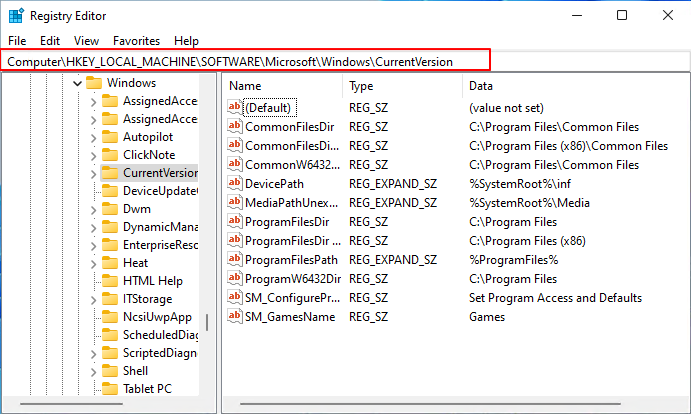
Step 2. Once Registry Editor opens, follow the path here to open the folder in Registry:
HKEY_LOCAL_MACHINESOFTWAREMicrosoftWindowsCurrentVersion
Step 3. Double-click on the ProgramFilesDir (x86) key and change the default value «C:ProgramFiles» to the new drive path.
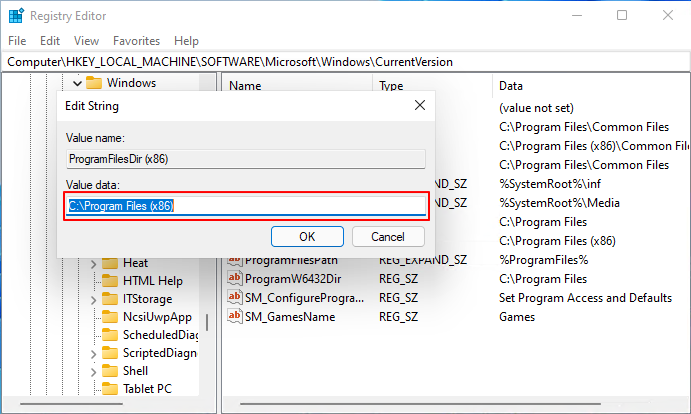
Step 4. Click «OK».
Step 5. Double-click on «ProgramFilesDir» and change the default value from «C:ProgramFiles» to your new drive path.
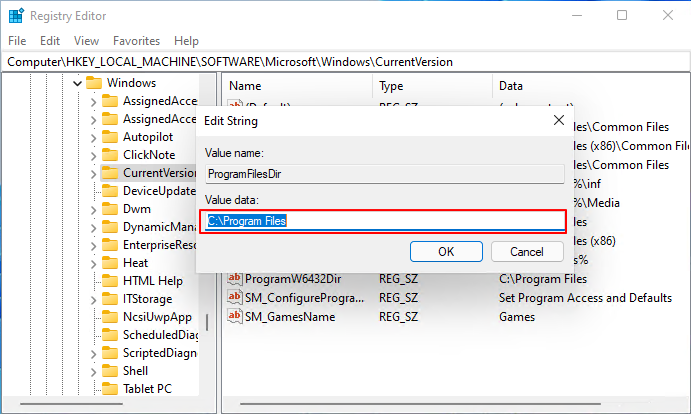
Step 6. Click «OK», close Registry, and restart your computer.
Bonus Tip: How to Change Windows 11 Default Installation Folder
Aside from the above 4 methods to change the location of installed programs in Windows 11, it’s also important that you change the Windows 11 default installation folder to save disk space in the C drive.
Here are the steps that you can follow:
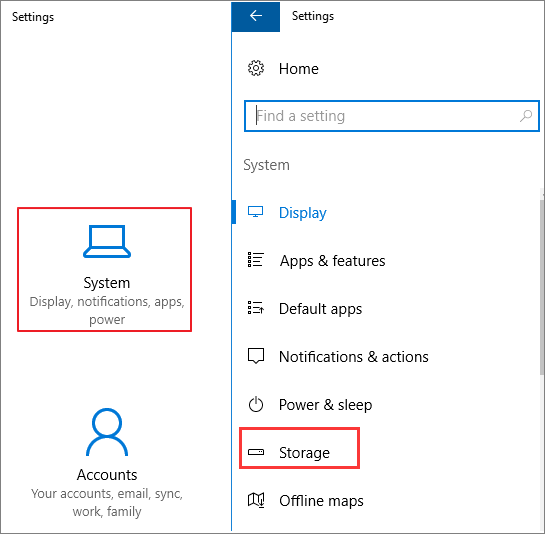
Step 1. Press Windows + I to open Windows Settings, click «System» > «Storage».
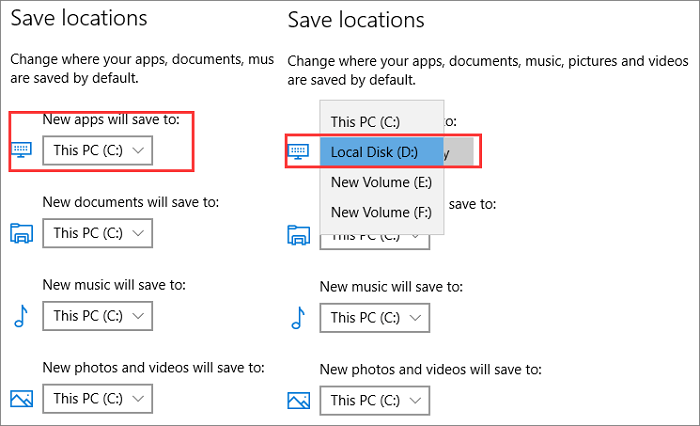
Step 2. At the Save locations section, click «New apps will save to:» column, and select a new drive to change where your apps, documents, music, pictures, and videos are saved by default.
Conclusion
This page covers 4 reliable methods that help move installed programs in Windows 11 from C drive to another drive without any boot issue.
Among the 4 methods, Windows beginners can totally trust EaseUS Todo PCTrans to migrate apps from C to another drive.
Experienced Windows users can also try the other 3 methods if they only want to move some basic apps around Windows 11.
Changing the location of installed programs in Windows 11 is possible and easy. As long as you turn to the correct methods, you can directly execute the operation like an expert on your own.
Categories
- Transfer Programs from C Drive to D Drive
- Transfer Installed Software to New PC
- Transfer Files from Old PC to New PC
- Transfer Microsoft Office
- Find Office Product Key
- Move User Folder
- Move Google Chrome Bookmarks
- Complex Level: Easy
- Applies to: Switch and change the location of installed apps on Windows 11/10/8.1/8/7/XP and Vista, etc.
This page shows new Windows 11 users how to change where new content is saved in Windows 11, especially for applications like Office, Adobe software, and even some extremely huge games.
| Workable Solutions | Step-by-step Troubleshooting |
|---|---|
| Fix 1. Use App Migration Software | Try every USB port available; Determine you’re using USB 2.0 or 3.0…Full steps |
| Fix 2. Use Apps and Features | Step 1. Press Windows + I keys to open Windows settings, click on «system» and select «Apps and Features»….Full steps |
| Fix 3. Use CMD Command-Line | Step 1. Open your C drive and find out the app you want to move to another drive…Full steps |
| Fix 4. Using Registry Editor | Step 1. Press Windows + R keys to open the run dialog, type regedit, and click «OK»…Full steps |
Why Do You Want to Change the Location of an Installed Program in Windows 11
Though being designed with many new features such as a new user desktop centered Start menu and taskbar on Windows 11, Microsoft still keeps the most classic Windows system design in its newest operating system — Windows 11. All new content will automatically be saved and installed on the Local System C (This PC) Drive is still the same on Windows 11.
As a result, the C drive will soon get full with the following content:
- Downloaded content.
- Installed applications and software.
- Operating system.
- Personal folders, like Documents, Pictures.
- Desktop contents, etc.
How will you resolve this issue when the C drive gets full in Windows 11? You can turn to fix this issue in many ways, such as changing the default download location, moving user folders like Documents, Pictures, and Desktop to another drive, deleting useless large files, etc. Changing the location of installed programs in Windows 11 is also a very efficient way that helps to free up large space in the system C drive.
In this next part, we’ll discuss how and what method you can rely on for changing apps’ location in Windows 11 without any boot issue. Let’s see.
According to experienced and professional Windows administrators, we collect 4 efficient ways to move apps around Windows 11 successfully without losing any app data or boot issues. Let’s see:
- #1. Third-Party App Migration Software
- #2. Apps and Features Tool in Windows 11
- #3. CMD Command Line
- #4. Registry Editor
Among the 4 methods, which method suits you the most? Check the comparison table, and you’ll learn which method suits you the most:
| Comparison | App Migration Software | Apps and Features | CMD | Registry |
|---|---|---|---|---|
| Transfer Content |
|
|
|
|
| Difficulty Level | Easy | Easy | Medium | Complex |
From the comparison table, it’s clear that the third-party app migration software is the most comprehensive solution for Windows 11 users to change the location of installed applications. However, if you are looking for an easy and efficient method, you can’t miss Method 1. Let’s see how to migrate apps and change the install location of your programs in Windows 11 now.
#1. Change Location of Installed Programs in Windows 11 Using App Migration Software
Professional app migration software can directly help you move the C drive installed programs, software, and even games to another local drive on your computer without any boot issue. EaseUS Todo PCTrans, with its App Migration feature, is exactly what you need.
It allows you directly move multiple programs and apps from C drive to D or even a second hard drive at one time on your computer without losing any personal data or boot issue. Here are the detailed steps:
Step 1. Run EaseUS Todo PCTrans on your PC
Go to «App Migration» and click «Start» to continue.
Step 2. Select programs to move from C drive to another drive
1. Tick the C drive and select programs (marked as «Yes») that you want to transfer.
2. Click the triangle icon to select another drive on your computer as the destination, and click «Transfer» to start the process.
Step 3. Finish the transferring
Wait patiently until the transferring process finishes and click «OK» to confirm.
When it has done, you can restart PC if necessary. This will keep all changes on your PC and then you can run and programs from another hard drive without reinstallation.
Aside from this, you can also apply EaseUS Todo PCTrans to:
- Move apps from other drives to C drive
- Move the Desktop folder to another drive
- Transfer apps or programs to another computer
- Backup and rescue data and programs in computer
- More…
#2. Use Apps and Features Tool in Windows 11 to Change Location of Installed Programs
Apps and Features tool is a Windows built-in tool that helps change the location of some installed programs on Windows computers. Windows 11 users can also apply this tool to switch some C drive installed programs from C to other drives.
Here are the steps:
Step 1. Press Windows + I keys to open Windows settings, click on «system» and select «Apps and Features».
Step 2. Wait for the Apps and Feature to open, select the programs or application you’d like to transfer and click «Move».
Step 3. Select the drive where you want to move the program to, such as D: drive.
Step 4. Click «Move» to confirm.
If you need to move several programs, you’ll need to repeat the process several times. For a more efficient way, you can totally trust EaseUS Todo PCTrans.
#3. Use CMD Command-Line to Move Apps Around Windows 11
Another efficient but more complex solution to move apps around Windows 11 is to run CMD command lines. To do so, you must be very careful while running the following steps on your PC.
Some experienced Windows administrators recommend that you create a restore point in Windows 11 if you face any issues while moving apps around Windows 11.
Here are steps to move apps around in Windows 11 using CMD:
Step 1. Open your C drive and find out the app you want to move to another drive.
Step 2. Create a text document, copy and paste the two command lines in the file:
- Robocopy «Source» «Destination» /sec /mov /e
- Mklink «Source» «Destination» /j
Replace the Source with the path location of the target program in your C drive.
Replace the Destination with the path where you want to move the app to on your PC.
Step 3. Type cmd in the search box, right-click Command Prompt and select «Run as Administrator».
Step 4. Once the command prompt opens, type the first line in your text file and hit Enter:
- Robocopy «Source» «Destination» /sec /mov /e
Step 5. Type the second line in the command prompt and hit Enter:
- Mklink «Source» «Destination» /j
Wait for the process to complete. After this, you can open the target new drive and see if the selected app folder have been successfully moved here.
Note: You need to be very careful while running the command lines, and if any error occurs, it could be Windows that doesn’t allow you to do so. In this case, you should stop the operation and return to Method 1 for help.
#4. Change App Location from C to Other Drive in Windows 11 Using Registry Editor
The last workaround for moving apps from C to another drive in Windows 11 is using Registry Editor. And before you start, you should also confirm where you want to move the apps to.
Here are the steps:
Step 1. Press Windows + R keys to open the run dialog, type regedit, and click «OK».
Step 2. Once Registry Editor opens, follow the path here to open the folder in Registry:
HKEY_LOCAL_MACHINESOFTWAREMicrosoftWindowsCurrentVersion
Step 3. Double-click on the ProgramFilesDir (x86) key and change the default value «C:ProgramFiles» to the new drive path.
Step 4. Click «OK».
Step 5. Double-click on «ProgramFilesDir» and change the default value from «C:ProgramFiles» to your new drive path.
Step 6. Click «OK», close Registry, and restart your computer.
Bonus Tip: How to Change Windows 11 Default Installation Folder
Aside from the above 4 methods to change the location of installed programs in Windows 11, it’s also important that you change the Windows 11 default installation folder to save disk space in the C drive.
Here are the steps that you can follow:
Step 1. Press Windows + I to open Windows Settings, click «System» > «Storage».
Step 2. At the Save locations section, click «New apps will save to:» column, and select a new drive to change where your apps, documents, music, pictures, and videos are saved by default.
Conclusion
This page covers 4 reliable methods that help move installed programs in Windows 11 from C drive to another drive without any boot issue.
Among the 4 methods, Windows beginners can totally trust EaseUS Todo PCTrans to migrate apps from C to another drive.
Experienced Windows users can also try the other 3 methods if they only want to move some basic apps around Windows 11.
Changing the location of installed programs in Windows 11 is possible and easy. As long as you turn to the correct methods, you can directly execute the operation like an expert on your own.