![]()
Download Article
![]()
Download Article
- Using Word
- Using Pages
- Using Google Docs
|
|
This wikiHow teaches you how to edit documents on your iPhone. You can edit Microsoft Office Word documents using the iPhone version of Word. You need an Office 365 account to edit documents using Word. If you don’t have an Office 365 account, you can edit Word documents using Pages. You can also edit text documents using Google Docs on iPhone.
-

1
Download and install Word. It’s the app that has a blue icon with a page with a «W» in front of another page. You can download Word from the App Store using the following steps.
- Open the App Store.
- Tap Search.
- Type Word in the search bar.
- Tap Microsoft Word.
- Tap Get.
-
2
Open Word. You can open it by tapping the Word icon on your home screen, or tapping «Open» in the App Store.
- You need to sign in to be able to edit documents. To sign in, tap «Sign In» in the upper-left corner and sign in with the email and password associated with your Office 365 account. If you don’t have an Office 365 account, you can edit Word documents for free using Pages. See Method 2.
Advertisement
-
3
Tap Open. You can open a document saved to a cloud service, or saved to your iPhone or iPad from an email attachment.
- To open a Word document saved to a Cloud service, tap «Add a place», tap a Cloud Service and sign in to the cloud service. You will then be able to open documents from the cloud service.
- To open a Word document saved from an Email attachment, tap «More» and then tap the Word document.
-
4
Tap the document text. This will display the keyboard.
-
5
Type with the keyboard. Use the keyboard to edit the document text. The Bold, Italics, and Underline buttons are in the upper-right corner of the keyboard.
-
6
Use the tabs at the top to edit the document. The tabs at the top offer the following options:
- Home: This tab allows you to change the font, text and background color, add bullet points, or numbered lists, and align your text to the left, center, right, or justified.
- Insert: This tab allows you to add tables, images, shapes, hyperlinks, quote boxes, and more.
- Draw: This tab allows you to draw on the document using your stylus or Apple Pencil. There are a number of marker options at the top of the page.
- Layout: This tab allows you to change the orientation, page size, add margins, columns, and breaks.
- Review: This tab has options for spellcheck, word count, track comments, and smart lookup.
- View: This option allows you to change from print layout to mobile view, as well as turn rulers on and off.
-
7
Save the document. To save the document, tap the paper icon in the upper-left corner and tap «Save a Copy», or tap the back arrow in the upper-left corner to back out and save all changes.


Advertisement
-
1
Download and Install Pages. Pages is Apple’s word processor application for Mac and iOS devices. It’s the app that has an orange icon with a pencil and paper. You can download it for free on iPhone using the following steps.
- Open the App Store.
- Tap Search
- Type Pages in the search bar.
- Tap the Pages app.
- Tap Get next to Pages.
-
2
Open Pages. You can open it by tapping the Pages icon on your home screen, or tapping «Open» in the App Store.
-
3
Tap Browse. It’s the second tab that has an image of a folder. This will display a popout menu to the left.
-
4
Tap On My iPhone. It’s the second option under the «Locations» heading.
-
5
Tap Pages. It’s the folder with the Pages icon on it.
-
6
Tap a document and tap Done. You can open Pages or Word documents in Pages. Word documents may not be formatted properly in Pages.
-
7
Tap the document text. This will display the keyboard.
-
8
Type with the keyboard. Use the keyboard to edit the document.
- Tap the Arrow with the line in the upper-left corner of the keyboard to indent the text or add a tab.
- Tap the font name in the upper-left corner of the keyboard to change the font.
- Tap the icon with the small «A» and the large «A» in the keyboard to change the font size and add bold, italic, or underlined text.
- Tap the icon with the lines on the upper-right side of the keyboard to align the text.
- Tap the symbol on the right side of the keyboard to add a comment, page break, line break, column break, bookmark, footnote, or equation.
- Tap the paintbrush icon at the top of the page to change the font, font color, size, paragraph style, line spacing, and add bullets and lists.
- Tap the «+» icon at the top of the page to add images, tables, graphs, and shapes.
- Tap «⋯» to share the document, export the document, print, search for text, and change the document setup.
-
9
Tap ⋯. It’s in the upper-left corner of the screen.
-
10
Tap Export. It’s the third option in the options menu.
-
11
Select a format. You can export the document as a PDF, Word document, Rich Text Format (RTF), or EPUB. Afterward, you will be given the option to share the document.
-
12
Select a share method. You can send the document over email, or messages, or save it to Files.


Advertisement
-
1
Download and Install Google Docs. Google Docs is Google’s word processing application. Google Docs is an app that has an icon of a blue sheet of paper. Use the following steps to download Google Docs from the App Store.
- Open the App Store.
- Tap Search
- Type Google Docs in the search bar.
- Tap the Google Docs app.
- Tap Get next to Google Docs.
-
2
Open Google Docs. You can open Google Docs by tapping the icon on your home screen, or tapping «Open» in the App Store.
-
3
Sign in to Google Docs. You are required to sign in to your Google account the first time you open Google Docs. Tap «Sign In» in the lower-left corner, and sign in with the email address and password associated with your Google account.
-
4
Open a Google Doc document. Recent documents will be listed on the opening page. You can also tap the folder icon in the upper-right corner to open documents from Google Drive.
- Google Doc doesn’t have the ability to edit Word documents. However, it can export in Word .docx format.
-
5
Tap the pencil icon
. It’s the blue icon with the pencil in the lower-right corner. This will display the keyboard.
-
6
Type with the keyboard. Use the keyboard to edit and type text in the document. Use the buttons at the top of the screen to add bold, italics, underline, and strike-through text. You can also change the text alignment, add bullet points, numbered lists, and indents.
-
7
Tap +. The «plus» button in the upper-right corner allows you to add links, comments, images, tables, horizontal lines, page breaks, and page numbers to a document.
-
8
Tap the icon with «A» and with lines to the right. This icon allows you to modify the text. The «Text» tab allows you to change the font, font style, font size, and text color. The «Paragraph» tab allows you to change the text alignment, add indents, create bullet and numbered lists, and change the line spacing.
-
9
Tap …. This options menu allows you to view a print layout, document outline, find and replace, explore, check word count, change the page setup, view document details, and share and export the document.
-
10
Share the document. Use the following methods to share the document.
- Tap «…» in the upper-right corner.
- Tap «Share & export».
- Tap «Add people».
- Type the email address of a recipient in the «People» line.
- Tap the icon that resembles a paper airplane in the upper-right corner of the popup.
- You can also turn on Link Sharing, tap «Copy Link» and send the link to people over email, text, or instant message.
-
11
Save the document. To save the document, tap the checkmark icon in the upper-right corner. This will exit the document and save it.
- To save the document as a Word document, tap «…», then tap «Share & export», then tap «Save as Word (.docx)».


Advertisement
Ask a Question
200 characters left
Include your email address to get a message when this question is answered.
Submit
Advertisement
Thanks for submitting a tip for review!
About This Article
Thanks to all authors for creating a page that has been read 218,423 times.
Is this article up to date?
![]()
Download Article
![]()
Download Article
- Using Word
- Using Pages
- Using Google Docs
|
|
This wikiHow teaches you how to edit documents on your iPhone. You can edit Microsoft Office Word documents using the iPhone version of Word. You need an Office 365 account to edit documents using Word. If you don’t have an Office 365 account, you can edit Word documents using Pages. You can also edit text documents using Google Docs on iPhone.
-
1
Download and install Word. It’s the app that has a blue icon with a page with a «W» in front of another page. You can download Word from the App Store using the following steps.
- Open the App Store.
- Tap Search.
- Type Word in the search bar.
- Tap Microsoft Word.
- Tap Get.
-
2
Open Word. You can open it by tapping the Word icon on your home screen, or tapping «Open» in the App Store.
- You need to sign in to be able to edit documents. To sign in, tap «Sign In» in the upper-left corner and sign in with the email and password associated with your Office 365 account. If you don’t have an Office 365 account, you can edit Word documents for free using Pages. See Method 2.
Advertisement
-
3
Tap Open. You can open a document saved to a cloud service, or saved to your iPhone or iPad from an email attachment.
- To open a Word document saved to a Cloud service, tap «Add a place», tap a Cloud Service and sign in to the cloud service. You will then be able to open documents from the cloud service.
- To open a Word document saved from an Email attachment, tap «More» and then tap the Word document.
-
4
Tap the document text. This will display the keyboard.
-
5
Type with the keyboard. Use the keyboard to edit the document text. The Bold, Italics, and Underline buttons are in the upper-right corner of the keyboard.
-
6
Use the tabs at the top to edit the document. The tabs at the top offer the following options:
- Home: This tab allows you to change the font, text and background color, add bullet points, or numbered lists, and align your text to the left, center, right, or justified.
- Insert: This tab allows you to add tables, images, shapes, hyperlinks, quote boxes, and more.
- Draw: This tab allows you to draw on the document using your stylus or Apple Pencil. There are a number of marker options at the top of the page.
- Layout: This tab allows you to change the orientation, page size, add margins, columns, and breaks.
- Review: This tab has options for spellcheck, word count, track comments, and smart lookup.
- View: This option allows you to change from print layout to mobile view, as well as turn rulers on and off.
-
7
Save the document. To save the document, tap the paper icon in the upper-left corner and tap «Save a Copy», or tap the back arrow in the upper-left corner to back out and save all changes.
Advertisement
-
1
Download and Install Pages. Pages is Apple’s word processor application for Mac and iOS devices. It’s the app that has an orange icon with a pencil and paper. You can download it for free on iPhone using the following steps.
- Open the App Store.
- Tap Search
- Type Pages in the search bar.
- Tap the Pages app.
- Tap Get next to Pages.
-
2
Open Pages. You can open it by tapping the Pages icon on your home screen, or tapping «Open» in the App Store.
-
3
Tap Browse. It’s the second tab that has an image of a folder. This will display a popout menu to the left.
-
4
Tap On My iPhone. It’s the second option under the «Locations» heading.
-
5
Tap Pages. It’s the folder with the Pages icon on it.
-
6
Tap a document and tap Done. You can open Pages or Word documents in Pages. Word documents may not be formatted properly in Pages.
-
7
Tap the document text. This will display the keyboard.
-
8
Type with the keyboard. Use the keyboard to edit the document.
- Tap the Arrow with the line in the upper-left corner of the keyboard to indent the text or add a tab.
- Tap the font name in the upper-left corner of the keyboard to change the font.
- Tap the icon with the small «A» and the large «A» in the keyboard to change the font size and add bold, italic, or underlined text.
- Tap the icon with the lines on the upper-right side of the keyboard to align the text.
- Tap the symbol on the right side of the keyboard to add a comment, page break, line break, column break, bookmark, footnote, or equation.
- Tap the paintbrush icon at the top of the page to change the font, font color, size, paragraph style, line spacing, and add bullets and lists.
- Tap the «+» icon at the top of the page to add images, tables, graphs, and shapes.
- Tap «⋯» to share the document, export the document, print, search for text, and change the document setup.
-
9
Tap ⋯. It’s in the upper-left corner of the screen.
-
10
Tap Export. It’s the third option in the options menu.
-
11
Select a format. You can export the document as a PDF, Word document, Rich Text Format (RTF), or EPUB. Afterward, you will be given the option to share the document.
-
12
Select a share method. You can send the document over email, or messages, or save it to Files.
Advertisement
-
1
Download and Install Google Docs. Google Docs is Google’s word processing application. Google Docs is an app that has an icon of a blue sheet of paper. Use the following steps to download Google Docs from the App Store.
- Open the App Store.
- Tap Search
- Type Google Docs in the search bar.
- Tap the Google Docs app.
- Tap Get next to Google Docs.
-
2
Open Google Docs. You can open Google Docs by tapping the icon on your home screen, or tapping «Open» in the App Store.
-
3
Sign in to Google Docs. You are required to sign in to your Google account the first time you open Google Docs. Tap «Sign In» in the lower-left corner, and sign in with the email address and password associated with your Google account.
-
4
Open a Google Doc document. Recent documents will be listed on the opening page. You can also tap the folder icon in the upper-right corner to open documents from Google Drive.
- Google Doc doesn’t have the ability to edit Word documents. However, it can export in Word .docx format.
-
5
Tap the pencil icon
. It’s the blue icon with the pencil in the lower-right corner. This will display the keyboard.
-
6
Type with the keyboard. Use the keyboard to edit and type text in the document. Use the buttons at the top of the screen to add bold, italics, underline, and strike-through text. You can also change the text alignment, add bullet points, numbered lists, and indents.
-
7
Tap +. The «plus» button in the upper-right corner allows you to add links, comments, images, tables, horizontal lines, page breaks, and page numbers to a document.
-
8
Tap the icon with «A» and with lines to the right. This icon allows you to modify the text. The «Text» tab allows you to change the font, font style, font size, and text color. The «Paragraph» tab allows you to change the text alignment, add indents, create bullet and numbered lists, and change the line spacing.
-
9
Tap …. This options menu allows you to view a print layout, document outline, find and replace, explore, check word count, change the page setup, view document details, and share and export the document.
-
10
Share the document. Use the following methods to share the document.
- Tap «…» in the upper-right corner.
- Tap «Share & export».
- Tap «Add people».
- Type the email address of a recipient in the «People» line.
- Tap the icon that resembles a paper airplane in the upper-right corner of the popup.
- You can also turn on Link Sharing, tap «Copy Link» and send the link to people over email, text, or instant message.
-
11
Save the document. To save the document, tap the checkmark icon in the upper-right corner. This will exit the document and save it.
- To save the document as a Word document, tap «…», then tap «Share & export», then tap «Save as Word (.docx)».
Advertisement
Ask a Question
200 characters left
Include your email address to get a message when this question is answered.
Submit
Advertisement
Thanks for submitting a tip for review!
About This Article
Thanks to all authors for creating a page that has been read 218,423 times.
Is this article up to date?
Обновление даты рождения, связанной с идентификатором Apple ID
При использовании идентификатора Apple ID важно правильно указать вашу дату рождения. Она используется в таких функциях, как «Семейный доступ», а в некоторых случаях может помочь сбросить пароль.
Изменение даты рождения
При необходимости изменить дату рождения ребенка младше 13 лет обратитесь в службу поддержки Apple.*
На странице учетной записи Apple ID
- Войдите на страницу своей учетной записи Apple ID.
- В разделе «Учетная запись» нажмите кнопку «Изменить».
- Обновите дату своего рождения и нажмите кнопку «Готово». Если вы хотите поменять дату рождения ребенка, узнайте, как это сделать.
В зависимости от того, как был создан Apple ID, вам может потребоваться предоставить дополнительные сведения или изменить имя пользователя Apple ID с номера мобильного телефона на адрес электронной почты.
На iPhone, iPad или iPod touch
- Выберите «Настройки» > [ваше имя].
- Нажмите «Имя, номера телефонов, e-mail». Может потребоваться ввести пароль для вашего идентификатора Apple ID.
- Нажмите «Изменить день рождения» или «День рождения».
- Обновите дату своего рождения и нажмите «Готово». Если вы хотите поменять дату рождения ребенка, узнайте, как это сделать.
Изменение даты рождения ребенка
Чтобы изменить дату рождения на любой возраст младше 13 лет*, необходимо быть участником группы «Семейный доступ», а организатор семейного доступа должен утвердить изменение. После изменения даты рождения на любой возраст младше 13 лет она станет недоступна для изменения.* Дополнительная информация о функции «Семейный доступ».
- Обновите дату рождения.
- Следуйте инструкциям на экране, чтобы отправить по электронной почте запрос организатору семейного доступа.
- Организатор семейного доступа получит сообщение электронной почты с инструкциями по утверждению запроса.
Источник
Если не удается изменить время или часовой пояс на устройстве iPhone, iPad или iPod touch
В настройках даты и времени на устройстве можно задать автоматическую корректировку при смене часового пояса и переходе на летнее время. Узнайте, что делать, если устройство неверно отображает дату, время или часовой пояс либо не выполняет переход на летнее время автоматически.
Проверка настроек
После каждого действия проверяйте, устранена ли проблема.
- Убедитесь, что на устройстве установлена последняя версия ОС iOS или iPadOS.
- Включите функцию «Автоматически» 1 , выбрав «Настройки» > «Основные» > «Дата и время». Эта функция автоматически устанавливает дату и время в соответствии с часовым поясом. Если доступно обновление данных о часовых поясах, на устройстве выводится соответствующее сообщение.
- Разрешите устройству использовать текущее местоположение для определения часового пояса. Для этого выберите «Настройки» > «Конфиденциальность» > «Службы геолокации» > «Системные службы» и установите флажок «Установка часового пояса».
- Проверьте, правильно ли отображается часовой пояс на устройстве. Для этого выберите «Настройки» > «Основные» > «Дата и время» > «Часовой пояс».

Если требуется дополнительная помощь
Если устройство по-прежнему отображает неверную дату, время или часовой пояс 2 , измените каждый параметр вместо использования функции «Автоматически». Допустим, на устройстве установлена ОС iOS 9 или более ранней версии, а правительство страны или региона приняло решение о смене часового пояса или вводе летнего времени. В таком случае выполните следующие действия.
Источник
Как поменять дату в айфоне 4 5 6 7 8 9 10 11 12?

Добрый день, друзья. Как поменять дату в Айфоне? Большинство начинающих пользователей Айфона делают ту же самую ошибку: если им нужно поменять время, они заходят в утилиту «Часы» и ищут в ней подходящий раздел. Поменять время, применив данный раздел они не смогут. Если же вы желаете изменить время на iPhone, вам необходимо отрегулировать данную функцию во вкладке настройки.

Как поменять дату с временем на iPhone?
Если вы желаете изменить дату со временем на данном девайсе, вам нужно следовать по шагам ниже:
1 Входим во вкладку «Настройки» и следует в меню «Основные»;
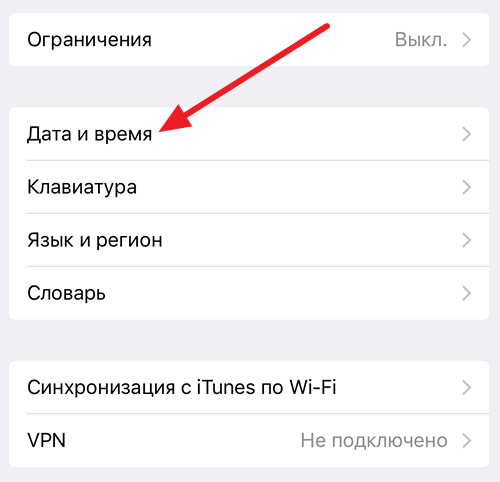
2 После этого переходим в раздел «Дата и время»;
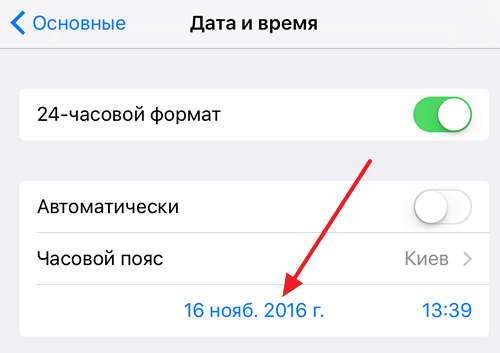
3 После этого появится следующее окно:
4 Теперь нужно установить временной формат на 24 часа или же на 12 часов. Жители США привыкли отсчитывать время по 12 часов перед полуднем, и 12 часов после. Отсюда, на Айфонах 12 часовая форма установлена на заводе. Если житель России захочет перейти на удобный для него формат в виде 24 часов, в этом случае, необходимо передвинуть бегунок;
5 Убираем тумблер «Автоматически». Если вы решите оставить включенной данную функцию, Айфон станет сам выбирать ваш временной пояс, исходя из информации, которую он узнал, применив геолокацию из всемирной сети. Существует несколько оснований для отказа от данной функции:
- Есть опасность, что время само перейдёт с зимнего на летнее, или же в обратном порядке. Чем вам это может помешать? Хотя бы тем, что вы можете опоздать на любимую работу;
- iPhone будет плохо определять время, если его хозяин находится в путешествии и перелетает сразу через целые часовые пояса. Происходит это потому, что sim карта часто недополучает сигнал и не в состоянии понять, где именно находится её владелец;
- функция желает подключить геолокацию, а это в данный момент может привести к лишним тратам энергии.
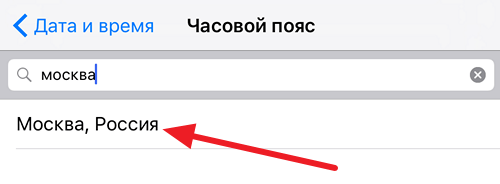
6 Необходимо выбрать временной пояс, тапнуть по нужной вкладке,
после этого желательно внести в поиск «Россия» и выбрать место, где вы проживаете или, которое совпадает с вашим временем по временному поясу. Можно выбрать «Нижний Новгород, Россия» или то время, которое вам удобнее;
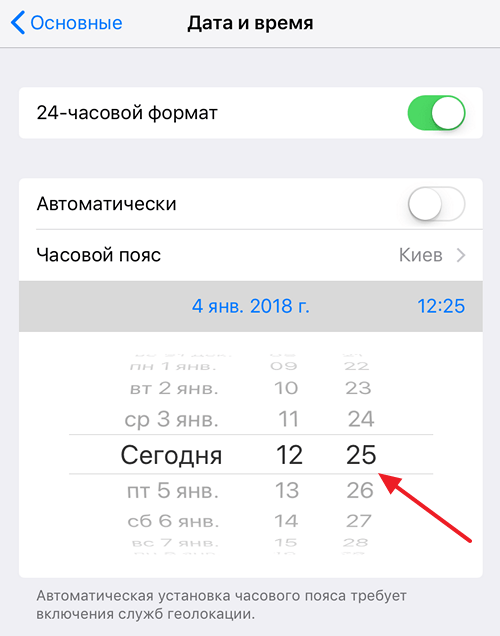
7 тапнем по вкладке, где синим цветом стоят дата с временем, и в ручном режиме установим нужные настройки, крутя виртуальные настройщики. Чтобы понять, какое сейчас время более точно, можно зайти и посмотреть в Яндексе.
Что интересно, настройщика, отвечающего за год, в этой вкладке нет. Отсюда, если вам необходимо перейти не определенный год вперёд – назад, вам нужно покрутить барабан.
После проделанной операции, применяйте iPhone и не думайте о времени, что оно может сбиться с настроек.
Не точно показывается год, что же делать?
Во время изменения временного пояса, человек возможно увидеть, что он проживает в 32 г, во времена эпохи Хейсэй.
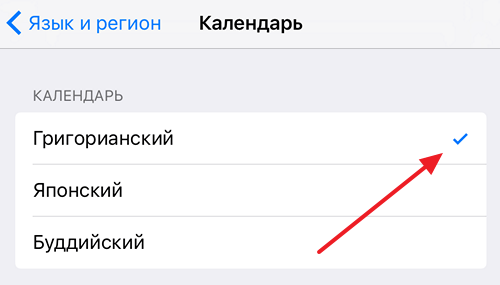
Это говорит о том, что на девайсе настроено не Грегорианское время, используемое сейчас, а Японское. Поставить нужное время довольно просто: вернёмся в команду «Основные» в настройках, далее идём во вкладку «Язык и текст» (находится рядом с «Датой и временем»).
Во вкладке «Календарь» нужно выбрать «Григорианский», и убрать галочку от «Японский». Ваше время исчисление нормализуется.
Вывод: вы теперь знаете, как поменять дату в Айфоне. Вы понимаете, что данная функция этого мобильного гаджета недоработана. Поэтому, лучше будет, если вы выберите ручную настройку, взяв точное время из Яндекса. Успехов!
Источник
Как изменить дату и время на iPhone
Изменение даты и времени — это простая процедура, которая обычно не вызывает никаких проблем. Но, многие начинающие пользователи iPhone все такие сталкиваются с трудностями. Например, они пытаются изменить эти параметры через приложение «Часы», хотя это нужно делать через «Настройки».
Поэтому в этой статье мы рассмотрим данную задачу максимально детально. Материал будет актуален для всех моделей iPhone, iPhone включая 4, 4s, 5, 5s, se, 6, 6s, 7, 8 и iPhone X.
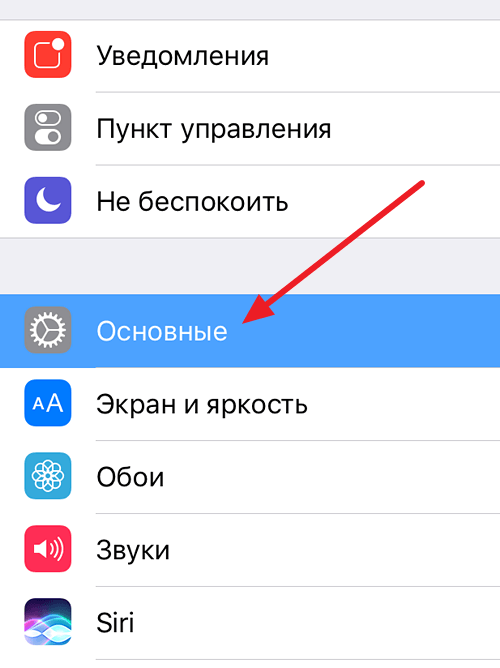
Для того чтобы изменить дату или время на Айфоне откройте приложение «Настройки» и перейдите в раздел «Основные».
После чего откройте раздел «Дата и время», который находится ближе к концу списка настроек, рядом с настройками клавиатуры, языка и региона.
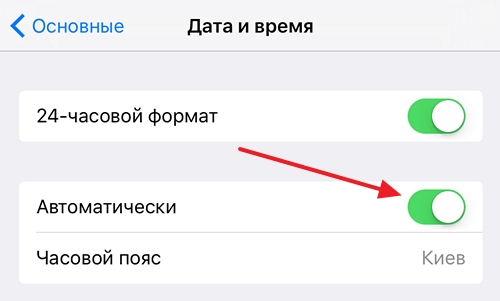
В результате перед вами появится экран с настройками времени и даты. По умолчанию, здесь включено автоматический выбор часового пояса и времени. Для того чтобы появилась возможность поменять время и дату нужно сначала выключить эту опцию.
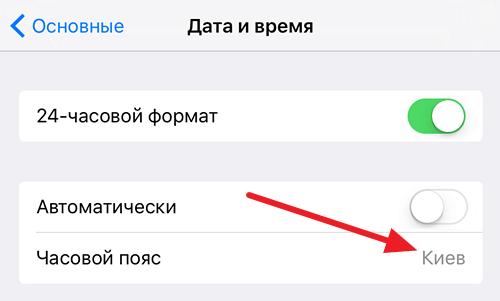
После выключения автоматического определения часового пояса и даты, эти параметры можно будет настроить вручную. Для этого нужно нажать на текущее значение часового пояса.
После чего ввести название города в поиск и выбрать предложенный вариант часового пояса.
Аналогичным способом можно изменить и дату с временем, для этого просто нажимаем на дату.
И выбираем нужную дату и время
Настройки времени и даты сохраняются автоматически. Поэтому после изменения этих параметров приложение «Настройки» можно просто закрывать.
Возможные проблемы при изменении времени и даты
Нужно отметить, что на мобильных устройствах Apple с 64 битными процессорами есть уязвимость, связанная с датой. Если на таком устройстве установить дату на 1 января 1970 года, то такое устройство зависнет и превратится в кирпич. При этом данная проблема не решается даже принудительной перезагрузкой устройства и приходится обращаться в сервисный центр. Возможно, эта проблема уже была исправлена, но во избежание лишних проблем это лучше не проверять.
Кроме этого, есть еще одна проблема связаная с календарем. Иногда, пользователи обнаруживают, что в их календаре упоминается «Эпоха Хенсей», 2559 год или что-то другое в подобном стиле.

Обычно это связано с тем, что на устройстве используется Японский или Буддийский календарь. Для решения этой проблемы открыть настройки Айфона, перейти в раздел «Основные – Язык и регион – Календарь» и выбрать «Григорианский календарь».
После смены календаря нужно будет вернуться в раздел «Основные – Дата и время» и изменить там время и дату.
Источник
![]()
Как изменить дату и время на iPhone и iPad?
Здравствуйте! Казалось бы, как поменять дату в системе iOS — это максимально элементарный вопрос, но он все равно может вызвать затруднения. И дело далеко не в каких-то «скрытых» настройках, тайных конфигурациях, премудростях меню и т.д. Все намного проще. При активации смартфона дата и время выставляются автоматически, причем достаточно точно (синхронизируясь со специальным сервером в сети интернет), поэтому редкий пользователь вообще задумывается над этим. Зачем что-то менять, если все и так прекрасно работает?
Однако в некоторых ситуациях (ярким примером которых может являться установка emu4ios) возникает необходимость поменять дату в iPad или iPhone вручную. Как это сделать? Держите подробную инструкцию!
Важно!!! На устройствах с 64-х битным процессором (iPhone 5S и выше) НЕЛЬЗЯ ПЕРЕВОДИТЬ дату на 1 января 1970 года. Получите кирпич. Восстановить будет невозможно, даже через DFU.
Примечание:
В конце статьи разбираем некоторые проблемы которые могут возникнуть, а также способы их решения. Никуда не уходите:)
Поехали! Вооружаемся планшетом, телефоном или плеером и переходим в основные настройки гаджета. Кстати, если меню устройства на незнакомом языке – переведите его на русский.
В «главных» настройках ищем пункт «Основные».


Прокручивая экран вниз видим именно то, что искали.

Нажимаем, после этого нам открывается меню корректировки даты в iOS, здесь можно не только поменять ее, но и… а давайте посмотрим, что еще можно сделать.

- 24-часовой формат. В Америке используется 12 часовой формат времени – до полудня и после полудня. Если вам ближе обычные и родные 21, 22, 23 часа – включаем этот переключатель.
- Автоматически. Включая этот режим, отдаем все на откуп системы. Часовой пояс, сегодняшнюю дату, время – она выставит самостоятельно (считывая данные из интернета, геопозиции, сим-карты).
- Часовой пояс – выбираем то место, где вы сейчас находитесь.
- Последняя строчка – указание даты и времени, нажимая на нее – вручную устанавливаем эти данные.
Если последних двух строчек у Вас нет – значит включен автоматический режим (см. пункт 2) и его нужно выключить.
Несколько важных замечаний.
- Сразу пролистывать года нельзя – только по дням, так что крутить время лет на 20 назад придется достаточно долго.
- Режим «Автоматически» выставляет данные корректно, во всяком случае, у меня никогда проблем не возникало.
- Если при установке у Вас не получается выставить правильную дату, то скорее всего дело в том, что на Вашем iPhone или iPad активирован японский или буддийский календарь. Необходимо сменить его на григорианский. В основных настройках – язык и текст – календарь. Картинки ниже – примеры подобного безобразия:)
")

Кстати, у меня на iPhone, часы постоянно торопятся, каждый месяц приблизительно на 1 минуту. Интересно, это только на моем экземпляре? Вы у себя не замечали подобного?
P.S. Секрет! Для того чтобы iOS всегда показывала точное время, необходимо поставить «лайк» к этой статье. Все просто, попробуйте!:)
![]()
Дорогие друзья! Минутка полезной информации:
1. Вступайте в группу ВК — возможно, именно там вы сможете получить всю необходимую вам помощь!
2. Иногда я занимаюсь ерундой (запускаю стрим) — играю в игрушки в прямом эфире. Приходите, буду рад общению!
3. Вы всегда можете кинуть деньги в монитор (поддержать автора). Респект таким людям!
P.S. Моя самая искренняя благодарность (карта *9644, *4550, *0524, *9328, *1619, *6732, *6299, *4889, *1072, *9808, *7501, *6056, *7251, *4949, *6339, *6715, *4037, *2227, *8877, *7872, *5193, *0061, *7354, *6622, *9273, *5012, *1962, *1687 + перевод *8953, *2735, *2760 + без реквизитов (24.10.2021 в 18.34; 10.12.2021 в 00.31)) — очень приятно!