-

1
Press and hold the Volume Down and Power buttons simultaneously. After 1-2 seconds the screen will flash indicated a screenshot was taken.
- The key combination may vary depending on your phone or tablet. On some Android models, you’ll have to hold the Home and Power buttons.
- If you’re using Android 9.0 or later, you can also take a screenshot by holding down the power button until a menu appears, and then tapping Screenshot.[1]
- If you only need to crop or draw on your screenshot, you may be able to do this immediately after you take the screenshot on Android. Simply click the pencil icon on the preview of the screenshot to draw on it or the crop symbol to change the size of the screenshot before you save it.
-
2
Open Photos. It’s the white icon with a multicolored flower inside (labeled Photos or Google Photos).[2]
- If you don’t have Google Photos on your Android, you can download it now from the Play Store.
Advertisement
-
3
Tap the screenshot to open it.
-
4
Tap the edit button. It’s the second icon at the bottom (the three lines with sliders) of Google Photos.
-
5
Select a filter. If you’d like to apply one of Google Photos’ preset color/lighting filters, select an option from the row at the bottom of the screen. Swipe left across the examples and tap the one you want to use.
-
6
Tap
to crop and/or rotate photo.
- Crop: The screenshot is surrounded by a border with white dots at each corner. Drag the dots until only the part of the image you want to keep is surrounded. The crop will happen automatically (though you can drag the dots back outward to undo your changes.
- Rotate: Tap the curved arrow icon at the bottom-right corner until the image appears as you like.
-
7
Tap Done to save your changes. If you’d like to edit the colors and lighting effects, continue with this method.
-
8
Tap the edit button. It’s at the bottom of the screen (the one with sliders and knobs). This opens the lighting and color options.
-
9
Adjust the lighting and color. Use the sliders to adjust the lighting and color of the screenshot if desired.
- Slide the “Light” slider left to make the image darker, or right to increase its brightness.
- Slide the “Color” slider left to decrease the intensity of the colors, or right to make the colors very saturated.
-
10
Tap Save when you’re finished. If you didn’t make any changes (or don’t want to save them), tap the X at the top-left corner, and tap Discard if prompted.


Advertisement
-
1
Press and hold the Volume Down and Power buttons simultaneously. After 1-2 seconds the screen will flash indicated a screenshot was taken. The image will be saved to your gallery.
- The key combination may vary depending on your phone or tablet. On some Android models, you’ll have to hold the Home and Power buttons.
- If you use Google Photos on your Galaxy, see this method instead.
- If you only need to crop or draw on your screenshot, you may be able to do this immediately after you take the screenshot on Android. Simply click the pencil icon on the preview of the screenshot to draw on it or the crop symbol to change the size of the screenshot before you save it.
-
2
Open the Gallery app. The icon usually has a yellow flower, and you’ll find it in the app drawer.
- If you see a preview of the screenshot right after you take it, you can tap it to open it in the editor without having to open the Gallery.
-
3
Tap the screenshot to open it. Several options will appear along the bottom of the screen.
- The remaining settings will vary depending on your version of the Gallery app, as well as which model of Galaxy you own.
-
4
Tap Edit (the pencil icon) or the icon with three-bars. The option you see will look different depending on your version.[3]
- If you already see some editing tools at the bottom of the screen, you won’t need to complete this step.
-
5
Crop the screenshot. Tap the crop icon (a square with two longer lines at two of its corners) at the bottom of the screen, or the Adjustment option. Drag the box to surround only the part of the screenshot you want to keep, and then tap SAVE or the check mark.[4]
-
6
Rotate the screenshot. To do this, tap the ⁝ menu at the top-right corner, then select Rotate Left or Rotate Right as needed.
-
7
Make additional edits as needed. The remaining options vary by model, but you’ll usually find options to choose a filter (usually under Effect), adjust colors (often called Tone), and draw on the image using a tool called Drawing.
-
8
Tap SAVE when you’re finished editing. This saves the changes to your screenshot.


Advertisement
-
1
Press the Home and Power buttons simultaneously to take a screenshot. The screen will flash briefly and a preview of the screenshot will appear at the bottom-left corner of the screen.
- If your iPhone doesn’t have a Home button, you can take a screenshot by pressing the Power and Volume-Up buttons.
-
2
Tap the screenshot preview. It’s the small image at the bottom-left corner. This opens the screenshot in the Markup tool, which displays several editing icons at the bottom.
- The preview will only stay at the bottom-left corner for a few seconds before disappearing. If it disappears before you tap it, follow these steps to open it in the Markup tool:[5]
- Open the Photos app.
- Tap the screenshot.
- Tap Edit at the top-right corner.
- Tap the three dots icon.
- Tap Markup (the icon of a marker at the bottom).
- The preview will only stay at the bottom-left corner for a few seconds before disappearing. If it disappears before you tap it, follow these steps to open it in the Markup tool:[5]
-
3
Drag the blue borders to crop the screenshot. Drag the blue lines to surround only the part of the screenshot you want to save, if desired.
-
4
Draw on the screenshot. Here’s how:
- Tap one of the drawing tools (the marker, highlighter, and pencil icons at the bottom-left corner) to select it.
- Tap the tool again to choose a line width and weight.
- Tap the filled-in circle to select a color.
- Use your finger to draw on or highlight certain areas.
- Tap the drawing tool you select at the bottom-left corner to return to the tools list.
- If you made a mistake in your drawing, tap the pencil eraser tool at the bottom and then tap the error to delete it.
-
5
Tap the Text tool to type on the photo. If you don’t see the “T” at the bottom of the screen, tap the + at the bottom-right corner to expand more options, and then tap Text.
- Tap the filled-in circle to choose a text color.
- Tap aA icon to choose a font face, size, and alignment.
-
6
Add shapes to the screenshot. Tap the + at the bottom-right corner, then tap the square, circle, chat bubble, or arrow to add these shapes to the screenshot.
- Use the filled-in circle at the bottom to select a color.
-
7
Add your signature. If you need to sign the screenshot, here’s how you can do that:
- Tap the + at the bottom-right corner
- Tap Signature.
- Use your finger to sign your name at the bottom (or select your signature if you’ve already created one).
- Tap Done at the top.
- If your signature doesn’t appear, tap Signature again, then tap your signature to place it.
- Drag your signature to the desired position.
-
8
Use the magnifying glass. If you’d like to increase the size of one area of the screenshot, tap the + and select Magnifier. You can then use your fingers to position or change the size of the enlarged area.
-
9
Tap Done when you’re finished editing. It’s at the top of the screen. A menu will expand at the bottom.
-
10
Tap Save to Photos. This saves the screenshot to the Photos app.


Advertisement
-
1
Press the Home and Power buttons simultaneously to take a screenshot. The screen will flash briefly and a preview of the screenshot will appear at the bottom-left corner of the screen.
- If your iPhone doesn’t have a Home button, you can take a screenshot by pressing the Power and Volume-Up buttons.
-
2
Open the Photos app. Your screenshot is saved to this location by default.
-
3
Tap the screenshot to open it.
-
4
Tap the “Edit” button. This button is located in the upper right corner of the screenshot and will bring up a variety of editing tools.
-
5
Tap the Magic Wand icon to make auto changes. This button is in the upper right corner of the screen and will automatically make color and lightning adjustments to the screenshot.
-
6
Tap the Dial icon to adjust color, light, and balance. This button appears in the bottom toolbar and will bring up 3 menus: “Light”, “Color”, and “B&W”.
- Each category will have a submenu with a number of options that can be adjusted with a slider.
-
7
Tap the “Filter” icon to add artistic filters. This icon is represented by 3 overlapping circles and is located on the bottom toolbar.
- Filters like Mono, Tonal, and Noir will add a black and white stylized filter.
- Filters like Fade or Instant will give the screenshot a washed out, retro look.
-
8
Tap the “Rotation Icon” to crop, zoom, or rotate the screenshot. This icon is located on the right of the bottom toolbar.
- Tap and drag the corners of the picture space to crop the picture.
- Adjust the slider to manually rotate the photo or press the “Rotate” icon (square with a curved arrow) to automatically rotate 90 degrees.
- Reverse pinch the photo to zoom.
-
9
Tap “Done” to keep your changes. This button appears in the lower right corner after changes have been made.
- You can undo your changes by tapping “Cancel” in the lower left corner and selecting “Discard Changes”.
- You can undo changes after saving by selecting “Revert” which appears in place of the “Done” button.


Advertisement
-
1
Type “Snipping Tool” into the search bar. You can usually open the search bar by clicking the circle or magnifying glass to the right of the Start menu.
- Microsoft plans to discontinue the Snipping Tool in a future release. This tool will be replaced by Windows Snip and Sketch.
-
2
Click Snipping Tool in the search results.
-
3
Click New. It’s at the top-left corner of the window. The screen will appear slightly faded and mouse cursor will change to a selection tool.
-
4
Click and drag the mouse to select the area you want to screenshot. When you release the cursor, the image will be captured and open in the Snipping Tool.
-
5
Click the pen to if you want to draw on the screenshot. It’s at the top of the tool. You can use this to write simple notes or circle areas of interest.
- To select a color, click the small arrow next to the icon, then choose a color.
-
6
Click the highlighter tool to highlight parts of the screenshot. You can then click and drag the tool to highlight text.
-
7
Click the eraser tool to remove changes. With the eraser tool selected, click a pen or highlighter marked to remove it.
-
8
Click File menu when you’re ready to save. It’s at the top-left corner of the tool.
-
9
Click Save As.
-
10
Type a name for your screenshot and click Save. This saves your edited screenshot.


Advertisement
-
1
Open Snip & Sketch. Snip & Sketch will be replacing the Snipping Tool as the default screenshot tool.
- If you have the app installed, type snip into the Windows search bar, then click Snip & Sketch in the search results.
- If you don’t have the app, you can install it now for free from the Microsoft Store.
- You must have the most up-to-date version of Windows to use Snip & Sketch.
-
2
Click New. It’s at the top-left corner of the tool if the window is expanded, or the bottom-left corner if the window is smaller. [6]
-
3
Take a screenshot. Choose one of these three options:
- To capture a square or rectangular area of the screen, click the rectangle with a dot at the top-center part of the tool, then draw a square around the desired area.
- To draw a freehand line around the area you want to capture, click the curved line shape with a dot (the second icon in the bar at the top), and then trace around the area you want to capture.
- To capture the entire screen, just click the rectangle with darkened corners (the third icon in bar at the top).
-
4
Use the drawing tools. Click the pen, pencil, or highlighter tool near the top-center part of Snip & Sketch to select a drawing tool, then tap the tool again to select a color and line weight. Use the mouse to draw on the image.[7]
-
5
Crop the screenshot. Click the crop symbol (the square with a diagonal line in the row at the top-center part of the screen), then draw a box around the area you want to keep. Click the check mark at the top-right corner to crop.
-
6
Click the disk to save your w.ork It’s near the top-right corner. This opens the Save As dialog, where you can choose a new location and filename for your screenshot and then click Save.


Advertisement
-
1
Press ⎙ PrtScr on your keyboard. This key will copy the contents of your screen to your clipboard.
- If your keyboard doesn’t have this key, you can use the one on the on-screen keyboard. Here’s how:
- Click the circle or magnifying glass to the right of the Start menu to open the search bar.
- Type on screen keyboard, and then click On-Screen Keyboard in the search results.
- Click the PrtScn key.
- If your keyboard doesn’t have this key, you can use the one on the on-screen keyboard. Here’s how:
-
2
Press ⊞ Win+R and type “mspaint” into the text field that appears. The Windows Run tool will launch Microsoft Paint upon pressing “OK”.
-
3
Press Ctrl+V to paste your screenshot into paint.
- You can also paste by right-clicking the paint area and selecting «Paste».
-
4
Click «Rotate» and select a rotation option. This button is located in the “Image” section of the toolbar and will open a menu to with different rotation options, such as vertical, horizontal, or 90 degree rotation.
-
5
Click «Resize» to change the image size. This button is located in the «Image» section of the toolbar and will open a window to set a new window size. Enter a new size value (e.g. 200% size) and press “OK”.
- You can select to adjust the size by pixel or percentage. Use pixel adjustments if you need a more precise change.
- Changing the size to be larger than the original will result in a loss of picture quality.
-
6
Crop your screenshot. Click the «Select» option from “Image” section of the toolbar. Click and drag to select the area of the screenshot you want to use then click the «Crop» button the right of the “Select” tool.
-
7
Click the “A” button to add text to your screenshot. This button is located in the tools section on the toolbar. Click and drag to select a text area and type to enter your desired text.[8]
-
8
Click the brush icon or select a shape to make markings on the screenshot. Both options can be selected from the “Shapes” section. Brushes can be used for freehand marking and shapes will make markings in the shape selected.
- You can change the color of the shapes and markers by selecting a color palette from the “Color” section.
-
9
Open the “File” menu and select “Save As” to save your changes. You will be prompted to name the screenshot and browse for a save location. Clicking “Save” will confirm your changes.


Advertisement
-
1
Press ⇧ Shift+⌘ Command+3 to take a screenshot. A screenshot will be taken of your current screen and saved to your desktop.
- If you’d like to capture a single window, press ⇧ Shift+⌘ Command+4, press the space bar, then click the window you want to capture.[9]
- To take a screenshot of a certain part of the screen, press ⇧ Shift+⌘ Command+4, and then click and drag the mouse to select the desired part of the screen.
- If you’d like to capture a single window, press ⇧ Shift+⌘ Command+4, press the space bar, then click the window you want to capture.[9]
-
2
Double-click the new file on your desktop. It’s the new image file that contains date and time you took the screenshot.
- If your images open with a different app, press ⌘ Command as you click the file, select Open With and choose Preview.
-
3
Rotate the image. You can click the rotate button (the rectangle with a curved arrow near the top of Preview) to rotate the image 90 degrees.
-
4
Adjust the size of the image. Click the Tools menu at the top of the screen, and then select Adjust Size. This allows you to change the height, width, and resolution as needed.
-
5
Crop the screenshot. If you want to save just part of the screenshot, click the selection tool (the dotted box near the top-left corner), and then click and drag the area you want to keep. Once selected, click the Tools menu at the top of the screen, and then Crop to cut out everything but the selected area.
-
6
Adjust the colors and brightness. If you want to get crafty, click the Tools menu and select Adjust Color. You can use the sliders to adjust the exposure, contrast, highlights, shadows, saturation, temperature, tint, and sharpness.
- Your screenshot will reflect your changes as you make them, allowing you to experiment and find the right mix of settings.
- Exposure, contrast, highlights, and shadows will affect the brightness and black/white balance of the colors.
- Saturation, temperature, and tint will affect the intensity of the colors.
-
7
Add text, shapes, and drawings.[10]
- Click the A button near the top-right corner to open the text tool, and then click anywhere on the screenshot to type.
- Click the pen tool to draw.
- Click the icon of a square and rectangle to insert shapes like triangles and circles.
-
8
Click the File menu when you’re finished. It’s at the top-left corner of the screen.
-
9
Click Save.
-
10
Enter a file name and click Save. Your edited screenshot is now saved.


Advertisement
Ask a Question
200 characters left
Include your email address to get a message when this question is answered.
Submit
Advertisement
Thanks for submitting a tip for review!
About This Article
Article SummaryX
1. Take the screenshot.
2. Open Google Photos.
3. Tap the screenshot.
4. Tap the edit button.
5. Use filters and tools.
6. Tap Done.
Did this summary help you?
Thanks to all authors for creating a page that has been read 192,857 times.
Is this article up to date?
-
1
Press and hold the Volume Down and Power buttons simultaneously. After 1-2 seconds the screen will flash indicated a screenshot was taken.
- The key combination may vary depending on your phone or tablet. On some Android models, you’ll have to hold the Home and Power buttons.
- If you’re using Android 9.0 or later, you can also take a screenshot by holding down the power button until a menu appears, and then tapping Screenshot.[1]
- If you only need to crop or draw on your screenshot, you may be able to do this immediately after you take the screenshot on Android. Simply click the pencil icon on the preview of the screenshot to draw on it or the crop symbol to change the size of the screenshot before you save it.
-
2
Open Photos. It’s the white icon with a multicolored flower inside (labeled Photos or Google Photos).[2]
- If you don’t have Google Photos on your Android, you can download it now from the Play Store.
Advertisement
-
3
Tap the screenshot to open it.
-
4
Tap the edit button. It’s the second icon at the bottom (the three lines with sliders) of Google Photos.
-
5
Select a filter. If you’d like to apply one of Google Photos’ preset color/lighting filters, select an option from the row at the bottom of the screen. Swipe left across the examples and tap the one you want to use.
-
6
Tap
to crop and/or rotate photo.
- Crop: The screenshot is surrounded by a border with white dots at each corner. Drag the dots until only the part of the image you want to keep is surrounded. The crop will happen automatically (though you can drag the dots back outward to undo your changes.
- Rotate: Tap the curved arrow icon at the bottom-right corner until the image appears as you like.
-
7
Tap Done to save your changes. If you’d like to edit the colors and lighting effects, continue with this method.
-
8
Tap the edit button. It’s at the bottom of the screen (the one with sliders and knobs). This opens the lighting and color options.
-
9
Adjust the lighting and color. Use the sliders to adjust the lighting and color of the screenshot if desired.
- Slide the “Light” slider left to make the image darker, or right to increase its brightness.
- Slide the “Color” slider left to decrease the intensity of the colors, or right to make the colors very saturated.
-
10
Tap Save when you’re finished. If you didn’t make any changes (or don’t want to save them), tap the X at the top-left corner, and tap Discard if prompted.
Advertisement
-
1
Press and hold the Volume Down and Power buttons simultaneously. After 1-2 seconds the screen will flash indicated a screenshot was taken. The image will be saved to your gallery.
- The key combination may vary depending on your phone or tablet. On some Android models, you’ll have to hold the Home and Power buttons.
- If you use Google Photos on your Galaxy, see this method instead.
- If you only need to crop or draw on your screenshot, you may be able to do this immediately after you take the screenshot on Android. Simply click the pencil icon on the preview of the screenshot to draw on it or the crop symbol to change the size of the screenshot before you save it.
-
2
Open the Gallery app. The icon usually has a yellow flower, and you’ll find it in the app drawer.
- If you see a preview of the screenshot right after you take it, you can tap it to open it in the editor without having to open the Gallery.
-
3
Tap the screenshot to open it. Several options will appear along the bottom of the screen.
- The remaining settings will vary depending on your version of the Gallery app, as well as which model of Galaxy you own.
-
4
Tap Edit (the pencil icon) or the icon with three-bars. The option you see will look different depending on your version.[3]
- If you already see some editing tools at the bottom of the screen, you won’t need to complete this step.
-
5
Crop the screenshot. Tap the crop icon (a square with two longer lines at two of its corners) at the bottom of the screen, or the Adjustment option. Drag the box to surround only the part of the screenshot you want to keep, and then tap SAVE or the check mark.[4]
-
6
Rotate the screenshot. To do this, tap the ⁝ menu at the top-right corner, then select Rotate Left or Rotate Right as needed.
-
7
Make additional edits as needed. The remaining options vary by model, but you’ll usually find options to choose a filter (usually under Effect), adjust colors (often called Tone), and draw on the image using a tool called Drawing.
-
8
Tap SAVE when you’re finished editing. This saves the changes to your screenshot.
Advertisement
-
1
Press the Home and Power buttons simultaneously to take a screenshot. The screen will flash briefly and a preview of the screenshot will appear at the bottom-left corner of the screen.
- If your iPhone doesn’t have a Home button, you can take a screenshot by pressing the Power and Volume-Up buttons.
-
2
Tap the screenshot preview. It’s the small image at the bottom-left corner. This opens the screenshot in the Markup tool, which displays several editing icons at the bottom.
- The preview will only stay at the bottom-left corner for a few seconds before disappearing. If it disappears before you tap it, follow these steps to open it in the Markup tool:[5]
- Open the Photos app.
- Tap the screenshot.
- Tap Edit at the top-right corner.
- Tap the three dots icon.
- Tap Markup (the icon of a marker at the bottom).
- The preview will only stay at the bottom-left corner for a few seconds before disappearing. If it disappears before you tap it, follow these steps to open it in the Markup tool:[5]
-
3
Drag the blue borders to crop the screenshot. Drag the blue lines to surround only the part of the screenshot you want to save, if desired.
-
4
Draw on the screenshot. Here’s how:
- Tap one of the drawing tools (the marker, highlighter, and pencil icons at the bottom-left corner) to select it.
- Tap the tool again to choose a line width and weight.
- Tap the filled-in circle to select a color.
- Use your finger to draw on or highlight certain areas.
- Tap the drawing tool you select at the bottom-left corner to return to the tools list.
- If you made a mistake in your drawing, tap the pencil eraser tool at the bottom and then tap the error to delete it.
-
5
Tap the Text tool to type on the photo. If you don’t see the “T” at the bottom of the screen, tap the + at the bottom-right corner to expand more options, and then tap Text.
- Tap the filled-in circle to choose a text color.
- Tap aA icon to choose a font face, size, and alignment.
-
6
Add shapes to the screenshot. Tap the + at the bottom-right corner, then tap the square, circle, chat bubble, or arrow to add these shapes to the screenshot.
- Use the filled-in circle at the bottom to select a color.
-
7
Add your signature. If you need to sign the screenshot, here’s how you can do that:
- Tap the + at the bottom-right corner
- Tap Signature.
- Use your finger to sign your name at the bottom (or select your signature if you’ve already created one).
- Tap Done at the top.
- If your signature doesn’t appear, tap Signature again, then tap your signature to place it.
- Drag your signature to the desired position.
-
8
Use the magnifying glass. If you’d like to increase the size of one area of the screenshot, tap the + and select Magnifier. You can then use your fingers to position or change the size of the enlarged area.
-
9
Tap Done when you’re finished editing. It’s at the top of the screen. A menu will expand at the bottom.
-
10
Tap Save to Photos. This saves the screenshot to the Photos app.
Advertisement
-
1
Press the Home and Power buttons simultaneously to take a screenshot. The screen will flash briefly and a preview of the screenshot will appear at the bottom-left corner of the screen.
- If your iPhone doesn’t have a Home button, you can take a screenshot by pressing the Power and Volume-Up buttons.
-
2
Open the Photos app. Your screenshot is saved to this location by default.
-
3
Tap the screenshot to open it.
-
4
Tap the “Edit” button. This button is located in the upper right corner of the screenshot and will bring up a variety of editing tools.
-
5
Tap the Magic Wand icon to make auto changes. This button is in the upper right corner of the screen and will automatically make color and lightning adjustments to the screenshot.
-
6
Tap the Dial icon to adjust color, light, and balance. This button appears in the bottom toolbar and will bring up 3 menus: “Light”, “Color”, and “B&W”.
- Each category will have a submenu with a number of options that can be adjusted with a slider.
-
7
Tap the “Filter” icon to add artistic filters. This icon is represented by 3 overlapping circles and is located on the bottom toolbar.
- Filters like Mono, Tonal, and Noir will add a black and white stylized filter.
- Filters like Fade or Instant will give the screenshot a washed out, retro look.
-
8
Tap the “Rotation Icon” to crop, zoom, or rotate the screenshot. This icon is located on the right of the bottom toolbar.
- Tap and drag the corners of the picture space to crop the picture.
- Adjust the slider to manually rotate the photo or press the “Rotate” icon (square with a curved arrow) to automatically rotate 90 degrees.
- Reverse pinch the photo to zoom.
-
9
Tap “Done” to keep your changes. This button appears in the lower right corner after changes have been made.
- You can undo your changes by tapping “Cancel” in the lower left corner and selecting “Discard Changes”.
- You can undo changes after saving by selecting “Revert” which appears in place of the “Done” button.
Advertisement
-
1
Type “Snipping Tool” into the search bar. You can usually open the search bar by clicking the circle or magnifying glass to the right of the Start menu.
- Microsoft plans to discontinue the Snipping Tool in a future release. This tool will be replaced by Windows Snip and Sketch.
-
2
Click Snipping Tool in the search results.
-
3
Click New. It’s at the top-left corner of the window. The screen will appear slightly faded and mouse cursor will change to a selection tool.
-
4
Click and drag the mouse to select the area you want to screenshot. When you release the cursor, the image will be captured and open in the Snipping Tool.
-
5
Click the pen to if you want to draw on the screenshot. It’s at the top of the tool. You can use this to write simple notes or circle areas of interest.
- To select a color, click the small arrow next to the icon, then choose a color.
-
6
Click the highlighter tool to highlight parts of the screenshot. You can then click and drag the tool to highlight text.
-
7
Click the eraser tool to remove changes. With the eraser tool selected, click a pen or highlighter marked to remove it.
-
8
Click File menu when you’re ready to save. It’s at the top-left corner of the tool.
-
9
Click Save As.
-
10
Type a name for your screenshot and click Save. This saves your edited screenshot.
Advertisement
-
1
Open Snip & Sketch. Snip & Sketch will be replacing the Snipping Tool as the default screenshot tool.
- If you have the app installed, type snip into the Windows search bar, then click Snip & Sketch in the search results.
- If you don’t have the app, you can install it now for free from the Microsoft Store.
- You must have the most up-to-date version of Windows to use Snip & Sketch.
-
2
Click New. It’s at the top-left corner of the tool if the window is expanded, or the bottom-left corner if the window is smaller. [6]
-
3
Take a screenshot. Choose one of these three options:
- To capture a square or rectangular area of the screen, click the rectangle with a dot at the top-center part of the tool, then draw a square around the desired area.
- To draw a freehand line around the area you want to capture, click the curved line shape with a dot (the second icon in the bar at the top), and then trace around the area you want to capture.
- To capture the entire screen, just click the rectangle with darkened corners (the third icon in bar at the top).
-
4
Use the drawing tools. Click the pen, pencil, or highlighter tool near the top-center part of Snip & Sketch to select a drawing tool, then tap the tool again to select a color and line weight. Use the mouse to draw on the image.[7]
-
5
Crop the screenshot. Click the crop symbol (the square with a diagonal line in the row at the top-center part of the screen), then draw a box around the area you want to keep. Click the check mark at the top-right corner to crop.
-
6
Click the disk to save your w.ork It’s near the top-right corner. This opens the Save As dialog, where you can choose a new location and filename for your screenshot and then click Save.
Advertisement
-
1
Press ⎙ PrtScr on your keyboard. This key will copy the contents of your screen to your clipboard.
- If your keyboard doesn’t have this key, you can use the one on the on-screen keyboard. Here’s how:
- Click the circle or magnifying glass to the right of the Start menu to open the search bar.
- Type on screen keyboard, and then click On-Screen Keyboard in the search results.
- Click the PrtScn key.
- If your keyboard doesn’t have this key, you can use the one on the on-screen keyboard. Here’s how:
-
2
Press ⊞ Win+R and type “mspaint” into the text field that appears. The Windows Run tool will launch Microsoft Paint upon pressing “OK”.
-
3
Press Ctrl+V to paste your screenshot into paint.
- You can also paste by right-clicking the paint area and selecting «Paste».
-
4
Click «Rotate» and select a rotation option. This button is located in the “Image” section of the toolbar and will open a menu to with different rotation options, such as vertical, horizontal, or 90 degree rotation.
-
5
Click «Resize» to change the image size. This button is located in the «Image» section of the toolbar and will open a window to set a new window size. Enter a new size value (e.g. 200% size) and press “OK”.
- You can select to adjust the size by pixel or percentage. Use pixel adjustments if you need a more precise change.
- Changing the size to be larger than the original will result in a loss of picture quality.
-
6
Crop your screenshot. Click the «Select» option from “Image” section of the toolbar. Click and drag to select the area of the screenshot you want to use then click the «Crop» button the right of the “Select” tool.
-
7
Click the “A” button to add text to your screenshot. This button is located in the tools section on the toolbar. Click and drag to select a text area and type to enter your desired text.[8]
-
8
Click the brush icon or select a shape to make markings on the screenshot. Both options can be selected from the “Shapes” section. Brushes can be used for freehand marking and shapes will make markings in the shape selected.
- You can change the color of the shapes and markers by selecting a color palette from the “Color” section.
-
9
Open the “File” menu and select “Save As” to save your changes. You will be prompted to name the screenshot and browse for a save location. Clicking “Save” will confirm your changes.
Advertisement
-
1
Press ⇧ Shift+⌘ Command+3 to take a screenshot. A screenshot will be taken of your current screen and saved to your desktop.
- If you’d like to capture a single window, press ⇧ Shift+⌘ Command+4, press the space bar, then click the window you want to capture.[9]
- To take a screenshot of a certain part of the screen, press ⇧ Shift+⌘ Command+4, and then click and drag the mouse to select the desired part of the screen.
- If you’d like to capture a single window, press ⇧ Shift+⌘ Command+4, press the space bar, then click the window you want to capture.[9]
-
2
Double-click the new file on your desktop. It’s the new image file that contains date and time you took the screenshot.
- If your images open with a different app, press ⌘ Command as you click the file, select Open With and choose Preview.
-
3
Rotate the image. You can click the rotate button (the rectangle with a curved arrow near the top of Preview) to rotate the image 90 degrees.
-
4
Adjust the size of the image. Click the Tools menu at the top of the screen, and then select Adjust Size. This allows you to change the height, width, and resolution as needed.
-
5
Crop the screenshot. If you want to save just part of the screenshot, click the selection tool (the dotted box near the top-left corner), and then click and drag the area you want to keep. Once selected, click the Tools menu at the top of the screen, and then Crop to cut out everything but the selected area.
-
6
Adjust the colors and brightness. If you want to get crafty, click the Tools menu and select Adjust Color. You can use the sliders to adjust the exposure, contrast, highlights, shadows, saturation, temperature, tint, and sharpness.
- Your screenshot will reflect your changes as you make them, allowing you to experiment and find the right mix of settings.
- Exposure, contrast, highlights, and shadows will affect the brightness and black/white balance of the colors.
- Saturation, temperature, and tint will affect the intensity of the colors.
-
7
Add text, shapes, and drawings.[10]
- Click the A button near the top-right corner to open the text tool, and then click anywhere on the screenshot to type.
- Click the pen tool to draw.
- Click the icon of a square and rectangle to insert shapes like triangles and circles.
-
8
Click the File menu when you’re finished. It’s at the top-left corner of the screen.
-
9
Click Save.
-
10
Enter a file name and click Save. Your edited screenshot is now saved.
Advertisement
Ask a Question
200 characters left
Include your email address to get a message when this question is answered.
Submit
Advertisement
Thanks for submitting a tip for review!
About This Article
Article SummaryX
1. Take the screenshot.
2. Open Google Photos.
3. Tap the screenshot.
4. Tap the edit button.
5. Use filters and tools.
6. Tap Done.
Did this summary help you?
Thanks to all authors for creating a page that has been read 192,857 times.
Is this article up to date?
Если вы еще не знаете, каким именно способом делаются снимки экрана на компьютере, перед переходом к следующим инструкциям ознакомьтесь с соответствующим тематическим материалом на нашем сайте, кликнув по расположенной далее ссылке.
Подробнее: Учимся делать скриншоты в Windows
Способ 1: Canva
Популярная онлайн-платформа для создания дизайнов, презентаций, публикаций в социальных сетях и многих других творческих проектов. Вся работа осуществляется во встроенном графическом редакторе, с помощью которого вполне можно решить и такую несложную задачу, как обработка снимка экрана.
Перейти к онлайн-сервису Canva
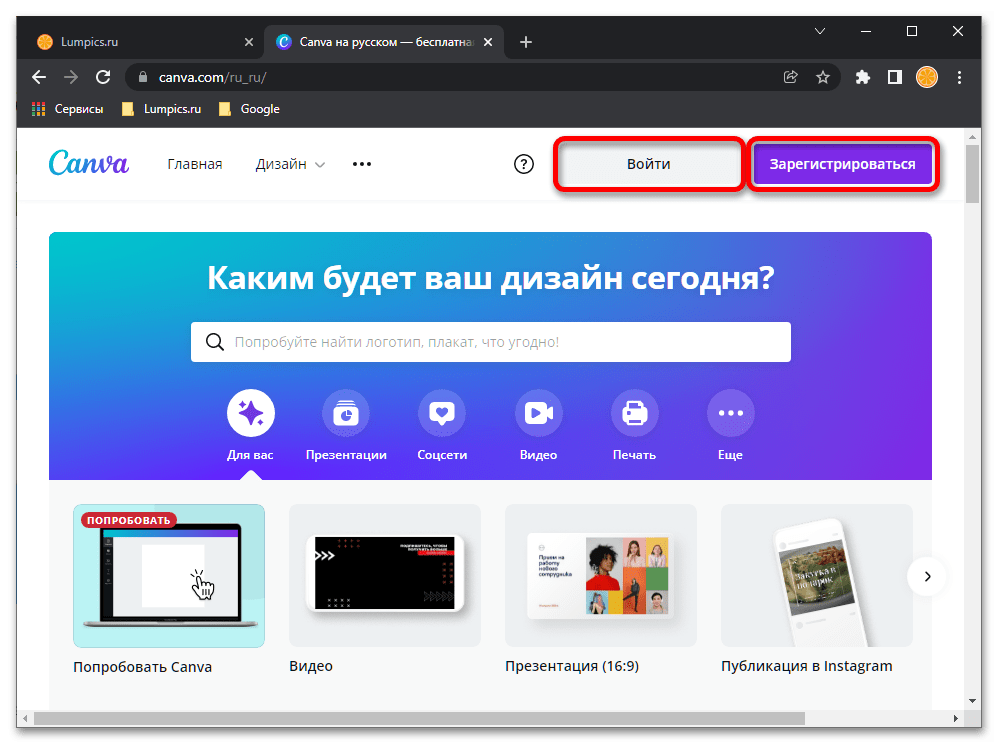
- После перехода по указанной выше ссылке нажмите «Войти» или «Зарегистрироваться».

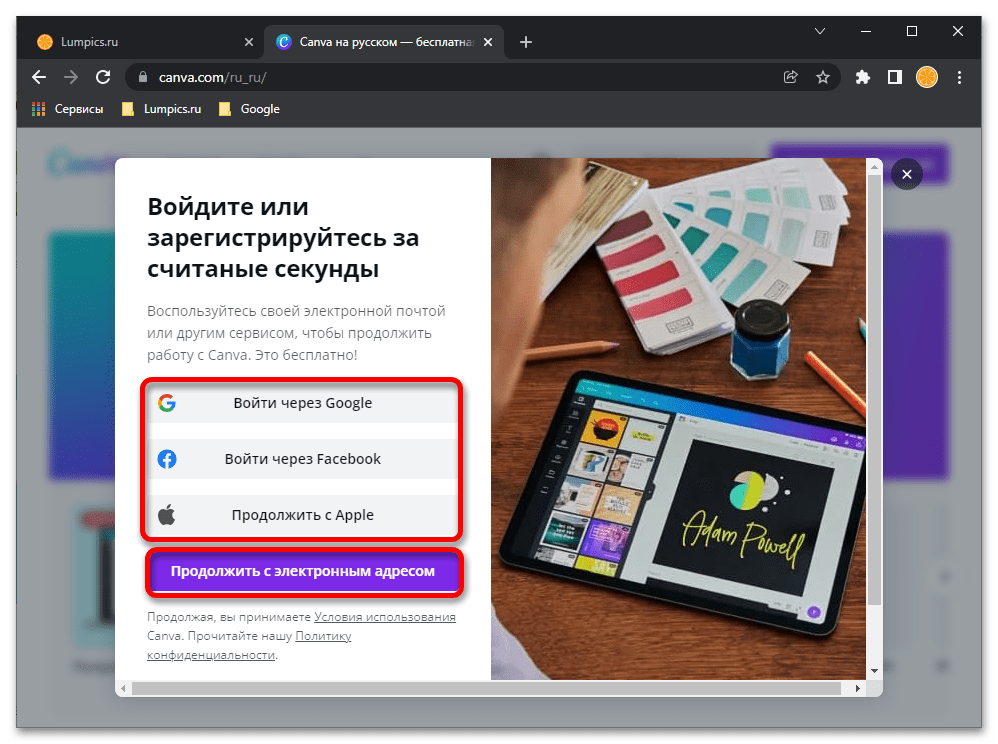
Укажите логин и пароль от аккаунта в сервисе, если вы ранее им пользовались, либо выберите один из удобных вариантов регистрации – по электронной почте или через Google, Apple, Facebook.
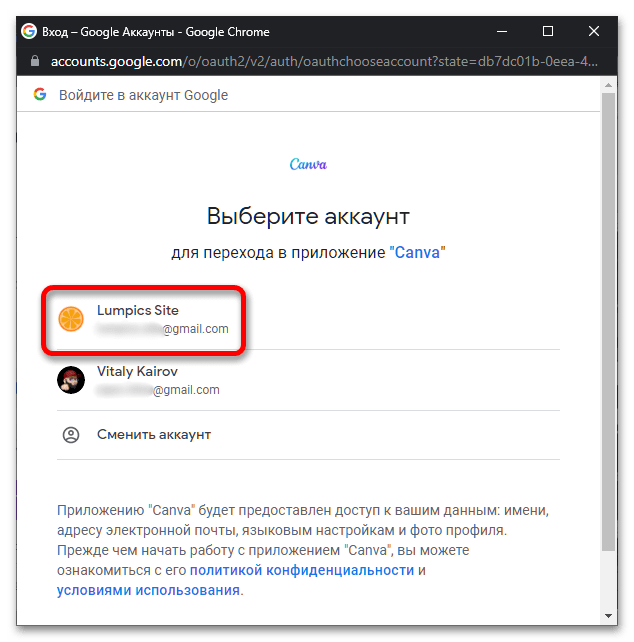
Подтвердите вход в соответствующую учетку.
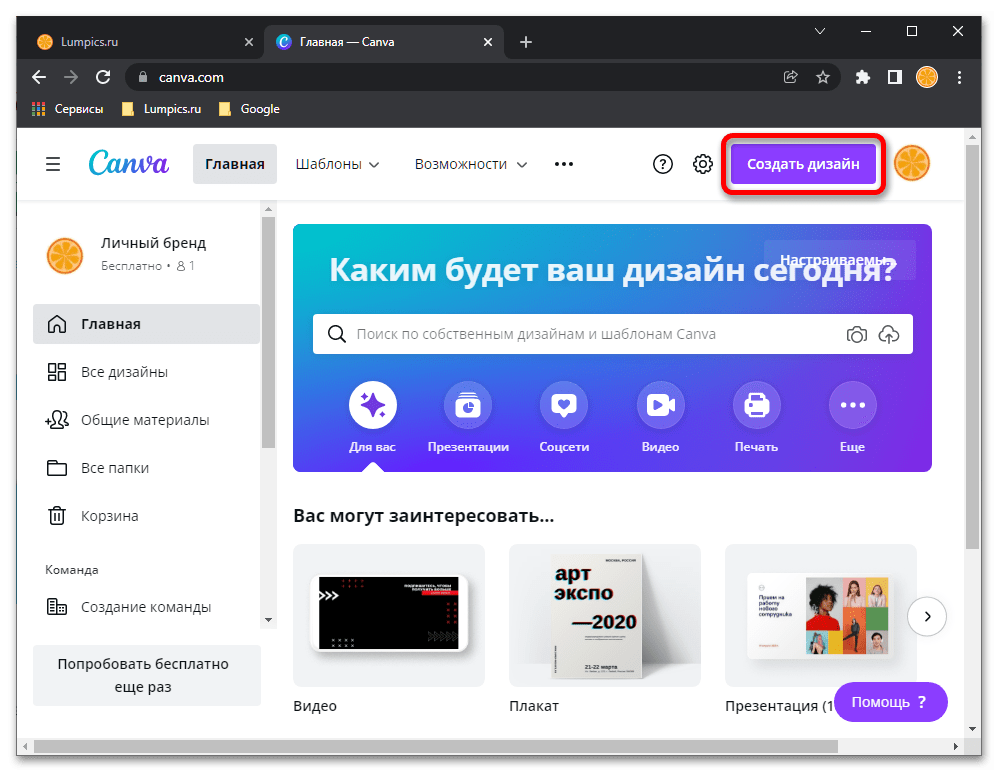
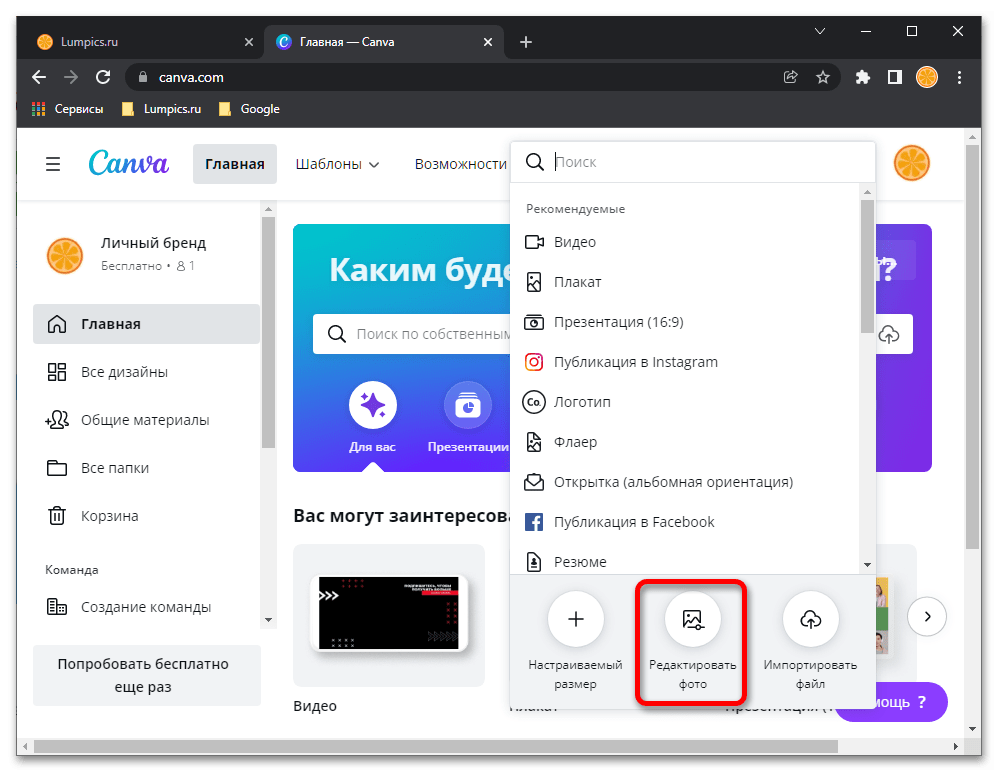
- Авторизовавшись в сервисе, воспользуйтесь кнопкой «Создать дизайн»

и выберите в появившемся меню пункт «Редактировать фото».
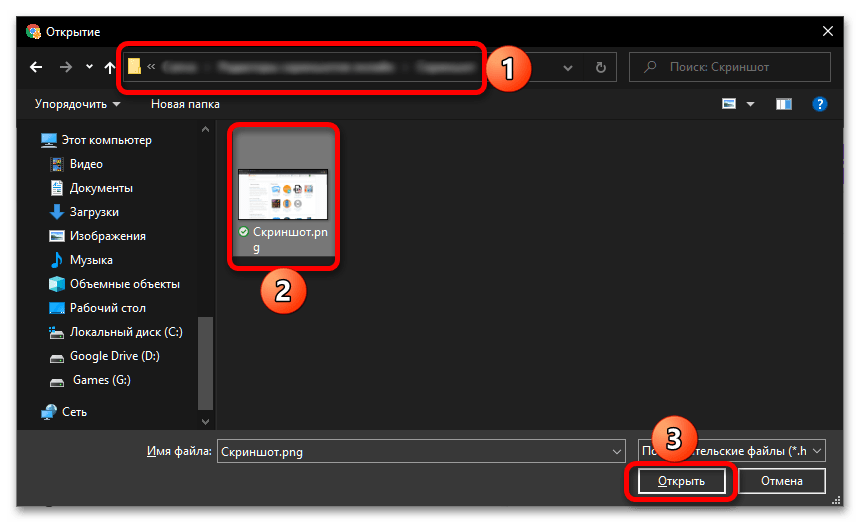
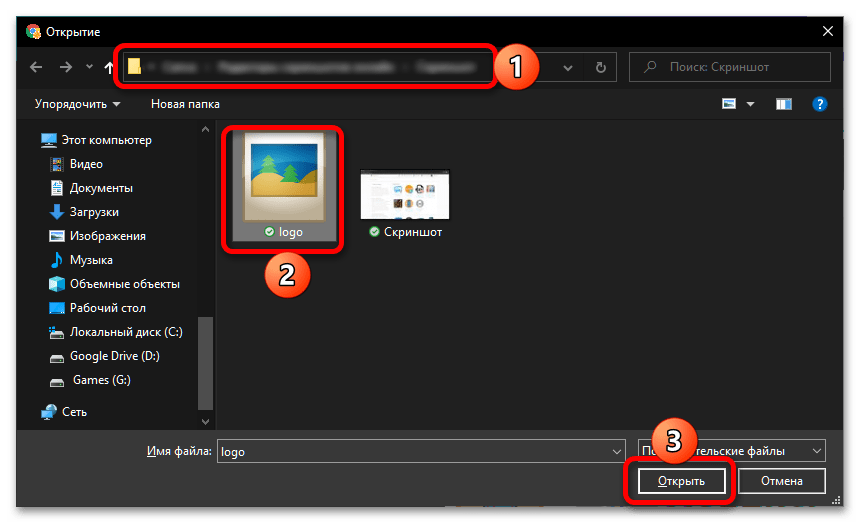
- В открывшемся окне системного «Проводника» перейдите в папку со скриншотом, который требуется отредактировать, выделите его и нажмите «Открыть».
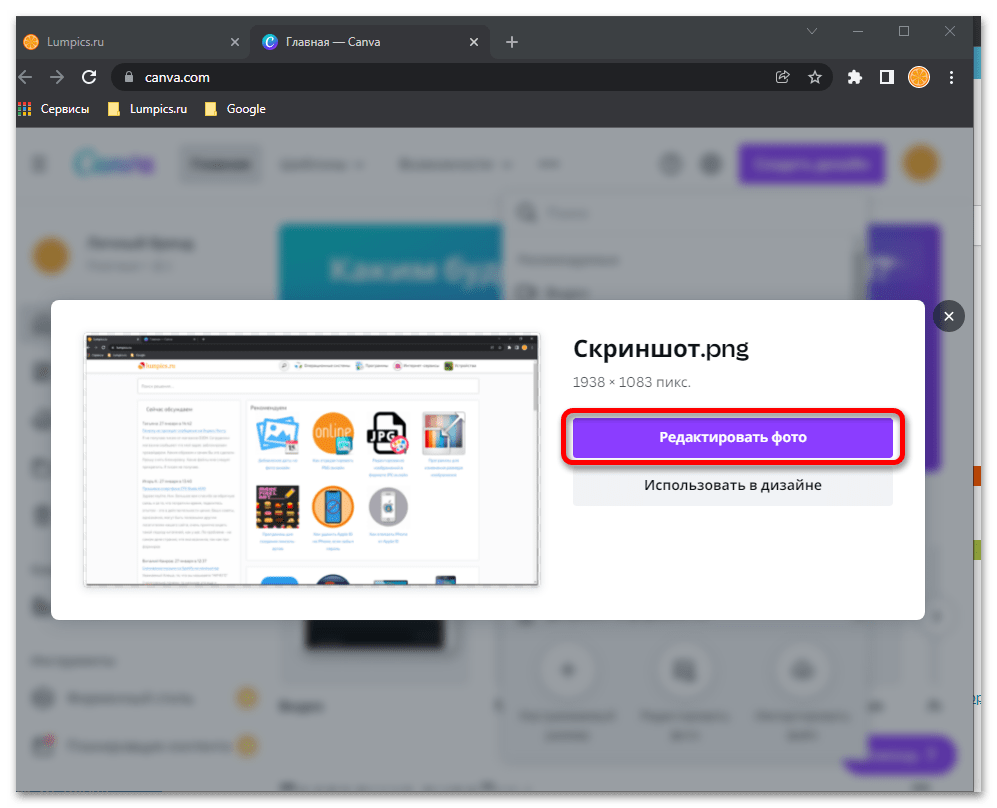
- После практически моментальной загрузки воспользуйтесь кнопкой «Редактировать фото».
- Для более удобного взаимодействия с картинкой рекомендуем увеличить масштаб ее отображения. Помимо этого, в любой момент вы можете перейти в полноэкранный режим просмотра.
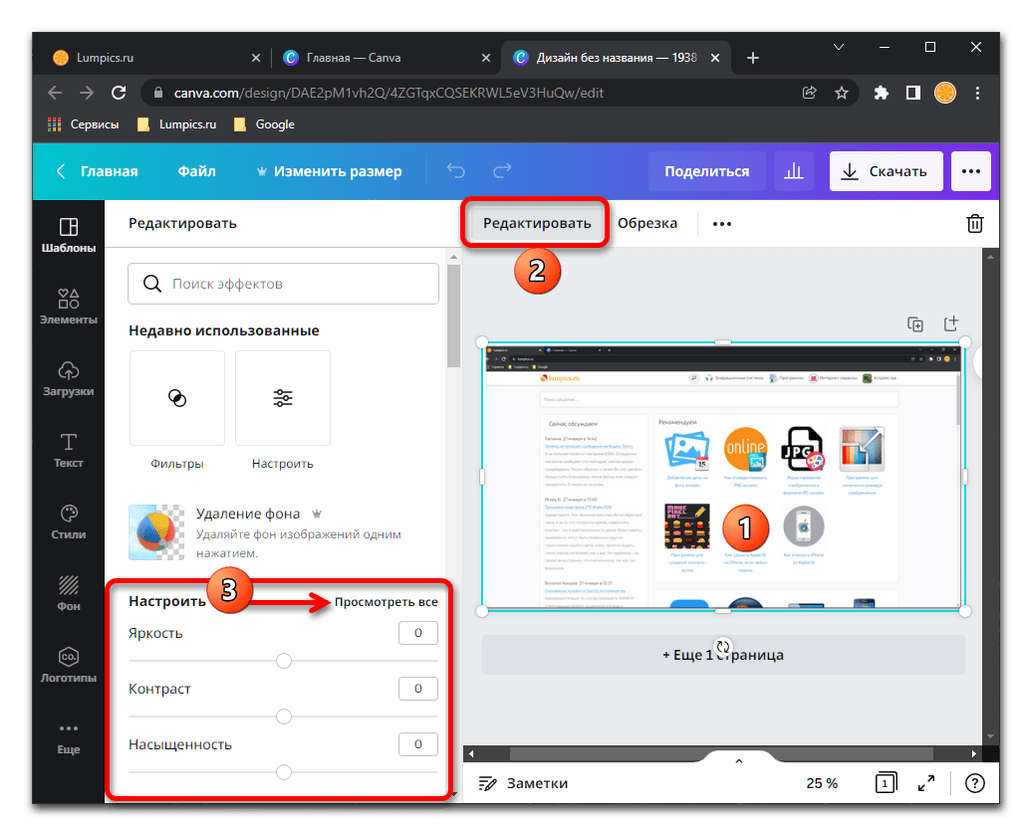
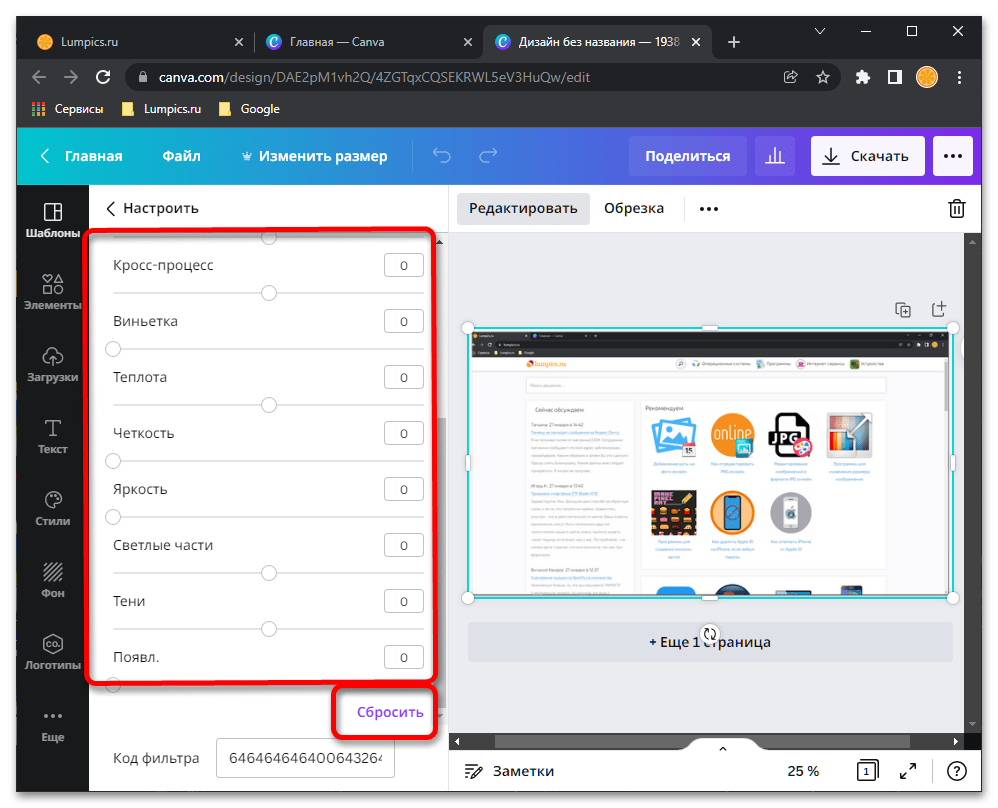
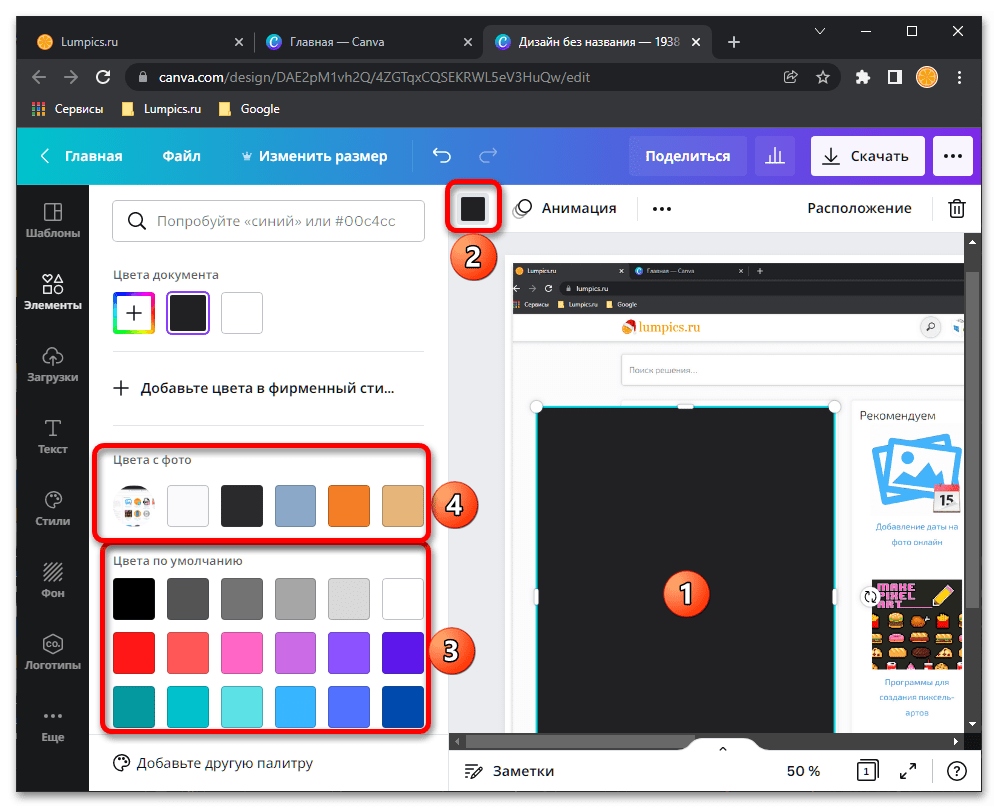
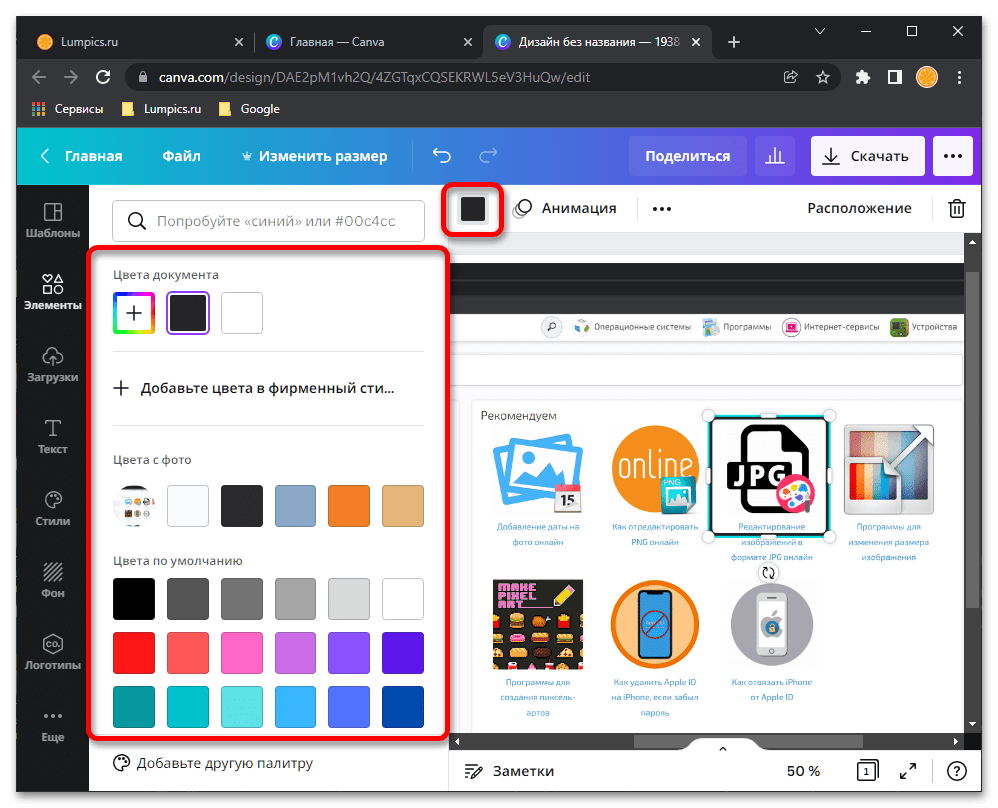
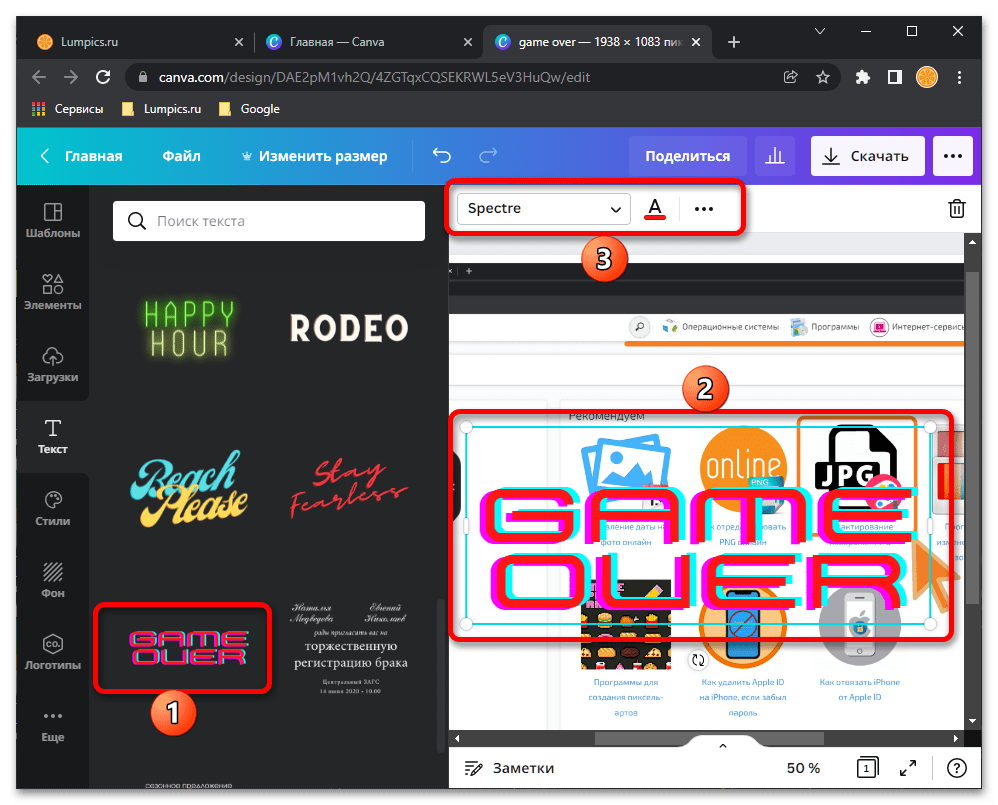
- Выделите изображение нажатием левой кнопки мышки (ЛКМ), после чего откройте вкладку «Редактировать» и, если есть такая необходимость, «Настройте» основные параметры: яркость, контраст, насыщенность и т. д.

Изменяйте указанные значения путем перемещения бегунка по шкале, при этом если что-то пойдет не так, вы всегда можете их «Сбросить».
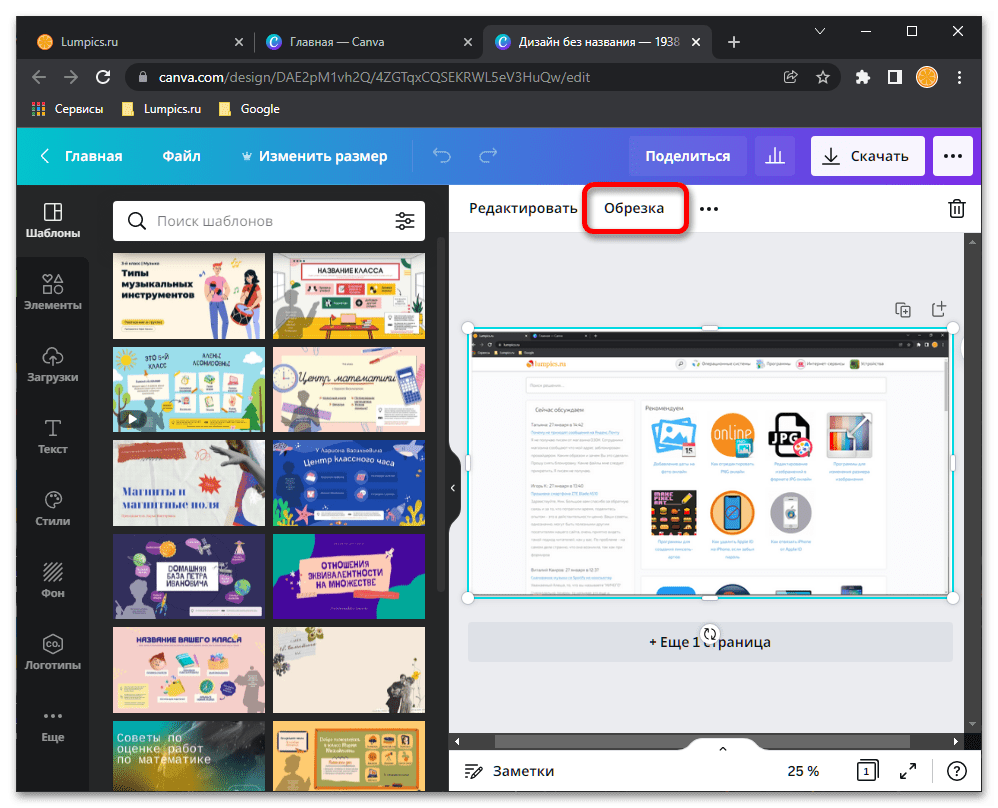
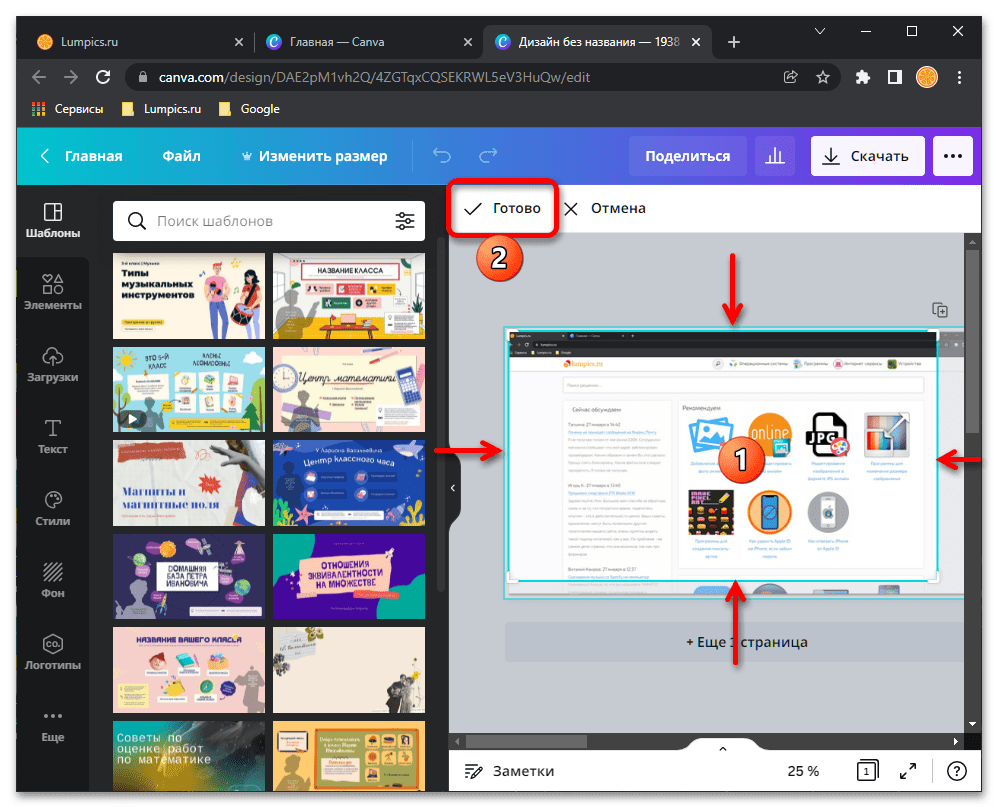
- Если требуется выполнить «Обрезку» скриншота до определенных размеров, выберите соответствующий пункт на верхней панели

и переместите рамку так, чтобы все ненужное осталось за ее пределами. Для подтверждения кликните «Готово».
Примечание: Если выполнить обрезку не получается (рамка не смещается), кликните по картинке правой кнопкой мышки и выберите в контекстном меню пункт «Убрать изображение с фона»
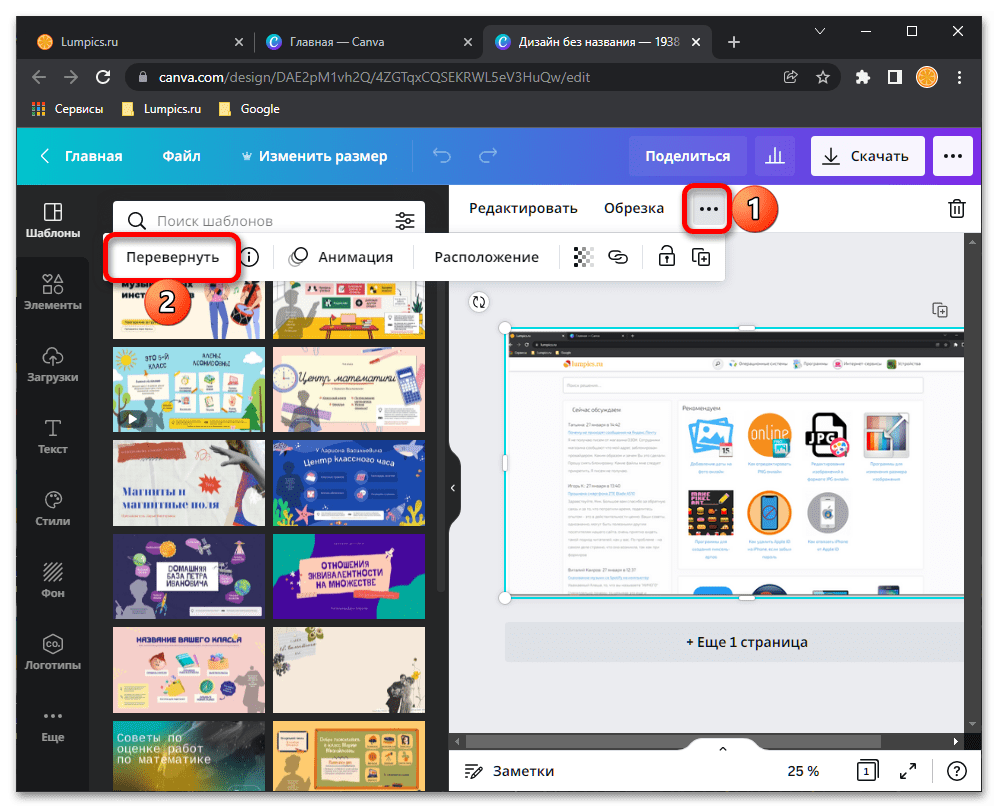
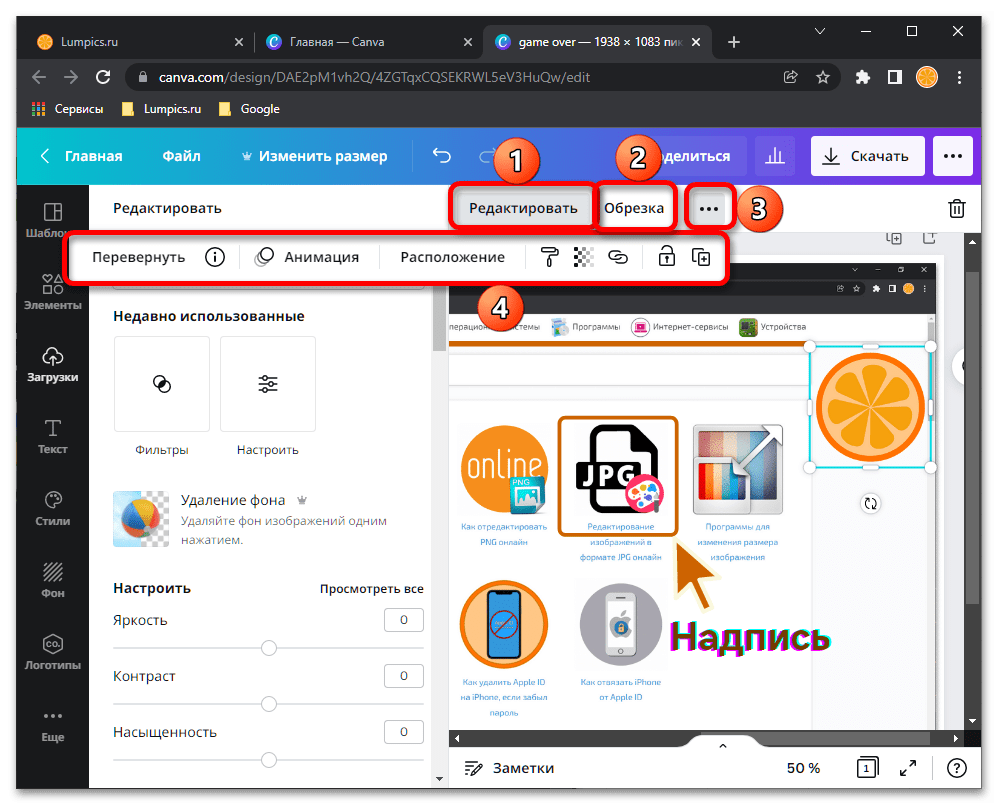
В дополнительном меню (кнопка с тремя точками) можно «Перевернуть» изображение — отразить его зеркально по вертикали или горизонтали.
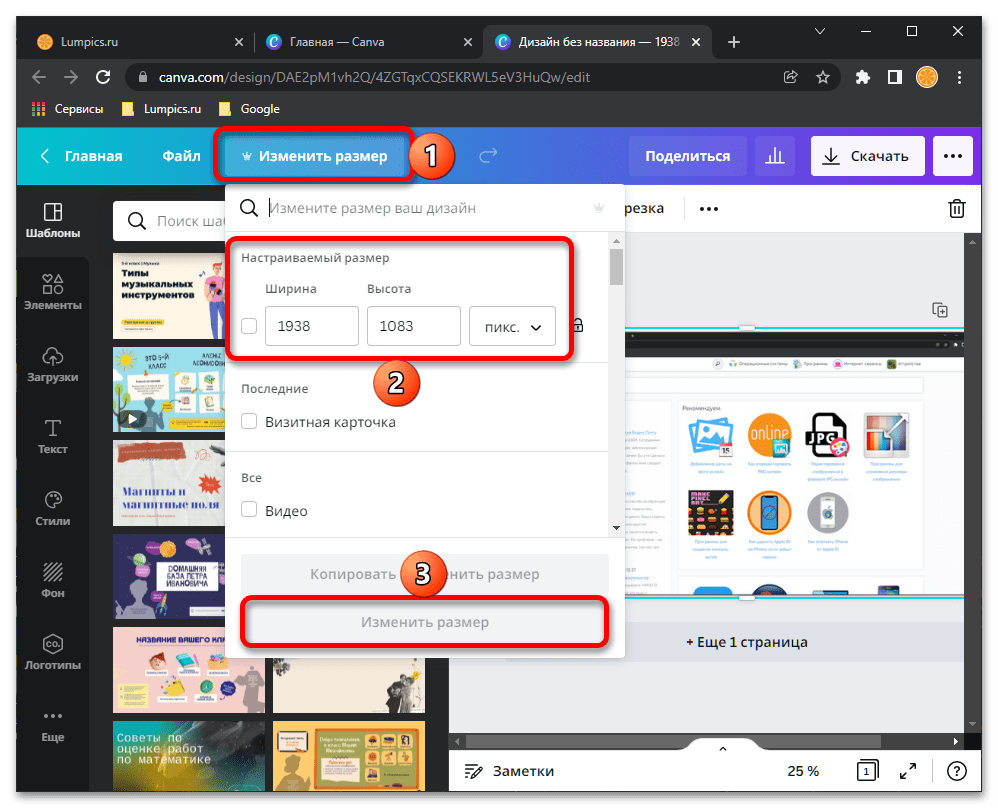
Помимо этого, имеется возможность «Изменить размер», указав конкретные значения ширины и высоты.
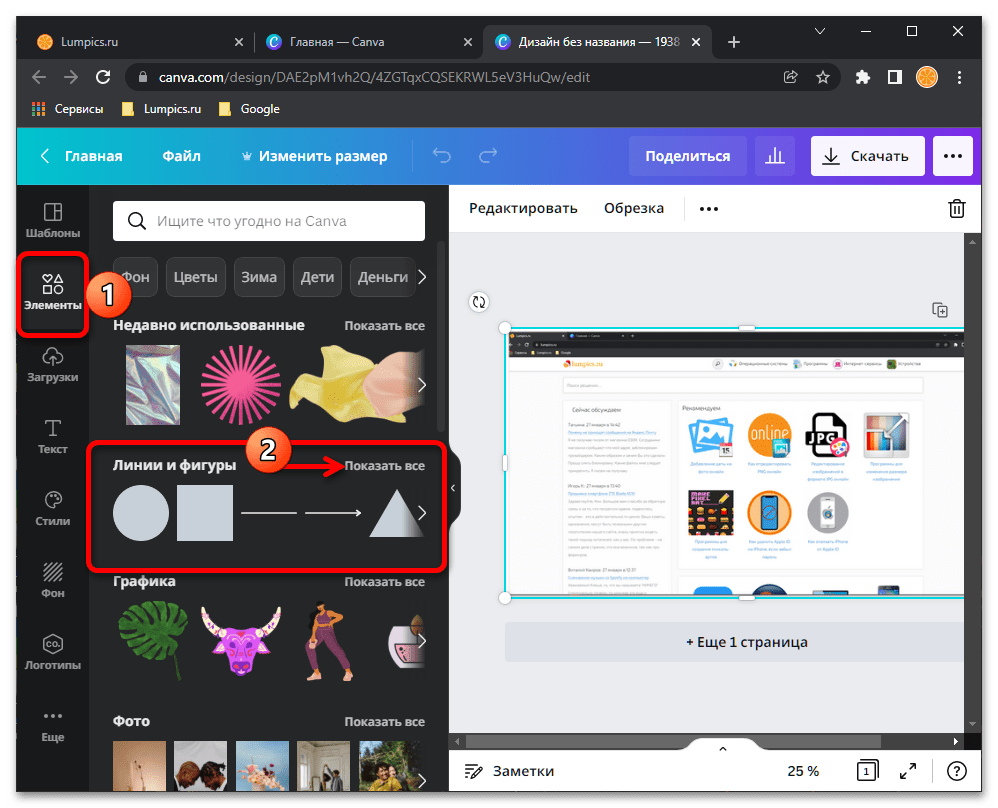
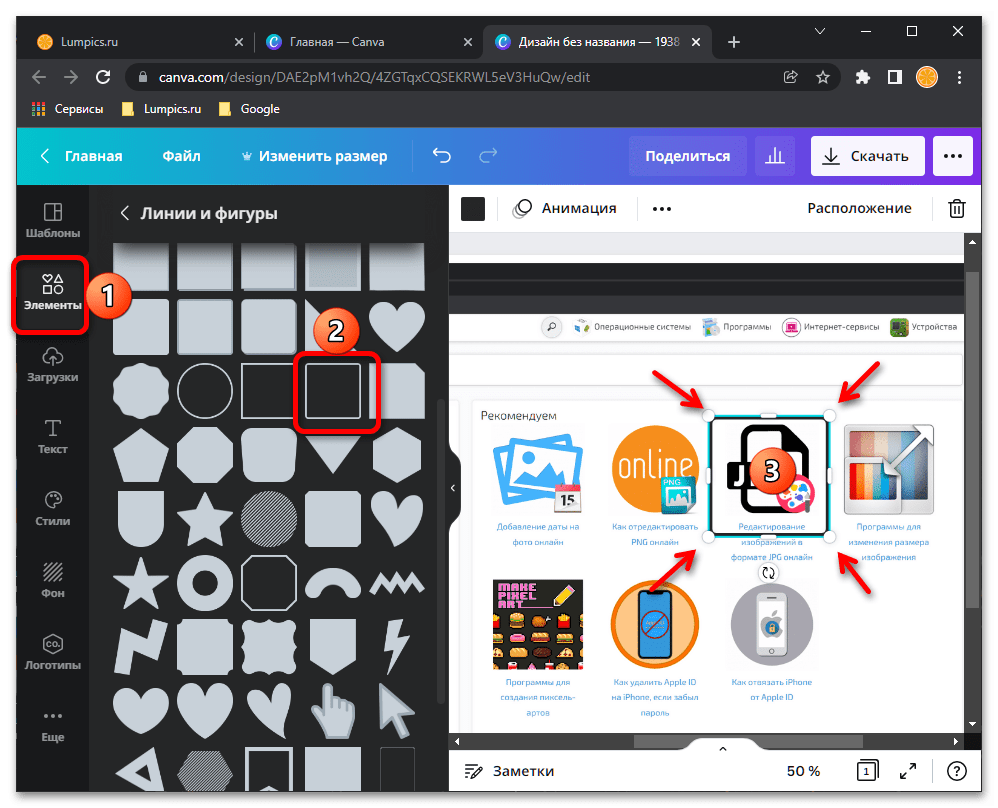
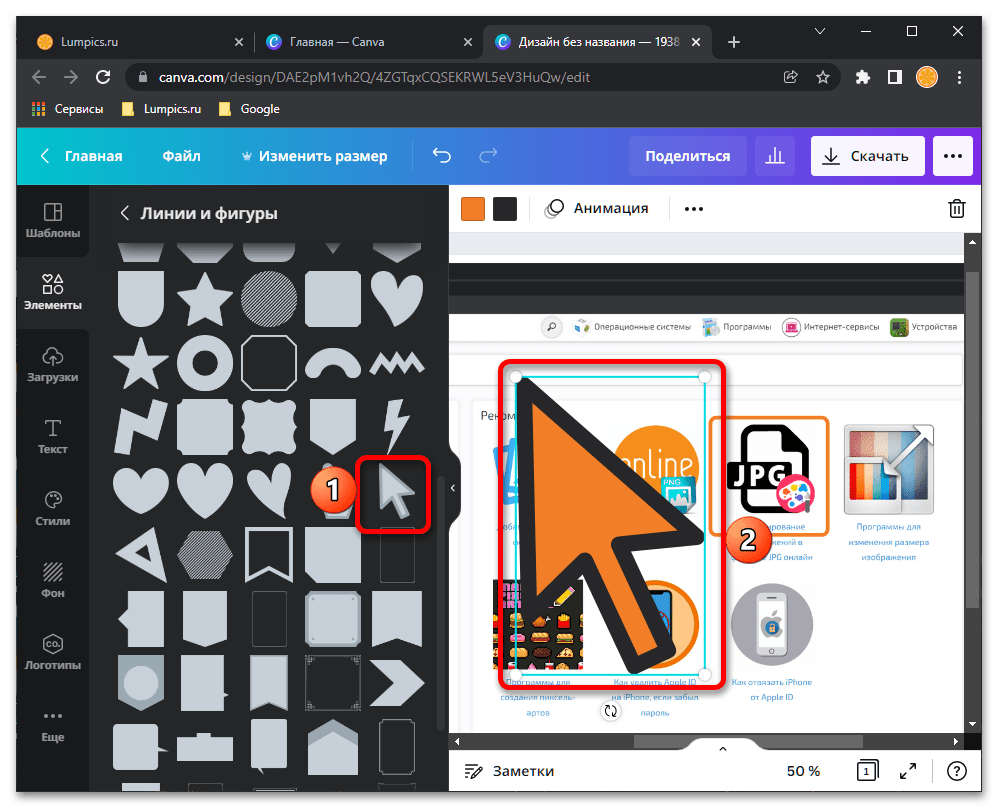
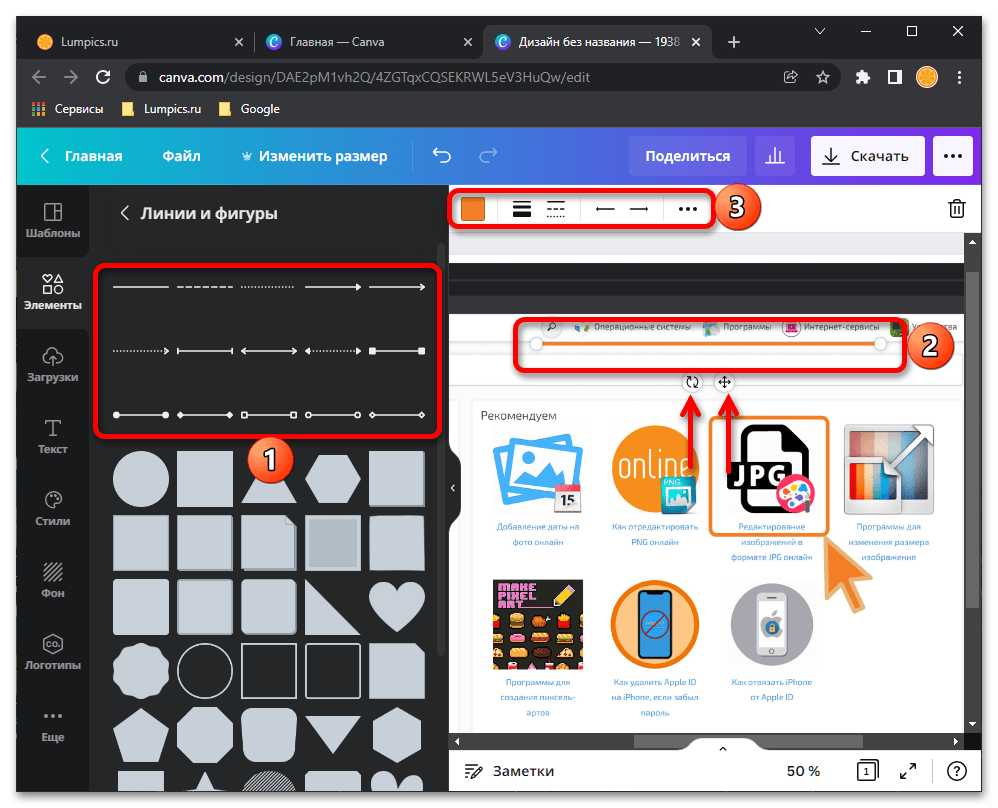
- Редактирование снимков экрана чаще всего подразумевает решение нескольких задач – скрытие личной и выделение важной информации, добавление разного рода указателей и объектов, надписей. Практически все необходимые для этих целей инструменты представлены в разделе «Линии и фигуры» вкладки «Элементы».
Примечание: Все элементы изначально добавляются в центр изображения, откуда их можно переместить в любое удобное место.
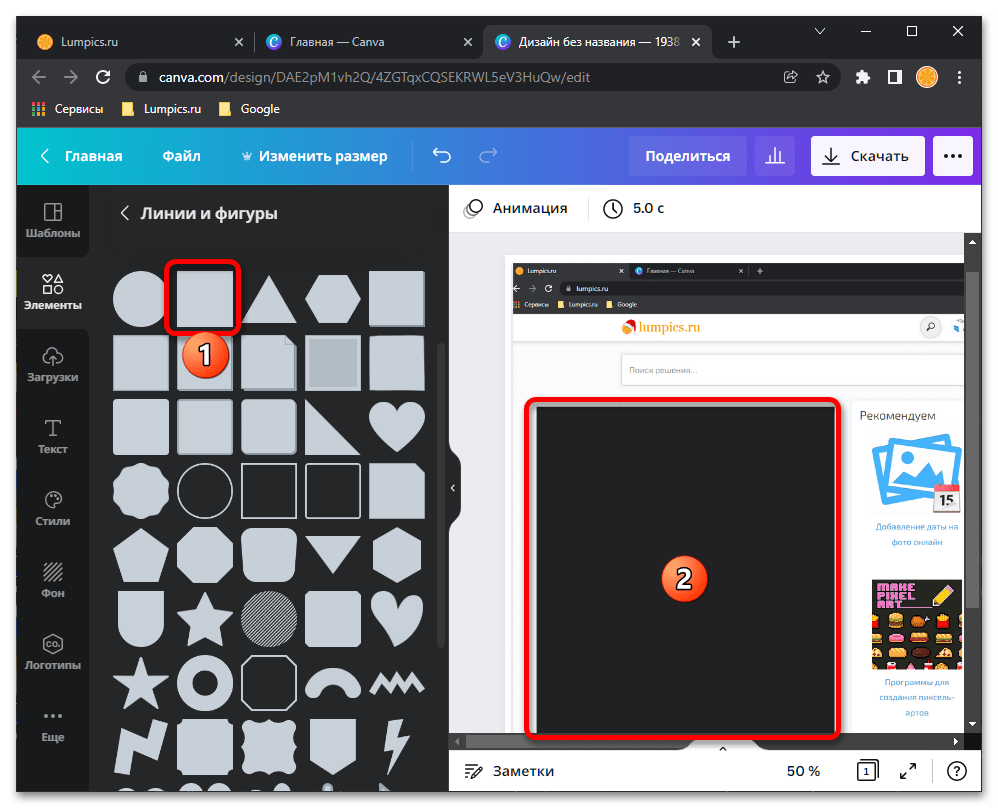
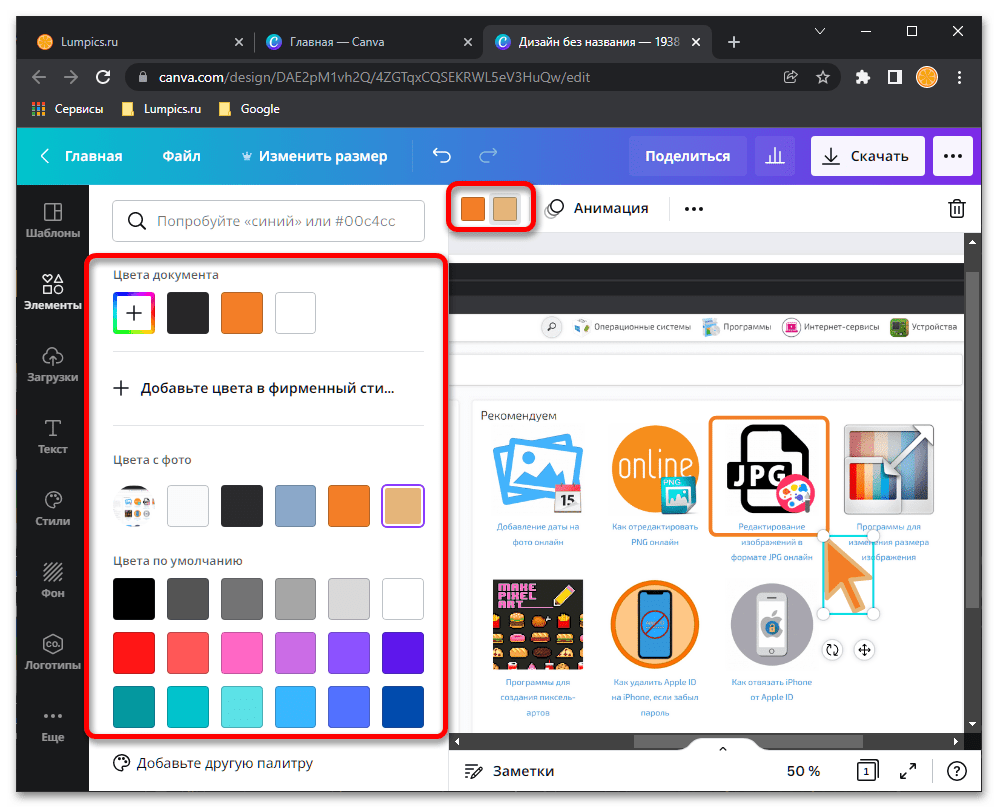
Так, с помощью обычного прямоугольника можно скрыть ненужный текст (или любые другие объекты). Стандартный цвет выбранной фигуры легко заменяется не только на любой из доступных на палитре, но и на один из тех, который является «доминирующим» на картинке – Canva автоматически распознает их и добавляет в блок «Цвета с фото».
Обвести что-то важное на скриншоте можно с помощью любой понравившейся фигуры без заливки.
Примечание: Изменение размера графических объектов осуществляется путем перемещения углов и границ рамки.
Цвет по умолчанию также можно изменить на любой доступный.
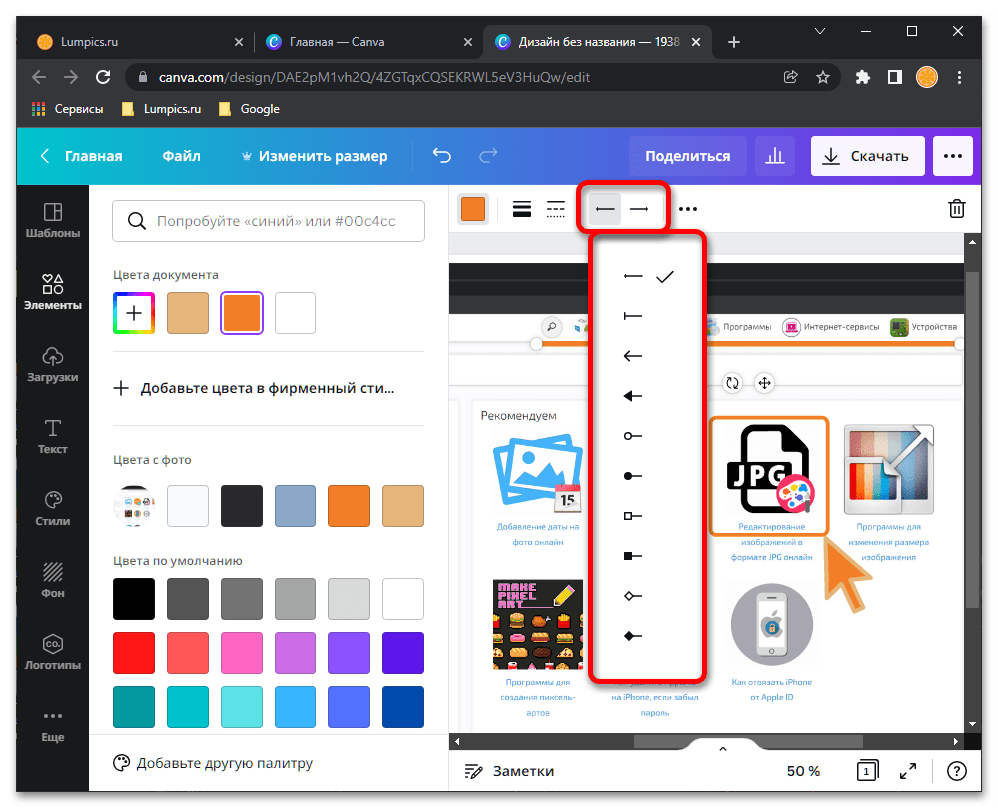
Аналогичным образом осуществляется добавление на снимок экрана любых других фигур,
например, стрелки и линии.
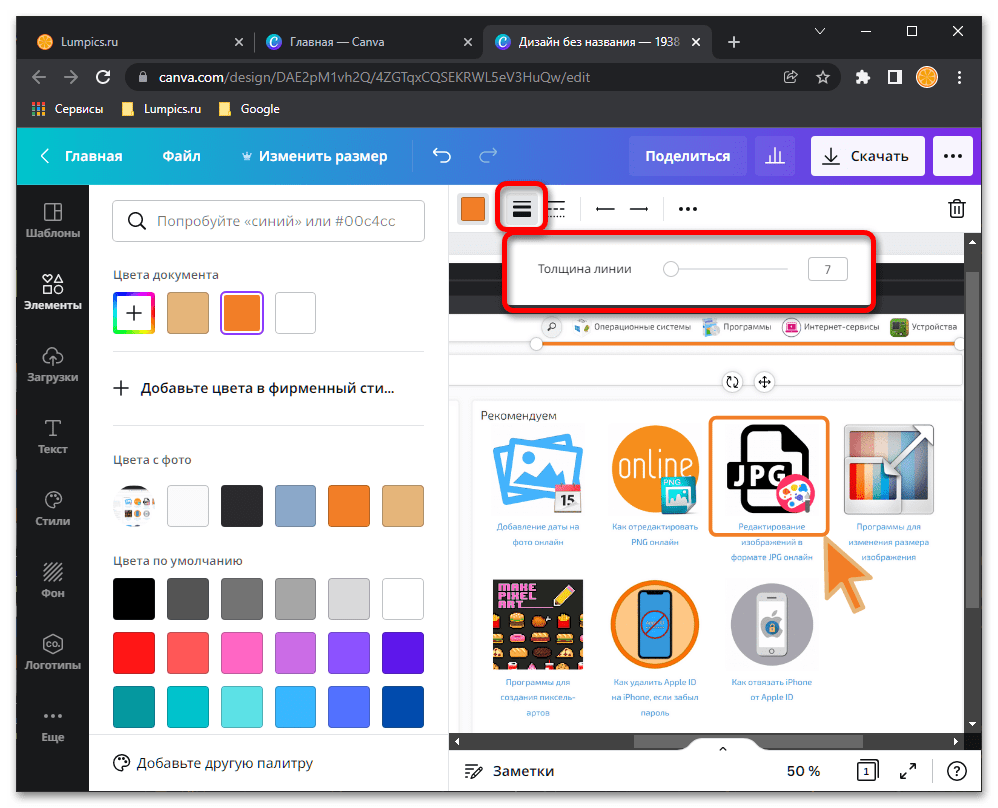
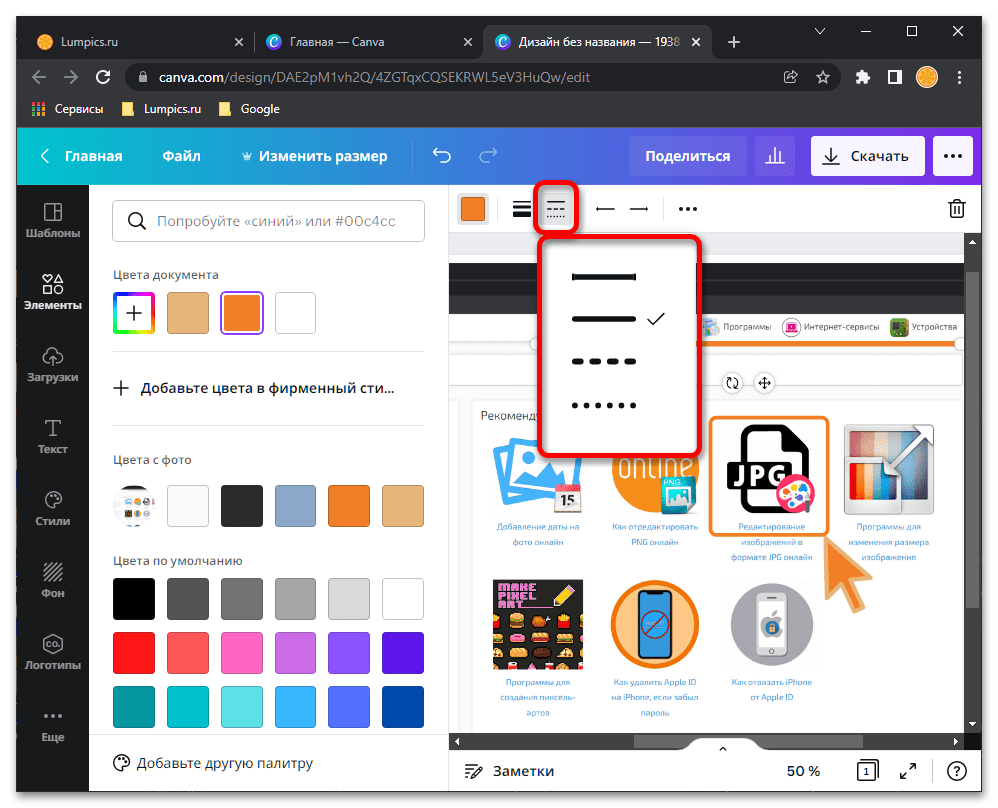
Для некоторых из них доступны дополнительные параметры (3),
предоставляющие возможность изменения внешнего вида –
толщины,
типа,
стилистики и т. д.
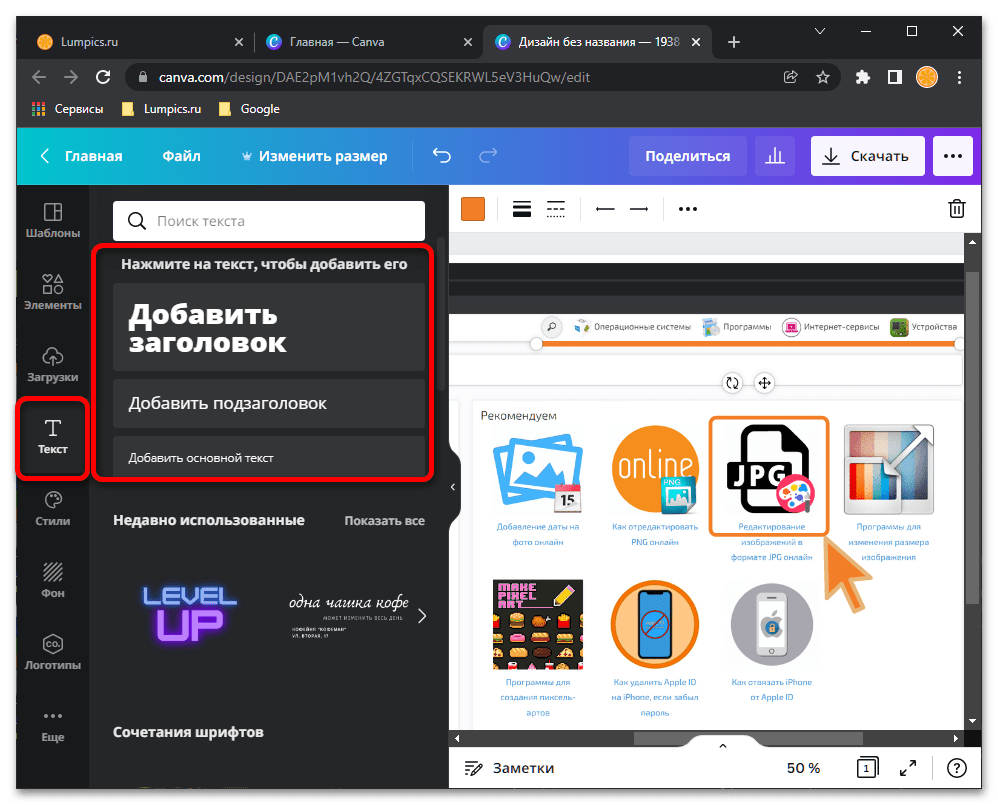
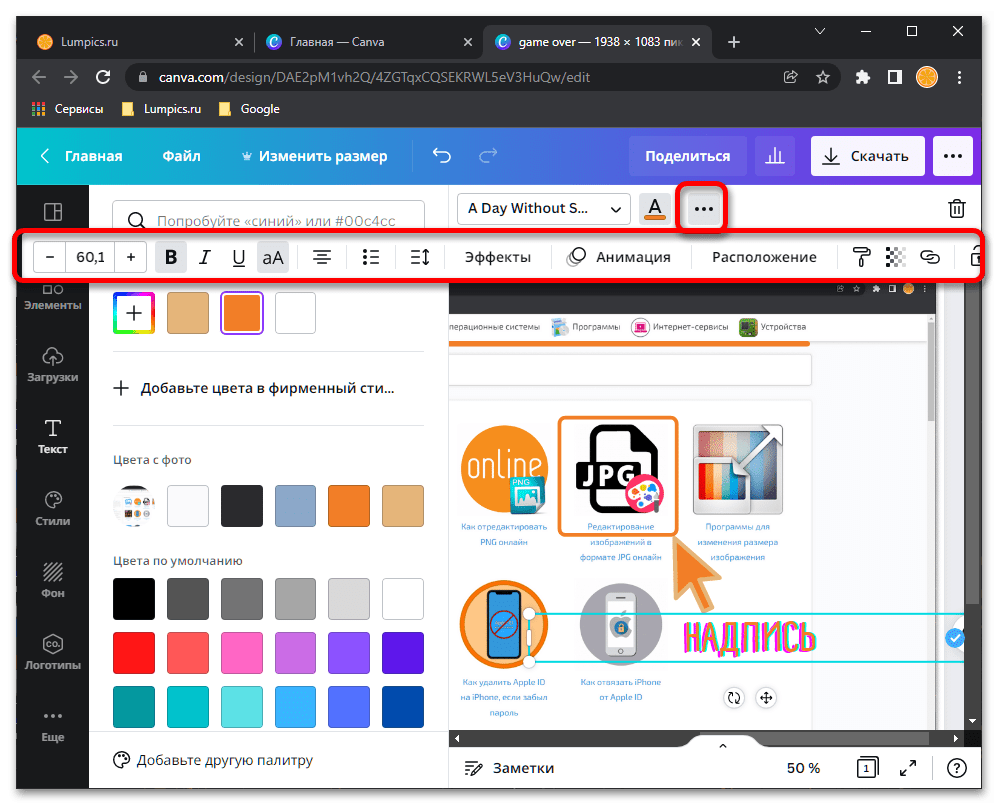
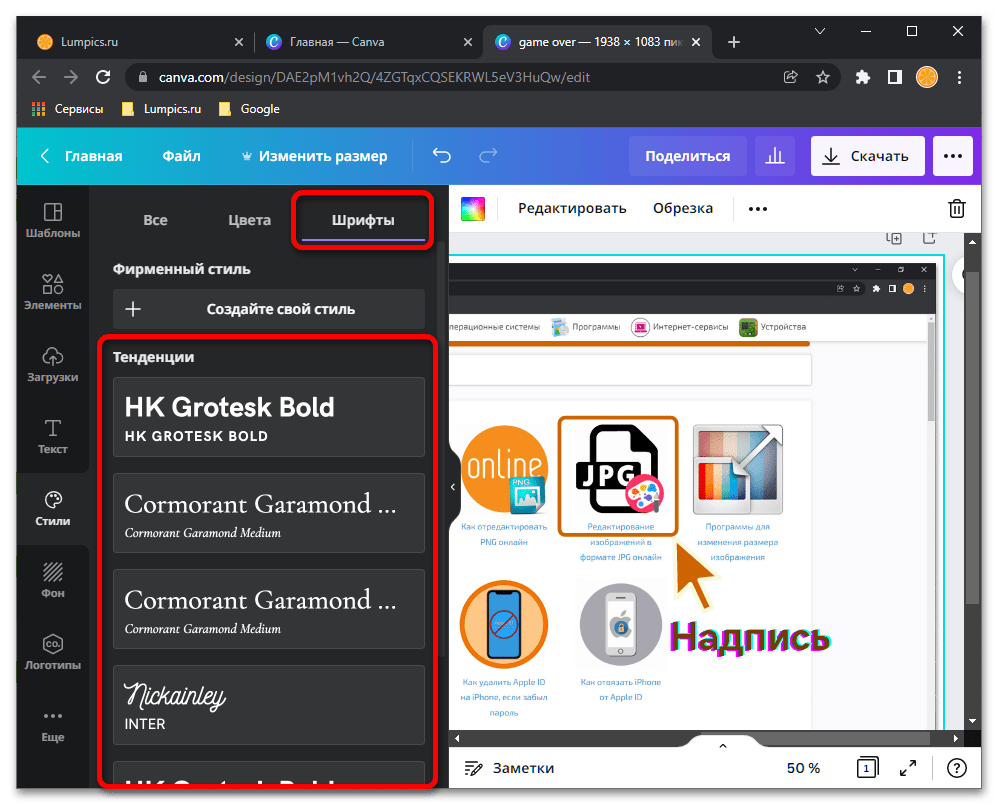
- Добавить поверх скриншота надпись можно во вкладке «Текст», в которой предусмотрены как «обычные» варианты,

так и стилизованные «Сочетания шрифтов» — по сути, наклейки с шаблонными (редактируемыми) записями.
Работа с текстовыми блоками осуществляется практически по тому же алгоритму, что и с фигурами –
доступно изменение расположения и размера, цвета, а также ряда характерных исключительно для текста параметров (тип, размер, начертание, выравнивание и т. д.).
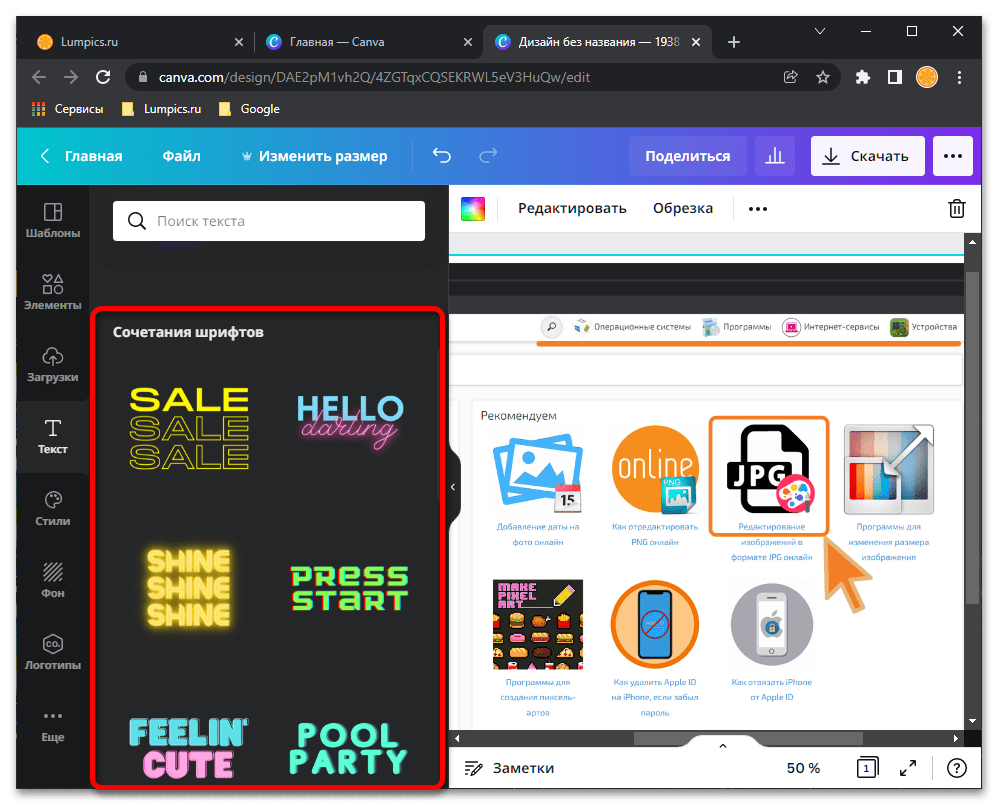
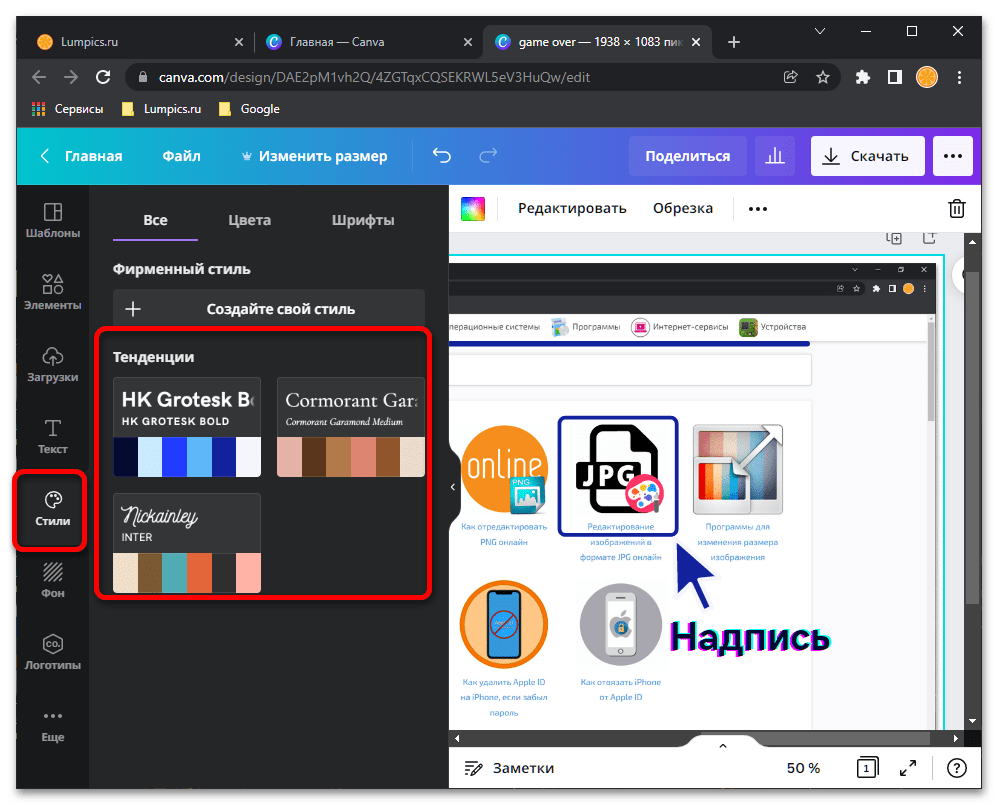
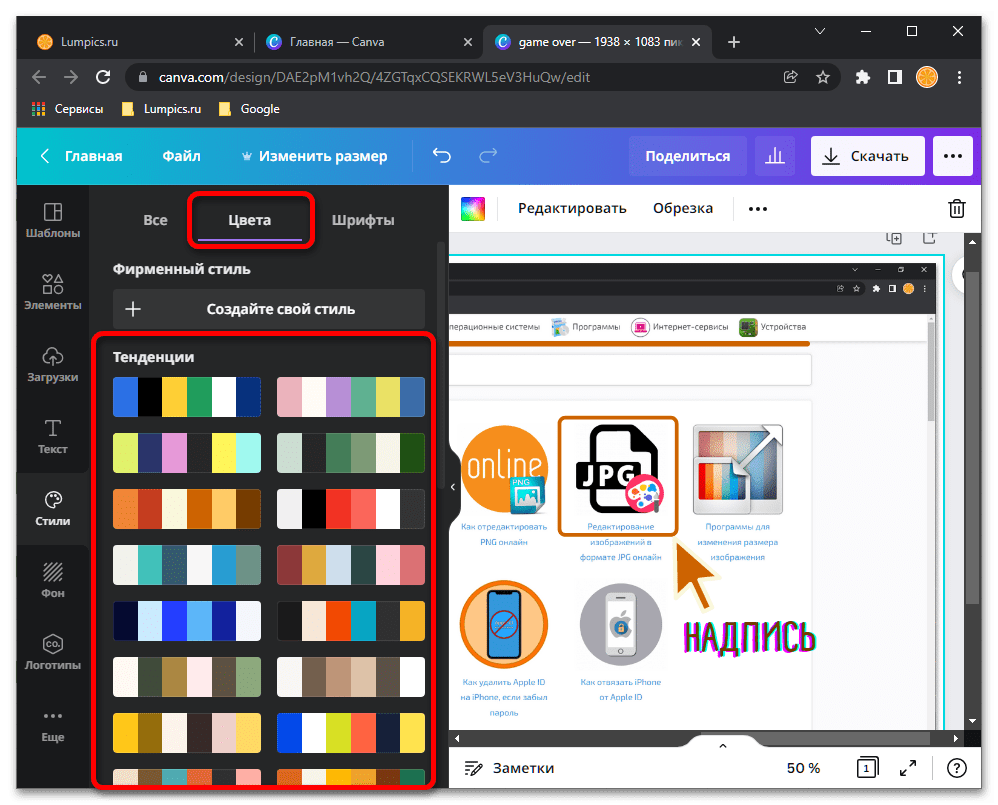
- Сделать блоки с текстом более привлекательными и оригинальными помогут «Стили» — раздел онлайн-сервиса Canva, в котором представлены наборы с характерными шрифтами и цветовыми решениями.
Их можно использовать как комплексно,
так и каждый отдельно.
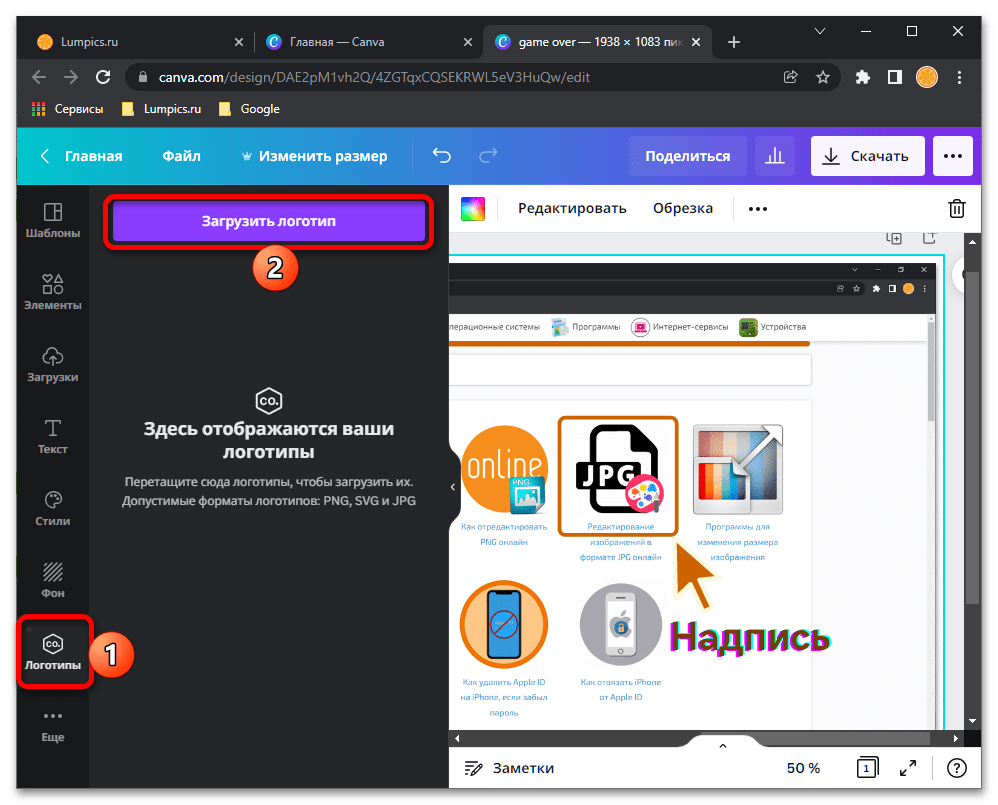
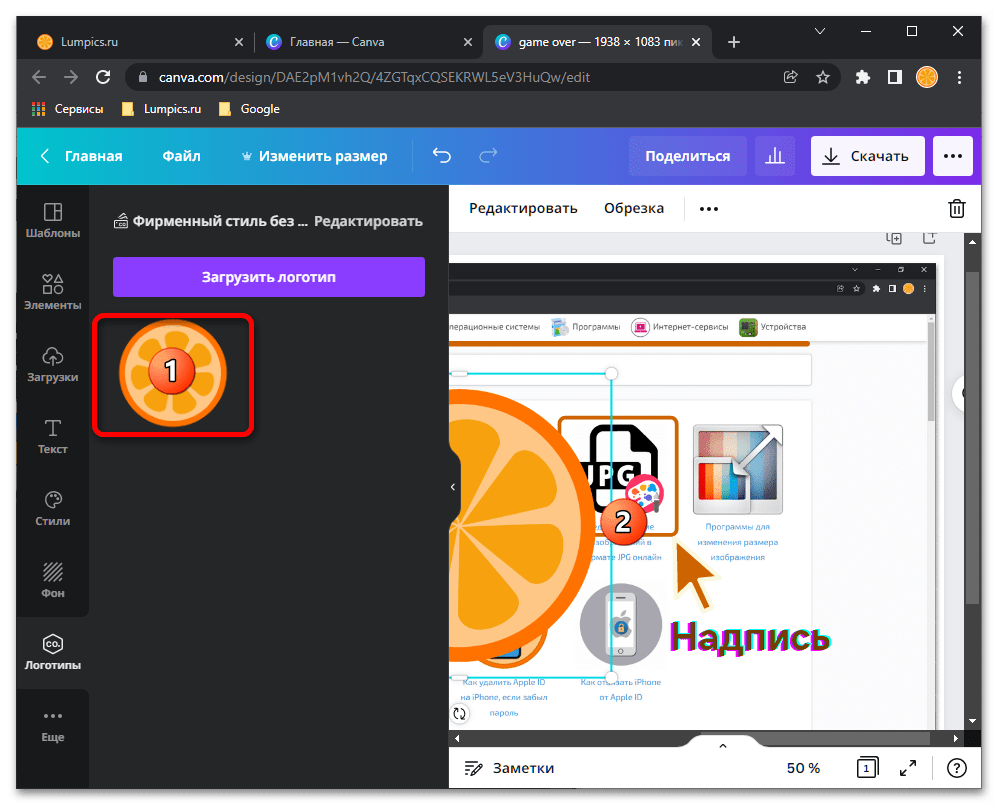
- В некоторых случаях на снимок экрана может потребоваться добавить логотип,
для этого в pro-версии онлайн-сервиса предусмотрен отдельный раздел,

но решить аналогичную задачу можно и базовыми средствами.
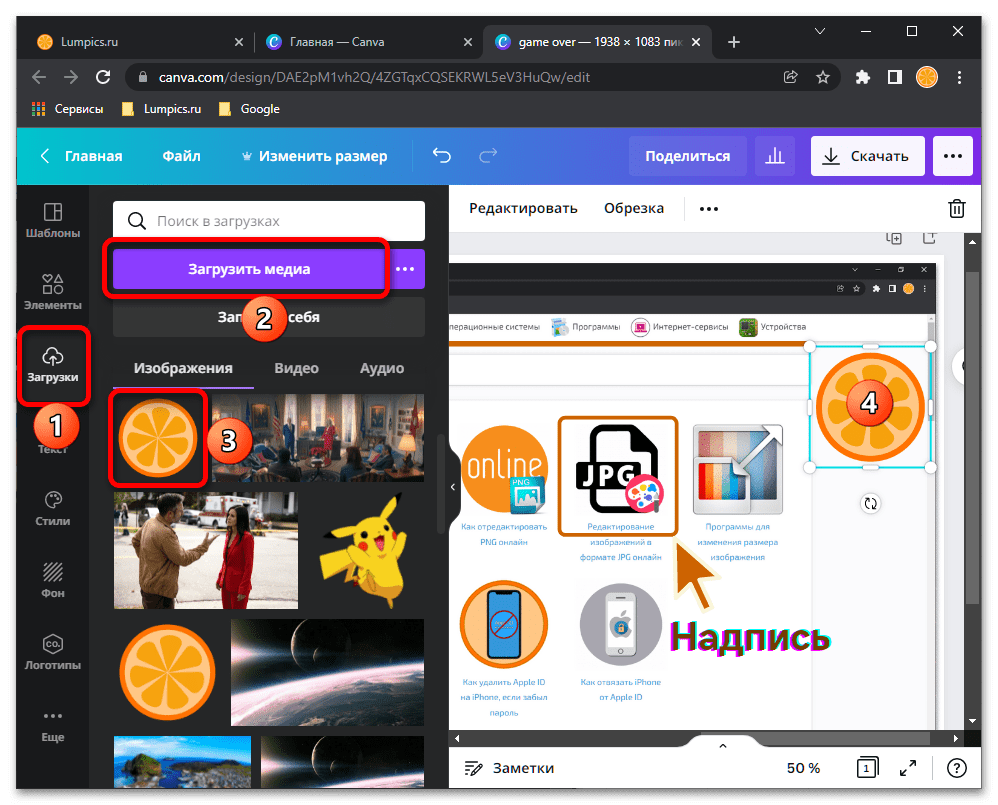
Так, если воспользоваться функцией «Загрузить медиа» во вкладке «Загрузки»,
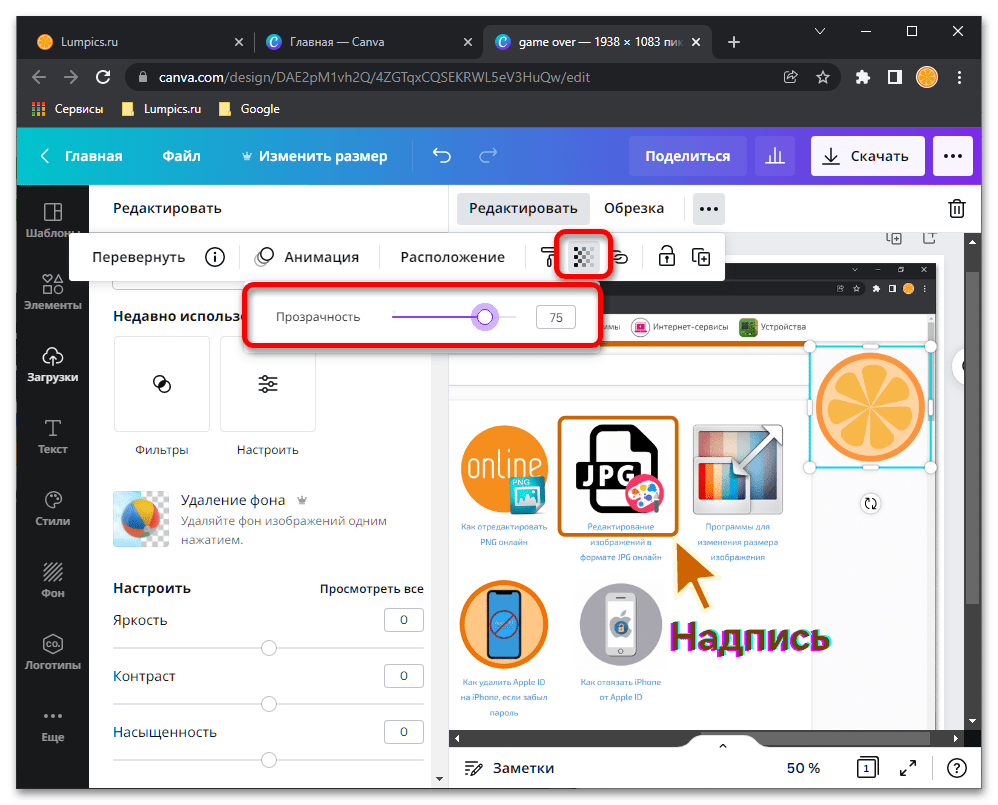
поместить графический файл в удобное место изображения, уменьшить его размер
и добавить эффект прозрачности, можно получить неплохой водяной знак.
- Когда редактирование скриншота будет закончено, оцените итоговый результат. Для этого лучше скрыть боковую панель с шаблонами и увеличить масштаб, также имеется возможность перехода в полноэкранный режим просмотра.
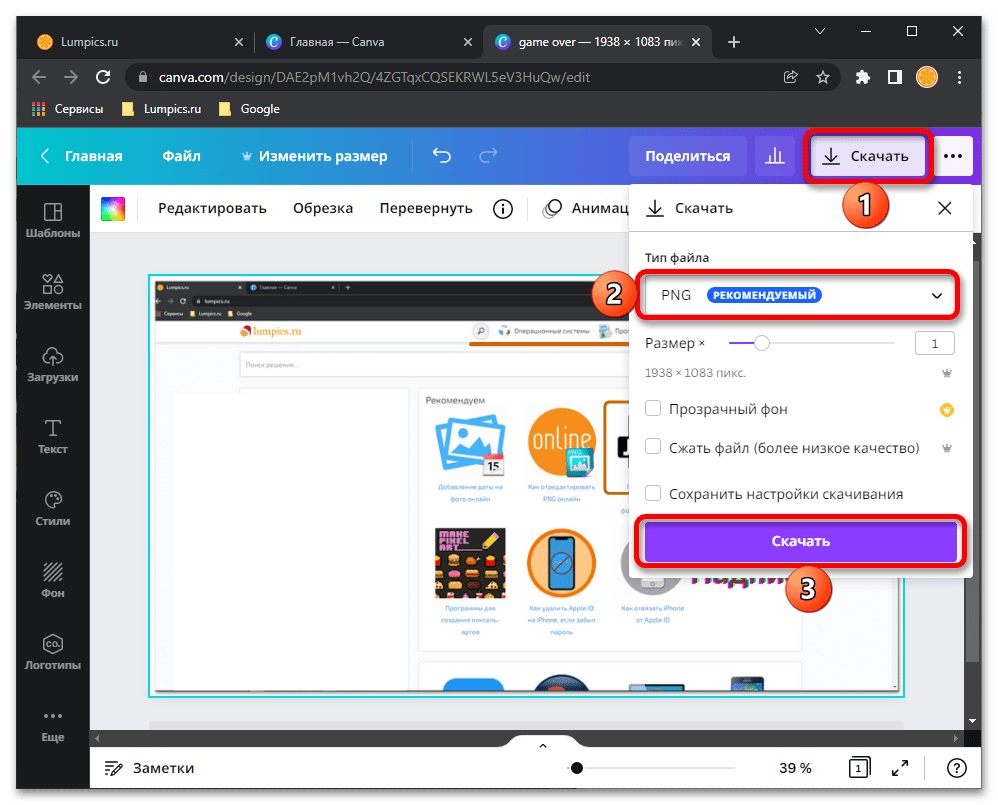
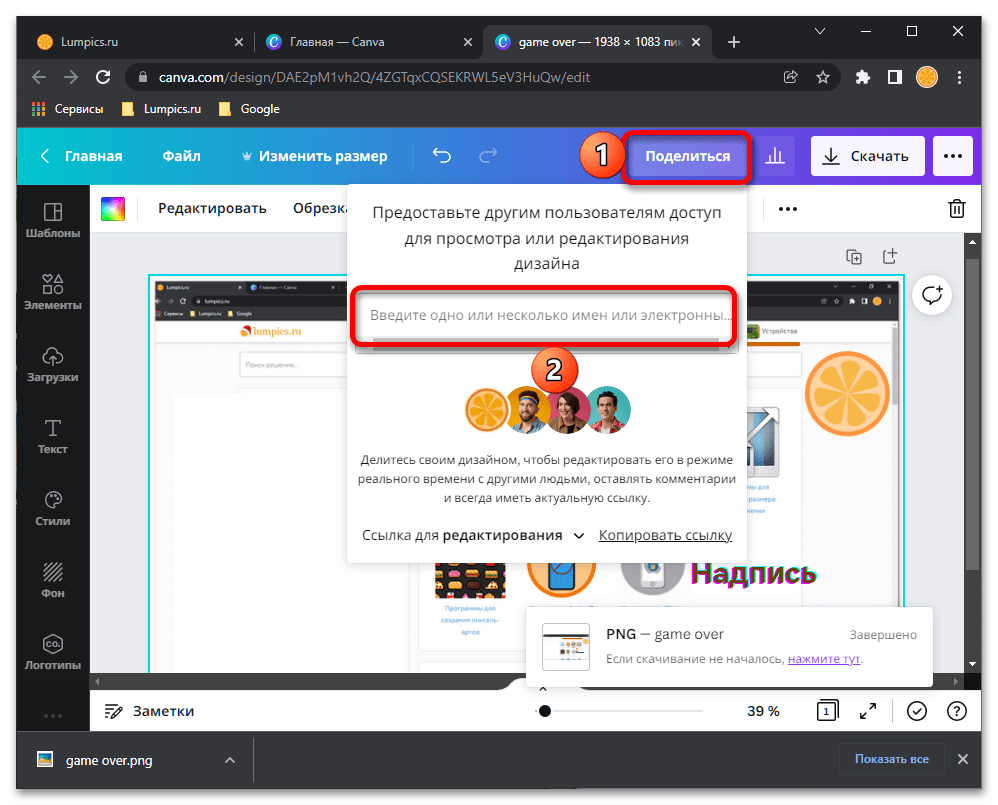
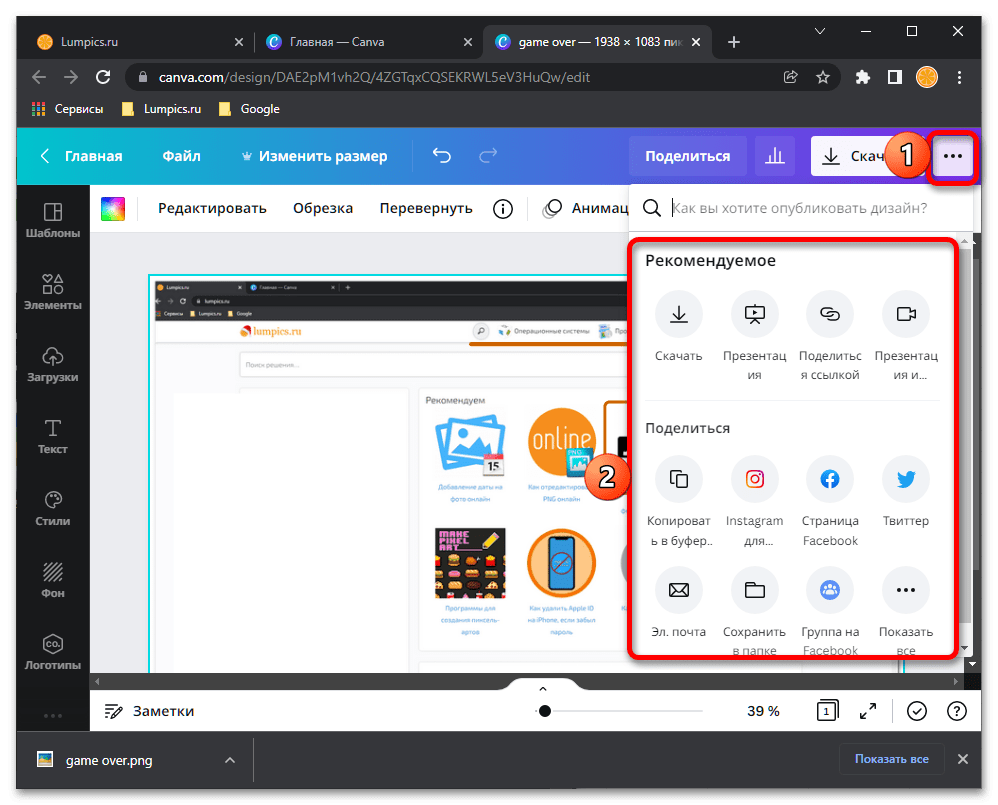
- Если вас все устраивает, нажмите на кнопку «Скачать» сначала на верхней панели, а затем в отобразившемся меню для подтверждения.
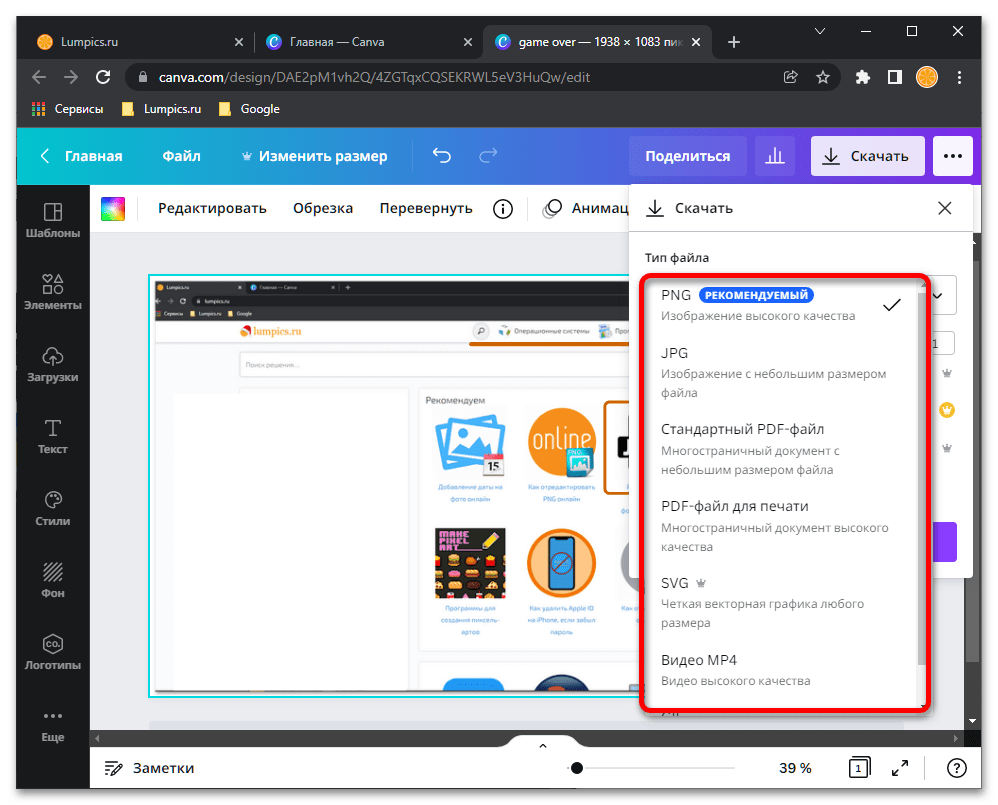
По необходимости в выпадающем списке «Тип файла» выберите предпочтительный формат или оставьте предложенный по умолчанию.
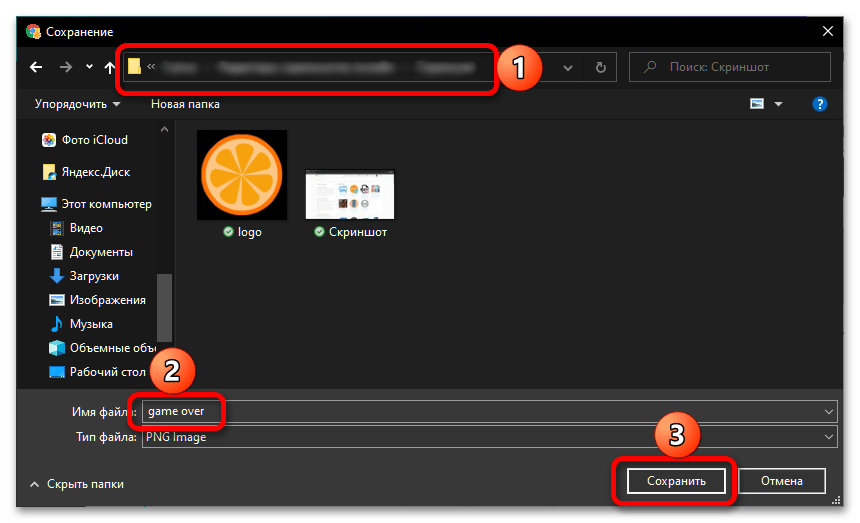
Укажите желаемое место на диске ПК, если потребуется, измените стандартное название, и «Сохраните» снимок экрана.
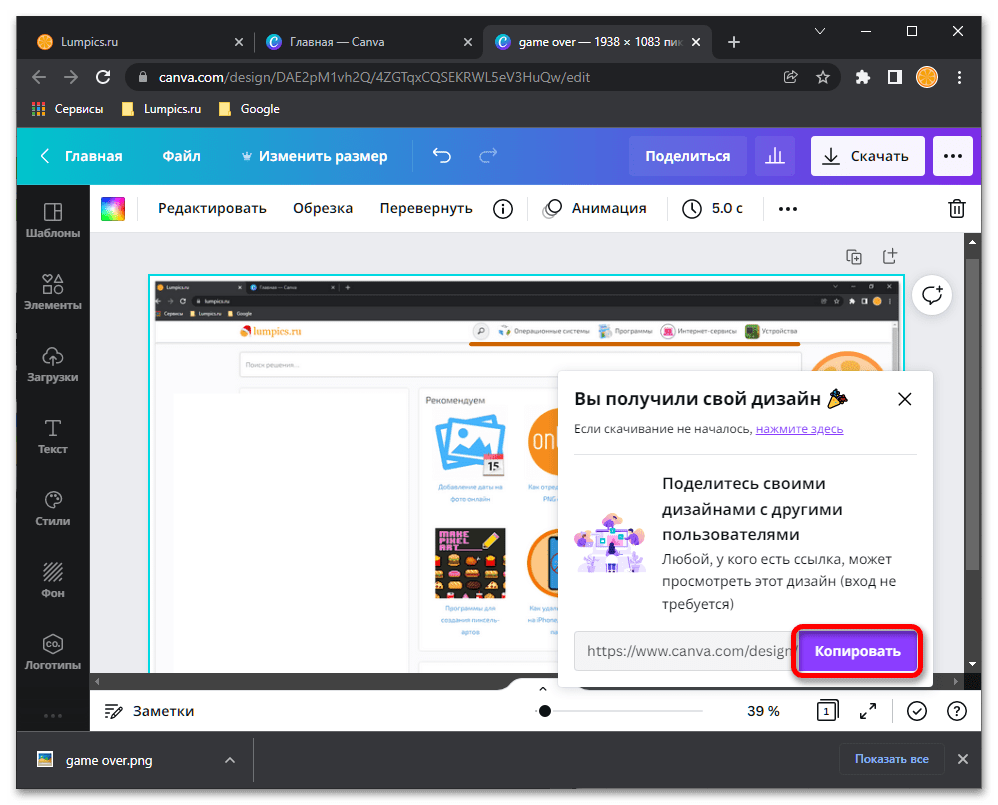
По завершении экспорта вам будет предложено «Копировать» ссылку на файл.
Также им можно «Поделиться» с другими пользователями сервиса,
преобразовать в презентацию, опубликовать в социальных сетях и выполнить некоторые другие действия.


Веб-платформу Canva сложно назвать подходящим решением для постоянной работы со скриншотами, но если необходимость редактирования является разовой, доступных во встроенном графическом редакторе инструментов и его возможностей более чем достаточно.
Способ 2: OnPaste
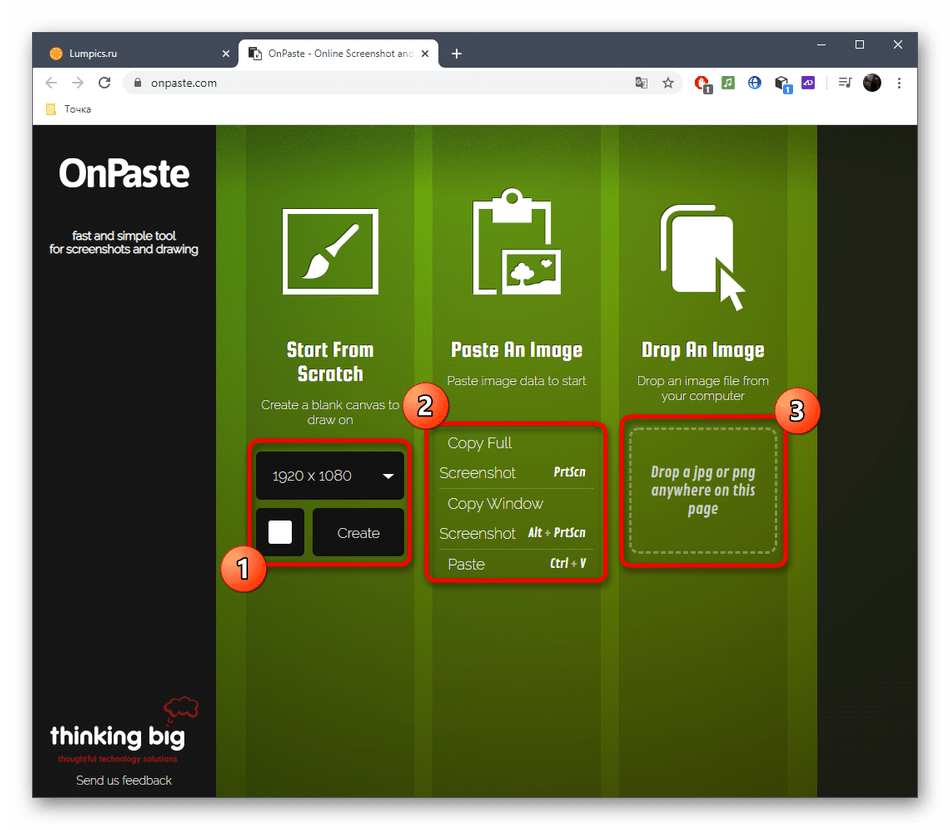
Онлайн-сервис OnPaste позволяет вставить скриншот в редактор одним из трех разных методов, а затем приступить к его оформлению, чтобы после скачать измененное изображение на свой компьютер.
Перейти к онлайн-сервису OnPaste
- Кликните по ссылке и выберите подходящий вариант работы со скриншотом. Сначала можете создать пустой макет для дальнейшей вставки изображения, сделать захват так, как показано во втором методе или перетащить картинку в выделенную область.
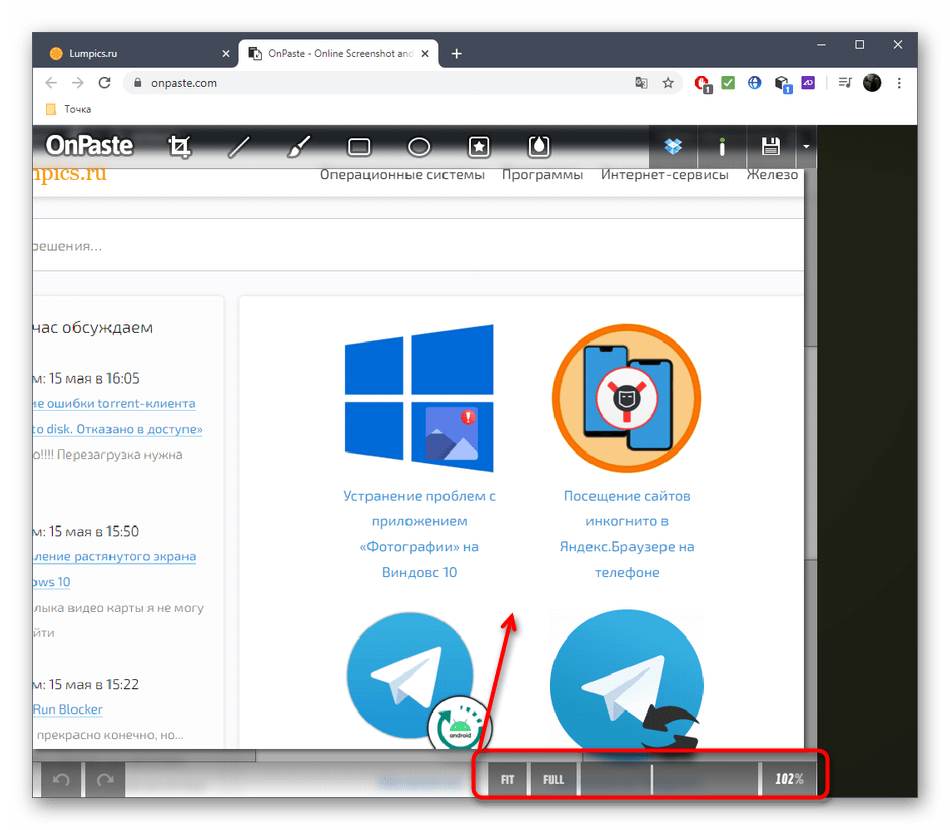
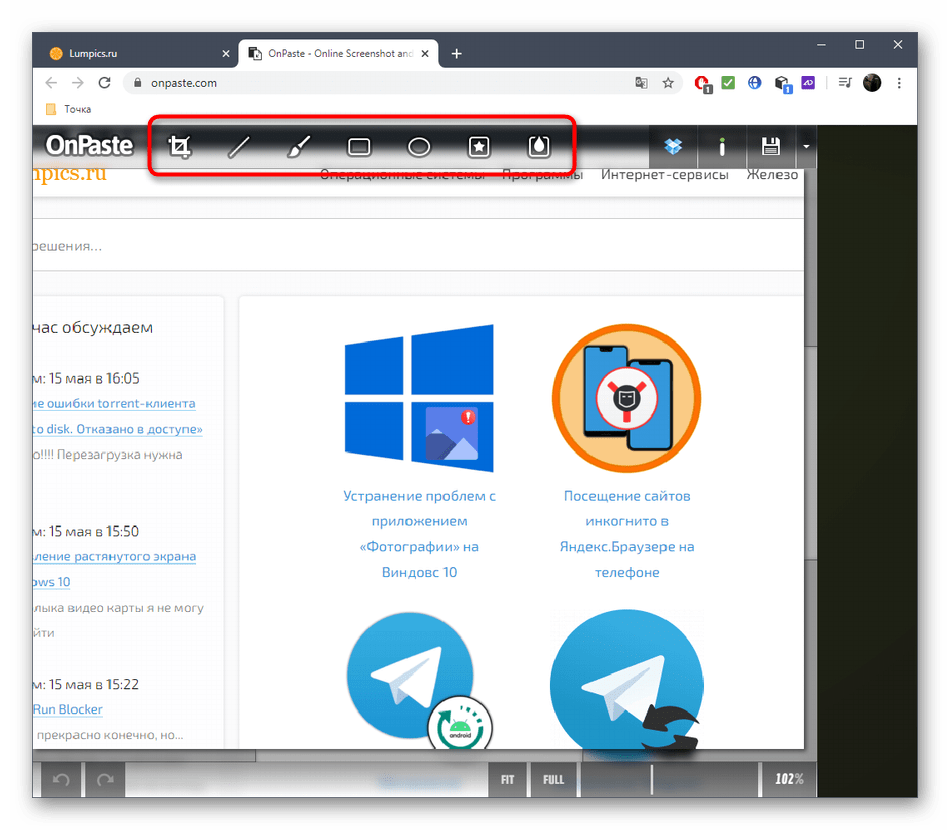
- После успешной загрузки самое время поработать над масштабом — регулируйте его значение, чтобы получить корректное отображение снимка на рабочем пространстве.
- Обратите внимание на верхнюю панель инструментов: с их помощью осуществляется кадрирование скриншота, добавление линий, произвольного рисунка или геометрической фигуры.
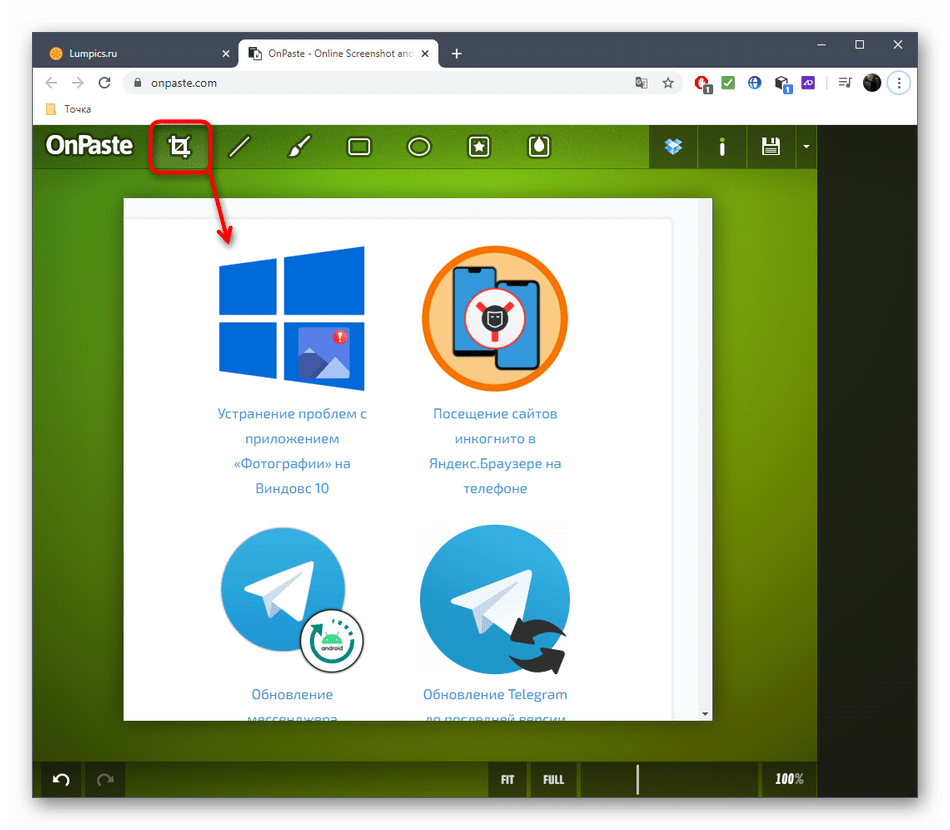
- Чаще остальных пользователю требуется произвести кадрирование, для которого нужно выбрать соответствующий инструмент на той же панели. Обрежьте лишние детали изображения, оставив только подходящую область.
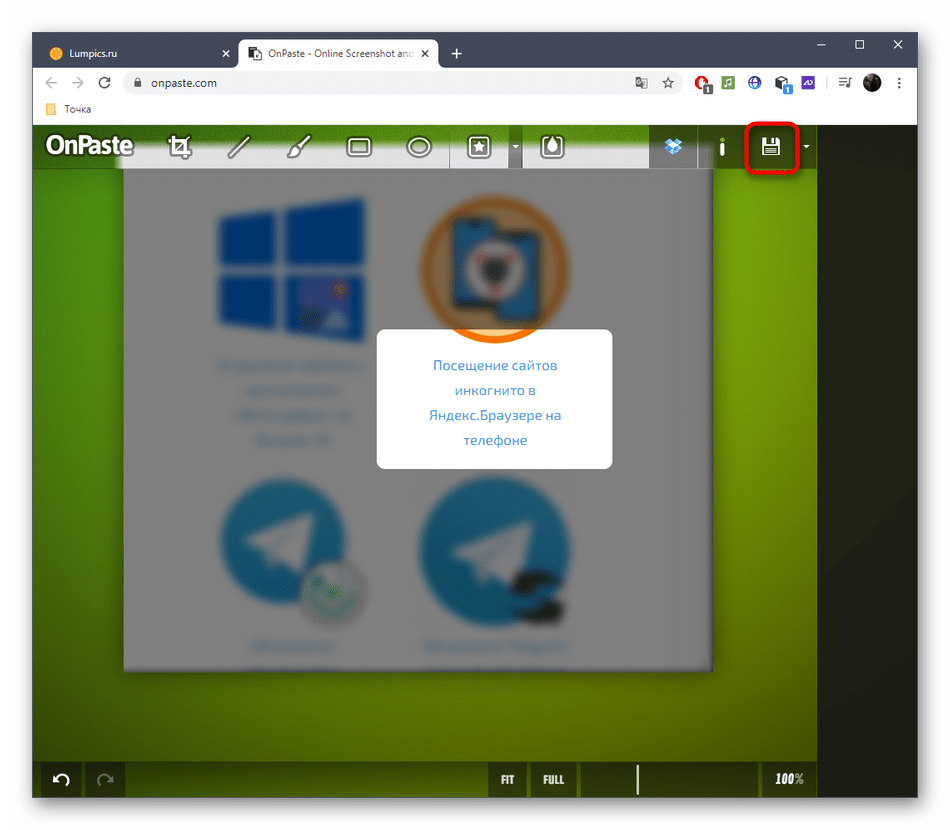
- Процесс добавления элементов или использования кистей знаком каждому, поэтому уточним лишь то, что в OnPaste также присутствует редкий инструмент. Он позволяет выделить конкретный участок скриншота, оставив его четким, а остальное содержимое поместить будто на задний план.
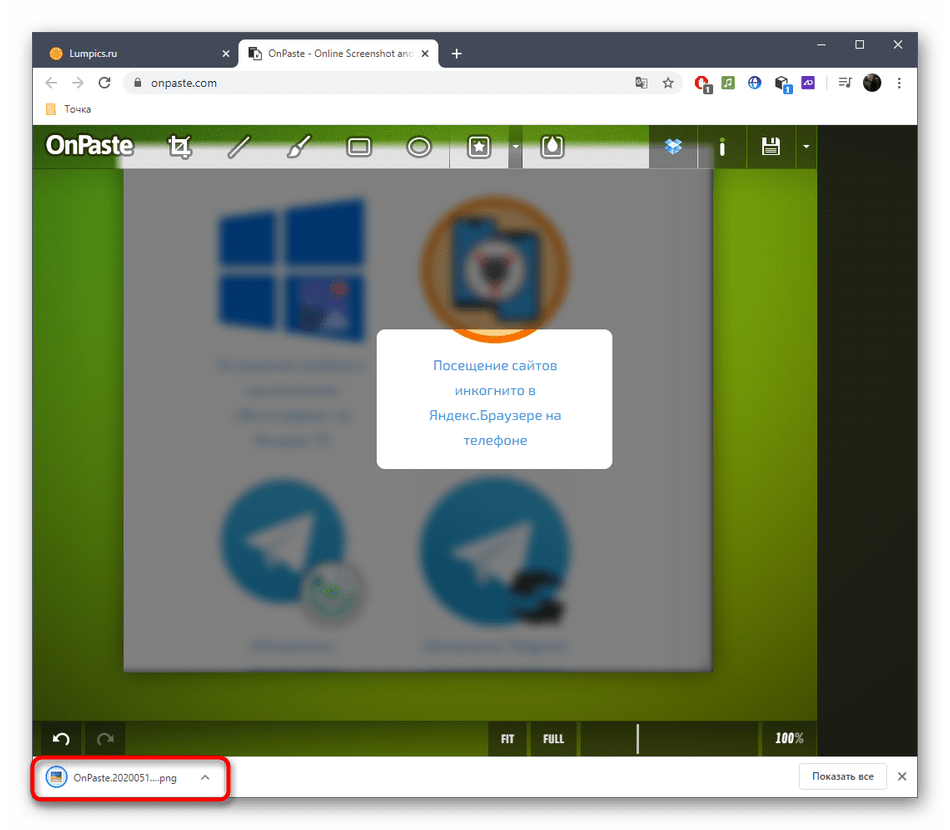
- По готовности нажмите по кнопке в виде дискеты, чтобы перейти к сохранению результата на компьютер.
- Ожидайте скачивания и приступайте к дальнейшему взаимодействию с изображением.

Способ 3: SnipBoard
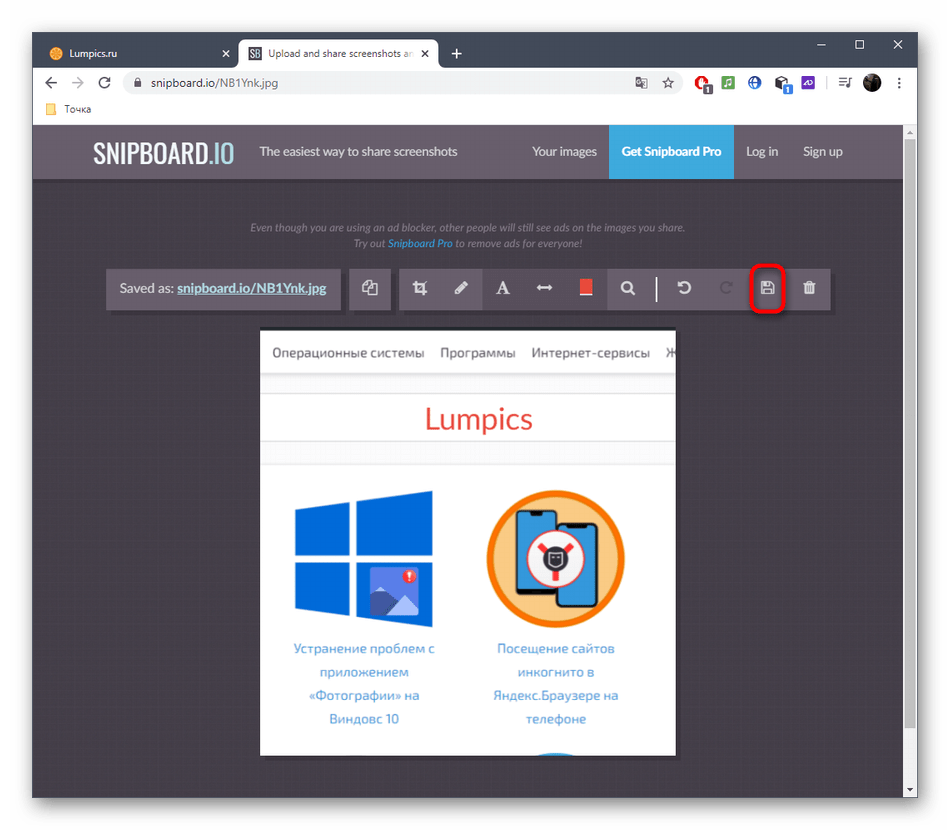
Если же редактирование скриншота производится для того, чтобы далее передать его другому пользователю, можно просто загрузить снимок в онлайн-сервис SnipBoard, внести нужные коррективы и поделиться ссылкой.
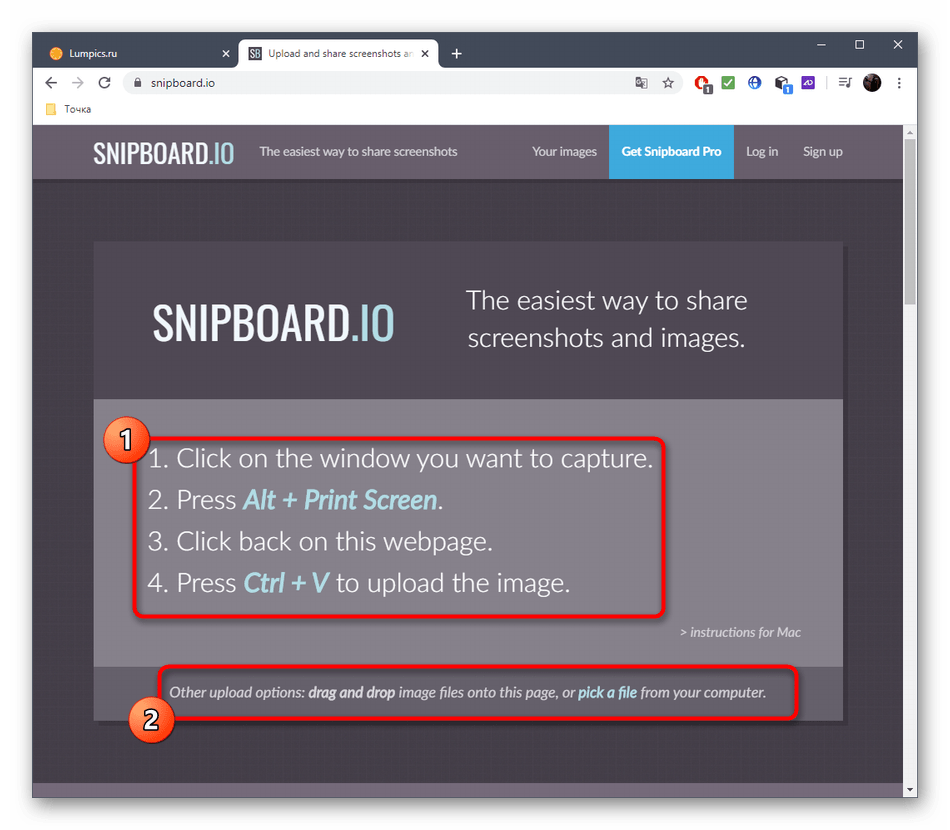
Перейти к онлайн-сервису SnipBoard
- Для этого нажмите по ссылке выше, вставьте скриншот через Ctrl + V (если тот находится в буфере обмена) или загрузите его в виде файла.
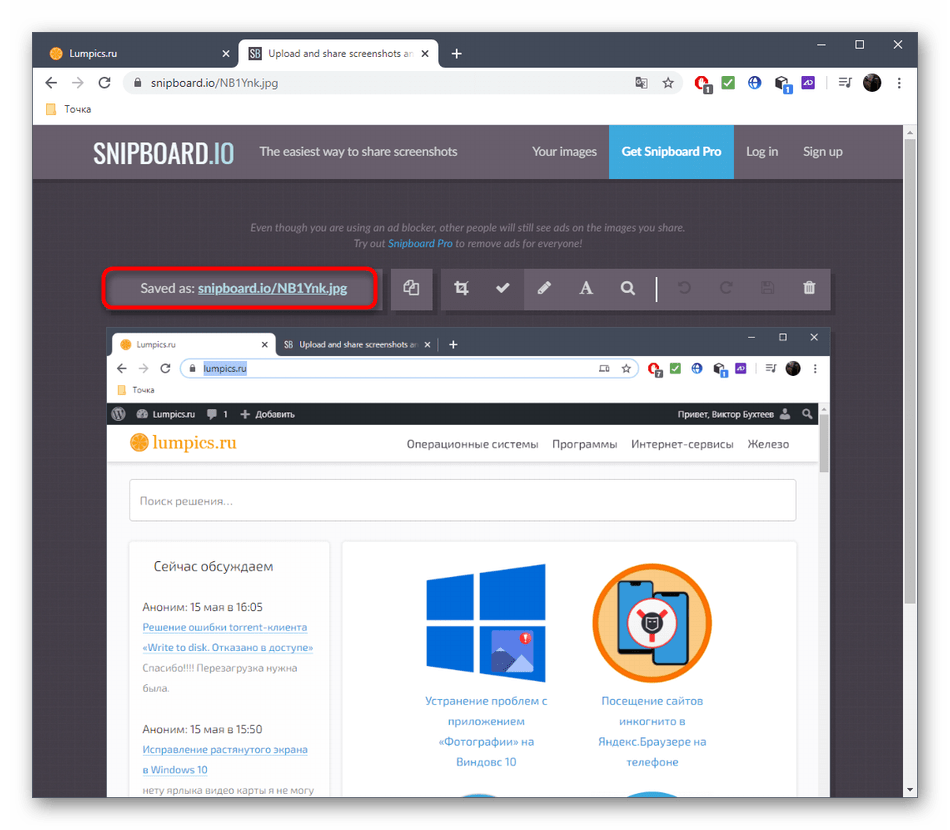
- Вы сразу же получите ссылку, переход по которой и будет открывать снимок.
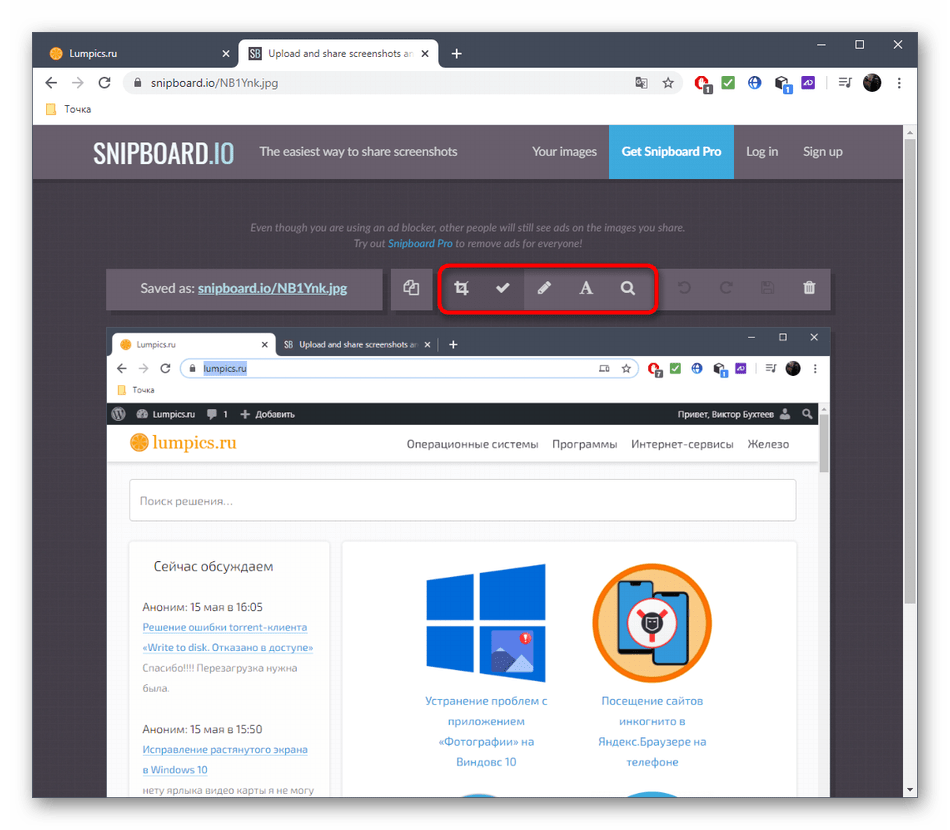
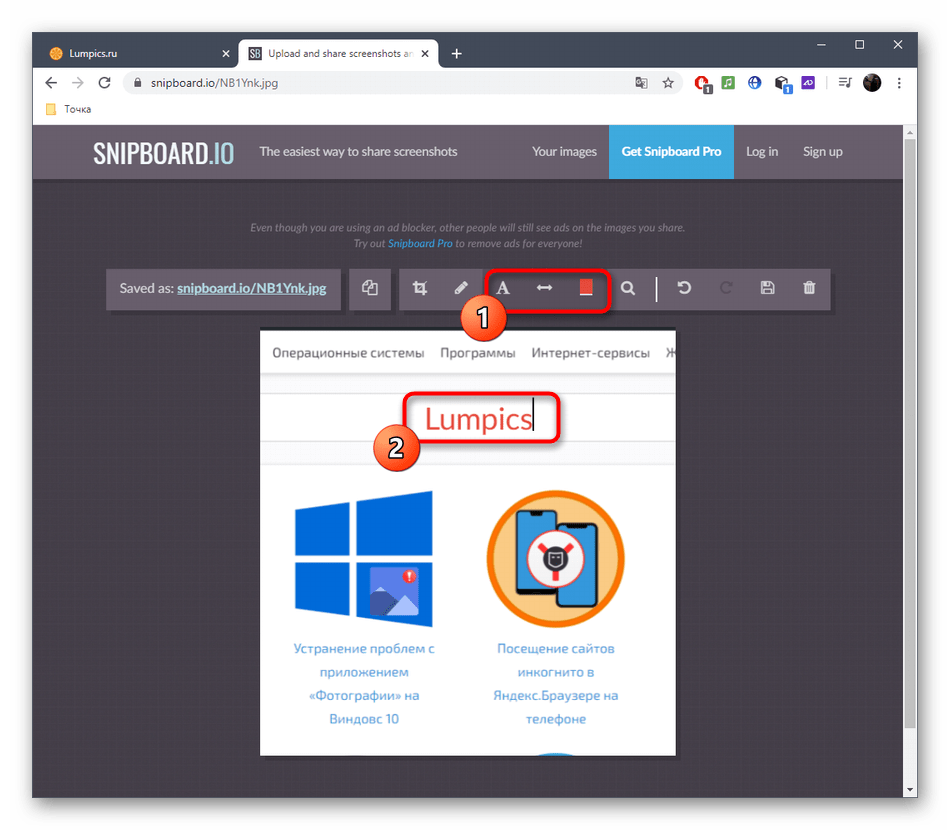
- Справа находится панель с основными инструментами. Выберите один из них для начала редактирования.
- Некоторые из них имеют дополнительные свойства: например, можно поменять размер текста или задать ему другой цвет. Не забывайте о том, что каждый из добавленных элементов свободно трансформируется и перемещается по рабочему пространству.
- Если какое-то действие было сделано случайно, отмените его при помощи кнопки на той же верхней панели.
- В конце обязательно сохраните результат, чтобы при переходе по ссылке уже показывался готовый захват экрана.
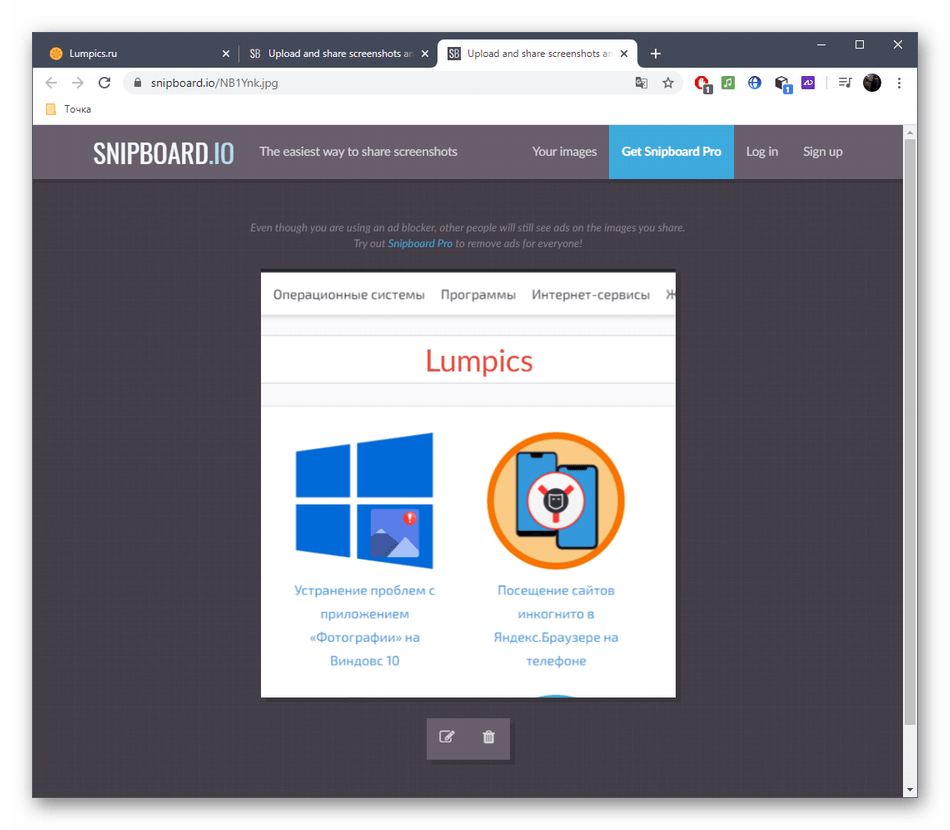
- На изображении ниже вы видите пример того, как открывается скриншот после перехода по ссылке.

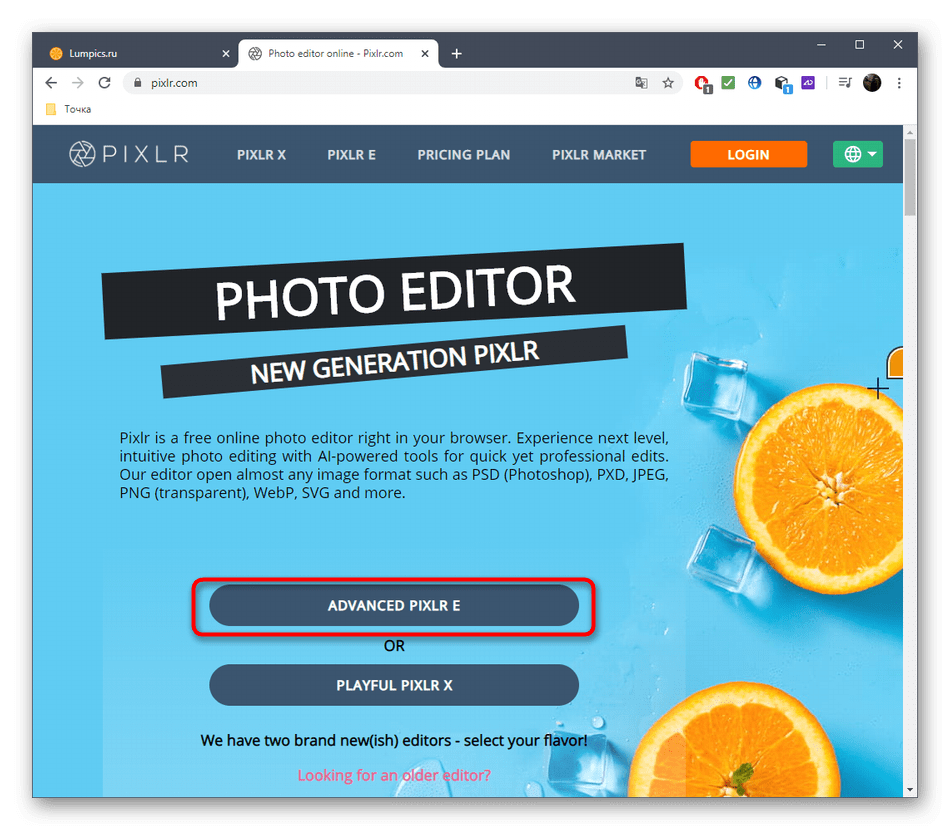
Способ 4: PIXLR
Метод с использованием онлайн-сервиса PIXLR подойдет тем юзерам, кто желает обработать скриншот через полноценный графический редактор, открывающийся в браузере. Здесь у юзера появляется простор для редактирования, поскольку количество доступных инструментов значительно больше, если брать за сравнение два рассмотренных выше сайта.
Перейти к онлайн-сервису PIXLR
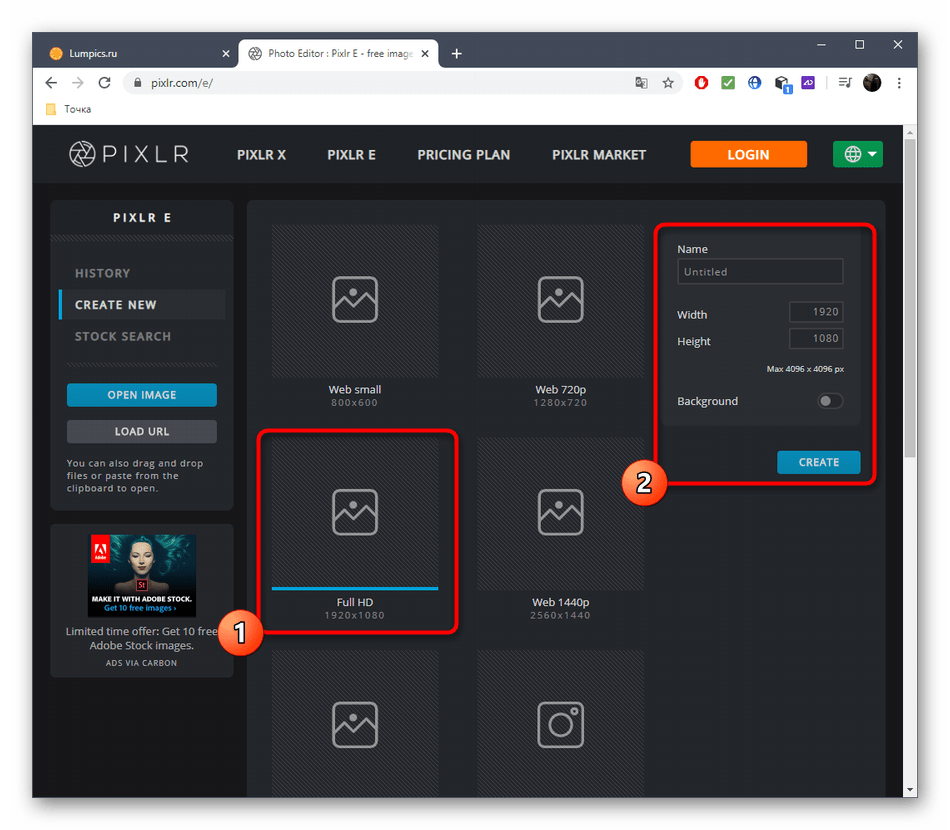
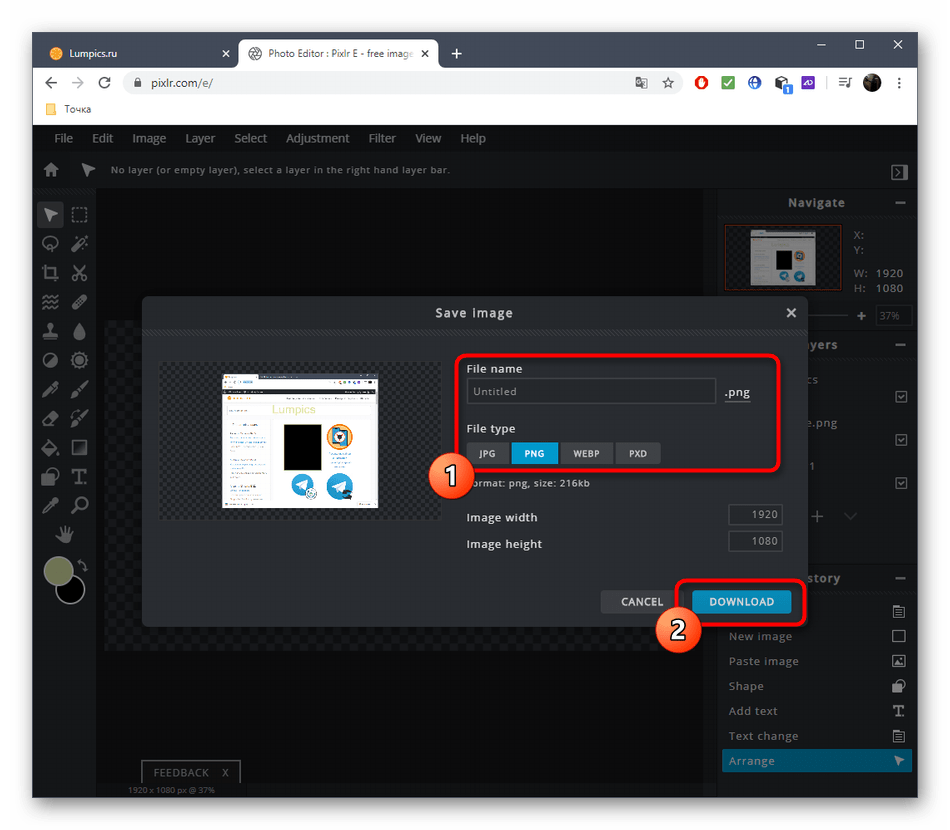
- Откройте главную страницу сайта PIXLR и нажмите «Advanced PIXLR E».
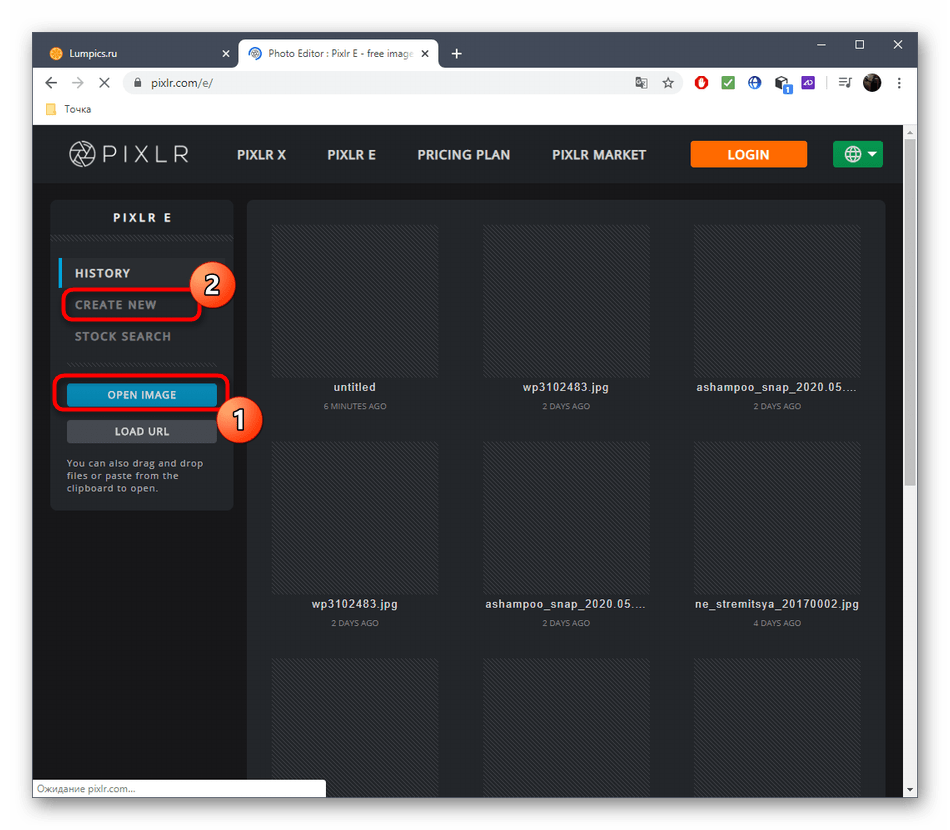
- Создайте новый проект, если хотите вставить скриншот, или откройте уже готовое изображение.
- При создании нового проекта подберите оптимальный размер, задайте название и укажите, должен ли использоваться белый фон.
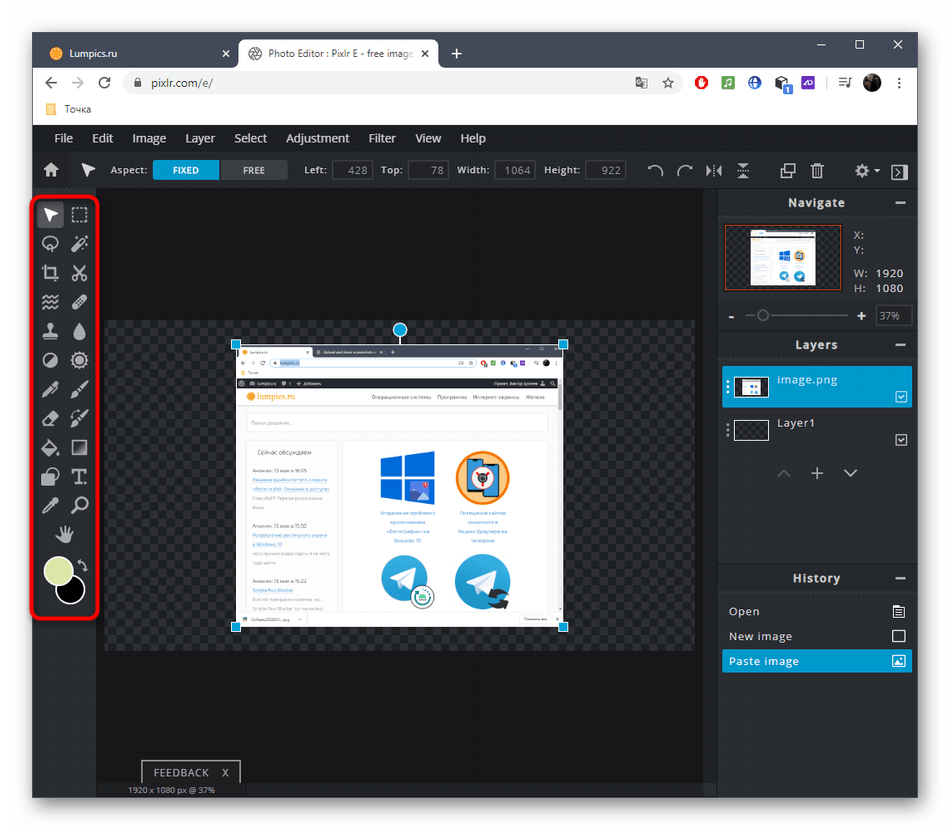
- Вставьте снимок через CTRL + V, а при необходимости добавляйте неограниченное количество слоев, если хотите поместить одну картинку на другую.
- Через левое меню выберите один из инструментов для редактирования. Как видно, используется в PIXLR их стандартный набор, присущий всем графическим редакторам.
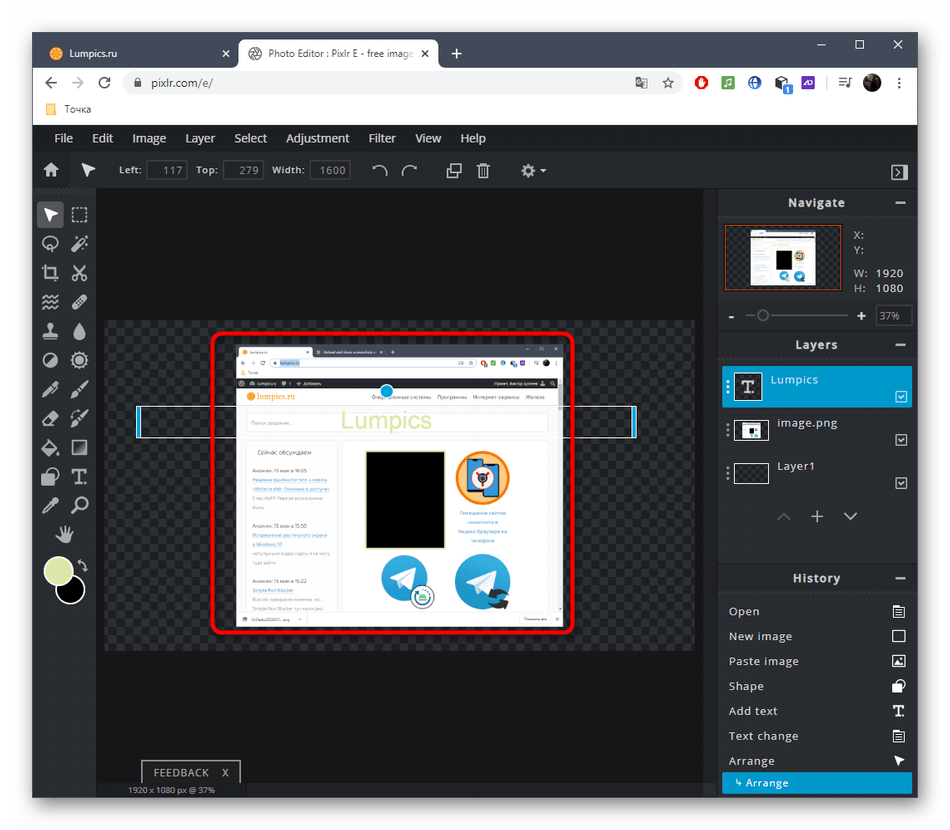
- Например, вы можете поместить фигуру с заливкой или без, добавить надпись и кадрировать снимок либо же заменить какие-то детали другими путем использования штампа.
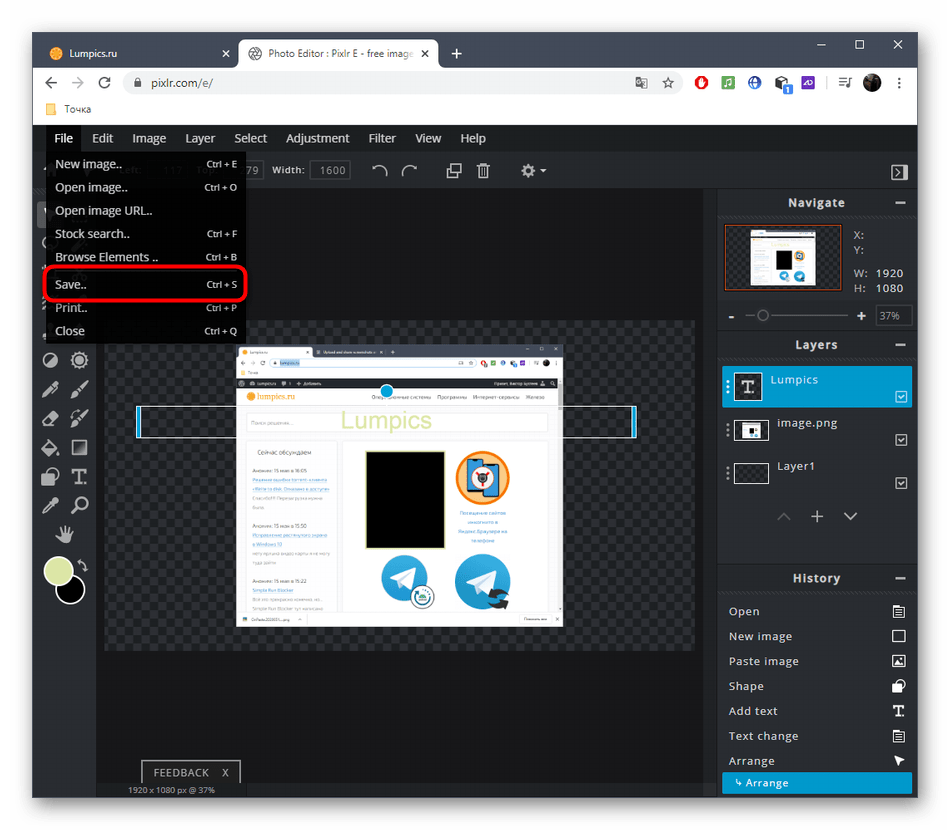
- По завершении через меню «File» переходите к сохранению или вместо этого нажмите CTRL + S.
- Выберите формат сохранения и подтвердите начало скачивания.

Многие программы для создания захватов экрана тоже позволяют редактировать их перед сохранением. Если вы решили рассмотреть и такие варианты, щелкните по ссылке ниже, чтобы ознакомиться с обзором на софт.
Подробнее: Программы для создания скриншотов
Еще статьи по данной теме:
Помогла ли Вам статья?

Существует, как минимум, два способа создания скриншотов с последующим их редактированием:
- Использование любого самостоятельного графического редактора (в т.ч. встроенного в Windows приложения Paint) путем вставки (CTRL + V) в него скриншота, скопированного в буфер обмена (автоматически помещается в буфер при нажатии клавиши Print Screen). Как альтернативный вариант — открытие в редакторе графического файла-скриншота, если тот был сохранен ранее на диске (Windows может сохранять снимки экрана в специальной папке при нажатии Print Screen).
- Использование специальных программ для создания скриншотов со встроенным графическим редактором, не требующим выполнения лишних манипуляций со вставкой из буфера обмена или предварительным сохранением снимков экрана в файл на компьютере.
Если пользователю приходится часто иметь дело со скриншотами, второй вариант ему подойдет лучше всего. Основное его преимущество перед стандартным способом — значительное экономия времени. Рассмотрим это на примере использования бесплатной программы для создания скриншотов — ScreenShooter.
Создание и редактирование скриншотов при помощи ScreenShooter
Сначала следует отметить, что программа ScreenShooter позволяет создавать скриншоты в трех режимах — снимок экрана целиком, выделенной области или снимок открытого окна. Но для нас важнее способность приложения редактировать полученные снимки, причем встроенный графический редактор запускается автоматически (если пользователем не были изменены настройки по умолчанию) после создания скриншота. Пользоваться программой ScreenShooter достаточно просто:
Создаем скриншот, используя одну из трех комбинаций клавиш (если они кажутся слишком сложными, можно изменить в настройках программы по своему усмотрению):
- «Alt+Shift+1» для создания снимка экрана целиком.
- «Alt+Shift+2» для создания скриншота выделенной области экрана (после нажатия указанных клавиш пользователю потребуется выделить мышкой прямоугольную область экрана).
- «Alt+Shift+3» для создания снимка открытого окна (нужно кликнуть мышкой по открытому окну после нажатия указанных клавиш).

Как только снимок экрана, области или окна будет создан, автоматически запустится графический редактор ScreenShooter. Он имеет следующий вид (для примера мы создали снимок окна «Параметры» Windows):

Теперь пользователь сможет отредактировать скриншот. В ScreenShooter присутствуют все наиболее востребованные для этого инструменты:
- Наложение стрелок, линий, геометрических фигур возможностью задания размера и цвета, а также форматированного текста;
- Создание размытых областей для сокрытия как-либо данных на снимке (на нашем скриншоте была размыта область с именем учетной записи);
- Обрезка изображения;
- Простановка автоматически нумеруемых значков/штампов для создания графических инструкций/руководств.
В число преимуществ ScreenShooter, по сравнению со стандартными способами создания и редактирования скриншотов или ряда аналогичных программ, входит возможность автоматической загрузки скриншотов на FTP-серверы и в облачные хранилища Google Drive, Dropbox, OneDrive и Яндекс.Диск, а также их отправки по электронной почте.

Таким образом, ScreenShooter — отличная находка для пользователей, которым приходится сталкиваться с необходимостью создания скриншотов в своей ежедневной практике.
Теперь давайте рассмотрим некоторые распространенные формы редактирования скриншота, которые вы должны знать в Paint. Здесь показано, как редактировать снимок экрана в Windows 10, но методы работают и в более ранних версиях.
Скорее всего, если вы захватили все окно на своем скриншоте, вы не хотите показывать все это. Обрезка является простым решением для этого.
Чтобы обрезать скриншот, просто выберите инструмент « Выбрать» в верхней части ленты. Если вы этого не видите, дважды щелкните вкладку « Главная », чтобы открыть ее.
По умолчанию это прямоугольный выбор; щелкните стрелку под этим, чтобы изменить это. Наведите курсор на область, которую хотите сохранить, затем нажмите кнопку « Обрезать» на верхней панели, чтобы обрезать изображение только до этого выделения.

Если вы хотите обрезать края, возьмите одну из белых рамок на нижнем, правом или нижнем правом краях холста в программе Paint. Вы можете перетащить это, чтобы легко обрезать нежелательные биты с краев. Если вместо этого вы перетащите края, вы увеличите холст.
Выделите элементы, используя поля
Простой и ненавязчивый способ выделить определенные части вашего скриншота — использовать поля. В Paint это встроено в раздел Shapes ленты.
Сначала выберите параметр прямоугольник или прямоугольник с закругленными углами. Далее, под Outline , выберите Solid color и установите Fill на No fill . Выберите размер для толщины контура и выберите цвет справа от этого. Красный, как правило, хороший цвет для привлечения внимания.

Оттуда это так же просто, как нарисовать коробку, где вы хотите. Удерживайте Shift, чтобы нарисовать идеальный квадрат. После того как вы разместите его, вы можете использовать белые поля на каждой стороне, чтобы изменить размер фигуры. Нажмите Ctrl + Z, чтобы отменить и попробуйте снова, если вы его не поместили.
Добавление стрелок к скриншотам
Если поле не подходит, стрелки могут помочь вам указать что-то на скриншоте. Поскольку они также находятся в меню « Фигуры» , они работают точно так же.
Выберите одну из четырех стрелок в зависимости от нужного вам направления, затем выберите размер линии и цвета для них. Со стрелками вам может потребоваться сплошной цвет под заливкой, чтобы стрелка была лучше видна. Paint будет использовать Color 2 в качестве цвета заливки, поэтому установите его таким же, как Color 1 для равномерной стрелки.
![]()
Как коробка, просто используйте мышь, чтобы нарисовать форму стрелки. Удерживайте Shift, чтобы сохранить симметрию.
Как запутать скриншоты с помощью рисования
Часто скриншоты содержат конфиденциальную информацию, такую как серийные номера или фотографии друзей, которую вы хотите удалить, прежде чем делиться ими. В Paint нет решения в один клик для размытия или создания пикселов, но вы можете сделать это вручную.
Самый простой способ сделать это аккуратно — использовать инструмент « Выделение» , чтобы выделить область, которую вы хотите запутать. Возьмите одну из маленьких ручек в углу изображения, уменьшите выделение и отпустите. Затем, используя ту же ручку, измените размер выделения до его исходного размера.

После этого текст или изображение должны быть пикселированы до неузнаваемости. Чем меньше вы сделаете это, тем более размытым он станет. Если вы не удовлетворены, либо нажмите Ctrl + Z и повторите процесс полностью, либо просто повторите его на слегка размытом тексте, чтобы дополнительно исказить его.
Если вам не нравится этот метод, вы можете использовать прямоугольник или что-то еще из инструмента « Фигуры» и просто рисовать над чувствительными частями, чтобы заблокировать их. Для достижения наилучших результатов, вы должны использовать инструмент пипетки, чтобы сделать поле того же цвета, что и фон.
Как добавить текст на скриншоты
Иногда вам может понадобиться добавить текст на скриншот для получения дополнительных инструкций. Paint облегчает задачу с помощью инструмента « Текст» , обозначенного буквой « A» на ленте. Выберите его, затем нажмите на свое изображение, где вы хотите разместить текст.
Как только вы нажмете, вы увидите текстовое поле и можете начать печатать прямо сейчас. По умолчанию для него установлен маленький размер шрифта, который вы, вероятно, не сможете увидеть, поэтому вы можете использовать вкладку « Текст », которая появляется на ленте, для внесения изменений.
Здесь вы можете настроить шрифт и его размер, выбрать прозрачный или непрозрачный фон и изменить цвет текста. Чтобы изменить свойства существующего текста, нажмите Ctrl + A, чтобы сначала выделить все это, затем внесите свои коррективы. Нажмите и перетащите рамку вокруг текста, чтобы переместить его, или используйте ручки, чтобы изменить размер, если это необходимо.

Будьте осторожны во время этого процесса, так как после того, как вы щелкнете из текстового поля, Paint навсегда разместит его. Вы не можете переместить его после этого, поэтому вам нужно нажать Ctrl + Z и повторить попытку, если у вас его нет в нужном месте.
Как изменить размер и повернуть скриншоты
Нужно освободить место для скриншота или настроить изображение целиком? Для этого вы можете использовать кнопки « Изменить размер» и « Повернуть» в разделе « Изображение ».
С установленным флажком « Поддерживать пропорции» инструмент « Изменение размера» позволяет уменьшить размер изображения без существенной потери качества. Вы можете изменить размер в процентах или в абсолютных пикселях.

Инструменты Rotate и Skew не очень полезны для редактирования скриншотов, но они доступны, если они вам нужны.
Сохранение вашего скриншота

Когда вы закончите редактирование, последним шагом будет сохранение вашего скриншота. Как и большинство графических редакторов, Paint предоставляет вам несколько вариантов формата файла.
В общем, вы можете придерживаться PNG или JPEG. Изображения PNG более высокого качества, но занимают больше места. Изображения JPEG более компактны, но часто подвержены искажениям.
Если вам не нужен абсолютно наименьший возможный размер файла, мы рекомендуем сохранять снимки экрана в формате PNG для наилучшего качества. Вы всегда можете сделать копию в формате JPEG для последующего обмена.
Обновите свой скриншот редактирования
Мы рассмотрели основы редактирования скриншотов на вашем компьютере с помощью MS Paint. Несмотря на то, что он работает, когда у вас нет других вариантов, мы определенно рекомендуем переключаться на более совершенные инструменты для создания и редактирования снимков экрана, если вы часто работаете с ними.
Превосходные инструменты для создания скриншотов дают вам больше методов для захвата экрана и делают простые изменения, такие как запутывание, намного проще.
Посмотрите на лучшие инструменты для создания скриншотов для Windows и лучшие бесплатные альтернативы Microsoft Paint об обновлениях на обоих фронтах.
Изображение предоставлено: omihay / Shutterstock