MySQL slave after upgrade from 5.6.x to 5.7.x may throw the following error:
mysql> START SLAVE;
ERROR 1872 (HY000): Slave failed to initialize relay log info structure from the repository
The best solution for this error is to:
- Master server – mysqldump the database with –master-data=1 –single-transaction
- On the slave server issue command “RESET SLAVE;”
- On the slave server import the dump sql file and issue “CHANGE MASTER” command with the meta data written in the sql dump
- On the slave server issue START SLAVE to start the replication.
Here is an a real world example:
First, mysqldump in the master with
root@master ~ # mysqldump --master-data=1 --single-transaction mydb > /root/mydb.sql
root@master ~ # grep "CHANGE MASTER" media.sql
CHANGE MASTER TO MASTER_LOG_FILE='mysql-bin.023283', MASTER_LOG_POS=537774724;
And then copy the dump file to the slave server and import it and issue several specific slave commands:
root@slave ~ # mysql < /root/mydb.sql
root@slave ~ # mysql
Welcome to the MySQL monitor.  Commands end with ; or g.
Your MySQL connection id is 23
Server version: 5.7.31-log Gentoo Linux mysql-5.7.31

Copyright (c) 2000, 2020, Oracle and/or its affiliates. All rights reserved.

Oracle is a registered trademark of Oracle Corporation and/or its
affiliates. Other names may be trademarks of their respective
owners.

Type 'help;' or 'h' for help. Type 'c' to clear the current input statement.

mysql> reset slave;
Query OK, 0 rows affected (0.01 sec)
mysql> CHANGE MASTER TO MASTER_LOG_FILE='mysql-bin.023283', MASTER_LOG_POS=537774724;
Query OK, 0 rows affected (0.00 sec)
mysql> START SLAVE;
Query OK, 0 rows affected (0.00 sec)

mysql> show slave statusG;
*************************** 1. row ***************************
               Slave_IO_State: Queueing master event to the relay log
                  Master_Host: 10.10.10.10
                  Master_User: ruser
                  Master_Port: 3306
                Connect_Retry: 60
              Master_Log_File: mysql-bin.023283
          Read_Master_Log_Pos: 641769286
               Relay_Log_File: slave-relay-bin.000002
                Relay_Log_Pos: 90874706
        Relay_Master_Log_File: mysql-bin.023283
             Slave_IO_Running: Yes
            Slave_SQL_Running: Yes
              Replicate_Do_DB:
          Replicate_Ignore_DB:
           Replicate_Do_Table:
       Replicate_Ignore_Table:
      Replicate_Wild_Do_Table: mydb.%
  Replicate_Wild_Ignore_Table:
                   Last_Errno: 0
                   Last_Error:
                 Skip_Counter: 0
          Exec_Master_Log_Pos: 628649113
              Relay_Log_Space: 103995088
              Until_Condition: None
               Until_Log_File:
                Until_Log_Pos: 0
           Master_SSL_Allowed: No
           Master_SSL_CA_File:
           Master_SSL_CA_Path:
              Master_SSL_Cert:
            Master_SSL_Cipher:
               Master_SSL_Key:
        Seconds_Behind_Master: 2395
Master_SSL_Verify_Server_Cert: No
                Last_IO_Errno: 0
                Last_IO_Error:
               Last_SQL_Errno: 0
               Last_SQL_Error:
  Replicate_Ignore_Server_Ids:
             Master_Server_Id: 101
                  Master_UUID: cd1bcebb-cc27-11e8-90c9-801844f2c4d8
             Master_Info_File: /mnt/mysql/master.info
                    SQL_Delay: 0
          SQL_Remaining_Delay: NULL
      Slave_SQL_Running_State: Reading event from the relay log
           Master_Retry_Count: 86400
                  Master_Bind:
      Last_IO_Error_Timestamp:
     Last_SQL_Error_Timestamp:
               Master_SSL_Crl:
           Master_SSL_Crlpath:
           Retrieved_Gtid_Set:
            Executed_Gtid_Set:
                Auto_Position: 0
         Replicate_Rewrite_DB:
                 Channel_Name:
           Master_TLS_Version:
1 row in set (0.00 sec)
The replication is advancing. It is 2395 seconds behind the master.
Bonus – More logs
And here it is the show slave status:
mysql> show slave statusG;
*************************** 1. row ***************************
               Slave_IO_State:
                  Master_Host: 10.10.10.10
                  Master_User: ruser
                  Master_Port: 3306
                Connect_Retry: 60
              Master_Log_File: mysql-bin.023283
          Read_Master_Log_Pos: 516785716
               Relay_Log_File: mysqld-relay-bin.015762
                Relay_Log_Pos: 516785879
        Relay_Master_Log_File: mysql-bin.023283
             Slave_IO_Running: No
            Slave_SQL_Running: No
              Replicate_Do_DB:
          Replicate_Ignore_DB:
           Replicate_Do_Table:
       Replicate_Ignore_Table:
      Replicate_Wild_Do_Table: mydb.%
  Replicate_Wild_Ignore_Table:
                   Last_Errno: 1872
                   Last_Error: Slave failed to initialize relay log info structure from the repository
                 Skip_Counter: 0
          Exec_Master_Log_Pos: 516785716
              Relay_Log_Space: 0
              Until_Condition: None
               Until_Log_File:
                Until_Log_Pos: 0
           Master_SSL_Allowed: No
           Master_SSL_CA_File:
           Master_SSL_CA_Path:
              Master_SSL_Cert:
            Master_SSL_Cipher:
               Master_SSL_Key:
        Seconds_Behind_Master: NULL
Master_SSL_Verify_Server_Cert: No
                Last_IO_Errno: 0
                Last_IO_Error:
               Last_SQL_Errno: 1872
               Last_SQL_Error: Slave failed to initialize relay log info structure from the repository
  Replicate_Ignore_Server_Ids:
             Master_Server_Id: 0
                  Master_UUID: cd1bcebb-cc27-11e8-90c9-801844f2c4d8
             Master_Info_File: /mnt/mysql/master.info
                    SQL_Delay: 0
          SQL_Remaining_Delay: NULL
      Slave_SQL_Running_State:
           Master_Retry_Count: 86400
                  Master_Bind:
      Last_IO_Error_Timestamp:
     Last_SQL_Error_Timestamp: 210405 00:22:17
               Master_SSL_Crl:
           Master_SSL_Crlpath:
           Retrieved_Gtid_Set:
            Executed_Gtid_Set:
                Auto_Position: 0
         Replicate_Rewrite_DB:
                 Channel_Name:
           Master_TLS_Version:
1 row in set (0.00 sec)
And the logs show that there is a problem loading the metadata for the relay log files:
2021-04-05T00:21:37.773162Z 0 [ERROR] Failed to open the relay log './mysqld-relay-bin.015762' (relay_log_pos 516785879).
2021-04-05T00:21:37.773168Z 0 [ERROR] Could not find target log file mentioned in relay log info in the index file './slave-relay-bin.index' during relay log initialization.
2021-04-05T00:21:37.773765Z 0 [ERROR] Slave: Failed to initialize the master info structure for channel ''; its record may still be present in 'mysql.slave_master_info' table, consider deleting it.
2021-04-05T00:21:37.773783Z 0 [ERROR] Failed to create or recover replication info repositories.
2021-04-05T00:21:37.773786Z 0 [Note] Failed to start slave threads for channel ''
2021-04-05T00:21:37.773788Z 0 [Note] Some of the channels are not created/initialized properly. Check for additional messages above. You will not be able to start replication on those channels until the issue is resolved and the server restarted.
2021-04-05T00:21:37.776954Z 0 [Note] Event Scheduler: Loaded 0 events
2021-04-05T00:21:37.777125Z 0 [Note] /usr/sbin/mysqld: ready for connections.
Version: '5.7.31-log'  socket: '/var/run/mysqld/mysqld.sock'  port: 3306  Gentoo Linux mysql-5.7.31
2021-04-05T00:21:37.792390Z 0 [Note] InnoDB: Buffer pool(s) load completed at 210405  0:21:37
2021-04-05T00:22:17.152988Z 2 [ERROR] Slave SQL for channel '': Slave failed to initialize relay log info structure from the repository, Error_code: 1872
2021-04-05T00:34:51.322739Z 14 [Note] 'CHANGE MASTER TO FOR CHANNEL '' executed'. Previous state master_host='10.10.10.10', master_port= 3306, master_log_file='mysql-bin.023283', master_log_pos= 516785716, master_bind=''. New state master_host='10.10.10.10', master_port= 3306, master_log_file='mysql-bin.023283', master_log_pos= 537774724, master_bind=''.
2021-04-05T01:05:54.949873Z 22 [Note] 'CHANGE MASTER TO FOR CHANNEL '' executed'. Previous state master_host='10.10.10.10', master_port= 3306, master_log_file='mysql-bin.023283', master_log_pos= 537774724, master_bind=''. New state master_host='10.10.10.10', master_port= 3306, master_log_file='mysql-bin.023283', master_log_pos= 537774724, master_bind=''.
2021-04-05T01:05:58.984766Z 22 [ERROR] Slave SQL for channel '': Slave failed to initialize relay log info structure from the repository, Error_code: 1872
2021-04-05T01:06:56.446260Z 23 [Note] 'CHANGE MASTER TO FOR CHANNEL '' executed'. Previous state master_host='10.10.10.10', master_port= 3306, master_log_file='', master_log_pos= 4, master_bind=''. New state master_host='10.10.10.10', master_port= 3306, master_log_file='mysql-bin.023283', master_log_pos= 537774724, master_bind=''.
There’s an acknowledged upstream MySQL bug that affects at least 5.7 and 8.0 that shows this error when trying to start replication. We encounter it a few times per month.
Slave failed to initialize relay log info structure from the repository (errno 1872)
This has also been a cause for flaky tests in the past, so we may be experiencing it in CI more often than we know. #3237
There is also a simple solution that should be 100% safe and works almost every time when we apply it manually.
reset slave;
start slave IO_THREAD;
stop slave IO_THREAD;
reset slave;
start slave;
I’d like for repairReplication to attempt that when it encounters this specific error. If nobody is opposed, I’m happy to send in a PR.
@sjmudd has also experienced this issue and has commented on the linked MySQL bugs.
Here are the full Vitess logs surrounding the error.
replication_reporter.go:69] Slave is stopped. Trying to reconnect to master...
locks.go:359] Locking shard domains/c0-e0 for action repairReplication to uscentral1-0498823900 as parent)
query.go:73] exec CHANGE MASTER TO ...
query.go:73] exec START SLAVE
locks.go:396] Unlocking shard domains/c0-e0 for action repairReplication to uscentral1-0498823900 as parent) with error ExecuteFetch(START SLAVE) failed: Slave failed to initialize relay log info structure from the repository (errno 1872) (sqlstate HY000) during query: START SLAVE
replication_reporter.go:72] Failed to reconnect to master: ExecuteFetch(START SLAVE) failed: Slave failed to initialize relay log info structure from the repository (errno 1872) (sqlstate HY000) during query: START SLAVE

ERROR 1872 (HY000): Slave failed to initialize relay log info structure from the repository
This issue happens on configuring MySQL replication from AWS RDS to self-hosted server. We can resolve this by restarting the replication.
Step1: Login to the slave MySQL terminal as root.
Step2: Check the slave status.
>show slave status G;Please note tha values of Master_Log_File and Read_Master_Log_Pos from the result.
Step3: Reset the slave.
>reset slave;This will clear the master replication configurations from slave.
Step4: Reconfigure replication.
>CHANGE MASTER TO MASTER_HOST='host', MASTER_USER='user', MASTER_PASSWORD='password', MASTER_LOG_FILE='log-file', MASTER_LOG_POS= log-position;Here we need to replace the values of host, user, password, log-file and log-position with the corresponding values.
Step5: Start the replication.
>start slave;Now the replication should starts working.
That’s all…
The salve replication thread stops, and an error 1872 is reported when trying to start slave
mysql> system perror 1872
MySQL error code 1872 (ER_SLAVE_RLI_INIT_REPOSITORY): Slave failed to initialize relay log info structure from the repository
Solution process
1. It seems that the warehouse of relay log cannot be found, but the location of relay log is set
mysql> show variables like 'relay%';
+---------------------------+---------------------------------------------------+
| Variable_name             | Value                                             |
+---------------------------+---------------------------------------------------+
| relay_log                 | relay-log                                         |
| relay_log_basename        | /datadir/relay-log       |
| relay_log_index           | /datadir/relay-log.index |
| relay_log_info_file       | relay-log.info
2. Log related information is also recorded in master.infor, and no exception is found after viewing
3. Reset the replication information
mysql> reset master;
Query OK, 0 rows affected (0.00 sec)
mysql> show slave statusG
*************************** 1. row ***************************
               Slave_IO_State:
                  Master_Host: *******
                  Master_User: repl
                  Master_Port: 3306
                Connect_Retry: 60
              Master_Log_File:
          Read_Master_Log_Pos: 4
               Relay_Log_File: relay-log.000001
                Relay_Log_Pos: 4
Note: There is still a copy message
After that, proceed to
set global gtid_purged=’*******’;
change master to …… ;
The error is still reported when starting the slave
4. MySQL DOC description of start slave:
RESET SLAVE does not change any replication connection parameters such as master host, master port, master user, or master password, which are retained in memory. This means that START SLAVE can be issued without requiring a CHANGE MASTER TO statement following RESET SLAVE.
Connection parameters are reset by RESET SLAVE ALL.
5. Use reset slave all to clear all replication information, then reset gtid_purged and master.infor
After start slave, replication is normal
Similar Posts:
 В предыдущих статьях шла речь о базовой установке и настройке Percona mysql серверов и о настройке Master-Master репликации. Продолжим знакомство с Percona mysql репликацией и перейдем к настройке и тестированию Master-Slave репликации. Как и в предыдущих статьях, наведу рисунок нашей схемы репликации, которую мы затеяли (рис. 3).
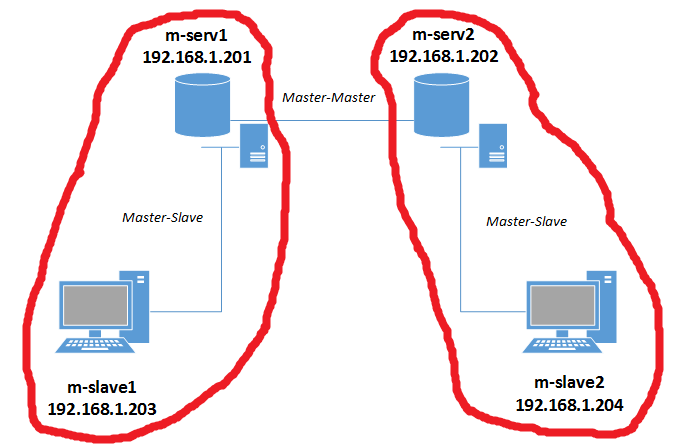
Рисунок 3 — Схема Master-Slave репликации
3.2 Master-Slave репликация
Мастер-Мастер репликация была настроена, теперь можно добавлять слейвы (рис. 3). Для этого нам нужно добавить конфигурационный файл /etc/mysql/my.cnf для каждого mysql-слейва, который входит в репликацию.
3.2.1 Настройка m-slave1 слейва
Сначала настроим первый слейв-сервер.
root@m-slave1:~# cat /etc/mysql/my.cnf
[mysqld]
#Уникальный идентификатор сервера
server-id = 3

#Логи ошибок
log_error = /var/log/mysql/mysql.err

#Путь к relay-логам слейва (бинлог, скачанный с мастера)
relay-log = /var/lib/mysql/slave-mysql-relay-bin
relay-log-index = /var/lib/mysql/slave-mysql-relay-bin.index

#БД, которые нужно/не нужно реплицировать
replicate-do-db = testdb
replicate-ignore-db=information_schema
replicate-ignore-db=mysql
replicate-ignore-db=performance_schema

#Чтобы не было конфликтов автоинкремента, говорим серверу,
#чтобы id генерировались начиная с 4-го прибавляя по 10,
# например 11, 21, 31, 41...
auto_increment_increment = 10
auto_increment_offset = 1
Теперь рестартуем mysql
root@m-slave1:~# /etc/init.d/mysql restart
 * Stopping MySQL (Percona Server) mysqld                                                                                                                       [ OK ]
 * Starting MySQL (Percona Server) database server mysqld                                                                                                       [ OK ]
 * Checking for corrupt, not cleanly closed and upgrade needing tables.
3.2.2 Настройка m-slave2 слейва
Переходим к настройке второго слейва.
root@m-slave2:~# cat /etc/mysql/my.cnf
[mysqld]
#Уникальный идентификатор сервера
server-id = 4

#Логи ошибок
log_error = /var/log/mysql/mysql.err

#Путь к relay-логам слейва (бинлог, скачанный с мастера)
relay-log = /var/lib/mysql/slave-mysql-relay-bin
relay-log-index = /var/lib/mysql/slave-mysql-relay-bin.index

#БД, которые нужно/не нужно реплицировать
replicate-do-db = testdb
replicate-ignore-db=information_schema
replicate-ignore-db=mysql
replicate-ignore-db=performance_schema

#Чтобы не было конфликтов автоинкремента, говорим серверу,
#чтобы id генерировались начиная с 4-го прибавляя по 10,
# например 12, 22, 32, 42...
auto_increment_increment = 10
auto_increment_offset = 2
Теперь рестартуем mysql
root@m-slave2:~# /etc/init.d/mysql restart
 * Stopping MySQL (Percona Server) mysqld                                                                                                                       [ OK ]
 * Starting MySQL (Percona Server) database server mysqld                                                                                                       [ OK ]
 * Checking for corrupt, not cleanly closed and upgrade needing tables.
3.2.3 Запуск репликации
Если вы следовали пункту 3.1.4 (Тестирование мастер репликации) после настройки Мастер – Мастер репликации, то на обоих слейвах нужно разворачивать новый дамп testdb, так как в эту БД добавлялись данные. Т.е. для слейва m-slave1 нужно снять дамп с мастера m-serv1 и развернуть (описано в пункте 2.2 Дамп и деплой), для m-slave2 дамп нужно снять с m-serv2 и развернуть. После того, как дамп будет развернут, у нас будут следующие данные в БД testdb.
root@m-slave1:~# mysql -u root -p -e 'use testdb;select * from users;'
Enter password:
+----+-------+
| id | name  |
+----+-------+
|  1 | Alex  |
|  3 | Vova  |
|  4 | Pasha |
| 13 | Frodo |
| 14 | Misha |
+----+-------+
Т.е. те же данные, что остались на мастер-серверах после тестирования Масте-Мастер репликации.
Теперь осталось запустить репилкацию. В случаи с m-slave1 мастер сервер должен быть m-serv1, поэтому переходим на первый мастер сервер и смотрим MASTER_LOG_FILE и MASTER_LOG_POS.
root@m-serv1:~# mysql -u root -p -e 'show master status;'
Enter password:
+-------------------------+----------+--------------+--------------------------------------------------+-------------------+
| File                    | Position | Binlog_Do_DB | Binlog_Ignore_DB                                 | Executed_Gtid_Set |
+-------------------------+----------+--------------+--------------------------------------------------+-------------------+
| server-mysql-bin.000006 |      120 |              | information_schema,mysql,performance_schema      |                   |
+-------------------------+----------+--------------+--------------------------------------------------+-------------------+
Следовательно MASTER_LOG_FILE = server-mysql-bin.000006, а MASTER_LOG_POS = 120. Теперь переходим обратно на m-slave1 и настраиваем репликацию.
root@m-slave1:~# mysql -u root -p -e "CHANGE MASTER TO MASTER_HOST = '192.168.1.201', MASTER_USER = 'replica', MASTER_PASSWORD = '%repl2015', MASTER_LOG_FILE = 'server-mysql-bin.000006', MASTER_LOG_POS = 120;"
Все интуитивно понятно. Теперь стартуем слейв и смотрим статус.
root@m-slave1:~# mysql -u root -p -e 'start slave;'
root@m-slave1:~# mysql -u root -p -e 'show slave status G;'
*************************** 1. row ***************************
               Slave_IO_State: Waiting for master to send event
                  Master_Host: 192.168.1.201
                  Master_User: replica
                  Master_Port: 3306
                Connect_Retry: 60
              Master_Log_File: server-mysql-bin.000006
          Read_Master_Log_Pos: 120
               Relay_Log_File: slave-mysql-relay-bin.000002
                Relay_Log_Pos: 290
        Relay_Master_Log_File: server-mysql-bin.000006
             Slave_IO_Running: Yes
            Slave_SQL_Running: Yes
              Replicate_Do_DB: testdb
          Replicate_Ignore_DB: information_schema,mysql,performance_schema
           Replicate_Do_Table:
       Replicate_Ignore_Table:
      Replicate_Wild_Do_Table:
  Replicate_Wild_Ignore_Table:
                   Last_Errno: 0
                   Last_Error:
                 Skip_Counter: 0
          Exec_Master_Log_Pos: 120
              Relay_Log_Space: 469
              Until_Condition: None
               Until_Log_File:
                Until_Log_Pos: 0
           Master_SSL_Allowed: No
           Master_SSL_CA_File:
           Master_SSL_CA_Path:
              Master_SSL_Cert:
            Master_SSL_Cipher:
               Master_SSL_Key:
        Seconds_Behind_Master: 0
Master_SSL_Verify_Server_Cert: No
                Last_IO_Errno: 0
                Last_IO_Error:
               Last_SQL_Errno: 0
               Last_SQL_Error:
  Replicate_Ignore_Server_Ids:
             Master_Server_Id: 1
                  Master_UUID: f208be92-fa66-11e4-a905-08002742f2f0
             Master_Info_File: /var/lib/mysql/master.info
                    SQL_Delay: 0
          SQL_Remaining_Delay: NULL
      Slave_SQL_Running_State: Slave has read all relay log; waiting for the slave I/O thread to update it
           Master_Retry_Count: 86400
                  Master_Bind:
      Last_IO_Error_Timestamp:
     Last_SQL_Error_Timestamp:
               Master_SSL_Crl:
           Master_SSL_Crlpath:
           Retrieved_Gtid_Set:
            Executed_Gtid_Set:
                Auto_Position: 0
Все ок. Теперь делаем те же движения для m-slave2. Переходим на второй мастер сервер и смотрим MASTER_LOG_FILE и MASTER_LOG_POS.
root@m-serv2:~# mysql -u root -p -e 'show master status;'
Enter password:
+-------------------------+----------+--------------+--------------------------------------------------+-------------------+
| File                    | Position | Binlog_Do_DB | Binlog_Ignore_DB                                 | Executed_Gtid_Set |
+-------------------------+----------+--------------+--------------------------------------------------+-------------------+
| server-mysql-bin.000002 |      120 |              | information_schema,mysql,performance_schema      |                   |
+-------------------------+----------+--------------+--------------------------------------------------+-------------------+
Следовательно MASTER_LOG_FILE = server-mysql-bin.000002, а MASTER_LOG_POS = 120. Теперь переходим обратно на m-slave2 и настраиваем репликацию.
root@m-slave2:~# mysql -u root -p -e "CHANGE MASTER TO MASTER_HOST = '192.168.1.202', MASTER_USER = 'replica', MASTER_PASSWORD = '%repl2015', MASTER_LOG_FILE = 'server-mysql-bin.000002', MASTER_LOG_POS = 120;"
Все интуитивно понятно. Теперь стартуем слейв и смотрим статус.
root@m-slave2:~# mysql -u root -p -e 'start slave;'
root@m-slave2:~# mysql -u root -p -e 'show slave status G;'
*************************** 1. row ***************************
               Slave_IO_State: Waiting for master to send event
                  Master_Host: 192.168.1.202
                  Master_User: replica
                  Master_Port: 3306
                Connect_Retry: 60
              Master_Log_File: server-mysql-bin.000002
          Read_Master_Log_Pos: 120
               Relay_Log_File: slave-mysql-relay-bin.000002
                Relay_Log_Pos: 290
        Relay_Master_Log_File: server-mysql-bin.000002
             Slave_IO_Running: Yes
            Slave_SQL_Running: Yes
              Replicate_Do_DB: testdb
          Replicate_Ignore_DB: information_schema,mysql,performance_schema
           Replicate_Do_Table:
       Replicate_Ignore_Table:
      Replicate_Wild_Do_Table:
  Replicate_Wild_Ignore_Table:
                   Last_Errno: 0
                   Last_Error:
                 Skip_Counter: 0
          Exec_Master_Log_Pos: 120
              Relay_Log_Space: 469
              Until_Condition: None
               Until_Log_File:
                Until_Log_Pos: 0
           Master_SSL_Allowed: No
           Master_SSL_CA_File:
           Master_SSL_CA_Path:
              Master_SSL_Cert:
            Master_SSL_Cipher:
               Master_SSL_Key:
        Seconds_Behind_Master: 0
Master_SSL_Verify_Server_Cert: No
                Last_IO_Errno: 0
                Last_IO_Error:
               Last_SQL_Errno: 0
               Last_SQL_Error:
  Replicate_Ignore_Server_Ids:
             Master_Server_Id: 2
                  Master_UUID: 25f9f3ac-fd3b-11e4-bb77-080027ead940
             Master_Info_File: /var/lib/mysql/master.info
                    SQL_Delay: 0
          SQL_Remaining_Delay: NULL
      Slave_SQL_Running_State: Slave has read all relay log; waiting for the slave I/O thread to update it
           Master_Retry_Count: 86400
                  Master_Bind:
      Last_IO_Error_Timestamp:
     Last_SQL_Error_Timestamp:
               Master_SSL_Crl:
           Master_SSL_Crlpath:
           Retrieved_Gtid_Set:
            Executed_Gtid_Set:
                Auto_Position: 0
3.2.4 Тестируем репликацию
Тестируем всю нашу цепочку репликации (рис. 1). Перейдем на первый мастер сервер и добавим новую запись в testdb.users.
root@m-serv1:~# mysql -u root -p -e 'USE testdb; INSERT INTO users(name) VALUES ("Server1 record");'
root@m-serv1:~# mysql -u root -p -e 'select * from testdb.users;'
+----+----------------+
| id | name           |
+----+----------------+
|  1 | Alex           |
|  3 | Vova           |
|  4 | Pasha          |
| 13 | Frodo          |
| 14 | Misha          |
| 23 | Server1 record |
+----+----------------+
Теперь проверяем добавилась ли запись на все слейвы и на второй мастер
root@m-slave1:~# mysql -u root -p -e 'use testdb;select * from users;'
+----+----------------+
| id | name           |
+----+----------------+
|  1 | Alex           |
|  3 | Vova           |
|  4 | Pasha          |
| 13 | Frodo          |
| 14 | Misha          |
| 23 | Server1 record |
+----+----------------+

root@m-slave2:~# mysql -u root -p -e 'use testdb;select * from users;'
+----+----------------+
| id | name           |
+----+----------------+
|  1 | Alex           |
|  3 | Vova           |
|  4 | Pasha          |
| 13 | Frodo          |
| 14 | Misha          |
| 23 | Server1 record |
+----+----------------+

root@m-serv2:~# mysql -u root -p -e 'use testdb;select * from users;'
+----+----------------+
| id | name           |
+----+----------------+
|  1 | Alex           |
|  3 | Vova           |
|  4 | Pasha          |
| 13 | Frodo          |
| 14 | Misha          |
| 23 | Server1 record |
+----+----------------+
Как видим, все в порядке. Теперь добавим запись на втором мастере.
root@m-serv2:~# mysql -u root -p -e 'USE testdb; INSERT INTO users(name) VALUES ("Server2 record");'
root@m-serv2:~# mysql -u root -p -e 'select * from testdb.users;'
+----+----------------+
| id | name           |
+----+----------------+
|  1 | Alex           |
|  3 | Vova           |
|  4 | Pasha          |
| 13 | Frodo          |
| 14 | Misha          |
| 23 | Server1 record |
| 24 | Server2 record |
+----+----------------+
Теперь проверяем добавилась ли запись на все слейвы и на первый мастер
root@m-slave1:~# mysql -u root -p -e 'use testdb;select * from users;'
+----+----------------+
| id | name           |
+----+----------------+
|  1 | Alex           |
|  3 | Vova           |
|  4 | Pasha          |
| 13 | Frodo          |
| 14 | Misha          |
| 23 | Server1 record |
| 24 | Server2 record |
+----+----------------+

root@m-slave2:~# mysql -u root -p -e 'use testdb;select * from users;'
+----+----------------+
| id | name           |
+----+----------------+
|  1 | Alex           |
|  3 | Vova           |
|  4 | Pasha          |
| 13 | Frodo          |
| 14 | Misha          |
| 23 | Server1 record |
| 24 | Server2 record |
+----+----------------+

root@m-serv1:~# mysql -u root -p -e 'use testdb;select * from users;'
+----+----------------+
| id | name           |
+----+----------------+
|  1 | Alex           |
|  3 | Vova           |
|  4 | Pasha          |
| 13 | Frodo          |
| 14 | Misha          |
| 23 | Server1 record |
| 24 | Server2 record |
+----+----------------+
Как видим, репликация работает как и предполагалось.
4. Распространенные ошибки
==========================================================================
Ошибка: ERROR 1872 (HY000): Slave failed to initialize relay log info structure from the repository
Решение:
mysql> reset slave;
Query OK, 0 rows affected (0.00 sec)

mysql> CHANGE MASTER TO MASTER_HOST='192.168.1.201', MASTER_USER='rep_user', MASTER_PASSWORD='rep_user', MASTER_PORT=3306, MASTER_LOG_FILE='mysql-bin.000005', MASTER_LOG_POS=120, MASTER_CONNECT_RETRY=10;
Query OK, 0 rows affected, 2 warnings (0.05 sec)

mysql> start slave;
==========================================================================
Ошибки:
- Error_code: 1032; handler error HA_ERR_KEY_NOT_FOUND for deleting row
- Can’t drop database ‘********’: database doesn’t exist’
- Error ‘Duplicate entry’
- Could not execute Write_rows event on table ***********: Duplicate entry ‘XXXXXXXX’ for key ‘ххххххх’, Error_code: 1062
Решение: Эти ошибки можно просто скипнуть, но посмотреть их причины сначала.
mysql -uroot -p -e 'STOP SLAVE; SET GLOBAL SQL_SLAVE_SKIP_COUNTER = 1; START SLAVE;'
==========================================================================
Ошибка: Relay log read failure (#1594): Could not parse relay log event entry.
Решение:
#Подключаемся к серверу, где возникла проблема и смотрим статус репликации
root@server:~# mysql -uroot -p -e 'show slave status G;' | grep -E 'Relay_Master_Log_File|Exec_Master_Log_Pos'
        Relay_Master_Log_File: mysql-bin.008189
      Exec_Master_Log_Pos: 71687831

# Останавливаем репликацию и обновляем бин-лог и позицию
#master_log_file = Relay_Master_Log_File = mysql-bin.008189
#master_log_pos = Exec_Master_Log_Pos = 71687831
root@server:~# mysql -uroot -p -e "STOP SLAVE;"
root@server:~# mysql -uroot -p -e "CHANGE MASTER TO master_log_file='mysql-bin.008189', master_log_pos=71687831;"

#Стартуем слейв
root@server:~# mysql -uroot -p218e5ccb4a834382%FBF87B604F1FE14B -e "START SLAVE;"
==========================================================================
Далее пойдет речь о полезных командах для администрирования percona mysql сервера.
Это очередная проблема в Mysql-репликации, которая может возникнуть при обновлении версии Mysql. Ну или просто так. Чтобы ее решить, необходимо перезапустить репликацию:
1. Запоминаем позицию слейва
На слейве выполняем команду:
|
mysql> show slave statusG |
И запоминаем следующие параметры:
|
... Master_Log_File: <b>mysql-bin.228649</b> Read_Master_Log_Pos: <b>22124493</b> ... |
2. Перезапускаем реплику
На слейве делаем полный ресет:
После этого запускаем реплику заново, используя сохраненные параметры:
|
mysql> CHANGE MASTER TO MASTER_HOST=‘<b>IP-адрес-мастера</b>’, MASTER_USER=‘<b>логин</b>’, MASTER_PASSWORD=‘<b>пароль</b>’, MASTER_LOG_FILE=‘<b>mysql-bin.228649</b>’, MASTER_LOG_POS= <b>22124493</b>; |
После этого запускаем репликацию:
3. Проверяем
Чтобы убедиться что реплика работает необходимо снова выполнить команду:
|
mysql> show slave statusG |
При этом мы должны увидеть следующие параметры установленные в Yes:
|
... Slave_IO_Running: <b>Yes</b> Slave_SQL_Running: <b>Yes</b> ... |
Если не вышло
Если не выходит придется пересобрать репликацию.