
Ошибка HTTP 413 Request Entity Too Large появляется, когда пользователь пытается загрузить на сервер слишком большой файл. Размер определяется относительно лимита, который установлен в конфигурации. Изменить его может только администратор сервера.
Что делать, если вы пользователь
Если вы видите ошибку 413, когда пытаетесь загрузить файл на чужом сайте, то вам нужно уменьшить размер передаваемых данных. Вот несколько ситуаций.
- Если вы пытались загрузить одновременно несколько файлов (форма позволяет так делать), попробуйте загружать их по одному.
- Если не загружается изображение, уменьшите его размер перед загрузкой на сервер. Можно сделать это с помощью онлайн-сервисов — например, Tiny PNG.
- Если не загружается видео, попробуйте сохранить его в другом формате и уменьшить размер. Можно сделать это с помощью онлайн-сервисов — я использую Video Converter.
- Если не загружается PDF-документ, уменьшите его размер. Можно сделать это с помощью онлайн-сервисов — я обычно использую PDF.io.
Универсальный вариант — архивация файла со сжатием. Ошибка сервера 413 появляется только в том случае, если вы пытаетесь одновременно загрузить слишком большой объем данных. Поэтому и выход во всех ситуациях один — уменьшить размер файлов.
Комьюнити теперь в Телеграм
Подпишитесь и будьте в курсе последних IT-новостей
Подписаться
Исправление ошибки сервера 413 владельцем сайта
Если вы владелец сайта, который при загрузке файлов выдает ошибку 413, то необходимо изменить конфигурацию сервера. Порядок действий зависит от используемых технологий.
Чтобы понять, что стало причиной ошибки, нужно посмотреть логи. Это поможет сэкономить время. Вот подробная инструкция, которая рассказывает, как посмотреть логи в панели управления Timeweb. В зависимости от того, какая информация будет в логах, вы поймете, как исправлять ошибку 413.
Увеличение разрешенного размера для загрузки файлов на Nginx и Apache
На Nginx максимально допустимый размер файла задан в параметре client_max_body_size. По умолчанию он равен 1 МБ. Если запрос превышает установленное значение, пользователь видит ошибку 413 Request Entity Too Large.
Параметр client_max_body_size находится в файле nginx.conf. Для его изменения нужен текстовый редактор — например, vi.
Подключитесь к серверу через SSH и выполните в консоли следующую команду:
Во встроенном редакторе vi откроется файл nginx.conf. В разделе http добавьте или измените следующую строку:
client_max_body_size 20M;
Сохраните и закройте файл. Затем проверьте конфигурацию файла:
Перезагрузите сервер следующей командой:
После перезагрузки будет действовать новая конфигурация с увеличенным лимитом на размер загружаемого файла.
На Apache опция, устанавливающая максимально допустимый размер загружаемого файла, называется LimitRequestBody. По умолчанию лимит не установлен (равен 0).
На CentOS главный конфиг располагается по адресу /etc/httpd/conf/httpd.conf. На Debian/Ubuntu — по адресу /etc/apache2/apache2.conf.
Значение задается в байтах:
LimitRequestBody 33554432
Эта запись выставляет максимально допустимый размер 32 МБ.
Изменить конфиги можно также через панель управления. Я пользуюсь ISPmanager, поэтому покажу на ее примере.
- Раскройте раздел «Домены» и перейдите на вкладку «WWW-домены».
- Выберите домен, на котором появляется ошибка, и нажмите на кнопку «Конфиг».
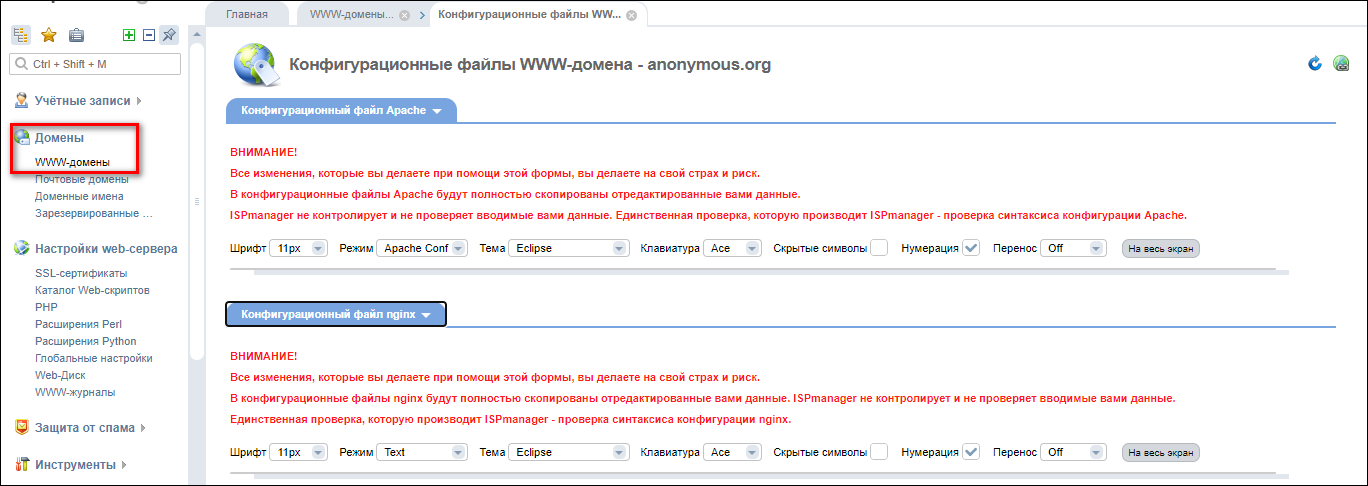
Появится вкладка с конфигами Apache и Nginx. Вы можете редактировать их вручную, устанавливая лимит на размер загружаемого файла.
Исправление ошибки на WordPress
На WordPress ошибку можно исправить двумя способами.
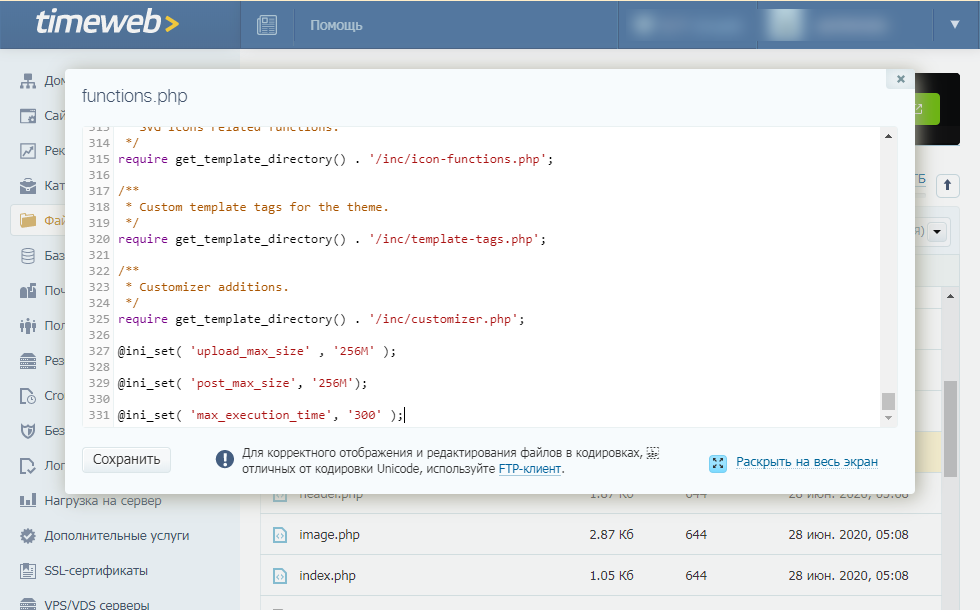
Способ первый — изменение разрешенного размера в файле functions.php. Этот файл отвечает за добавление функций и возможностей — например, меню навигации.
- Откройте файловый менеджер.
- Перейдите в папку public.html.
- Откройте директорию wp-content/themes.
- Выберите тему, которая используется на сайте с WordPress.
- Скачайте файл functions.php и откройте его через любой текстовый редактор.
В панели управления на Timeweb можно также воспользоваться встроенным редактором или IDE — путь будет такой же, как указан выше: public.html/wp-content/themes/ваша тема/functions.php.
В конце файла functions.php добавьте следующий код:
@ini_set( 'upload_max_size' , '256M' );

@ini_set( 'post_max_size', '256M');

@ini_set( 'max_execution_time', '300' );
Сохраните изменения и загрузите модифицированный файл обратно на сервер. Проверьте, появляется ли ошибка 413.
Второй способ — изменение файла .htaccess. Это элемент конфигурации, который способен переопределять конфигурацию сервера в плане авторизации, кэширования и даже оптимизации. Найти его можно через файловый менеджер в папке public.html.
Скачайте файл на компьютер, на всякий случай сделайте резервную копию. Затем откройте .htaccess в текстовом редакторе и после строчки #END WORDPRESS вставьте следующий код:
php_value upload_max_filesize 999M

php_value post_max_size 999M

php_value max_execution_time 1600

php_value max_input_time 1600
Сохраните файл и загрузите его обратно на сервер с заменой исходного файла. То же самое можно сделать через встроенный редактор или IDE в панели управления Timeweb.
Исправление ошибки при использовании PHP-скрипта
Если файлы загружаются с помощью PHP-скрипта, то для исправления ошибки 413 нужно отредактировать файл php.ini. В нем нас интересуют три директивы.:
- upload_max_filesize — в ней указан максимально допустимый размер загружаемого файла (значение в мегабайтах);
- post_max_size — максимально допустимый размер данных, отправляемых методом POST (значение в мегабайтах);
- max_execution_time — максимально допустимое время выполнения скрипта (значение в секундах).
Например, если я хочу, чтобы пользователи могли загружать файлы размером до 20 МБ, то я делаю так:
max_execution_time = 90

post_max_size = 20M

upload_max_filesize = 20M
Если все значения указаны верно, то файлы с допустимым размером будут загружаться на сервер без ошибок.
То же самое можно сделать через панель управления. Например, в ISPmanager порядок будет такой:
- Авторизуйтесь с root-правами.
- В левом меню раскройте раздел «Настройки web-сервера» и перейдите на вкладку «PHP».
- Выберите используемую версию и нажмите на кнопку «Изменить».
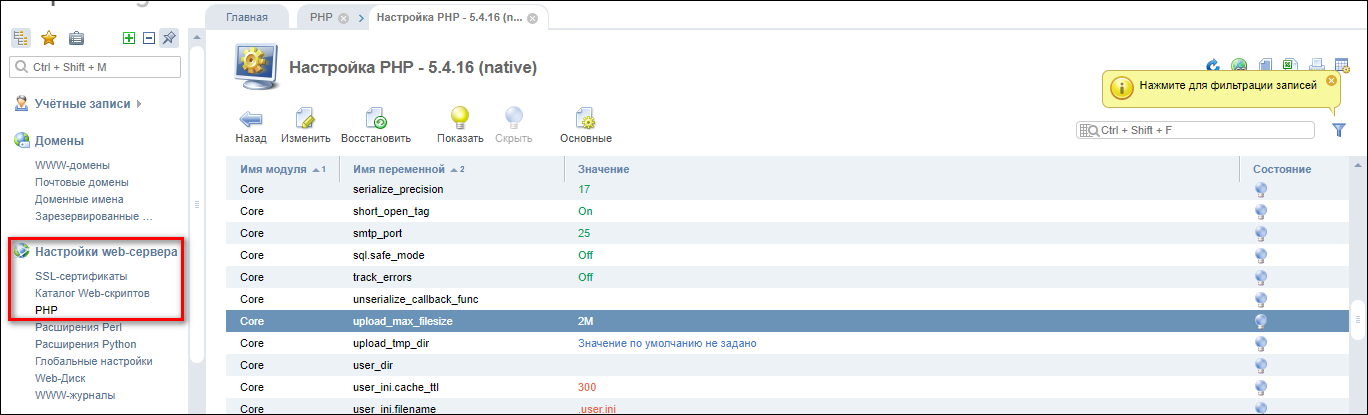
На экране появится список параметров. Они отсортированы по алфавиту. Установите необходимые значения для параметров max_execution_time, post_max_size и upload_max_filesize. Изменения применяются автоматически.

I had the same issue but in docker. when I faced this issue, added client_max_body_size 120M; to my Nginx server configuration,
nginx default configuration file path is /etc/nginx/conf.d/default.conf
server {
    client_max_body_size 120M;
    ...
it resizes max body size to 120 megabytes. pay attention to where you put client_max_body_size, because it effects on its scope. for example if you put client_max_body_size in a location scope, only the location scope will be effected with.
after that, I did add these three lines to my PHP docker file
RUN echo "max_file_uploads=100" >> /usr/local/etc/php/conf.d/docker-php-ext-max_file_uploads.ini
RUN echo "post_max_size=120M" >> /usr/local/etc/php/conf.d/docker-php-ext-post_max_size.ini
RUN echo "upload_max_filesize=120M" >> /usr/local/etc/php/conf.d/docker-php-ext-upload_max_filesize.ini
since docker PHP image automatically includes all setting files from the path (/usr/local/etc/php/conf.d/) into php.ini file, PHP configuration file will change by these three lines and the issue must disappear
Linux, Программное обеспечение
- 21.01.2015
- 35 060
- 5
- 03.04.2020
- 22
- 21
- 1
- Содержание статьи
- Описание ошибки
- nginx
- Apache
- httpd.conf
- .htaccess
- PHP
- Комментарии к статье ( 5 шт )
- Добавить комментарий
Описание ошибки
413 Request Entity Too Large
Данная ошибка может появиться в том случае, если вы загружаете какой-либо файл на сервер и размер этого файла превышает максимально разрешенный в конфиге в веб-сервера (например, в nginx по умолчанию установлено ограничение в 1 МБ). Для того, чтобы это исправить, необходимо внести определенные правки в файл конфигурации, который может быть разным, в зависимости от используемого веб-сервера. Ниже будут приведены примеры для самых популярных веб-серверов:
nginx
Максимальный размер файла указывается параметром client_max_body_size. Поэтому, достаточно прописать параметр и новое значение в любой конфиг, который использует nginx для сайта, на котором у вас появилась эта проблема. Получится должно что-то примерно следующее:
server {
    ...
    client_max_body_size 4m;
    ...
}
Где 4m — это 4 Мб. Для установки лимита в 32 Мб, надо соответственно написать client_max_body_size 32m, и т. д.
После изменения настроек нужно обязательно перезагрузить конфиг в nginx.
Apache
httpd.conf
Размер файла, допустимого для заливки, можно отрегулировать в главном конфиге Apache, который можно найти по адресу /etc/httpd/conf/httpd.conf (в CentOS) или /etc/apache2/apache2.conf (в Debian/Ubuntu). Задается он параметром LimitRequestBody, и ему можно прописать любое нужное значение в байтах. Например, так выглядит ограничение в 32 МБ:
LimitRequestBody 33554432Для применения настроек нужно перезагрузить веб-сервер Apache.
.htaccess
Очень часто у веб-сервера Apache для настройки определенного сайта используется файл .htaccess, который лежит в корневой директории веб-сайта. Удобство данного метода в том, что Вы можете прописать нужные настройки, которые будут применяться только для данной директории и веб-сайта, который данную директорию использует.
Если используемый для загрузки скрипт находится в какой-то поддиректории, где имеется свой файл .htaccess, то его настройки будут иметь больший приоритет!
Для этого, нужно либо открыть уже существующий файл .htaccess (или создать, в случае отсутствия) и добавить туда следующие строки (32 МБ в байтах):
LimitRequestBody 33554432Если для работы сайта и заливки файла используется PHP, то нужно добавить еще другую строчку:
php_value upload_max_filesize 32MPHP
Если при заливке файла используется PHP скрипт, то для PHP имеются отдельные настройки максимального размера файла. Для их изменений потребуется внести правку в файл php.ini, который расположен по адресу /etc/<версия php>/fpm. Открываем его любым текстовым редактором и находим следующие строки:
upload_max_filesizepost_max_sizeИ выставляем им нужные значения, например 4M (т. е. 4 МБ).
После внесения правок просто перезагружаем php, и проверяем работу.
To totally unlock this section you need to Log-in
It can be found on standalone Apache/Nginx web server or while proxy-based solutions when Nginx acts as a front end server for Apache at back end server. In this guide, we will see how to fix this error “413 request entity is too large” in Apache as well as in Nginx, Microsoft IIS, and definitely in PHP as well.
As the error says request entity too large, it occurs when a request made by the client is large and trying to access or process more information than what is limited by Apache/Nginx and PHP configuration file. Mostly it occurs when you have everything set up in default mode (means just installed software and left all settings as it is).
As stated in Nginx manual, The client_max_body_size directive assigns the maximum accepted body size of client request, indicated by the line Content-Length in the header of request. If size is greater the given one, then the client gets the error «Request Entity Too Large (413)«.
Here we need to allow more memory to the webserver to fix this issue.
Apache Users: Fix 413 Request Entity Too Large
Edit .htaccess file and add the below directive in it.
LimitRequestBody 104857600
Now restart Apache daemon.
sudo service apache2 reload
Now fix PHP limits as well to fix this issue: see below in this article to see how to do it.
Nginx Users: Fix 413 Request Entity Too Large
It can be fixed by increasing the memory limit in Nginx as well as PHP configuration file. In order to fix this issue, we need to edit nginx.conf file.
sudo nano /etc/nginx/nginx.conf
Search for this variable: client_max_body_size.
If you find it, just increase its size to 100M, for example. If it doesn’t exist, then you can add it inside and at the end of http { … } block.
client_max_body_size 100M;
Restart the Nginx to apply the changes.
sudo service nginx restart
Now fix PHP limits as well to fix this issue: see below in this article to see how to do it.
Modify PHP.ini File to Increase Upload Limits
It’s not needed on all configurations, but you may also have to modify the PHP upload settings as well to ensure that nothing is going out of limit by PHP configurations.
Here we need to edit the php.ini file.
Note: You need to identify yourself what version of PHP is installed on the webserver in order to edit that. Below an example involving the PHP 7.3 version:
nano /etc/php/7.3/fpm/php.ini
Now find following directives one by one:
upload_max_filesize
post_max_size
…and increase its limit to 100M, by default they are 8M and 2M.
- upload_max_filesize defines the maximum allowed size for uploaded files.
- post_max_size defines the maximum size of POST data that PHP will accept.
upload_max_filesize = 100M
post_max_size = 100M
Finally, save it and restart the PHP (in this example is PHP 7.3 FPM.
service php7.3-fpm restart
You can set any limit to Apache/Nginx and PHP configuration files, here we have set them to 100M means 100 MegaBytes which is more than enough what we needed.
For IIS Users (Microsoft Windows Server)
The quickest solution is to increase the upload size limit. IIS uses uploadReadAheadSize parameter in applicationHost.config and web.config files to control this limit.
uploadReadAheadSize: Specifies the number of bytes that a Web server will read into a buffer and pass to an ISAPI extension or module. This occurs once per client request. The ISAPI extension or module receives any additional data directly from the client. The value must be between 0 and 2147483647. The default value is 49152.
Steps to change the value of this parameter:
- Open IIS Manager.
- Select the site.
- Double click “Configuration Editor”.
- Select system.webServer and then serverRuntime.
- Modify the uploadReadAheadSize value.
- Click “Apply”.
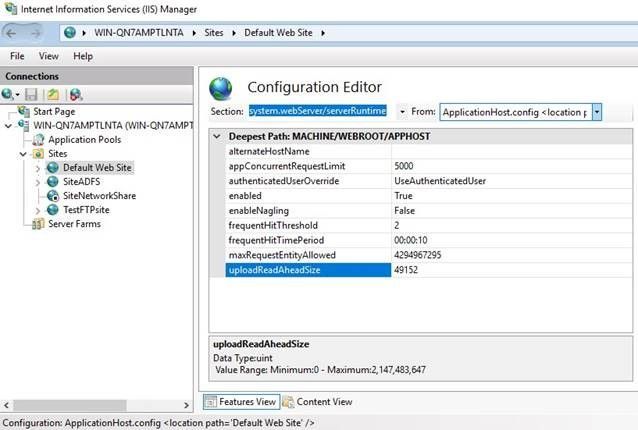
You may also want to change maxRequestEntityAllowed parameter. It specifies the maximum number of bytes allowed in the request body.
Using the command line, on IIS Server, we could use both appcmd.exe and Powershell approaches, as the following:
appcmd.exe set config -section:system.webServer/serverRuntime /uploadReadAheadSize:"491521" /commit:apphost
Set-WebConfigurationProperty -pspath 'MACHINE/WEBROOT/APPHOST' -filter "system.webServer/serverRuntime" -name "uploadReadAheadSize" -value 2147483647
Remember that the uploadReadAheadSize value must be between 0 and 2147483647.

Is your website showing a 413 request entity too large error? We are here to help you.
The 413 error simply means that the browser request was too large for the webserver to process.
Again, the fix for 413 request entity too large error involves modifying the size of the request body that the server accepts.
At Bobcares, we manage web servers for our customers as part of our Server Management Services.
Today, we’ll see how our Expert Engineers fix 413 errors in popular webservers like Apache, Nginx, and IIS.
Common scenarios of 413 request entity too large error
Let’s first have a quick look at the common scenarios that show the 413 error.
In general, most users experience the error while trying to upload files to the server.
For instance, in WordPress, it can happen during a theme or a plugin file upload using the WordPress dashboard. Or when a visitor tries to upload a large file, the error shows up as:

Similarly, the same error can appear while trying to restore a large WordPress backup too.
In a recent Helpdesk request, the customer reported the error as:
The upload page on my website shows the request entity is too large error. A reload will always fix it. Any clue how to prevent that issue?
What exactly causes a 413 error?
Now that we know the various scenarios of the error, we’ll see the reason for the error.
The 413 request entity too large error happens when the browser requests a very large file that the webserver cannot process. In other words, it means that the client’s HTTP request is too large for the server to handle.
For security reasons, every web server limits the size of the client request. This helps to avoid any resource abuse on the server.
For example, when any visitor tries to request a big file, it can even slow down the entire server. In many attacks, overloading the server with huge sized requests is a common method. When the request body is larger than the server allowed limit, it ends up in the 413 error.

How we fix 413 request entity too large error
The fix for 413 request entity too large error is to increase the maximum request size that a web server can process. This again varies depending on the type of web server that the website uses.
Having a decade of experience in managing various servers, let’s see how our Dedicated Engineers fix this error in different web servers.
In IIS web server
To resolve the 413 error in IIS, we increase the value of the “uploadReadAheadSize” parameter. This value determines the number of bytes that IIS will read to run the respective IIS module.
The steps for modifying applicationHost.config on an IIS7 web server are:
- In IIS7, select the website.
- Then go to the “Configuration Editor“, in the drop-down menu, select “system.webServer“
- Select “serverRuntime“.
- Find “uploadReadAheadSize” and increase its value.
- Finally, click Apply.
Solution for 413 request entity too large error in Apache
Similarly, when the website runs on an Apache webserver, we edit the value of LimitRequestBody in the configuration.
Based on the setting, we modify it in either the httpd.conf file or in a local .htaccess file inside the website.
To restrict the Apache requests beyond 50MB, we set the value as:
LimitRequestBody 52428800Then we do a config test, followed by a server reload.
service apache2 reload
Now the new value will be effective and the upload works fine.
Setting a value of 0 will allow any client request. But for security reasons, we never recommend it.
For Nginx webserver
Similarly, one of our customers came with a similar request on his Nginx server.
I have done a silly thing on my WordPress site and I need to reinstall my backup. However, I am getting an error message when I try to restore the site. The server responded with a “413 Request Entity Too Large”, please make sure that the server is not blocking our requests.
Here, we modified the value of the client_body_max_size directive in the Nginx configuration.
We opened the file at /usr/local/nginx/conf/nginx.conf and then modify the value as
# set client body size to 50M #
client_max_body_size 50M;
Then we restarted the Nginx server. This fixed the 413 Request Entity Too Large error.
Cross-checking PHP limits
In some cases, even if the webserver allows the client request size, often PHP limits on the website can throw up errors. Therefore, our Dedicated Engineers always cross verify the server limits for
- upload_max_filesize
- post_max_size
- max_execution_time
And, we modify the values either using .htaccess file or php.ini file depending on the website settings.
[Looking for a fix for a 413 error on your website. We are here to help you.]
Conclusion
To sum up, the 413 Request Entity Too Large error occurs when the client browser request is too large for the webserver to handle. Today, we saw how our Support Engineers modify the value of HTTP request size limit in IIS, Apache, and Nginx.
PREVENT YOUR SERVER FROM CRASHING!
Never again lose customers to poor server speed! Let us help you.
Our server experts will monitor & maintain your server 24/7 so that it remains lightning fast and secure.
GET STARTED
var google_conversion_label = «owonCMyG5nEQ0aD71QM»;
Sometimes, a website shows annoying errors confusing users while browsing. If browsing other sites makes you annoyed when it comes to your site, things are very different. Many types of website errors occur, some generic and others specific to WordPress. One such error is 413.
Error 413 belongs to the family of HTTP 4xx status codes, which identify errors connected to the request made by the client. In this article, you will see what the “413 Request Entity Too Large” error is and how you can fix it in your WordPress.
- What Is the “Error 413 Request Entity Too Large” Error?
- Why Does “413 Request Entity Too Large” Error Occur?
- Fixing the “413 Request Entity Too Large” Error in WordPress
HTTP Error 413 indicates that the request made cannot be managed by the server, and this is because it involves a file or a block of data or, again, a group of files that are too large compared to the maximum limit that the server can manage.
The browser window generally displays the message “413 Request Entity Too Large”. This problem can occur if you try to upload too large files via the browser, exceeding the limits imposed by the webmaster for security reasons or others.
Why Does the “413 Request Entity Too Large” Error Occur?
Error 413 Request Entity Too Large occurs when you try to upload a file that exceeds the maximum upload limit set on your web server. In other words, when you try to upload a file that is too large, the web server returns an error message informing the user that “413 Request Entity Too Large”.
The message shown to the user may vary depending on the web server and the client. The following are the most common messages that indicate the occurrence of this error:
- Error 413
- HTTP Error 413
- HTTP Code: 413
- Request Entity Too Large
- 413. That’s an error.
Fixing the “413 Request Entity Too Large” Error in WordPress
As you know, error 413 usually occurs when you upload a large file to your web server, and your hosting provider has set a limitation on file size.
One of the common problems webmasters encounter when managing WordPress is allowing the webserver to allow file uploads via the Media Library. However, if your Nginx-powered website is not configured to allow the uploading of large files, the upload process will mostly fail.
I will show you some of the easiest methods to increase the file upload size and fix the 413 Request Entity Too Large error in WordPress.
- Reset File Permissions
- Manually Upload the File via FTP
- Increase Upload File Size
- Modify Your Functions.php File
- Modify Your .htaccess File
- Modify Your nginx.conf File
- Contact Your Hosting Provider
1. Reset File Permissions
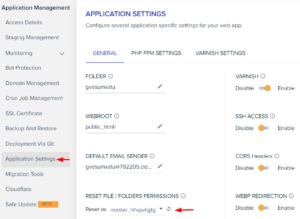
It might be possible that you are encountering this error due to limited access to a file and upload permission. So, it would be great to check the WordPress file/folder permissions and set the recommended permission, then try uploading the file to your site.
You can set the permissions from an FTP Client like FileZilla, and if your hosting provider offers any file permission reset option, then you can fix it from there.
2. Manually Upload the File via FTP
It’s a good idea to consider FTP to upload your large file, but please note that if you are uploading a file via FileZilla, it takes more time.
Here, you will need to access your web server and upload the file by drag and drop. Therefore, first, you need to check whether your hosting provider offers server credentials or SFTP access to your web server.
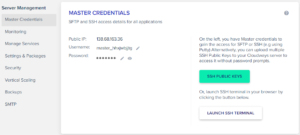
Now, you need the FileZilla FTP Client to access your web files, so download it if you don’t have one. Then, open FileZilla and fill the respective fields; Host, Username, Password, and Port. You can see in the below screenshot that I pasted my server IP, Username, Password, and 22 as a port number.
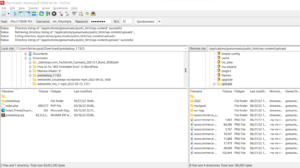
Next, drag the file you want to upload to your website from your local desktop (left-side) and drop it into your web server’s folder. In my case, the webserver folder path is /applications/dbname/public_html/wp-content/uploads. If you want to upload any plugin then the folder path is /applications/dbname/public_html/wp-content/plugins.
3. Increase Upload File Size
Many good WordPress hosting providers offer the file size settings feature on their platform that lets users increase the maximum upload size value, maximum execution time, post max size, and more.
Now, let’s look at how you can increase your upload file size from the hosting dashboard. Cloudways offers application and server settings from which you can increase your file upload settings. From the Application Management panel, I have to remove comment “;” from three values and increase the upload and post max size to 256M & execution time to 300.
php_admin_value[post_max_size] = 256M

php_admin_value[upload_max_filesize] = 256M

php_admin_value[max_execution_time] = 300
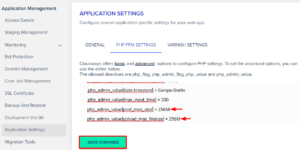
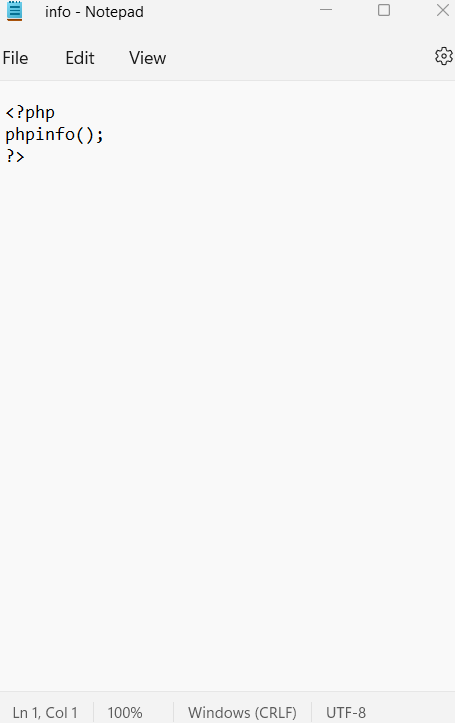
To check whether the file size value is updated or not, you need to create an info.php file on your desktop and upload it to your website folder via FileZilla. Now, open any file editor like Notebook, paste the following code, and save it as info.php.
<?php

phpinfo();

?>
Now, upload it to your site’s public_html folder.
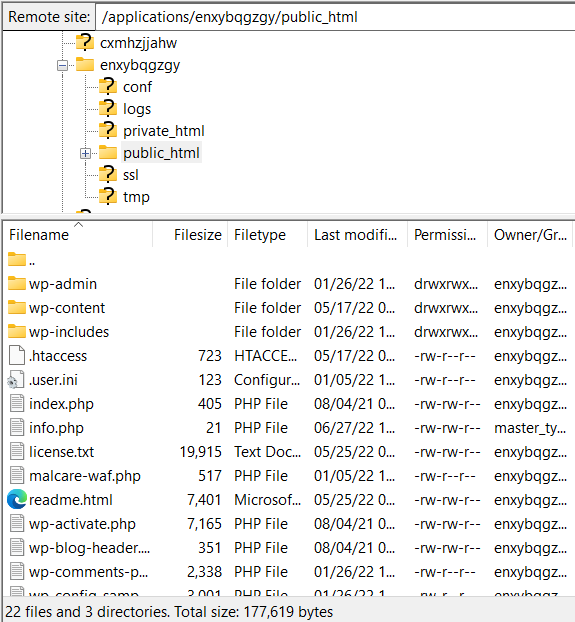
In the next step, open your browser and run this URL “www.yoursite.com/info.php”. In my case, the URL is https://wordpress-675386-2363839.cloudwaysapps.com/info.php. Search for the PHP admin values that you updated; if the values are changed, you have successfully increased the file size. After this, try to upload your file and check whether the issue has been resolved or not.
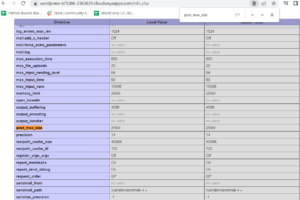
If your hosting provider doesn’t offer any feature to modify the file upload size, move to the next method.
4. Modify Your Functions.php File
You can edit your theme’s functions.php file and increase the file upload size. But before that, you will need to create a backup of your entire WordPress site for data recovery. Backups help you recover your web files if something goes wrong.
You need an FTP Client like FileZilla to access your site’s file. So, connect your server via FileZilla and go to your active theme folder. You will find the theme files in the wp-content folder and in my case, the source path is “/applications/enxybqgzgy/public_html/wp-content/themes/twentynineteen”. Next, find the functions.php and click View/Edit.
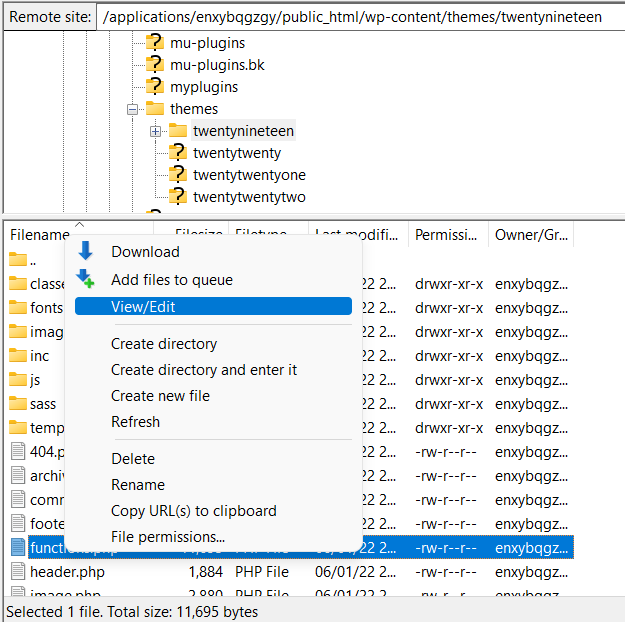
Next, paste the following lines of code into your file and save it. This will define the max upload size in Megabytes. Replace the numbers as per your requirement.
@ini_set( 'upload_max_size' , '256M' );

@ini_set( 'post_max_size', '256M');

@ini_set( 'max_execution_time', '300' );
After this, check open info.php on your browser “www.yoursite.com/info.php” and check whether the values are updated or not, then try uploading your file.
In case this doesn’t work, then move to the next method.
5. Modify Your .htaccess File
If your website is hosted on LAMP Stack (using Apache web server and PHP), you can increase the max upload size from your .htaccess file.
Again, you need to access your .htaccess file from an FTP client like FileZilla and go to the public_html folder. Search for the .htaccess file, and if you do not see the .htaccess file, it’s probably hidden. Hence, navigate to FileZilla menus > Server and click Force Showing Hidden Files.
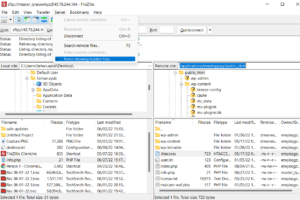
Now View/Edit the .htaccess file in a code editor or Notepad and add the following lines.
php_value post_max_size 256M

php_value memory_limit 256M

php_value max_execution_time 300
Choose a number and size that is suitable for your site and file. Next, open info.php ““www.yoursite.com/infor.php”” on your browser to check the updated sizes as we did in the previous step.
6. Modify Your nginx.conf File
The above troubleshooting method is for Apache web server, but if you are running your website on LEMP (NGINX as a web server and PHP), you need to edit nginx.conf i.e., located in /etc/nginx/ and add the following line of code to the file.
http {

client_max_body_size 100M;

}
7. Contact Your Hosting Provider
If you tried all the above and are still facing the issues, then it would be good to contact your hosting support and ask them to fix this issue ASAP. Several hosting providers offer 24/7 support chat and ticket assistance to help their customers.
Summary
Error 413 Request Entity Too Large is related to the size of the client request. There are multiple ways to fix this error you have read in this article. The most common way is to reduce the file size or to change the web server settings to increase the upload file size. If you know any other methods that can help fix the HTTP 413 Error, then please comment in the section below.
Frequently Asked Questions
Q. How do I fix Error 413 Request Entity Too Large?
A. The most common way to fix the HTTP 413 Error is to increase the media file maximum upload size. Other ways are: resetting file permissions, uploading files using an FTP client, and modifying your files (fuctions.php/.htaccess/nginx.config).
Q. What does “HTTP Error 413” mean?
A. If a user gets this error it is because he’s uploading a file that is too large. When a webmaster receives this report, what he can do is ask the user to reduce the file size and try to upload it again.