
Categories
Here is the WhatsMiner checklist of error code and we strongly recommend every WhatsMiner user to keep it because almost 80% of the problems can be solved by corresponding solutions.
We hope it is helpful for all WhatsMiner users. For rest of the problems, Kindly reach us and we’re willing to help.
Meaning of Error Code and Corresponding Solutions on WhatsM liner Tool 1
Inlet fan detcction speed error
Check whether the fan connction is normal, or replace the power supply, or replace the fan
Outlet fan detection speed error
120 Inlet fan speed error(Deviation 2000+) 121 Outlet fan speed error(Deviation 2000+)
Inlet fan speed error
Outlet fan spced error
Fan speed is too high
Please check the environment temperature
Power detection error
Detecting the power output cable, or updating the latest firmware, or replacing the power supply
Power does not match the configuration file
Updating to the latest software
Power output voltage error
Updating to the latest software or check the power supply
Power supply protection
Please check the environment temperature
Power supply current protection
Power current error
Inspection of power supply in power grid
Power input voltage is low
Improve power supply conditions and input voltage
Power input current protecting
Power status error
Check the power failure code
Power input voltage and current do not match the power
Replace the PSU
216 Power remained unchanged for a long time 217 Power set enable error 218 Power input voltage is lower than 230V for high power mode Increase input voltage,replace power supply
Overtemperature Protection of Power Output
Plcase check the environment temperature
Overtemperature Protection of Power Output
Overtemperature Protection of Power Output
Overcurrent Protection of Power Output
Please check the environment temperature and the copper wire screw(Recommend to use the protable electric screwdriver)
Overcurrent Protection of Power Output
Overcurrent Protection of Power Output
Overvoltage Protection of Power Output
Check grid power
Low Voltage Protection for Power Output
Power output current imbalance
Replace the power
Over-tempcrature Protection for Power Input
Please check the environment temperature
Over-temperature Protection for Power Input
Over-tempcrature Protection for Power Input
Overcurrent Protection for Power Input
Overcurrent Protection for Power Input
Overvoltage Protection for Power Input
Check grid power
Overvoltage Protection for Power Input
Undervoltage Protection for Power Input
Undervoltage Protection for Power Input
Power Fan Error
Replace the power supply
Power Fan Error
Protection of over power output
Please check the environment temperature
Protection of over power output
Input over current protection of power supply primary side
Try to power off and restart, no effect to replace the power supply
Power communication warning
Check whether the screws of the control board are locked
Power communication error
Power watchdog protection
Contact the technician in time
Power output over-current protection
Check the ambient temperature, check the copper bar screw
Power input over-current protection
Improve power supply conditions and input voltage
Power input over-voltage protection
Inspection of input voltage in power grid
Power input under-voltage protection
Warning of excessive power
output of power supply
Please check the environment temperature
Power input power too high warning
Power fan warning
Check if the power fan is blocked and may need to be replaced
Power over temperature warning
Please check the environment temperature
Meaning of Error Code and Corresponding Solutions on WhatsMiner Tool 2
SM0 temperature sensor detection error
Check the connection of the hash board
SM1 temperature sensor detection error
SM2 temperature sensor detection error
SM0 board temperature sensor communication error
Check if the control panel screws are locked, check the adapter plate and the cable contacts
SM1 board temperature sensor communication error
SM2 board temperature sensor communication error
Control board temperature
sensor communication error
Replace the power supply
SM0 tempcrature protection
Check the environment temperature (Recommend to use the GS320 infrared thermometer)
M1 tempcrature protection
SM2 tempcrature protection
360 The temperature of the hash board is overheating
SMO detect eeprom error
Check adapter plate and cable contact
SM1 detect eeprom error
SM2 detect eeprom error
SM0 parser eeprom error
SM1 parser eeprom error
SM2 parser eeprom error
SM0 chip bin type error
SM1 chip bin type error
SM2 chip bin type error
SM0 eeprom chip num X error
SM1 eeprom chip num X error
SM2 eeprom chip num X error
450 SM0 eeprom xfer error Check adapter board and wiring contacts.Upgrade firmware 451 SM1 eeprom xfer error 452 SM2 eeprom xfer error
SM0 miner type error
The version and type of hashboard are
inconsistent, replace the correct hashboard
SM1 miner type error
SM2 miner type error
520 SM0 bin type error If the chip type of the hash board is inconsistent, replace the correct hash board. 521 SM1 bin type error 522 SM2 bin type error
SM0 board is not detected
Check the adapter board wiring and cablc, or replace the control board to check whether the hash board connector is soldered
SM1 board is not detected
SM2 board is not detected
The number of SM0 chips is incomplete
Check adapter plate and cable contact
The number of SM1 chips is incomplete
The number of SM2 chips is incomplete
SM0 has bad chips
Replace the bad chip in the print position
SM1 has bad chips
SM2 has bad chips
SM0 loss balance
Plug in the adapter plate, and then screw in the power connection hash board again
SM1 loss balance
SM2 loss balance
SM0 frequency is too low
Replace the hash board and place the hash boards which reported the same error together
SM1 frequency is too low
SM2 frequency is too low
Environment temperature is too high
Check the environment temperature
If the ambient temperature is too high in high performance mode, return to normal mode
Check the ambient temperature, high
performance mode needs to be ontrolled below 30 ℃
701 Control board no support chip Upgrade the corresponding type of firmware
Control board error
Update to the latest firmware
712 Control board rebooted as exception Updating the latest firmware.Check whether the control board screw is locked properly
cgminer checksum error
system-monitor checksum error
system-monitor checksum error
2000 No pool information configured Check pool configuration
All mining pool connections failed
Check the network or mining pools setting
Mining pool0 connection failed
Mining pool1 connection failed
Mining pool2 connection failed
Mining pool rejcction rate is too high
Check the network or mining pool setting, and the mining setting of the cryptocurrency
The pool does not support
the asicboost mode
Check pool configuration
2310 Hash rate is too low Check input voltage, network environment, and ambient temperature 2320 Hash rate is too low 2340 The loss of hash rate is too high 2350 The loss of hash rate is too high 5070 SM0 water velocity is abnormal Check if the water flow is normal 5071 SM1 water velocity is abnormal 5072 SM2 water velocity is abnormal
SM0 Frequency Up Timeout
SM1 Frequency Up Timeout
SM2 Frequency Up Timeout
8410 Software version error (M2x miner with M3x firmware, or M3x with M2x firmware) Upgrade to the correct firmware version 100001 /antiv/signature Illegal Upgrade the latest firmware or burn the card 100002 /antiv/dig/initd.dig Illegal
Check the power supply
Temperature sampling over temperature protection of power radiator
Power on again after 10 minutes of power failure. If it occurs again, replace the power supply
Temperature sampling over
temperature protection of power radiator
Over temperature protection of environmental emperature sampling in power supply
Primary side over current
Power on again after 10 minutes of power failure. If it occurs again, replace the power supply
Check the power supply
Output over current (continuous load 320A for more than 2S)
Tighten the copper bar screw again
Primary side over current
Power on again after 10 minutes of power failure. If it occurs again, replace the power supply
Single circuit overcurrent (protection point 120a)
Single circuit overcurrent (protection point 120a)
Single circuit overcurrent
(protection point 120a)
Replace the PSU
Output over current (continuous load of 310A
for more than 5min)
Output over current
(continuous load 295A for
more than 10min)
We hope it is helpful for all WhatsMiner users. For rest of the problems, Kindly reach us and we’re willing to help.
About products purchase, please contact our sales manager:
 [email protected]
About miner repair and after-sale issues, please contact the repair manager email:
[email protected]
For business cooperation, please contact:
[email protected]
COMPLAINTS & SUGGESTIONS
If you have any dissatisfaction during the transaction or have valuable suggestions for us, please contact us via this email address:
[email protected]
Chinese New Year holiday notice
Due to the arrival of the Chinese New Year holiday, we will suspend shipments on January 17, 2023, and resume on January 30, 2023. The response of sales and tech service probably delay during the holidays.
Thank you for your support.
Zeus Mining (Hong Kong) International Co., Ltd.
Recently, many companies claiming to be mining companies imitate us and say that they are related to us, or that they are our branch companies, which has caused customers to be deceived. Please be careful not to believe any impostors, please check our correct contact information and beware of being deceived getting scammed, and losing money.
please check our right contact way: Here
Источник
fan
fan
fan
fan
Inspection of input voltage in power grid
Error code
302
320
322
329
352
360
410
412
420
422
430
431
432
440
441
442
450
451
452
510
511
512
520
521
522
530
ли
разъем хэш-платы.
531
532
540
541
542
550
551
552
560
561
562
590
591
592
600
610
нормальный
режим
701
710
712
802
2000
2021
2030
2340
2350
5070
5072
5110
5112
8410


This page needs more content for completeness. Please contribute!
Graphical LCD Artifacts
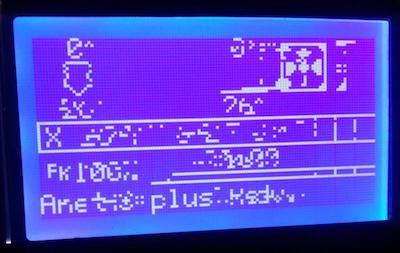 After a new install of Marlin your graphical LCD shows glitches or is blank. This is caused by bad timing in the LCD data transmission.
Solution: Define custom delays. Add the following lines to Configuration.h as your starting-point and adjust values upward until the display works reliably. You should keep testing to find the lowest values that produce a reliable display because the LCD update steals time from the main loop.
#define ST7920_DELAY_1 DELAY_NS(200) // After CLK LOW
#define ST7920_DELAY_2 DELAY_NS(400) // After DAT
#define ST7920_DELAY_3 DELAY_NS(200) // After CLK HIGH
Alternative Solutions
- For AVR boards open
ultralcd_st7920_u8glib_rrd_AVR.hand remove#pragma GCC optimize (3)to reduce code optimization. - Add 4.7k pullup resistors to the SPI lines if they are not commonly used for SPI.
Hanging LCD?
Try doubling BLOCK_BUFFER_SIZE to see if the problem goes away.
No LCD / SD on ReARM?
As seen in this Chris’s Basement video, the RRD display doesn’t always work on first install. It didn’t even light up. A custom adapter is needed with the ReARM. See this issue, and this issue, and this page.
G29 Probing Failed!
Marlin uses the Z_PROBE_LOW_POINT value to prevent the probe from pressing too hard against the bed and getting damaged. A value of -2 works well for a flat and level bed, but if the bed isn’t trammed yet, the probe may exceed the low point and trigger a “Probing Failed” error. To prevent this from happening, change the setting to something like -10 during initial setup, and then you can change it back after the bed is perfectly trammed.
One Side High, One Side Low
- Problem: Bed probe done, leveling compensation enabled, and the first layer comes out out too squished on the right side, or too high on the left side, or vice-versa.
- Solution: Make sure the probe is always perpendicular to the bed as the carriage moves. If the wires or Bowden tube are pulling on the carriage, or if the X gantry is even slightly twisted, the probe will not remain perpendicular and its readings will be garbaggio. There is a feature called
MECHANICAL_GANTRY_CALIBRATIONthat can be used to compensate, but it is always best to tackle any mechanical issues first.
Heating Failed!
Thermal Runaway is a constant concern with heaters, so Marlin watches heaters for some common runaway conditions:
- Thermistor shorted or broken (MINTEMP/MAXTEMP).
- Heating Failed: Temperature is rising too slowly (while below target).
- Thermal Runaway: Temperature is too far from target range for too long (after settling). NOTE: Thermal Runaway can be caused by a fan blowing too close to the hotend.
During a first-time setup or firmware upgrade, we recommend leaving Thermal Protection enabled but relaxing the settings. To do this, set WATCH_TEMP_PERIOD and WATCH_BED_TEMP_PERIOD to longer intervals, such as 40 or 60 seconds. You can increase the HYSTERESIS settings to makes thermal protection more tolerant of an untuned PID. You should run M303 on the hotend and bed as soon as possible, and it will help to loosen up thermal protection until all the PID is well tuned.
Depending on your setup, you may get more stable heating using MPCTEMP instead of PIDTEMP.
FTDI USB Bandwidth
At 115K baud use 167 latency, 192 USB block request. As one goes up the other goes down.
Long Beep on Boot
This is a hardware issue due to the connected beeper pin being HIGH when the board is first powered. Marlin turns off the BEEPER pin as soon as it possibly can. A new bootloader for your board might fix the issue in the future.
Random Halting
An under-powered PSU combined with heaters and high speed moves can lead to a frozen board. No kill, no watchdog, heaters stuck on. See #17202. To test for this:
- To test for this, enable the bed and extruder heaters and print at high speed to see if a hard freeze occurs. Try disabling heaters and/or slower printing to see if the problem goes away.
- Read the input voltage from PSU with a meter during fast moves. If you see a drop too far below your expected voltage (e.g., 12V or 24V) this indicates a problem.
EEPROM Errors
After flashing a new version of Marlin, the existing EEPROM contents may no longer conform to the updated EEPROM layout. As a result, you may see an error like one of these:
Error:EEPROM datasize error.
EEPROM CRC mismatch - (stored) 4235 != 6244 (calculated)!
Troubleshooting Procedure
-
If using Octoprint, turn off the option to disconnect on “Error” messages before proceeding.
-
Do
M502andM500and then reboot the machine. This procedure will initialize the EEPROM to your configured “factory” settings. - If you continue to get error messages, use
DEBUG_EEPROM_READWRITEto run a check for mismatched fields duringM501(read) andM500(write). A mismatched field is a bug, so please report these errors to the Marlin project. To do this check, add the following option to yourConfiguration.h, flash, and reboot:#define DEBUG_EEPROM_READWRITE - You can also enable the
EEPROM_AUTO_INIToption to automatically reset the EEPROM when the data structure changes or the data gets corrupted.
Sanity Check Errors
Marlin’s SanityCheck.h files exist to check the validity of settings and make sure obsolete settings get updated for the newest Marlin. Be sure to read and follow all directions provided by these checks.
Build Too Large
A Marlin build can range in size from under 60K to over 200K with a generous complement of features enabled. All features try to use as little SRAM as possible, but some have a higher SRAM cost. As a guide and starting-point, be sure to use the example configuration included with Marlin that best matches your specific machine model.
Delta Height, Z Probe Offset, and G33
Since Marlin 1.1 “Delta Height” is defined as the distance between Z Home Position and the Z-MIN trigger point (so it remains constant). The Z Probe Offset is added to that distance in order to go to the height of the first printed layer and as such is independent from Delta Height. (Printers without a probe have no Z Probe Offset. Instead, the Z-MIN trigger-point comes from the paper test height, aka Z0.)
Trinamic Stepper Drivers
These tips are collected from various reports we have received. See Trinamic troubleshooting for additional guidance.
- Some SilentStepSticks with variable 3-5V logic voltage (VIO) might get damaged if only powered over USB.
- SPI conflict with the SD card? Solutions vary.
- E Stepper won’t move when using Linear Advance with TMC drivers?
- “I ended up using the drivers in legacy mode and setting them to SpreadCycle using the OTP (One Time Programmer). Unfortunately trying to set individual drivers to SpreadCycle via UART by enabling HybridThreshhold and setting the threshold to 0 for the respective axes did not work.” See #11825.
- Loud / grinding TMC2208? Increase the current to ~1500mA and lower the Hybrid Threshold.
- Unreliable printing, shifting layers? Make sure the ‘rsense’ value is configured according to recommendations. See #9368.
- TMC2208 uses SoftwareSerial, and this conflicts with Endstop Interrupts. Disable Endstop Interrupts to proceed.
- Should I use
SOFTWARE_DRIVER_ENABLE? Not unless required by the hardware. See #13326.
Babystep Double-click ignored
- Increase the
DOUBLECLICK_MAX_INTERVALvalue
False Endstop Triggering
- Enable and set
ENDSTOP_NOISE_THRESHOLDto filter the endstop signals.
BLTouch Pin Drop / Blinking
- Servo voltage / signals may be unstable due to heater signal lines being too close to servo traces.
- Solution: Disconnect the servo signal line after the print starts.