-
#1
Всем привет!
Столкнулся с такой проблемой при заходе на сервер пишет Вам запрещен доступ на этот сервер
Soursebans бана нету
пускает только после перезапуска сервера!
Может кто сталкивался с данной проблемой? я даже стим акк поменял все равно не пускает….
Если надо список плагинов напишите скину….
на другие сервера пускает нормально.
-
#2
Всем привет!
Столкнулся с такой проблемой при заходе на сервер пишет Вам запрещен доступ на этот сервер
Soursebans бана нету
пускает только после перезапуска сервера!
Может кто сталкивался с данной проблемой? я даже стим акк поменял все равно не пускает….
Если надо список плагинов напишите скину….
на другие сервера пускает нормально.
Скинь-ка список плагинов
-
#3
Для большого количества текста используйте спойлер
[SM] Listing 60 plugins:
01 «Players Votes» (1.5.0) by The Resident, pZv! FiX Nek.’a 2×2
02 «Quake Sounds» (1.8) by dalto
03 «Admin loggin» (1.0) by vIr-Dan
04 «Basic Votes» (1.7.3-dev+5253) by AlliedModders LLC
05 «Spray Tracer» (5.8a) by Nican132, CptMoore, Lebson506th
06 «SMAC Anti-Speedhack» (0.8.6.0) by SMAC Development Team
07 «Show Damage» (1.0.7) by exvel
08 «Nextmap» (1.7.3-dev+5253) by AlliedModders LLC
09 «Rock The Vote» (1.7.3-dev+5253) by AlliedModders LLC
10 «SMAC ConVar Checker» (0.8.6.0) by SMAC Development Team
11 «SMAC Eye Angle Test» (0.8.6.0) by SMAC Development Team
12 «No Team Flash» (0.3) by SAMURAI and Kigen
13 «Client Preferences» (1.7.3-dev+5253) by AlliedModders LLC
14 «Advanced c4 Countdown Timer» (1.4.1) by dalto
15 «Basic Commands» (1.7.3-dev+5253) by AlliedModders LLC
16 «Anti-Flood» (1.7.3-dev+5253) by AlliedModders LLC
17 «SMAC Spinhack Detector» (0.8.6.0) by SMAC Development Team
18 «Advertisements» (0.6.2) by Tsunami, Otstrel.ru Team
19 «Auto Swap Team» (2.2.0) by Experto
20 «SMAC Aimbot Detector» (0.8.6.0) by SMAC Development Team
21 «Admin List» (1.2) by Fredd,Runner
22 «SourceBans» (1.4.9) by SourceBans Development Team
23 «SMAC Rcon Locker» (0.8.6.0) by SMAC Development Team
24 «SourceMod Anti-Cheat» (0.8.6.0) by SMAC Development Team
25 «SMAC AutoTrigger Detector» (0.8.6.0) by SMAC Development Team
26 «Dissolve by acik»
27 «Forlix FloodCheck» (1.73) by Forlix (Dominik Friedrichs)
28 «Basic Comm Control» (1.7.3-dev+5253) by AlliedModders LLC
29 «SMAC CS:S Exploit Fixes» (0.8.5.1) by SMAC Development Team
30 «Weapon Restrict» (3.1.5) by Dr!fter
31 «Admin File Reader» (1.7.3-dev+5253) by AlliedModders LLC
32 «SourceComms» (0.8.253) by Alex
33 «Knife Fight» (1.3.8) by XARiUS, Otstrel.Ru Team
34 «mapchooser_snd.smx»
35 «Fun Votes» (1.7.3-dev+5253) by AlliedModders LLC
36 «ConnectInfo» (1.5.1) by merk
37 «Round and Map End Sound» (2.4.5) by FrozDark (HLModders.ru LLC)
38 «Admin Help» (1.7.3-dev+5253) by AlliedModders LLC
39 «SMAC Command Monitor» (0.8.6.0) by SMAC Development Team
40 «Hostage Down!» (1.0) by dalto
41 «NoBlock» (1.4.2) by Otstrel.ru Team
42 «Extra Cash» (0.2) by Peoples Army
43 «Sound Commands» (1.7.3-dev+5253) by AlliedModders LLC
44 «Map Nominations» (1.7.3-dev+5253) by AlliedModders LLC
45 «QuickDefuse» (0.3) by pRED*
46 «Blocker passes» (1.2.5) by >>Satan<<
47 «SM Parachute» (2.5) by SWAT_88
48 «[KDLP] Game Events» (1.0) by KorDen
49 «Player Commands» (1.7.3-dev+5303) by AlliedModders LLC
50 «Losing Team Killer» (1.2) by wS / Schmidt
51 «Basic Chat» (1.7.3-dev+5253) by AlliedModders LLC
52 «Basic Info Triggers» (1.7.3-dev+5253) by AlliedModders LLC
53 «Resetscore» (1.1) by tuty
54 «Anticamp Source» (1.0.9.1a) by Blade
55 «RankFM» (2.8.3) by lok1
56 «WallHack» (1.1) by wS (World-Source.Ru)
57 «Reserved Slots» (1.7.3-dev+5253) by AlliedModders LLC
58 «TeamSwitch» (1.3) by MistaGee
59 «Admin Menu» (1.7.3-dev+5253) by AlliedModders LLC
60 «Fun Commands» (1.7.3-dev+5253) by AlliedModders LLC
Последнее редактирование модератором: 4 Июн 2016
The “Access Denied” error appears when your browser uses different proxy settings or VPN instead of what’s really set on your Windows 10 PC. Thus, when a website detects that there is something wrong with your browser cookies or your network, it blocks you and this is why you can’t open it.
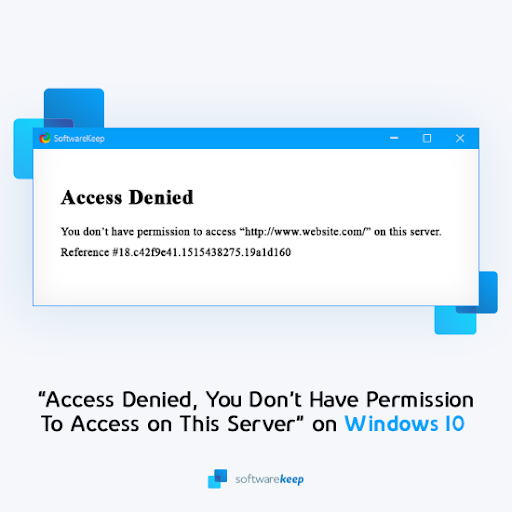
Windows 10 users – we’ve all been there. You’re working on your computer and suddenly you get an error message that says “Access Denied, You don’t have permission to access this server”. There could be a number of reasons this is happening including the server was taken down, the URL has changed, or the host may have disabled access from a VPN.
No matter what the reason is, it can be frustrating not being able to access certain websites when you need them most. Here are some tips on how to fix this issue so you can get back to work with ease.
Solved: Access Denied, You Don’t Have Permission To Access on This Server
There are a number of things you can try to recover from this pesky error. The solution that’ll work for you is mainly dependent on what caused the error in the first place. For example, when using the Firefox browser, a website might block you when you have a VPN activated. This happens because the site thinks something is wrong with your proxy or browser cookies.
So, what can you do to restore a website affected by the “Access Denied” error? Let’s review our options, and then jump right into troubleshooting. You can try:
- Clearing your browser cookies and history
- Turning off VPN and VPN extensions
- Disabling your proxy
- Switching to a premium VPN service
- Resetting your browser data
The step-by-step guides below will help you get past whatever might stand between you and your favorite website!
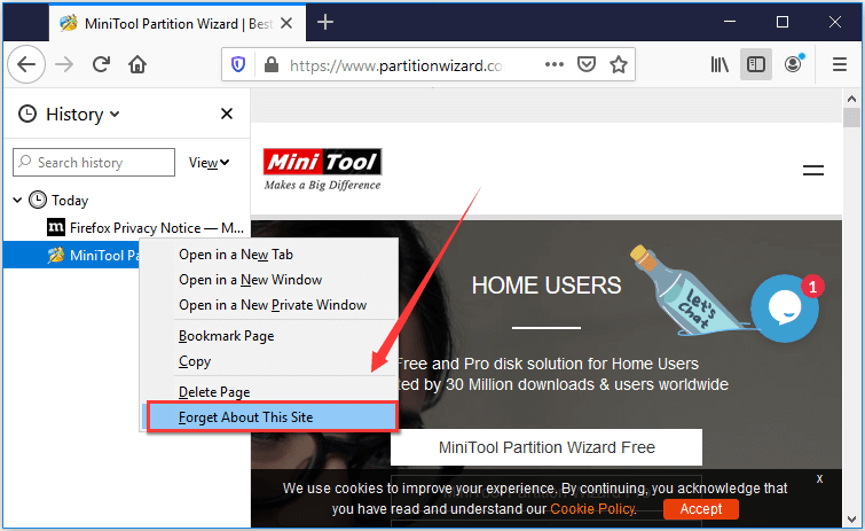
Method 1. Forget the Website in Firefox
It appears that this error is the most common in Mozilla Firefox. If you’re using this browser, there’s a handy button to forget a single website, which may help solve your issues without having to clear other data.
- Open Mozilla Firefox, and then use the Ctrl + H keyboard shortcut to open the History tab.
- Find the website causing the “Access Denied” error from your browsing history. Select it by clicking on it once, and then choose to Forget About This Site from the context menu.

- Refresh the website, or navigate to it again and see if you’re still getting the error message.

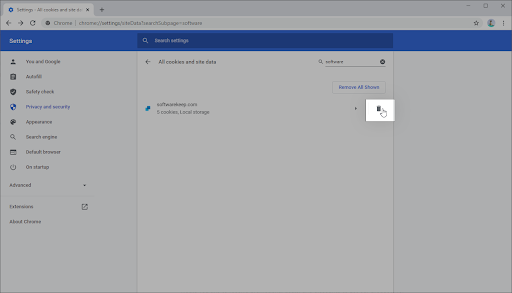
Method 2. Delete the Site Data of a Specific Website in Chrome
Google Chrome has a similar option to Firefox, which allows you to clear cookies from just a single website. If you’re not having other issues, it might be best to perform this method before deleting all of your browsing data in one sweep.
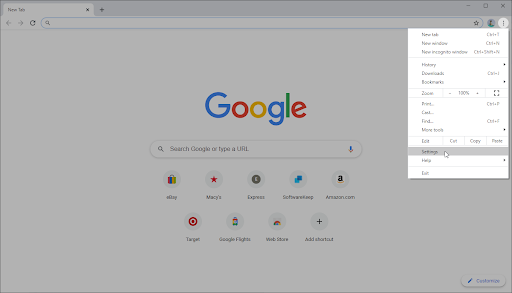
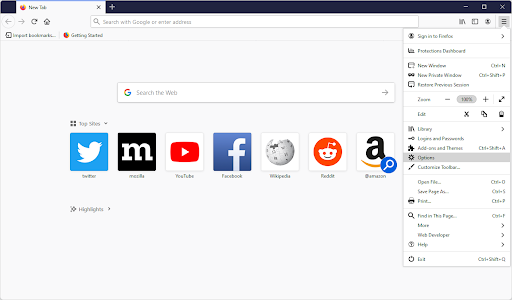
- In Google Chrome, click on the More icon (displayed by three dots arranged vertically) and choose Settings.

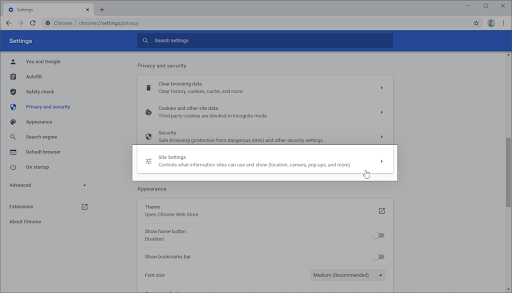
- Click on Privacy and security from the menu on the left, and then click on Site settings.
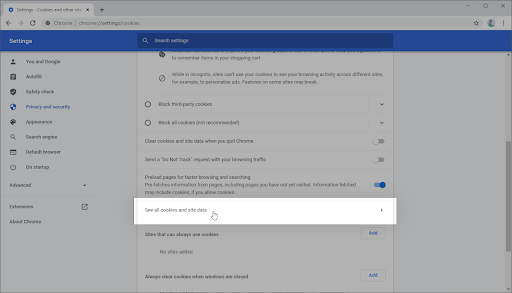
- Click on Cookies and site data, and then select the See all cookies and site data option. You’ll see a list of all of your cookies appear shortly after.
- Search for the domain of the problematic website. Click on the Delete button next to the shown cookies.
- Restart your browser and see if the error still happens when you try to access the website.
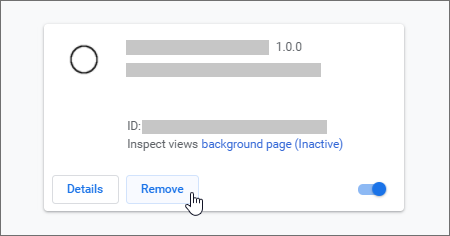
Method 3. Turn Off Your VPN Extension
VPNs can cause some unexpected issues despite being extremely useful in other areas. Things can happen whether you’re using a VPN on your computer itself, or a VPN extension in your browser. To ensure your VPN isn’t causing the “Access Denied” error, temporarily disable it.
Disable VPN Extensions in Google Chrome
- In Google Chrome, click on the More icon (displayed by three dots arranged vertically) and choose More tools → Extensions.
- Alternatively, you can get to the Extensions page by typing chrome://extensions into your address bar.
- Find your VPN extension. In the bottom-right corner of the extension box, you’ll see a toggle. Make sure that the VPN is toggled off.

- To entirely uninstall your VPN extension, you can also click on the Remove button. Keep in mind that you’ll have to re-install the extension to use it again.
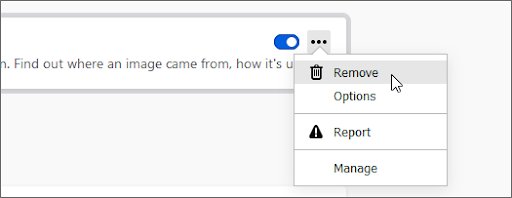
Disable VPN Extensions in Firefox
- In Mozilla Firefox, click on the menu button, and then select Add-ons and Themes from the context-menu.
- Switch to the Extensions tab. Locate your VPN extension, and then use the toggle to turn it off temporarily.

- To uninstall a VPN extension you don’t want to keep on your device, click the More actions button and select Remove from the context-menu.
Disable VPN Extensions in Microsoft Edge
- In Microsoft Edge, type the following link into your address bar: edge://extensions/
- Find any VPN extension you want to turn off, and then click on the toggle so it’s greyed out and disabled.

- You can uninstall a VPN extension from Edge by clicking on the Remove link underneath the extension’s name and details.

Disable VPN Extensions in Opera
- In Opera, click on the Main menu near the top-left corner, and then navigate to Extensions → Extensions.
- Find your VPN extension and disable it with the toggle button. Alternatively, click the X button near the top-right corner to uninstall it.

Method 4. Disable Proxy Server in Windows 10
You might be using a proxy server for your LAN. In this case, we recommend turning the feature off to test whether or not the issue was caused by the configuration.
- Open the search bar in your taskbar by clicking on the magnifying glass icon. You can also bring it up with the Windows + S keyboard shortcut.
- Type in Internet Options and click on the first search result. Switch to the Connections tab once the pop-up window shows up, and then click on LAN Settings.
- Once in the Local Area Network (LAN) Settings window, deselect the Use a proxy server for your LAN option if it’s currently turned on. If the option is not ticked, your issue is not related to the proxy server.
- Check if the website will load after disabling this option. If the error was caused by network traffic filtered by a proxy, you might be able to get on now.
Method 5. Download a Premium VPN
Users with a freeware VPN may experience poor connection and limited features. However, premium VPN services get around these problems with ease. While it will cost you some money to get started, it’s definitely worth switching to a well-endorsed VPN for your own comfort and safety.
It might be hard to find the perfect, most suitable VPN for you and your personal browsing needs. Here are some of the top-selling services we recommend using:
- Surfshark VPN
- NordVPN
- ExpressVPN
After making your purchase and installing the VPN, try and access the website you’re getting the “Access Denied” error on. The best VPNs are definitely worth the investment. Premium services come with a lot of benefits, like unlimited bandwidth and more robust security features that will keep you safe when browsing on public WiFi hotspots or video chatting!
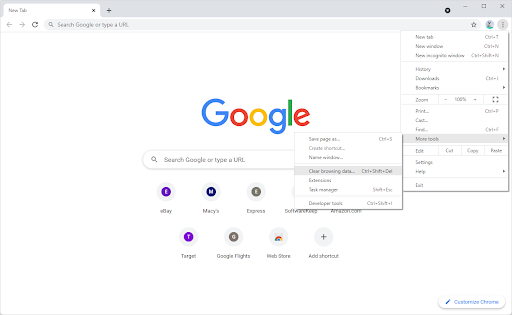
Method 6. Clear Your Browser Data
Try to clear your browser data before moving on to more drastic steps. Clearing browser data will allow you to keep custom settings intact, but will remove your cookies and history.
Clear Browser Data in Google Chrome
- Open Google Chrome, then click on the More icon, displayed by three dots arranged vertically. Hover over More Tools, and then select Clear browsing data.

- Make sure the Time range is set to All time. Tick the following options: Browsing history, Cookies, and other site data, and Cached images and files.
- Click on the Clear data button.
- After the process is over, restart Google Chrome and see if the error is still appearing when you try to access the website.

Clear Browser Data in Mozilla Firefox
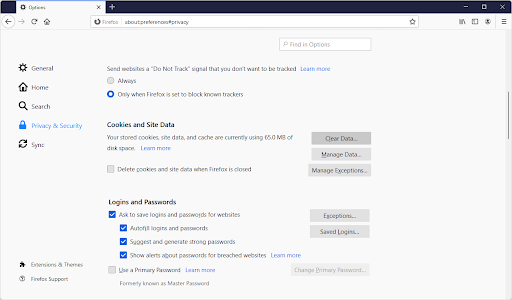
- Open Firefox. In the upper right-hand corner of the browser, click the menu and click the Options setting. Alternatively, you can type about: preferences into the address bar and hit Enter.

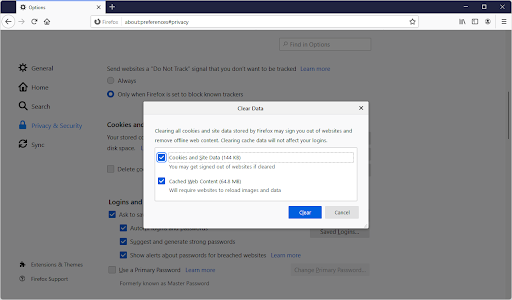
- Switch to the Privacy & Security tab. Scroll down until you reach the cookies and site data section. Here, click on the Clear Data… button.
- Select Cookies and Site Data. You can also delete the cache if you want to make some space on your computer, but this option is not necessary for troubleshooting.
- Click on the Clear button. Once the clearing is complete, try to access the problematic website again. The error might’ve been solved by this process.
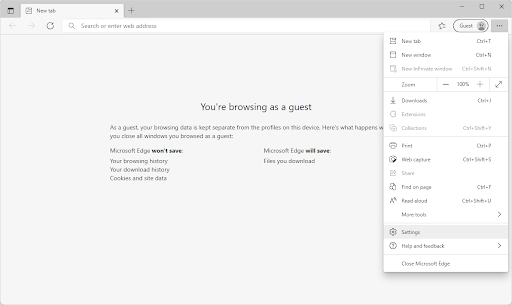
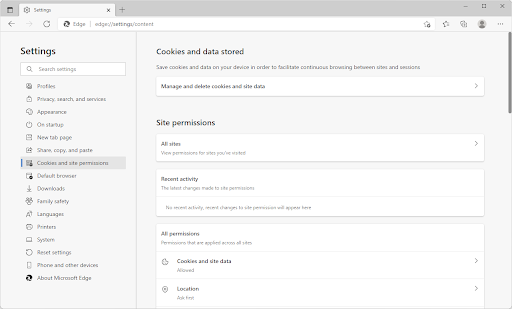
Clear Browser Data in Microsoft Edge
- Launch Microsoft Edge. Click on the menu icon in the top-right, and then click on Settings. You can also type edge://settings into the address bar, and press the Enter key.

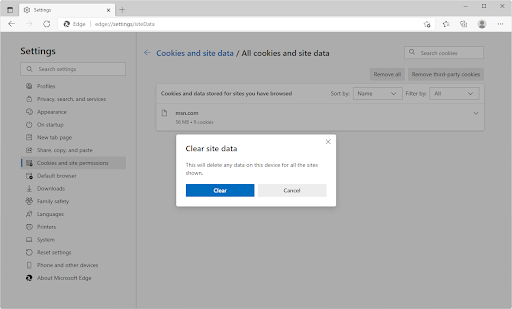
- Switch to the Cookies and site permissions tab. Here, click on the Manage and delete cookies and site data button on the top of the page.

- Click on the See all cookies and site data button. You’ll once again be redirected to a new page.

- Click on the Remove all button. A pop-up message will show up on the screen. Read the warning, and then proceed by clicking on the Clear button.
- Check if you’re able to access the website giving you the “Access Denied” error previously.
Method 7. Reset the Browser
If nothing else has worked, try to reset your browser to its default settings.
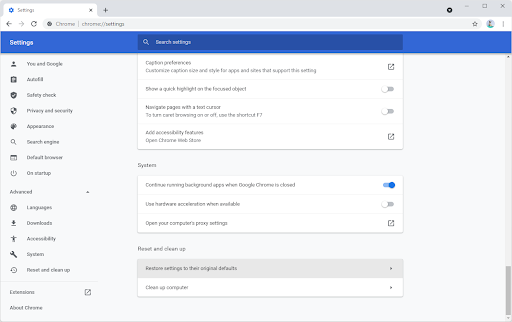
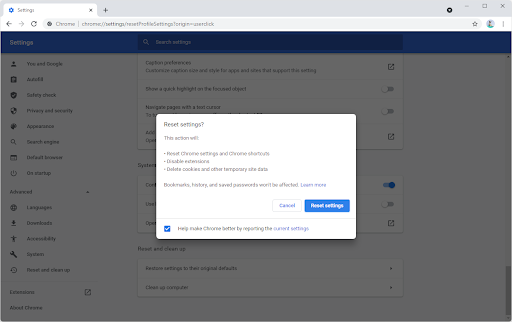
How to Reset Google Chrome
- Open Google Chrome, then click on the More icon, displayed by three dots arranged vertically. Click on Settings.
- Scroll down to the bottom of the page, and expand the Advanced settings. Scroll down to the bottom again, and then click Restore settings to their original defaults.
- Read the warning, and then click the Reset settings button if you agree to have your browser restored to the default configuration.

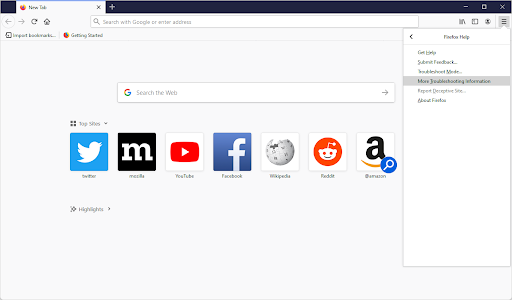
How to Reset Mozilla Firefox
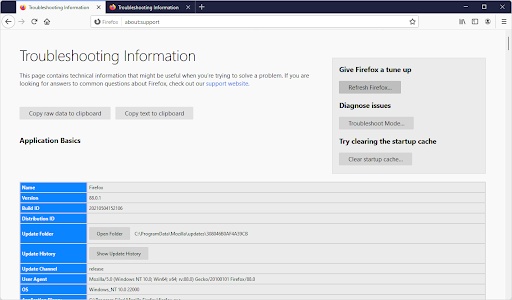
- Open the Firefox menu with the icon in the upper right corner, and then click on Help. Next, click on More Troubleshoot Information. Alternatively, you can type about: support into the address bar and press Enter to be redirected.
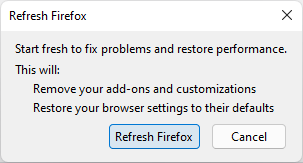
- Click on the Refresh Firefox button.
- Read the pop-up warning, and then press Refresh Firefox again if you wish to proceed. After the process has concluded, try and see if you’re able to access the website.

How to Reset Microsoft Edge
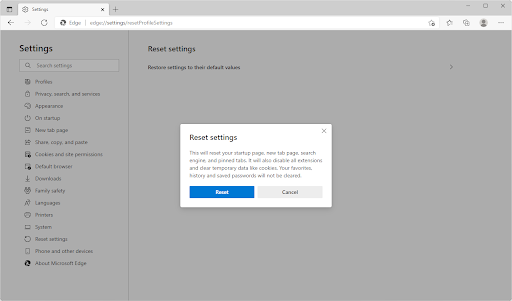
- Press the three dots in the top-right corner to open the menu, and then click on Settings from the available options.
- Switch to the Reset Settings tab. Here, click on the button that says Restore settings to their default values. In the pop-up window, confirm your choice after reading the information.

- Allow some time for Edge to reset. When it’s done, navigate to the website with the “Access Denied” error to see if it’s been resolved.
Final Thoughts
As we’ve discussed, there are a number of reasons you might be receiving an Access Denied error. Thankfully, you can remedy most of them with minimal effort on your part. In the event that they cannot, our experts will help to find a solution for you — so don’t hesitate to reach out! We hope these tips have been helpful and would love to hear from you if something here has helped solve your problem.
Have any other trouble accessing websites? Let us know! Our Help Center and Blog offer plenty of tips and tricks like the ones above, which will help make sure you never have an issue again when trying to access certain sites online.
If you want more information about this issue or other computer problems, sign up for our newsletter. Get promotions, deals and discounts from us right in your inbox. Subscribe with your email address below.
You May Also Like
» What Is the “A Web Page Is Slowing Down Your Browser” Warning in Firefox?
» Which Web Browser Should You Be Using in 2021?
» Save Hundreds of Dollars With These Google Chrome Extensions
The “Access Denied” error appears when your browser uses different proxy settings or VPN instead of what’s really set on your Windows 10 PC. Thus, when a website detects that there is something wrong with your browser cookies or your network, it blocks you and this is why you can’t open it.
Windows 10 users – we’ve all been there. You’re working on your computer and suddenly you get an error message that says “Access Denied, You don’t have permission to access this server”. There could be a number of reasons this is happening including the server was taken down, the URL has changed, or the host may have disabled access from a VPN.
No matter what the reason is, it can be frustrating not being able to access certain websites when you need them most. Here are some tips on how to fix this issue so you can get back to work with ease.
Solved: Access Denied, You Don’t Have Permission To Access on This Server
There are a number of things you can try to recover from this pesky error. The solution that’ll work for you is mainly dependent on what caused the error in the first place. For example, when using the Firefox browser, a website might block you when you have a VPN activated. This happens because the site thinks something is wrong with your proxy or browser cookies.
So, what can you do to restore a website affected by the “Access Denied” error? Let’s review our options, and then jump right into troubleshooting. You can try:
- Clearing your browser cookies and history
- Turning off VPN and VPN extensions
- Disabling your proxy
- Switching to a premium VPN service
- Resetting your browser data
The step-by-step guides below will help you get past whatever might stand between you and your favorite website!
Method 1. Forget the Website in Firefox
It appears that this error is the most common in Mozilla Firefox. If you’re using this browser, there’s a handy button to forget a single website, which may help solve your issues without having to clear other data.
- Open Mozilla Firefox, and then use the Ctrl + H keyboard shortcut to open the History tab.
- Find the website causing the “Access Denied” error from your browsing history. Select it by clicking on it once, and then choose to Forget About This Site from the context menu.
- Refresh the website, or navigate to it again and see if you’re still getting the error message.
Method 2. Delete the Site Data of a Specific Website in Chrome
Google Chrome has a similar option to Firefox, which allows you to clear cookies from just a single website. If you’re not having other issues, it might be best to perform this method before deleting all of your browsing data in one sweep.
- In Google Chrome, click on the More icon (displayed by three dots arranged vertically) and choose Settings.
- Click on Privacy and security from the menu on the left, and then click on Site settings.
- Click on Cookies and site data, and then select the See all cookies and site data option. You’ll see a list of all of your cookies appear shortly after.
- Search for the domain of the problematic website. Click on the Delete button next to the shown cookies.
- Restart your browser and see if the error still happens when you try to access the website.
Method 3. Turn Off Your VPN Extension
VPNs can cause some unexpected issues despite being extremely useful in other areas. Things can happen whether you’re using a VPN on your computer itself, or a VPN extension in your browser. To ensure your VPN isn’t causing the “Access Denied” error, temporarily disable it.
Disable VPN Extensions in Google Chrome
- In Google Chrome, click on the More icon (displayed by three dots arranged vertically) and choose More tools → Extensions.
- Alternatively, you can get to the Extensions page by typing chrome://extensions into your address bar.
- Find your VPN extension. In the bottom-right corner of the extension box, you’ll see a toggle. Make sure that the VPN is toggled off.
- To entirely uninstall your VPN extension, you can also click on the Remove button. Keep in mind that you’ll have to re-install the extension to use it again.
Disable VPN Extensions in Firefox
- In Mozilla Firefox, click on the menu button, and then select Add-ons and Themes from the context-menu.
- Switch to the Extensions tab. Locate your VPN extension, and then use the toggle to turn it off temporarily.
- To uninstall a VPN extension you don’t want to keep on your device, click the More actions button and select Remove from the context-menu.
Disable VPN Extensions in Microsoft Edge
- In Microsoft Edge, type the following link into your address bar: edge://extensions/
- Find any VPN extension you want to turn off, and then click on the toggle so it’s greyed out and disabled.
- You can uninstall a VPN extension from Edge by clicking on the Remove link underneath the extension’s name and details.
Disable VPN Extensions in Opera
- In Opera, click on the Main menu near the top-left corner, and then navigate to Extensions → Extensions.
- Find your VPN extension and disable it with the toggle button. Alternatively, click the X button near the top-right corner to uninstall it.
Method 4. Disable Proxy Server in Windows 10
You might be using a proxy server for your LAN. In this case, we recommend turning the feature off to test whether or not the issue was caused by the configuration.
- Open the search bar in your taskbar by clicking on the magnifying glass icon. You can also bring it up with the Windows + S keyboard shortcut.
- Type in Internet Options and click on the first search result. Switch to the Connections tab once the pop-up window shows up, and then click on LAN Settings.
- Once in the Local Area Network (LAN) Settings window, deselect the Use a proxy server for your LAN option if it’s currently turned on. If the option is not ticked, your issue is not related to the proxy server.
- Check if the website will load after disabling this option. If the error was caused by network traffic filtered by a proxy, you might be able to get on now.
Method 5. Download a Premium VPN
Users with a freeware VPN may experience poor connection and limited features. However, premium VPN services get around these problems with ease. While it will cost you some money to get started, it’s definitely worth switching to a well-endorsed VPN for your own comfort and safety.
It might be hard to find the perfect, most suitable VPN for you and your personal browsing needs. Here are some of the top-selling services we recommend using:
- Surfshark VPN
- NordVPN
- ExpressVPN
After making your purchase and installing the VPN, try and access the website you’re getting the “Access Denied” error on. The best VPNs are definitely worth the investment. Premium services come with a lot of benefits, like unlimited bandwidth and more robust security features that will keep you safe when browsing on public WiFi hotspots or video chatting!
Method 6. Clear Your Browser Data
Try to clear your browser data before moving on to more drastic steps. Clearing browser data will allow you to keep custom settings intact, but will remove your cookies and history.
Clear Browser Data in Google Chrome
- Open Google Chrome, then click on the More icon, displayed by three dots arranged vertically. Hover over More Tools, and then select Clear browsing data.
- Make sure the Time range is set to All time. Tick the following options: Browsing history, Cookies, and other site data, and Cached images and files.
- Click on the Clear data button.
- After the process is over, restart Google Chrome and see if the error is still appearing when you try to access the website.
Clear Browser Data in Mozilla Firefox
- Open Firefox. In the upper right-hand corner of the browser, click the menu and click the Options setting. Alternatively, you can type about: preferences into the address bar and hit Enter.
- Switch to the Privacy & Security tab. Scroll down until you reach the cookies and site data section. Here, click on the Clear Data… button.
- Select Cookies and Site Data. You can also delete the cache if you want to make some space on your computer, but this option is not necessary for troubleshooting.
- Click on the Clear button. Once the clearing is complete, try to access the problematic website again. The error might’ve been solved by this process.
Clear Browser Data in Microsoft Edge
- Launch Microsoft Edge. Click on the menu icon in the top-right, and then click on Settings. You can also type edge://settings into the address bar, and press the Enter key.
- Switch to the Cookies and site permissions tab. Here, click on the Manage and delete cookies and site data button on the top of the page.
- Click on the See all cookies and site data button. You’ll once again be redirected to a new page.
- Click on the Remove all button. A pop-up message will show up on the screen. Read the warning, and then proceed by clicking on the Clear button.
- Check if you’re able to access the website giving you the “Access Denied” error previously.
Method 7. Reset the Browser
If nothing else has worked, try to reset your browser to its default settings.
How to Reset Google Chrome
- Open Google Chrome, then click on the More icon, displayed by three dots arranged vertically. Click on Settings.
- Scroll down to the bottom of the page, and expand the Advanced settings. Scroll down to the bottom again, and then click Restore settings to their original defaults.
- Read the warning, and then click the Reset settings button if you agree to have your browser restored to the default configuration.
How to Reset Mozilla Firefox
- Open the Firefox menu with the icon in the upper right corner, and then click on Help. Next, click on More Troubleshoot Information. Alternatively, you can type about: support into the address bar and press Enter to be redirected.
- Click on the Refresh Firefox button.
- Read the pop-up warning, and then press Refresh Firefox again if you wish to proceed. After the process has concluded, try and see if you’re able to access the website.
How to Reset Microsoft Edge
- Press the three dots in the top-right corner to open the menu, and then click on Settings from the available options.
- Switch to the Reset Settings tab. Here, click on the button that says Restore settings to their default values. In the pop-up window, confirm your choice after reading the information.
- Allow some time for Edge to reset. When it’s done, navigate to the website with the “Access Denied” error to see if it’s been resolved.
Final Thoughts
As we’ve discussed, there are a number of reasons you might be receiving an Access Denied error. Thankfully, you can remedy most of them with minimal effort on your part. In the event that they cannot, our experts will help to find a solution for you — so don’t hesitate to reach out! We hope these tips have been helpful and would love to hear from you if something here has helped solve your problem.
Have any other trouble accessing websites? Let us know! Our Help Center and Blog offer plenty of tips and tricks like the ones above, which will help make sure you never have an issue again when trying to access certain sites online.
If you want more information about this issue or other computer problems, sign up for our newsletter. Get promotions, deals and discounts from us right in your inbox. Subscribe with your email address below.
You May Also Like
» What Is the “A Web Page Is Slowing Down Your Browser” Warning in Firefox?
» Which Web Browser Should You Be Using in 2021?
» Save Hundreds of Dollars With These Google Chrome Extensions
Если при открытии определенного веб-сайта вы получаете сообщение об отказе в доступе, это, вероятно, связано с какой-то сетевой проблемой только в браузере. В полном сообщении об ошибке будет сказано: «Доступ запрещен, у вас нет разрешения на доступ к этому серверу,”Вместе с URL-адресом, к которому нельзя получить доступ по ссылочному номеру. Недавно я столкнулся с этой проблемой, когда пытался зайти на microsoft.com с помощью своего браузера Firefox. Посмотрим, как решить эту проблему.
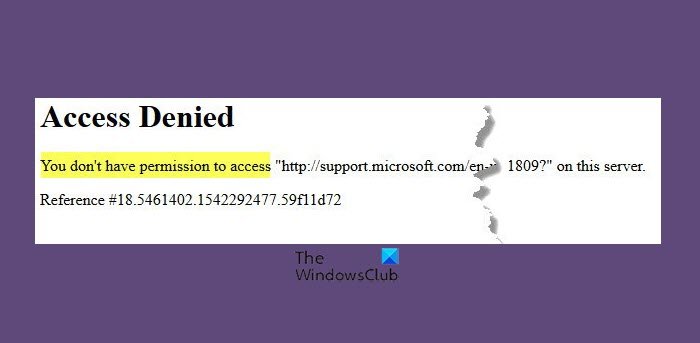
Почему я вижу отказано в доступе к этому серверу?
Ошибка «Доступ запрещен» появляется, когда ваш браузер Firefox использует другую настройку прокси-сервера или VPN вместо того, что действительно установлено на вашем ПК с Windows 10. Эта ошибка, скорее всего, вызвана какой-либо сетевой проблемой в вашем браузере и возникает в браузерах Firefox. Таким образом, когда веб-сайт обнаруживает, что что-то не так с файлами cookie вашего браузера или вашей сети, он блокирует вас, поэтому вы не можете его открыть.
Как исправить ошибку «Доступ запрещен»?
Чтобы исправить ошибку «Доступ запрещен», отключите программное обеспечение VPN. Попробуйте удалить данные браузера, данные определенного веб-сайта в Firefox или сбросьте настройки браузера. Если эти исправления вам не помогают, вы можете отключить расширения VPN или использовать премиум-сервис VPN.
Доступ запрещен, у вас нет разрешения на доступ
Проблема возникает, когда Firefox использует другие настройки прокси или VPN вместо того, что установлено на вашем компьютере с Windows. Когда веб-сайт обнаруживает, что что-то не так с файлами cookie вашей сети или браузера и т. Д., Он блокирует вас.
Вот несколько вещей, которые нужно сделать, если вы столкнулись с этой проблемой в Firefox.
- Очистить все о сайте
- Отключите VPN или расширения VPN
- Отключить прокси
- Используйте премиум-сервис VPN
- Очистить все данные для определенного веб-сайта в Firefox
- Сбросить браузер
То же самое можно сделать и в любом другом браузере.
1]Очистить все о веб-сайте
- Запустите Firefox и нажмите CTRL + H.
- Найдите список веб-сайта в истории и щелкните его правой кнопкой мыши.
- Выбирать Забудьте об этом сайте.
Эта опция удаляет все данные, включая историю, кеш, файлы cookie и пароли. Поэтому, если у вас есть пароль или какие-либо важные данные веб-сайта, сохраните их — иначе используйте другой метод для очистки кеша браузера.
2]Отключите VPN или расширения VPN
Если вы используете программное обеспечение VPN или установили в Firefox какое-либо стороннее расширение VPN, отключите его. После выключения Firefox будет проходить через все, что настроено на компьютере, и вы сможете получить к нему доступ. Эти расширения должны легко включаться и выключаться, чтобы помочь вам разобраться в проблеме.
3]Отключить прокси в браузере
Если у вас нет расширения VPN, нам необходимо проверить настройки прокси-сервера в вашем браузере.
- Запустите Firefox, а затем нажмите кнопку меню (три строки)
- Выберите Параметры. Вы также можете ввести «about: preferences» в адресную строку, чтобы открыть его.
- В разделе «Общие»> «Сетевой прокси»> нажмите кнопку «Настройки».
- Это откроет настройки подключения и выберите «Использовать системные настройки прокси».
Это гарантирует, что Firefox теперь использует те же сетевые настройки, которые настроены на вашем компьютере с Windows. Удаление любого прокси-сервера из конфигурации гарантирует, что между Интернетом и компьютером нет ничего.
4]Используйте премиум-сервис VPN
Вы можете использовать множество бесплатных VPN-сервисов. Тем не менее, настоятельно рекомендуется использовать премиум-сервис VPN, чтобы сохранить вашу анонимность и не накладывать ограничений на доступ к чему-либо. Если веб-сайт сможет определить, что вы используете заблокированный VPN, он не позволит вам получить доступ к веб-сайту.
Однако, когда вы используете премиум-сервис VPN, веб-сайтам будет сложно идентифицировать и блокировать IP-адрес VPN. Вы даже можете подумать о службе Private VPN, использующей программное обеспечение, которое позволяет вам получать доступ к этим веб-сайтам.
5]Очистить все данные для определенного веб-сайта в Firefox.
Неправильно настроенный файл или настройки, относящиеся к веб-сайту, также могут ограничить доступ. Это связано с тем, что способ отправки запроса на доступ к веб-сайту делает его подозрительным. Вы можете перейти в настройки Firefox и очистить все данные, такие как кеш, файлы cookie и автономные файлы.
- Откройте Firefox и нажмите гамбургер-меню в правом верхнем углу.
- Нажмите «Настройки», а затем перейдите в раздел «Конфиденциальность и безопасность».
- Нажмите кнопку «Управление данными».
- В поле поиска веб-сайта введите имя веб-сайта и нажмите «Удалить выбранное».
Попробуйте зайти на сайт и проверьте, решена ли проблема.
6]Сбросить браузер
Все браузеры, включая Firefox, предлагают кнопку обновления. Все, что вам нужно сделать, это ввести about: support в новой вкладке, нажать клавишу Enter, а затем нажать кнопку «Обновить Firefox», доступную на следующем экране. Как только мастер завершит свою работу, попробуйте повторно получить доступ к веб-сайту.
Вы также можете попробовать сбросить настройки сетевого адаптера, открыв его через панель управления, чтобы исключить последнее. Если это не помогает, используйте другой браузер для доступа к сайту.
7]Проверьте с помощью контроллера домена
Если ваш компьютер подключен к корпоративному домену, вам может потребоваться свериться с контроллером домена назначения или контроллером домена по умолчанию. Если сервер блокируется из-за настроек прокси, вам нужно будет связаться со своим ИТ-администратором, чтобы решить эту проблему. Может существовать политика, которая может блокировать доступ.
8]Снимите флажок с прокси-сервера в настройках локальной сети.
В настройках локальной сети есть собственные настройки для прокси-сервера. Его можно изменить вручную или с помощью скрипта. Вы можете проверить, есть ли какие-либо изменения, и отключить их.
Введите Параметры прокси в меню «Пуск» и щелкните параметр, когда он появится. Откроются настройки прокси в разделе Сеть и Интернет> Прокси. Удалите все и выберите автоматическое определение прокси.
То же самое можно сделать, выбрав Панель управления> Свойства обозревателя> вкладка Подключения> Настройки локальной сети. Снимите флажок — Использовать прокси-сервер для вашей локальной сети. Примените изменения и проверьте
Я надеюсь, что за публикацией было легко следить, и вы смогли получить доступ к веб-сайту, разрешив — Доступ запрещен, у вас нет разрешения на доступ на этом сервере — ошибка
Связанное чтение: Ошибка удаления отказа в доступе при доступе к файлам или папкам.
.
-
Partition Wizard
-
Partition Manager
- 4 Methods to Fix Access Denied on This Server Quickly
By Amanda | Follow |
Last Updated March 03, 2020
Sometimes, you might fail to open a specific website and receive error message “Access Denied. You don’t have permission to access on this server”. It can be fixed easily. You just need to follow the solutions provided by MiniTool in this post.
Some users report that they are stopped to visit a specific website by access denied on this server error. The full error message says “Access Denied. You don’t have permission to access on this server” with the URL which you cannot access and followed by a reference number.
This access denied website issue is most likely caused by certain network-related issue in your browser, and it commonly occurs in Mozilla Firefox browser. If you are using Firefox browser and encounter this problem unfortunately, you can try the given methods below to fix it.
Let’s see the details about these solutions.
Fix 1: Clear Everything About the Website
If a website detects that there is something wrong with the related browser cookies, it might block you and give the access denied on this server error. So, you can try clearing everything about the website at first.
To clear website data in Firefox browser, just follow the steps below:
Step 1: Open your browser and press Ctrl + H to open the browsing history.
Step 2: In the list of browser history, find and right-click the problematic website.
Step 3: Choose Forget About This Site from the drop-down menu.
Note: This operation will remove all the data about this website, including browsing history, cache, passwords, etc. So, you should back up the data you need in advance.
Fix 2: Turn Off VPN or Uninstall VPN Service
The VPN you are using currently might also lead to access denied website issue. Therefore, you can try disabling your VPN to fix it. If you are using a VPN software, you just need to exit or log off from your account; if you are using the VPN built in your Windows, just turn it off by choosing it in your network list and clicking Disconnect button.
You might want to uninstall the VPN service if disabling it has fixed access denied on this server issue. To do that, you can follow the given instructions below.
Step 1: Press Windows + R to open Run dialog.
Step 2: Type appwiz.cpl and press Enter to go to Programs and Features page in Control Panel.
Step 3: Select the VPN service you are using and click Uninstall to remove it.
Once it’s done, restart your computer. If you want to continue using this VPN service, you can go to its official website to download the latest version.
Fix 3: Configure Proxy Settings
If you don’t use VPN or above methods fail to fix the issue for you, you might need to configure your proxy settings in Firefox browser.
Just right-click the three-line icon and chose Options. Then, go to Network Settings and click Settings button. In Connection Settings page, select Use system proxy settings and click OK to make sure your browser uses the same network settings in your Windows.
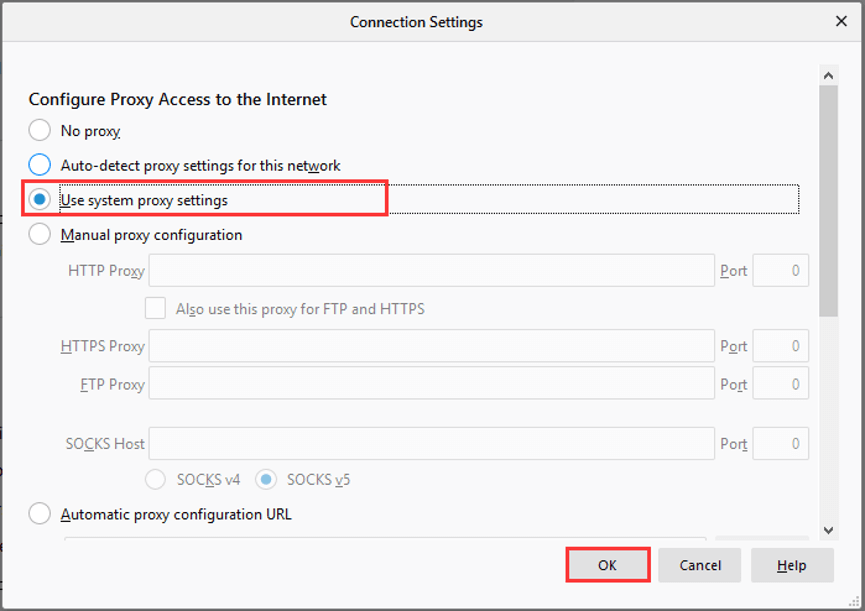
If this doesn’t work to fix the issue either, you can try disabling the proxy for your LAN. Here’s a simple guide.
Step 1: After invoking Run dialog, type inetcpl.cpl and press Enter to open Internet Properties.
Step 2: In the pop-up window, switch to Connection tab.
Step 3: Click LAN settings button.
Step 4: In the Local Area Network (LAN) Settings window, uncheck Use a proxy server for your LAN and click OK.
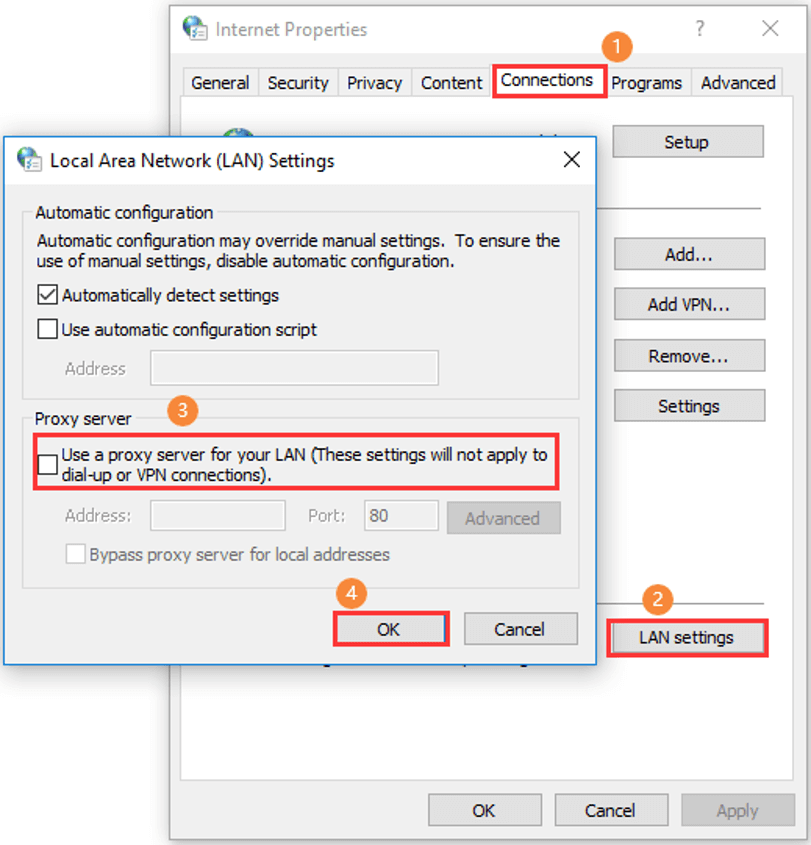
Step 5: Save the change and restart your computer.
Now, you should be able to visit the website without any problems.
About The Author

Position: Columnist
Amanda has been working as English editor for the MiniTool team since she was graduated from university. She enjoys sharing effective solutions and her own experience to help readers fix various issues with computers, dedicated to make their tech life easier and more enjoyable.
She has published many articles, covering fields of data recovery, partition management, disk backup, and etc. In order to provide more useful tips and information, she is still committed to expand her technical knowledge.
-
Partition Wizard
-
Partition Manager
- 4 Methods to Fix Access Denied on This Server Quickly
By Amanda | Follow |
Last Updated March 03, 2020
Sometimes, you might fail to open a specific website and receive error message “Access Denied. You don’t have permission to access on this server”. It can be fixed easily. You just need to follow the solutions provided by MiniTool in this post.
Some users report that they are stopped to visit a specific website by access denied on this server error. The full error message says “Access Denied. You don’t have permission to access on this server” with the URL which you cannot access and followed by a reference number.
This access denied website issue is most likely caused by certain network-related issue in your browser, and it commonly occurs in Mozilla Firefox browser. If you are using Firefox browser and encounter this problem unfortunately, you can try the given methods below to fix it.
Let’s see the details about these solutions.
Fix 1: Clear Everything About the Website
If a website detects that there is something wrong with the related browser cookies, it might block you and give the access denied on this server error. So, you can try clearing everything about the website at first.
To clear website data in Firefox browser, just follow the steps below:
Step 1: Open your browser and press Ctrl + H to open the browsing history.
Step 2: In the list of browser history, find and right-click the problematic website.
Step 3: Choose Forget About This Site from the drop-down menu.
Note: This operation will remove all the data about this website, including browsing history, cache, passwords, etc. So, you should back up the data you need in advance.
Fix 2: Turn Off VPN or Uninstall VPN Service
The VPN you are using currently might also lead to access denied website issue. Therefore, you can try disabling your VPN to fix it. If you are using a VPN software, you just need to exit or log off from your account; if you are using the VPN built in your Windows, just turn it off by choosing it in your network list and clicking Disconnect button.
You might want to uninstall the VPN service if disabling it has fixed access denied on this server issue. To do that, you can follow the given instructions below.
Step 1: Press Windows + R to open Run dialog.
Step 2: Type appwiz.cpl and press Enter to go to Programs and Features page in Control Panel.
Step 3: Select the VPN service you are using and click Uninstall to remove it.
Once it’s done, restart your computer. If you want to continue using this VPN service, you can go to its official website to download the latest version.
Fix 3: Configure Proxy Settings
If you don’t use VPN or above methods fail to fix the issue for you, you might need to configure your proxy settings in Firefox browser.
Just right-click the three-line icon and chose Options. Then, go to Network Settings and click Settings button. In Connection Settings page, select Use system proxy settings and click OK to make sure your browser uses the same network settings in your Windows.
If this doesn’t work to fix the issue either, you can try disabling the proxy for your LAN. Here’s a simple guide.
Step 1: After invoking Run dialog, type inetcpl.cpl and press Enter to open Internet Properties.
Step 2: In the pop-up window, switch to Connection tab.
Step 3: Click LAN settings button.
Step 4: In the Local Area Network (LAN) Settings window, uncheck Use a proxy server for your LAN and click OK.
Step 5: Save the change and restart your computer.
Now, you should be able to visit the website without any problems.
About The Author
Position: Columnist
Amanda has been working as English editor for the MiniTool team since she was graduated from university. She enjoys sharing effective solutions and her own experience to help readers fix various issues with computers, dedicated to make their tech life easier and more enjoyable.
She has published many articles, covering fields of data recovery, partition management, disk backup, and etc. In order to provide more useful tips and information, she is still committed to expand her technical knowledge.
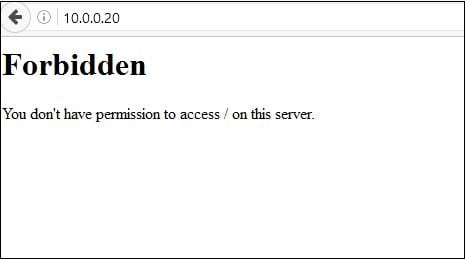
При переходе на какую-либо страницу сетевого ресурса (стороннего или своего) вебмастер (пользователь) может встретиться с ошибкой открытия страницы сайта и соответствующим сообщением «Forbidden You don’t have permission to access / on this server». Указанная проблема возникает довольно спонтанно, вынуждая пользователя гадать о различных причинах её появления. Что же делать в такой ситуации? В данной статье я расскажу, что это за ошибка, каковы её причины, а также поясню, как её исправить на сервере (компьютере).
Содержание
- Что значит сообщение «You don’t have permission to access / on this server»
- Как исправить ошибку Forbidden вебмастеру
- Как избавиться от ошибки Forbidden пользователю сайта
- Заключение
Что значит сообщение «You don’t have permission to access / on this server»
В переводе с английского языка данное сообщение звучит как «Вы не имеете разрешения для доступа на данный сервер» и обычно означает ситуацию, когда данный Вебмастер (пользователь) не имеет прав для просмотра данной страницы.
Причины, по которым это происходит, различны для вебмастера и обычного пользователя. В частности, для вебмастера они могут быть следующими:
- Индексный файл отсутствует или имеет некорректное имя. Указанный файл заглавной страницы должен иметь название index.htm, index.html, index.phtml, index.shtml, index.php, причём все буквы должны быть маленькими;
- Установлены некорректные права на папку, где находится нужный файл, или некорректные права установлены на родительскую директорию, в которой находится данная папка (в них должны быть права на выполнения для владельца);
- Файлы сайта загружены в неверную папку;
- Некорректно настроены применяемые вебмастером плагины безопасности (блокируют нужные IP-адреса);
- Повреждён файл настроек .htaccess;
- Хостер внёс изменения в настройки сервера без ведома вебмастера.
При попытке открыть страницу сайта в браузере у вас также могут появляться ошибки err_ssl_version_or_cipher_mismatch и ssl_error_rx_record_too_long.
Для стандартного пользователя причины ошибки также могут быть следующими:
- Случайный сбой на сервере;
- Администрация сайта закрыла пользователю (пользователям) доступ к данной странице (например, из-за бана);
- Имеются проблемы с пользовательским роутером;
- Провайдер закрыл доступ к данной странице (или у провайдера наблюдаются технические проблемы);
- Ваш браузер работает некорректно;
- Ссылка не верна;
- Ранее существующая страница была удалена.


Как исправить ошибку Forbidden вебмастеру
Методы исправления ошибки Forbidden You don’t have permission to access / on this server зависят от тех инструментов, которыми вы пользуетесь при создании и редактировании сайтов (например, это «WAMP» — Windows, Apache, MySQL и PHP).
Действие 1. Стоит выполнить следующее:
- Если в каталоге не оказалось индексного файла, то попробуйте создать файл index.html и проверьте, возникает ли ошибка
- Проверьте права на папку с вашим сайтом (установите права на папку 775, а на файлы – 644);
- Проверьте наличие в .htaccess команды «deny from all», при её нахождении удалите её, а лучше замените на «allow from all». Также можно попробовать вместо команды «Require local» вписать «Require all granted»;

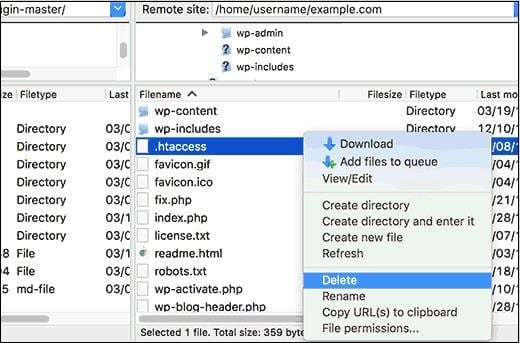
Удалите файл .htaccess - Скопируйте .htaccess из корневой папки вашего сайта в запасную директорию, а затем удалите оригинальный файл .htaccess.
Действие 2. Если после выполнения данной операции проблема пропала, тогда причина была в повреждённом (некорректном) файле .htaccess. Сгенерировать новую версию данного файла можно перейдя в админке, в «Настройки» — «Постоянные ссылки», и нажав на кнопку «Сохранить изменения» (Save changes) внизу.
- Если произошла ошибка с целевой папкой, тогда загрузите файлы вашего сайта в правильную папку (посмотрите путь к правильной папке в контрольной панели «Домены/ Мои домены);
- Если причиной дисфункции стало действие плагинов, то рекомендую отключить все имеющиеся плагины, и поочерёдно включая их, найти непосредственного виновника проблемы;
- Обратитесь к вашему хостеру на предмет проверки корректности прав доступа к файлам.


Как избавиться от ошибки Forbidden пользователю сайта
Если вы обычный пользователь, и встретились с указанной проблемой, то рекомендую выполнить следующее:
- Перезагрузите ваш ПК. В некоторых случаях этот шаблонный совет может оказаться эффективным;
- Перезагрузите ваш роутер. Выключите его на несколько секунд, а затем включите обратно;
- Очистите кэш и куки вашего браузера;
- Попробуйте зайти на нужную страницу с другого браузера;
- Обратитесь к вашему провайдеру, и удостоверьтесь, что он не закрывал вам доступ к проблемной странице (например, из-за предписания Роскомнадзора);
- Напишите письмо администрации проблемного сайта с изложением проблемы. Возможно, админы сайта просто не в курсе, или вы просто забанены на данном ресурсе за какие-то проступки;
- Просто подождите. Возможно, на сайте наблюдаются какие-либо проблемы, которые скоро будут решены администрацией.


Заключение
Сутью проблемы «Forbidden You don’t have permission to access / on this server» является отсутствие разрешения на доступ к конкретной странице (файлу) у вебмастера (пользователя). Для её решения необходимо определиться с конкретной причиной указанной дисфункции, и затем и использовать одно из соответствующих решений, позволяющих восстановить доступ к нужным сетевым файлам.
Опубликовано 27 марта 2017 Обновлено 30 сентября 2020