| title | description | ms.date | ms.topic |
|---|---|---|---|
|
Check for pool and node errors |
This article covers the background operations that can occur, along with errors to check for and how to avoid them when creating pools and nodes. |
03/15/2021 |
how-to |
Check for pool and node errors
When you’re creating and managing Azure Batch pools, some operations happen immediately. Detecting failures for these operations is usually straightforward, because they are returned immediately by the API, CLI, or UI. However, some operations are asynchronous and run in the background, taking several minutes to complete.
Check that you’ve set your applications to implement comprehensive error checking, especially for asynchronous operations. This can help you promptly identify and diagnose issues.
This article describes ways to detect and avoid failures in the background operations that can occur for pools and pool nodes.
Pool errors
Resize timeout or failure
When creating a new pool or resizing an existing pool, you specify the target number of nodes. The create or resize operation completes immediately, but the actual allocation of new nodes or the removal of existing nodes might take several minutes. You can specify the resize timeout in the create or resize API. If Batch can’t obtain the target number of nodes during the resize timeout period, the pool goes into a steady state and reports resize errors.
The ResizeError property for the most recent evaluation lists the errors that occurred.
Common causes for resize errors include:
- Resize timeout is too short
- Under most circumstances, the default timeout of 15 minutes is long enough for pool nodes to be allocated or removed.
- If you’re allocating a large number of nodes, we recommend setting the resize timeout to 30 minutes. For example, when you’re resizing to more than 1,000 nodes from an Azure Marketplace image, or to more than 300 nodes from a custom VM image.
- Insufficient core quota
- A Batch account is limited in the number of cores that it can allocate across all pools. Batch stops allocating nodes once that quota has been reached. You can increase the core quota so that Batch can allocate more nodes.
- Insufficient subnet IPs when a pool is in a virtual network
- A virtual network subnet must have enough unassigned IP addresses to allocate to every requested pool node. Otherwise, the nodes can’t be created.
- Insufficient resources when a pool is in a virtual network
- You might create resources such as load-balancers, public IPs, and network security groups in the same subscription as the Batch account. Check that the subscription quotas are sufficient for these resources.
- Large pools with custom VM images
- Large pools that use custom VM images can take longer to allocate and resize timeouts can occur. See Create a pool with the Azure Compute Gallery for recommendations on limits and configuration.
Automatic scaling failures
You can set Azure Batch to automatically scale the number of nodes in a pool. You define the parameters for the automatic scaling formula for a pool. The Batch service will then use the formula to periodically evaluate the number of nodes in the pool and set a new target number.
The following types of issues can occur when using automatic scaling:
- The automatic scaling evaluation fails.
- The resulting resize operation fails and times out.
- A problem with the automatic scaling formula leads to incorrect node target values. The resize either works or times out.
To get information about the last automatic scaling evaluation, use the autoScaleRun property. This property reports the evaluation time, the values and result, and any performance errors.
The pool resize complete event captures information about all evaluations.
Pool deletion failures
When you delete a pool that contains nodes, first Batch deletes the nodes. This can take several minutes to complete. After that, Batch deletes the pool object itself.
Batch sets the pool state to deleting during the deletion process. The calling application can detect if the pool deletion is taking too long by using the state and stateTransitionTime properties.
If the pool is taking longer than expected, Batch will retry periodically until the pool can be successfully deleted. In some cases, the delay is due to an Azure service outage or other temporary issues. Other factors that can prevent a pool from successfully being deleted may require you to take actions to correct the issue. These factors include the following:
- Resource locks have been placed on Batch-created resources, or on network resources used by Batch.
- Resources that you created have a dependency on a Batch-created resource. For instance, if you create a pool in a virtual network, Batch creates a network security group (NSG), a public IP address, and a load balancer. If you use these resources outside of the pool, the pool can’t be deleted until that dependency is removed.
- The Microsoft.Batch resource provider was unregistered from the subscription that contains your pool.
- «Microsoft Azure Batch» no longer has the Contributor or Owner role to the subscription that contains your pool (for user subscription mode Batch accounts).
Node errors
Even when Batch successfully allocates nodes in a pool, various issues can cause some of the nodes to be unhealthy and unable to run tasks. These nodes still incur charges, so it’s important to detect problems to avoid paying for nodes that can’t be used. In addition to common node errors, knowing the current job state is useful for troubleshooting.
Start task failures
You might want to specify an optional start task for a pool. As with any task, you can use a command line and resource files to download from storage. The start task is run for each node after it’s been started. The waitForSuccess property specifies whether Batch waits until the start task completes successfully before it schedules any tasks to a node.
What if you’ve configured the node to wait for successful start task completion, but the start task fails? In that case, the node will not be usable, but will still incur charges.
You can detect start task failures by using the result and failureInfo properties of the top-level startTaskInfo node property.
A failed start task also causes Batch to set the node state to starttaskfailed if waitForSuccess was set to true.
As with any task, there can be many causes for a start task failure. To troubleshoot, check the stdout, stderr, and any further task-specific log files.
Start tasks must be re-entrant, as it is possible the start task is run multiple times on the same node; the start task is run when a node is reimaged or rebooted. In rare cases, a start task will be run after an event caused a node reboot, where one of the operating system or ephemeral disks was reimaged while the other wasn’t. Since Batch start tasks (like all Batch tasks) run from the ephemeral disk, this is not normally a problem, but in some instances where the start task is installing an application to the operating system disk and keeping other data on the ephemeral disk, this can cause problems because things are out of sync. Protect your application accordingly if you are using both disks.
Application package download failure
You can specify one or more application packages for a pool. Batch downloads the specified package files to each node and uncompresses the files after the node has started, but before tasks are scheduled. It’s common to use a start task command line in conjunction with application packages. For example, to copy files to a different location or to run setup.
The node errors property reports a failure to download and un-compress an application package; the node state is set to unusable.
Container download failure
You can specify one or more container references on a pool. Batch downloads the specified containers to each node. The node errors property reports a failure to download a container and sets the node state to unusable.
Node OS updates
For Windows pools, enableAutomaticUpdates is set to true by default. Allowing automatic updates is recommended, but they can can interrupt task progress, especially if the tasks are long-running. You can set this value to false if you need to ensure that an OS update doesn’t happen unexpectedly.
Node in unusable state
Azure Batch might set the node state to unusable for many reasons. With the node state set to unusable, tasks can’t be scheduled to the node, but it still incurs charges.
Nodes in an unusable state, but without errors means that Batch is unable to communicate with the VM. In this case, Batch always tries to recover the VM. Batch will not automatically attempt to recover VMs that failed to install application packages or containers even though their state is unusable.
If Batch can determine the cause, the node errors property reports it.
Additional examples of causes for unusable nodes include:
- A custom VM image is invalid. For example, an image that’s not properly prepared.
- A VM is moved because of an infrastructure failure or a low-level upgrade. Batch recovers the node.
- A VM image has been deployed on hardware that doesn’t support it. For example, trying to run a CentOS HPC image on a Standard_D1_v2 VM.
- The VMs are in an Azure virtual network, and traffic has been blocked to key ports.
- The VMs are in a virtual network, but outbound traffic to Azure storage is blocked.
- The VMs are in a virtual network with a customer DNS configuration and the DNS server cannot resolve Azure storage.
Node agent log files
The Batch agent process that runs on each pool node can provide log files that might be helpful if you need to contact support about a pool node issue. Log files for a node can be uploaded via the Azure portal, Batch Explorer, or an API. It’s useful to upload and save the log files. Afterward, you can delete the node or pool to save the cost of the running nodes.
Node disk full
The temporary drive for a pool node VM is used by Batch for job files, task files, and shared files, such as the following:
- Application packages files
- Task resource files
- Application-specific files downloaded to one of the Batch folders
- Stdout and stderr files for each task application execution
- Application-specific output files
Some of these files are only written once when pool nodes are created, such as pool application packages or pool start task resource files. Even if only written once when the node is created, if these files are too large they could fill the temporary drive.
Other files are written out for each task that is run on a node, such as stdout and stderr. If a large number of tasks run on the same node and/or the task files are too large, they could fill the temporary drive.
Additionally, after the node starts, a small amount of space is needed on the operating system disk to create users.
The size of the temporary drive depends on the VM size. One consideration when picking a VM size is to ensure the temporary drive has enough space for the planned workload.
- In the Azure portal when adding a pool, the full list of VM sizes can be displayed and there is a ‘Resource Disk Size’ column.
- The articles describing all VM sizes have tables with a ‘Temp Storage’ column; for example Compute Optimized VM sizes
For files written out by each task, a retention time can be specified for each task that determines how long the task files are kept before being automatically cleaned up. The retention time can be reduced to lower the storage requirements.
If the temporary or operating system disk runs out of space (or is very close to running out of space), the node will move to Unusable state and a node error will be reported saying that the disk is full.
If you’re not sure what is taking up space on the node, try remoting to the node and investigating manually where the space has gone. You can also make use of the Batch List Files API to examine files in Batch managed folders (for example, task outputs). Note that this API only lists files in the Batch managed directories. If your tasks created files elsewhere, you won’t see them.
Make sure that any data you need has been retrieved from the node or uploaded to a durable store, then delete data as needed to free up space.
You can delete old completed jobs or old completed tasks whose task data is still on the nodes. Look in the RecentTasks collection on the node, or at the files on the node. Deleting a job will delete all the tasks in the job; deleting the tasks in the job will trigger data in the task directories on the node to be deleted, thus freeing up space. Once you’ve freed up enough space, reboot the node and it should move out of «Unusable» state and into «Idle» again.
To recover an unusable node in VirtualMachineConfiguration pools, you can remove a node from the pool using the remove nodes API. Then, you can grow the pool again to replace the bad node with a fresh one. For CloudServiceConfiguration pools, you can re-image the node via the Batch re-image API. This will clean the entire disk. Re-image is not currently supported for VirtualMachineConfiguration pools.
Next steps
- Learn about job and task error checking.
- Learn about best practices for working with Azure Batch.
Что такое BAD POOL CALLER в Windows 10? BAD POOL CALLER — это ошибка типа «синий экран смерти», часто вызываемая несовместимостью оборудования или программного обеспечения, ошибками драйверов или разгоном.
Как исправить ошибку Bad Pool Caller Error в Windows 10
- Перезагрузите компьютер. …
- Удалите недавно установленные программы. …
- Проверьте обновления драйверов. …
- Удалите последние обновления Windows. …
- Используйте Восстановление системы, чтобы вернуть компьютер в предыдущее состояние. …
- Загрузите средство диагностики памяти Windows, чтобы узнать, виновата ли память в ошибке.
Как исправить плохой вызов пула?
Эта ошибка означает, что вам может потребоваться вернуться к предыдущей конфигурации вашего ПК. Выключите компьютер, нажав и удерживая мощностью кнопку, затем подождите и снова нажмите ее, чтобы снова включить. Когда вы увидите логотип производителя вашего ПК, снова выключите его. Повторяйте процесс, пока не увидите сообщение «Подождите».
Что означает ошибка плохого пула?
Ошибка заголовка неверного пула относится к пул памяти вашего компьютера. Если вы получаете эту распространенную ошибку, это означает, что ваш компьютер не может выделить достаточно памяти для правильного запуска приложения, обычно из-за повреждения пула памяти.
Как исправить стоп-код в Windows 10?
Основные исправления ошибок кода остановки
- Перезагрузите компьютер. Первое исправление — самое простое и очевидное: перезагрузка компьютера. …
- Запустите SFC и CHKDSK. SFC и CHKDSK — это системные утилиты Windows, которые можно использовать для исправления поврежденной файловой системы. …
- Обновите Windows 10.
Как избавиться от синего экрана в Windows 10?
Что нужно сделать в первую очередь — Ремонт синего экрана
- Щелкните правой кнопкой мыши «Этот компьютер».
- Зайдите в Свойства.
- Слева нажмите Расширенные настройки системы.
- В разделе «Запуск и восстановление» щелкните «Параметры».
- Теперь в разделе «Сбой системы» снимите флажок «Автоматический перезапуск».
- Нажмите ОК, чтобы сохранить и продолжить.
Как исправить нарушение, обнаруженное программой Driver Verifier?
Попробуйте разогнать свой графический процессор Чтобы избавиться от драйвера, верификатор обнаружил нарушение BSoD.
…
- Используйте сторонний фиксатор BSoD. …
- Держите Windows 10 в актуальном состоянии. …
- Вернитесь к более старой версии драйверов Nvidia. …
- Обновите свои драйверы. …
- Понизьте частоту вашей видеокарты. …
- Сбросить Windows 10.…
- Проверьте свое оборудование. …
- Сбросить верификатор драйверов.
Как исправить поврежденный список PFN?
Как я могу исправить ошибку BSoD PFN LIST CORRUPT в Windows 10?
- Обновите Windows 10 и ваши драйверы. …
- Обновите драйверы автоматически. …
- Запустите средство устранения неполадок BSOD. …
- Запустите сканирование SFC. …
- Запустите DISM. …
- Проверьте жесткий диск. …
- Отключите Microsoft OneDrive. …
- Удалите проблемное программное обеспечение.
Как запустить средство устранения неполадок BSOD?
Использование средства устранения неполадок синего экрана в Windows 10
- Откройте Панель управления (вид значков) и щелкните / коснитесь значка Устранение неполадок.
- Щелкните / коснитесь ссылки «Просмотреть все» в левом верхнем углу окна «Устранение неполадок». (…
- Щелкните правой кнопкой мыши или нажмите и удерживайте средство устранения неполадок синего экрана, а затем нажмите / коснитесь Запуск от имени администратора. (
Что такое исключение системной службы в Windows 10?
SYSTEM_SERVICE_EXCEPTION — это ошибка синего экрана смерти это присутствует во всех версиях Windows, и сегодня мы собираемся показать вам, как исправить это в Windows 10. SYSTEM_SERVICE_EXCEPTION может быть вызвано несовместимостью драйверов или программным обеспечением, несовместимым с Windows 10.
Что означает повреждение кучи режима ядра?
Как и в случае с другими кодами, «повреждение кучи режима ядра» создан специально, чтобы помочь пользователям определить проблемы, вызывающие сбои системы. Обычно ошибка вызвана проблемами с драйверами (особенно драйверами видеокарты) или конфликтами программного обеспечения, но также может быть вызвана неисправностью оборудования.
Что такое критический процесс, умерла ошибка Windows 10?
Когда происходит критический процесс остановки кода Windows 10, это означает, что процесс, который был необходим для запуска системы, завершился из-за поврежденных или отсутствующих системных файлов, плохие драйверы устройств, вирусные атаки, проблемы совместимости, битые сектора и т. д.
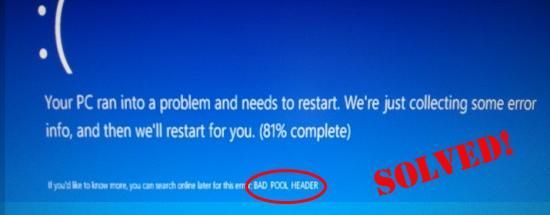
Плохой заголовок пула (Bad Pool Header) — это обычный синий экран смертельной ошибки, которая может возникать во всех версиях Windows, включая Windows 7, Windows 8, 8.1 и Windows 10.
Существует множество причин плохих заголовков пула, включая проблемы с физической памятью, поврежденные записи реестра Windows, вирусы и вредоносное ПО или несовместимые приложения.
Плохие заголовочные коды ошибок пула часто бывают временными, и простая перезагрузка исправляет проблему. Однако иногда ошибка может быть более постоянной, что может быть большой головной болью для владельцев компьютеров.
Если перезагрузка компьютера не исправит ошибку, вам придется диагностировать и решать проблему самостоятельно.
В этом руководстве мы расскажем о нескольких методах, которые вы можете использовать для исправления ошибок в заголовке пула.
Содержание
- Что означает «Плохой заголовок бассейна»?
- Общие причины, которые могут вызвать ошибку в заголовке плохого бассейна.
- Методы, которые можно использовать для исправления ошибки BSOD в заголовке плохого пула в Windows 10
- 1. Отключить службу индексирования Windows для исправления плохого заголовка пула BSOD.
- 2. Отключить быстрый запуск в Windows 10.
- 3. Отключите все подключенные внешние устройства, кроме клавиатуры и мыши.
- 4. Отменить последние изменения на компьютере с Windows
- 5. Сканирование и восстановление поврежденных системных файлов Windows
- 6. Обновление или переустановка драйверов Windows
- 7. Восстановление ПК Windows обратно в предыдущую рабочую точку
Что означает «Плохой заголовок бассейна»?
Плохая ошибка заголовка пула относится к пулу памяти компьютера. Если вы получаете эту общую ошибку, это означает, что ваша машина имеет проблемы с выделением достаточного количества памяти, чтобы правильно запустить приложение, как правило, потому, что пул памяти поврежден.
Общие причины, которые могут вызвать ошибку в заголовке плохого бассейна.
Несмотря на то, что существует множество причин, вот наиболее распространенные причины, которые приводят к ошибке заголовка плохого пула:
- Поврежденные системные файлы Windows.
- Поврежденные или несовместимые драйверы устройств.
- Плохая оперативная память или жесткий диск/SSD.
- Поврежденные записи реестра Windows.
- Вирусы и вредоносные программы.
- Антивирусные и антивирусные программы.
Чтобы помочь вам быстрее разобраться в причинах, вы можете скачать WhoCrashed или BlueScreenView и установите их на свой ПК с Windows, чтобы проанализировать и найти причину.
Обе утилиты являются бесплатными и помогают сканировать MINIDUMP файлы, анализировать их и показывать отчет. По отчету Вы узнаете, откуда возникла ошибка на синем экране и какой системный файл или драйвер Windows ее вызвал.
Если вы не можете получить доступ к своему компьютеру в обычном режиме, я бы рекомендовал загрузить Windows в безопасный режим и выполнить все шаги. Не знаете, как это сделать? Вот несколько методов, которые вы можете использовать для загрузка в безопасный режим Windows 10.
Примечание: Эти методы не только используются для исправления такого типа ошибок BSOD в Windows 10, но и могут быть использованы для решения той же проблемы на ваших ПК под управлением Windows 7 и Windows 8, 8.1. Поэтому если вы столкнулись с ошибкой Bad Pool Header на компьютере, не работающем под управлением Windows 10, не стесняйтесь использовать эти методы для ее решения.
Совет: Прежде чем использовать нижеприведенные методы, перезагрузите компьютер, чтобы он автоматически восстановился. Иногда, если проблема не серьезная, например, прерывание при выделении памяти, Windows автоматически восстанавливает и восстанавливает сам себя.
1. Отключить службу индексирования Windows для исправления плохого заголовка пула BSOD.
По некоторым данным от пользователей сообщества Майкрософтпосле отключения службы Windows Indexing, этот тип BSOD больше не появляется на их компьютере.
Чтобы отключить службу индексирования Windows, нажмите кнопку Windows + R, напечатайте: services.msc и нажмите кнопку Введите.
Совет: Вы также можете получить доступ к Службам Windows, перейдя в Панель управления -> Инструменты администрирования -> Службы.
В приложении Windows Services найдите Windows Search в списке всех служб Windows, затем щелкните правой кнопкой мыши на нем и выберите опцию Properties (Свойства).
На следующем этапе в выпадающем списке типа «Startup type» выберите «Disabled», затем нажмите кнопку «OK».
Перезагрузите компьютер с Windows, чтобы проверить, не исчез ли Bad Pool Header BSOD и не сохранился ли он. Если он все еще там, используйте другие методы, описанные ниже.
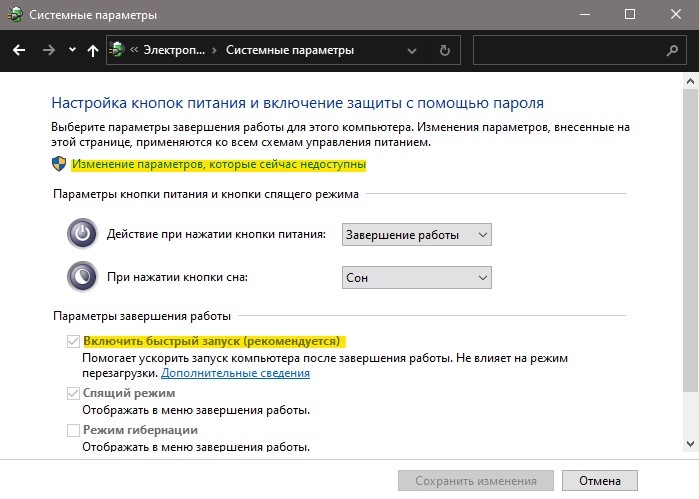
2. Отключить быстрый запуск в Windows 10.
По умолчанию опция Быстрый старт будет включена, и в некоторых случаях вызывает этот тип BSOD.
Чтобы отключить опцию быстрого запуска, нажмите кнопку Windows + X а затем во всплывающем меню выберите «Параметры питания».
В окне «Параметры питания» на левой боковой панели выберите опцию «Выбрать, что делает кнопка питания».
На следующем этапе нажмите на опцию «Изменить настройки, которые в данный момент недоступны». Затем снимите флажок «Включить быстрый запуск (рекомендуется)», нажмите кнопку «Сохранить изменения» и перезагрузите компьютер, чтобы проверить, сохраняется ли проблема.
Не можете найти опцию «Включить быстрый запуск (рекомендуется)»? Прочитайте эту статью, чтобы узнать больше о функции быстрого запуска и о том, как показать эту опцию.
3. Отключите все подключенные внешние устройства, кроме клавиатуры и мыши.
Иногда, когда вы подключаете новое внешнее устройство, и оно не полностью совместимо с компьютером под управлением Windows, оно может создать ошибку Bad Pool Header BSOD.
Для тестирования временно отключите все подключенные внешние устройства, подключенные к компьютеру, за исключением клавиатуры и мыши. Затем перезагрузите компьютер, чтобы проверить, сохраняется ли ошибка.
Если этот BSOD пропал, причина в одном из этих внешних устройств. Чтобы идентифицировать конкретное устройство, подключайте их по одному до тех пор, пока не найдете его.
4. Отменить последние изменения на компьютере с Windows
Если вы недавно установили новую программу на ПК под управлением Windows, и произошло появление заголовка «Плохой пул», удалите его. Эта программа может конфликтовать с другими установленными на вашем компьютере приложениями и привести к такому типу BSOD.
Для деинсталляции приложений в Windows 10 перейдите в «Настройки -> Система -> Приложения и функции».
Найдите приложение, которое вы недавно установили, затем выберите его и нажмите кнопку «Удалить».
Совет: В некоторых случаях сторонние антивирусные программы могут вызывать этот тип BSOD. Поэтому вы можете временно отключить сторонний антивирус и перезагрузить компьютер, чтобы убедиться, что проблема сохраняется. Если этот шаг помог исправить проблему, вам следует подумать об удалении этого антивирусного программного обеспечения с вашего компьютера и найти замену.
5. Сканирование и восстановление поврежденных системных файлов Windows
Поврежденный системный файл Windows также может привести к Bad Pool Header BSOD. Выполните команду SFC для сканирования поврежденных файлов на компьютере и их автоматического восстановления.
Чтобы начать, нажмите Windows + Xзатем нажмите A и выберите Да, чтобы запустить приложение Command Prompt с учетной записью администратора.
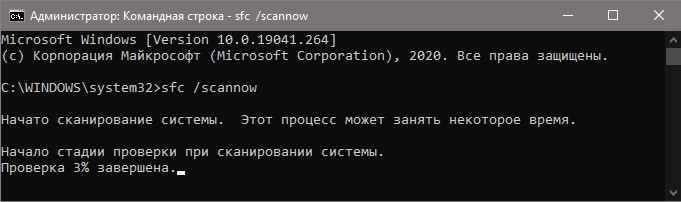
В окне командной строки выполните следующую команду, чтобы просканировать все системные файлы Windows и автоматически исправить их при обнаружении повреждений.
SFC / сканирование
Этот процесс может занять некоторое время. Пожалуйста, не перезагружайте и не выключайте компьютер во время работы процесса.
6. Обновление или переустановка драйверов Windows
Как рекомендовано выше, вы можете использовать инструмент BlueScreenView или WhoCrashed, чтобы выяснить причину ошибки заголовка «Плохой пул». Если это вызвано одним из драйверов Windows, инструмент покажет вам имя драйвера с формой xxx.sys.
Вы можете легко узнать, к какому оборудованию оно относится, вставив его в веб-сайт www.carrona.org. Это каталог, который скажет вам имя устройства на основе файла .sys.
Зная драйвер, который вызвал ошибку Bad Pool Header BSOD, удалите его, а затем загрузите последнюю версию с сайта производителя и установите ее на свой Windows PC.
Если вы используете Windows 10, вам нужно только удалить драйвер, перезагрузить компьютер, а затем подключиться к Интернету. Ваша ОС Windows автоматически просканирует недостающие драйверы, загрузит обновленные драйверы и установит их.
7. Восстановление ПК Windows обратно в предыдущую рабочую точку
Если вы попробовали все вышеперечисленные методы, но ошибка Bad Pool Header BSOD сохраняется, воспользуйтесь функцией Windows System Restore, чтобы откатить компьютер к выбранной предыдущей рабочей точке.
Технически, это легкая система резервного копирования, которая помогает создавать резервные копии системных файлов и создает точки, которые позволяют пользователям откатить компьютер к определенной точке, в случае, если что-то пойдет не так.
Чтобы узнать больше о Восстановлении системы Windows, а также о том, как ею пользоваться, прочтите эту статью. Если у вас нет резервной копии, вы всегда можете сбросить Windows PC, чтобы также исправить ошибку Bad Pool Header (Плохой заголовок пула).
Я надеюсь, что эта статья поможет вам разрешить ошибку Bad Pool Header BSOD на вашем компьютере с Windows 10, а также на других версиях Windows, включая Windows 7 и Windows 8, 8.1.
BAD_POOL_HEADER (плохой заголовок пула) — ошибка появляется на синем экране в Windows 10/7 и в большинстве случаев с ней можно столкнуться после обновления системы. Также, ошибка возникает из-за проблем с неправильным распределением памяти.
Виновником ошибки BAD POOL HEADER может быть недавнее установленное оборудование в ПК, включая USB устройства. Также, проблема может быть связана со сторонней программой как антивирус, драйверами, плохими секторами на диске или повреждением системных файлов.

Если ошибка BAD POOL HEADER не циклическая, и вы можете попасть на рабочий стол, то можете приступить ниже к способам, но я рекомендую начать с рекомендации 1 ниже (попасть в дополнительные параметры «Включить 4-5 раза…»). Если вы не можете загрузиться на рабочий стол, так как ошибка появляется каждый раз при включении, то у вас два варианта:
- Включить 4-5 раза компьютер или ноутбук, доходя до ошибки или логотипа загрузки. Тогда вас автоматически перекинет в дополнительные параметры.
- Вы можете создать установочную флешку с Windowsw 10 и во время установки нажать на восстановление системы, после чего, вас перекинет в дополнительные параметры.
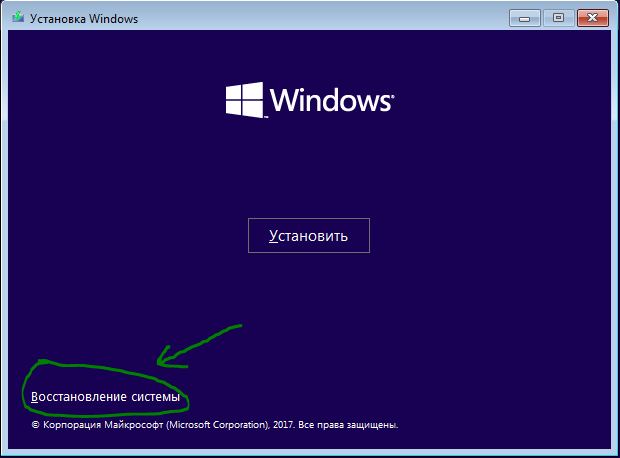
В дополнительных параметрах, в первую очередь, выберите «Восстановление при загрузке». Если вы получили ошибку после обновления системы, то можно удалить последнее обновление. Также, вы можете «Восстановить систему» выбрав точку восстановления на пару дней назад, когда ошибки еще не было. Далее вы можете загрузиться в безопасном режиме, что позволит нам загрузиться на рабочий стол. И запустить командную строку, которая нам понадобиться ниже.

1. Стороннее ПО
Попробуйте вспомнить, что недавно устанавливали и удалите. Удалите сторонний антивирус полностью, так как он может со временем вызывать различные ошибки BSOD. В ошибке BAD POOL HEADER была замечена программа Dell Sonic Global VPN.
Если вам сложно определить программу, то лучшим способом будет, это загрузка системы в чистом состоянии. Это позволит загрузить систему только с процессами и службами Microsoft ОС Windows. Если синего экрана не появится, то нужно искать виновника ошибки. Это может быть стороннее ПО, драйвер и т.п.
- Выполнение чистой загрузки в Windows 10/8/7
2. Отключите быстрый запуск
Быстрый запуск ускоряет загрузку компьютеру, но также имеет и недостатки. Иногда, система не успевает обработать нужные операции и соответственно появляется различные ошибки, ошибка BAD POOL HEADER не исключение. По этому отключим быстрый запуск.
Перейдите в панель управление > оборудование и звук > электропитание > действие кнопок питание > изменить параметры, которые сейчас недоступны и ниже уберите галочку «Включить быстрый запуск«.
3. Проверка драйверов
Нажмите сочетание кнопок Win+X и выберите «Диспетчер устройств«. В диспетчере устройств вам нужно определить какой драйвер может вызывать ошибку BAD_POOL_HEADER и удалите его, после чего перезагрузить ПК, чтобы драйвер переустановился. Ниже пример показан на удаление драйверов сетевого адаптера Ethernet и WiFi и мне помогло решить данную проблему, так как Netgear вызывал конфликт с Realtek PCIe Controller.
Вы также, можете запустить проверку плохих драйверов с этим руководством.
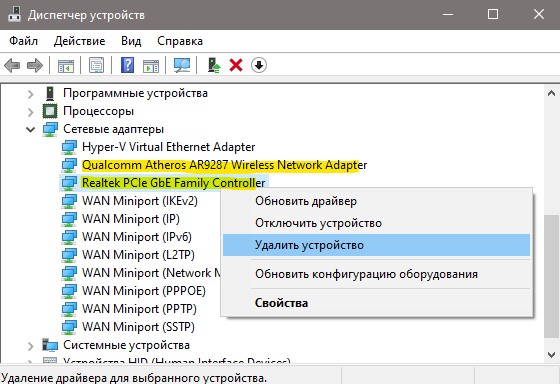
Обязательно сравните установленные версии драйвера с версией на сайте производителя устройства. Если текущая версия старая, то нужно скачать последнюю именно с сайта производителя оборудования.
4. Проверка ОЗУ
Если у вас компьютер, то вы можете физически поменять местами планки ОЗУ в разные слоты. Также, если у вас установлено две планки, то извлеките одну. Комбинируйте любые возможные моменты, чтобы убедиться, что ошибка BAD POOL HEADER не из-за оперативной памяти. На форму Microsoft, некоторым пользователям помогло удаление и переустановка Аудио драйвера.
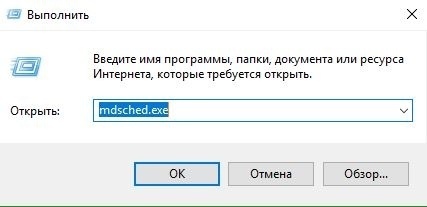
- Также, есть возможность проверить память на ошибки программным путем, нажав Win+R и введя mdsched.exe.
5. Проверка SYS файлов
Повреждение системных файлов может вызывать ошибку BAD POOL HEADER. Запустим инструмент, который проверит целостность системных файлов и, если будут поврежденные, то их попытается автоматически исправить.
Запустите командную строку от имени администратора и введите ниже команды по очереди:
sfc /scannow
DISM /ONLINE /CLEANUP-IMAGE /RESTOREHEALTH
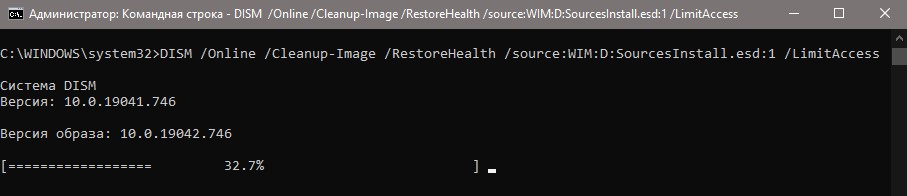
Если какие-либо ошибки обнаружены и не исправлены, особенно в случае команды DISM, то создайте установочную флешку с Windows 10. Также, можно монтировать ISO образ в виртуальный привод. Далее запустите обратно командную строку от имени администратора и введите:
DISM /Online /Cleanup-Image /RestoreHealth /source:WIM:D:SourcesInstall.esd:1 /LimitAccess
Замените D на свой путь к флешке или виртуальному приводу.
Смотрите еще:
- Исправить ошибку BAD_SYSTEM_CONFIG_INFO в Windows
- Ошибка Bad Image 0xc000012f и 0xc0000020 в Windows 10
- Программа Bad_Module_Info не работает в Windows 10
- Диагностика ошибок синего экрана смерти BSOD Window
- netio.sys: Ошибки синего экрана BSOD в Windows 10
[ Telegram | Поддержать ]
Если вы продолжаете получать случайные синие экраны с Bad_Pool_Header ошибка на вашем Windows 7 компьютер, не волнуйтесь. Часто это совсем не сложно исправить …
Вот 5 исправлений, которые помогли другим пользователям решить проблему с неверным заголовком пула в Windows 7. Возможно, вам не придется пробовать их все; просто продвигайтесь вниз по списку, пока не найдете тот, который вам подходит.
- Обновите драйверы вашего устройства
- Запустите диагностику памяти Windows
- Отключить поиск Windows
- Проверьте наличие проблем с оборудованием
- Проверить ошибки на диске
Исправление 1. Обновите драйверы устройства.
Эта проблема может возникнуть, если вы используете неправильные или устаревшие драйверы устройств. Поэтому вам следует обновить драйверы вашего устройства, чтобы увидеть, решит ли это вашу проблему. Если у вас нет времени, терпения или навыков для обновления драйвера вручную, вы можете сделать это автоматически с помощью Водитель Easy .
Driver Easy автоматически распознает вашу систему и найдет для нее подходящие драйверы. Вам не нужно точно знать, в какой системе работает ваш компьютер, вам не нужно беспокоиться о неправильном драйвере, который вы будете загружать, и вам не нужно беспокоиться об ошибке при установке. Driver Easy справится со всем этим.
Вы можете автоматически обновлять драйверы с помощью СВОБОДНЫЙ или Pro версия Driver Easy. Но с версией Pro требуется всего 2 шага (и вы получаете полную поддержку и 30-дневную гарантию возврата денег):
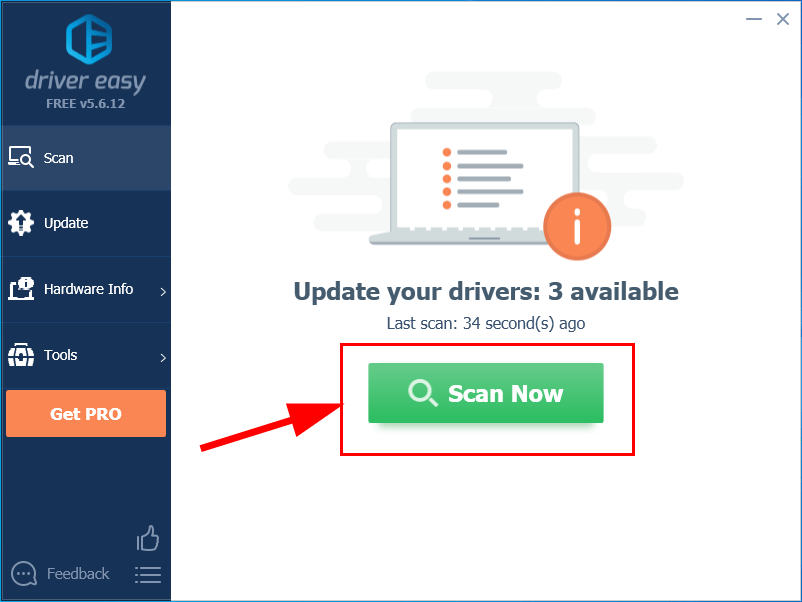
1) Скачать и установите Driver Easy.
2) Запустите Driver Easy и нажмите Сканировать сейчас кнопка. Затем Driver Easy просканирует ваш компьютер и обнаружит проблемы с драйверами.
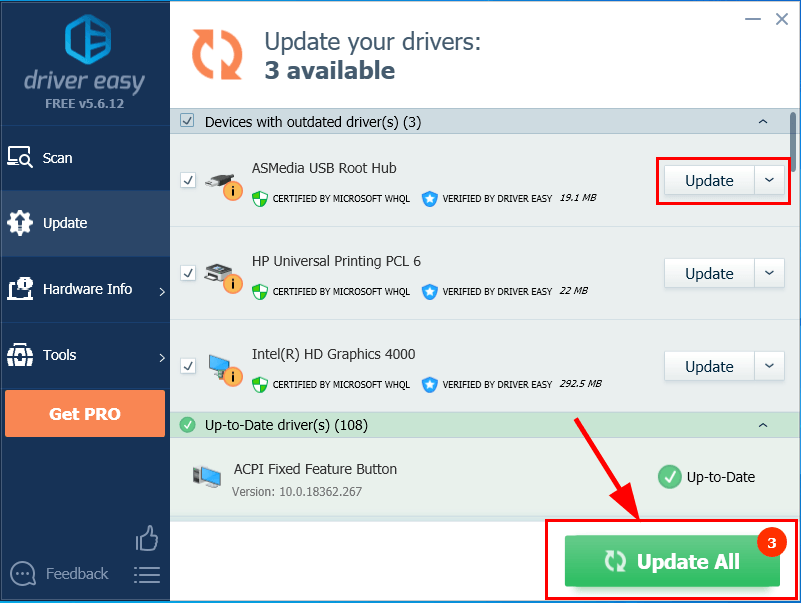
3) Нажмите Обновить все для автоматической загрузки и установки правильной версии все драйверы, которые отсутствуют или устарели в вашей системе (для этого требуется Pro версия — вам будет предложено выполнить обновление, когда вы нажмете «Обновить все»).
4) Перезагрузите компьютер, чтобы изменения вступили в силу.
5) Проверьте, решена ли проблема с синим экраном заголовка плохого пула. Если да, то отлично! Если проблема не исчезнет, перейдите к Исправить 2 , ниже.
Исправление 2: Запустите диагностику памяти Windows
Если вы недавно внесли какие-либо изменения в свой компьютер, например, обновили память и т. Д., Возможно, нам придется запустить встроенный инструмент Windows под названием Диагностика памяти Windows чтобы помочь проверитьнаша система для проблем с памятью и посмотрите, исправит ли она это Плохой заголовок пула проблема с синим экраном.
Вся проверка памяти займет 20 минут или даже больше. Обязательно выделить достаточно времени перед тем как бежать Диагностика памяти Windows .
Для этого:
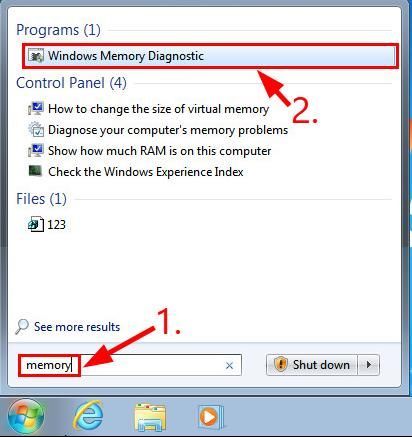
- На вашей клавиатуреНажмите клавиша с логотипом Windows и введите память. Затем нажмите на Диагностика памяти Windows .

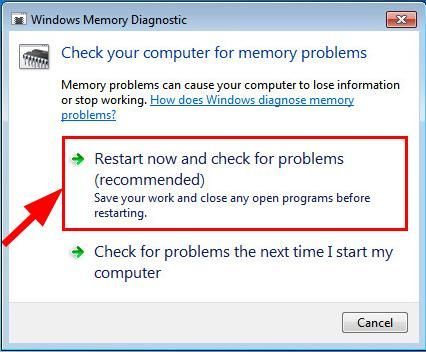
- Обязательно сохраните свою работу & закрыть все приложения на вашем ПК, прежде чем щелкнуть Перезагрузите сейчас и проверьте наличие проблем (рекомендуется) .
- Подождите, пока Windows снова перезагрузится (это когда закончится проверка памяти), а затем:
- Если вы получили отчет об ошибках памяти , а затем следуйте инструкциям на экране для дальнейшего устранения неполадок.
- Если вы получили сообщение «Ошибки памяти не обнаружены» в диагностике памяти Windows , то у вас не произошло сбоев памяти в оперативной памяти, перейдите к Исправить 3 ниже для дальнейшего устранения неполадок.
Исправление 3: отключить поиск Windows
Поиск Windows — это служба в нашей системе, которая ведет индекс файлов на вашем компьютере для повышения скорости поиска. Но он также может быть поврежден и является причиной этой проблемы с синим экраном. Поэтому нам, возможно, придется отключить его, чтобы увидеть, работает ли он. Вот как:
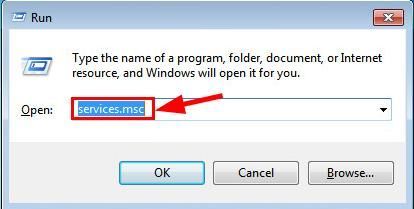
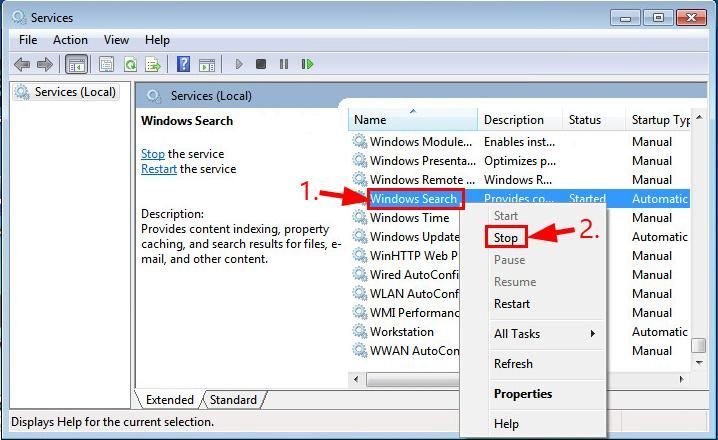
- FНа клавиатуре нажмите Windows logo key и р в то же время. Затем скопируйте и вставьте services.msc в коробку и нажмите Войти .
- Прокрутите вниз, затем щелкните правой кнопкой мыши Поиск Windows и нажмите Стоп .
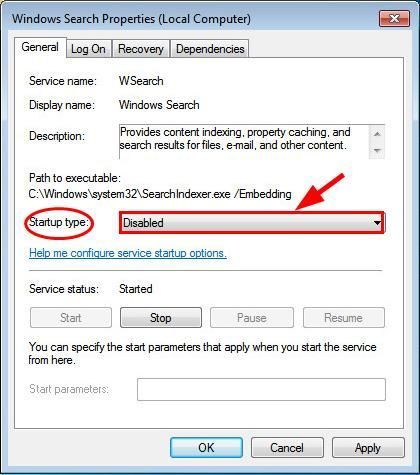
- Дважды щелкните на Поиск Windows . Затем в Тип запуска: , выберите Отключено .
- Нажмите Применять > Хорошо .
- Перезагрузите компьютер и проверьте, Bad_Pool_Header выпускфиксированный. Если да, то отлично! Если проблема не исчезнет, перейдите к Исправить 4 , ниже.
Исправление 4: проверьте наличие проблем с оборудованием
Выключите и отсоедините компьютер, затем извлеките все карты памяти. Попробуйте снова включить компьютер с помощью палочек, ПО ОДНОМУ. Если ваш компьютер не загружается с одной конкретной оперативной памятью, вы знаете, какая из них виновата.
Исправление 5: проверьте ошибки диска
Проверка диска — полезная встроенная Инструмент Windows, который сканирует наш жесткий диск и внешние диски на наличие ошибок и исправляет их.
Проверка диска на наличие ошибок занимает всего несколько минут. Но как только он обнаруживает ошибки, процедура крепления на выполнение может потребоваться ЧАСЫ. Убедитесь, что у вас достаточно времени.
Для этого:
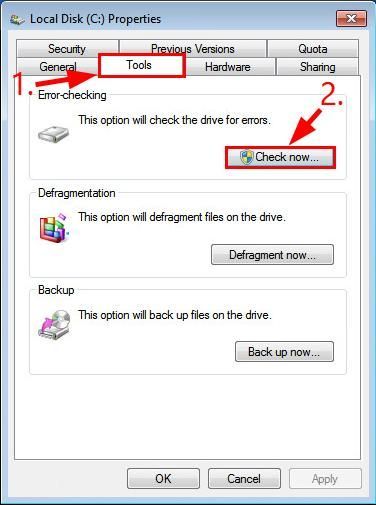
- На клавиатуре нажмите клавиша с логотипом Windows и ЯВЛЯЕТСЯ в то же время. Затем щелкните правой кнопкой мыши на Локальный диск (C и нажмите Свойства .
- Щелкните значок инструменты вкладка> Проверьте .
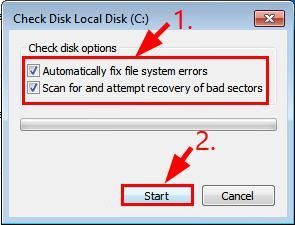
- Обязательно проверьте ОБЕ коробки во всплывающем окне и нажмите Начало .
- Следуйте инструкциям на экране для Windows, чтобы обнаружить и исправить найденные ошибки.
- Перезагрузите компьютер и посмотрите, исправит ли он Плохой заголовок пула ошибка синего экрана.
 и нажмите Свойства .
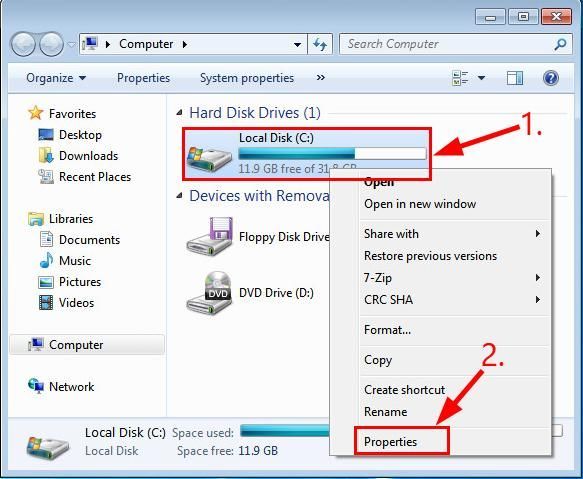
Надеюсь, к настоящему времени вы успешно решили проблему с недопустимым заголовком пула в Windows 7. Если у вас есть вопросы, идеи или предложения, дайте мне знать в комментариях. Спасибо за прочтение!