В редких случаях, но бывает, что во время загрузки больших файлов на веб-сайт возникает ошибка, которую возвращает веб-сервер Nginx — 413 Request Entity Too Large. Ошибка появляется, при попытке загрузить на сервер слишком большой файл чем это разрешено на сервере. Дальше рассмотрим описание ошибки 413 Request Entity Too Large а также методы её исправления на стороне веб-сервера Nginx.
Что означает ошибка 413
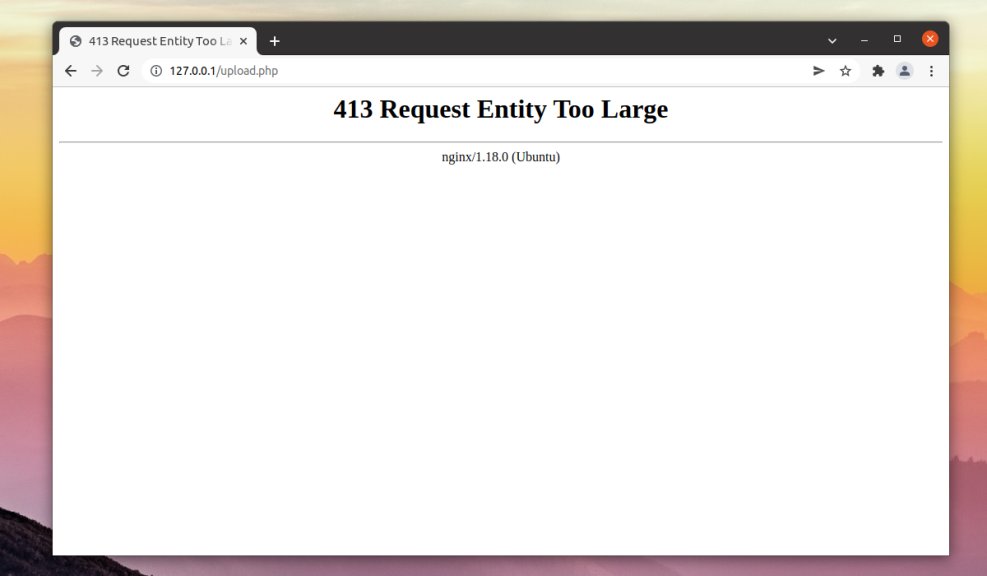
Ошибка 413 или Request Entity Too Large расшифровывается как «объект запроса слишком велик» или простыми словами объем передаваемых данных слишком большой. Ошибка возвращается в случае, если сервер не может обработать запрос по причине слишком большого размера тела запроса (или большого файла). Снимок экрана с ошибкой изображен ниже:
По умолчанию в Nginx установлен лимит на размер тела запроса который равен 1 МБ. Если запрос превышает установленное значение, вы увидите ошибку 413 Request Entity Too Large.
Как исправить
Для исправления ошибки 413 следует увеличить допустимый лимит. Увеличить размер тела запроса и соответственно, загружаемых файлов, можно путем использования client_max_body_size. Опциюя доступна для использования в директивах http, server или location в конфигурационном файле /etc/nginx/nginx.conf или в конфигурационном файле веб-сайта.
Откройте конфигурационный файл nginx.conf при помощи любого текстового редактора:
$ sudo nano /etc/nginx/nginx.conf
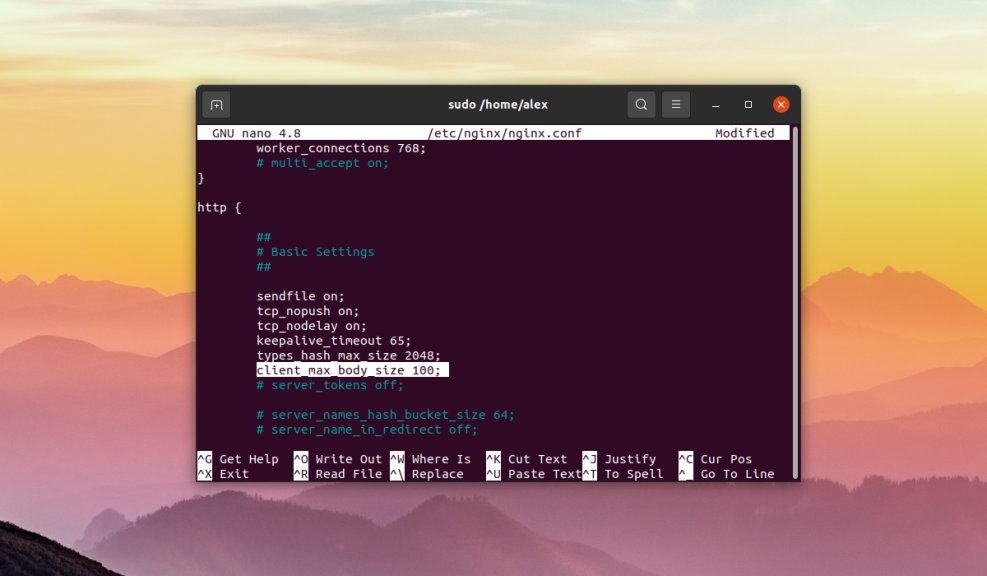
Вписываем строчку в секцию http:
$ client_max_body_size 100M
100 — максимальный размер файла в мегабайтах который можно загрузить на веб-сайт, в данном случае — 100 мегабайт. Если в распоряжении имеется несколько веб-сайтов и необходимо ограничить загрузку на все сайты сразу, то строку client_max_body_size необходимо вписываем в раздел блока http. Если ограничение на загрузку необходимо выставить только для конкретного сайта, то строку client_max_body_size необходимо добавить в блок server конфигурационного файла сайта, который по умолчанию находиться в /etc/nginx/sites-available/имя_файла_с_конфигурацией:
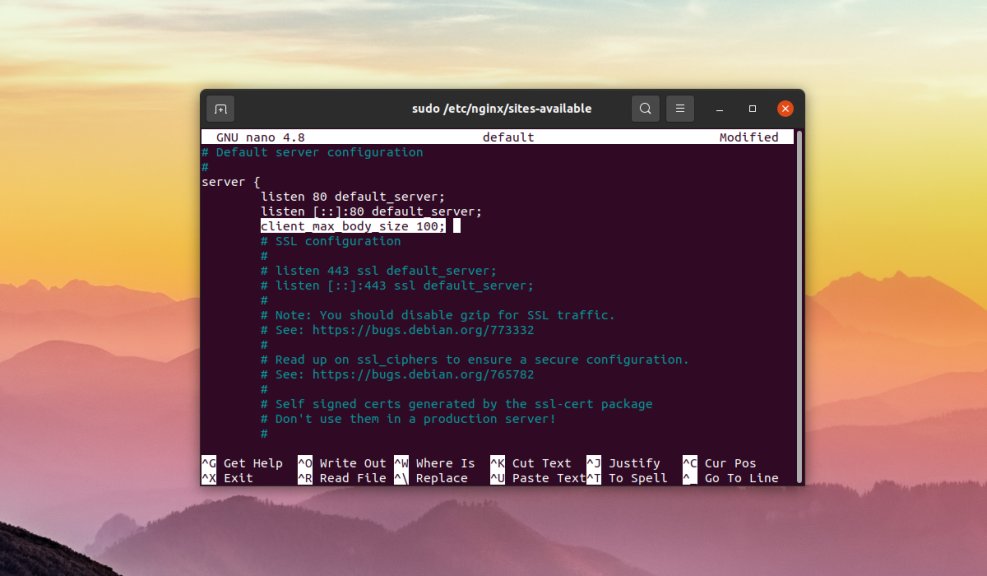
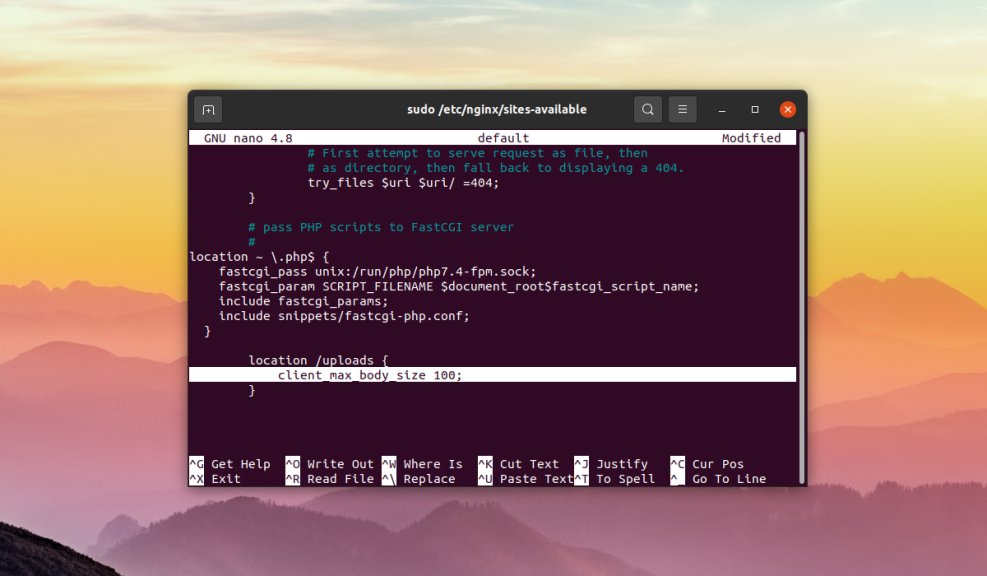
Когда ограничение на загрузку необходимо выставить только для конкретного раздела на сайте, строку client_max_body_size необходимо вписать в директиву location конфигурационного файла сайта, который по умолчанию находиться в /etc/nginx/sites-available/имя_файла_с_конфигурацией:
Как только были внесены изменения в конфигурационные файлы, сохраните их, закройте текстовый редактор и проверьте синтаксис конфигурационных файлов на наличие ошибок при помощи команды:
$ sudo nginx -t
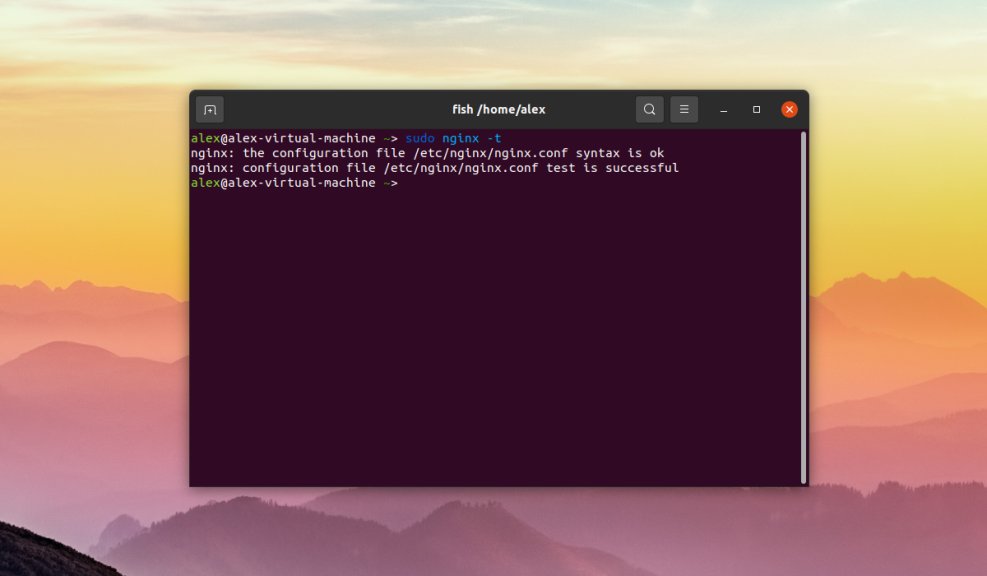
Вы можете увидеть следующие строки:
nginx: the configuration file /etc/nginx/nginx.conf syntax is ok
nginx: configuration file /etc/nginx/nginx.conf test is successful
Это означает что ошибок нет. В противном случае будет выведено описание ошибки, имя файла в котором найдена ошибка и номер строки. После внесения любых изменений в конфигурационные файлы Nginx их необходимо перезапустить при помощи команды:
$ sudo systemctl reload nginx
В этой статье рассмотрена ошибка в Nginx, известная 413 Request Entity Too Large, возникающая при загрузке больших файлов на веб-сайт. Помимо описания самой ошибки также было описаны шаги по устранению ошибки путем редактирования конфигурационных файлов Nginx.
WordPress errors come in all shapes and sizes. In most cases they’re easy to decipher; such is the accessibility of WordPress’ error reporting. Even so, when the “413 Request Entity Too Large” error pops up, it can leave you scratching your head.
Without realizing it, you already have everything you need to understand and diagnose the error within its name. The good news is you won’t need more than a standard Secure File Transfer Protocol (SFTP) client and administrator access to your server.
In this post, we’ll take a look at how to solve the “413 Request Entity Too Large” error. We’ll also give you a quick list of steps to take before you begin to solve the error, to make the process super straightforward.
Check out our video guide to fixing the “413 Request Entity Too Large” Error
What the “413 Request Entity Too Large” Error Is (And Why It Exists)
We noted that there’s a clue in the error name as to what the solution and problem are. Before you go sleuthing yourself, though, we’ll spoil the surprise: it’s in the adjective “large.”
In a nutshell, the “413 Request Entity Too Large” error is a size issue. It happens when a client makes a request that’s too large for the end server to process. Depending on the nature of the error, the server could close the connection altogether to prevent further requests being made.
Let’s break the error down into its parts:
- “413”: This is one of the 4xx error codes, which mean there’s a problem between the server and browser.
- “Request Entity”: The “entity” in this case is the information payload being requested by the client from the server.
- “Too Large”: This is straightforward: the entity is bigger than the server is willing or able to serve.
In fact, this error has changed its name from what it originally was to be more specific and offer more clarity. It’s now known as the “413 Payload Too Large” error, although in practice, you’ll see the older name a lot more.
As for why the error occurs, the simple explanation is that the server is set up to deny explicit uploads that are too large. Think of times when you upload a file where there’s a maximum file size limit:

In most cases, there will be some validation in place to stop the error… if you’re seeing the “413 Request Entity Too Large” error, those validation efforts may not be as watertight as you think.
What You’ll Need to Resolve the “413 Request Entity Too Large” Error
Fixing this error is all about raising the maximum file size for the server in question. Once that’s out of the way, you shouldn’t see the error anymore.
As such, to fix the “413 Request Entity Too Large” error, you’ll need the following:
- Administrator access to your server.
- A suitable SFTP client (we’ve covered many of these in the past).
- The know-how to use SFTP — there’s a good guide to the basics on WordPress.org, and you won’t need more than that.
- A text editor, though there’s no need for anything too complex.
- A clean and current backup in case the worst happens.
As an aside, we mention SFTP throughout this article as opposed to FTP. In short, the former is more secure than the latter (hence the name). That said, while there are other differences you should investigate, the functionality remains the same for the vast majority of uses.
Also, it’s worth noting that the MyKinsta dashboard has plenty of functionality on hand to help you get onto your server. For example, each site displays SFTP connection information that’s easy to understand:

This can help you get into your site without fuss. In some cases, you may be able to import the credentials straight to your chosen SFTP client.
3 “Pre-Steps” You Can Take Before Rectifying the “413 Request Entity Too Large” Error
Before you crack open your toolbox, there are some steps you can take to help resolve the “413 Request Entity Too Large” error. Here are two — and each one may give you a welcome workaround to the error.
1. Try to Upload a Large File to Your Server Through SFTP
Because the issue is related to the file sizes hitting your server, it’s a good idea to circumvent the frontend interface and upload a large file to the server yourself. The best way to do this is through SFTP.
This is because protocols such as SFTP are almost as “close to the bone” as you can get with regards to the way you access your server. Also, you can simultaneously rule out any issues with the frontend that may be causing the error.
To do this, log into your site through SFTP and find the wp-content folder. In here will be the uploads folder.

Next, upload your file to this folder on the server and see what the outcome is. If the upload is successful, we suggest sending an email to the site’s developer, as they may want to investigate the issue further on the frontend.
2. Check for Server Permissions Errors
Of course, permissions errors will stop any server request from running. As such, you should check whether the user has sufficient permissions to upload files of any size. Once this is sorted, the error should disappear.
The first step is to determine whether this is an issue with a single user (in which case they may be restricted for a reason). If the “413 Request Entity Too Large” error is happening for multiple users, you can be more sure of something that needs your input.
We’d suggest two “pre-fixes” here:
- Double-check your WordPress file permissions, just in case there’s an issue.
- Remove and re-create your SFTP user (a general investigation is a great idea).
While they may not solve the error in the first instance, you’ll at least know that your file and user structure is as it should be.
How to Solve the “413 Request Entity Too Large Error” for Your WordPress Website (3 Ways)
Once you’ve gone through the pre-steps, you’re ready to tackle the error head-on.
The following three methods are listed from easiest to toughest, with the understanding that that the path of least resistance is the best one to take.
1. Edit Your WordPress functions.php File
First off, you can work with your functions.php file to help bump up the file upload size for your site. To do this, first log into your site through SFTP using the credentials found within your hosting control panel.
When you’re in, you’ll want to look for the file itself. The functions.php file should be in the root of your server. In many cases, this root is called www or public_html, or it could be the abbreviated name of your site.
Once you’ve found it, you can open it in your text editor of choice. If you don’t see the file, you can create it using your text editor.
Once you have a file open, enter the following:
@ini_set( '_max_size' , '64M' );
@ini_set( 'post_max_size', '64M');
@ini_set( 'max_execution_time', '300' );
In short, this increases the maximum file size of posts and uploads while boosting the time the server will spend trying to process the request. The numbers here could be anything you wish, but they should be large enough to make the error disappear. In practice, 64 MB is enough for all but the most heavy-duty of tasks.

When you’re ready, save your file and upload it to the server again. Then, check whether the “413 Request Entity Too Large” error still exists. If it does, head onto the next method.
2. Modify Your WordPress .htaccess File
Much like your functions.php file, your .htaccess file sits on your server. The difference here is that .htaccess is a configuration file for Apache servers. If you’re a Kinsta customer, you’ll know we run Nginx servers, so you won’t see this file in your setup.
Still, for those with an Apache server, this is the approach you’ll need. Much like with the guidance for functions.php, first log into your server through SFTP, then look in your root folder as before.
The .htaccess file should be within this directory, but if it’s missing, we suggest you get in touch with your host to determine where it is, and whether your server runs on Nginx instead.
Once you’ve found it, open it up again. You’ll see some tags, and the most important here is # END WordPress. You’ll want to paste the following after this line:
php_value upload_max_filesize 64M
php_value post_max_size 64M
php_value max_execution_time 300
php_value max_input_time 300
In short, this does almost the same thing as the code you’d add to the functions.php file, but it’s akin to giving the server direct instructions.

When you’ve finished, save your changes, upload the file, and check your site again. If you’re still having trouble, we’d again suggest contacting your host, as they will need to verify some aspects of your setup that lie beyond the scope of this article.
3. Change Your Nginx Server Configuration
Our final method is specific to Nginx servers — those used at Kinsta. The purpose is the same as when working with the .htaccess file, in that you’re talking to the server, rather than going through WordPress.
We mentioned that for Apache servers you’ll use .htaccess. For Nginx servers, though, you’ll want to find the nginx.conf file. Rather than walk you through every step in the chain, we’ve gone over the full details in our post on changing the WordPress maximum upload size.
Remember that you’ll need to also alter the php.ini file based on the changes you make to nginx.conf. We’ve covered that in the aforementioned blog post too, so take a look there for the exact steps.
Summary
Despite WordPress being a rock-solid platform, you’ll see a lot of different WordPress errors over time. The “413 Request Entity Too Large” error is related to your server, though — not WordPress. As such, there’s a different approach to solving this error than other platform-specific issues.
If you have SFTP skills, there’s no reason you can’t fix this error quickly. It relates to the upload size specified in your server configuration files, so digging into your .htaccess or nginx.config files will be necessary. It’s a breeze to crack open your text editor and make the changes to these files, and if you’re a Kinsta customer, we’re on hand to support you through the process.
Get all your applications, databases and WordPress sites online and under one roof. Our feature-packed, high-performance cloud platform includes:
- Easy setup and management in the MyKinsta dashboard
- 24/7 expert support
- The best Google Cloud Platform hardware and network, powered by Kubernetes for maximum scalability
- An enterprise-level Cloudflare integration for speed and security
- Global audience reach with up to 35 data centers and 275 PoPs worldwide
Test it yourself with $20 off your first month of Application Hosting or Database Hosting. Explore our plans or talk to sales to find your best fit.
WordPress errors come in all shapes and sizes. In most cases they’re easy to decipher; such is the accessibility of WordPress’ error reporting. Even so, when the “413 Request Entity Too Large” error pops up, it can leave you scratching your head.
Without realizing it, you already have everything you need to understand and diagnose the error within its name. The good news is you won’t need more than a standard Secure File Transfer Protocol (SFTP) client and administrator access to your server.
In this post, we’ll take a look at how to solve the “413 Request Entity Too Large” error. We’ll also give you a quick list of steps to take before you begin to solve the error, to make the process super straightforward.
Check out our video guide to fixing the “413 Request Entity Too Large” Error
What the “413 Request Entity Too Large” Error Is (And Why It Exists)
We noted that there’s a clue in the error name as to what the solution and problem are. Before you go sleuthing yourself, though, we’ll spoil the surprise: it’s in the adjective “large.”
In a nutshell, the “413 Request Entity Too Large” error is a size issue. It happens when a client makes a request that’s too large for the end server to process. Depending on the nature of the error, the server could close the connection altogether to prevent further requests being made.
Let’s break the error down into its parts:
- “413”: This is one of the 4xx error codes, which mean there’s a problem between the server and browser.
- “Request Entity”: The “entity” in this case is the information payload being requested by the client from the server.
- “Too Large”: This is straightforward: the entity is bigger than the server is willing or able to serve.
In fact, this error has changed its name from what it originally was to be more specific and offer more clarity. It’s now known as the “413 Payload Too Large” error, although in practice, you’ll see the older name a lot more.
As for why the error occurs, the simple explanation is that the server is set up to deny explicit uploads that are too large. Think of times when you upload a file where there’s a maximum file size limit:
In most cases, there will be some validation in place to stop the error… if you’re seeing the “413 Request Entity Too Large” error, those validation efforts may not be as watertight as you think.
What You’ll Need to Resolve the “413 Request Entity Too Large” Error
Fixing this error is all about raising the maximum file size for the server in question. Once that’s out of the way, you shouldn’t see the error anymore.
As such, to fix the “413 Request Entity Too Large” error, you’ll need the following:
- Administrator access to your server.
- A suitable SFTP client (we’ve covered many of these in the past).
- The know-how to use SFTP — there’s a good guide to the basics on WordPress.org, and you won’t need more than that.
- A text editor, though there’s no need for anything too complex.
- A clean and current backup in case the worst happens.
As an aside, we mention SFTP throughout this article as opposed to FTP. In short, the former is more secure than the latter (hence the name). That said, while there are other differences you should investigate, the functionality remains the same for the vast majority of uses.
Also, it’s worth noting that the MyKinsta dashboard has plenty of functionality on hand to help you get onto your server. For example, each site displays SFTP connection information that’s easy to understand:
This can help you get into your site without fuss. In some cases, you may be able to import the credentials straight to your chosen SFTP client.
3 “Pre-Steps” You Can Take Before Rectifying the “413 Request Entity Too Large” Error
Before you crack open your toolbox, there are some steps you can take to help resolve the “413 Request Entity Too Large” error. Here are two — and each one may give you a welcome workaround to the error.
1. Try to Upload a Large File to Your Server Through SFTP
Because the issue is related to the file sizes hitting your server, it’s a good idea to circumvent the frontend interface and upload a large file to the server yourself. The best way to do this is through SFTP.
This is because protocols such as SFTP are almost as “close to the bone” as you can get with regards to the way you access your server. Also, you can simultaneously rule out any issues with the frontend that may be causing the error.
To do this, log into your site through SFTP and find the wp-content folder. In here will be the uploads folder.
Next, upload your file to this folder on the server and see what the outcome is. If the upload is successful, we suggest sending an email to the site’s developer, as they may want to investigate the issue further on the frontend.
2. Check for Server Permissions Errors
Of course, permissions errors will stop any server request from running. As such, you should check whether the user has sufficient permissions to upload files of any size. Once this is sorted, the error should disappear.
The first step is to determine whether this is an issue with a single user (in which case they may be restricted for a reason). If the “413 Request Entity Too Large” error is happening for multiple users, you can be more sure of something that needs your input.
We’d suggest two “pre-fixes” here:
- Double-check your WordPress file permissions, just in case there’s an issue.
- Remove and re-create your SFTP user (a general investigation is a great idea).
While they may not solve the error in the first instance, you’ll at least know that your file and user structure is as it should be.
How to Solve the “413 Request Entity Too Large Error” for Your WordPress Website (3 Ways)
Once you’ve gone through the pre-steps, you’re ready to tackle the error head-on.
The following three methods are listed from easiest to toughest, with the understanding that that the path of least resistance is the best one to take.
1. Edit Your WordPress functions.php File
First off, you can work with your functions.php file to help bump up the file upload size for your site. To do this, first log into your site through SFTP using the credentials found within your hosting control panel.
When you’re in, you’ll want to look for the file itself. The functions.php file should be in the root of your server. In many cases, this root is called www or public_html, or it could be the abbreviated name of your site.
Once you’ve found it, you can open it in your text editor of choice. If you don’t see the file, you can create it using your text editor.
Once you have a file open, enter the following:
@ini_set( '_max_size' , '64M' );
@ini_set( 'post_max_size', '64M');
@ini_set( 'max_execution_time', '300' );
In short, this increases the maximum file size of posts and uploads while boosting the time the server will spend trying to process the request. The numbers here could be anything you wish, but they should be large enough to make the error disappear. In practice, 64 MB is enough for all but the most heavy-duty of tasks.
When you’re ready, save your file and upload it to the server again. Then, check whether the “413 Request Entity Too Large” error still exists. If it does, head onto the next method.
2. Modify Your WordPress .htaccess File
Much like your functions.php file, your .htaccess file sits on your server. The difference here is that .htaccess is a configuration file for Apache servers. If you’re a Kinsta customer, you’ll know we run Nginx servers, so you won’t see this file in your setup.
Still, for those with an Apache server, this is the approach you’ll need. Much like with the guidance for functions.php, first log into your server through SFTP, then look in your root folder as before.
The .htaccess file should be within this directory, but if it’s missing, we suggest you get in touch with your host to determine where it is, and whether your server runs on Nginx instead.
Once you’ve found it, open it up again. You’ll see some tags, and the most important here is # END WordPress. You’ll want to paste the following after this line:
php_value upload_max_filesize 64M
php_value post_max_size 64M
php_value max_execution_time 300
php_value max_input_time 300
In short, this does almost the same thing as the code you’d add to the functions.php file, but it’s akin to giving the server direct instructions.
When you’ve finished, save your changes, upload the file, and check your site again. If you’re still having trouble, we’d again suggest contacting your host, as they will need to verify some aspects of your setup that lie beyond the scope of this article.
3. Change Your Nginx Server Configuration
Our final method is specific to Nginx servers — those used at Kinsta. The purpose is the same as when working with the .htaccess file, in that you’re talking to the server, rather than going through WordPress.
We mentioned that for Apache servers you’ll use .htaccess. For Nginx servers, though, you’ll want to find the nginx.conf file. Rather than walk you through every step in the chain, we’ve gone over the full details in our post on changing the WordPress maximum upload size.
Remember that you’ll need to also alter the php.ini file based on the changes you make to nginx.conf. We’ve covered that in the aforementioned blog post too, so take a look there for the exact steps.
Summary
Despite WordPress being a rock-solid platform, you’ll see a lot of different WordPress errors over time. The “413 Request Entity Too Large” error is related to your server, though — not WordPress. As such, there’s a different approach to solving this error than other platform-specific issues.
If you have SFTP skills, there’s no reason you can’t fix this error quickly. It relates to the upload size specified in your server configuration files, so digging into your .htaccess or nginx.config files will be necessary. It’s a breeze to crack open your text editor and make the changes to these files, and if you’re a Kinsta customer, we’re on hand to support you through the process.
Get all your applications, databases and WordPress sites online and under one roof. Our feature-packed, high-performance cloud platform includes:
- Easy setup and management in the MyKinsta dashboard
- 24/7 expert support
- The best Google Cloud Platform hardware and network, powered by Kubernetes for maximum scalability
- An enterprise-level Cloudflare integration for speed and security
- Global audience reach with up to 35 data centers and 275 PoPs worldwide
Test it yourself with $20 off your first month of Application Hosting or Database Hosting. Explore our plans or talk to sales to find your best fit.
When building and maintaining a website, you’re bound to encounter some unexpected HTTP errors here and there. Problems like these are tough to avoid, and some are trickier to resolve than others.

If you’re experiencing a «413 Request Entity Too Large» error, the good news is that this issue is quick and simple to address — you just need to do a bit of server reconfiguration. And no, you don’t need to be a technical expert. Let’s learn how.
![Free Resource: Website Optimization Checklist [Download Now]](https://no-cache.hubspot.com/cta/default/53/00d9cc96-eff7-4cea-8ff3-583374c3dcd5.png)
A 413 HTTP error code occurs when the size of a client’s request exceeds the server’s file size limit. This typically happens when a client attempts to upload a large file to a web server, and the server responds with a 413 error to alert the client.
Web servers place size limits on uploads to prevent users from overwhelming the server and exceeding storage permissions. This limit usually isn’t an issue, and common website files should stay well under it. However, especially large file uploads may occasionally exceed the limit, resulting in a message like this:

While you can reduce the size of your upload to get around the error, it’s also possible to change your file size limit with some server-side modification.
How to Fix a “413 Request Entity Too Large” Error
Your default upload size limit will depend on how your server is set up. In this guide, we’ll show you how to fix a 413 error by increasing your size limit with a WordPress setup, as well as with an Apache or Nginx server configuration.
All methods require some edits to your server files, so we recommend creating a backup before attempting the steps below.
WordPress
Themes and plugins are common causes of the 413 error with the WordPress content management system. Fortunately, there are several ways to increase your WordPress upload size limit enough to let these larger files through. As long as you do not exceed the limits of your hosting plan, you can try any of the following:
Modify PHP.ini
The easiest method to increase your upload limit is by modifying your server’s PHP.ini file. Here, you can change your limit through the cPanel interface without any coding. To do this:
1. In your cPanel menu, select MultiPHP INI Editor under Software.

2. In the window that appears, choose your domain from the dropdown menu.
3. Change the values of the following parameters to your preference:
- max_execution_time (maximum time to upload, in seconds)
- upload_max_filesize (maximum upload size, in megabytes)
- post_max_size (maximum post size, in megabytes)
4. When finished, click Apply.
Modify .htaccess
If your WordPress site is hosted on an Apache server, it’s also possible to increase your server’s limit via .htaccess, a file that contains many directives for the server. See the solution below.
Modify functions.php
You can also try increasing your size limit via the functions.php file of your current WordPress theme.
If you want to make this change permanent, we recommend trying the above approaches first. With this approach, you’ll need to update functions.php whenever you update or change your current theme.
1. In your cPanel menu, select File Manager under Files.

2. Navigate to the folder of your current theme inside your root WordPress directory (public_html by default). Open this theme file.
3. Select functions.php and click the Edit icon.
4. Copy the code below and paste it at the end of the file
@ini_set( ‘upload_max_size’ , ’64M’ );
@ini_set( ‘post_max_size’, ’64M’);
@ini_set( ‘max_execution_time’, ‘300’ );
5. Click Save.
This code sets the maximum allowed size of your WordPress uploads and posts to 64 megabytes. You can change this number to something larger or smaller if you need, as long as you do not exceed your hosting plan’s storage limit.
It also sets the maximum period your uploads can take to 300 seconds. Feel free to change this as well.
Nginx Server
Nginx server settings can be modified inside the file nginx.conf. Open this file and check for the directive client_max_body_size. Then, change the value (in megabytes) to your maximum file size preference.
If you do not see this directive in nginx.conf, you can add it to the end of a server, location, or http block like so:
server {
          ...
          client_max_body_size 64M;
}
This allows for a 64-megabyte upload. Set this number to your preference, save the file, then reload Nginx for the change to take effect.
Apache Server
Change the size limit on an Apache server by updating your .htaccess file like so:
1. In your cPanel menu, select File Manager under Files.
2. In your root WordPress directory (public_html by default), locate .htaccess. Depending on your settings, the .htaccess file may be hidden.
3. Select .htaccess and click the Edit icon.
4. Copy and paste the code below at the bottom of your .htaccess file:
php_value upload_max_filesize 64M
php_value post_max_size 64M
php_value max_execution_time 300
php_value max_input_time 300
5. Click Save and reload Apache.
Doing this sets the maximum allowed size of your WordPress uploads and posts to 64 megabytes and sets the maximum file upload time to 300 seconds. You can change both of these values to your preference.
Still getting a 413?
After trying one or more of the solutions above, you still may encounter a 413 error when uploading large files, even if these files are below your new size limit.
In this case, the issue may stem from your CDN’s servers or some other restriction set by your hosting provider. First, reach out to your hosting support, detailing the problem and the steps you’ve taken so far to resolve it. It may be that you’ve exceeded your plan’s file size limit without realizing. Or, your configurations may have inadvertently caused another error.
If you use a CDN to improve your site’s performance, this may also be the cause of your issue — the CDN servers you’re using may impose file size limits that are too small. Since you probably can’t modify these servers’ files directly, you consult the documentation for your CDN provider or contact product support to resolve the error.
If all else fails, consider uploading alternative files, reducing the size of your current file, or upgrading your storage plan. If you find yourself needing to upload a massive amount of data, more likely than not there’s a workaround.
Fixing a 413 Error
While HTTP errors can be frustrating, many are quickly solvable including a 413. By finding and tackling this issue now, you’ll have one less thing to worry about while building out your website. If your site allows users to upload their own content, changing your upload size limit solves this problem too — just make sure you’re not exceeding the limits set by your hosting plan.
As for the best option, we recommend WordPress users modify their server’s PHP.ini file first if possible, since this can easily be done through your hosting panel. Otherwise, choose the option that matches your server software.
This post was originally published in January 2021 and has been updated for comprehensiveness.


При загрузке файла в свой блог, столкнулся с ошибкой «413 Request Entity Too Large». Быстрое гугление показало, что для исправления, нужно чуть поднастроить веб-сервер..
Что означает ошибка «413 Request Entity Too Large»
Ошибка «413 Request Entity Too Large» переводится как «Размер запроса слишком большой» возникает когда размер запроса от клиента превышает максимальные ограничения установленные для обработки на стороне веб-сервера. Такие ограничение применяют для защиты от атак направленных на увеличение нагрузки на веб-сервер.
Например, в моем случае, я попытался загрузить gif-ку размер которой был около 2 мб. Соответственно мой браузер отправил POST запрос на веб-сервер, примерно такого же размера. В результате я получил ошибку «Request entity too large» от веб-сервера, о том, что мой запрос слишком большой для дальнейшей обработки.
Как исправить ошибку «413 Request Entity Too Large» со стороны клиента
Самый простой способ, это уменьшить размер запроса. Тут многое зависит от того, что именно вы отправляете на сервер.
Если это форма с несколькими файлами, попробуйте загружать файлы по одному.
Если это какие-то документы и есть возможность, попробуйте их заархивировать.
Если это картинка, попробуйте её сохранить в другом формате, например уменьшить разрешение и сохранить в JPG.

У Вас Jpeg
Как исправить ошибку «413 Request Entity Too Large» на стороне Nginx веб-сервера
Разумеется, можно поправить конфигурацию веб-сервера, если у вас есть к ней доступ, чтобы избежать таких ошибок в дальнейшем.
В nginx, за это отвечает опция client_max_body_size: http://nginx.org/en/docs/http/ngx_http_core_module.html#client_max_body_size
Значение по-умолчанию: 1Мб
Данную опцию можно использовать в следующих контекстах: http, server, location. Т.е. можно задать глобальное значение, значение для домена и значение для конкретного адреса url.
Я решил увеличить глобальное значение, т.к. это исправит проблему сразу для нескольких блогов, расположенных в рамках одного сервера.
Для этого добавляем нужное значение (в моем случае это 16 Мб) в главный файл конфигурации
|
$ sudo nano /etc/nginx/nginx.conf ... http { ... client_max_body_size 16M; .... } |
далее, проверяем конфигурацию и перезапускаем nginx
|
$ sudo nginx —t nginx: the configuration file /etc/nginx/nginx.conf syntax is ok nginx: configuration file /etc/nginx/nginx.conf test is successful $ sudo nginx —s reload |
Пример конфигурации в других контекстах
|
server { client_max_body_size 1m; location /users/profile/edit/avatar { client_max_body_size 2m; ... } location /users/profile/edit/images { client_max_body_size 5m; ... } } |
Как исправить ошибку «413 Request Entity Too Large» на стороне Apache веб-сервера
В Apache эта опция называется LimitRequestBody: http://httpd.apache.org/docs/2.4/mod/core.html#LimitRequestBody
По-умолчанию лимит не установлен (равен 0). Размер задается в байтах
Данную опцию можно использовать в следующих контекстах: server config, virtual host, directory, .htaccess. Т.е. можно задать глобальное значение, значение для домена, значение для конкретного url, а так же модифицировать его через .htaccess
Пример конфигурации VirtualHost
|
0 1 2 3 4 5 6 7 8 9 10 11 12 13 14 15 16 17 18 |
<VirtualHost *:80> # Small, safe default (1 MB) <Location /> LimitRequestBody 1048576 </Location> # 2 MB <Location /users/profile/edit/avatar> LimitRequestBody 2097152 </Location> # 5 MB <Location /users/profile/edit/images> LimitRequestBody 5242880 </Location> </VirtualHost> |
Пример изменения конфигурации в .htaccess
|
$ nano .htaccess ... LimitRequestBody 5242880 ... |
Заключение
В современном мире знать и уметь все не возможно. Для решения повседневных проблем самое главное умение — это уметь искать нужную информацию в интернете. Если Вы это читаете, то у Вас все хорошо 🙂

Is your website showing a 413 request entity too large error? We are here to help you.
The 413 error simply means that the browser request was too large for the webserver to process.
Again, the fix for 413 request entity too large error involves modifying the size of the request body that the server accepts.
At Bobcares, we manage web servers for our customers as part of our Server Management Services.
Today, we’ll see how our Expert Engineers fix 413 errors in popular webservers like Apache, Nginx, and IIS.
Common scenarios of 413 request entity too large error
Let’s first have a quick look at the common scenarios that show the 413 error.
In general, most users experience the error while trying to upload files to the server.
For instance, in WordPress, it can happen during a theme or a plugin file upload using the WordPress dashboard. Or when a visitor tries to upload a large file, the error shows up as:

Similarly, the same error can appear while trying to restore a large WordPress backup too.
In a recent Helpdesk request, the customer reported the error as:
The upload page on my website shows the request entity is too large error. A reload will always fix it. Any clue how to prevent that issue?
What exactly causes a 413 error?
Now that we know the various scenarios of the error, we’ll see the reason for the error.
The 413 request entity too large error happens when the browser requests a very large file that the webserver cannot process. In other words, it means that the client’s HTTP request is too large for the server to handle.
For security reasons, every web server limits the size of the client request. This helps to avoid any resource abuse on the server.
For example, when any visitor tries to request a big file, it can even slow down the entire server. In many attacks, overloading the server with huge sized requests is a common method. When the request body is larger than the server allowed limit, it ends up in the 413 error.

How we fix 413 request entity too large error
The fix for 413 request entity too large error is to increase the maximum request size that a web server can process. This again varies depending on the type of web server that the website uses.
Having a decade of experience in managing various servers, let’s see how our Dedicated Engineers fix this error in different web servers.
In IIS web server
To resolve the 413 error in IIS, we increase the value of the “uploadReadAheadSize” parameter. This value determines the number of bytes that IIS will read to run the respective IIS module.
The steps for modifying applicationHost.config on an IIS7 web server are:
- In IIS7, select the website.
- Then go to the “Configuration Editor“, in the drop-down menu, select “system.webServer“
- Select “serverRuntime“.
- Find “uploadReadAheadSize” and increase its value.
- Finally, click Apply.
Solution for 413 request entity too large error in Apache
Similarly, when the website runs on an Apache webserver, we edit the value of LimitRequestBody in the configuration.
Based on the setting, we modify it in either the httpd.conf file or in a local .htaccess file inside the website.
To restrict the Apache requests beyond 50MB, we set the value as:
LimitRequestBody 52428800Then we do a config test, followed by a server reload.
service apache2 reload
Now the new value will be effective and the upload works fine.
Setting a value of 0 will allow any client request. But for security reasons, we never recommend it.
For Nginx webserver
Similarly, one of our customers came with a similar request on his Nginx server.
I have done a silly thing on my WordPress site and I need to reinstall my backup. However, I am getting an error message when I try to restore the site. The server responded with a “413 Request Entity Too Large”, please make sure that the server is not blocking our requests.
Here, we modified the value of the client_body_max_size directive in the Nginx configuration.
We opened the file at /usr/local/nginx/conf/nginx.conf and then modify the value as
# set client body size to 50M #
client_max_body_size 50M;
Then we restarted the Nginx server. This fixed the 413 Request Entity Too Large error.
Cross-checking PHP limits
In some cases, even if the webserver allows the client request size, often PHP limits on the website can throw up errors. Therefore, our Dedicated Engineers always cross verify the server limits for
- upload_max_filesize
- post_max_size
- max_execution_time
And, we modify the values either using .htaccess file or php.ini file depending on the website settings.
[Looking for a fix for a 413 error on your website. We are here to help you.]
Conclusion
To sum up, the 413 Request Entity Too Large error occurs when the client browser request is too large for the webserver to handle. Today, we saw how our Support Engineers modify the value of HTTP request size limit in IIS, Apache, and Nginx.
PREVENT YOUR SERVER FROM CRASHING!
Never again lose customers to poor server speed! Let us help you.
Our server experts will monitor & maintain your server 24/7 so that it remains lightning fast and secure.
GET STARTED
var google_conversion_label = «owonCMyG5nEQ0aD71QM»;