I had the same issue. But to my surprize, ignoring the error and continuing the execution of the rest of the code, send the data as normal. So the device was supported and could communicate as normal. And for some reason, libUSB-1.0 thought it could not support the device.
My code example:
#include <libusb.h>
#include <stdio.h>
#include <unistd.h>
libusb_context* context = NULL;


int main(void)
{
int kernelDriverDetached = 0;  /* Set to 1 if kernel driver detached*/
uint8_t buffer[64];                /* 64 byte transfer buffer */

int numBytes = 0;  /* Actual bytes transferred. */

libusb_device_handle* handle = NULL;
int res = libusb_init(&context); //initialize the library using libusb_init

if (res != 0)
{
  fprintf(stderr, "Error initialising libusb.n");

}


/* Get the first device with the matching Vendor ID and Product ID.If
* intending to allow multiple demo boards to be connected at once,you
* will need to use libusb_get_device_list() instead. Refer to the libusb
* documentation for details. */
handle = libusb_open_device_with_vid_pid(0, 0x1cbe, 0x0003);

if (!handle)
{
    fprintf(stderr, "Unable to open device.n");

}

       /* Check whether a kernel driver is attached to interface #0. If so, we'll
  * need to detach it.*/
 if (libusb_kernel_driver_active(handle, 0))
 {
    res = libusb_detach_kernel_driver(handle, 0);
    if (res == 0)
    {
       kernelDriverDetached = 1;
    }
    else
    {
       fprintf(stderr, "Error detaching kernel driver. %sn", libusb_error_name(res));
    }
}

   /* Claim interface #0. */
res = libusb_claim_interface(handle, 0);
if (res != 0)
{
   fprintf(stderr, "Error claiming interface.n");

}

memset(buffer, 0, 12);
buffer[0] = 0x55;
buffer[1] = 0xAA;
buffer[2] = 0x01;
buffer[3] = 0x00;
buffer[4] = 0x00;
buffer[5] = 0x00;
buffer[6] = 0x00;
buffer[7] = 0x00;
buffer[8] = 0x01;
buffer[9] = 0x00;
buffer[10] = 0x01;
buffer[11] = 0x01;

res = libusb_bulk_transfer(handle, 0x01, buffer, 12, &numBytes, 100);
if (res == 0)
{
   printf("%d bytes transmitted successfully.n", numBytes);
}
else
{
  fprintf(stderr, "Error during send message: %sn",libusb_error_name(res));
}

memset(buffer, 0, 12);

 res = libusb_bulk_transfer(handle, 0x81, buffer, 12, &numBytes, 100);
 if (res == 0)
 {
    printf("%d bytes receibed successfully.n", numBytes);
 }
 else
 {
    fprintf(stderr, "Error during receibe response:%sn",libusb_error_name(res));
 }


/* Release interface #0. */
res = libusb_release_interface(handle, 0);
if (0 != res)
{
   fprintf(stderr, "Error releasing interface.n");
}

/* If we detached a kernel driver from interface #0 earlier, we'll now
* need to attach it again.  */
if (kernelDriverDetached)
{
  libusb_attach_kernel_driver(handle, 0);
}

/* Shutdown libusb. */
libusb_exit(0);
system("pause");
return 0;
}
This page provides troubleshooting instructions for common OpenOCD problems that you may encounter with VisualGDB.
Couldn’t bind to TCL socket
Sometimes OpenOCD fails to start with the following error:
|
Error: couldn‘t bind tcl to socket on port 6666: |
This happens when OpenOCD is not able to listen for incoming scripting connections on its default port. You can solve this by manually adding the following textat the beginning of the OpenOCD command line:
If you still get errors, try replacing 10240 with another number between 1024 and 65535.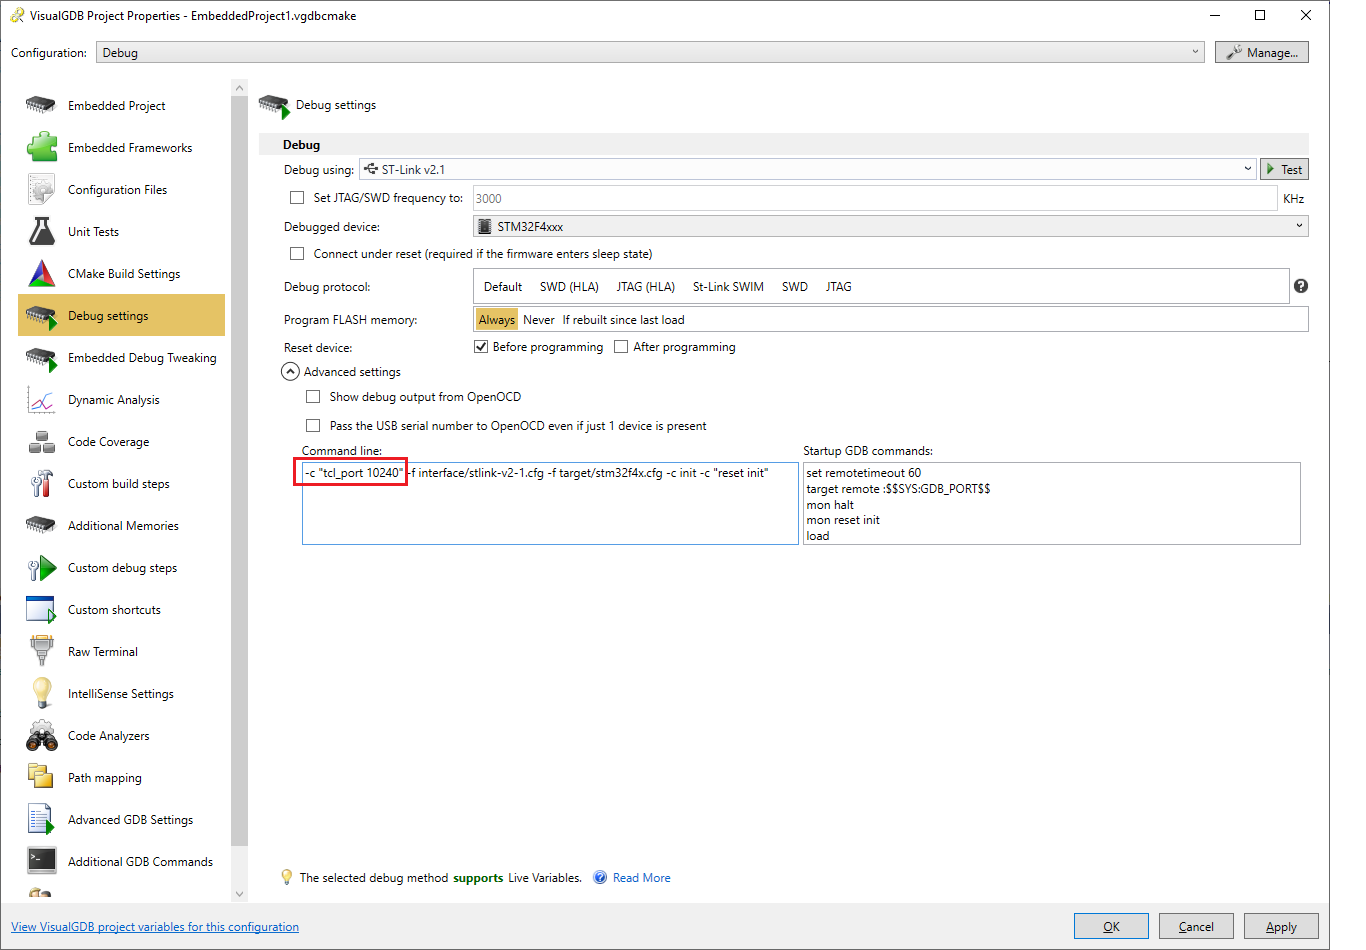
Open Failed
Sometimes OpenOCD would fail to start the debug session displaying the “Error: Open Failed” message. It typically happens when the debug adapter (e.g. ST-Link) returns an error code and usually indicates problem with wiring, power, or JTAG pins. You can obtain more information about whereabouts of the problem by enabling the “Show debug output from OpenOCD” checkbox: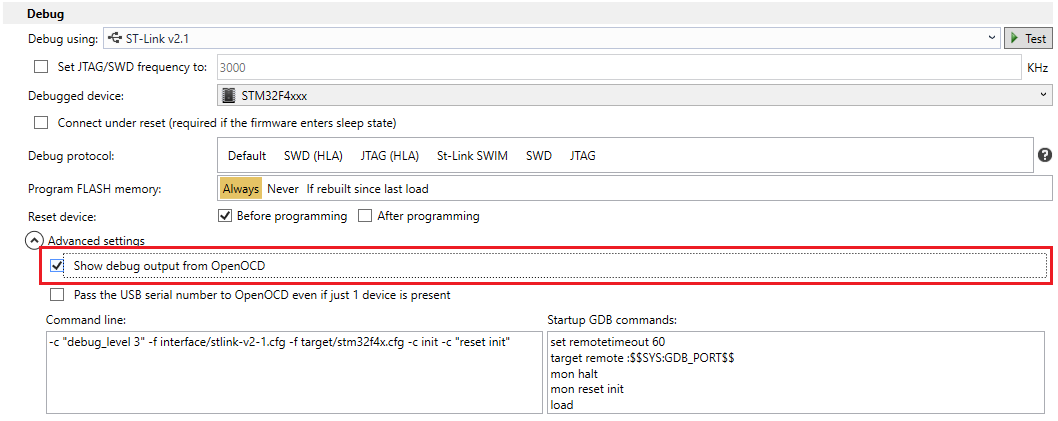 If nothing helps, try erasing the target’s FLASH memory using a different tool (e.g. ST-Link Tool) or using a different debug probe.
No Device Found / LIBUSB_ERROR_NOT_SUPPORTED
Another reason for the “Open Failed” message could be a missing USB driver. This may also result in the LIBUSB_ERROR_NOT_SUPPORTED message. If this happens, make sure you are using the USB Devices view in Debug Settings so that VisualGDB can automatically check/install the USB drivers: Warning: Security settings on some computers may prevent VisualGDB from installing the WinUSB driver for your JTAG probe automatically. If this happens, try installing them manually as shown in the OpenOCD documentation or using the open-source Zadig tool.
JTAG Scan Chain Interrogation Failed
Another common type of OpenOCD error is the one shown below:
|
Error: JTAG scan chain interrogation failed: all ones Error: Check JTAG interface, timings, target power, etc. Error: Trying to use configured scan chain anyway... |
It means that OpenOCD has managed to connect to the JTAG probe (i.e. the USB driver is working correctly), however the debugged device did not respond. The typical causes of this problem are:
- Incorrect wiring (e.g. some JTAG pins are not connected)
- Power issues (the device is not running or is constantly reset)
- Device configuration issues (the device has disabled the JTAG pins or entered deep sleep mode)
We have been using the newly released Trezor Model T Hardware Wallet for a few days now and wanted to provide a quick update on an error we came across during initial setup.
After unboxing the new Model T (excellent new packaging with the magnetic mount), we took some time to remove all of the Security seal adhesive. The tamper security seal has been moved to the Trezor Model T body and goes over the USB C connection on the wallet. (The original Trezor One had two tamper seals on the packaging but none on the wallet). The adhesive does take some work to get off but rubs off with a little work. Some have reported using different chemicals to remove the adhesive but we don’t believe that is really needed and some chemicals could react with the plastic body so use caution with chemicals when removing the adhesive.
After the Model T was all cleanup up, we connected to a Windows 10 PC with the provided USB-C cable (approx 12 inch USB-C cable). Following the 3 simple steps to begin setup we went to trezor.io/start and had the option of setting up a Trezor One or Trezor Model T.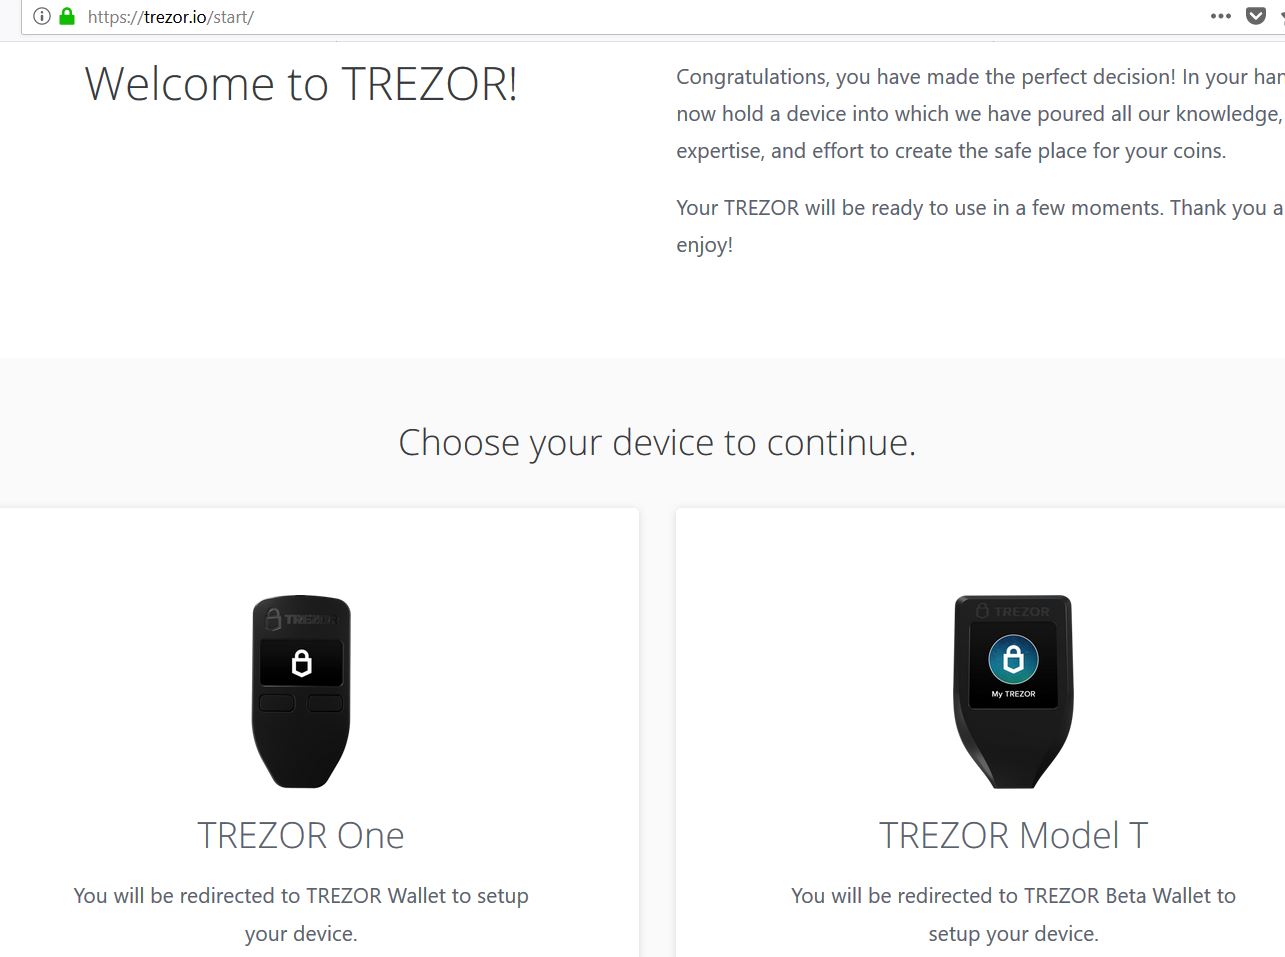
Selected the Trezor Model T and the next step was to install the Trezor Bridge. The Bridge software is used to communicate with the Trezor Wallet and is available for Windows, Linux and Mac. The Bridge is a small install file and only took a few seconds to download and install.
After the bridge was loaded we were able to install the firmware. All new devices come without a firmware and this is loaded on initial setup (this is very easy/automated and no technical skills are needed to install the firmware) (current firmware version of of 03/12/18 is 2.0.1)
The next step is where we ran into some issues and received an error in the portal of “Action was interrupted – Error Details: LIBUSB_ERROR_NOT_SUPPORTED”.

Started with typical troubleshooting steps of disconnecting and reconnecting the wallet, closed all browser windows and reopened and rebooted PC to make sure no issues with initial install, browser or connection. All these steps resulted in the same error of LIBUSB_ERROR_NOT_SUPPORTED. Next, we uninstalled and reinstalled the new bridge software, only to receive the same error. Spent a little time reviewing error logs and was able to see the step it was failing on but not why.
At, this point, it was time to hit up the forums and see if anyone else had come across the same error when setting up the new Trezor Model T. At this point there was only around 1000 or so shipped worldwide so the install base was pretty small at that point. The forums did point to an email from Trezor support with the same error reported and a note that a box (around 100 units) did make it out of manufacturing with an older version of the bootloader installed and this error is related to the older bootloader and some incompatible issue with some USB ports. The impacted bootloader was version 2.0.0 and the correct version (without the issue) was 2.0.1. This issue could impact batch numbers labeled with 08-2018 and 09-2018 (*note, just because you have this batch number it does not mean you will have the older 2.0.0 bootloader as only around 100 units from that batch slipped through shipping). To confirm your version of the bootloader and firmware, swipe across the Trezor Model T screen right as you connect.

The test confirmed the Model T was already on the most recent version of the bootloader (2.0.1) but there were a few comments in the forums that reinstalling the bootloader resolved the error even when they already had the latest.
To reinstall the bootloader you will need a microSD card. Of course in the middle of the night, when you really need one, they will be impossible to find, regardless of how many you have seen in a drawer the week before. After a quick trip out to buy a $9.88 microSD card with SD card adapter we were ready to go with updating the bootloader. The process to update the bootloader is relatively simple and only takes a few minutes.
- Download the latest bootloader file (2.0.1)
- Download and install the free software “Etcher” (this will be used to prepare your microSD card)
- Insert the microSD card (you may need to use a card reader or SD card adapter depending on what card slots you have on your PC).
- Open Etcher and click “Select Image”

- Locate the bootloader-2.0.1.bin file you downloaded and click open.
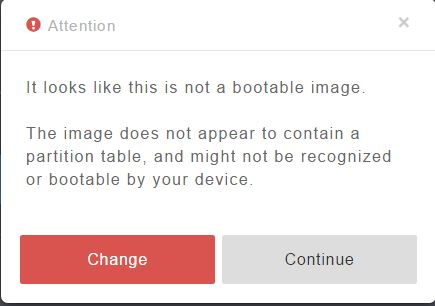
- You may get a message that it is not a bootable image, just click “Continue”

- Next you will need to click “Select Drive” and select your microSD card. (*At this point we had an issue with our brand new $9.88 microSD card where it always said it was write protected no matter the position of the write-protected tab on the card…a little scotch tape took care of this write protection…most would not have that problem but it was just that kind of day and of course we picked up a bad microSD card).
- Click finish and this will complete prep of your microSD card.
- Disconnect your Trezor Model T and insert the microSD card. It will only insert in one direction and will fully insert in the Model T.
- Reconnect the Model T and the bootloader will begin updating, this takes around 10 seconds.
- After the install is completed, disconnect the Model T and eject the microSD card. (the microSD card is spring loaded in the port so push in lightly and it should pop out).
- Now you are ready to reconnect your Model T with a fresh install of the bootloader!!!

We connected our Model T, went to the portal and …same error! A reflash of the bootloader again resulted in the same error.
Taking another look at the logs we started to expect something with the bridge or something conflicting with USB connections. Reviewing what was installed we discovered two versions of the bridge software was still installed. Both the new bridge and the older version 1.x bridge software that was used for our Trezor One Wallets. We uninstalled both version of the bridge and started over with connecting and installing the latest bridge. IT WORKED! The whole issue turned out to be an issue with having two versions of the bridge software. Surprised that installing the new bridge software did not uninstall or overwrite the old version.
The end fix ended up only taking a minute and was not difficult after getting on the right path. We look at the experience as a positive one (silver lining) though as it presented a learning opportunity to learn how to flash the bootloader using the new microSD slot that has been included with the Model T. Hopefully this post can help you out if you just received your Model T and encounter an issue with your old bridge software causing a conflict.
Post any questions you may have on the new Model T in the comments and any experiences you may have with the new wallet.