
For Laravel 8
go to your appExceptionsHandler.php and override invalidJson method like this:
// Add this line at the top of the class
use IlluminateValidationValidationException;


/**
 * Convert a validation exception into a JSON response.
 *
 * @param  IlluminateHttpRequest  $request
 * @param  IlluminateValidationValidationException  $exception
 * @return IlluminateHttpJsonResponse
 */
protected function invalidJson($request, ValidationException $exception)
{
    // You can return json response with your custom form
    return response()->json([
        'success' => false,
        'data' => [
            'code' => $exception->status,
            'message' => $exception->getMessage(),
            'errors' => $exception->errors()
        ]
    ], $exception->status);
}
Response Sample:
{
  "success": false,
  "data": {
    "code": 422,
    "message": "The given data was invalid.",
    "errors": {
      "password": [
        "The password field is required."
      ]
    }
  }
}
The original method was:
/**
 * Convert a validation exception into a JSON response.
 *
 * @param  IlluminateHttpRequest  $request
 * @param  IlluminateValidationValidationException  $exception
 * @return IlluminateHttpJsonResponse
 */
protected function invalidJson($request, ValidationException $exception)
{
    return response()->json([
        'message' => $exception->getMessage(),
        'errors' => $exception->errors(),
    ], $exception->status);
}
Response Sample:
{
  "message": "The given data was invalid.",
  "errors": {
    "password": [
      "The password field is required."
    ]
  }
}
Note that unauthenticated response is in separate method, so you can override it as well
/**
 * Convert an authentication exception into a response.
 *
 * @param  IlluminateHttpRequest  $request
 * @param  IlluminateAuthAuthenticationException  $exception
 * @return SymfonyComponentHttpFoundationResponse
 */
protected function unauthenticated($request, AuthenticationException $exception)
{
    return $request->expectsJson()
        // Here you can change the form of the json response
        ? response()->json(['message' => $exception->getMessage()], 401) // <-
        : redirect()->guest($exception->redirectTo() ?? route('login'));
}
- Introduction
- Error Objects
- Error Lists
- Responses
- HTTP Status
- JSON:API Exceptions
- Helper Methods
- Validation Errors
- Source Pointers
- Error Rendering
- JSON Responses
- Middleware Responses
- Always Rendering JSON:API Errors
- Custom Rendering Logic
- Converting Exceptions
- Error Reporting
# Introduction
The JSON:API specification defines error objects (opens new window)
that are used to provide information to a client about problems encountered
while performing an operation.
Errors are returned to the client in the top-level errors member of the
JSON document.
Laravel JSON:API makes it easy to return errors to the client — either
as responses, or by throwing exceptions. In addition, the exception
renderer you added to your exception handler during
installation takes care of
converting standard Laravel exceptions to JSON:API error responses
if the client has sent an Accept: application/vnd.api+json header.
# Error Objects
Use our LaravelJsonApiCoreDocumentError object to create a JSON:API
error object. The easiest way to construct an error object is using the
static fromArray method. For example:
The fromArray method accepts all the error object members
defined in the specification. (opens new window)
Alternatively, if you want to use setters, use the static make method
to fluently construct your error object:
The available setters are:
setAboutLinksetCodesetDetailsetIdsetLinkssetMetasetStatussetSourcesetSourceParametersetSourcePointersetTitle
# Error Lists
If you need to return multiple errors at once, use our
LaravelJsonApiCoreDocumentErrorList class. This accepts any number
of error objects to its constructor. For example:
Use the push method to add errors after constructing the error list:
# Responses
Both the Error and ErrorList classes implement Laravel’s Responsable
interface. This means you can return them directly from controller actions
and they will be converted to a JSON:API error response.
If you need to customise the error response, then you need to use our
LaravelJsonApiCoreResponsesErrorResponse class. Either create
a new one, passing in the Error or ErrorList object:
Or alternatively, use the prepareResponse method on either the Error
or ErrorList object:
The ErrorResponse class has all the helper methods
required to customise both the headers and the JSON:API document that
is returned in the response.
For example, if we were adding a header and meta to our response:
# HTTP Status
The JSON:API specification says:
When a server encounters multiple problems for a single request,
the most generally applicable HTTP error code SHOULD be used in the response.
For instance,400 Bad Requestmight be appropriate for multiple 4xx errors
or500 Internal Server Errormight be appropriate for multiple 5xx errors.
Our ErrorResponse class takes care of calculating the HTTP status for you.
If there is only one error, or all the errors have the same status, then
the response status will match this status.
If you have multiple errors with different statuses, the response status
will be 400 Bad Request if the error objects only have 4xx status codes.
If there are any 5xx status codes, the response status will be
500 Internal Server Error.
If the response has no error objects, or none of the error objects have a
status, then the response will have a 500 Internal Server Error status.
If you want the response to have a specific HTTP status, use the
withStatus method. For example:
# JSON:API Exceptions
Our LaravelJsonApiCoreExceptionsJsonApiException allows you to terminate
processing of a request by throwing an exception with JSON:API errors
attached.
The exception expects its first argument to be either an Error or an
ErrorList object. For example:
The JsonApiException class has all the helper methods
required to customise both the headers and the JSON:API document that
is returned in the response. Use the static make method if you need to
call any of these methods. For example:
There is also a handy static error method. This allows you to fluently
construct an exception for a single error, providing either an Error
object or an array. For example:
# Helper Methods
The JsonApiException class has a number of helper methods:
- is4xx
- is5xx
- getErrors
# is4xx
Returns true if the HTTP status code is a client error, i.e. in the 400-499
range.
# is5xx
Returns true if the HTTP status code is a server error, i.e. in the 500-599
range.
# getErrors
Use the getErrors() method to retrieve the JSON:API error objects from the
exception. For example, if we wanted to log the errors:
# Validation Errors
Our implementation of resource requests and
query parameter requests already takes
care of converting Laravel validation error messages to JSON:API errors.
If however you have a scenario where you want to convert a failed validator
to JSON:API errors manually, we provide the ability to do this.
You will need to resolve an instance of LaravelJsonApiValidationFactory
out of the service container. For example, you could use the app helper,
or use dependency injection by type-hinting it in a constructor of a service.
Once you have the factory instance, use the createErrors method,
providing it with the validator instance. For example, in a controller
action:
The object this returns is Responsable — so you can return it directly
from a controller action. If you want to convert it to an error response,
use our prepareResponse pattern as follows:
# Source Pointers
By default this process will convert validation error keys to JSON source
pointers. For example, if you have a failed message for the foo.bar
value, the resulting error object will have a source pointer of
/foo/bar.
If you need to prefix the pointer value, use the withSourcePrefix method.
The following example would convert foo.bar to /data/attributes/foo/bar:
If you need to fully customise how the validation key should be converted,
provide a Closure to the withPointers method:
# Error Rendering
As described in the installation instructions,
the following should have been added to the register method on your
application’s exception handler:
The Laravel exception handler already takes care of converting exceptions to
either application/json or text/html responses. Our exception handler
effectively adds JSON:API error responses as a third media type. If the
client has sent a request with an Accept header of application/vnd.api+json,
then they will receive the exception response as a JSON:API error response —
even if the endpoint they are hitting is not one of your JSON:API server
endpoints.
WARNING
There are some scenarios where the Laravel exception handler does not call
any registered renderables. For example, if an exception implements Laravel’s
Responsable interface, our exception parser will not be invoked as the handler
uses the Responsable::toResponse() method on the exception to generate a
response.
# JSON Responses
If a client encounters an exception when using an Accept header of
application/json, they will still receive Laravel’s default JSON exception
response, rather than a JSON:API response.
If you want our exception parser to render JSON exception responses instead
of the default Laravel response, use the acceptsJson() method when registering
our exception parser:
# Middleware Responses
Sometimes you may want exceptions to be converted to JSON:API errors if the
current route has a particular middleware applied to it. The most common example
of this would be if you want JSON:API errors to always be rendered if the
current route has the api middleware.
In this scenario, use the acceptsMiddleware() method when registering our
exception parser. For example:
TIP
You can provide multiple middleware names to the acceptsMiddleware() method.
When you do this, it will match a route that contains any of the provided
middleware.
# Always Rendering JSON:API Errors
If you want our exception parser to always convert exceptions to JSON:API
errors, use the acceptsAll() helper method:
# Custom Rendering Logic
If you want your own logic for when a JSON:API exception response should be
rendered, pass a closure to the accept() method.
For example, let’s say we wanted our API to always return JSON:API exception
responses, regardless of what Accept header the client sent. We would use
the request is() method to check if the path is our API:
TIP
If you return false from the callback, the normal exception rendering logic
will run — meaning a client that has sent an Accept header with the JSON:API
media type will still receive a JSON:API response. This is semantically correct,
as the Accept header value should be respected.
# Converting Exceptions
Our exception parser is built so that you can easily add support for
custom exceptions to the JSON:API rendering process. The implementation works
using a pipeline, meaning you can add your own handlers for converting
exceptions to JSON:API errors.
For example, imagine our application had a PaymentFailed exception, that
we wanted to convert to JSON:API errors if thrown to the exception handler.
We would write the following class:
We can then add it to the JSON:API exception parser using either the
prepend or append method:
# Error Reporting
As described in the installation instructions,
the following should have been added to the $dontReport property on your
application’s exception handler:
This prevents our JsonApiException from being reported in your application’s
error log. This is a sensible starting position, as the JsonApiException
class is effectively a HTTP exception that needs to be rendered to the client.
However, this does mean that any JsonApiException that has a 5xx status
code (server-side error) will not be reported in your error log. Therefore,
an alternative is to use the helper methods on the JsonApiException class
to determine whether or not the exception should be reported.
To do this, we will use the reportable() method to register a callback
for the JSON:API exception class. (At the same time, we remove the exception
class from the $dontReport property.) For example, the following will stop
the propagation of JSON:API exceptions to the default logging stack if the
exception does not have a 5xx status:
In the following example, we log 4xx statuses as debug information, while
letting all other JSON:API exceptions propagate to the default logging stack:
Tutorial last revisioned on August 10, 2022 with Laravel 9
API-based projects are more and more popular, and they are pretty easy to create in Laravel. But one topic is less talked about — it’s error handling for various exceptions. API consumers often complain that they get «Server error» but no valuable messages. So, how to handle API errors gracefully? How to return them in «readable» form?
Main Goal: Status Code + Readable Message
For APIs, correct errors are even more important than for web-only browser projects. As people, we can understand the error from browser message and then decide what to do, but for APIs — they are usually consumed by other software and not by people, so returned result should be «readable by machines». And that means HTTP status codes.
Every request to the API returns some status code, for successful requests it’s usually 200, or 2xx with XX as other number.
If you return an error response, it should not contain 2xx code, here are most popular ones for errors:
| Status Code | Meaning |
| 404 | Not Found (page or other resource doesn’t exist) |
| 401 | Not authorized (not logged in) |
| 403 | Logged in but access to requested area is forbidden |
| 400 | Bad request (something wrong with URL or parameters) |
| 422 | Unprocessable Entity (validation failed) |
| 500 | General server error |
Notice that if we don’t specify the status code for return, Laravel will do it automatically for us, and that may be incorrect. So it is advisable to specify codes whenever possible.
In addition to that, we need to take care of human-readable messages. So typical good response should contain HTTP error code and JSON result with something like this:
{
    "error": "Resource not found"
}
Ideally, it should contain even more details, to help API consumer to deal with the error. Here’s an example of how Facebook API returns error:
{
  "error": {
    "message": "Error validating access token: Session has expired on Wednesday, 14-Feb-18 18:00:00 PST. The current time is Thursday, 15-Feb-18 13:46:35 PST.",
    "type": "OAuthException",
    "code": 190,
    "error_subcode": 463,
    "fbtrace_id": "H2il2t5bn4e"
  }
}
Usually, «error» contents is what is shown back to the browser or mobile app. So that’s what will be read by humans, therefore we need to take care of that to be clear, and with as many details as needed.
Now, let’s get to real tips how to make API errors better.
Tip 1. Switch APP_DEBUG=false Even Locally
There’s one important setting in .env file of Laravel — it’s APP_DEBUG which can be false or true.
If you turn it on as true, then all your errors will be shown with all the details, including names of the classes, DB tables etc.

It is a huge security issue, so in production environment it’s strictly advised to set this to false.
But I would advise to turn it off for API projects even locally, here’s why.
By turning off actual errors, you will be forced to think like API consumer who would receive just «Server error» and no more information. In other words, you will be forced to think how to handle errors and provide useful messages from the API.
Tip 2. Unhandled Routes — Fallback Method
First situation — what if someone calls API route that doesn’t exist, it can be really possible if someone even made a typo in URL. By default, you get this response from API:
Request URL: http://q1.test/api/v1/offices
Request Method: GET
Status Code: 404 Not Found
{
    "message": ""
}
And it is OK-ish message, at least 404 code is passed correctly. But you can do a better job and explain the error with some message.
To do that, you can specify Route::fallback() method at the end of routes/api.php, handling all the routes that weren’t matched.
Route::fallback(function(){
    return response()->json([
        'message' => 'Page Not Found. If error persists, contact info@website.com'], 404);
});
The result will be the same 404 response, but now with error message that give some more information about what to do with this error.
Tip 3. Override 404 ModelNotFoundException
One of the most often exceptions is that some model object is not found, usually thrown by Model::findOrFail($id). If we leave it at that, here’s the typical message your API will show:
{
    "message": "No query results for model [AppOffice] 2",
    "exception": "SymfonyComponentHttpKernelExceptionNotFoundHttpException",
    ...
}
It is correct, but not a very pretty message to show to the end user, right? Therefore my advice is to override the handling for that particular exception.
We can do that in app/Exceptions/Handler.php (remember that file, we will come back to it multiple times later), in render() method:
// Don't forget this in the beginning of file
use IlluminateDatabaseEloquentModelNotFoundException;

// ...

public function render($request, Exception $exception)
{
    if ($exception instanceof ModelNotFoundException) {
        return response()->json([
            'error' => 'Entry for '.str_replace('App', '', $exception->getModel()).' not found'], 404);
    }

    return parent::render($request, $exception);
}
We can catch any number of exceptions in this method. In this case, we’re returning the same 404 code but with a more readable message like this:
{
    "error": "Entry for Office not found"
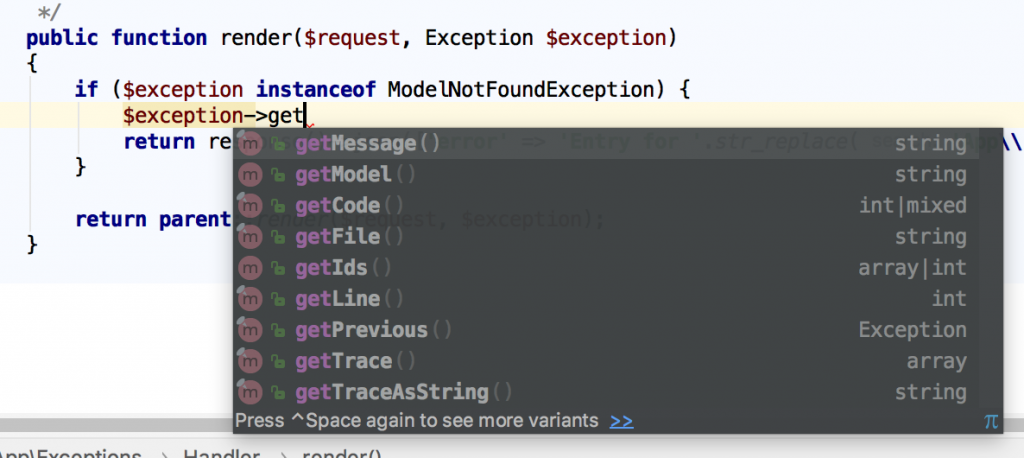
}Notice: have you noticed an interesting method $exception->getModel()? There’s a lot of very useful information we can get from the $exception object, here’s a screenshot from PhpStorm auto-complete:
Tip 4. Catch As Much As Possible in Validation
In typical projects, developers don’t overthink validation rules, stick mostly with simple ones like «required», «date», «email» etc. But for APIs it’s actually the most typical cause of errors — that consumer posts invalid data, and then stuff breaks.
If we don’t put extra effort in catching bad data, then API will pass the back-end validation and throw just simple «Server error» without any details (which actually would mean DB query error).
Let’s look at this example — we have a store() method in Controller:
public function store(StoreOfficesRequest $request)
{
    $office = Office::create($request->all());

    return (new OfficeResource($office))
        ->response()
        ->setStatusCode(201);
}
Our FormRequest file app/Http/Requests/StoreOfficesRequest.php contains two rules:
public function rules()
{
    return [
        'city_id' => 'required|integer|exists:cities,id',
        'address' => 'required'
    ];
}
If we miss both of those parameters and pass empty values there, API will return a pretty readable error with 422 status code (this code is produced by default by Laravel validation failure):
{
    "message": "The given data was invalid.",
    "errors": {
        "city_id": ["The city id must be an integer.", "The city id field is required."],
        "address": ["The address field is required."]
    }
}
As you can see, it lists all fields errors, also mentioning all errors for each field, not just the first that was caught.
Now, if we don’t specify those validation rules and allow validation to pass, here’s the API return:
{
    "message": "Server Error"
}
That’s it. Server error. No other useful information about what went wrong, what field is missing or incorrect. So API consumer will get lost and won’t know what to do.
So I will repeat my point here — please, try to catch as many possible situations as possible within validation rules. Check for field existence, its type, min-max values, duplication etc.
Tip 5. Generally Avoid Empty 500 Server Error with Try-Catch
Continuing on the example above, just empty errors are the worst thing when using API. But harsh reality is that anything can go wrong, especially in big projects, so we can’t fix or predict random bugs.
On the other hand, we can catch them! With try-catch PHP block, obviously.
Imagine this Controller code:
public function store(StoreOfficesRequest $request)
{
    $admin = User::find($request->email);
    $office = Office::create($request->all() + ['admin_id' => $admin->id]);
    (new UserService())->assignAdminToOffice($office);

    return (new OfficeResource($office))
        ->response()
        ->setStatusCode(201);
}
It’s a fictional example, but pretty realistic. Searching for a user with email, then creating a record, then doing something with that record. And on any step, something wrong may happen. Email may be empty, admin may be not found (or wrong admin found), service method may throw any other error or exception etc.
There are many way to handle it and to use try-catch, but one of the most popular is to just have one big try-catch, with catching various exceptions:
try {
    $admin = User::find($request->email);
    $office = Office::create($request->all() + ['admin_id' => $admin->id]);
    (new UserService())->assignAdminToOffice($office);
} catch (ModelNotFoundException $ex) { // User not found
    abort(422, 'Invalid email: administrator not found');
} catch (Exception $ex) { // Anything that went wrong
    abort(500, 'Could not create office or assign it to administrator');
}
As you can see, we can call abort() at any time, and add an error message we want. If we do that in every controller (or majority of them), then our API will return same 500 as «Server error», but with much more actionable error messages.
Tip 6. Handle 3rd Party API Errors by Catching Their Exceptions
These days, web-project use a lot of external APIs, and they may also fail. If their API is good, then they will provide a proper exception and error mechanism (ironically, that’s kinda the point of this whole article), so let’s use it in our applications.
As an example, let’s try to make a Guzzle curl request to some URL and catch the exception.
Code is simple:
$client = new GuzzleHttpClient();
$response = $client->request('GET', 'https://api.github.com/repos/guzzle/guzzle123456');
// ... Do something with that response
As you may have noticed, the Github URL is invalid and this repository doesn’t exist. And if we leave the code as it is, our API will throw.. guess what.. Yup, «500 Server error» with no other details. But we can catch the exception and provide more details to the consumer:
// at the top
use GuzzleHttpExceptionRequestException;

// ...

try {
    $client = new GuzzleHttpClient();
    $response = $client->request('GET', 'https://api.github.com/repos/guzzle/guzzle123456');
} catch (RequestException $ex) {
    abort(404, 'Github Repository not found');
}
Tip 6.1. Create Your Own Exceptions
We can even go one step further, and create our own exception, related specifically to some 3rd party API errors.
php artisan make:exception GithubAPIExceptionThen, our newly generated file app/Exceptions/GithubAPIException.php will look like this:
namespace AppExceptions;

use Exception;

class GithubAPIException extends Exception
{

    public function render()
    {
        // ...
    }

}
We can even leave it empty, but still throw it as exception. Even the exception name may help API user to avoid the errors in the future. So we do this:
try {
    $client = new GuzzleHttpClient();
    $response = $client->request('GET', 'https://api.github.com/repos/guzzle/guzzle123456');
} catch (RequestException $ex) {
    throw new GithubAPIException('Github API failed in Offices Controller');
}
Not only that — we can move that error handling into app/Exceptions/Handler.php file (remember above?), like this:
public function render($request, Exception $exception)
{
    if ($exception instanceof ModelNotFoundException) {
        return response()->json(['error' => 'Entry for '.str_replace('App', '', $exception->getModel()).' not found'], 404);
    } else if ($exception instanceof GithubAPIException) {
        return response()->json(['error' => $exception->getMessage()], 500);
    } else if ($exception instanceof RequestException) {
        return response()->json(['error' => 'External API call failed.'], 500);
    }

    return parent::render($request, $exception);
}
Final Notes
So, here were my tips to handle API errors, but they are not strict rules. People work with errors in quite different ways, so you may find other suggestions or opinions, feel free to comment below and let’s discuss.
Finally, I want to encourage you to do two things, in addition to error handling:
- Provide detailed API documentation for your users, use packages like API Generator for it;
- While returning API errors, handle them in the background with some 3rd party service like Bugsnag / Sentry / Rollbar. They are not free, but they save massive amount of time while debugging. Our team uses Bugsnag, here’s a video example.
Version


Error Handling
- Introduction
- Configuration
-
The Exception Handler
- Reporting Exceptions
- Exception Log Levels
- Ignoring Exceptions By Type
- Rendering Exceptions
- Reportable & Renderable Exceptions
-
HTTP Exceptions
- Custom HTTP Error Pages
Introduction
When you start a new Laravel project, error and exception handling is already configured for you. The AppExceptionsHandler class is where all exceptions thrown by your application are logged and then rendered to the user. We’ll dive deeper into this class throughout this documentation.
Configuration
The debug option in your config/app.php configuration file determines how much information about an error is actually displayed to the user. By default, this option is set to respect the value of the APP_DEBUG environment variable, which is stored in your .env file.
During local development, you should set the APP_DEBUG environment variable to true. In your production environment, this value should always be false. If the value is set to true in production, you risk exposing sensitive configuration values to your application’s end users.
The Exception Handler
Reporting Exceptions
All exceptions are handled by the AppExceptionsHandler class. This class contains a register method where you may register custom exception reporting and rendering callbacks. We’ll examine each of these concepts in detail. Exception reporting is used to log exceptions or send them to an external service like Flare, Bugsnag or Sentry. By default, exceptions will be logged based on your logging configuration. However, you are free to log exceptions however you wish.
For example, if you need to report different types of exceptions in different ways, you may use the reportable method to register a closure that should be executed when an exception of a given type needs to be reported. Laravel will deduce what type of exception the closure reports by examining the type-hint of the closure:
use AppExceptionsInvalidOrderException;

/**
 * Register the exception handling callbacks for the application.
 *
 * @return void
 */
public function register()
{
    $this->reportable(function (InvalidOrderException $e) {
        //
    });
}
When you register a custom exception reporting callback using the reportable method, Laravel will still log the exception using the default logging configuration for the application. If you wish to stop the propagation of the exception to the default logging stack, you may use the stop method when defining your reporting callback or return false from the callback:
$this->reportable(function (InvalidOrderException $e) {
    //
})->stop();

$this->reportable(function (InvalidOrderException $e) {
    return false;
});
Note
To customize the exception reporting for a given exception, you may also utilize reportable exceptions.
Global Log Context
If available, Laravel automatically adds the current user’s ID to every exception’s log message as contextual data. You may define your own global contextual data by overriding the context method of your application’s AppExceptionsHandler class. This information will be included in every exception’s log message written by your application:
/**
 * Get the default context variables for logging.
 *
 * @return array
 */
protected function context()
{
    return array_merge(parent::context(), [
        'foo' => 'bar',
    ]);
}
Exception Log Context
While adding context to every log message can be useful, sometimes a particular exception may have unique context that you would like to include in your logs. By defining a context method on one of your application’s custom exceptions, you may specify any data relevant to that exception that should be added to the exception’s log entry:
<?php

namespace AppExceptions;

use Exception;

class InvalidOrderException extends Exception
{
    // ...

    /**
     * Get the exception's context information.
     *
     * @return array
     */
    public function context()
    {
        return ['order_id' => $this->orderId];
    }
}
The report Helper
Sometimes you may need to report an exception but continue handling the current request. The report helper function allows you to quickly report an exception via the exception handler without rendering an error page to the user:
public function isValid($value)
{
    try {
        // Validate the value...
    } catch (Throwable $e) {
        report($e);

        return false;
    }
}
Exception Log Levels
When messages are written to your application’s logs, the messages are written at a specified log level, which indicates the severity or importance of the message being logged.
As noted above, even when you register a custom exception reporting callback using the reportable method, Laravel will still log the exception using the default logging configuration for the application; however, since the log level can sometimes influence the channels on which a message is logged, you may wish to configure the log level that certain exceptions are logged at.
To accomplish this, you may define an array of exception types and their associated log levels within the $levels property of your application’s exception handler:
use PDOException;
use PsrLogLogLevel;

/**
 * A list of exception types with their corresponding custom log levels.
 *
 * @var array<class-string<Throwable>, PsrLogLogLevel::*>
 */
protected $levels = [
    PDOException::class => LogLevel::CRITICAL,
];
Ignoring Exceptions By Type
When building your application, there will be some types of exceptions you simply want to ignore and never report. Your application’s exception handler contains a $dontReport property which is initialized to an empty array. Any classes that you add to this property will never be reported; however, they may still have custom rendering logic:
use AppExceptionsInvalidOrderException;

/**
 * A list of the exception types that are not reported.
 *
 * @var array<int, class-string<Throwable>>
 */
protected $dontReport = [
    InvalidOrderException::class,
];
Note
Behind the scenes, Laravel already ignores some types of errors for you, such as exceptions resulting from 404 HTTP «not found» errors or 419 HTTP responses generated by invalid CSRF tokens.
Rendering Exceptions
By default, the Laravel exception handler will convert exceptions into an HTTP response for you. However, you are free to register a custom rendering closure for exceptions of a given type. You may accomplish this via the renderable method of your exception handler.
The closure passed to the renderable method should return an instance of IlluminateHttpResponse, which may be generated via the response helper. Laravel will deduce what type of exception the closure renders by examining the type-hint of the closure:
use AppExceptionsInvalidOrderException;

/**
 * Register the exception handling callbacks for the application.
 *
 * @return void
 */
public function register()
{
    $this->renderable(function (InvalidOrderException $e, $request) {
        return response()->view('errors.invalid-order', [], 500);
    });
}
You may also use the renderable method to override the rendering behavior for built-in Laravel or Symfony exceptions such as NotFoundHttpException. If the closure given to the renderable method does not return a value, Laravel’s default exception rendering will be utilized:
use SymfonyComponentHttpKernelExceptionNotFoundHttpException;

/**
 * Register the exception handling callbacks for the application.
 *
 * @return void
 */
public function register()
{
    $this->renderable(function (NotFoundHttpException $e, $request) {
        if ($request->is('api/*')) {
            return response()->json([
                'message' => 'Record not found.'
            ], 404);
        }
    });
}
Reportable & Renderable Exceptions
Instead of type-checking exceptions in the exception handler’s register method, you may define report and render methods directly on your custom exceptions. When these methods exist, they will be automatically called by the framework:
<?php

namespace AppExceptions;

use Exception;

class InvalidOrderException extends Exception
{
    /**
     * Report the exception.
     *
     * @return bool|null
     */
    public function report()
    {
        //
    }

    /**
     * Render the exception into an HTTP response.
     *
     * @param  IlluminateHttpRequest  $request
     * @return IlluminateHttpResponse
     */
    public function render($request)
    {
        return response(/* ... */);
    }
}
If your exception extends an exception that is already renderable, such as a built-in Laravel or Symfony exception, you may return false from the exception’s render method to render the exception’s default HTTP response:
/**
 * Render the exception into an HTTP response.
 *
 * @param  IlluminateHttpRequest  $request
 * @return IlluminateHttpResponse
 */
public function render($request)
{
    // Determine if the exception needs custom rendering...

    return false;
}
If your exception contains custom reporting logic that is only necessary when certain conditions are met, you may need to instruct Laravel to sometimes report the exception using the default exception handling configuration. To accomplish this, you may return false from the exception’s report method:
/**
 * Report the exception.
 *
 * @return bool|null
 */
public function report()
{
    // Determine if the exception needs custom reporting...

    return false;
}
Note
You may type-hint any required dependencies of thereportmethod and they will automatically be injected into the method by Laravel’s service container.
HTTP Exceptions
Some exceptions describe HTTP error codes from the server. For example, this may be a «page not found» error (404), an «unauthorized error» (401) or even a developer generated 500 error. In order to generate such a response from anywhere in your application, you may use the abort helper:
abort(404);
Custom HTTP Error Pages
Laravel makes it easy to display custom error pages for various HTTP status codes. For example, if you wish to customize the error page for 404 HTTP status codes, create a resources/views/errors/404.blade.php view template. This view will be rendered on all 404 errors generated by your application. The views within this directory should be named to match the HTTP status code they correspond to. The SymfonyComponentHttpKernelExceptionHttpException instance raised by the abort function will be passed to the view as an $exception variable:
<h2>{{ $exception->getMessage() }}</h2>
You may publish Laravel’s default error page templates using the vendor:publish Artisan command. Once the templates have been published, you may customize them to your liking:
php artisan vendor:publish --tag=laravel-errors
Fallback HTTP Error Pages
You may also define a «fallback» error page for a given series of HTTP status codes. This page will be rendered if there is not a corresponding page for the specific HTTP status code that occurred. To accomplish this, define a 4xx.blade.php template and a 5xx.blade.php template in your application’s resources/views/errors directory.
Содержание
- HTTP Responses
- Creating Responses
- Strings & Arrays
- Response Objects
- Eloquent Models & Collections
- Attaching Headers To Responses
- Cache Control Middleware
- Attaching Cookies To Responses
- Generating Cookie Instances
- Expiring Cookies Early
- Cookies & Encryption
- Redirects
- Redirecting To Named Routes
- Populating Parameters Via Eloquent Models
- Redirecting To Controller Actions
- Redirecting To External Domains
- Redirecting With Flashed Session Data
- Redirecting With Input
- Other Response Types
- View Responses
- JSON Responses
- File Downloads
- Streamed Downloads
- File Responses
- Response Macros
- # Errors
- # Introduction
- # Error Objects
- # Error Lists
- # Responses
- # HTTP Status
- # JSON:API Exceptions
- # Helper Methods
- # is4xx
- # is5xx
- # getErrors
- # Validation Errors
- # Source Pointers
- # Error Rendering
- # JSON Responses
- # Middleware Responses
- # Always Rendering JSON:API Errors
- # Custom Rendering Logic
- # Converting Exceptions
- # Error Reporting
HTTP Responses
Creating Responses
Strings & Arrays
All routes and controllers should return a response to be sent back to the user’s browser. Laravel provides several different ways to return responses. The most basic response is returning a string from a route or controller. The framework will automatically convert the string into a full HTTP response:
In addition to returning strings from your routes and controllers, you may also return arrays. The framework will automatically convert the array into a JSON response:
Note
Did you know you can also return Eloquent collections from your routes or controllers? They will automatically be converted to JSON. Give it a shot!
Response Objects
Typically, you won’t just be returning simple strings or arrays from your route actions. Instead, you will be returning full IlluminateHttpResponse instances or views.
Returning a full Response instance allows you to customize the response’s HTTP status code and headers. A Response instance inherits from the SymfonyComponentHttpFoundationResponse class, which provides a variety of methods for building HTTP responses:
Eloquent Models & Collections
You may also return Eloquent ORM models and collections directly from your routes and controllers. When you do, Laravel will automatically convert the models and collections to JSON responses while respecting the model’s hidden attributes:
Keep in mind that most response methods are chainable, allowing for the fluent construction of response instances. For example, you may use the header method to add a series of headers to the response before sending it back to the user:
Or, you may use the withHeaders method to specify an array of headers to be added to the response:
Cache Control Middleware
Laravel includes a cache.headers middleware, which may be used to quickly set the Cache-Control header for a group of routes. Directives should be provided using the «snake case» equivalent of the corresponding cache-control directive and should be separated by a semicolon. If etag is specified in the list of directives, an MD5 hash of the response content will automatically be set as the ETag identifier:
Attaching Cookies To Responses
You may attach a cookie to an outgoing IlluminateHttpResponse instance using the cookie method. You should pass the name, value, and the number of minutes the cookie should be considered valid to this method:
The cookie method also accepts a few more arguments which are used less frequently. Generally, these arguments have the same purpose and meaning as the arguments that would be given to PHP’s native setcookie method:
If you would like to ensure that a cookie is sent with the outgoing response but you do not yet have an instance of that response, you can use the Cookie facade to «queue» cookies for attachment to the response when it is sent. The queue method accepts the arguments needed to create a cookie instance. These cookies will be attached to the outgoing response before it is sent to the browser:
Generating Cookie Instances
If you would like to generate a SymfonyComponentHttpFoundationCookie instance that can be attached to a response instance at a later time, you may use the global cookie helper. This cookie will not be sent back to the client unless it is attached to a response instance:
Expiring Cookies Early
You may remove a cookie by expiring it via the withoutCookie method of an outgoing response:
If you do not yet have an instance of the outgoing response, you may use the Cookie facade’s expire method to expire a cookie:
Cookies & Encryption
By default, all cookies generated by Laravel are encrypted and signed so that they can’t be modified or read by the client. If you would like to disable encryption for a subset of cookies generated by your application, you may use the $except property of the AppHttpMiddlewareEncryptCookies middleware, which is located in the app/Http/Middleware directory:
Redirects
Redirect responses are instances of the IlluminateHttpRedirectResponse class, and contain the proper headers needed to redirect the user to another URL. There are several ways to generate a RedirectResponse instance. The simplest method is to use the global redirect helper:
Sometimes you may wish to redirect the user to their previous location, such as when a submitted form is invalid. You may do so by using the global back helper function. Since this feature utilizes the session, make sure the route calling the back function is using the web middleware group:
Redirecting To Named Routes
When you call the redirect helper with no parameters, an instance of IlluminateRoutingRedirector is returned, allowing you to call any method on the Redirector instance. For example, to generate a RedirectResponse to a named route, you may use the route method:
If your route has parameters, you may pass them as the second argument to the route method:
Populating Parameters Via Eloquent Models
If you are redirecting to a route with an «ID» parameter that is being populated from an Eloquent model, you may pass the model itself. The ID will be extracted automatically:
If you would like to customize the value that is placed in the route parameter, you can specify the column in the route parameter definition ( /profile/ ) or you can override the getRouteKey method on your Eloquent model:
Redirecting To Controller Actions
You may also generate redirects to controller actions. To do so, pass the controller and action name to the action method:
If your controller route requires parameters, you may pass them as the second argument to the action method:
Redirecting To External Domains
Sometimes you may need to redirect to a domain outside of your application. You may do so by calling the away method, which creates a RedirectResponse without any additional URL encoding, validation, or verification:
Redirecting With Flashed Session Data
Redirecting to a new URL and flashing data to the session are usually done at the same time. Typically, this is done after successfully performing an action when you flash a success message to the session. For convenience, you may create a RedirectResponse instance and flash data to the session in a single, fluent method chain:
After the user is redirected, you may display the flashed message from the session. For example, using Blade syntax:
Redirecting With Input
You may use the withInput method provided by the RedirectResponse instance to flash the current request’s input data to the session before redirecting the user to a new location. This is typically done if the user has encountered a validation error. Once the input has been flashed to the session, you may easily retrieve it during the next request to repopulate the form:
Other Response Types
The response helper may be used to generate other types of response instances. When the response helper is called without arguments, an implementation of the IlluminateContractsRoutingResponseFactory contract is returned. This contract provides several helpful methods for generating responses.
View Responses
If you need control over the response’s status and headers but also need to return a view as the response’s content, you should use the view method:
Of course, if you do not need to pass a custom HTTP status code or custom headers, you may use the global view helper function.
JSON Responses
The json method will automatically set the Content-Type header to application/json , as well as convert the given array to JSON using the json_encode PHP function:
If you would like to create a JSONP response, you may use the json method in combination with the withCallback method:
File Downloads
The download method may be used to generate a response that forces the user’s browser to download the file at the given path. The download method accepts a filename as the second argument to the method, which will determine the filename that is seen by the user downloading the file. Finally, you may pass an array of HTTP headers as the third argument to the method:
Warning
Symfony HttpFoundation, which manages file downloads, requires the file being downloaded to have an ASCII filename.
Streamed Downloads
Sometimes you may wish to turn the string response of a given operation into a downloadable response without having to write the contents of the operation to disk. You may use the streamDownload method in this scenario. This method accepts a callback, filename, and an optional array of headers as its arguments:
File Responses
The file method may be used to display a file, such as an image or PDF, directly in the user’s browser instead of initiating a download. This method accepts the path to the file as its first argument and an array of headers as its second argument:
Response Macros
If you would like to define a custom response that you can re-use in a variety of your routes and controllers, you may use the macro method on the Response facade. Typically, you should call this method from the boot method of one of your application’s service providers, such as the AppProvidersAppServiceProvider service provider:
The macro function accepts a name as its first argument and a closure as its second argument. The macro’s closure will be executed when calling the macro name from a ResponseFactory implementation or the response helper:
Laravel is a web application framework with expressive, elegant syntax. We believe development must be an enjoyable and creative experience to be truly fulfilling. Laravel attempts to take the pain out of development by easing common tasks used in most web projects.
Источник
# Errors
# Introduction
The JSON:API specification defines error objects
(opens new window) that are used to provide information to a client about problems encountered while performing an operation.
Errors are returned to the client in the top-level errors member of the JSON document.
Laravel JSON:API makes it easy to return errors to the client — either as responses, or by throwing exceptions. In addition, the exception renderer you added to your exception handler during installation takes care of converting standard Laravel exceptions to JSON:API error responses if the client has sent an Accept: application/vnd.api+json header.
# Error Objects
Use our LaravelJsonApiCoreDocumentError object to create a JSON:API error object. The easiest way to construct an error object is using the static fromArray method. For example:
The fromArray method accepts all the error object members defined in the specification.
Alternatively, if you want to use setters, use the static make method to fluently construct your error object:
The available setters are:
- setAboutLink
- setCode
- setDetail
- setId
- setLinks
- setMeta
- setStatus
- setSource
- setSourceParameter
- setSourcePointer
- setTitle
# Error Lists
If you need to return multiple errors at once, use our LaravelJsonApiCoreDocumentErrorList class. This accepts any number of error objects to its constructor. For example:
Use the push method to add errors after constructing the error list:
# Responses
Both the Error and ErrorList classes implement Laravel’s Responsable interface. This means you can return them directly from controller actions and they will be converted to a JSON:API error response.
If you need to customise the error response, then you need to use our LaravelJsonApiCoreResponsesErrorResponse class. Either create a new one, passing in the Error or ErrorList object:
Or alternatively, use the prepareResponse method on either the Error or ErrorList object:
The ErrorResponse class has all the helper methods required to customise both the headers and the JSON:API document that is returned in the response.
For example, if we were adding a header and meta to our response:
# HTTP Status
The JSON:API specification says:
When a server encounters multiple problems for a single request, the most generally applicable HTTP error code SHOULD be used in the response. For instance, 400 Bad Request might be appropriate for multiple 4xx errors or 500 Internal Server Error might be appropriate for multiple 5xx errors.
Our ErrorResponse class takes care of calculating the HTTP status for you.
If there is only one error, or all the errors have the same status, then the response status will match this status.
If you have multiple errors with different statuses, the response status will be 400 Bad Request if the error objects only have 4xx status codes. If there are any 5xx status codes, the response status will be 500 Internal Server Error .
If the response has no error objects, or none of the error objects have a status, then the response will have a 500 Internal Server Error status.
If you want the response to have a specific HTTP status, use the withStatus method. For example:
# JSON:API Exceptions
Our LaravelJsonApiCoreExceptionsJsonApiException allows you to terminate processing of a request by throwing an exception with JSON:API errors attached.
The exception expects its first argument to be either an Error or an ErrorList object. For example:
The JsonApiException class has all the helper methods required to customise both the headers and the JSON:API document that is returned in the response. Use the static make method if you need to call any of these methods. For example:
There is also a handy static error method. This allows you to fluently construct an exception for a single error, providing either an Error object or an array. For example:
# Helper Methods
The JsonApiException class has a number of helper methods:
# is4xx
Returns true if the HTTP status code is a client error, i.e. in the 400-499 range.
# is5xx
Returns true if the HTTP status code is a server error, i.e. in the 500-599 range.
# getErrors
Use the getErrors() method to retrieve the JSON:API error objects from the exception. For example, if we wanted to log the errors:
# Validation Errors
Our implementation of resource requests and query parameter requests already takes care of converting Laravel validation error messages to JSON:API errors.
If however you have a scenario where you want to convert a failed validator to JSON:API errors manually, we provide the ability to do this.
You will need to resolve an instance of LaravelJsonApiValidationFactory out of the service container. For example, you could use the app helper, or use dependency injection by type-hinting it in a constructor of a service.
Once you have the factory instance, use the createErrors method, providing it with the validator instance. For example, in a controller action:
The object this returns is Responsable — so you can return it directly from a controller action. If you want to convert it to an error response, use our prepareResponse pattern as follows:
# Source Pointers
By default this process will convert validation error keys to JSON source pointers. For example, if you have a failed message for the foo.bar value, the resulting error object will have a source pointer of /foo/bar .
If you need to prefix the pointer value, use the withSourcePrefix method. The following example would convert foo.bar to /data/attributes/foo/bar :
If you need to fully customise how the validation key should be converted, provide a Closure to the withPointers method:
# Error Rendering
As described in the installation instructions, the following should have been added to the register method on your application’s exception handler:
The Laravel exception handler already takes care of converting exceptions to either application/json or text/html responses. Our exception handler effectively adds JSON:API error responses as a third media type. If the client has sent a request with an Accept header of application/vnd.api+json , then they will receive the exception response as a JSON:API error response — even if the endpoint they are hitting is not one of your JSON:API server endpoints.
There are some scenarios where the Laravel exception handler does not call any registered renderables. For example, if an exception implements Laravel’s Responsable interface, our exception parser will not be invoked as the handler uses the Responsable::toResponse() method on the exception to generate a response.
# JSON Responses
If a client encounters an exception when using an Accept header of application/json , they will still receive Laravel’s default JSON exception response, rather than a JSON:API response.
If you want our exception parser to render JSON exception responses instead of the default Laravel response, use the acceptsJson() method when registering our exception parser:
# Middleware Responses
Sometimes you may want exceptions to be converted to JSON:API errors if the current route has a particular middleware applied to it. The most common example of this would be if you want JSON:API errors to always be rendered if the current route has the api middleware.
In this scenario, use the acceptsMiddleware() method when registering our exception parser. For example:
You can provide multiple middleware names to the acceptsMiddleware() method. When you do this, it will match a route that contains any of the provided middleware.
# Always Rendering JSON:API Errors
If you want our exception parser to always convert exceptions to JSON:API errors, use the acceptsAll() helper method:
# Custom Rendering Logic
If you want your own logic for when a JSON:API exception response should be rendered, pass a closure to the accept() method.
For example, let’s say we wanted our API to always return JSON:API exception responses, regardless of what Accept header the client sent. We would use the request is() method to check if the path is our API:
If you return false from the callback, the normal exception rendering logic will run — meaning a client that has sent an Accept header with the JSON:API media type will still receive a JSON:API response. This is semantically correct, as the Accept header value should be respected.
# Converting Exceptions
Our exception parser is built so that you can easily add support for custom exceptions to the JSON:API rendering process. The implementation works using a pipeline, meaning you can add your own handlers for converting exceptions to JSON:API errors.
For example, imagine our application had a PaymentFailed exception, that we wanted to convert to JSON:API errors if thrown to the exception handler. We would write the following class:
We can then add it to the JSON:API exception parser using either the prepend or append method:
# Error Reporting
As described in the installation instructions, the following should have been added to the $dontReport property on your application’s exception handler:
This prevents our JsonApiException from being reported in your application’s error log. This is a sensible starting position, as the JsonApiException class is effectively a HTTP exception that needs to be rendered to the client.
However, this does mean that any JsonApiException that has a 5xx status code (server-side error) will not be reported in your error log. Therefore, an alternative is to use the helper methods on the JsonApiException class to determine whether or not the exception should be reported.
To do this, we will use the reportable() method to register a callback for the JSON:API exception class. (At the same time, we remove the exception class from the $dontReport property.) For example, the following will stop the propagation of JSON:API exceptions to the default logging stack if the exception does not have a 5xx status:
(opens new window) , returning false from the reportable callback prevents the exception from propagating to the default logging stack.
In the following example, we log 4xx statuses as debug information, while letting all other JSON:API exceptions propagate to the default logging stack:
Источник
Версия


ПРЕДУПРЕЖДЕНИЕ Вы просматриваете документацию к старой версии Laravel.
Рассмотрите возможность обновления Вашего проекта до Laravel 9.x.

HTTP-ответы
-
Создание ответов
- Прикрепление заголовков к ответам
- Прикрепление файлов cookie к ответам
- Файлы cookie и шифрование
-
Редиректы
- Перенаправление на именованные маршруты
- Перенаправление к действиям контроллера
- Перенаправление на внешние домены
- Перенаправление с флеш данными сессии
-
Другие типы ответов
- Ответы представлений
- Ответы JSON
- Загрузки файлов
- Файловые ответы
- Макросы ответа
Создание ответов
Строки и массивы
Все маршруты и контроллеры должны возвращать ответ, который будет отправлен обратно в браузер пользователя. Laravel предоставляет несколько разных способов вернуть ответы. Самый простой ответ — это возврат строки от маршрута или контроллера. Фреймворк автоматически преобразует строку в полный HTTP-ответ:
Route::get('/', function () {
return 'Hello World';
});
Помимо возврата строк из Ваших маршрутов и контроллеров, Вы также можете возвращать массивы. Фреймворк автоматически преобразует массив в ответ JSON:
Route::get('/', function () {
return [1, 2, 3];
});
{tip} Знаете ли Вы, что Вы также можете возвращать коллекции Eloquent с Ваших маршрутов или контроллеров? Они будут автоматически преобразованы в JSON. Дать ему шанс!
Объекты ответа
Как правило, Вы не будете просто возвращать простые строки или массивы из действий маршрута. Вместо этого Вы вернете полные экземпляры IlluminateHttpResponse или представления.
Возврат полного экземпляра Response позволяет Вам настроить код состояния HTTP и заголовки ответа. Экземпляр Response наследуется от класса SymfonyComponentHttpFoundationResponse, который предоставляет множество методов для построения HTTP-ответов:
Route::get('/home', function () {
return response('Hello World', 200)
->header('Content-Type', 'text/plain');
});
Eloquent модели и коллекции
Вы также можете вернуть модели и коллекции Eloquent ORM прямо из Ваших маршрутов и контроллеров. Когда Вы это сделаете, Laravel автоматически преобразует модели и коллекции в Ответы JSON, соблюдая скрытые атрибуты модели:
use AppModelsUser;
Route::get('/user/{user}', function (User $user) {
return $user;
});
Прикрепление заголовков к ответам
Имейте в виду, что большинство методов ответа объединяются в цепочку, что позволяет плавно создавать экземпляры ответа. Например, Вы можете использовать метод header для добавления серии заголовков к ответу перед его отправкой обратно пользователю:
return response($content)
->header('Content-Type', $type)
->header('X-Header-One', 'Header Value')
->header('X-Header-Two', 'Header Value');
Или Вы можете использовать метод withHeaders, чтобы указать массив заголовков, который будет добавлен к ответу:
return response($content)
->withHeaders([
'Content-Type' => $type,
'X-Header-One' => 'Header Value',
'X-Header-Two' => 'Header Value',
]);
Мидлвар управления кешем
Laravel включает мидлвар cache.headers, который можно использовать для быстрой установки заголовка Cache-Control для группы маршрутов. Директивы должны быть предоставлены с использованием «snake case», эквивалентного соответствующей директиве управления кэшем, и должны быть разделены точкой с запятой. Если в списке директив указан etag, в качестве идентификатора ETag автоматически будет установлен хеш MD5 содержимого ответа:
Route::middleware('cache.headers:public;max_age=2628000;etag')->group(function () {
Route::get('/privacy', function () {
// ...
});
Route::get('/terms', function () {
// ...
});
});
Прикрепление файлов cookie к ответам
Вы можете прикрепить cookie к исходящему экземпляру IlluminateHttpResponse, используя метод cookie. Вы должны передать этому методу имя, значение и количество минут, в течение которых файл cookie должен считаться действительным:
return response('Hello World')->cookie(
'name', 'value', $minutes
);
Метод cookie также принимает еще несколько аргументов, которые используются реже. Как правило, эти аргументы имеют то же назначение и значение, что и аргументы, передаваемые встроенному в PHP методу setcookie method:
return response('Hello World')->cookie(
'name', 'value', $minutes, $path, $domain, $secure, $httpOnly
);
Если Вы хотите, чтобы cookie отправлялся вместе с исходящим ответом, но у Вас еще нет экземпляра этого ответа, Вы можете использовать фасад Cookie, чтобы «поставить в очередь» файлы cookie для прикрепления к ответу при его отправке. Метод queue принимает аргументы, необходимые для создания экземпляра cookie. Эти файлы cookie будут прикреплены к исходящему ответу перед его отправкой в браузер:
use IlluminateSupportFacadesCookie;
Cookie::queue('name', 'value', $minutes);
Создание экземпляров файлов cookie
Если Вы хотите сгенерировать экземпляр SymfonyComponentHttpFoundationCookie, который может быть присоединен к экземпляру ответа позже, Вы можете использовать глобальный помощник cookie. Этот файл cookie не будет отправлен обратно клиенту, если он не прикреплен к экземпляру ответа:
$cookie = cookie('name', 'value', $minutes);
return response('Hello World')->cookie($cookie);
Срок действия файлов cookie истекает раньше
Вы можете удалить куки-файл, истек в его срок действия с помощью метода исходящего ответа withoutCookie:
return response('Hello World')->withoutCookie('name');
Если у вас еще нет экземпляра исходящего ответа, вы можете использовать метод expire фасада Cookie для истечения срока действия cookie:
Cookie::expire('name');
Файлы cookie и шифрование
По умолчанию все файлы cookie, сгенерированные Laravel, зашифрованы и подписаны, поэтому клиент не может их изменить или прочитать. Если Вы хотите отключить шифрование для подмножества файлов cookie, созданных Вашим приложением, Вы можете использовать свойство $except мидлвара AppHttpMiddlewareEncryptCookies, которое находится в app/Http/Middleware каталог:
/**
* Имена файлов cookie, которые не следует шифровать.
*
* @var array
*/
protected $except = [
'cookie_name',
];
Редиректы
Ответы на перенаправление являются экземплярами класса IlluminateHttpRedirectResponse и содержат правильные заголовки, необходимые для перенаправления пользователя на другой URL. Есть несколько способов сгенерировать экземпляр RedirectResponse. Самый простой способ — использовать глобальный помощник redirect:
Route::get('/dashboard', function () {
return redirect('home/dashboard');
});
Иногда Вы можете захотеть перенаправить пользователя в его предыдущее местоположение, например, когда отправленная форма недействительна. Вы можете сделать это с помощью глобальной вспомогательной функции back. Поскольку эта функция использует сессии, убедитесь, что маршрут, вызывающий функцию back, использует группу мидлваров web:
Route::post('/user/profile', function () {
// Validate the request...
return back()->withInput();
});
Перенаправление на именованные маршруты
Когда Вы вызываете помощник redirect без параметров, возвращается экземпляр IlluminateRoutingRedirector, что позволяет Вам вызывать любой метод экземпляра Redirector. Например, чтобы сгенерировать RedirectResponse на именованный маршрут, Вы можете использовать метод route:
return redirect()->route('login');
Если у Вашего маршрута есть параметры, Вы можете передать их как второй аргумент методу route:
// Для маршрута со следующим URI: /profile/{id}
return redirect()->route('profile', ['id' => 1]);
Заполнение параметров с помощью Eloquent моделей
Если Вы перенаправляете на маршрут с параметром «ID», который заполняется из модели Eloquent, Вы можете передать саму модель. ID будет извлечен автоматически:
// Для маршрута со следующим URI: /profile/{id}
return redirect()->route('profile', [$user]);
Если Вы хотите настроить значение, которое помещается в параметр маршрута, Вы можете указать столбец в определении параметра маршрута (/profile/{id:slug}) или Вы можете переопределить метод getRouteKey в Вашем Eloquent модель:
/**
* Получить значение ключа маршрута модели.
*
* @return mixed
*/
public function getRouteKey()
{
return $this->slug;
}
Перенаправление к действиям контроллера
Вы также можете генерировать перенаправления на действия контроллера. Для этого передайте имя контроллера и действия методу action:
use AppHttpControllersUserController;
return redirect()->action([UserController::class, 'index']);
Если Ваш маршрут контроллера требует параметров, Вы можете передать их в качестве второго аргумента методу action:
return redirect()->action(
[UserController::class, 'profile'], ['id' => 1]
);
Перенаправление на внешние домены
Иногда может потребоваться перенаправление на домен за пределами Вашего приложения. Вы можете сделать это, вызвав метод away, который создает RedirectResponse без какой-либо дополнительной кодировки URL, проверки или проверки:
return redirect()->away('https://www.google.com');
Перенаправление с флеш данными сессии
Перенаправление на новый URL-адрес и проброс данных в сессию обычно выполняются одновременно. Обычно это делается после успешного выполнения действия, когда Вы отправляете сообщение об успешном завершении сеанса. Для удобства Вы можете создать экземпляр RedirectResponse и передать данные в сеанс в единой плавной цепочке методов:
Route::post('/user/profile', function () {
// ...
return redirect('dashboard')->with('status', 'Profile updated!');
});
После перенаправления пользователя Вы можете отобразить проброшенное сообщение из сессии. Например, используя синтаксис Blade:
@if (session('status'))
<div class="alert alert-success">
{{ session('status') }}
</div>
@endif
Перенаправление с вводом
Вы можете использовать метод withInput, предоставляемый экземпляром RedirectResponse, для передачи входных данных текущего запроса в сеанс перед перенаправлением пользователя в новое место. Обычно это делается, если пользователь обнаружил ошибку проверки. После того, как ввод был передан в сеанс, Вы можете легко получить его во время следующего запроса на повторное заполнение формы:
return back()->withInput();
Другие типы ответов
Помощник response может использоваться для генерации других типов экземпляров ответа. Когда помощник response вызывается без аргументов, возвращается реализация IlluminateContractsRoutingResponseFactory контракт. Этот контракт предоставляет несколько полезных методов для генерации ответов.
Ответы представлений
Если Вам нужен контроль над статусом и заголовками ответа, но также необходимо вернуть представление в качестве содержимого ответа, Вам следует использовать метод view:
return response()
->view('hello', $data, 200)
->header('Content-Type', $type);
Конечно, если Вам не нужно передавать пользовательский код состояния HTTP или пользовательские заголовки, Вы можете использовать глобальную вспомогательную функцию view.
Ответы JSON
Метод json автоматически установит заголовок Content-Type в application/json, а также преобразует данный массив в JSON с помощью PHP-функции json_encode:
return response()->json([
'name' => 'Abigail',
'state' => 'CA',
]);
Если Вы хотите создать ответ JSONP, Вы можете использовать метод json в сочетании с методом withCallback:
return response()
->json(['name' => 'Abigail', 'state' => 'CA'])
->withCallback($request->input('callback'));
Загрузки файлов
Метод download может использоваться для генерации ответа, который заставляет браузер пользователя загружать файл по заданному пути. Метод download принимает имя файла в качестве второго аргумента метода, который будет определять имя файла, которое видит пользователь, загружающий файл. Наконец, Вы можете передать массив заголовков HTTP в качестве третьего аргумента метода:
return response()->download($pathToFile);
return response()->download($pathToFile, $name, $headers);
{note} Symfony HttpFoundation, который управляет загрузкой файлов, требует, чтобы загружаемый файл имел имя файла ASCII.
Потоковые загрузки
Иногда Вы можете захотеть превратить строковый ответ данной операции в загружаемый ответ без необходимости записывать содержимое операции на диск. В этом сценарии Вы можете использовать метод streamDownload. Этот метод принимает в качестве аргументов обратный вызов, имя файла и необязательный массив заголовков:
use AppServicesGitHub;
return response()->streamDownload(function () {
echo GitHub::api('repo')
->contents()
->readme('laravel', 'laravel')['contents'];
}, 'laravel-readme.md');
Файловые ответы
Метод file может использоваться для отображения файла, такого как изображение или PDF, непосредственно в браузере пользователя вместо того, чтобы инициировать загрузку. Этот метод принимает путь к файлу в качестве первого аргумента и массив заголовков в качестве второго аргумента:
return response()->file($pathToFile);
return response()->file($pathToFile, $headers);
Макросы ответа
Если вы хотите определить собственный ответ, который вы можете повторно использовать в различных ваших маршрутах и контроллерах, вы можете использовать метод macro на фасаде Response. Как правило, этот метод следует вызывать из метода boot одного из сервис провайдеров вашего приложения, например, сервис провайдера AppProvidersAppServiceProvider:
<?php
namespace AppProviders;
use IlluminateSupportFacadesResponse;
use IlluminateSupportServiceProvider;
class AppServiceProvider extends ServiceProvider
{
/**
* Загрузка любых сервисов приложения.
*
* @return void
*/
public function boot()
{
Response::macro('caps', function ($value) {
return Response::make(strtoupper($value));
});
}
}
Функция macro принимает имя в качестве первого аргумента и замыкание в качестве второго аргумента. Замыкание макроса будет выполнено при вызове имени макроса из реализации ResponseFactory или вспомогательной функции response:
return response()->caps('foo');
- Introduction
- Configuration
-
The Exception Handler
- Reporting Exceptions
- Exception Log Levels
- Ignoring Exceptions By Type
- Rendering Exceptions
- Reportable & Renderable Exceptions
-
HTTP Exceptions
- Custom HTTP Error Pages
Introduction
When you start a new Laravel project, error and exception handling is already configured for you. The AppExceptionsHandler class is where all exceptions thrown by your application are logged and then rendered to the user. We’ll dive deeper into this class throughout this documentation.
Configuration
The debug option in your config/app.php configuration file determines how much information about an error is actually displayed to the user. By default, this option is set to respect the value of the APP_DEBUG environment variable, which is stored in your .env file.
During local development, you should set the APP_DEBUG environment variable to true. In your production environment, this value should always be false. If the value is set to true in production, you risk exposing sensitive configuration values to your application’s end users.
The Exception Handler
Reporting Exceptions
All exceptions are handled by the AppExceptionsHandler class. This class contains a register method where you may register custom exception reporting and rendering callbacks. We’ll examine each of these concepts in detail. Exception reporting is used to log exceptions or send them to an external service like Flare, Bugsnag or Sentry. By default, exceptions will be logged based on your logging configuration. However, you are free to log exceptions however you wish.
For example, if you need to report different types of exceptions in different ways, you may use the reportable method to register a closure that should be executed when an exception of a given type needs to be reported. Laravel will deduce what type of exception the closure reports by examining the type-hint of the closure:
use AppExceptionsInvalidOrderException;
/**
* Register the exception handling callbacks for the application.
*
* @return void
*/
public function register()
{
$this->reportable(function (InvalidOrderException $e) {
//
});
}
When you register a custom exception reporting callback using the reportable method, Laravel will still log the exception using the default logging configuration for the application. If you wish to stop the propagation of the exception to the default logging stack, you may use the stop method when defining your reporting callback or return false from the callback:
$this->reportable(function (InvalidOrderException $e) {
//
})->stop();
$this->reportable(function (InvalidOrderException $e) {
return false;
});
Note
To customize the exception reporting for a given exception, you may also utilize reportable exceptions.
Global Log Context
If available, Laravel automatically adds the current user’s ID to every exception’s log message as contextual data. You may define your own global contextual data by overriding the context method of your application’s AppExceptionsHandler class. This information will be included in every exception’s log message written by your application:
/**
* Get the default context variables for logging.
*
* @return array
*/
protected function context()
{
return array_merge(parent::context(), [
'foo' => 'bar',
]);
}
Exception Log Context
While adding context to every log message can be useful, sometimes a particular exception may have unique context that you would like to include in your logs. By defining a context method on one of your application’s custom exceptions, you may specify any data relevant to that exception that should be added to the exception’s log entry:
<?php
namespace AppExceptions;
use Exception;
class InvalidOrderException extends Exception
{
// ...
/**
* Get the exception's context information.
*
* @return array
*/
public function context()
{
return ['order_id' => $this->orderId];
}
}
The report Helper
Sometimes you may need to report an exception but continue handling the current request. The report helper function allows you to quickly report an exception via the exception handler without rendering an error page to the user:
public function isValid($value)
{
try {
// Validate the value...
} catch (Throwable $e) {
report($e);
return false;
}
}
Exception Log Levels
When messages are written to your application’s logs, the messages are written at a specified log level, which indicates the severity or importance of the message being logged.
As noted above, even when you register a custom exception reporting callback using the reportable method, Laravel will still log the exception using the default logging configuration for the application; however, since the log level can sometimes influence the channels on which a message is logged, you may wish to configure the log level that certain exceptions are logged at.
To accomplish this, you may define an array of exception types and their associated log levels within the $levels property of your application’s exception handler:
use PDOException;
use PsrLogLogLevel;
/**
* A list of exception types with their corresponding custom log levels.
*
* @var array<class-string<Throwable>, PsrLogLogLevel::*>
*/
protected $levels = [
PDOException::class => LogLevel::CRITICAL,
];
Ignoring Exceptions By Type
When building your application, there will be some types of exceptions you simply want to ignore and never report. Your application’s exception handler contains a $dontReport property which is initialized to an empty array. Any classes that you add to this property will never be reported; however, they may still have custom rendering logic:
use AppExceptionsInvalidOrderException;
/**
* A list of the exception types that are not reported.
*
* @var array<int, class-string<Throwable>>
*/
protected $dontReport = [
InvalidOrderException::class,
];
Note
Behind the scenes, Laravel already ignores some types of errors for you, such as exceptions resulting from 404 HTTP «not found» errors or 419 HTTP responses generated by invalid CSRF tokens.
Rendering Exceptions
By default, the Laravel exception handler will convert exceptions into an HTTP response for you. However, you are free to register a custom rendering closure for exceptions of a given type. You may accomplish this via the renderable method of your exception handler.
The closure passed to the renderable method should return an instance of IlluminateHttpResponse, which may be generated via the response helper. Laravel will deduce what type of exception the closure renders by examining the type-hint of the closure:
use AppExceptionsInvalidOrderException;
/**
* Register the exception handling callbacks for the application.
*
* @return void
*/
public function register()
{
$this->renderable(function (InvalidOrderException $e, $request) {
return response()->view('errors.invalid-order', [], 500);
});
}
You may also use the renderable method to override the rendering behavior for built-in Laravel or Symfony exceptions such as NotFoundHttpException. If the closure given to the renderable method does not return a value, Laravel’s default exception rendering will be utilized:
use SymfonyComponentHttpKernelExceptionNotFoundHttpException;
/**
* Register the exception handling callbacks for the application.
*
* @return void
*/
public function register()
{
$this->renderable(function (NotFoundHttpException $e, $request) {
if ($request->is('api/*')) {
return response()->json([
'message' => 'Record not found.'
], 404);
}
});
}
Reportable & Renderable Exceptions
Instead of type-checking exceptions in the exception handler’s register method, you may define report and render methods directly on your custom exceptions. When these methods exist, they will be automatically called by the framework:
<?php
namespace AppExceptions;
use Exception;
class InvalidOrderException extends Exception
{
/**
* Report the exception.
*
* @return bool|null
*/
public function report()
{
//
}
/**
* Render the exception into an HTTP response.
*
* @param IlluminateHttpRequest $request
* @return IlluminateHttpResponse
*/
public function render($request)
{
return response(/* ... */);
}
}
If your exception extends an exception that is already renderable, such as a built-in Laravel or Symfony exception, you may return false from the exception’s render method to render the exception’s default HTTP response:
/**
* Render the exception into an HTTP response.
*
* @param IlluminateHttpRequest $request
* @return IlluminateHttpResponse
*/
public function render($request)
{
// Determine if the exception needs custom rendering...
return false;
}
If your exception contains custom reporting logic that is only necessary when certain conditions are met, you may need to instruct Laravel to sometimes report the exception using the default exception handling configuration. To accomplish this, you may return false from the exception’s report method:
/**
* Report the exception.
*
* @return bool|null
*/
public function report()
{
// Determine if the exception needs custom reporting...
return false;
}
Note
You may type-hint any required dependencies of thereportmethod and they will automatically be injected into the method by Laravel’s service container.
HTTP Exceptions
Some exceptions describe HTTP error codes from the server. For example, this may be a «page not found» error (404), an «unauthorized error» (401) or even a developer generated 500 error. In order to generate such a response from anywhere in your application, you may use the abort helper:
abort(404);
Custom HTTP Error Pages
Laravel makes it easy to display custom error pages for various HTTP status codes. For example, if you wish to customize the error page for 404 HTTP status codes, create a resources/views/errors/404.blade.php view template. This view will be rendered on all 404 errors generated by your application. The views within this directory should be named to match the HTTP status code they correspond to. The SymfonyComponentHttpKernelExceptionHttpException instance raised by the abort function will be passed to the view as an $exception variable:
<h2>{{ $exception->getMessage() }}</h2>
You may publish Laravel’s default error page templates using the vendor:publish Artisan command. Once the templates have been published, you may customize them to your liking:
php artisan vendor:publish --tag=laravel-errors
Fallback HTTP Error Pages
You may also define a «fallback» error page for a given series of HTTP status codes. This page will be rendered if there is not a corresponding page for the specific HTTP status code that occurred. To accomplish this, define a 4xx.blade.php template and a 5xx.blade.php template in your application’s resources/views/errors directory.