
Содержание
- Ошибка накопителя: Запуск этого устройства невозможен. (Код 10)
- Способ 1: Отключение устройств USB
- Способ 2: Обновление драйверов
- Способ 3: Назначение новой буквы
- Способ 4: Чистка реестра
- Способ 5: Восстановление системы
- Вопросы и ответы

Вы подключаете флешку, а компьютер ее не видит? Такое может произойти как с новым накопителем, так и с тем, что постоянно используется на Вашем ПК. При этом в свойствах устройства появляется характерная ошибка. К решению этой проблемы следует подходить в зависимости от причины, которая привела к такой ситуации.
На всякий случай уточним, что мы говорим о такой ошибке, как показано на фото ниже:
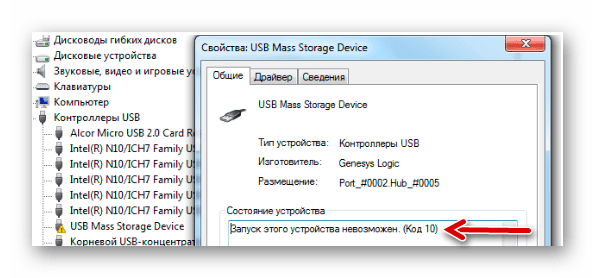
Скорее всего, кроме сообщения о невозможности запуска съемного накопителя, система не даст никакой другой информации. Поэтому придется поочередно рассматривать самые вероятные причины, а конкретно:
- установка драйверов устройства прошла некорректно;
- произошел конфликт оборудования;
- повреждены ветки реестра;
- другие непредвиденные причины, помешавшие идентификации флешки в системе.
Вполне возможно, что неисправен сам носитель информации или USB-разъем. Поэтому для начала правильно будет попытаться вставить ее в другой компьютер и посмотреть, как она будет себя вести.
Способ 1: Отключение устройств USB
Отказ работы флешки мог быть вызван конфликтом с другими подключенными устройствами. Поэтому Вам нужно выполнить несколько простых действий:
- Извлеките все USB-устройства и кардридеры, включая флешку.
- Перезагрузите компьютер.
- Вставьте нужную флешку.
Если дело было в конфликте, то ошибка должна исчезнуть. Но если ничего не происходит, переходите к следующему способу.
Способ 2: Обновление драйверов
Наиболее часто всему виной отсутствующие или неработающие (некорректные) драйвера накопителя. Эту проблему исправить довольно просто.
Для этого сделайте вот что:
- Вызовите «Диспетчер устройств» (одновременно нажмите «Win» и «R» на клавиатуре, и введите команду devmgmt.msc, после чего нажмите «Enter»).
- В разделе «Контроллеры USB» найдите проблемную флешку. Скорее всего, она будет обозначена как «Неизвестное USB-устройство», а рядом будет треугольник с восклицательным знаком. Кликните по ней правой кнопкой и выберите «Обновить драйверы».
- Начните с варианта автоматического поиска драйверов. Обратите внимание, что на компьютере обязательно должен быть доступ в Интернет.
- В сети начнется поиск подходящих драйверов с дальнейшей их установкой. Однако Windows не всегда справляется с этой задачей. И если таким способом исправить проблему не получилось, то зайдите на официальный сайт производителя флешки и скачайте драйвера там. Найти их чаще всего можно в разделе сайта «Обслуживание» или «Поддержка». Далее нажмите кнопку «Выполнить поиск драйверов на этом компьютере» и выберете скачанные файлы.
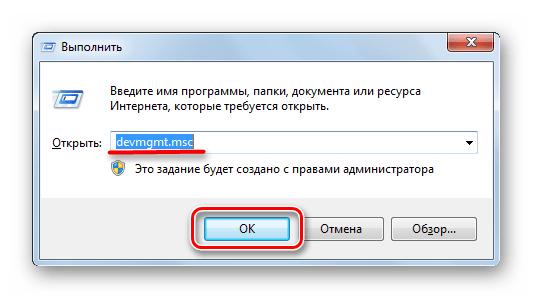
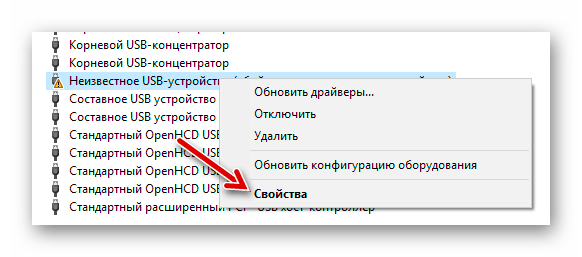
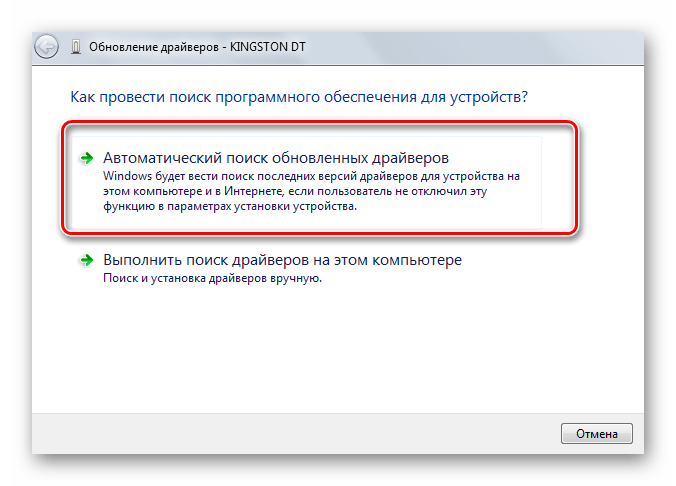
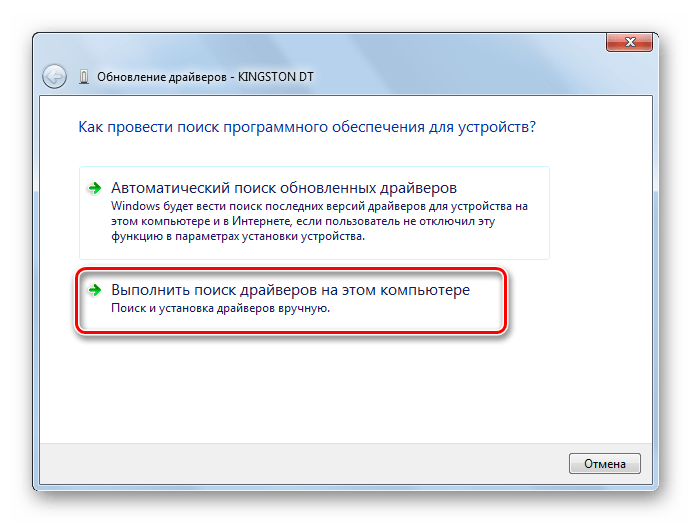
Кстати, переносное устройство может перестать работать как раз после обновления драйверов. В этом случае поищите на том же официальном сайте или других надежных источниках более старые версии драйверов и установите их.
Читайте также: Решение проблемы со скрытыми файлами и папками на флешке

Способ 3: Назначение новой буквы
Есть вероятность, что флешка не работает из-за присвоенной ей буквы, которую нужно изменить. К примеру, такая буква уже есть в системе, и она отказывается воспринимать второе устройство с ней. В любом случае стоит попробовать сделать следующее:
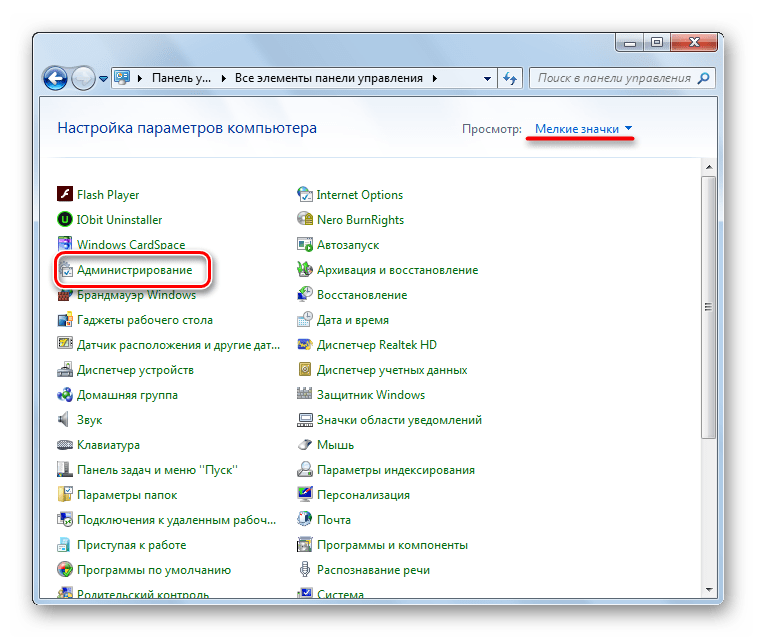
- Войдите в «Панель управления» и выберите раздел «Администрирование».
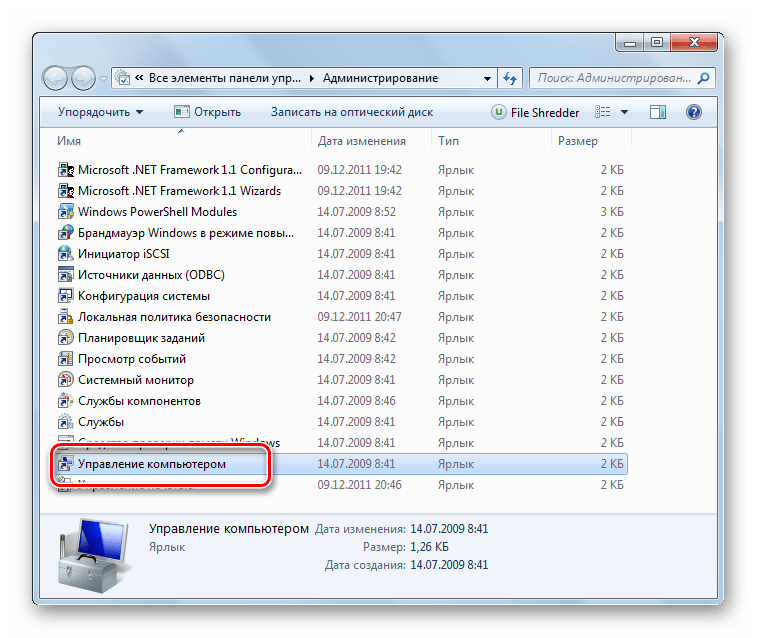
- Дважды кликните по ярлыку «Управление компьютером».
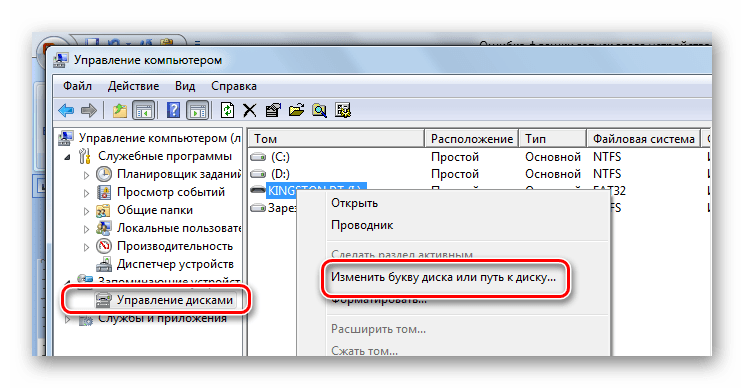
- Выберите пункт «Управление дисками».
- Кликните правой кнопкой по проблемной флешке и выберите «Изменить букву диска…».
- Нажмите кнопку «Изменить».
- В выпадающем меню выберите новую букву, но проследите, чтобы она не совпадала с обозначением других устройств, подключаемых к компьютеру. Нажмите «ОК» в этом и следующем окне.
- Теперь можно закрывать все ненужные окна.
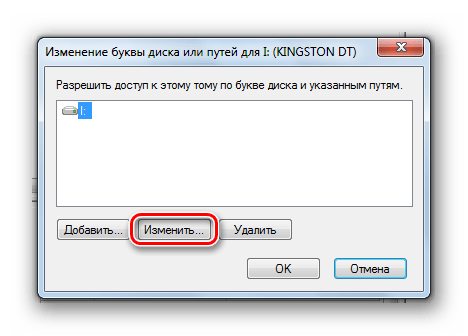
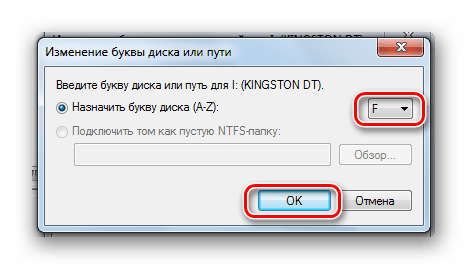
В нашем уроке Вы можете узнать больше о том, как переименовать флешку, и прочитать о еще 4 способах выполнения данной задачи.
Урок: 5 способов переименовать флешку
Способ 4: Чистка реестра
Возможно, целостность важных записей в реестре была нарушена. Нужно найти и удалить файлы Вашей флешки. Инструкция в данном случае будет выглядеть так:
- Запустите «Редактор реестра» (снова нажмите одновременно кнопки «Win» и «R», введите regedit и нажмите «Enter»).
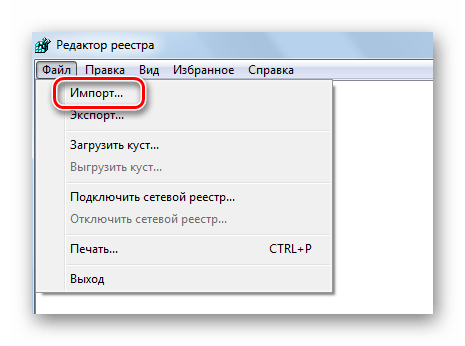
- На всякий случай сделайте резервную копию реестра. Для этого нажмите «Файл», а затем «Экспорт».
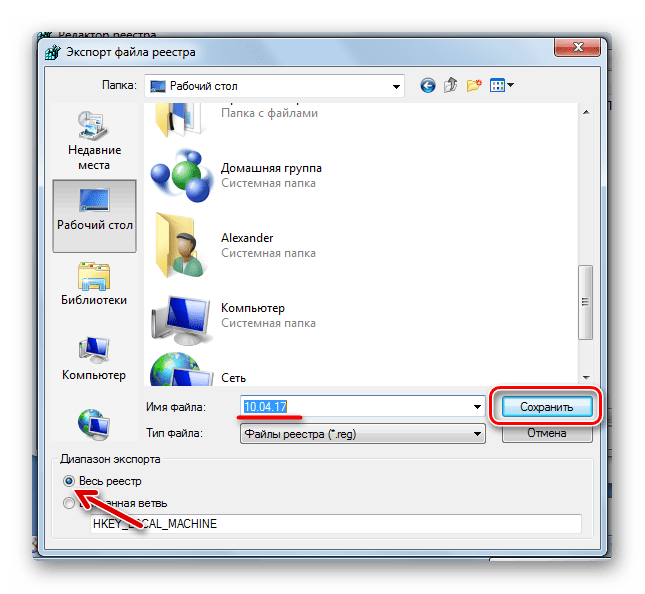
- Обозначьте «Весь реестр», укажите имя файла (рекомендуется дата создания копии), выберите место сохранения (появится стандартное диалоговое окно сохранения) и нажмите «Сохранить».
- Если Вы случайно удалите что-то нужное, можно будет все исправить, загрузив этот файл через пункт «Импорт».
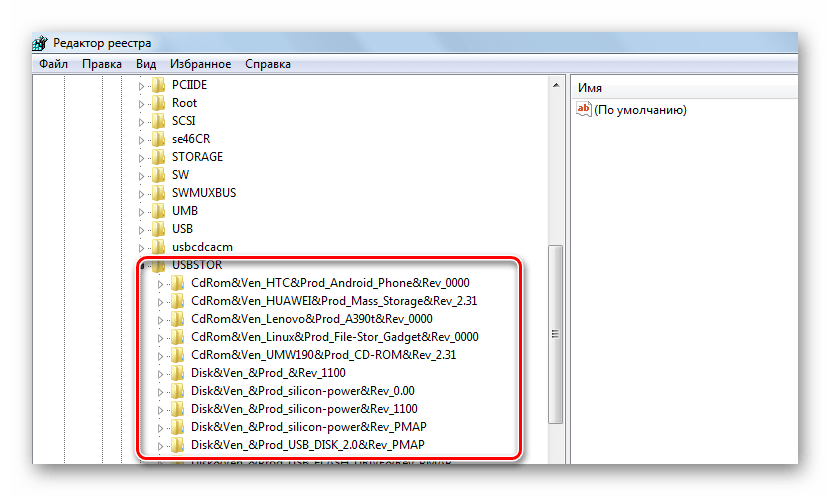
- Данные обо всех USB-устройствах, когда-либо подключенных к ПК, хранятся в этой ветке:
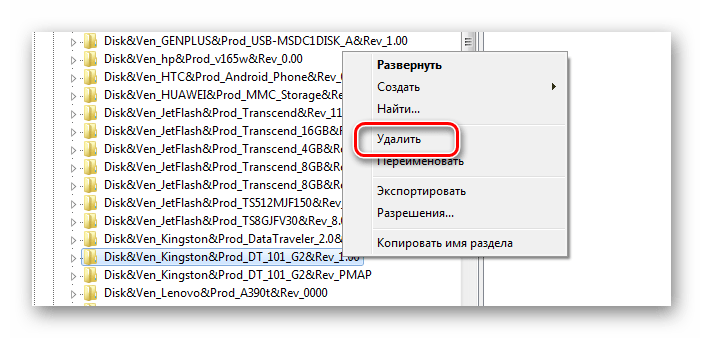
HKEY_LOCAL_MACHINE\SYSTEM\CurrentControlSet\Enum\USBSTOR - В перечне отыщите папку с названием модели флешки и удалите ее.
- Также проверьте следующие ветки
HKEY_LOCAL_MACHINE\SYSTEM\ControlSet001\Enum\USBSTORHKEY_LOCAL_MACHINE\SYSTEM\ControlSet002\Enum\USBSTOR
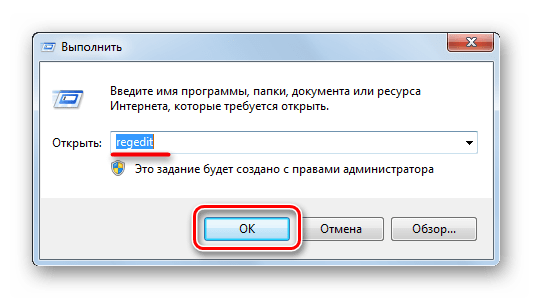
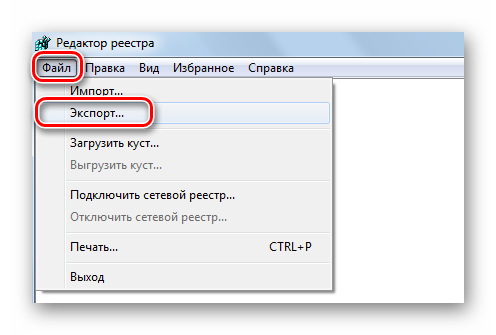
Как вариант, можно использовать одну из программ, в функционал которой включена чистка реестра. С этой задачей, например, хорошо справляется Advanced SystemCare.

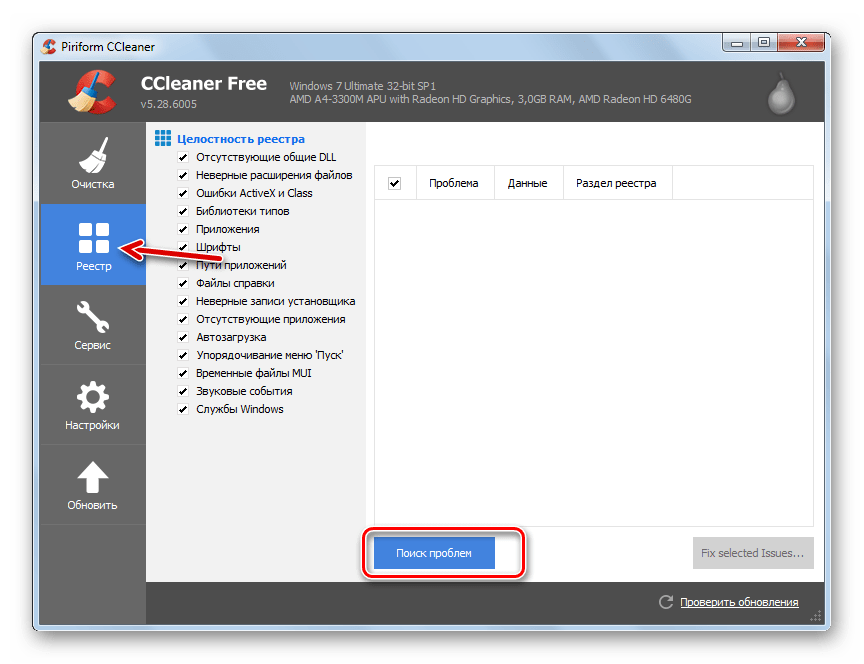
На CCleaner это выглядит так, как показано на фото ниже.
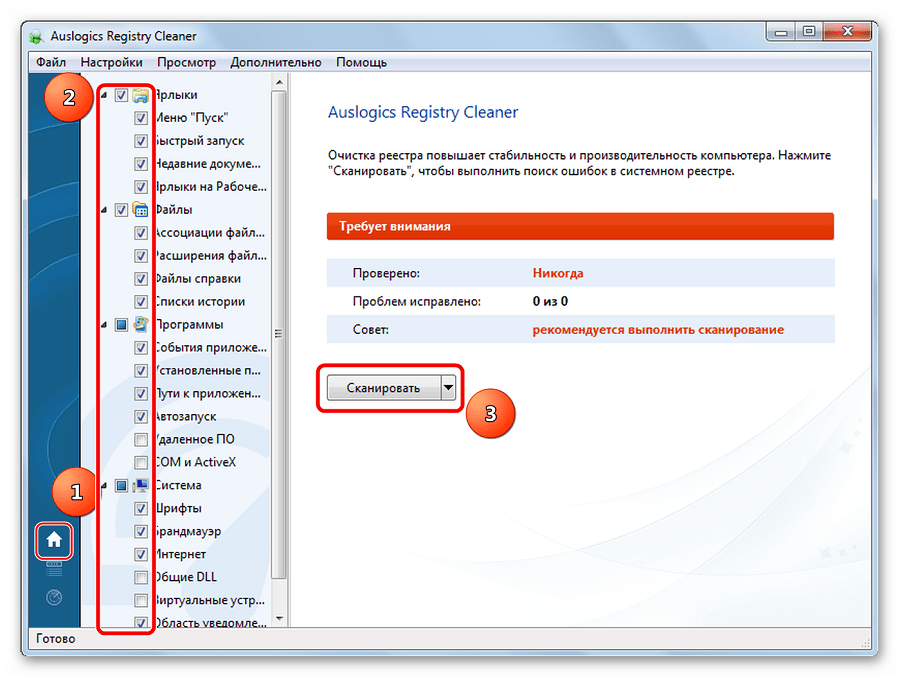
Также можно использовать Auslogics Registry Cleaner.
Если Вы не уверены, что справитесь с ручной очисткой реестра, то лучше прибегнуть к использованию одной их этих утилит.
Способ 5: Восстановление системы
Ошибка могла возникнуть после внесения каких-либо изменений в операционную систему (установка программ, драйверов и так далее). Восстановление позволит сделать откат на момент, когда проблем еще не было. Данная процедура выполняется следующим образом:
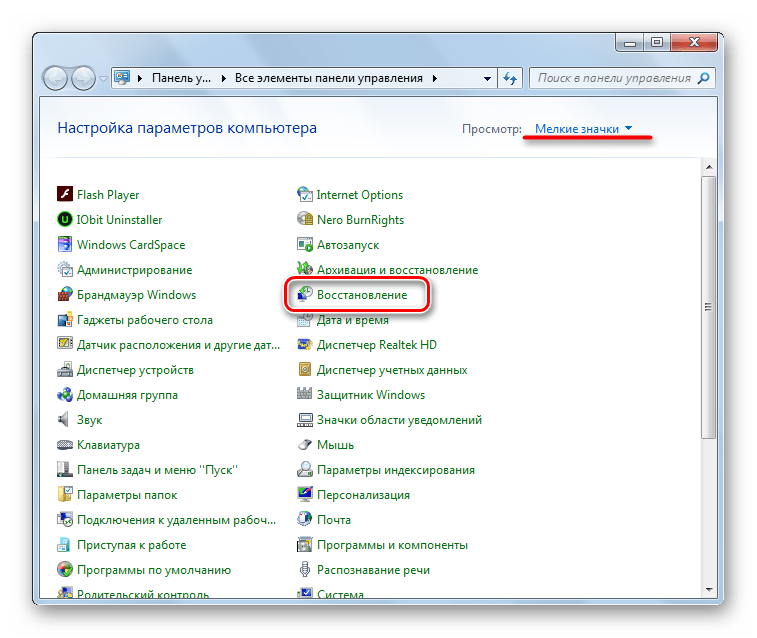
- В «Панели управления» войдите в раздел «Восстановление».
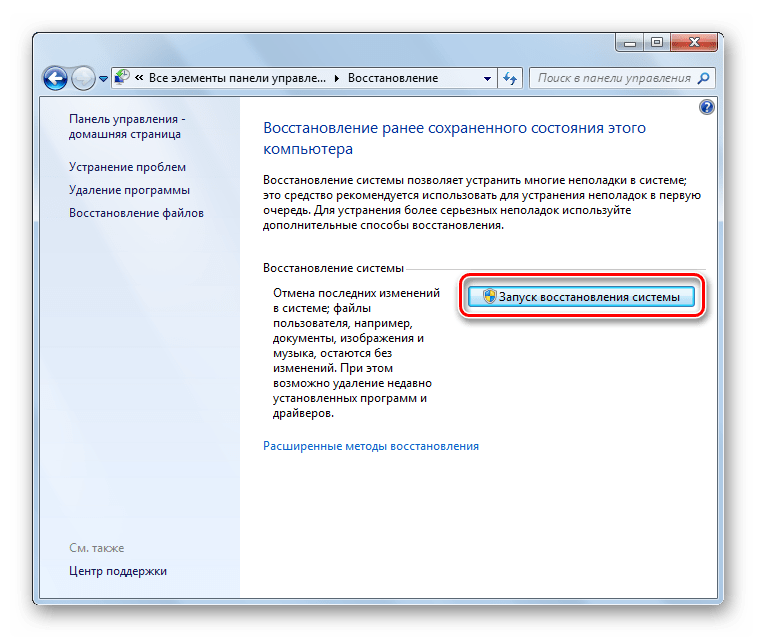
- Нажмите кнопку «Запуск восстановления системы».
- Из перечня можно будет выбрать точку отката и вернуть систему в прежнее состояние.
Проблема может быть в устаревшей системе Windows, например, XP. Возможно, пора задуматься о переходе на одну из актуальных версий этой ОС, т.к. выпускаемое сегодня оборудование ориентировано на работу именно с ними. Это касается и случаев, когда пользователи пренебрегают установкой обновлений.
В заключение можно сказать, что мы рекомендуем поочередно использовать каждый из приведенных в этой статье способов. Сложно точно сказать, какой из них наверняка поможет решить проблему с флешкой – все зависит от первопричины. Если что-то будет непонятно, пишите об этом в комментариях.
Читайте также: Как сделать из загрузочной флешки загрузочный диск
Содержание
- Ошибка накопителя: Запуск этого устройства невозможен. (Код 10)
- Способ 1: Отключение устройств USB
- Способ 2: Обновление драйверов
- Способ 3: Назначение новой буквы
- Способ 4: Чистка реестра
- Способ 5: Восстановление системы
- Вопросы и ответы
Вы подключаете флешку, а компьютер ее не видит? Такое может произойти как с новым накопителем, так и с тем, что постоянно используется на Вашем ПК. При этом в свойствах устройства появляется характерная ошибка. К решению этой проблемы следует подходить в зависимости от причины, которая привела к такой ситуации.
На всякий случай уточним, что мы говорим о такой ошибке, как показано на фото ниже:
Скорее всего, кроме сообщения о невозможности запуска съемного накопителя, система не даст никакой другой информации. Поэтому придется поочередно рассматривать самые вероятные причины, а конкретно:
- установка драйверов устройства прошла некорректно;
- произошел конфликт оборудования;
- повреждены ветки реестра;
- другие непредвиденные причины, помешавшие идентификации флешки в системе.
Вполне возможно, что неисправен сам носитель информации или USB-разъем. Поэтому для начала правильно будет попытаться вставить ее в другой компьютер и посмотреть, как она будет себя вести.
Способ 1: Отключение устройств USB
Отказ работы флешки мог быть вызван конфликтом с другими подключенными устройствами. Поэтому Вам нужно выполнить несколько простых действий:
- Извлеките все USB-устройства и кардридеры, включая флешку.
- Перезагрузите компьютер.
- Вставьте нужную флешку.
Если дело было в конфликте, то ошибка должна исчезнуть. Но если ничего не происходит, переходите к следующему способу.
Способ 2: Обновление драйверов
Наиболее часто всему виной отсутствующие или неработающие (некорректные) драйвера накопителя. Эту проблему исправить довольно просто.
Для этого сделайте вот что:
- Вызовите «Диспетчер устройств» (одновременно нажмите «Win» и «R» на клавиатуре, и введите команду devmgmt.msc, после чего нажмите «Enter»).
- В разделе «Контроллеры USB» найдите проблемную флешку. Скорее всего, она будет обозначена как «Неизвестное USB-устройство», а рядом будет треугольник с восклицательным знаком. Кликните по ней правой кнопкой и выберите «Обновить драйверы».
- Начните с варианта автоматического поиска драйверов. Обратите внимание, что на компьютере обязательно должен быть доступ в Интернет.
- В сети начнется поиск подходящих драйверов с дальнейшей их установкой. Однако Windows не всегда справляется с этой задачей. И если таким способом исправить проблему не получилось, то зайдите на официальный сайт производителя флешки и скачайте драйвера там. Найти их чаще всего можно в разделе сайта «Обслуживание» или «Поддержка». Далее нажмите кнопку «Выполнить поиск драйверов на этом компьютере» и выберете скачанные файлы.
Кстати, переносное устройство может перестать работать как раз после обновления драйверов. В этом случае поищите на том же официальном сайте или других надежных источниках более старые версии драйверов и установите их.
Читайте также: Решение проблемы со скрытыми файлами и папками на флешке
Способ 3: Назначение новой буквы
Есть вероятность, что флешка не работает из-за присвоенной ей буквы, которую нужно изменить. К примеру, такая буква уже есть в системе, и она отказывается воспринимать второе устройство с ней. В любом случае стоит попробовать сделать следующее:
- Войдите в «Панель управления» и выберите раздел «Администрирование».
- Дважды кликните по ярлыку «Управление компьютером».
- Выберите пункт «Управление дисками».
- Кликните правой кнопкой по проблемной флешке и выберите «Изменить букву диска…».
- Нажмите кнопку «Изменить».
- В выпадающем меню выберите новую букву, но проследите, чтобы она не совпадала с обозначением других устройств, подключаемых к компьютеру. Нажмите «ОК» в этом и следующем окне.
- Теперь можно закрывать все ненужные окна.
В нашем уроке Вы можете узнать больше о том, как переименовать флешку, и прочитать о еще 4 способах выполнения данной задачи.
Урок: 5 способов переименовать флешку
Способ 4: Чистка реестра
Возможно, целостность важных записей в реестре была нарушена. Нужно найти и удалить файлы Вашей флешки. Инструкция в данном случае будет выглядеть так:
- Запустите «Редактор реестра» (снова нажмите одновременно кнопки «Win» и «R», введите regedit и нажмите «Enter»).
- На всякий случай сделайте резервную копию реестра. Для этого нажмите «Файл», а затем «Экспорт».
- Обозначьте «Весь реестр», укажите имя файла (рекомендуется дата создания копии), выберите место сохранения (появится стандартное диалоговое окно сохранения) и нажмите «Сохранить».
- Если Вы случайно удалите что-то нужное, можно будет все исправить, загрузив этот файл через пункт «Импорт».
- Данные обо всех USB-устройствах, когда-либо подключенных к ПК, хранятся в этой ветке:
HKEY_LOCAL_MACHINESYSTEMCurrentControlSetEnumUSBSTOR - В перечне отыщите папку с названием модели флешки и удалите ее.
- Также проверьте следующие ветки
HKEY_LOCAL_MACHINESYSTEMControlSet001EnumUSBSTORHKEY_LOCAL_MACHINESYSTEMControlSet002EnumUSBSTOR
Как вариант, можно использовать одну из программ, в функционал которой включена чистка реестра. С этой задачей, например, хорошо справляется Advanced SystemCare.
На CCleaner это выглядит так, как показано на фото ниже.
Также можно использовать Auslogics Registry Cleaner.
Если Вы не уверены, что справитесь с ручной очисткой реестра, то лучше прибегнуть к использованию одной их этих утилит.
Способ 5: Восстановление системы
Ошибка могла возникнуть после внесения каких-либо изменений в операционную систему (установка программ, драйверов и так далее). Восстановление позволит сделать откат на момент, когда проблем еще не было. Данная процедура выполняется следующим образом:
- В «Панели управления» войдите в раздел «Восстановление».
- Нажмите кнопку «Запуск восстановления системы».
- Из перечня можно будет выбрать точку отката и вернуть систему в прежнее состояние.
Проблема может быть в устаревшей системе Windows, например, XP. Возможно, пора задуматься о переходе на одну из актуальных версий этой ОС, т.к. выпускаемое сегодня оборудование ориентировано на работу именно с ними. Это касается и случаев, когда пользователи пренебрегают установкой обновлений.
В заключение можно сказать, что мы рекомендуем поочередно использовать каждый из приведенных в этой статье способов. Сложно точно сказать, какой из них наверняка поможет решить проблему с флешкой – все зависит от первопричины. Если что-то будет непонятно, пишите об этом в комментариях.
Читайте также: Как сделать из загрузочной флешки загрузочный диск
Для удобства вывода и обработки ошибок в сети Интернет была введена классификация и структурирование. Существует целый ряд ошибок 4ххх. В этом выпуске поговорим о конкретной ошибке: ошибка 410 что это и как решить эту проблему на сайте, youtube, планшете или телефоне, который работает на андроиде.
[toc]
Определение ошибки простым языком
Не всегда достаточно просто найти, как исправить ошибку 410, к примеру, на сайте YouTube. Порой встречаются совершенно нестандартные ситуации, поэтому, если вы понимаете природы появления этой ошибки, вы легко сможете решить даже не типичную проблему.
Давайте простыми словами выясним, ошибка 410 что это? Итак, ошибка 410 – это ответ сервера на вносимые изменения разработчиком. Проще говоря, когда возникает такая ошибка, виноваты либо вы, либо прямые руки разработчика. Но часто, такую ошибку можно встретить на YouTube и старых версиях Android. Например, к старой версии Google относит Android 4.0.
Ошибка или код 410 – Gone, значит, что страница или запрашиваемый файл был удален. Частично ошибка дублируется ошибкой 404 (Not Found – Не найдено).
В результате, чтобы вы не предпринимали, вам будет выходить ошибка 410 проблемы с сетью. Но не стоит отчаиваться, есть несколько способов решить данную проблему. Единственный момент, нужно четко понимать, что данная ошибка не связана с обновлением приложения или системы сайта. В этом случае никакие танцы с бубном вас не спасут.
Наиболее распространенные места возникновения этой ошибки: на Youtube (если у вас Android), на телефоне, на планшете, просто на сайте. Ниже мы подробно рассмотрим варианты, как исправить ошибку 410.
Если ошибка 410 возникла на Ютубе
Часто данная ошибка связана именно с обновлением официального приложения. Как это исправить? Так, если вылезла ошибка 410 в ютубе на адроиде, значит нужно проверить обновление программы. Как это сделать?
- Для этого нужно зайти в Play Market
- Найти приложение YouTube
- Нажмите кнопку обновить
- Если проживаете в Крыму, не забудьте включить VPN

Используйте ВПН для обновления, если вы живете в Крыму
Если обновить приложение не получается, значит версия прошивки не поддерживает больше такие обновления. Разработчики намерено отключили возможность поддержки старых устройств, намекая на покупку нового устройства. Например, если у Вас Андроид 4.4, тогда для вас это будет проблемой.
Если причины в прошивке устройства
Какой выход? Сразу хочу предупредить, что для устройств, которые выпушены лет 6 назад, вы не получите обновлений, необходимых для работы сервисов Play Market, а значит и приложения YouTube. Однако, есть способы как решить проблему, если ошибка 410 появилась на планшете. Давайте по порядку, проверим можно ли официально обновиться.

Проверьте обновления Вашей системы Android
- Пройдите в Настройки телефона или планшета.
- Найдите последний пункт «Об устройстве»
- Найдите пункт обновление и проверьте доступны ли они для вас.
- Если обновления есть – нужно скачать и установить, используя инструкции.
- По завершению обновления, перейдите в Play Market
- Найдите в ней программу YouTube и выполните обновление. После этого Ошибка 410 YouTube вас беспокоить не будет.

Убедитесь, что ошибка 410 не из-за устаревшей прошивки
Если устройство старое, то вероятно, обновлений не будет. Вариантов решения вопроса не много: либо установить прошивку новую не официальную, либо установить другую программу для просмотра YouTube. Благо таких программ полно:
- Vutube Player
- Newpipe
- OGYouTube
- YouTube Vanced
Кроме возможности смотреть видео с ютуба, программа блокирует любую рекламу. Однако, войти в свой аккаунт не выйдет, так программа не привязана к сервисам Google Play Market. Также есть моды официального приложения для старых прошивок, начиная с версии Андроид 2.2. Найти такую программу можно на сайте 4pda. Чтобы скачать, потребуется регистрация. Поэтому, если возникает ошибка 410 на адроид, что делать вы уже знаете.
ВАЖНО: перед установкой программ в настройках придется установить разрешение на сторонние приложения. Это нормально и ничего криминального в этом нет, тем более для вашего не столь нового устройства.
Если ошибка 410 появилась на сайте
Иногда ошибка 410 встречается на сайте, в том числе на популярных порталах. Сразу хочется сказать, что, если вы не администратор ресурса, то вам не стоит паниковать. Исправить вы ничего не сможете, если конечно сбой не носит системный характер.
- Проверьте настройки времени на своей ПК или ноутбуке. Обычно, ошибка 410 на сайте может возникать, если установлены не корректная дата в системе. Порой происходит сбой и время «слетает». Попробуйте решить вопрос включением автоматического времени.
- Также, проблема ошибки 410 может возникнуть от блокировки сайта антивирусом. Особенно это встречается в бесплатных версиях антивирусов Avast. Редко, но можно встретить такую беду и в антивирусе Dr.Web. Решается просто: кликните по значку антивируса правой кнопкой мыши и нажмите «Отключить». После этого пройдите на сайт. Если ничего не изменилось, ищите проблему дальше.
- Если вы администратор сайта и только что внесли изменения в файлах или настройках, нужно немного подождать. Конфигурация обновляется обычно в течении часа. Если через час ничего не изменилось, даже после очистки кэша браузера, свяжитесь с хостинг провайдером для выяснения причины проблемы. Иногда она возникает после обновления версии PHP на 7.1.
Обратите внимание: Действия на компьютере нужно делать, если вы уверены на 100%, что проблема именно на вашей стороне. Проверьте сайт на другом устройстве. Если ошибка 410 на планшете или телефоне не возникает, тогда поработайте над своим компьютером. Иногда вопрос может решиться только переустановкой системы Windows.
Если возникла проблема с сетью
Иногда бывают ситуации, когда ни один из вышеперечисленного не решает проблему. Например, у вас возникла ошибка 410 на телефоне, хотя прошивка свежая, да и программы обновлены. Что делать в этом случае? Как правило, причина проблема всего одна – ваш роутер. Что нужно сделать?
- Просто отключите ваш роутер на 15 минут. Желательно полностью отключить из розетки, а не выключить кнопкой на устройстве. Иногда такие сбои происходят ввиду постоянной работы вашего роутера.
- Время и DNS настроены не верно. Если вы разбираетесь в настройках роутера, тогда пройдите по адресу 192.168.0.1 (обычно это стандартный адрес настроек роутера) и найдите настройки самого устройства. Проверьте дату. Также в настройках интернета проверьте совпадает ли DNS с выданным вашим провайдером. Если ничего вам не давали – DNS должен быть пустым.
- Обновите прошивку роутера. Крайний случай, когда возникает проблема с сетью ошибка 410 – это перепрошить или обновить роутер. Например, компания Huawei выпустила роутер с явно сырой прошивкой W550, после чего, буквально через месяц выкатили свежее обновление.
Заключение
Ошибка 410 возникает чаще всего по вине администратора сайта или владельца приложения. При возникновении сбоя, не спешите искать проблему на своем устройстве. В первую очередь нужно убелиться, что проблема не является общей на всех устройствах. Удачи.
Привет, давно возникла проблема с распознаванием подключенных к компьютеру usb устройств. А это камера USB 2.0 и проводной геймпад XboX 360. Центр исправления ошибок не распознает проблемы с функционированием устройств и система «видит» эти устройства, но они не работают должным образом.
Камера вообще не работает, хотя все приложения распознают ее присутствие, а геймпад работает только первые несколько секунд после подключения (а потом только левый джойстик)
Недавно после перезагрузки компьютера в диспетчере устройств появилось новое сообщение о том, что Windows не может найти описание идентификатора события.
Далее идет текст ошибки из диспетчера устройств:
UserPnP событие
Установка драйвера xusb22.inf_amd64_e41db3fe2103ee21 для экземпляра устройства с ID USB VID_0738 и PID_F401 102176A завершена со следующим статусом: 0x0.
— Поставщик
[Имя] Microsoft-Windows-UserPnp
[Справка] {96F4A050-7E31-453C-88BE-9634F4E02139}
Код события 20001
Версия 0
Уровень 4
Задача 7005
Код операции 0
Ключевые слова 0x8000000000000000
— Время создания
[Системное время] 2018-11-02T16: 28: 57.314914100Z
EventRecordID 631512
Корреляция
— Исполнение
[ID процесса] 18812
[ID потока] 1268
Система каналов
KmsZarСемейный компьютер
— Безопасность
[ID пользователя] S-1-5-18
— Данные пользователя
— InstallDeviceID
Имя драйвера xusb22.inf_amd64_e41db3fe2103ee21
Версия драйвера 10.0.17134.1
Microsoft DriverProvider
DeviceInstanceID USB VID_0738 и PID_F401 102176A
Класс установки {D61CA365-5AF4-4486-998B-9DB4734C6CA3}
RebootOption false
UpgradeDevice false
IsDriverOEM подделка
InstallStatus 0x0
Описание драйвера Контроллер Xbox 360 для Windows
————————————————————————————
Событие Kernel-PnP 442
[Имя] Microsoft-Windows-Kernel-PnP
[Справка] {9C205A39-1250-487D-ABD7-E831C6290539}
Код события 442
Версия 0
Уровень 3
Задача 0
Код операции 0
Ключевые слова 0x400000000000000000
— Время создания
[SystemTime] 2018-11-02T16: 28: 57.165078000Z
EventRecordID 825
Корреляция
— Исполнение
[ID процесса] 4
[ID потока] 4100
Microsoft-Windows-Kernel-PnP / Канал конфигурации
DeviceInstanceId USB VID_0738 и PID_F401 102176A
LastDeviceInstanceId USB VID_1532 и PID_0510 00000000
Руководство по классам {36FC9E60-C465-11CF-8056-444553540000}
Путь PCIROOT Путь (0) #PCI (1D00) #USBROOT (0) #USB (2)
MigrationRank 0xf000ffffffff0023
Поддельный подарок
Статус 0xc0000719
Не удалось найти описание для события с кодом 442 в источнике Microsoft-Windows-Kernel-PnP. Компонент, вызывающий это событие, либо не установлен на этом локальном компьютере, либо поврежден. Установите или отремонтируйте компонент на локальном компьютере.
Если событие возникло на другом компьютере, может потребоваться сохранить информацию, отображаемую вместе с событием.
К событию добавлена следующая информация:
USB VID_0738 и PID_F401 102176A
USB VID_1532 и PID_0510 00000000
EV_RenderedValue_2.00
PCIROOT (0) #PCI (1D00) #USBROOT (0) #USB (2)
17294104044079349795
Ложь
321227289
————————————————————————————————————-
Событие ядра 420
Не удалось найти описание для события с идентификатором 420 в источнике Microsoft-Windows-Kernel-PnP. Компонент, вызывающий это событие, либо не установлен на этом локальном компьютере, либо поврежден. Установите или отремонтируйте компонент на вашем локальном компьютере.
Если событие возникло на другом компьютере, может потребоваться сохранить информацию, отображаемую вместе с событием.
К событию добавлена следующая информация:
USB VID_0738 и PID_F401 102176A
EV_RenderedValue_1.00
0
0
Система
— Поставщик
[Имя] Microsoft-Windows-Kernel-PnP
[Справка] {9C205A39-1250-487D-ABD7-E831C6290539}
Идентификатор события 420
Версия 0
Уровень 4
Задача 0
Код операции 0
Ключевые слова 0x400000000000000000
— Время создания
[SystemTime] 2018-11-03T14: 16: 30.232352900Z
EventRecordID 871
Корреляция
— Исполнение
[ID процесса] 5644
[ID потока] 10508
Microsoft-Windows-Kernel-PnP / Канал конфигурации
DeviceInstanceId USB VID_0738 и PID_F401 102176A
Руководство по классу {D61CA365-5AF4-4486-998B-9DB4734C6CA3}
Проблема 0x0
Статус 0x0
————————————————————————————-
Событие Kernel-PnP 410
Не удалось найти описание для события с кодом 410 в источнике Microsoft-Windows-Kernel-PnP. Компонент, вызывающий это событие, либо не установлен на этом локальном компьютере, либо поврежден. Установите или отремонтируйте компонент на вашем локальном компьютере.
Если событие возникло на другом компьютере, может потребоваться сохранить информацию, отображаемую вместе с событием.
К событию добавлена следующая информация:
USB VID_0738 и PID_F401 102176A
xusb22.inf
EV_RenderedValue_2.00
xusb22
0
0
DeviceInstanceId USB VID_0738 и PID_F401 102176A
Имя драйвера xusb22.inf
Руководство по классу {D61CA365-5AF4-4486-998B-9DB4734C6CA3}
Название службы xusb22
Нижние фильтры
Лучшие фильтры
Проблема 0x0
Статус 0x0
———————————————————————————-
Событие Kernel-PnP 400
Не удалось найти описание для события с кодом 400 из источника Microsoft-Windows-Kernel-PnP. Компонент, вызывающий это событие, либо не установлен на этом локальном компьютере, либо поврежден. Установите или отремонтируйте компонент на локальном компьютере
Если событие возникло на другом компьютере, может потребоваться сохранить информацию, отображаемую вместе с событием.
К событию добавлена следующая информация:
USB VID_0738 и PID_F401 102176A
xusb22.inf
EV_RenderedValue_2.00
10.04.2018
10.0.17134.1
Microsoft
Правда
CC_Install
16719872
USB MS_COMP_XUSB10
Ложь
0
DeviceInstanceId USB VID_0738 и PID_F401 102176A
Имя драйвера xusb22.inf
Руководство по классу {D61CA365-5AF4-4486-998B-9DB4734C6CA3}
Дата драйвера 10.04.2018
Версия драйвера 10.0.17134.1
Microsoft DriverProvider
Истинный драйвер
DriverSection CC_Install
DriverRank 0xff2000
MatchingDeviceId USB MS_COMP_XUSB10
Драйверы вне рейтинга
DeviceUpdated false
Статус 0x0
———————————————————————————
Событие Kernel-PnP 430
К событию добавлена следующая информация:
USB VID_0738 и PID_F401 102176A
DeviceInstanceId USB VID_0738 и PID_F401 102176A
———————————————————————————
Привет.
Вы пробовали установить последние версии драйверов для этой мыши? Они могут конфликтовать с вашей системой или другими драйверами.
Попробуйте удалить их полностью и использовать стандартный драйвер мыши — не исчезнет ли проблема в этом случае? ——————
если вы найдете чей-то пост полезным, отметьте его как ответ и оцените, пожалуйста. Это поможет другим пользователям найти ответы на похожие вопросы.
Источник: https://answers.microsoft.com/ru-ru/windows/forum/all/microsoft-windows-kernel-pnp-events-400-410-420/23c4cb7c-6ce6-49ff-bd4f-0c429c29e93e
| Воскресенье, 29.01.2023, 14:01 Приветствую Вас Гость | RSS |
||||||||||||||||||||||||||||||||||||||||||||||||||||||||
| Главная | Флешка Kingston DataTraveler 410 — Форум | Регистрация | Вход | ||||||||||||||||||||||||||||||||||||||||||||||||||||||||
|
|
|||||||||||||||||||||||||||||||||||||||||||||||||||||||
|


If you incorrectly type a URL, you may see a 404 error explaining that this web page doesn’t exist. However, if the page has been deleted, you’ll likely receive a “410 Gone” status code. This means you won’t be able to access the page at all.
Fortunately, there are a few easy ways to fix the “410 Gone” error. If it happens to your website, you can examine your site logs and reconfigure your server to resolve the issue. Alternatively, you can troubleshoot this error on the client side by rolling back recent updates or uninstalling new plugins.
Check Out Our Video Guide to the “410 Gone” Error
In this post, we’ll explain what error 410 is and discuss its potential causes. Then, we’ll show you how to fix it on both the client and server sides. Let’s get started!
What Is the “410 Gone” Error?
When someone clicks on a web page, their browser makes a request to the website’s server. After processing the request, the server will send the relevant site files, displaying the requested information.
Although you may not see it, the server will also send a status code in an HTTP header. These HTTP status codes indicate whether the request was a success or a failure.
Here are some different types of HTTP status codes:
- 100s: Informational requests
- 200s: Successful requests
- 300s: Redirects
- 400s: Client-side errors
- 500s: Server-side errors
The “410 Gone” error is a 400 HTTP status code that indicates that the target resource has been permanently deleted. In this case, the server can’t complete the request because the page does not exist.
Depending on your browser, the 410 error can appear in a few different ways:
- 410 Gone
- Gone
- Error 410
- HTTP Status 410
As a website owner, it’s important to monitor your status codes and fix any errors when they occur. If new visitors can’t find the information they’re looking for, they may turn to a competitor instead. To resolve the “410 Gone” error, you’ll first need to know what’s causing it.
Seeing this tricky error message? 👀 The solution is closer than you may think… ⬇️Click to Tweet
What Causes the “410 Gone” Error?
Since the “410 Gone” error is categorized as a 400 HTTP status code, you may think that it only occurs as a client-side error. However, this can happen on both the server and client sides.
A user might make a mistake when typing a URL. In many cases, this results in a “404 Not Found” error. However, it’s possible to get an error 410 if the resource once existed at that URL and the server was configured to return a “410 Gone” status code.
If you’ve recently made changes to your Content Management System (CMS), you could inadvertently trigger a “410 Gone” status code. Sometimes, new plugins, updates, or extensions can make changes to your database, leading to this error.
Alternatively, error 410 can be the result of incorrect server configuration. If you search your log files for unwanted 410 redirects, you’ll likely find the source of the issue.
The 410 HTTP status code can also be intentional. If you’re running a time-sensitive promotion on your website, that web page will only be available for a certain period:

If someone clicks on this promotional link after the sale is finished, you can redirect them to a “410 Gone” error. This will let them know that the page was taken down and won’t be coming back.
The Difference Between the “410 Gone” and the “404 Not Found” Error
Both the “410 Gone” and “404 Not Found” errors indicate that the resource cannot be retrieved. However, there are a few main differences between the two HTTP status codes.
404 Not Found is one of the most common HTTP status codes. When you see this error, it means that the requested resource doesn’t exist:

However, a “404 Not Found” error is a temporary problem. This means that you can try the URL again later to see if the problem has been resolved.
With a “410 Gone” error, the requested page has been permanently deleted. When search crawlers identify this HTTP status code, they will de-index the link. This can also inform other website owners to remove this link from their content.
If you don’t need a particular page anymore, it can be useful to implement a “410 Gone” redirect. However, if these errors happen on their own, you’ll need to fix them to keep your website performing properly.
How To Fix the “410 Gone” Error (2 Methods)
There are many ways you can fix the “410 Gone” error. By troubleshooting both the client and server sides, you can ensure that your content can be viewed by visitors and indexed by search engines. Since many of these methods involve altering site files, updates, and plugins, we recommend backing up your website first.
Method 1: Investigating a Client-Side “410 Gone” Error
Before you start making changes to your server, you can troubleshoot your website on the client side. This can be a simple way to fix the error without altering vital site files.
Step 1: Check the Requested URL
When you first experience the “410 Gone” error, it’s a good idea to check the link. As we discussed earlier, inputting an incorrect URL can cause this HTTP status code.
If you’re trying to reach a web page that has been permanently deleted, it will likely respond with a “410 Gone” error. This happens because the server disallowed access to that URL.
First, you can try retyping the address. If you still see the “410 Gone” status code, you can search for that page by typing in a few keywords in the search engine:

The website owner might have moved that page to a new URL. By searching for some keywords and entering the website’s name, you could find what you’re looking for on a new page.
Step 2: Roll Back Recent Updates
Once you notice that your web page has been replaced with a “410 Gone” error, you can consider downgrading your WordPress software to an older version. Sometimes, implementing new tools can lead to poor configuration or other unexpected problems, like the 410 error.
If you backed up your website before the update, you can easily restore this previous version. With our Kinsta hosting plans, you’ll receive automatic daily backups for all your websites, even your staging sites.
To restore your backup, open your MyKinsta dashboard. Then, go to Sites and select your website:

On the new page, click on the Backups tab. Here, you’ll see a history of your backups:

Find the backup that you want to restore. Next, locate the Restore to button and select whether you want to downgrade your live site or its staging environment:

Finally, you’ll need to confirm the backup restoration:

Once the restoration process is complete, you’ll be able to access your WordPress dashboard again. If the “410 Gone” issue persists, you’ll need to try another method.
Step 3: Uninstall Plugins and Extensions
If you have installed plugins or extensions that alter your URL structure or redirects, these can cause an error 410. You may see this HTTP status code in other cases because of general incompatibility issues. Either way, you can solve the problem by uninstalling these tools.
To see if your plugins are causing the issue, you can deactivate them all. Since 410 errors don’t usually lock you out of the WordPress dashboard, you can do this on your Plugins page.
Start by selecting all of your plugins. Then, from the Bulk actions dropdown menu, click on
Deactivate:

Finally, click on Apply. This should deactivate all the plugins on your website simultaneously.
Now you can check to see if the “410 Gone” error has been resolved. If so, you can reactivate each plugin one by one to find and delete the culprit. If it serves a vital purpose on your website, you can find a similar plugin or contact its developer about the issue.
Method 2: Investigating a Server-Side “410 Gone” Error
Since the “410 Gone” error can result from a server-side issue, you may not see any improvements on the client side of your website. After you’ve tried the first method with no results, you may need to make changes to your server configuration.
Step 1: Review Your Site Logs
You can check your server logs if you want to know whether your server is experiencing any “410 Gone” errors. This will help you monitor all your HTTP status codes and identify what’s causing errors.
If you have a Kinsta hosting plan, you can review your site logs directly from your dashboard. Once you log into MyKinsta, go to Sites > Logs:
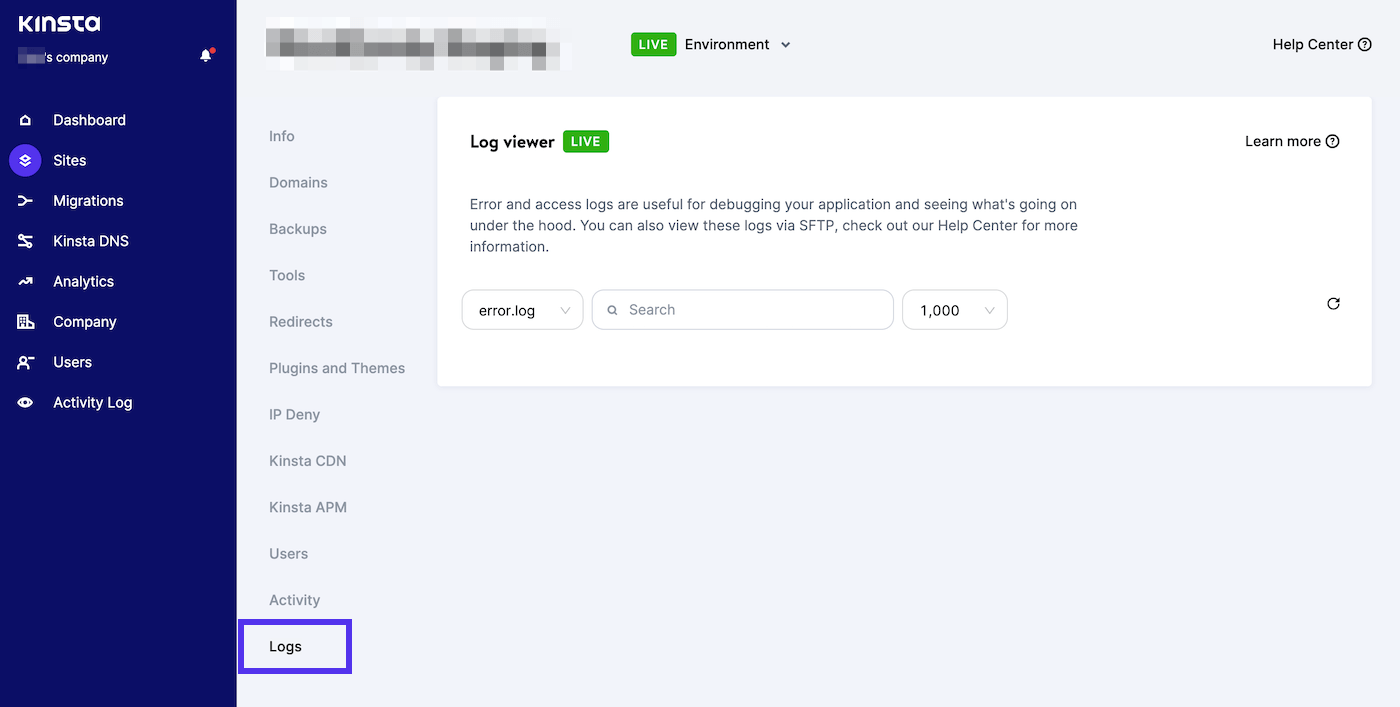
The Log viewer will automatically show your error logs, so you’ll need to select access.log from the dropdown menu:

This will display all of the HTTP requests for your website:

Each line will look something like this:
kinstahelptesting.kinsta.cloud 98.43.13.94 [22/Sep/2021:21:26:10 +0000] GET "/wp-admin/" HTTP/1.0 302 "-" "Mozilla/5.0 (Macintosh; Intel Mac OS X 10.15; rv:92.0) Gecko/20100101 Firefox/92.0" 98.43.13.94 "/wp-admin/index.php" - - 472 0.562 0.560In this example, the request gained a 302 HTTP status code. The requested URL was
“/wp-admin/”You can scan your HTTP requests for 410 errors in your site logs. You can also use the search bar to narrow down your results. If you find any errors, you can identify the specific web page that is down.
Step 2: Debug Your Website
If the “410 Gone” error persists, it’s time to debug your website. To do this, you can use the Query Monitor plugin. This free tool enables you to view the performance of your database queries, as well as PHP errors, enqueued scripts, HTTP API calls, and more:

First, download and install Query Monitor. Then, click on the new tab at the top of your dashboard. To monitor all of your server-side HTTP requests, select HTTP API Calls:

This will show you all of the server-side queries for your website. Here, you can see if any errors occurred while loading your website:

You’ll likely need to check your server configuration if you notice any “410 Gone” errors. However, if you need any help, you can contact your hosting provider.
Step 3: Verify Your Server Configuration
Your WordPress website has a .htaccess file that contains rules about your server configuration. If you recently made changes to this file, it could create a “410 Gone” error.
To check the configuration of the .htaccess file, you’ll need to open your site files. Often, the easiest way to do this is through a Secure File Transfer Protocol (SFTP) client. This will enable you to connect to your server.
If you’re using a Kinsta hosting plan, you can start by logging into your MyKinsta dashboard. Then, navigate to Sites and select your website.
Next, find the SFTP/SSH section. This will contain your login information for SFTP access, including the host number, username, password, and port:

Now you’ll need to open an FTP client like FileZilla. Once you download this software, you’ll need to change the settings from FTP to SFTP access. This provides a safer way to connect to your site.
To do this, go to File > Site Manager:

Here, create a new site. Then, change the Protocol to SFTP – SSH File Transfer Protocol:

Copy your host and port number from MyKinsta. Next, paste these details into their respective boxes and hit Connect:

To finish connecting to your server, enter your username and password and click on OK:

After you successfully log in, navigate to the public_html folder. Then, find the .htaccess file and open it:

Here’s what your .htaccess file might look like:
# BEGIN WordPress

<IfModule mod_rewrite.c>

RewriteEngine On

RewriteBase /

RewriteRule ^index.php$ - [L]

RewriteCond %{REQUEST_FILENAME} !-f

RewriteCond %{REQUEST_FILENAME} !-d

RewriteRule . /index.php [L]

</IfModule>
However, you may see some changes to this file. If you notice any rules containing a “Redirect 410”, you can go ahead and delete them. If your .htaccess file looks similar to the one listed above, you don’t have to make any changes.
Be prepared to fix this pesky issue on both the client ✨and✨ server sides with help from this guide 💪Click to Tweet
Summary
Although the “410 Gone” status code can be useful for removing expired promotions, it can also occur unexpectedly on your website. When this happens, visitors won’t be able to access your content, and search engines will consider the page permanently removed. You’ll need to fix this error to maintain your ranking in search results.
You can resolve this issue on both the client and server sides of your website. You can simply check the requested URL, downgrade your WordPress software, and uninstall your plugins to get started. To identify a “410 Gone” error on your server, you can review your site logs, debug your website, and verify your server configuration.
When you notice any errors on your website, you’ll likely want to troubleshoot them as soon as possible. Kinsta’s APM tool can immediately identify performance issues and get your content back online in no time!
Get all your applications, databases and WordPress sites online and under one roof. Our feature-packed, high-performance cloud platform includes:
- Easy setup and management in the MyKinsta dashboard
- 24/7 expert support
- The best Google Cloud Platform hardware and network, powered by Kubernetes for maximum scalability
- An enterprise-level Cloudflare integration for speed and security
- Global audience reach with up to 35 data centers and 275+ PoPs worldwide
Test it yourself with $20 off your first month of Application Hosting or Database Hosting. Explore our plans or talk to sales to find your best fit.
If you incorrectly type a URL, you may see a 404 error explaining that this web page doesn’t exist. However, if the page has been deleted, you’ll likely receive a “410 Gone” status code. This means you won’t be able to access the page at all.
Fortunately, there are a few easy ways to fix the “410 Gone” error. If it happens to your website, you can examine your site logs and reconfigure your server to resolve the issue. Alternatively, you can troubleshoot this error on the client side by rolling back recent updates or uninstalling new plugins.
Check Out Our Video Guide to the “410 Gone” Error
In this post, we’ll explain what error 410 is and discuss its potential causes. Then, we’ll show you how to fix it on both the client and server sides. Let’s get started!
What Is the “410 Gone” Error?
When someone clicks on a web page, their browser makes a request to the website’s server. After processing the request, the server will send the relevant site files, displaying the requested information.
Although you may not see it, the server will also send a status code in an HTTP header. These HTTP status codes indicate whether the request was a success or a failure.
Here are some different types of HTTP status codes:
- 100s: Informational requests
- 200s: Successful requests
- 300s: Redirects
- 400s: Client-side errors
- 500s: Server-side errors
The “410 Gone” error is a 400 HTTP status code that indicates that the target resource has been permanently deleted. In this case, the server can’t complete the request because the page does not exist.
Depending on your browser, the 410 error can appear in a few different ways:
- 410 Gone
- Gone
- Error 410
- HTTP Status 410
As a website owner, it’s important to monitor your status codes and fix any errors when they occur. If new visitors can’t find the information they’re looking for, they may turn to a competitor instead. To resolve the “410 Gone” error, you’ll first need to know what’s causing it.
Seeing this tricky error message? 👀 The solution is closer than you may think… ⬇️Click to Tweet
What Causes the “410 Gone” Error?
Since the “410 Gone” error is categorized as a 400 HTTP status code, you may think that it only occurs as a client-side error. However, this can happen on both the server and client sides.
A user might make a mistake when typing a URL. In many cases, this results in a “404 Not Found” error. However, it’s possible to get an error 410 if the resource once existed at that URL and the server was configured to return a “410 Gone” status code.
If you’ve recently made changes to your Content Management System (CMS), you could inadvertently trigger a “410 Gone” status code. Sometimes, new plugins, updates, or extensions can make changes to your database, leading to this error.
Alternatively, error 410 can be the result of incorrect server configuration. If you search your log files for unwanted 410 redirects, you’ll likely find the source of the issue.
The 410 HTTP status code can also be intentional. If you’re running a time-sensitive promotion on your website, that web page will only be available for a certain period:
If someone clicks on this promotional link after the sale is finished, you can redirect them to a “410 Gone” error. This will let them know that the page was taken down and won’t be coming back.
The Difference Between the “410 Gone” and the “404 Not Found” Error
Both the “410 Gone” and “404 Not Found” errors indicate that the resource cannot be retrieved. However, there are a few main differences between the two HTTP status codes.
404 Not Found is one of the most common HTTP status codes. When you see this error, it means that the requested resource doesn’t exist:
However, a “404 Not Found” error is a temporary problem. This means that you can try the URL again later to see if the problem has been resolved.
With a “410 Gone” error, the requested page has been permanently deleted. When search crawlers identify this HTTP status code, they will de-index the link. This can also inform other website owners to remove this link from their content.
If you don’t need a particular page anymore, it can be useful to implement a “410 Gone” redirect. However, if these errors happen on their own, you’ll need to fix them to keep your website performing properly.
How To Fix the “410 Gone” Error (2 Methods)
There are many ways you can fix the “410 Gone” error. By troubleshooting both the client and server sides, you can ensure that your content can be viewed by visitors and indexed by search engines. Since many of these methods involve altering site files, updates, and plugins, we recommend backing up your website first.
Method 1: Investigating a Client-Side “410 Gone” Error
Before you start making changes to your server, you can troubleshoot your website on the client side. This can be a simple way to fix the error without altering vital site files.
Step 1: Check the Requested URL
When you first experience the “410 Gone” error, it’s a good idea to check the link. As we discussed earlier, inputting an incorrect URL can cause this HTTP status code.
If you’re trying to reach a web page that has been permanently deleted, it will likely respond with a “410 Gone” error. This happens because the server disallowed access to that URL.
First, you can try retyping the address. If you still see the “410 Gone” status code, you can search for that page by typing in a few keywords in the search engine:
The website owner might have moved that page to a new URL. By searching for some keywords and entering the website’s name, you could find what you’re looking for on a new page.
Step 2: Roll Back Recent Updates
Once you notice that your web page has been replaced with a “410 Gone” error, you can consider downgrading your WordPress software to an older version. Sometimes, implementing new tools can lead to poor configuration or other unexpected problems, like the 410 error.
If you backed up your website before the update, you can easily restore this previous version. With our Kinsta hosting plans, you’ll receive automatic daily backups for all your websites, even your staging sites.
To restore your backup, open your MyKinsta dashboard. Then, go to Sites and select your website:
On the new page, click on the Backups tab. Here, you’ll see a history of your backups:
Find the backup that you want to restore. Next, locate the Restore to button and select whether you want to downgrade your live site or its staging environment:
Finally, you’ll need to confirm the backup restoration:
Once the restoration process is complete, you’ll be able to access your WordPress dashboard again. If the “410 Gone” issue persists, you’ll need to try another method.
Step 3: Uninstall Plugins and Extensions
If you have installed plugins or extensions that alter your URL structure or redirects, these can cause an error 410. You may see this HTTP status code in other cases because of general incompatibility issues. Either way, you can solve the problem by uninstalling these tools.
To see if your plugins are causing the issue, you can deactivate them all. Since 410 errors don’t usually lock you out of the WordPress dashboard, you can do this on your Plugins page.
Start by selecting all of your plugins. Then, from the Bulk actions dropdown menu, click on
Deactivate:
Finally, click on Apply. This should deactivate all the plugins on your website simultaneously.
Now you can check to see if the “410 Gone” error has been resolved. If so, you can reactivate each plugin one by one to find and delete the culprit. If it serves a vital purpose on your website, you can find a similar plugin or contact its developer about the issue.
Method 2: Investigating a Server-Side “410 Gone” Error
Since the “410 Gone” error can result from a server-side issue, you may not see any improvements on the client side of your website. After you’ve tried the first method with no results, you may need to make changes to your server configuration.
Step 1: Review Your Site Logs
You can check your server logs if you want to know whether your server is experiencing any “410 Gone” errors. This will help you monitor all your HTTP status codes and identify what’s causing errors.
If you have a Kinsta hosting plan, you can review your site logs directly from your dashboard. Once you log into MyKinsta, go to Sites > Logs:
The Log viewer will automatically show your error logs, so you’ll need to select access.log from the dropdown menu:
This will display all of the HTTP requests for your website:
Each line will look something like this:
kinstahelptesting.kinsta.cloud 98.43.13.94 [22/Sep/2021:21:26:10 +0000] GET "/wp-admin/" HTTP/1.0 302 "-" "Mozilla/5.0 (Macintosh; Intel Mac OS X 10.15; rv:92.0) Gecko/20100101 Firefox/92.0" 98.43.13.94 "/wp-admin/index.php" - - 472 0.562 0.560In this example, the request gained a 302 HTTP status code. The requested URL was
“/wp-admin/”You can scan your HTTP requests for 410 errors in your site logs. You can also use the search bar to narrow down your results. If you find any errors, you can identify the specific web page that is down.
Step 2: Debug Your Website
If the “410 Gone” error persists, it’s time to debug your website. To do this, you can use the Query Monitor plugin. This free tool enables you to view the performance of your database queries, as well as PHP errors, enqueued scripts, HTTP API calls, and more:
First, download and install Query Monitor. Then, click on the new tab at the top of your dashboard. To monitor all of your server-side HTTP requests, select HTTP API Calls:
This will show you all of the server-side queries for your website. Here, you can see if any errors occurred while loading your website:
You’ll likely need to check your server configuration if you notice any “410 Gone” errors. However, if you need any help, you can contact your hosting provider.
Step 3: Verify Your Server Configuration
Your WordPress website has a .htaccess file that contains rules about your server configuration. If you recently made changes to this file, it could create a “410 Gone” error.
To check the configuration of the .htaccess file, you’ll need to open your site files. Often, the easiest way to do this is through a Secure File Transfer Protocol (SFTP) client. This will enable you to connect to your server.
If you’re using a Kinsta hosting plan, you can start by logging into your MyKinsta dashboard. Then, navigate to Sites and select your website.
Next, find the SFTP/SSH section. This will contain your login information for SFTP access, including the host number, username, password, and port:
Now you’ll need to open an FTP client like FileZilla. Once you download this software, you’ll need to change the settings from FTP to SFTP access. This provides a safer way to connect to your site.
To do this, go to File > Site Manager:
Here, create a new site. Then, change the Protocol to SFTP – SSH File Transfer Protocol:
Copy your host and port number from MyKinsta. Next, paste these details into their respective boxes and hit Connect:
To finish connecting to your server, enter your username and password and click on OK:
After you successfully log in, navigate to the public_html folder. Then, find the .htaccess file and open it:
Here’s what your .htaccess file might look like:
# BEGIN WordPress

<IfModule mod_rewrite.c>

RewriteEngine On

RewriteBase /

RewriteRule ^index.php$ - [L]

RewriteCond %{REQUEST_FILENAME} !-f

RewriteCond %{REQUEST_FILENAME} !-d

RewriteRule . /index.php [L]

</IfModule>
However, you may see some changes to this file. If you notice any rules containing a “Redirect 410”, you can go ahead and delete them. If your .htaccess file looks similar to the one listed above, you don’t have to make any changes.
Be prepared to fix this pesky issue on both the client ✨and✨ server sides with help from this guide 💪Click to Tweet
Summary
Although the “410 Gone” status code can be useful for removing expired promotions, it can also occur unexpectedly on your website. When this happens, visitors won’t be able to access your content, and search engines will consider the page permanently removed. You’ll need to fix this error to maintain your ranking in search results.
You can resolve this issue on both the client and server sides of your website. You can simply check the requested URL, downgrade your WordPress software, and uninstall your plugins to get started. To identify a “410 Gone” error on your server, you can review your site logs, debug your website, and verify your server configuration.
When you notice any errors on your website, you’ll likely want to troubleshoot them as soon as possible. Kinsta’s APM tool can immediately identify performance issues and get your content back online in no time!
Get all your applications, databases and WordPress sites online and under one roof. Our feature-packed, high-performance cloud platform includes:
- Easy setup and management in the MyKinsta dashboard
- 24/7 expert support
- The best Google Cloud Platform hardware and network, powered by Kubernetes for maximum scalability
- An enterprise-level Cloudflare integration for speed and security
- Global audience reach with up to 35 data centers and 275+ PoPs worldwide
Test it yourself with $20 off your first month of Application Hosting or Database Hosting. Explore our plans or talk to sales to find your best fit.
Привет, давно возникла проблема с распознаванием подключенных к компьютеру usb устройств. А это камера USB 2.0 и проводной геймпад XboX 360. Центр исправления ошибок не распознает проблемы с функционированием устройств и система «видит» эти устройства, но они не работают должным образом.
Камера вообще не работает, хотя все приложения распознают ее присутствие, а геймпад работает только первые несколько секунд после подключения (а потом только левый джойстик)
Недавно после перезагрузки компьютера в диспетчере устройств появилось новое сообщение о том, что Windows не может найти описание идентификатора события.
Далее идет текст ошибки из диспетчера устройств:
UserPnP событие
Установка драйвера xusb22.inf_amd64_e41db3fe2103ee21 для экземпляра устройства с ID USB VID_0738 и PID_F401 102176A завершена со следующим статусом: 0x0.
— Поставщик
[Имя] Microsoft-Windows-UserPnp
[Справка] {96F4A050-7E31-453C-88BE-9634F4E02139}
Код события 20001
Версия 0
Уровень 4
Задача 7005
Код операции 0
Ключевые слова 0x8000000000000000
— Время создания
[Системное время] 2018-11-02T16: 28: 57.314914100Z
EventRecordID 631512
Корреляция
— Исполнение
[ID процесса] 18812
[ID потока] 1268
Система каналов
KmsZarСемейный компьютер
— Безопасность
[ID пользователя] S-1-5-18
— Данные пользователя
— InstallDeviceID
Имя драйвера xusb22.inf_amd64_e41db3fe2103ee21
Версия драйвера 10.0.17134.1
Microsoft DriverProvider
DeviceInstanceID USB VID_0738 и PID_F401 102176A
Класс установки {D61CA365-5AF4-4486-998B-9DB4734C6CA3}
RebootOption false
UpgradeDevice false
IsDriverOEM подделка
InstallStatus 0x0
Описание драйвера Контроллер Xbox 360 для Windows
————————————————————————————
Событие Kernel-PnP 442
[Имя] Microsoft-Windows-Kernel-PnP
[Справка] {9C205A39-1250-487D-ABD7-E831C6290539}
Код события 442
Версия 0
Уровень 3
Задача 0
Код операции 0
Ключевые слова 0x400000000000000000
— Время создания
[SystemTime] 2018-11-02T16: 28: 57.165078000Z
EventRecordID 825
Корреляция
— Исполнение
[ID процесса] 4
[ID потока] 4100
Microsoft-Windows-Kernel-PnP / Канал конфигурации
DeviceInstanceId USB VID_0738 и PID_F401 102176A
LastDeviceInstanceId USB VID_1532 и PID_0510 00000000
Руководство по классам {36FC9E60-C465-11CF-8056-444553540000}
Путь PCIROOT Путь (0) #PCI (1D00) #USBROOT (0) #USB (2)
MigrationRank 0xf000ffffffff0023
Поддельный подарок
Статус 0xc0000719
Не удалось найти описание для события с кодом 442 в источнике Microsoft-Windows-Kernel-PnP. Компонент, вызывающий это событие, либо не установлен на этом локальном компьютере, либо поврежден. Установите или отремонтируйте компонент на локальном компьютере.
Если событие возникло на другом компьютере, может потребоваться сохранить информацию, отображаемую вместе с событием.
К событию добавлена следующая информация:
USB VID_0738 и PID_F401 102176A
USB VID_1532 и PID_0510 00000000
EV_RenderedValue_2.00
PCIROOT (0) #PCI (1D00) #USBROOT (0) #USB (2)
17294104044079349795
Ложь
321227289
————————————————————————————————————-
Событие ядра 420
Не удалось найти описание для события с идентификатором 420 в источнике Microsoft-Windows-Kernel-PnP. Компонент, вызывающий это событие, либо не установлен на этом локальном компьютере, либо поврежден. Установите или отремонтируйте компонент на вашем локальном компьютере.
Если событие возникло на другом компьютере, может потребоваться сохранить информацию, отображаемую вместе с событием.
К событию добавлена следующая информация:
USB VID_0738 и PID_F401 102176A
EV_RenderedValue_1.00
0
0
Система
— Поставщик
[Имя] Microsoft-Windows-Kernel-PnP
[Справка] {9C205A39-1250-487D-ABD7-E831C6290539}
Идентификатор события 420
Версия 0
Уровень 4
Задача 0
Код операции 0
Ключевые слова 0x400000000000000000
— Время создания
[SystemTime] 2018-11-03T14: 16: 30.232352900Z
EventRecordID 871
Корреляция
— Исполнение
[ID процесса] 5644
[ID потока] 10508
Microsoft-Windows-Kernel-PnP / Канал конфигурации
DeviceInstanceId USB VID_0738 и PID_F401 102176A
Руководство по классу {D61CA365-5AF4-4486-998B-9DB4734C6CA3}
Проблема 0x0
Статус 0x0
————————————————————————————-
Событие Kernel-PnP 410
Не удалось найти описание для события с кодом 410 в источнике Microsoft-Windows-Kernel-PnP. Компонент, вызывающий это событие, либо не установлен на этом локальном компьютере, либо поврежден. Установите или отремонтируйте компонент на вашем локальном компьютере.
Если событие возникло на другом компьютере, может потребоваться сохранить информацию, отображаемую вместе с событием.
К событию добавлена следующая информация:
USB VID_0738 и PID_F401 102176A
xusb22.inf
EV_RenderedValue_2.00
xusb22
0
0
DeviceInstanceId USB VID_0738 и PID_F401 102176A
Имя драйвера xusb22.inf
Руководство по классу {D61CA365-5AF4-4486-998B-9DB4734C6CA3}
Название службы xusb22
Нижние фильтры
Лучшие фильтры
Проблема 0x0
Статус 0x0
———————————————————————————-
Событие Kernel-PnP 400
Не удалось найти описание для события с кодом 400 из источника Microsoft-Windows-Kernel-PnP. Компонент, вызывающий это событие, либо не установлен на этом локальном компьютере, либо поврежден. Установите или отремонтируйте компонент на локальном компьютере
Если событие возникло на другом компьютере, может потребоваться сохранить информацию, отображаемую вместе с событием.
К событию добавлена следующая информация:
USB VID_0738 и PID_F401 102176A
xusb22.inf
EV_RenderedValue_2.00
10.04.2018
10.0.17134.1
Microsoft
Правда
CC_Install
16719872
USB MS_COMP_XUSB10
Ложь
0
DeviceInstanceId USB VID_0738 и PID_F401 102176A
Имя драйвера xusb22.inf
Руководство по классу {D61CA365-5AF4-4486-998B-9DB4734C6CA3}
Дата драйвера 10.04.2018
Версия драйвера 10.0.17134.1
Microsoft DriverProvider
Истинный драйвер
DriverSection CC_Install
DriverRank 0xff2000
MatchingDeviceId USB MS_COMP_XUSB10
Драйверы вне рейтинга
DeviceUpdated false
Статус 0x0
———————————————————————————
Событие Kernel-PnP 430
К событию добавлена следующая информация:
USB VID_0738 и PID_F401 102176A
DeviceInstanceId USB VID_0738 и PID_F401 102176A
———————————————————————————
Привет.
Вы пробовали установить последние версии драйверов для этой мыши? Они могут конфликтовать с вашей системой или другими драйверами.
Попробуйте удалить их полностью и использовать стандартный драйвер мыши — не исчезнет ли проблема в этом случае? ——————
если вы найдете чей-то пост полезным, отметьте его как ответ и оцените, пожалуйста. Это поможет другим пользователям найти ответы на похожие вопросы.
Источник: https://answers.microsoft.com/ru-ru/windows/forum/all/microsoft-windows-kernel-pnp-events-400-410-420/23c4cb7c-6ce6-49ff-bd4f-0c429c29e93e
Для удобства вывода и обработки ошибок в сети Интернет была введена классификация и структурирование. Существует целый ряд ошибок 4ххх. В этом выпуске поговорим о конкретной ошибке: ошибка 410 что это и как решить эту проблему на сайте, youtube, планшете или телефоне, который работает на андроиде.
[toc]
Определение ошибки простым языком
Не всегда достаточно просто найти, как исправить ошибку 410, к примеру, на сайте YouTube. Порой встречаются совершенно нестандартные ситуации, поэтому, если вы понимаете природы появления этой ошибки, вы легко сможете решить даже не типичную проблему.
Давайте простыми словами выясним, ошибка 410 что это? Итак, ошибка 410 – это ответ сервера на вносимые изменения разработчиком. Проще говоря, когда возникает такая ошибка, виноваты либо вы, либо прямые руки разработчика. Но часто, такую ошибку можно встретить на YouTube и старых версиях Android. Например, к старой версии Google относит Android 4.0.
Ошибка или код 410 – Gone, значит, что страница или запрашиваемый файл был удален. Частично ошибка дублируется ошибкой 404 (Not Found – Не найдено).
В результате, чтобы вы не предпринимали, вам будет выходить ошибка 410 проблемы с сетью. Но не стоит отчаиваться, есть несколько способов решить данную проблему. Единственный момент, нужно четко понимать, что данная ошибка не связана с обновлением приложения или системы сайта. В этом случае никакие танцы с бубном вас не спасут.
Наиболее распространенные места возникновения этой ошибки: на Youtube (если у вас Android), на телефоне, на планшете, просто на сайте. Ниже мы подробно рассмотрим варианты, как исправить ошибку 410.
Если ошибка 410 возникла на Ютубе
Часто данная ошибка связана именно с обновлением официального приложения. Как это исправить? Так, если вылезла ошибка 410 в ютубе на адроиде, значит нужно проверить обновление программы. Как это сделать?
- Для этого нужно зайти в Play Market
- Найти приложение YouTube
- Нажмите кнопку обновить
- Если проживаете в Крыму, не забудьте включить VPN
Используйте ВПН для обновления, если вы живете в Крыму
Если обновить приложение не получается, значит версия прошивки не поддерживает больше такие обновления. Разработчики намерено отключили возможность поддержки старых устройств, намекая на покупку нового устройства. Например, если у Вас Андроид 4.4, тогда для вас это будет проблемой.
Если причины в прошивке устройства
Какой выход? Сразу хочу предупредить, что для устройств, которые выпушены лет 6 назад, вы не получите обновлений, необходимых для работы сервисов Play Market, а значит и приложения YouTube. Однако, есть способы как решить проблему, если ошибка 410 появилась на планшете. Давайте по порядку, проверим можно ли официально обновиться.
Проверьте обновления Вашей системы Android
- Пройдите в Настройки телефона или планшета.
- Найдите последний пункт «Об устройстве»
- Найдите пункт обновление и проверьте доступны ли они для вас.
- Если обновления есть – нужно скачать и установить, используя инструкции.
- По завершению обновления, перейдите в Play Market
- Найдите в ней программу YouTube и выполните обновление. После этого Ошибка 410 YouTube вас беспокоить не будет.
Убедитесь, что ошибка 410 не из-за устаревшей прошивки
Если устройство старое, то вероятно, обновлений не будет. Вариантов решения вопроса не много: либо установить прошивку новую не официальную, либо установить другую программу для просмотра YouTube. Благо таких программ полно:
- Vutube Player
- Newpipe
- OGYouTube
- YouTube Vanced
Кроме возможности смотреть видео с ютуба, программа блокирует любую рекламу. Однако, войти в свой аккаунт не выйдет, так программа не привязана к сервисам Google Play Market. Также есть моды официального приложения для старых прошивок, начиная с версии Андроид 2.2. Найти такую программу можно на сайте 4pda. Чтобы скачать, потребуется регистрация. Поэтому, если возникает ошибка 410 на адроид, что делать вы уже знаете.
ВАЖНО: перед установкой программ в настройках придется установить разрешение на сторонние приложения. Это нормально и ничего криминального в этом нет, тем более для вашего не столь нового устройства.
Если ошибка 410 появилась на сайте
Иногда ошибка 410 встречается на сайте, в том числе на популярных порталах. Сразу хочется сказать, что, если вы не администратор ресурса, то вам не стоит паниковать. Исправить вы ничего не сможете, если конечно сбой не носит системный характер.
- Проверьте настройки времени на своей ПК или ноутбуке. Обычно, ошибка 410 на сайте может возникать, если установлены не корректная дата в системе. Порой происходит сбой и время «слетает». Попробуйте решить вопрос включением автоматического времени.
- Также, проблема ошибки 410 может возникнуть от блокировки сайта антивирусом. Особенно это встречается в бесплатных версиях антивирусов Avast. Редко, но можно встретить такую беду и в антивирусе Dr.Web. Решается просто: кликните по значку антивируса правой кнопкой мыши и нажмите «Отключить». После этого пройдите на сайт. Если ничего не изменилось, ищите проблему дальше.
- Если вы администратор сайта и только что внесли изменения в файлах или настройках, нужно немного подождать. Конфигурация обновляется обычно в течении часа. Если через час ничего не изменилось, даже после очистки кэша браузера, свяжитесь с хостинг провайдером для выяснения причины проблемы. Иногда она возникает после обновления версии PHP на 7.1.
Обратите внимание: Действия на компьютере нужно делать, если вы уверены на 100%, что проблема именно на вашей стороне. Проверьте сайт на другом устройстве. Если ошибка 410 на планшете или телефоне не возникает, тогда поработайте над своим компьютером. Иногда вопрос может решиться только переустановкой системы Windows.
Если возникла проблема с сетью
Иногда бывают ситуации, когда ни один из вышеперечисленного не решает проблему. Например, у вас возникла ошибка 410 на телефоне, хотя прошивка свежая, да и программы обновлены. Что делать в этом случае? Как правило, причина проблема всего одна – ваш роутер. Что нужно сделать?
- Просто отключите ваш роутер на 15 минут. Желательно полностью отключить из розетки, а не выключить кнопкой на устройстве. Иногда такие сбои происходят ввиду постоянной работы вашего роутера.
- Время и DNS настроены не верно. Если вы разбираетесь в настройках роутера, тогда пройдите по адресу 192.168.0.1 (обычно это стандартный адрес настроек роутера) и найдите настройки самого устройства. Проверьте дату. Также в настройках интернета проверьте совпадает ли DNS с выданным вашим провайдером. Если ничего вам не давали – DNS должен быть пустым.
- Обновите прошивку роутера. Крайний случай, когда возникает проблема с сетью ошибка 410 – это перепрошить или обновить роутер. Например, компания Huawei выпустила роутер с явно сырой прошивкой W550, после чего, буквально через месяц выкатили свежее обновление.
Заключение
Ошибка 410 возникает чаще всего по вине администратора сайта или владельца приложения. При возникновении сбоя, не спешите искать проблему на своем устройстве. В первую очередь нужно убелиться, что проблема не является общей на всех устройствах. Удачи.
If you incorrectly type a URL, you may see a 404 error explaining that this web page doesn’t exist. However, if the page has been deleted, you’ll likely receive a “410 Gone” status code. This means you won’t be able to access the page at all.
Fortunately, there are a few easy ways to fix the “410 Gone” error. If it happens to your website, you can examine your site logs and reconfigure your server to resolve the issue. Alternatively, you can troubleshoot this error on the client side by rolling back recent updates or uninstalling new plugins.
Check Out Our Video Guide to the “410 Gone” Error
In this post, we’ll explain what error 410 is and discuss its potential causes. Then, we’ll show you how to fix it on both the client and server sides. Let’s get started!
What Is the “410 Gone” Error?
When someone clicks on a web page, their browser makes a request to the website’s server. After processing the request, the server will send the relevant site files, displaying the requested information.
Although you may not see it, the server will also send a status code in an HTTP header. These HTTP status codes indicate whether the request was a success or a failure.
Here are some different types of HTTP status codes:
- 100s: Informational requests
- 200s: Successful requests
- 300s: Redirects
- 400s: Client-side errors
- 500s: Server-side errors
The “410 Gone” error is a 400 HTTP status code that indicates that the target resource has been permanently deleted. In this case, the server can’t complete the request because the page does not exist.
Depending on your browser, the 410 error can appear in a few different ways:
- 410 Gone
- Gone
- Error 410
- HTTP Status 410
As a website owner, it’s important to monitor your status codes and fix any errors when they occur. If new visitors can’t find the information they’re looking for, they may turn to a competitor instead. To resolve the “410 Gone” error, you’ll first need to know what’s causing it.
Seeing this tricky error message? 👀 The solution is closer than you may think… ⬇️Click to Tweet
What Causes the “410 Gone” Error?
Since the “410 Gone” error is categorized as a 400 HTTP status code, you may think that it only occurs as a client-side error. However, this can happen on both the server and client sides.
A user might make a mistake when typing a URL. In many cases, this results in a “404 Not Found” error. However, it’s possible to get an error 410 if the resource once existed at that URL and the server was configured to return a “410 Gone” status code.
If you’ve recently made changes to your Content Management System (CMS), you could inadvertently trigger a “410 Gone” status code. Sometimes, new plugins, updates, or extensions can make changes to your database, leading to this error.
Alternatively, error 410 can be the result of incorrect server configuration. If you search your log files for unwanted 410 redirects, you’ll likely find the source of the issue.
The 410 HTTP status code can also be intentional. If you’re running a time-sensitive promotion on your website, that web page will only be available for a certain period:
If someone clicks on this promotional link after the sale is finished, you can redirect them to a “410 Gone” error. This will let them know that the page was taken down and won’t be coming back.
The Difference Between the “410 Gone” and the “404 Not Found” Error
Both the “410 Gone” and “404 Not Found” errors indicate that the resource cannot be retrieved. However, there are a few main differences between the two HTTP status codes.
404 Not Found is one of the most common HTTP status codes. When you see this error, it means that the requested resource doesn’t exist:
However, a “404 Not Found” error is a temporary problem. This means that you can try the URL again later to see if the problem has been resolved.
With a “410 Gone” error, the requested page has been permanently deleted. When search crawlers identify this HTTP status code, they will de-index the link. This can also inform other website owners to remove this link from their content.
If you don’t need a particular page anymore, it can be useful to implement a “410 Gone” redirect. However, if these errors happen on their own, you’ll need to fix them to keep your website performing properly.
How To Fix the “410 Gone” Error (2 Methods)
There are many ways you can fix the “410 Gone” error. By troubleshooting both the client and server sides, you can ensure that your content can be viewed by visitors and indexed by search engines. Since many of these methods involve altering site files, updates, and plugins, we recommend backing up your website first.
Method 1: Investigating a Client-Side “410 Gone” Error
Before you start making changes to your server, you can troubleshoot your website on the client side. This can be a simple way to fix the error without altering vital site files.
Step 1: Check the Requested URL
When you first experience the “410 Gone” error, it’s a good idea to check the link. As we discussed earlier, inputting an incorrect URL can cause this HTTP status code.
If you’re trying to reach a web page that has been permanently deleted, it will likely respond with a “410 Gone” error. This happens because the server disallowed access to that URL.
First, you can try retyping the address. If you still see the “410 Gone” status code, you can search for that page by typing in a few keywords in the search engine:
The website owner might have moved that page to a new URL. By searching for some keywords and entering the website’s name, you could find what you’re looking for on a new page.
Step 2: Roll Back Recent Updates
Once you notice that your web page has been replaced with a “410 Gone” error, you can consider downgrading your WordPress software to an older version. Sometimes, implementing new tools can lead to poor configuration or other unexpected problems, like the 410 error.
If you backed up your website before the update, you can easily restore this previous version. With our Kinsta hosting plans, you’ll receive automatic daily backups for all your websites, even your staging sites.
To restore your backup, open your MyKinsta dashboard. Then, go to Sites and select your website:
On the new page, click on the Backups tab. Here, you’ll see a history of your backups:
Find the backup that you want to restore. Next, locate the Restore to button and select whether you want to downgrade your live site or its staging environment:
Finally, you’ll need to confirm the backup restoration:
Once the restoration process is complete, you’ll be able to access your WordPress dashboard again. If the “410 Gone” issue persists, you’ll need to try another method.
Step 3: Uninstall Plugins and Extensions
If you have installed plugins or extensions that alter your URL structure or redirects, these can cause an error 410. You may see this HTTP status code in other cases because of general incompatibility issues. Either way, you can solve the problem by uninstalling these tools.
To see if your plugins are causing the issue, you can deactivate them all. Since 410 errors don’t usually lock you out of the WordPress dashboard, you can do this on your Plugins page.
Start by selecting all of your plugins. Then, from the Bulk actions dropdown menu, click on
Deactivate:
Finally, click on Apply. This should deactivate all the plugins on your website simultaneously.
Now you can check to see if the “410 Gone” error has been resolved. If so, you can reactivate each plugin one by one to find and delete the culprit. If it serves a vital purpose on your website, you can find a similar plugin or contact its developer about the issue.
Method 2: Investigating a Server-Side “410 Gone” Error
Since the “410 Gone” error can result from a server-side issue, you may not see any improvements on the client side of your website. After you’ve tried the first method with no results, you may need to make changes to your server configuration.
Step 1: Review Your Site Logs
You can check your server logs if you want to know whether your server is experiencing any “410 Gone” errors. This will help you monitor all your HTTP status codes and identify what’s causing errors.
If you have a Kinsta hosting plan, you can review your site logs directly from your dashboard. Once you log into MyKinsta, go to Sites > Logs:
The Log viewer will automatically show your error logs, so you’ll need to select access.log from the dropdown menu:
This will display all of the HTTP requests for your website:
Each line will look something like this:
kinstahelptesting.kinsta.cloud 98.43.13.94 [22/Sep/2021:21:26:10 +0000] GET "/wp-admin/" HTTP/1.0 302 "-" "Mozilla/5.0 (Macintosh; Intel Mac OS X 10.15; rv:92.0) Gecko/20100101 Firefox/92.0" 98.43.13.94 "/wp-admin/index.php" - - 472 0.562 0.560In this example, the request gained a 302 HTTP status code. The requested URL was
“/wp-admin/”You can scan your HTTP requests for 410 errors in your site logs. You can also use the search bar to narrow down your results. If you find any errors, you can identify the specific web page that is down.
Step 2: Debug Your Website
If the “410 Gone” error persists, it’s time to debug your website. To do this, you can use the Query Monitor plugin. This free tool enables you to view the performance of your database queries, as well as PHP errors, enqueued scripts, HTTP API calls, and more:
First, download and install Query Monitor. Then, click on the new tab at the top of your dashboard. To monitor all of your server-side HTTP requests, select HTTP API Calls:
This will show you all of the server-side queries for your website. Here, you can see if any errors occurred while loading your website:
You’ll likely need to check your server configuration if you notice any “410 Gone” errors. However, if you need any help, you can contact your hosting provider.
Step 3: Verify Your Server Configuration
Your WordPress website has a .htaccess file that contains rules about your server configuration. If you recently made changes to this file, it could create a “410 Gone” error.
To check the configuration of the .htaccess file, you’ll need to open your site files. Often, the easiest way to do this is through a Secure File Transfer Protocol (SFTP) client. This will enable you to connect to your server.
If you’re using a Kinsta hosting plan, you can start by logging into your MyKinsta dashboard. Then, navigate to Sites and select your website.
Next, find the SFTP/SSH section. This will contain your login information for SFTP access, including the host number, username, password, and port:
Now you’ll need to open an FTP client like FileZilla. Once you download this software, you’ll need to change the settings from FTP to SFTP access. This provides a safer way to connect to your site.
To do this, go to File > Site Manager:
Here, create a new site. Then, change the Protocol to SFTP – SSH File Transfer Protocol:
Copy your host and port number from MyKinsta. Next, paste these details into their respective boxes and hit Connect:
To finish connecting to your server, enter your username and password and click on OK:
After you successfully log in, navigate to the public_html folder. Then, find the .htaccess file and open it:
Here’s what your .htaccess file might look like:
# BEGIN WordPress

<IfModule mod_rewrite.c>

RewriteEngine On

RewriteBase /

RewriteRule ^index.php$ - [L]

RewriteCond %{REQUEST_FILENAME} !-f

RewriteCond %{REQUEST_FILENAME} !-d

RewriteRule . /index.php [L]

</IfModule>
However, you may see some changes to this file. If you notice any rules containing a “Redirect 410”, you can go ahead and delete them. If your .htaccess file looks similar to the one listed above, you don’t have to make any changes.
Be prepared to fix this pesky issue on both the client ✨and✨ server sides with help from this guide 💪Click to Tweet
Summary
Although the “410 Gone” status code can be useful for removing expired promotions, it can also occur unexpectedly on your website. When this happens, visitors won’t be able to access your content, and search engines will consider the page permanently removed. You’ll need to fix this error to maintain your ranking in search results.
You can resolve this issue on both the client and server sides of your website. You can simply check the requested URL, downgrade your WordPress software, and uninstall your plugins to get started. To identify a “410 Gone” error on your server, you can review your site logs, debug your website, and verify your server configuration.
When you notice any errors on your website, you’ll likely want to troubleshoot them as soon as possible. Kinsta’s APM tool can immediately identify performance issues and get your content back online in no time!
Get all your applications, databases and WordPress sites online and under one roof. Our feature-packed, high-performance cloud platform includes:
- Easy setup and management in the MyKinsta dashboard
- 24/7 expert support
- The best Google Cloud Platform hardware and network, powered by Kubernetes for maximum scalability
- An enterprise-level Cloudflare integration for speed and security
- Global audience reach with up to 35 data centers and 275 PoPs worldwide
Test it yourself with $20 off your first month of Application Hosting or Database Hosting. Explore our plans or talk to sales to find your best fit.
If you incorrectly type a URL, you may see a 404 error explaining that this web page doesn’t exist. However, if the page has been deleted, you’ll likely receive a “410 Gone” status code. This means you won’t be able to access the page at all.
Fortunately, there are a few easy ways to fix the “410 Gone” error. If it happens to your website, you can examine your site logs and reconfigure your server to resolve the issue. Alternatively, you can troubleshoot this error on the client side by rolling back recent updates or uninstalling new plugins.
Check Out Our Video Guide to the “410 Gone” Error
In this post, we’ll explain what error 410 is and discuss its potential causes. Then, we’ll show you how to fix it on both the client and server sides. Let’s get started!
What Is the “410 Gone” Error?
When someone clicks on a web page, their browser makes a request to the website’s server. After processing the request, the server will send the relevant site files, displaying the requested information.
Although you may not see it, the server will also send a status code in an HTTP header. These HTTP status codes indicate whether the request was a success or a failure.
Here are some different types of HTTP status codes:
- 100s: Informational requests
- 200s: Successful requests
- 300s: Redirects
- 400s: Client-side errors
- 500s: Server-side errors
The “410 Gone” error is a 400 HTTP status code that indicates that the target resource has been permanently deleted. In this case, the server can’t complete the request because the page does not exist.
Depending on your browser, the 410 error can appear in a few different ways:
- 410 Gone
- Gone
- Error 410
- HTTP Status 410
As a website owner, it’s important to monitor your status codes and fix any errors when they occur. If new visitors can’t find the information they’re looking for, they may turn to a competitor instead. To resolve the “410 Gone” error, you’ll first need to know what’s causing it.
Seeing this tricky error message? 👀 The solution is closer than you may think… ⬇️Click to Tweet
What Causes the “410 Gone” Error?
Since the “410 Gone” error is categorized as a 400 HTTP status code, you may think that it only occurs as a client-side error. However, this can happen on both the server and client sides.
A user might make a mistake when typing a URL. In many cases, this results in a “404 Not Found” error. However, it’s possible to get an error 410 if the resource once existed at that URL and the server was configured to return a “410 Gone” status code.
If you’ve recently made changes to your Content Management System (CMS), you could inadvertently trigger a “410 Gone” status code. Sometimes, new plugins, updates, or extensions can make changes to your database, leading to this error.
Alternatively, error 410 can be the result of incorrect server configuration. If you search your log files for unwanted 410 redirects, you’ll likely find the source of the issue.
The 410 HTTP status code can also be intentional. If you’re running a time-sensitive promotion on your website, that web page will only be available for a certain period:
If someone clicks on this promotional link after the sale is finished, you can redirect them to a “410 Gone” error. This will let them know that the page was taken down and won’t be coming back.
The Difference Between the “410 Gone” and the “404 Not Found” Error
Both the “410 Gone” and “404 Not Found” errors indicate that the resource cannot be retrieved. However, there are a few main differences between the two HTTP status codes.
404 Not Found is one of the most common HTTP status codes. When you see this error, it means that the requested resource doesn’t exist:
However, a “404 Not Found” error is a temporary problem. This means that you can try the URL again later to see if the problem has been resolved.
With a “410 Gone” error, the requested page has been permanently deleted. When search crawlers identify this HTTP status code, they will de-index the link. This can also inform other website owners to remove this link from their content.
If you don’t need a particular page anymore, it can be useful to implement a “410 Gone” redirect. However, if these errors happen on their own, you’ll need to fix them to keep your website performing properly.
How To Fix the “410 Gone” Error (2 Methods)
There are many ways you can fix the “410 Gone” error. By troubleshooting both the client and server sides, you can ensure that your content can be viewed by visitors and indexed by search engines. Since many of these methods involve altering site files, updates, and plugins, we recommend backing up your website first.
Method 1: Investigating a Client-Side “410 Gone” Error
Before you start making changes to your server, you can troubleshoot your website on the client side. This can be a simple way to fix the error without altering vital site files.
Step 1: Check the Requested URL
When you first experience the “410 Gone” error, it’s a good idea to check the link. As we discussed earlier, inputting an incorrect URL can cause this HTTP status code.
If you’re trying to reach a web page that has been permanently deleted, it will likely respond with a “410 Gone” error. This happens because the server disallowed access to that URL.
First, you can try retyping the address. If you still see the “410 Gone” status code, you can search for that page by typing in a few keywords in the search engine:
The website owner might have moved that page to a new URL. By searching for some keywords and entering the website’s name, you could find what you’re looking for on a new page.
Step 2: Roll Back Recent Updates
Once you notice that your web page has been replaced with a “410 Gone” error, you can consider downgrading your WordPress software to an older version. Sometimes, implementing new tools can lead to poor configuration or other unexpected problems, like the 410 error.
If you backed up your website before the update, you can easily restore this previous version. With our Kinsta hosting plans, you’ll receive automatic daily backups for all your websites, even your staging sites.
To restore your backup, open your MyKinsta dashboard. Then, go to Sites and select your website:
On the new page, click on the Backups tab. Here, you’ll see a history of your backups:
Find the backup that you want to restore. Next, locate the Restore to button and select whether you want to downgrade your live site or its staging environment:
Finally, you’ll need to confirm the backup restoration:
Once the restoration process is complete, you’ll be able to access your WordPress dashboard again. If the “410 Gone” issue persists, you’ll need to try another method.
Step 3: Uninstall Plugins and Extensions
If you have installed plugins or extensions that alter your URL structure or redirects, these can cause an error 410. You may see this HTTP status code in other cases because of general incompatibility issues. Either way, you can solve the problem by uninstalling these tools.
To see if your plugins are causing the issue, you can deactivate them all. Since 410 errors don’t usually lock you out of the WordPress dashboard, you can do this on your Plugins page.
Start by selecting all of your plugins. Then, from the Bulk actions dropdown menu, click on
Deactivate:
Finally, click on Apply. This should deactivate all the plugins on your website simultaneously.
Now you can check to see if the “410 Gone” error has been resolved. If so, you can reactivate each plugin one by one to find and delete the culprit. If it serves a vital purpose on your website, you can find a similar plugin or contact its developer about the issue.
Method 2: Investigating a Server-Side “410 Gone” Error
Since the “410 Gone” error can result from a server-side issue, you may not see any improvements on the client side of your website. After you’ve tried the first method with no results, you may need to make changes to your server configuration.
Step 1: Review Your Site Logs
You can check your server logs if you want to know whether your server is experiencing any “410 Gone” errors. This will help you monitor all your HTTP status codes and identify what’s causing errors.
If you have a Kinsta hosting plan, you can review your site logs directly from your dashboard. Once you log into MyKinsta, go to Sites > Logs:
The Log viewer will automatically show your error logs, so you’ll need to select access.log from the dropdown menu:
This will display all of the HTTP requests for your website:
Each line will look something like this:
kinstahelptesting.kinsta.cloud 98.43.13.94 [22/Sep/2021:21:26:10 +0000] GET "/wp-admin/" HTTP/1.0 302 "-" "Mozilla/5.0 (Macintosh; Intel Mac OS X 10.15; rv:92.0) Gecko/20100101 Firefox/92.0" 98.43.13.94 "/wp-admin/index.php" - - 472 0.562 0.560In this example, the request gained a 302 HTTP status code. The requested URL was
“/wp-admin/”You can scan your HTTP requests for 410 errors in your site logs. You can also use the search bar to narrow down your results. If you find any errors, you can identify the specific web page that is down.
Step 2: Debug Your Website
If the “410 Gone” error persists, it’s time to debug your website. To do this, you can use the Query Monitor plugin. This free tool enables you to view the performance of your database queries, as well as PHP errors, enqueued scripts, HTTP API calls, and more:
First, download and install Query Monitor. Then, click on the new tab at the top of your dashboard. To monitor all of your server-side HTTP requests, select HTTP API Calls:
This will show you all of the server-side queries for your website. Here, you can see if any errors occurred while loading your website:
You’ll likely need to check your server configuration if you notice any “410 Gone” errors. However, if you need any help, you can contact your hosting provider.
Step 3: Verify Your Server Configuration
Your WordPress website has a .htaccess file that contains rules about your server configuration. If you recently made changes to this file, it could create a “410 Gone” error.
To check the configuration of the .htaccess file, you’ll need to open your site files. Often, the easiest way to do this is through a Secure File Transfer Protocol (SFTP) client. This will enable you to connect to your server.
If you’re using a Kinsta hosting plan, you can start by logging into your MyKinsta dashboard. Then, navigate to Sites and select your website.
Next, find the SFTP/SSH section. This will contain your login information for SFTP access, including the host number, username, password, and port:
Now you’ll need to open an FTP client like FileZilla. Once you download this software, you’ll need to change the settings from FTP to SFTP access. This provides a safer way to connect to your site.
To do this, go to File > Site Manager:
Here, create a new site. Then, change the Protocol to SFTP – SSH File Transfer Protocol:
Copy your host and port number from MyKinsta. Next, paste these details into their respective boxes and hit Connect:
To finish connecting to your server, enter your username and password and click on OK:
After you successfully log in, navigate to the public_html folder. Then, find the .htaccess file and open it:
Here’s what your .htaccess file might look like:
# BEGIN WordPress

<IfModule mod_rewrite.c>

RewriteEngine On

RewriteBase /

RewriteRule ^index.php$ - [L]

RewriteCond %{REQUEST_FILENAME} !-f

RewriteCond %{REQUEST_FILENAME} !-d

RewriteRule . /index.php [L]

</IfModule>
However, you may see some changes to this file. If you notice any rules containing a “Redirect 410”, you can go ahead and delete them. If your .htaccess file looks similar to the one listed above, you don’t have to make any changes.
Be prepared to fix this pesky issue on both the client ✨and✨ server sides with help from this guide 💪Click to Tweet
Summary
Although the “410 Gone” status code can be useful for removing expired promotions, it can also occur unexpectedly on your website. When this happens, visitors won’t be able to access your content, and search engines will consider the page permanently removed. You’ll need to fix this error to maintain your ranking in search results.
You can resolve this issue on both the client and server sides of your website. You can simply check the requested URL, downgrade your WordPress software, and uninstall your plugins to get started. To identify a “410 Gone” error on your server, you can review your site logs, debug your website, and verify your server configuration.
When you notice any errors on your website, you’ll likely want to troubleshoot them as soon as possible. Kinsta’s APM tool can immediately identify performance issues and get your content back online in no time!
Get all your applications, databases and WordPress sites online and under one roof. Our feature-packed, high-performance cloud platform includes:
- Easy setup and management in the MyKinsta dashboard
- 24/7 expert support
- The best Google Cloud Platform hardware and network, powered by Kubernetes for maximum scalability
- An enterprise-level Cloudflare integration for speed and security
- Global audience reach with up to 35 data centers and 275 PoPs worldwide
Test it yourself with $20 off your first month of Application Hosting or Database Hosting. Explore our plans or talk to sales to find your best fit.