Skip to content
На чтение 3 мин. Просмотров 2.4k. Опубликовано 09.07.2019
Вы можете выбрать специальные звуки для VIP-персон и темы на iPhone или iPad
Вы можете настроить уникальные звуки для каждой учетной записи электронной почты на вашем iPhone, iPad или iPod touch. Другой вариант – заставить ваше устройство издавать уникальный звук, когда VIP-отправители отправляют вам электронные письма или когда вы получаете письма из определенных тем.
Звуки встроены в ваше устройство, и вы можете выбрать любой из них для новых звуков электронной почты. Просто откройте настройки Почта , чтобы выбрать звуковой сигнал или мелодию для новых писем или купить новые звуки для оповещений по электронной почте.
Со всеми различными звуками, которые вы можете использовать, и широкими настройками, которые вы можете вносить в свои настройки электронной почты, вы будете знать, важен ли этот звук электронной почты, который вы слышите, и требует ли он обращения прямо сейчас, или можете оставить его на более поздний срок.
Эти шаги должны работать для любого устройства iOS, на котором установлена современная версия Mail, включая устройства под управлением iOS 11 и iOS 12.
Как выбрать новый звук электронной почты в iOS Mail
-
Откройте приложение Настройки на своем устройстве.
-
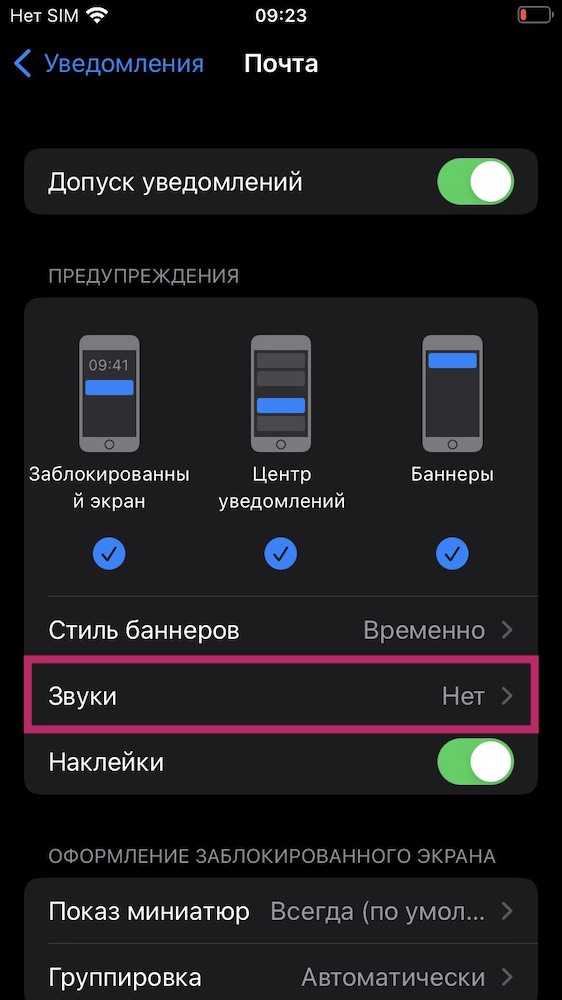
Перейдите на страницу Уведомления > Почта .

-
Выберите учетную запись, в которую вы хотите внести изменения, а затем выберите Звуки .
Вы можете изменить звук электронной почты на три типа учетных записей:
- Выберите учетную запись электронной почты, чтобы изменить ее новый звук электронной почты.
- Если у вас настроены VIP-отправители, вы можете настроить Почту на создание другого звука, чтобы отличать этих отправителей от других получателей. Для этого выберите VIP вместо любой конкретной учетной записи электронной почты.
- Или выберите Тематические уведомления , чтобы создать другой звук для сообщений, для которых включены уведомления.
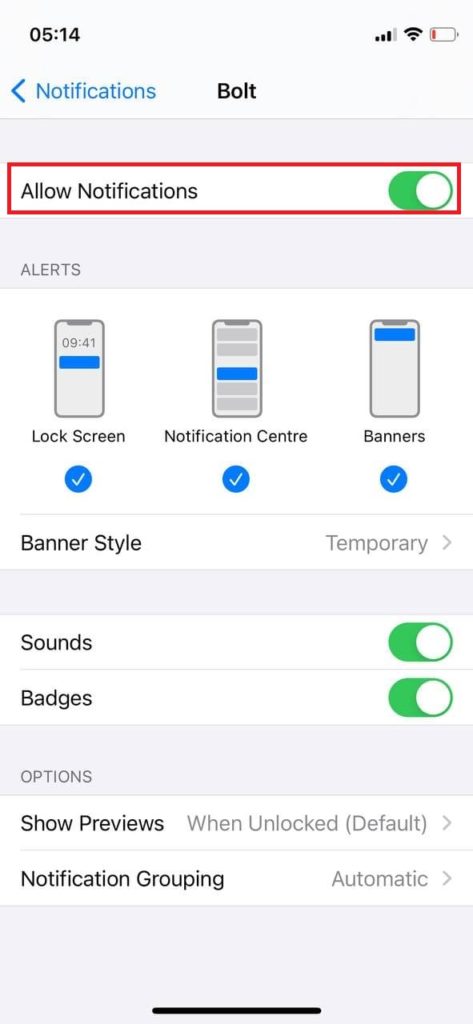
Если вы не видите ни одной учетной записи в списке, а параметр Разрешить уведомления белый, почтовые уведомления отключены. Нажмите кнопку, чтобы сделать ее зеленой и включить почтовые уведомления.
Пользовательские звуки для VIP-сообщений и потоковых уведомлений будут работать, даже если другие почтовые уведомления отключены.
-
Выберите новый звук электронной почты, который вы хотите использовать для этой учетной записи электронной почты, всех ваших VIP-отправителей или всех тем электронной почты, для которых включены уведомления.
Каждый выбранный вами тон будет воспроизводить звук предварительного просмотра. Вы также можете выбрать Магазин тонов в верхней части экрана, чтобы покупать новые звуки.
-
Нажмите кнопку «Домой», чтобы сохранить и выйти из настроек, или повторите шаги, чтобы изменить звук электронной почты для другой учетной записи электронной почты.


![]()
Download Article
![]()
Download Article
This wikiHow article teaches you how to choose different sounds and vibration patterns for iPhone notifications. Nearly all notification sounds on your iPhone are customizable, including your text message tones, calendar alarms, and voicemail alerts. But although you can generally change notification tones for Apple-specific apps like FaceTime and Mail, third-party apps from the App Store are a little different—you can’t choose custom notification sounds for non-Apple apps, but you can turn their notification sounds on or off as needed.
-
1
Open the Settings app on your iPhone
. This is the gray gear icon on your home screen. If you don’t see it there, you can find it by searching or asking Siri.
-
2
Tap Sounds & Haptics. This menu option is in the second group of settings.
- This option is called Sounds on older iPhones.
Advertisement
-
3
Scroll down to the «Sounds and Vibration Patterns» section. Here you’ll find a list of your iPhone’s general alert sounds.
-
4
Tap the notification type you want to change. For example, if you want to change the sound you hear when you receive a text message, tap Text Tone.
-
5
Tap Vibration to select a vibration pattern. The Synchronized option is selected by default, which means that your vibration will play just as long as notification sound you selected. You can choose a different vibration pattern if you’d like.
- Tap through the different vibration patterns until you find the one you like. You’ll be able to select different vibration patterns for different types of alerts.
- If you’d rather create a vibration pattern from scratch, scroll to the bottom and select Create New Vibration.[1]
You can then tap a little pattern of your own! - If you don’t want the phone to vibrate at all when you receive this type of notification, tap None at the bottom of the list.
- Tap the back button to return to Sounds & Haptics when you’re finished.
-
6
Scroll down and select a sound. You’ll actually have two sets of tone options—Ringtones and Alert Tones. Ringtones are longer and more appropriate for incoming calls, while alert tones are shorter and best for notifications.
- Tap through the different sounds until you find the one you like. Or, to disable alert tones for this particular type of alert, tap None at the top.
- If you’re looking for a vintage style of alert tone, tap Classic at the bottom of the Alert Tones section for more old school options.
- You can also download new alert tones by tapping the Tone Store link at the top of the page. Tones are generally cheap (in the $1 to $2 range) and you can even pay for them with iTunes gift cards.
-
7
Customize other sounds and vibrations. You can customize your alert tones as often as you wish!
- To adjust the volume of your alerts and ringtone, drag the slider under «Ringer and Alerts» at the top of the Sounds & Haptics page. There is only one volume slider for all types of audible alerts.
- You can also turn on audible keyboard clicks, the phone lock sound, and haptic feedback (that vibration you feel when you tap some app options) at the bottom of this section.


Advertisement
-
1
Open the Settings app on your iPhone
. This is the gray gear icon on your home screen. If you don’t see it there, you can find it by searching or asking Siri.
-
2
Tap Notifications. It’s at the top of the second group of options. This displays your notification settings for all apps on your iPhone.
- The majority of apps on your iPhone do not have their own unique notification tone settings. Most non-Apple apps just use your iPhone’s default alert tone, while others have their own unchangeable tones built into the apps themselves. This means you can’t choose a custom alert tone for an app that isn’t made by Apple.
-
3
Tap the app you want to change. Some apps that allow you to choose a custom notification sound are FaceTime, Mail, and Messages. But even if an app doesn’t let you choose your own sound, you can always turn its notification sounds on or off.
-
4
Turn sound on or off (non-Apple apps). If sound notifications are available for the selected app, you’ll see a slider called «Sounds.» When the slider is green, the app will announce notifications with its own built-in sound or using your iPhone’s default notification sound. If the slider is white, sounds are disabled. Tap the slider to toggle it to the preferred position.
-
5
Tap Sounds (Apple apps). If you chose FaceTime, Messages, or another Apple app that lets you customize sound, this menu option is where you’ll find a selection of audio to choose from.
-
6
Tap Vibration to select a vibration pattern (optional). By default, your phone will vibrate along with the sound of the tone you select. If you want to choose a different vibration pattern or disable vibrations for this type of alert altogether, you can do so here.
- Tap through the different vibration patterns until you find the one you like.
- You can also create a vibration pattern from scratch by scrolling to the bottom and selecting Create New Vibration.
- To disable vibration for this app, tap None at the bottom.
- Tap the back button to return to the previous menu after viewing or making changes.
-
7
Select a ringtone or alert tone. The available sounds are separated into two sections: Ringtones and Alert Tones. Ringtones are longer and better suited for an app like FaceTime. If you’re choosing a Mail or Messages tone, you’ll want to stick to options in the Alert Tones section. Once you find a tone you like, tapping it will select it.
- Tap through the different sounds until you find the one you like.
- If you’re looking for a vintage style of alert tone, tap Classic at the bottom of the Alert Tones or Ringtones section options from earlier iPhone models.
- You can also download new alert tones by tapping the Tone Store link at the top of the page. Tones are generally cheap (in the $1 to $2 range) and you can even pay for them with iTunes gift cards.
- To adjust the volume of your alerts and ringtone, drag the slider under «Ringer and Alerts» at the top of the Sounds & Haptics page.
-
8
Adjust the volume and other preferences (optional). The app notification tone you selected will ring as loud as your phone ringer and text message alerts (if you’ve turned these features on). To check your general sound preferences, tap the back button to return to the Settings menu and select Sounds & Haptics (or Sounds on some models).
- Drag the slider under «Ringers and Alerts» to adjust the volume.
- You can also turn on audible keyboard clicks, the phone lock sound, and haptic feedback (that vibration you feel when you tap some app options) at the bottom of this section. This feature is not available on all iPhones.


Advertisement
Ask a Question
200 characters left
Include your email address to get a message when this question is answered.
Submit
Advertisement
-
If you place your iPhone into silent mode, you will not hear any notification tones except for your alarm clock sound.[2]
-
Your alarm clock sound is separate from notification sounds. You can modify your alarm sounds in the Clock app.
Advertisement
About This Article
Article SummaryX
1. Open Settings.
2. Tap Sounds & Haptics.
3. Tap the alert type you want to change.
4. Tap Vibration to select a vibration pattern.
5. Tap a ringtone for a longer sound, or an alert tone for a shorter sound.
6. Repeat for other alert types.
Did this summary help you?
Thanks to all authors for creating a page that has been read 115,479 times.
Is this article up to date?
![]()
Download Article
![]()
Download Article
This wikiHow article teaches you how to choose different sounds and vibration patterns for iPhone notifications. Nearly all notification sounds on your iPhone are customizable, including your text message tones, calendar alarms, and voicemail alerts. But although you can generally change notification tones for Apple-specific apps like FaceTime and Mail, third-party apps from the App Store are a little different—you can’t choose custom notification sounds for non-Apple apps, but you can turn their notification sounds on or off as needed.
-
1
Open the Settings app on your iPhone
. This is the gray gear icon on your home screen. If you don’t see it there, you can find it by searching or asking Siri.
-
2
Tap Sounds & Haptics. This menu option is in the second group of settings.
- This option is called Sounds on older iPhones.
Advertisement
-
3
Scroll down to the «Sounds and Vibration Patterns» section. Here you’ll find a list of your iPhone’s general alert sounds.
-
4
Tap the notification type you want to change. For example, if you want to change the sound you hear when you receive a text message, tap Text Tone.
-
5
Tap Vibration to select a vibration pattern. The Synchronized option is selected by default, which means that your vibration will play just as long as notification sound you selected. You can choose a different vibration pattern if you’d like.
- Tap through the different vibration patterns until you find the one you like. You’ll be able to select different vibration patterns for different types of alerts.
- If you’d rather create a vibration pattern from scratch, scroll to the bottom and select Create New Vibration.[1]
You can then tap a little pattern of your own! - If you don’t want the phone to vibrate at all when you receive this type of notification, tap None at the bottom of the list.
- Tap the back button to return to Sounds & Haptics when you’re finished.
-
6
Scroll down and select a sound. You’ll actually have two sets of tone options—Ringtones and Alert Tones. Ringtones are longer and more appropriate for incoming calls, while alert tones are shorter and best for notifications.
- Tap through the different sounds until you find the one you like. Or, to disable alert tones for this particular type of alert, tap None at the top.
- If you’re looking for a vintage style of alert tone, tap Classic at the bottom of the Alert Tones section for more old school options.
- You can also download new alert tones by tapping the Tone Store link at the top of the page. Tones are generally cheap (in the $1 to $2 range) and you can even pay for them with iTunes gift cards.
-
7
Customize other sounds and vibrations. You can customize your alert tones as often as you wish!
- To adjust the volume of your alerts and ringtone, drag the slider under «Ringer and Alerts» at the top of the Sounds & Haptics page. There is only one volume slider for all types of audible alerts.
- You can also turn on audible keyboard clicks, the phone lock sound, and haptic feedback (that vibration you feel when you tap some app options) at the bottom of this section.
Advertisement
-
1
Open the Settings app on your iPhone
. This is the gray gear icon on your home screen. If you don’t see it there, you can find it by searching or asking Siri.
-
2
Tap Notifications. It’s at the top of the second group of options. This displays your notification settings for all apps on your iPhone.
- The majority of apps on your iPhone do not have their own unique notification tone settings. Most non-Apple apps just use your iPhone’s default alert tone, while others have their own unchangeable tones built into the apps themselves. This means you can’t choose a custom alert tone for an app that isn’t made by Apple.
-
3
Tap the app you want to change. Some apps that allow you to choose a custom notification sound are FaceTime, Mail, and Messages. But even if an app doesn’t let you choose your own sound, you can always turn its notification sounds on or off.
-
4
Turn sound on or off (non-Apple apps). If sound notifications are available for the selected app, you’ll see a slider called «Sounds.» When the slider is green, the app will announce notifications with its own built-in sound or using your iPhone’s default notification sound. If the slider is white, sounds are disabled. Tap the slider to toggle it to the preferred position.
-
5
Tap Sounds (Apple apps). If you chose FaceTime, Messages, or another Apple app that lets you customize sound, this menu option is where you’ll find a selection of audio to choose from.
-
6
Tap Vibration to select a vibration pattern (optional). By default, your phone will vibrate along with the sound of the tone you select. If you want to choose a different vibration pattern or disable vibrations for this type of alert altogether, you can do so here.
- Tap through the different vibration patterns until you find the one you like.
- You can also create a vibration pattern from scratch by scrolling to the bottom and selecting Create New Vibration.
- To disable vibration for this app, tap None at the bottom.
- Tap the back button to return to the previous menu after viewing or making changes.
-
7
Select a ringtone or alert tone. The available sounds are separated into two sections: Ringtones and Alert Tones. Ringtones are longer and better suited for an app like FaceTime. If you’re choosing a Mail or Messages tone, you’ll want to stick to options in the Alert Tones section. Once you find a tone you like, tapping it will select it.
- Tap through the different sounds until you find the one you like.
- If you’re looking for a vintage style of alert tone, tap Classic at the bottom of the Alert Tones or Ringtones section options from earlier iPhone models.
- You can also download new alert tones by tapping the Tone Store link at the top of the page. Tones are generally cheap (in the $1 to $2 range) and you can even pay for them with iTunes gift cards.
- To adjust the volume of your alerts and ringtone, drag the slider under «Ringer and Alerts» at the top of the Sounds & Haptics page.
-
8
Adjust the volume and other preferences (optional). The app notification tone you selected will ring as loud as your phone ringer and text message alerts (if you’ve turned these features on). To check your general sound preferences, tap the back button to return to the Settings menu and select Sounds & Haptics (or Sounds on some models).
- Drag the slider under «Ringers and Alerts» to adjust the volume.
- You can also turn on audible keyboard clicks, the phone lock sound, and haptic feedback (that vibration you feel when you tap some app options) at the bottom of this section. This feature is not available on all iPhones.
Advertisement
Ask a Question
200 characters left
Include your email address to get a message when this question is answered.
Submit
Advertisement
-
If you place your iPhone into silent mode, you will not hear any notification tones except for your alarm clock sound.[2]
-
Your alarm clock sound is separate from notification sounds. You can modify your alarm sounds in the Clock app.
Advertisement
About This Article
Article SummaryX
1. Open Settings.
2. Tap Sounds & Haptics.
3. Tap the alert type you want to change.
4. Tap Vibration to select a vibration pattern.
5. Tap a ringtone for a longer sound, or an alert tone for a shorter sound.
6. Repeat for other alert types.
Did this summary help you?
Thanks to all authors for creating a page that has been read 115,479 times.
Is this article up to date?
Айфоны чрезвычайно распространены, поэтому наверняка вы сталкивались с подобной ситуацией: вы находитесь в толпе и вдруг слышите звук уведомления. Вы достаете iPhone из кармана и проверяете его, но все было напрасно, уведомление пришло не на ваш iPhone, а на чей-то другой.
Это раздражает. Но вы можете решить эту проблему, так как Apple позволяет своим пользователям изменять звуки уведомлений. Так что вы можете просто использовать другой звук, который будет уникальным для вас. Вы можете изменить звук уведомления практически для каждого приложения — начиная от мелодии звонка, текстовых сообщений и даже напоминаний.
Поэтому в следующий раз, когда вы услышите звук, вы будете знать, что это ваш iPhone.
Вы можете изменить звуки уведомлений независимо от версии iOS, и я расскажу вам, как это сделать.
Как изменить звуки уведомлений на iPhone
Вот что нужно сделать, если вы хотите изменить звуки уведомлений:
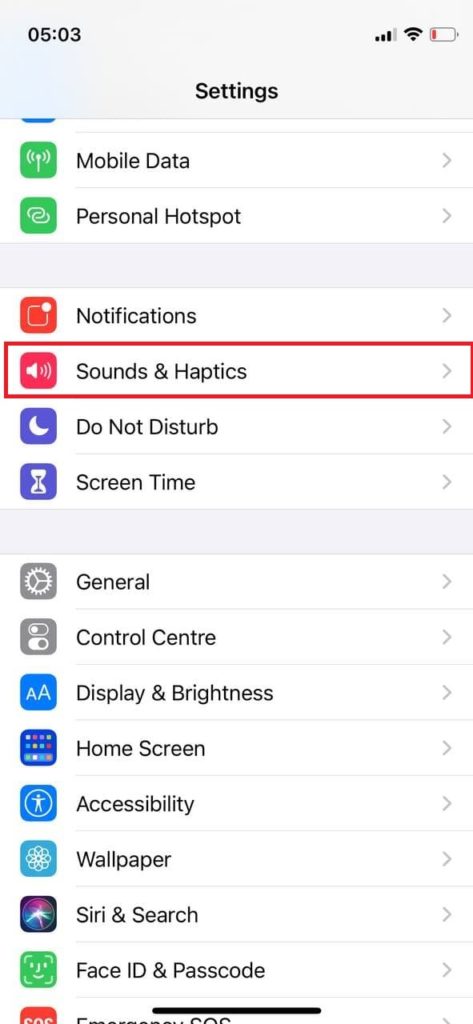
- Перейдите в раздел «Настройки».
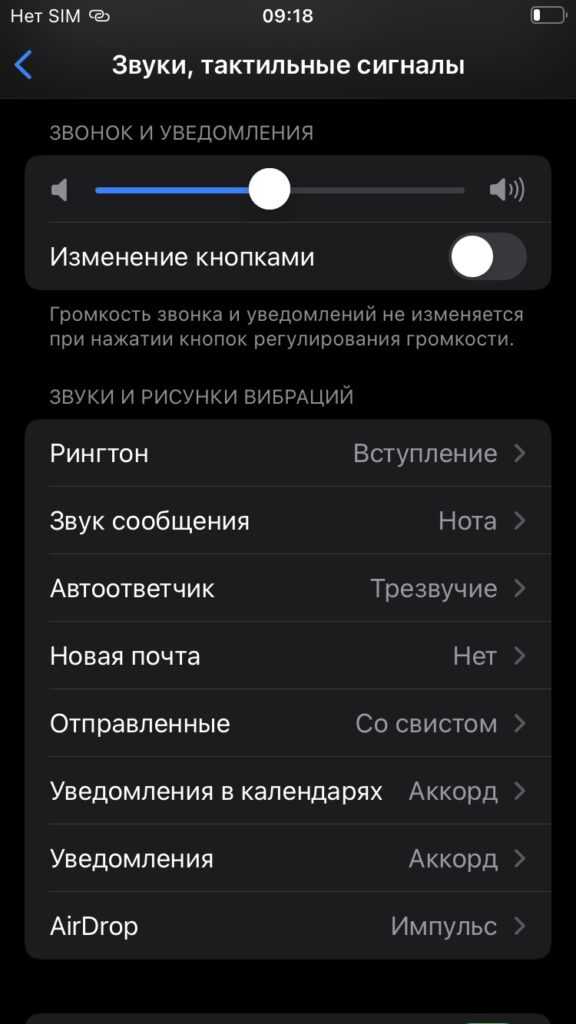
- Прокрутите вниз, чтобы найти пункт Звуки и тактильные ощущения, и нажмите на него.
- Прокрутите вниз, чтобы увидеть подменю Звуки и шаблоны вибрации, и выберите тип уведомления, для которого вы хотите изменить звук.

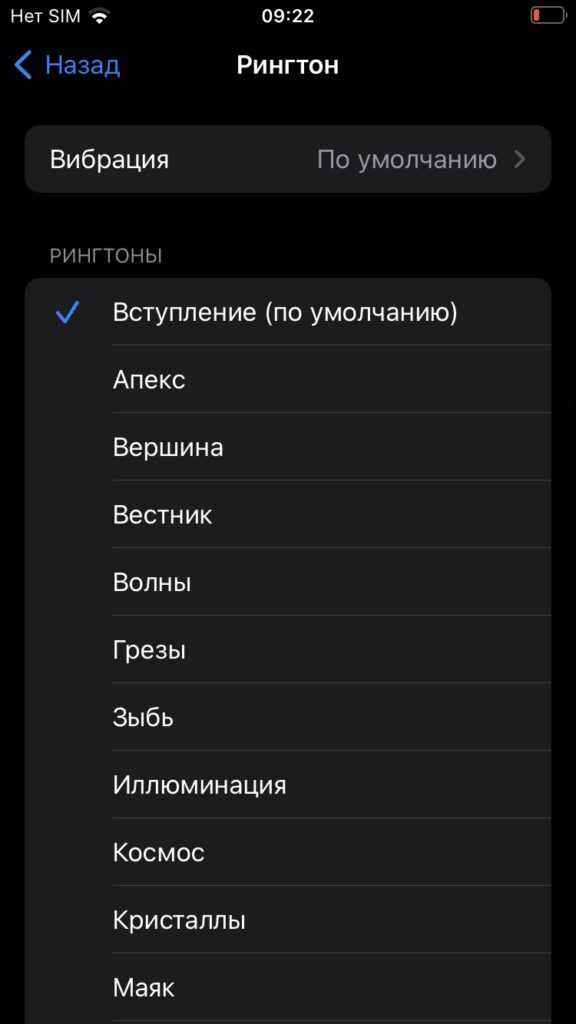
- Выберите звук, который вы хотели бы установить. Существует множество оригинальных звуков Apple, и вы можете попробовать их, нажав на них.
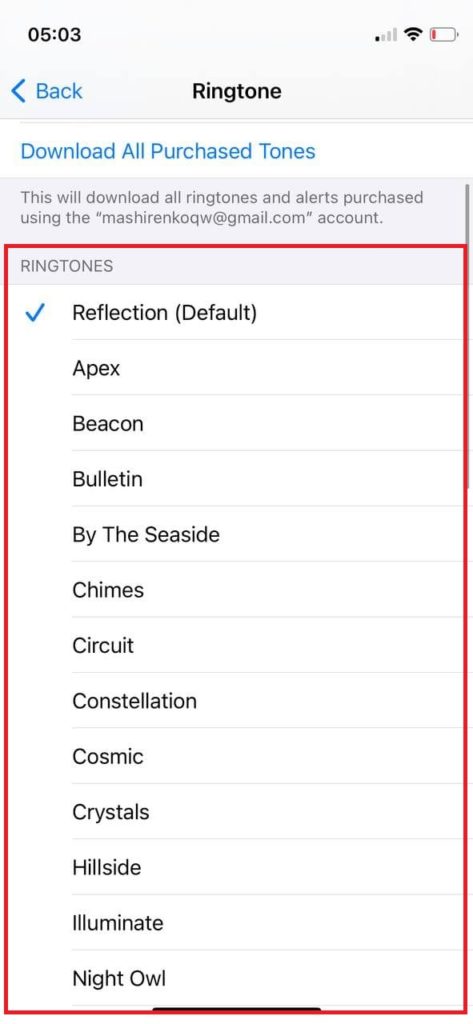
- Когда вы нажмете на звук, появится синяя галочка, уведомляющая о том, что вы выбрали этот звук. Просто выберите нужный звук и нажмите Назад.
Вы можете использовать этот метод для изменения звуков уведомлений для широкого спектра оригинальных функций iPhone. Однако если вы хотите изменить звуки уведомлений для сторонних приложений, вам следует перейти в настройки приложения и действовать оттуда.
Как включить звуки уведомлений для сторонних приложений на iPhone
Вы также можете изменить настройки уведомлений для других приложений на iPhone. Вот как это можно сделать:
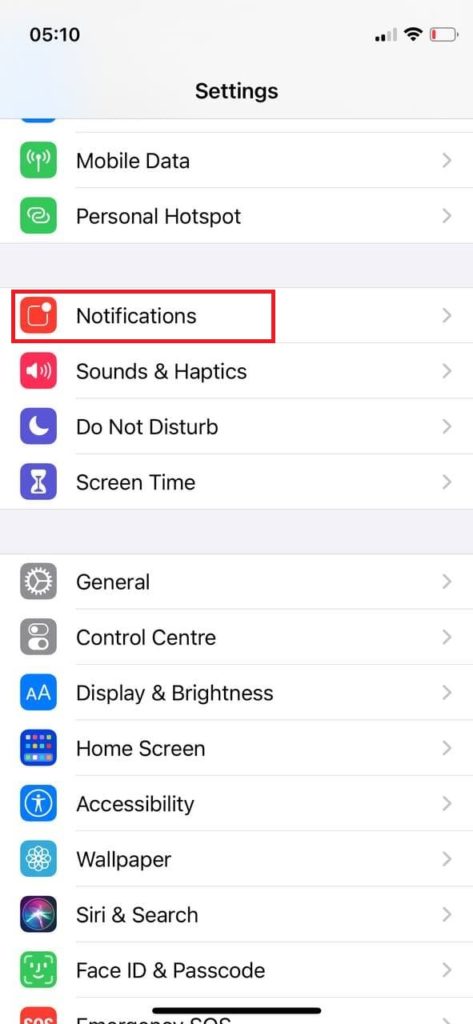
- Перейдите в раздел «Настройки».
- Прокрутите вниз, чтобы найти раздел Уведомления, и нажмите на него.
- Найдите подменю Стиль уведомлений и выберите приложение, для которого вы хотите включить/выключить уведомления. В качестве примера я буду использовать Bolt.
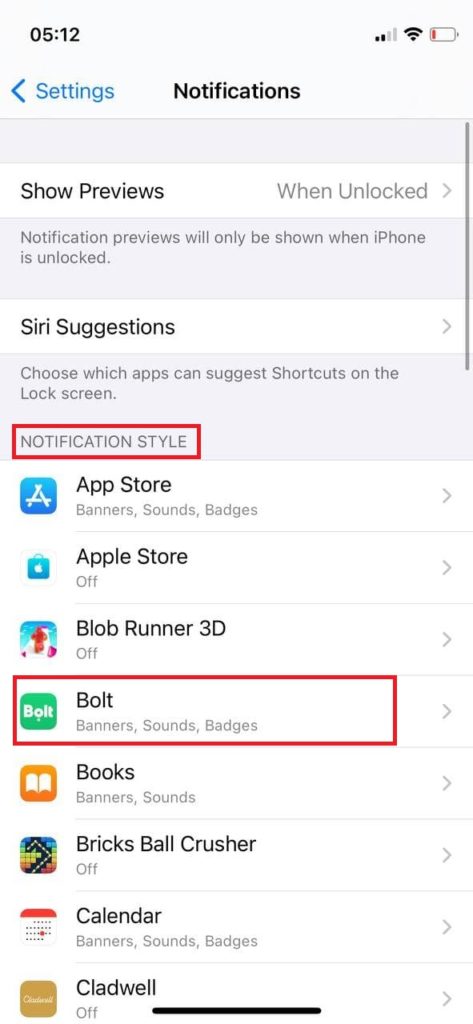
- После нажатия на приложение вы увидите опцию Разрешить уведомления, нажмите на тумблер, чтобы он стал зеленым, если вы хотите, чтобы уведомления были включены, или нажмите на него, чтобы он стал серым.
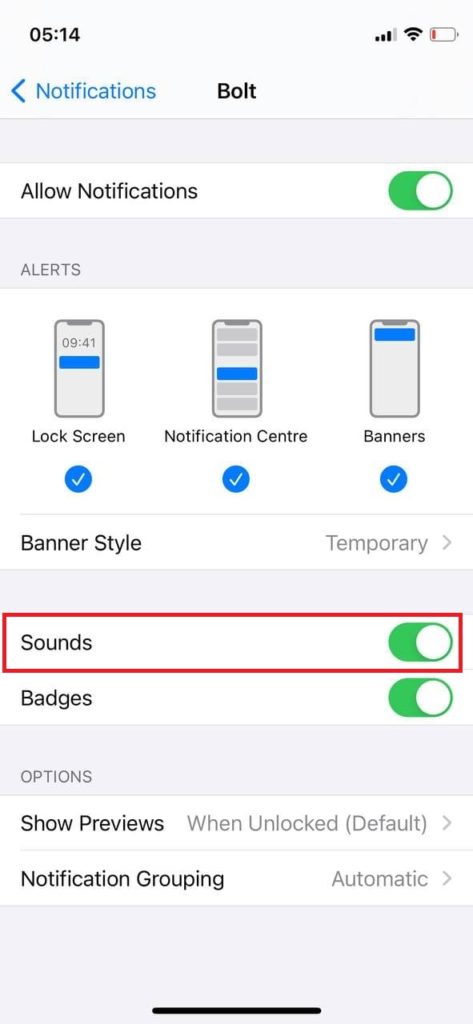
- Однако вы можете управлять уведомлениями более глубоко, например, вы можете отключить звуки, но включить значки, так что это всегда остается на ваше усмотрение.
Как отключить звуки уведомлений для других приложений на iPhone
Процесс такой же, как и при включении звуков уведомлений, только нужно сделать тумблер серым, а не зеленым. Вот что вам нужно сделать (вы можете посмотреть скриншоты выше, чтобы увидеть, как это должно выглядеть на вашем iPhone):
- Откройте Настройки.
- Перейдите в раздел Уведомления.
- В подменю Стиль уведомлений выберите приложение, для которого вы хотите отключить уведомления или звуки уведомлений, и нажмите на него.
- Нажмите на Уведомления (если вы хотите отключить все уведомления из этого приложения) зеленый переключатель, чтобы сделать его серым, или нажмите на Звуки, чтобы отключить только звуки, но оставить значки и другие уведомления.
Эта статья была написана Владиславом Шериданом и проверена Анатолием Шериданом, руководителем отдела контента Tab-tv, в соответствии с нашей политикой качества и проверки фактов.
Изображение с иллюстрацией: BGR
Если вы часто используете iPhone (а кто не делает этого в наши дни?), то вскоре звуки уведомлений станут скучными и утомительными. Вы, вероятно, хотите поменять звуки уведомлений на iPhone либо для всего телефона, либо для определенного приложения. Вот как это сделать. Вместо звукового сигнала вы можете услышать звук зеленого слизистого монстра из «Охотников за привидениями», когда звонит ваша вторая половинка. Только не говори ей.
Читайте далее: Как изменить звуки уведомлений в Viber и WhatsApp
ПЕРЕЙТИ К КЛЮЧЕВЫМ РАЗДЕЛАМ
- Как изменить звук уведомлений на iPhone
- Как изменить звук уведомления для определенного приложения на iPhone
Как изменить звук уведомлений на iPhone
Если вы хотите изменить звук уведомлений в общесистемных приложениях, например мелодию звонка для новых вызовов, вам нужно перейти в «Настройки» -> «Звуки и тактильные сигналы» . Прокрутите вниз до «Звуки и шаблоны вибрации» , и вы увидите список всех общесистемных уведомлений iPhone, которые можно поменять. Коснитесь того, который хотите изменить.
В разделе «Рингтоны» вы найдете список всех доступных мелодий. Все, что выше более толстой серой линии, — это то, что вы лично загрузили на iPhone. Как видно из скриншота ниже, там есть ссылка на Tone Store (часть App Store), а также ссылка на повторную загрузку всех купленных тонов. При нажатии на один из тонов на странице воспроизводится предварительный просмотр, который поможет вам принять решение. Нажав на новый вариант, вернитесь со страницы.
Как изменить звук уведомления для определенного приложения на iPhone
Если вы предпочитаете изменить звук уведомления для определенного приложения, вы тоже можете это сделать. Для этого вам нужно перейти в «Настройки» -> «Уведомления» . Найдите приложение у которого вы хотите поменять звук, и коснитесь его.
Однако обратите внимание, что не все приложения поддерживают изменение тона уведомлений. Другие приложения, такие как WhatsApp и Вконтакте, скрывают звуки уведомлений в настройках своего приложения.
Читайте далее: Как создать рингтоны и звуки уведомлений для телефона
Часто задаваемые вопросы
Можете загрузить свои звуки уведомлений на iPhone?
Да, вы можете создавать свои рингтоны и загружать их на iPhone с помощью приложения «Музыка» или iTunes. Однако вам нужно пройти через очень трудоемкий процесс их правильного кодирования и убедиться, что они в правильном формате. Многие люди на заморачиваются, предпочитая вместо этого скачивать платные рингтоны из App Store.
Можно купить новые звуки уведомлений для iPhone?
Да, если вы перейдете в раздел «Звуки и тактильные сигналы» в настройках iPhone, вы можете нажать на ссылку в разделе «Тоны» в App Store.

gorbanhttps://xpcom.ru
Старший редактор xpcom.ru. Ему нравится все, что связано с технологиями, включая планшеты, смартфоны и все, что между ними.
У многих пользователей в почтовый ящик электронной почты постоянно приходят письма разной тематики. Уведомления о такой чрезмерной активности могут раздражать. К счастью, штатное приложение Почта в iOS позволяет легко настроить эти оповещения.

♥ ПО ТЕМЕ: Менеджер загрузок в Safari на iPhone и iPad: как пользоваться, где находится, куда сохраняет файлы?
Вы можете быть подписаны на определенную тему, что сформирует целую цепочку сообщений электронной почты. Однако в случае отсутствия активного участия в обсуждении уведомления могут стать неприятными – они не несут никакой ценности для пользователя. Никому не хотелось бы получать множество сообщений о том, что не нужно. Но начиная с iOS 13 Apple предоставила возможность настройки уведомлений о новых событиях в ветках почты в приложении Почта.
♥ ПО ТЕМЕ: Как автоматически закрывать вкладки Safari на iPhone и iPad через определенное время.
Для отключения сообщений в любой ветке электронной почты в приложении Почта выполните следующие действия:
1. Запустите стандартное почтовое приложение на iPhone или iPad с iOS 13 или более поздних версий.
2. Найдите ветку сообщений электронной почты, уведомления для которой вы хотите отключить.
3. Проведите пальцем влево по верхнему сообщению ветки, чтобы отобразить скрытые действия, и нажмите «Еще».

4. Во всплывающем меню нажмите на «Не уведомлять».

Это отключит оповещения для всей выбранной ветки на всех ваших устройствах Apple, работающих с одинаковой учетной записью iCloud. В дальнейшем вы уже не будете получать уведомления каждый раз при появлении в этой цепочке нового сообщения. Программа Mail пометит приглушенные ветки маленьким значком колокольчика с диагональной линией. Это даст возможность быстро отделить приглушенные цепочки от обычных.
♥ ПО ТЕМЕ: Теги в Заметках на iPhone, iPad и macOS: как пользоваться.
Как включить уведомления о новых сообщениях в почтовых ветках Apple Mail
Чтобы активировать уведомления в любой приглушенной ранее ветке почты в Mail проделайте следующее:
1. Запустите стандартное почтовое приложение на вашем iPhone или iPad с iOS 13 или более поздних версий.
2. Найдите приглушенную ветку электронной почты в папке входящих сообщений, для которой требуется активировать уведомления. Apple Mail пометит такие цепочки маленьким значком перечеркнутого колокольчика.
3. Проведите пальцем влево по верхнему сообщению ветки, чтобы отобразить скрытые действия, и нажмите «Еще».
4. Во всплывающем меню нажмите на «Уведомлять».

Эти действия позволят восстановить звуковые уведомления о новых сообщениях для требуемой цепочки писем. В дальнейшем приложение Почта будет создавать звуковое оповещение при поступлении в ветку нового письма. И это действие для выбранной цепочки будет продублировано для всех ваших устройств Apple, работающих с одинаковой учетной записью iCloud (Apple ID).
♥ ПО ТЕМЕ: Как продлять жизнь батарее iPhone, который постоянно оставляют на зарядке на всю ночь.
Как настроить звуковое оповещение на новое письмо в цепочке
По умолчанию iOS автоматически помечает все новые сообщения, попавшие в цепочку с отключенными звуковыми уведомлениями, как прочитанные. Но можно изменить это действие в настройках программы Mail:
1. Откройте «Настройки» на вашем iPhone или iPad с iOS 13 или более поздних версий.
2. В корневом списке слева выберите Почта.
3. Нажмите пункт С выкл. уведомлен. в разделе Обработка тем.

4. Выберите один из двух вариантов действий для новых сообщений в приглушенных темах:
- Как прочитанное: новые письма, попадающие в приглушенную цепочку, будут автоматически помечаться прочитанными.
- В архив или удалить: новые письма в приглушенных темах будут архивироваться или удаляться.

♥ ПО ТЕМЕ: Как передать гостям пароль от Wi-Fi, при этом не называя его (QR-код).
Так Архивировать или Удалять?
Для дальнейшей настройки отключения звука для цепочек писем на вашем iPhone или iPad можно указать, как именно упомянутое выше действие «В архив или удалить» необходимо применять к новым сообщениям в обрабатываемой ветке.
Для этого перейдите в Настройки → Почта → Учетные записи и выберите учетную запись настроенной электронной почты.


Теперь нажмите на строку со своим адресом электронной почты и выберите «Дополнительно». Понадобится выбрать опцию Удаленные или Архив в разделе «Место перемещения ненужных сообщений». Этот параметр также определяет, что происходит с сообщением при нажатии на нем кнопки «Удалить» в Почте.

♥ ПО ТЕМЕ: Как быстро перезвонить на последний набранный номер с iPhone.
Быстрое включение или выключение уведомлений на новое письмо в цепочке – второй способ
Если вам покажется неудобным включать или выключать звук для веток писем с помощью свайпов по ним, то есть возможность сделать это другим способом, благодаря потрясающим контекстным меню, появившимся в iOS 13. Просто нажмите и удерживайте палец на ветке электронной почты в папке «Входящие» или нажмите на цепочку с помощью 3D Touch и выберите «Не уведомлять» или «Уведомить меня» в меню ярлыков.

Смотрите также:
- Можно ли оставлять iPhone подключенным к зарядке на ночь, или как правильно заряжать смартфон.
- Как настроить (добавить) почту Яндекс, Gmail и Mail.ru на iPhone или iPad.
- Levitagram, или как на iPhone создавать фото с эффектом левитации (полета).