Широкое распространение электронных книг привело к тому, что иногда не понятно, где чья книга.. Бывали ситуации, когда читалку не отличишь от аналогичной у знакомого. Пока не включишь — там по открытому тексту удаётся понять.
Не хотелось заниматься “колхозом” — добавлять индивидуальности и без того стильному внешнему виду чехла-обложки (хотя, небольшая наклейка в уголок, пожалуй, может являться вполне приемлемым решением). Однако, и включать книгу, чтобы удостовериться в том, что не прихватил чужую, лишний раз не хотелось. Вспомнил, что у Pocketbook-ов предусмотрена возможность установки заставок, которые могут добавить индивидуальности книге.
Как поменять заставку на Pocketbook
Чтобы поменять заставку на Pocketbook, следует подготовить изображение в формате BMP (16 или 256 цветов, для устройств с диагональю дисплея 6 дюймов разрешением 600х800 точек) и скопировать в память устройства (не на sd-карту) в папку “systemlogo”. После отсоединения устройства от компьютера выбрать заставку при старте (Главное меню — персонализация — Заставка при выключении)
Помимо установки фиксированной заставки в Pocketbook предусмотрена возможность отображения обложки читаемой книги. Искать в том же разделе пункт “Обложка книги” — в этом случае есть шанс “не узнать” свою читалку, если только что приступил к новому произведению. Заставка отображается при выключенном устройстве (в том числе, и когда Pocketbook не включается) и энергию батареи не расходует (сложно было с этим смириться, но пришлось принять, что такова уж особенность e-ink технологии)
Как создать заставку для электронной книги Pocketbook
Заставки в Pocketbook — это файлы размером 600×800 точек в формате BMP. Если возникают сложности при работе за компьютером (и Вас пугают слова графический редактор, палитра, цвета), можно попробовать поискать подходящую. В интернете представлен довольно большой выбор из множества готовых заставок для Pocketbook.
Для создания своей заставки из заранее выбранного изображения (желательно, чтобы первоначальный размер изображения был больше чем 800х600.. было бы неплохо, чтобы оно было достаточно контрастным — немного практики, и придёт понимание, из каких фотографий можно сделать удачную заставку для Pocketbook или другой “чёрно-белой” электронной книги на технологии e-ink), открываем его в графическом редакторе (подойдёт практически любой — от paint-а до Photoshop-а, gimp-а и других “монстров”), который поддерживает возможность сохранения файла в формате BMP.
Редактируем по своему усмотрению (компонуем, обрезаем, подгоняем размеры, добавляем надписи-логотипы “Made by afftar” (c))… после чего сохраняем нашу будущую заставку для читалки в формате BMP 8 бит. Созданный файл можно смело загружать на устройство. Заставки для Pocketbook хранятся в скрытом каталоге
Подготовка палитры для заставок Pocketbook
Есть рекомендация по предварительной подготовке палитры в Photoshop. Для “фиксации” цветов.
1. Загружаем любую многоцветную картину в режиме RGB Color и 8 Bits/Channel (меню Image/Mode).
2. Переводим в индексированную палитру (image/mode/indexed color). В окошке запол Colors=4, Palette=Custom. Открываем редактор с 4-х цветной палитрой. Задаём значения (не обращая внимания на текущие значения):
Черный — 0,0,0
Темно-серый — 85,85,85
Свето-серый — 170,170,170
Белый — 255,255,255
Сохраняем палитру в формате *.act — пригодится в дальнейшем. При сохранении задаём значения (отмечено Важным!) Dither=Diffusion, Amount=75%.
Картинку сохранять не обязательно.
3. В дальнейшем, при редактировании изображения подключаем сохранённую палитру (image/mode/color table)
Метки: pocketbook
Опубликовано
Четверг, Декабрь 3, 2015 в 09:45 в следующих категориях: Без рубрики.
Вы можете подписаться на комментарии к этому сообщению через RSS 2.0.
Вы можете оставить комментарий. Пинг отключен.
Автор будет признателен, если Вы поделитесь ссылкой на статью, которая Вам помогла:
BB-код (для вставки на форум)
html-код (для вставки в ЖЖ, WP, blogger и на страницы сайта)
ссылка (для отправки по почте)
КатегорииСтатьи
Среди разнообразных электронных книг именно устройства на базе E-Ink от данного бренда пользуются спросом благодаря соотношению стоимости и качества продукции. Но владельцы девайсов интересуются, как в Onyx Boox поменять заставку и поставить картинки на скринсейвер. Как вы знаете, первоначально многим моделям производитель даёт имена известных учёных, путешественников и т. д.
Например, у меня есть версия, посвященная Васко да Гама – португальскому мореплавателю, открывшему немало географических объектов и новых территорий. Весь дизайн оптимизирован под него, но возможность кастомизации сохраняется. Необходимо залить в память произвольные изображения в разрешении 758 на 1024 точки (или другом, зависит от конкретных характеристик), но именно в вертикальной развёртке.
Лучше использовать контрастные чёрно-белые фото или рисунки, но и цветные неплохо отображаются на E-Ink дисплее. Поддерживаются два формата – JPG и PNG. Через файловый менеджер (нативный или установленный через Play Market) находим файл, удерживаем по нему и вызываем контекстное меню.

Во всплывающем меню выбираем пункт «Установить на спящий режим» (или иной похожий). Затем увидим до пяти слотов, куда можно загрузить разные файлики или включить один на все. Процедура сохранения не мгновенная, происходит запись в скрытую директорию Android-системы. Именно данная операционная система находится в основе.
Как проверить корректность? Просто переведите книжку в спящий режим, а затем выведите обратно. Если задействованы все слоты, при каждом повторении процедуры будет отдельное изображение. Есть и подпункт «Вернуть исходные», тогда произойдёт откат к первоначальным параметрам. Отсутствует сенсорный ввод? Используйте крестовину для навигации.
Подписывайтесь на наши каналы в Яндекс.Дзене и на YouTube! Копирование текстов с сайта GameNewsBlog.ru запрещено. Комментарии закрыты ввиду невозможности их модерации.

GNB-Gamer
-

-
April 30 2013, 13:27
- Техника
- Cancel

Чтобы немного упростить жизнь тем, кого, как и меня, не устраивают стандартные картинки и изображения в Onyx Boox i62m Nemo, я подготовил небольшой патч, который вы найдете в аттаче.
Патч содержит:
backup — пустая папочка, куда будут скопированы бэкапы оригинальных картинок.
Off_image — папочка, где лежит картинка на экран включения/выключения книжки
screens — папочка, где лежат скринсейверы для экрана блокировки
Любой из этих файлов вы можете заменить своим собственным. Главное, чтобы разрешение файла соответствовало разрешению читалки — 758 x 1024, формат файла был PNG ( png-8 ), а количество цветов было 256 ( оттенки серого ).
Способ будет, скорее всего, работать и на некоторых других читалках Onyx Boox, если заменить предлагаемые мною файлы изображений на файлы с разрешением вашей читалки.
Если разрешение вашей читалки отличается от 758 x 1024, и вы используете предлагаемый мною способ без замены файлов на те, что соответствуют ее разрешению, обстоятельства могут быть самыми плачевными. Не делайте так.
На читалках Aurora, Albatros, Piligrim и.т.д. не проверял. Только на Nemo.
Как устанавливать:
1) Распаковываем архив в память читалки (не на SD-карточку). В самую верхнюю доступную папочку.
2) Запускаем в файловом менеджере читалки backup.oar, и в папочку backup копируются бэкапы оригинальных картинок.
3) Запускаем файл replace.oar, и стандартные картинки заменяются на ваши из папочек screens и Off_image
4) Если вы хотите, чтобы у вас показывалась только одна картинка screen_saver0.png, после окончания операции используйте remove.oar
Картинку на экран блокировки устанавливаем следующим образом: Открываем нужную картинку в файловом менеджере читалки. Заходим в настройки. В меню выбираем «экран блокировки». Готово
Патч на Google Drive: https://docs.google.com/file/d/0BwjaMXgOwuIBYndxX2kwQnpTemM/edit?usp=sharing
Патч на Яндекс.Диске: http://yadi.sk/d/sDwAoZYs4TA4W
upd: яндекс и гугл погрохали файлы патча, я нашел инструкцию, пробуйте вручную по ней: https://sites.google.com/site/onyxbooxrusres/home/faq-po-knigam-linejki-onyx
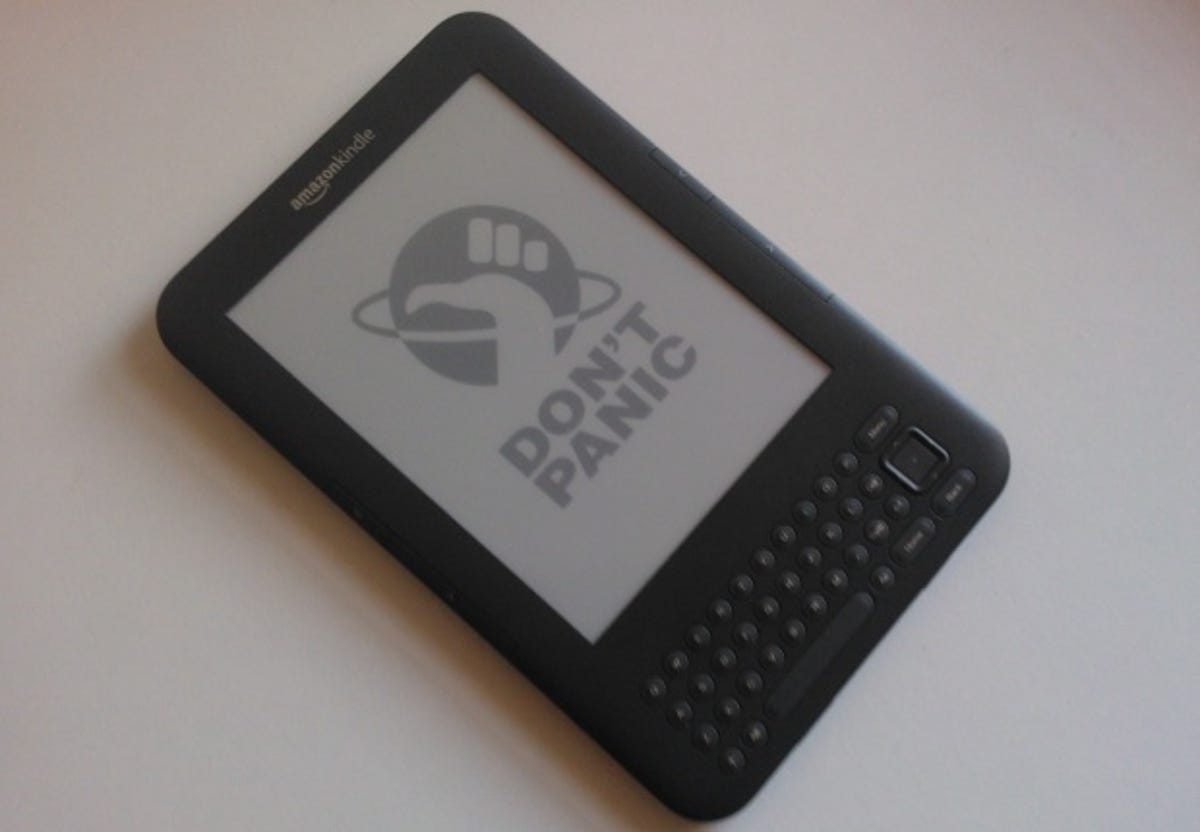
Those with an Amazon Kindle will be familiar with the selection of creepy E-Ink renderings on its screensaver. Doze off while reading and you’ll awake to any number of horrors, from the moustachioed countenance of Mark Twain to an ichthyophobic’s nightmare.
While the Kindle ordinarily won’t let you change the screensaver images, some simple jiggery-pokery will allow you to ‘jailbreak’ your device and customise it (jailbreaking being the process of overcoming the limitations imposed by the gadget’s manufacturer). Here’s how.
Getting started
Jailbreaking your Kindle won’t sever your link to the Amazonian mothership. Even an escapee can still enjoy web browsing, Whispernet and Kindle Store access. Although any software updates Amazon puts out will recapture your Kindle if you install them, it only ever deploys minor changes sparingly, so this shouldn’t be a problem.
It may be worth backing up your Kindle before you get started in case anything goes awry, though I had no issues of books going wandering when I tried it. I’ll start with the Kindle 2, 3 and DX. Scroll down for Kindle 4 instructions. I’ve not found a way to do this on the Kindle Touch yet, but I’ll update this article if and when I do.
Kindle 2, 3 and DX: Finding the jailbreak files
Download the zip folder by clicking here (the download should start automatically), and extract the files within, which you’ll use to spring your Kindle free. Note that as this is a compressed zip file, you may need to install WinRAR to extract it. WinRAR is available as a free trial and can be downloaded here.
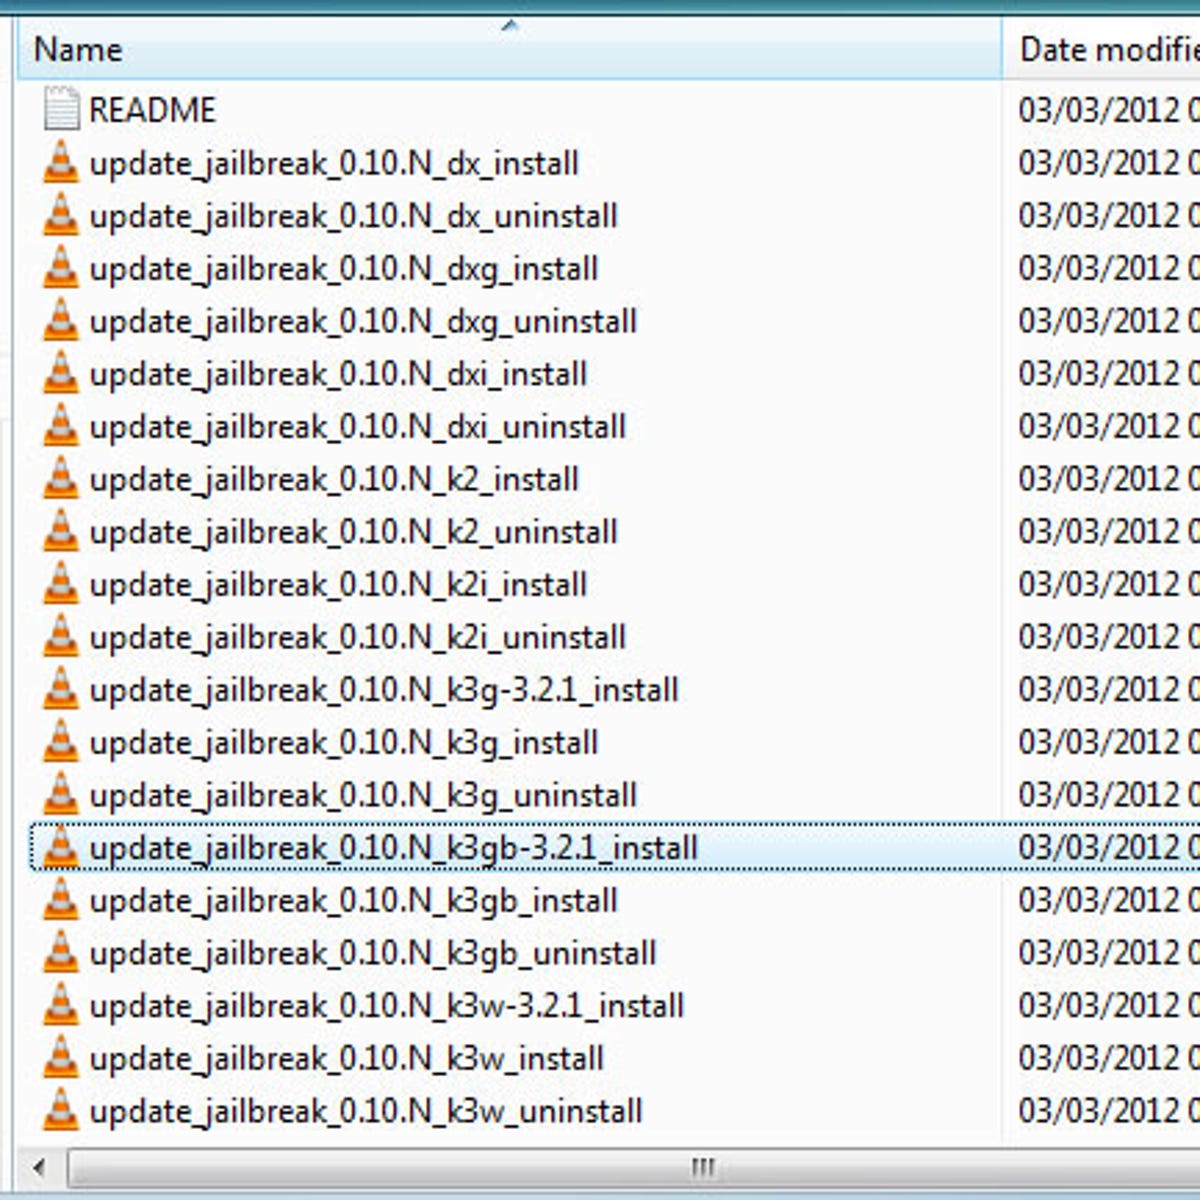
It’s very important that you select the correct update file for your device, so look carefully at the end of the file name. For the Kindle DX, select the file ending in ‘dx_install.bin’ and for the Kindle 2 select ‘k2_install.bin’. If you’re jailbreaking a Kindle 3, select ‘k3w’ for the Wi-Fi-only version, ‘k3g’ for the US 3G model or ‘k3gb’ for the UK 3G blend.
If your Kindle is using software version 3.1 or higher, find your file and select the version of it that ends in ‘-3.2.1’. In all cases, if you’re using an ‘International’ model, select the file for your device that ends in ‘i’ (e.g. ‘k2i_install’ for the Kindle 2 International).
Jailbreaking the Kindle
Connect your Kindle to your computer and mount it as a removable storage device. The file structure innards of your Kindle should look similar to this:
Once you’re in, copy and paste the appropriate update file into the root directory of the Kindle and then safely eject it from your computer.
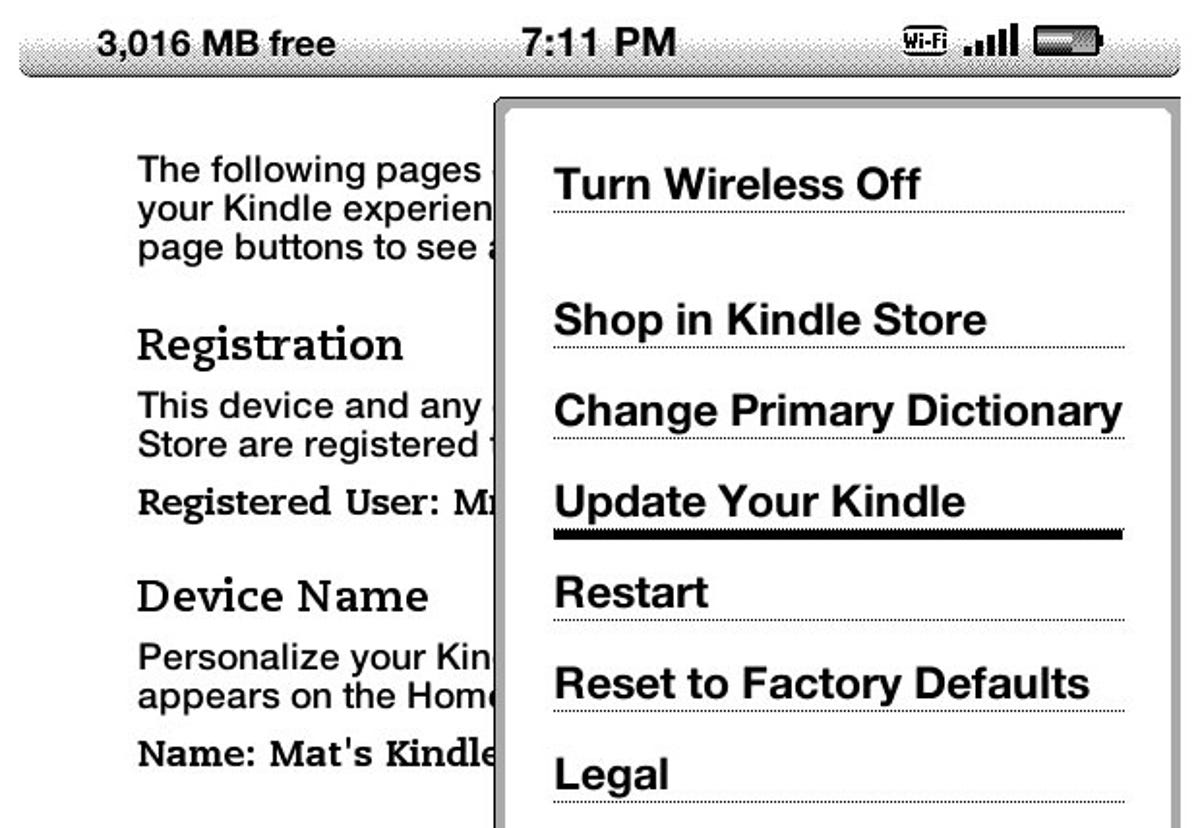
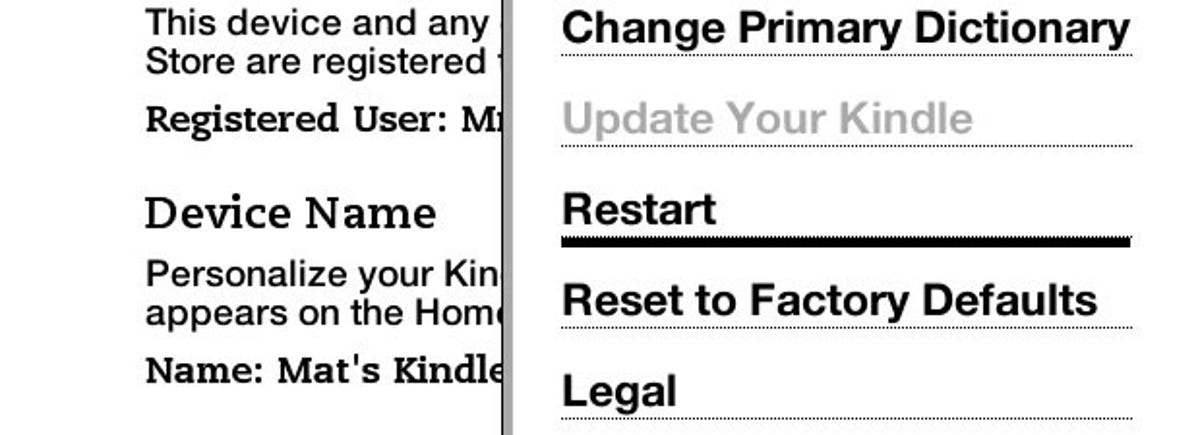
On your Kindle, press the ‘menu’ button and navigate to the settings screen. Press ‘menu’ again and scroll down to ‘Update your Kindle’. You’ll see a progress bar that should eventually turn into a big reassuring tick to indicate that the update was successful.

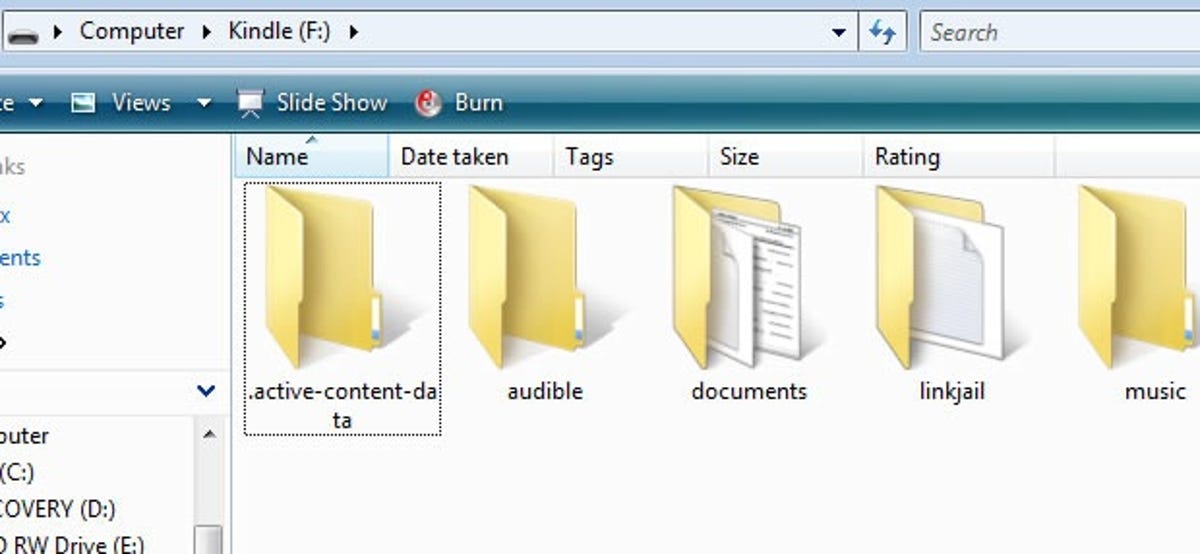
If all went to plan, you should have a new folder on your Kindle called ‘linkjail’.
Installing the screensaver hack
Download and unzip the file here and identify the correct binary file using the same naming convention as before. The only variation is that those of you who previously selected the ‘-3.2.1’ file don’t need to worry about that addendum this time around.
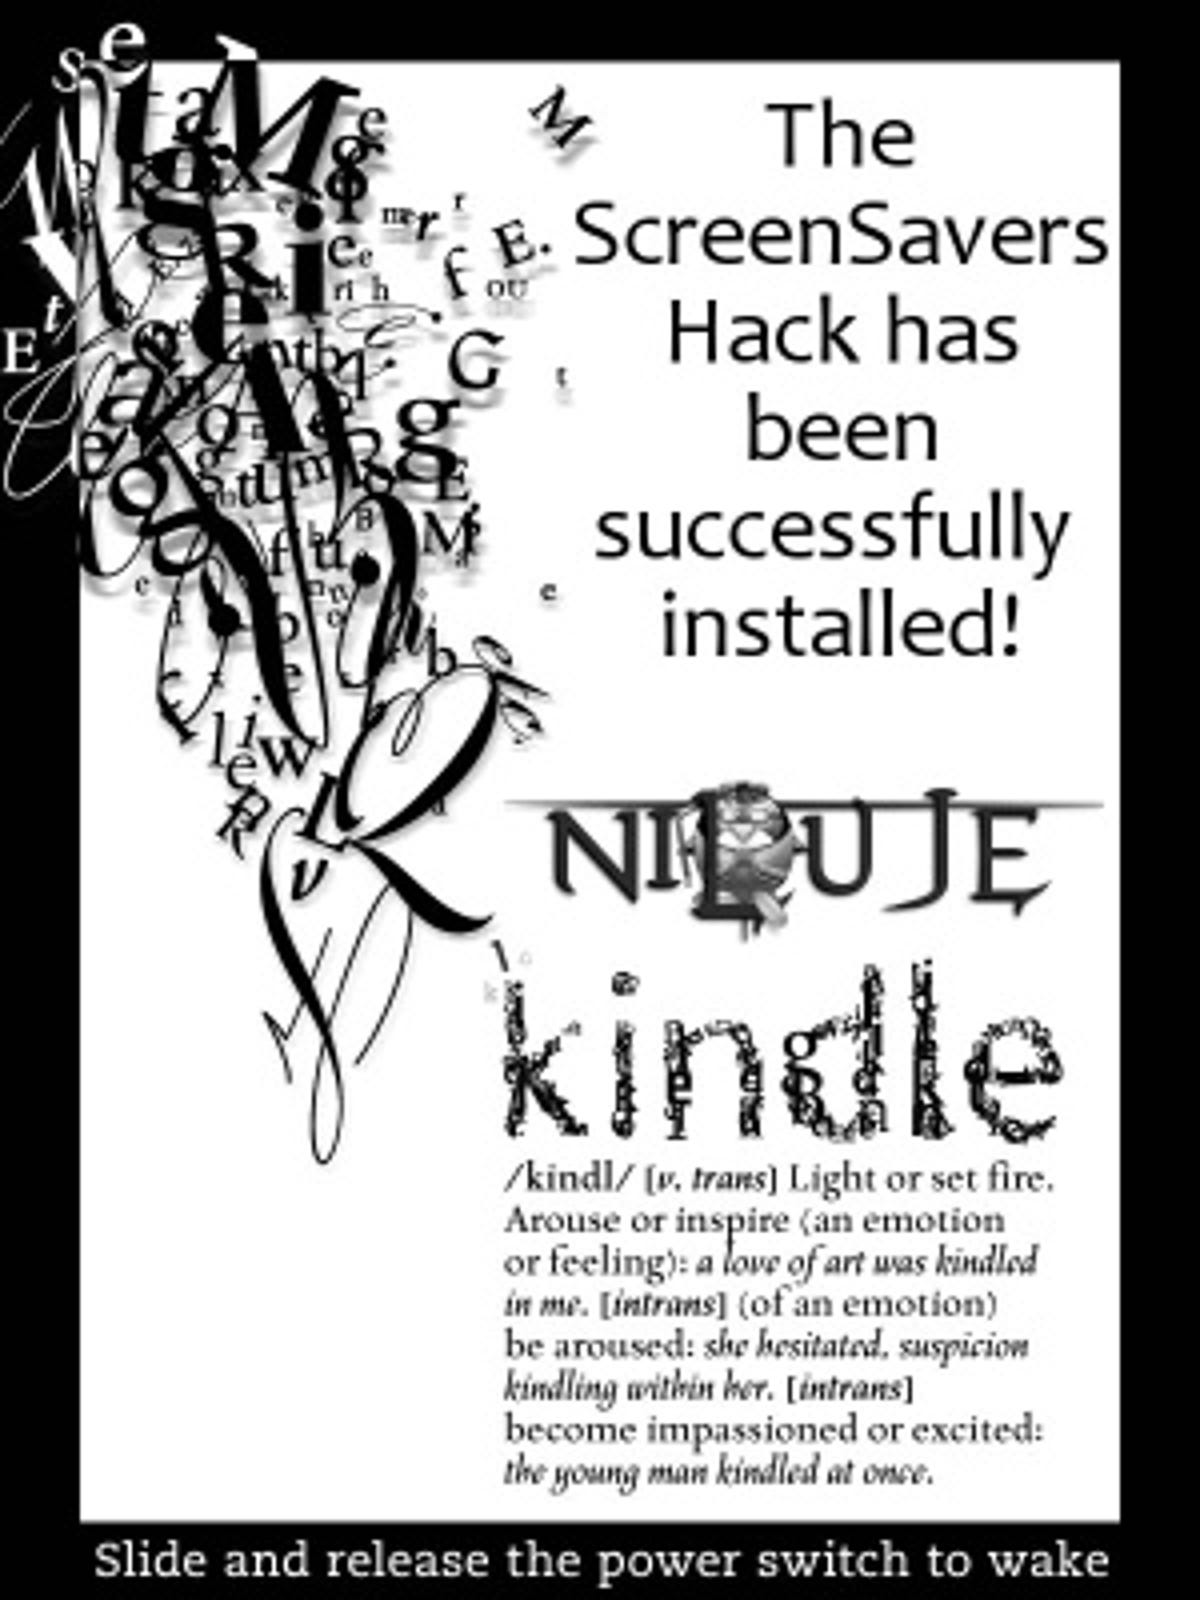
Update your Kindle using the same method as the original jailbreak. When complete, disconnect your Kindle from your computer and put it on standby. If this is the screensaver that greets you, then you’ve prevailed!
Adding new images and finding backups
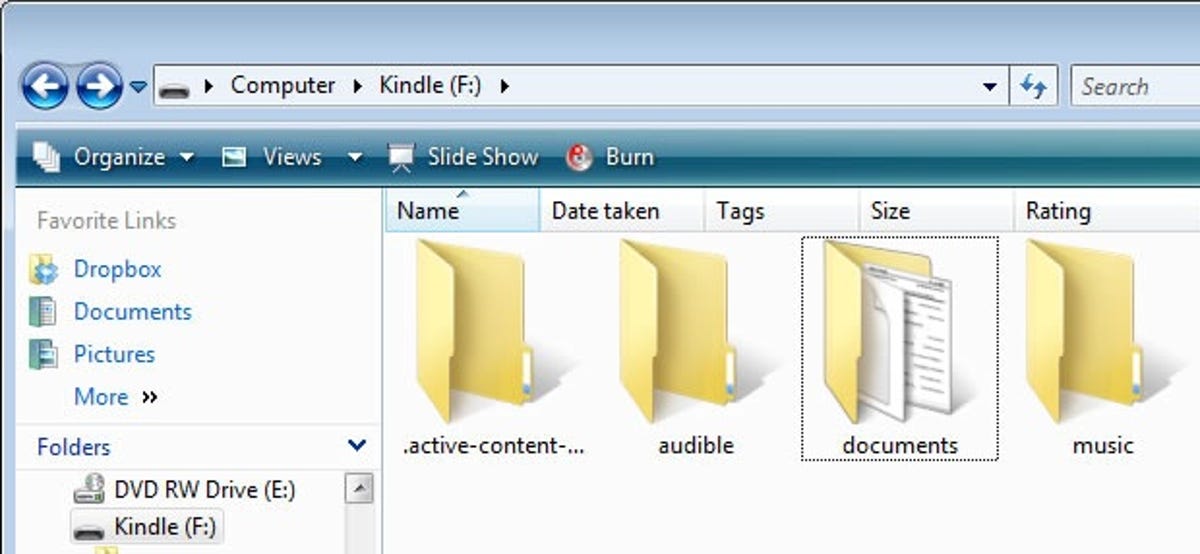
Mount your Kindle and find the ‘linkss’ folder:
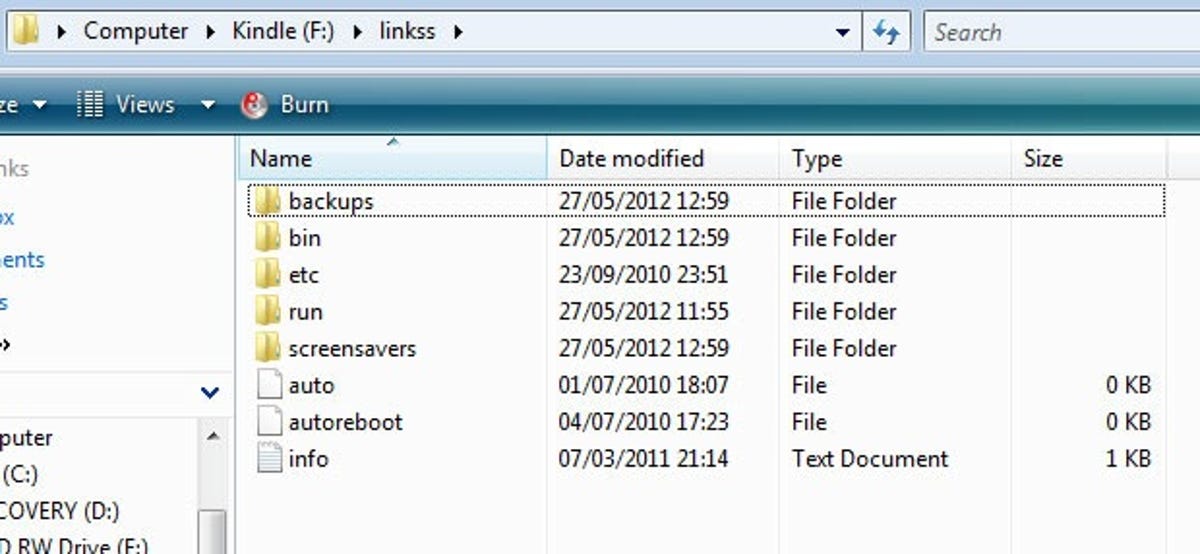
You can ignore most of the stuff here — you just need the ‘backups’ and ‘screensavers’ folders for our goal. The ‘screensavers’ folder is where you’ll house your new images. In ‘backups’ you’ll be reunited with the chilling original screensaver pics, which you can copy over to the ‘screensavers’ folder if you want to keep them.
Now, scan your peepers down to the ‘Adding new screensavers’ header in this article for guidance on what to do next, as the instructions are the same for the Kindle 4.
Uninstalling the lot
If you want to restore your Kindle back to proprietary purity, simply repeat the process using the ‘_uninstall’ binary files that accompanied the files you used to jailbreak originally (the ‘-3.2.1’ suffix isn’t needed). The files created during the jailbreak will remain but are no longer in use so they can be deleted harmlessly.
Kindle 4
Changing the screensaver on the latest model of Kindle is a different kettle of fish altogether. While you don’t have to rely on the guidance of hackers, you do have to delve much further into the Kindle’s gooey innards, which carries certain risks. But if you’re feeling particularly audacious, I’ll guide you through it.
Please be aware that on this model Kindle, the process will delete the default screensavers immediately with no way of restoring them unless you download and add them again.
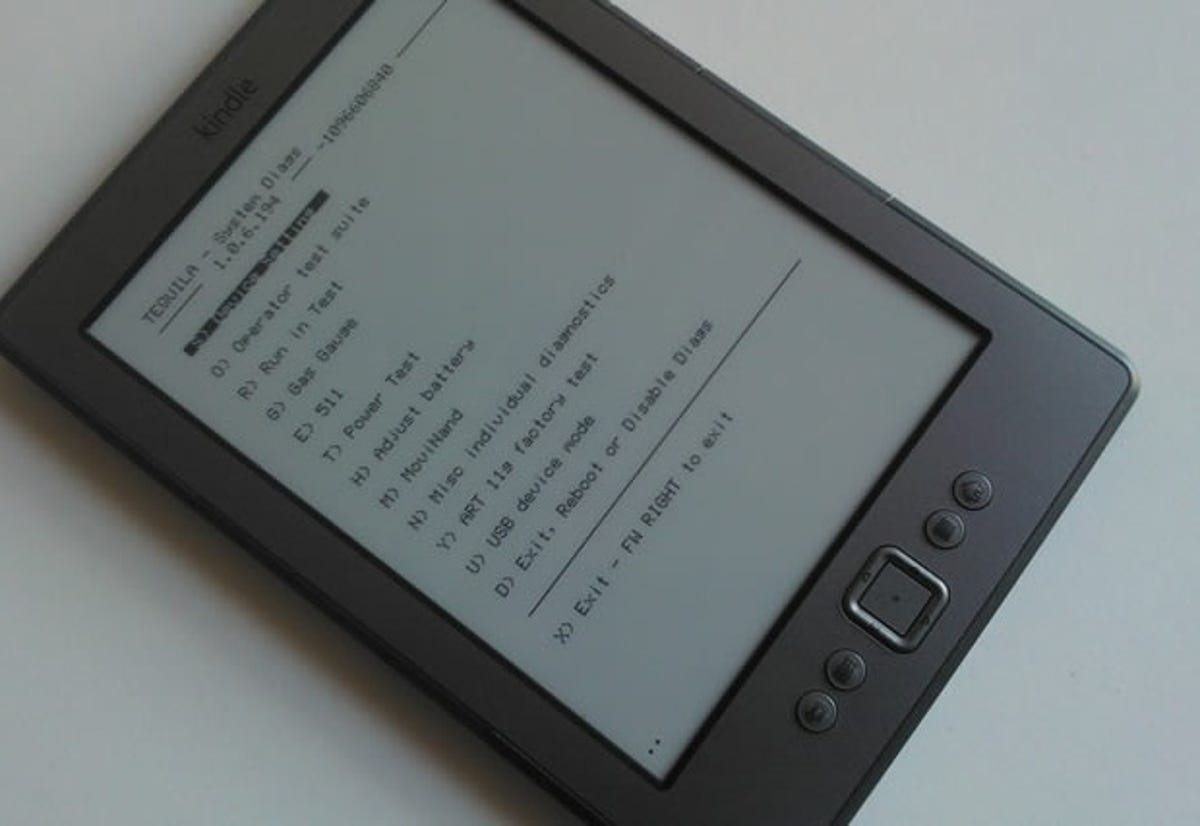
Diagnostics mode: Activate
Plug your Kindle into your computer and mount it as a removable storage device. You should see something not unlike this:
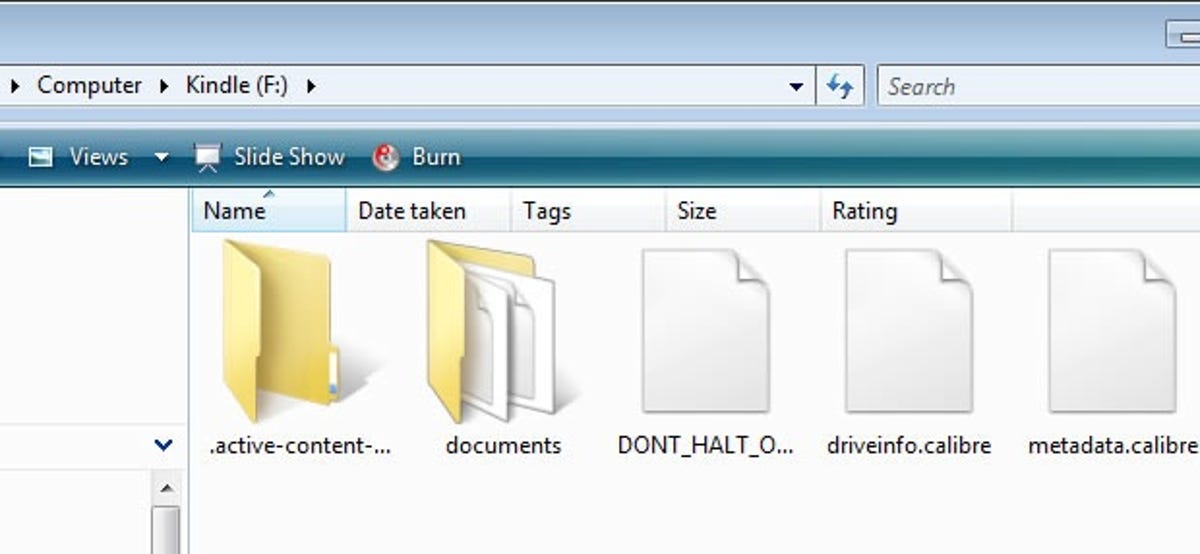
Create a blank file by right-clicking and going to ‘New’ and ‘File’. Change the name of this blank file to ‘ENABLE_DIAGS’ and safely eject your Kindle. If you don’t have the option to create a blank file, you can copy the blank ‘DONT_HALT_ON_REPAIR’ file in the same folder and change the name.
Restart your device and you’ll be chucked into the Kindle’s ‘Diagnostics Mode’. Scroll down to ‘N) Misc individual diagnostics’ using the d-pad and press the centre button to select it. On the next menu select ‘U) Utilities’. Then scroll down to ‘Z) Enable USBnet’ and you’ll be presented with a list of IP address information. This will allow your Kindle to function as a makeshift network device on your computer.
Plug your Kindle back into your computer and navigate to your list of network connections. For example, in Windows 7, this is in ‘Network and Sharing Centre’. There should be a connection named ‘Unidentified Network’, which is the Kindle masquerading as a network. Click on this connection and go to ‘Properties’, then scroll down and select ‘Internet Protocol Version 4 (TCP/IPv4)’ and select ‘Properties’ again.
In this window, click the ‘Use the following IP address’ radio button and enter the following:
- IP address: 192.168.15.1
- Subnet Mask: 255.255.255.0
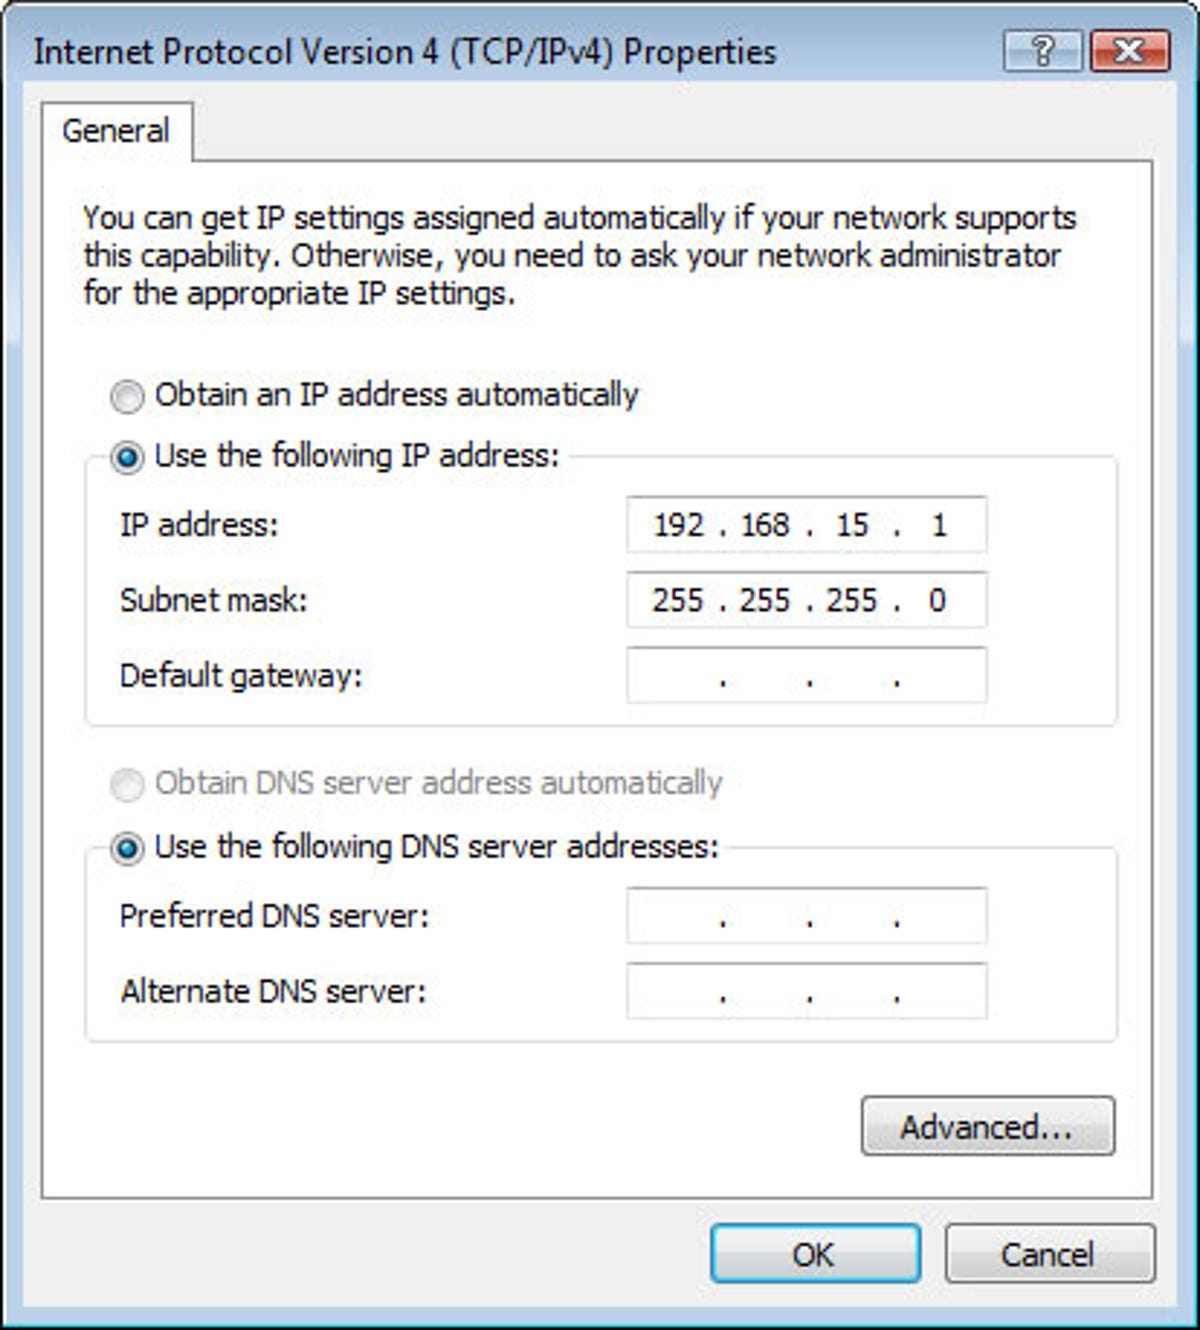
Click ‘Ok’ and exit these windows.
PuTTY in your hands
This is where it gets a little abstruse. Download and install PuTTY client software and run it.
Under ‘Host Name (or IP address)’, enter 192.168.15.244 and leave everything else as default. It should look like this:
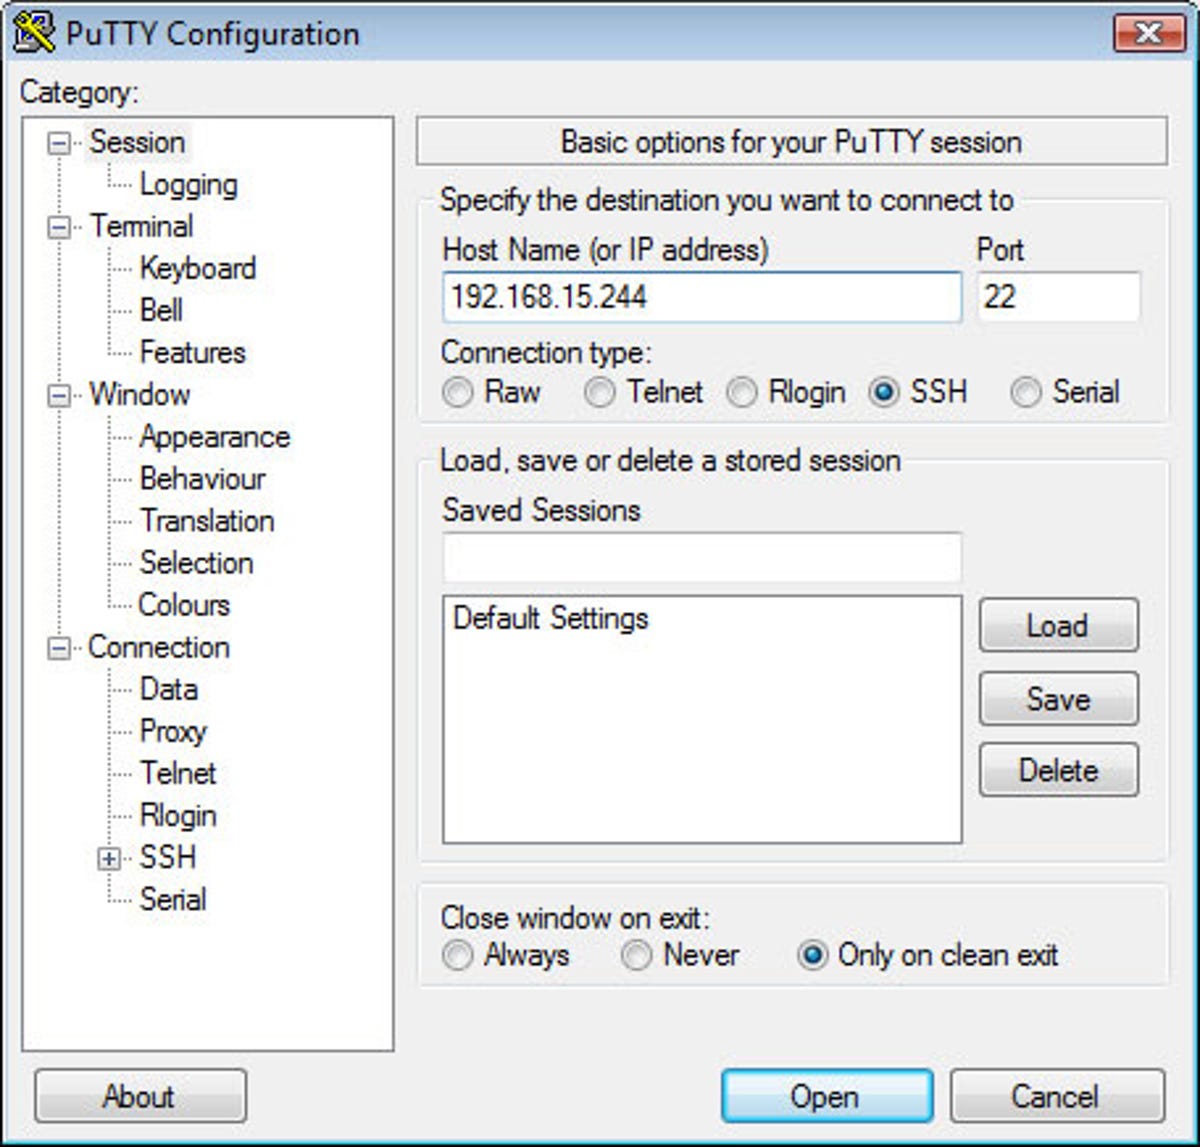
Press ‘Open’.
You should be presented with a terminal. Disregard prompts about security that will come up.
When asked, enter the following username and password, pressing enter to submit. For those unfamiliar with consoles, the password won’t appear as you type it.
- user: root
- pass: mario
Housing your images
Now that you’ve tapped into your Kindle, you need to tell it what to do. With these commands, we’ll create a new folder to house images and order your Kindle to defer to it for displaying the screensaver.
Enter these commands exactly as shown, pressing enter after each command. If you want to copy them from here, right click on the text cursor in the terminal window and it’ll paste automatically.
- mntroot rw
- mkdir /mnt/us/screensaver
- mount /dev/mmcblk0p1 /mnt/base-mmc
- mv /mnt/base-mmc/opt/amazon/screen_saver/600×800 /mnt/base-mmc/opt/amazon/screen_saver/600×800.old
- ln -sfn /mnt/us/screensaver /mnt/base-mmc/opt/amazon/screen_saver/600×800
If successful, you should see the following screen:
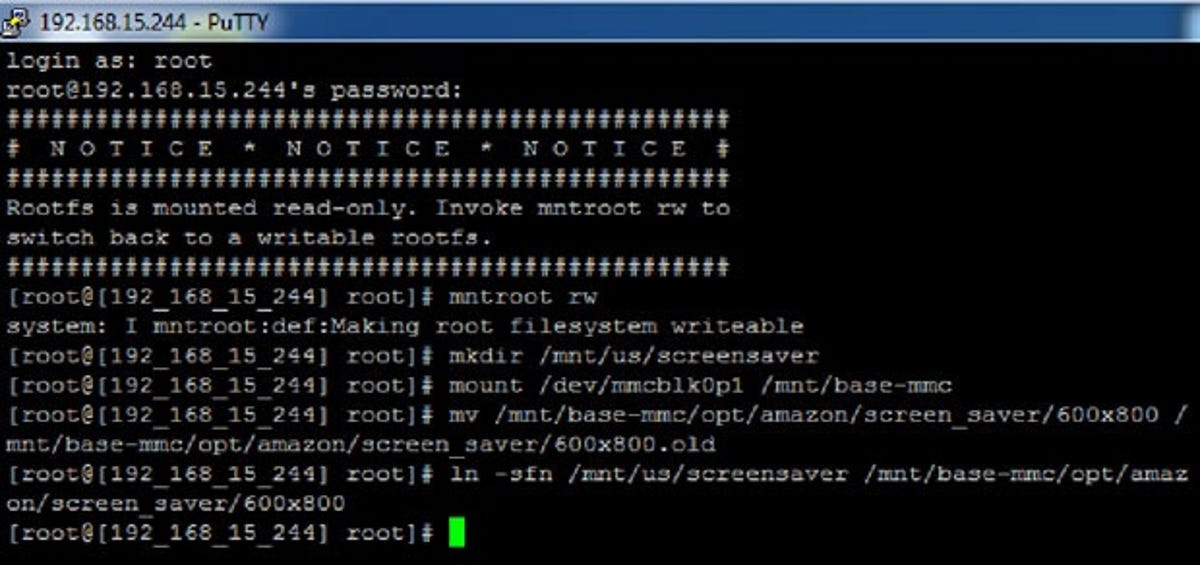
Type ‘exit’ and PuTTY will close.
Diagnostics mode: Deactivate
Disconnect your Kindle from the computer and press the right directional button until you reach the main menu. Scroll down to ‘D) Exit, Reboot or Disable Diags’ and then select ‘D) Disable Diagnostics’. When asked, press the ‘left’ directional button to confirm. It’ll return to the main menu and hang for a few seconds, but eventually it will restart into its normal mode.
If all has gone to plan, you should have a new folder called ‘screensaver’ on your Kindle’s root directory.
Adding new screensavers
The Kindle takes screensaver image sizes of 600×800 pixels (or 824×1,200 pixels on the DX), in either JPEG or PNG format. Since the E-Ink screen pays close attention to detail, the lossy compression method used by the JPEG format may not look as good as an image rendered as a PNG, but odds are you’ll barely notice.
Copy and paste your new images into the ‘screensavers’ folder. Each time you add a new one you’ll need to restart your Kindle before it’ll appear in the sleep mode cycle. The screensavers will cycle in alphabetical order but can be randomised by creating an empty file called ‘random’ in the ‘screensavers’ folder.
If you’re stuck for ideas, help yourself to my froody offering, in honour of Towel Day, or you can hit up the tumblr blog dedicated to Kindle wallpapers.
Those with an Amazon Kindle will be familiar with the selection of creepy E-Ink renderings on its screensaver. Doze off while reading and you’ll awake to any number of horrors, from the moustachioed countenance of Mark Twain to an ichthyophobic’s nightmare.
While the Kindle ordinarily won’t let you change the screensaver images, some simple jiggery-pokery will allow you to ‘jailbreak’ your device and customise it (jailbreaking being the process of overcoming the limitations imposed by the gadget’s manufacturer). Here’s how.
Getting started
Jailbreaking your Kindle won’t sever your link to the Amazonian mothership. Even an escapee can still enjoy web browsing, Whispernet and Kindle Store access. Although any software updates Amazon puts out will recapture your Kindle if you install them, it only ever deploys minor changes sparingly, so this shouldn’t be a problem.
It may be worth backing up your Kindle before you get started in case anything goes awry, though I had no issues of books going wandering when I tried it. I’ll start with the Kindle 2, 3 and DX. Scroll down for Kindle 4 instructions. I’ve not found a way to do this on the Kindle Touch yet, but I’ll update this article if and when I do.
Kindle 2, 3 and DX: Finding the jailbreak files
Download the zip folder by clicking here (the download should start automatically), and extract the files within, which you’ll use to spring your Kindle free. Note that as this is a compressed zip file, you may need to install WinRAR to extract it. WinRAR is available as a free trial and can be downloaded here.
It’s very important that you select the correct update file for your device, so look carefully at the end of the file name. For the Kindle DX, select the file ending in ‘dx_install.bin’ and for the Kindle 2 select ‘k2_install.bin’. If you’re jailbreaking a Kindle 3, select ‘k3w’ for the Wi-Fi-only version, ‘k3g’ for the US 3G model or ‘k3gb’ for the UK 3G blend.
If your Kindle is using software version 3.1 or higher, find your file and select the version of it that ends in ‘-3.2.1’. In all cases, if you’re using an ‘International’ model, select the file for your device that ends in ‘i’ (e.g. ‘k2i_install’ for the Kindle 2 International).
Jailbreaking the Kindle
Connect your Kindle to your computer and mount it as a removable storage device. The file structure innards of your Kindle should look similar to this:
Once you’re in, copy and paste the appropriate update file into the root directory of the Kindle and then safely eject it from your computer.
On your Kindle, press the ‘menu’ button and navigate to the settings screen. Press ‘menu’ again and scroll down to ‘Update your Kindle’. You’ll see a progress bar that should eventually turn into a big reassuring tick to indicate that the update was successful.
If all went to plan, you should have a new folder on your Kindle called ‘linkjail’.
Installing the screensaver hack
Download and unzip the file here and identify the correct binary file using the same naming convention as before. The only variation is that those of you who previously selected the ‘-3.2.1’ file don’t need to worry about that addendum this time around.
Update your Kindle using the same method as the original jailbreak. When complete, disconnect your Kindle from your computer and put it on standby. If this is the screensaver that greets you, then you’ve prevailed!
Adding new images and finding backups
Mount your Kindle and find the ‘linkss’ folder:
You can ignore most of the stuff here — you just need the ‘backups’ and ‘screensavers’ folders for our goal. The ‘screensavers’ folder is where you’ll house your new images. In ‘backups’ you’ll be reunited with the chilling original screensaver pics, which you can copy over to the ‘screensavers’ folder if you want to keep them.
Now, scan your peepers down to the ‘Adding new screensavers’ header in this article for guidance on what to do next, as the instructions are the same for the Kindle 4.
Uninstalling the lot
If you want to restore your Kindle back to proprietary purity, simply repeat the process using the ‘_uninstall’ binary files that accompanied the files you used to jailbreak originally (the ‘-3.2.1’ suffix isn’t needed). The files created during the jailbreak will remain but are no longer in use so they can be deleted harmlessly.
Kindle 4
Changing the screensaver on the latest model of Kindle is a different kettle of fish altogether. While you don’t have to rely on the guidance of hackers, you do have to delve much further into the Kindle’s gooey innards, which carries certain risks. But if you’re feeling particularly audacious, I’ll guide you through it.
Please be aware that on this model Kindle, the process will delete the default screensavers immediately with no way of restoring them unless you download and add them again.
Diagnostics mode: Activate
Plug your Kindle into your computer and mount it as a removable storage device. You should see something not unlike this:
Create a blank file by right-clicking and going to ‘New’ and ‘File’. Change the name of this blank file to ‘ENABLE_DIAGS’ and safely eject your Kindle. If you don’t have the option to create a blank file, you can copy the blank ‘DONT_HALT_ON_REPAIR’ file in the same folder and change the name.
Restart your device and you’ll be chucked into the Kindle’s ‘Diagnostics Mode’. Scroll down to ‘N) Misc individual diagnostics’ using the d-pad and press the centre button to select it. On the next menu select ‘U) Utilities’. Then scroll down to ‘Z) Enable USBnet’ and you’ll be presented with a list of IP address information. This will allow your Kindle to function as a makeshift network device on your computer.
Plug your Kindle back into your computer and navigate to your list of network connections. For example, in Windows 7, this is in ‘Network and Sharing Centre’. There should be a connection named ‘Unidentified Network’, which is the Kindle masquerading as a network. Click on this connection and go to ‘Properties’, then scroll down and select ‘Internet Protocol Version 4 (TCP/IPv4)’ and select ‘Properties’ again.
In this window, click the ‘Use the following IP address’ radio button and enter the following:
- IP address: 192.168.15.1
- Subnet Mask: 255.255.255.0
Click ‘Ok’ and exit these windows.
PuTTY in your hands
This is where it gets a little abstruse. Download and install PuTTY client software and run it.
Under ‘Host Name (or IP address)’, enter 192.168.15.244 and leave everything else as default. It should look like this:
Press ‘Open’.
You should be presented with a terminal. Disregard prompts about security that will come up.
When asked, enter the following username and password, pressing enter to submit. For those unfamiliar with consoles, the password won’t appear as you type it.
- user: root
- pass: mario
Housing your images
Now that you’ve tapped into your Kindle, you need to tell it what to do. With these commands, we’ll create a new folder to house images and order your Kindle to defer to it for displaying the screensaver.
Enter these commands exactly as shown, pressing enter after each command. If you want to copy them from here, right click on the text cursor in the terminal window and it’ll paste automatically.
- mntroot rw
- mkdir /mnt/us/screensaver
- mount /dev/mmcblk0p1 /mnt/base-mmc
- mv /mnt/base-mmc/opt/amazon/screen_saver/600×800 /mnt/base-mmc/opt/amazon/screen_saver/600×800.old
- ln -sfn /mnt/us/screensaver /mnt/base-mmc/opt/amazon/screen_saver/600×800
If successful, you should see the following screen:
Type ‘exit’ and PuTTY will close.
Diagnostics mode: Deactivate
Disconnect your Kindle from the computer and press the right directional button until you reach the main menu. Scroll down to ‘D) Exit, Reboot or Disable Diags’ and then select ‘D) Disable Diagnostics’. When asked, press the ‘left’ directional button to confirm. It’ll return to the main menu and hang for a few seconds, but eventually it will restart into its normal mode.
If all has gone to plan, you should have a new folder called ‘screensaver’ on your Kindle’s root directory.
Adding new screensavers
The Kindle takes screensaver image sizes of 600×800 pixels (or 824×1,200 pixels on the DX), in either JPEG or PNG format. Since the E-Ink screen pays close attention to detail, the lossy compression method used by the JPEG format may not look as good as an image rendered as a PNG, but odds are you’ll barely notice.
Copy and paste your new images into the ‘screensavers’ folder. Each time you add a new one you’ll need to restart your Kindle before it’ll appear in the sleep mode cycle. The screensavers will cycle in alphabetical order but can be randomised by creating an empty file called ‘random’ in the ‘screensavers’ folder.
If you’re stuck for ideas, help yourself to my froody offering, in honour of Towel Day, or you can hit up the tumblr blog dedicated to Kindle wallpapers.
Kindle пользуется статусом лучшего устройства для чтения электронных книг, которым владеют и лелеют миллионы читателей по всему миру. Помимо того, что это настоящая библиотека в кармане, электронные книги, такие как Kindle, также можно персонализировать различными способами. Но до недавнего времени было любопытно, что у вас нет возможности установить обложку вашего текущего чтения в качестве обоев экрана блокировки на Kindle.
Многие владельцы Kindle выбрали путь побег из тюрьмы, чтобы иметь возможность отображать обложки своих книг на экране блокировки. Но к счастью — а это было давно — новое обновление прошивки сейчас позволяет вам сделайте дальнейшую настройку экрана блокировки. Вот как вы можете добавить обложку текущего чтения на экран блокировки Kindle.

Обратите внимание, что это обновление функции крышки дисплея не будет распространяться на все устройства Kindles. Только следующие устройства Kindle без рекламы получат обновление инфраструктуры 5.13.5, которое позволяет вам установить текущее чтение в качестве обоев экрана блокировки Kindle.
- Kindle (8-е и 10-е поколение)
- Kindle Paperwhite (7-го и 10-го поколения)
- Kindle Oasis (8, 9 и 10 поколения)
- Kindle Voyage (7-е поколение)
Ты можешь определить свой Kindle на этой странице Amazon здесь.
Установить обложку книги в качестве обоев экрана блокировки на Kindle
Изображение: AmazonЧтобы установить обложку книги в качестве обоев экрана блокировки, сделайте следующее. Сначала перейдите в меню «Настройки», а затем нажмите «Параметры устройства».
Если ваш Kindle поддерживается и обновлен до последней версии, вы должны увидеть новое поле Display Cover. Нажмите на него, чтобы включить.
И точно так же обои на экране блокировки Kindle изменится на обложку книги, которую вы сейчас читаете.
Что делать, если у меня нет этой функции?
Если у вас есть совместимое устройство и вы убедились, что ваш Kindle обновлен до версии 5.13.5, но по-прежнему не получаете эту новую функцию, перезагрузите устройство. После завершения последовательности загрузки функция должна перейти на страницу «Настройки»> «Параметры устройства».
Согласно Amazon, функция «Показать обложку» работает «с большинством книг, журналов, комиксов и манги». Но хотите ли вы отображать обложку текущей книги в качестве обоев экрана блокировки для всеобщего обозрения, будет полностью зависеть от вас (и самой книги). У всех нас есть виноватые удовольствия, не так ли?