В Linux права собственности на файлы и папки составляют основу управления доступом к различным возможностям операционной системы. То какому пользователю и группе принадлежит папка определяет кто сможет получить к ней доступ, создавать и удалять там файлы и другие папки и так далее.
В этой небольшой статье мы рассмотрим как сменить владельца папки Linux в графическом интерфейсе или с помощью терминала.
Вы можете изменить владельца папки с помощью файлового менеджера, например в Nautilus. Но для этого надо запустить файловый менеджер от имени суперпользователя. Откройте терминал с помощью сочетания клавиш Ctrl+Alt+T и выполните команду:
sudo nautilus
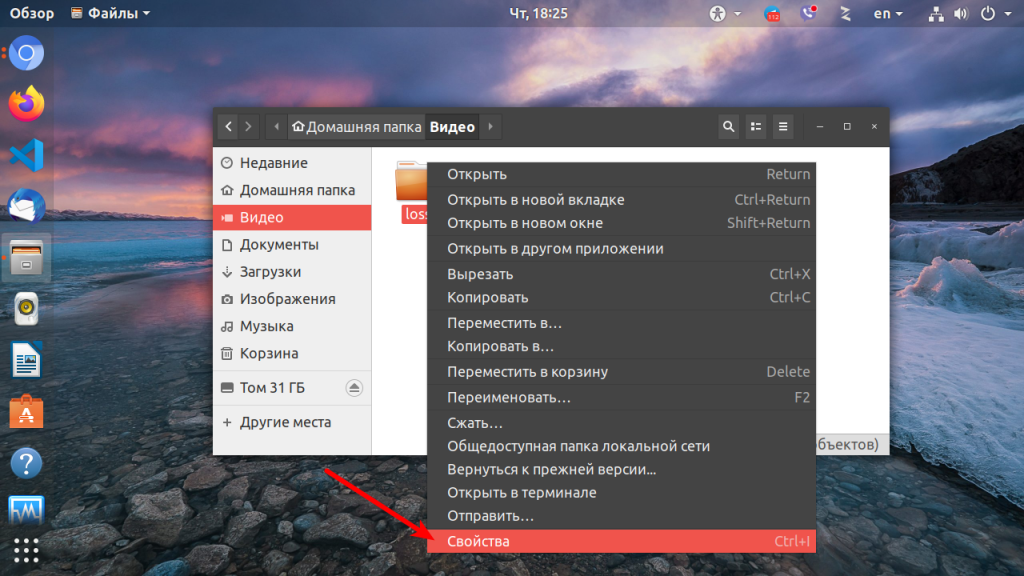
Затем найдите нужную папку, и кликните по ней правой кнопкой мыши. В открывшемся контекстном меню выберите пункт Свойства:
В появившемся окне перейдите на вкладку Права. Здесь можно изменить владельца папки и группу владельца с помощью выпадающего списка напротив соответствующего пункта:
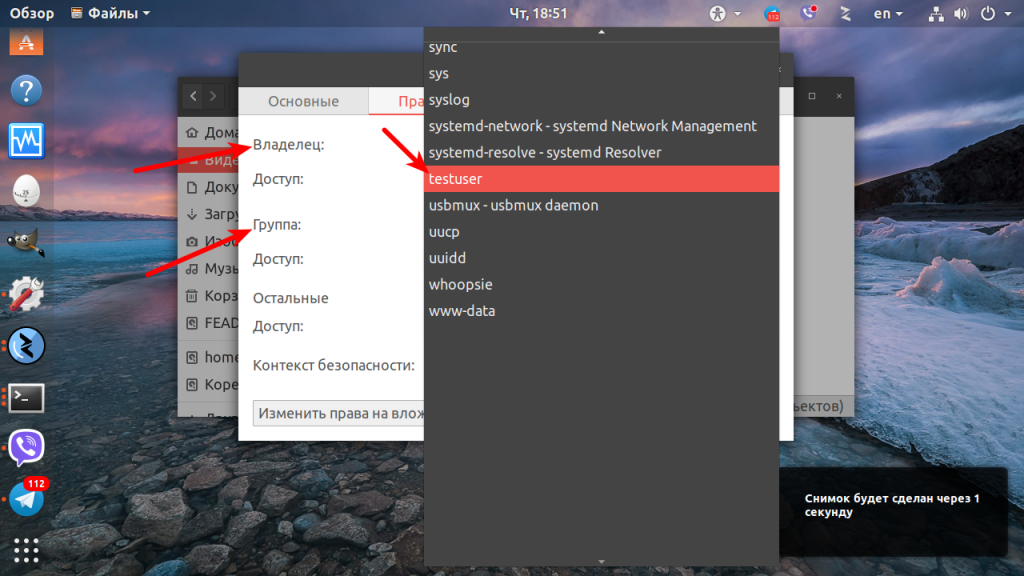
Если вам нужно чтобы эти изменения были применены для всех вложенных папок и файлов, нажмите внизу окна кнопку Изменить права на вложенные файлы…
Вот так всё просто. Если у вас не получается запустить файловый менеджер или вы хотите работать в терминале это тоже возможно. Для того чтобы сменить владельца папки следует использовать утилиту chown. Синтаксис у неё такой:
$ chown опции новый_владелец:новая_группа /путь/к/папке
Подробнее об этой утилите вы можете просмотреть в отдельной статье. Например, чтобы сменить владельца папки ~/Видео/losst/ на testuser следует выполнить такую команду:
sudo chown testuser ~/Видео/losst

В данном случае группа останется без изменений, чтобы изменить также группу-владельца выполните:
sudo chown testuser:testuser ~/Видео/losst

Если нужно сменить владельца папки Linux рекурсивно используйте опцию -R:
sudo chown -R testuser:testuser ~/Видео/losst
Обратите внимание, что все файлы и папки, создаваемые в системе по умолчанию будут иметь владельцем пользователя, который их создаёт, а группой-владельцем — основную группу этого пользователя. Такое поведение изменить нельзя. Чтобы избежать проблем с неверно присвоенным папке владельцем в будущем запускайте программу, которая создаёт папку или файл от имени пользователя, которому папка должна принадлежать. Сделать это очень просто с помощью sudo. Например, для пользователя losst:
sudo -u losst ./script.sh
Как видите, поменять владельца папки в Linux можно очень просто. Для этого достаточно выполнить несколько команд в терминале или сделать пару щелчков мышкой.

Статья распространяется под лицензией Creative Commons ShareAlike 4.0 при копировании материала ссылка на источник обязательна .
Об авторе
![]()
Основатель и администратор сайта losst.ru, увлекаюсь открытым программным обеспечением и операционной системой Linux. В качестве основной ОС сейчас использую Ubuntu. Кроме Linux, интересуюсь всем, что связано с информационными технологиями и современной наукой.
Команда chown позволяет изменить владельца пользователя и / или группы для данного файла, каталога или символической ссылки.
В Linux все файлы связаны с владельцем и группой, и им назначены права доступа для владельца файла, членов группы и других.
Как пользоваться chown
Прежде чем перейти к использованию chown команды, давайте начнем с обзора основного синтаксиса.
В chown выражении команды принимает следующий вид:
chown [OPTIONS] USER[:GROUP] FILE(s)
USER является именем пользователя или идентификатором пользователя (UID) нового владельца. GROUP это имя новой группы или идентификатор группы (GID). FILE(s) это имя одного или нескольких файлов, каталогов или ссылок. Числовые идентификаторы должны начинаться с + символа.
USER— Если указан только пользователь, указанный пользователь станет владельцем данных файлов, владение группой не изменится.USER:— Когда за именем пользователя следует двоеточие:, а имя группы не указывается, пользователь становится владельцем файлов, а принадлежность группы файлов изменяется на группу входа пользователя.USER:GROUP— Если указаны и пользователь, и группа (без пробелов между ними), пользовательское владение файлами изменяется на данного пользователя, а групповое владение изменяется на данную группу.:GROUP— Если пользователь не указан, а перед группой стоит двоеточие:, то только группа, владеющая файлами, будет изменена на данную группу.:Если задано только двоеточие:, без указания пользователя и группы, никаких изменений не производится.
По умолчанию в случае успеха chown не выводит никаких данных и возвращает ноль.
Используйте ls -l команду, чтобы узнать, кому принадлежит файл или к какой группе принадлежит файл:
ls -l filename.txt -rw-r--r-- 12 linuxize users 12.0K Apr 8 20:51 filename.txt
|[-][-][-]- [------] [---]
| |
| +-----------> Group
+-------------------> Owner
Обычные пользователи могут изменять группу файла только в том случае, если они владеют файлом и только в группе, членом которой они являются. Административные пользователи могут изменять групповое владение всеми файлами.
Как сменить владельца файла
Чтобы изменить владельца файла, используйте chown команду, за которой следует имя пользователя нового владельца и целевой файл в качестве аргумента:
Например, следующая команда изменит владельца файла с именем file1 на нового владельца с именем linuxize :
chown linuxize file1
Чтобы изменить владельца нескольких файлов или каталогов, укажите их в виде списка через пробел. Команда ниже меняет владельца файла с именем file1 и каталогом dir1 на нового владельца с именем linuxize :
chown linuxize file1 dir1
Числовой идентификатор пользователя (UID) можно использовать вместо имени пользователя. Следующий пример изменит владельца файла с именем file2 на нового владельца с UID 1000 :
chown 1000 file2
Если в качестве имени пользователя существует числовой владелец, то владение будет перенесено в имя пользователя. Чтобы избежать этого префикса, идентификатор с помощью + :
chown 1000 file2
Как изменить владельца и группу файла
Чтобы изменить владельца и группу файла, используйте chown команду, за которой следует новый владелец и группа, разделенные двоеточием ( : ) без промежуточных пробелов и целевого файла.
Следующая команда изменит владельца файла с именем file1 на нового владельца с именем linuxize и группой users :
chown linuxize:users file1
Если вы опустите имя группы после двоеточия ( : ), группа файла изменится на группу входа указанного пользователя:
chown linuxize: file1
Как изменить группу файла
Чтобы изменить только группу файла, используйте chown команду с двоеточием ( : ) и именем новой группы (без пробелов между ними) и целевой файл в качестве аргумента:
chown :GROUP FILE
Следующая команда изменит группу-владельца файла с именем file1 на www-data :
chown :www-data file1
Еще одна команда, которую вы можете использовать для изменения групповой принадлежности файлов — это chgrp .
Как изменить владельца символических ссылок
Когда рекурсивный параметр не используется, chown команда изменяет групповое владение файлами, на которые указывают символические ссылки , а не сами символьные ссылки .
Например, если вы попытаетесь изменить владельца и группу символической ссылки, на symlink1 которую указывает ссылка /var/www/file1 , chown изменит владельца файла или каталога, на который указывает символическая ссылка:
chown www-data: symlink1 Скорее всего, вместо смены целевого владельца вы получите ошибку «невозможно разыменовать symlink1: Permission denied».
Ошибка возникает из-за того, что по умолчанию в большинстве дистрибутивов Linux символические ссылки защищены, и вы не можете работать с целевыми файлами. Эта опция указана в /proc/sys/fs/protected_symlinks . 1 значит включен и 0 отключен. Мы рекомендуем не отключать защиту символических ссылок.
Чтобы изменить групповое владение самой символической ссылкой, используйте -h параметр:
chown -h www-data symlink1
Как рекурсивно изменить владельца файла
Чтобы рекурсивно работать со всеми файлами и каталогами в данном каталоге, используйте параметр -R ( --recursive ):
chown -R USER:GROUP DIRECTORY
Следующий пример изменит владельца всех файлов и подкаталогов в /var/www каталоге на нового владельца и группу с именем www-data :
chown -R www-data: /var/www
Если каталог содержит символические ссылки, передайте -h опцию:
chown -hR www-data: /var/www
Другими параметрами, которые можно использовать при рекурсивном изменении владельца каталога, являются -H и -L .
Если аргумент, переданный chown команде, является символической ссылкой, указывающей на каталог, эта -H опция заставит команду пройти по ней. -L указывает chown на прохождение каждой символической ссылки в каталог, который встречается. Обычно вы не должны использовать эти параметры, потому что вы можете испортить вашу систему или создать угрозу безопасности.
Использование справочного файла
--reference=ref_file Опция позволяет изменить пользователя и группы владельца указанные файлы , чтобы быть такими же , как в указанном отпечатком ( ref_file ). Если ссылочный файл является символической ссылкой, chown будут использоваться пользователь и группа целевого файла.
chown --reference=REF_FILE FILE
Например, следующая команда назначит пользователя и владельца группы file1 для file2
chown --reference=file1 file2
Вывод
chown утилита командной строки Linux / UNIX для изменения владельца файла и / или группы
Чтобы узнать больше о chown команде, посетите страницу руководства chown или введите man chown свой терминал.

Linux is a multi user OS which means that it supports multiple users at a time.
As many people can access the system simultaneously and some resources are shared, Linux controls access through ownership and permissions.
In Linux, there are three types of owners: user, group, and others .
Linux User
A user is the default owner and creator of the file. So this user is called owner as well.
Linux Group
A user-group is a collection of users. Users that belonging to a group will have the same Linux group permissions to access a file/ folder.
You can use groups to assign permissions in a bulk instead of assigning them individually. A user can belong to more than one group as well.
Other
Any users that are not part of the user or group classes belong to this class.
Linux File Permissions
File permissions fall in three categories: read, write, and execute.
Read permission
For regular files, read permissions allow users to open and read the file only. Users can’t modify the file.
Similarly for directories, read permissions allow the listing of directory content without any modification in the directory.
Write permission
When files have write permissions, the user can modify (edit, delete) the file and save it.
For folders, write permissions enable a user to modify its contents (create, delete, and rename the files inside it), and modify the contents of files that the user has write permissions to.
Execute permission
For files, execute permissions allows the user to run an executable script. For directories, the user can access them, and access details about files in the directory.
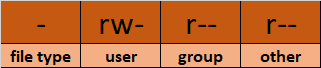
Below is the symbolic representation of permissions to user, group, and others.

Note that we can find permissions of files and folders using long listing (ls -l) on a Linux terminal.
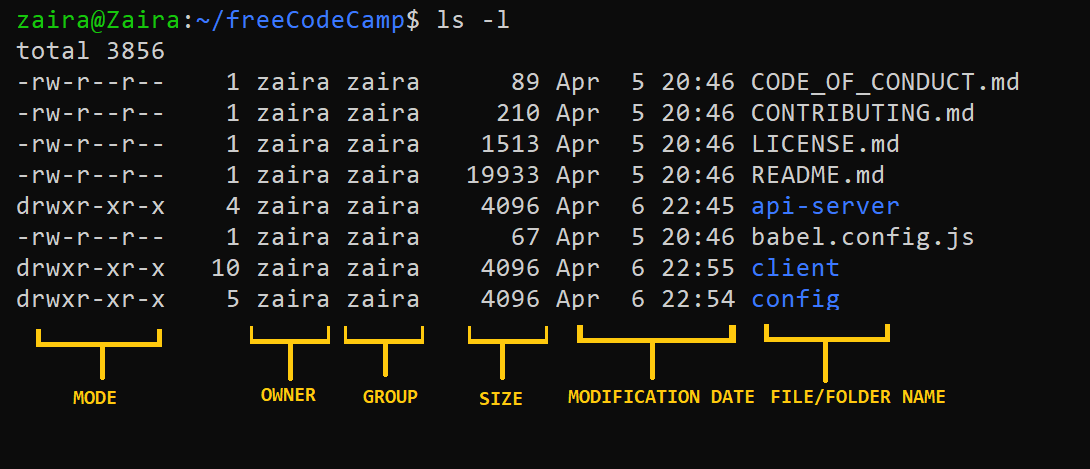
In the output above, d represents a directory and- represents a regular file.

How to Change Permissions in Linux Using the chmod Command
Now that we know the basics of ownerships and permissions, let’s see how we can modify permissions using the chmod command.
Syntax of chmod:
chmod permissions filenameWhere,
permissionscan be read, write, execute or a combination of them.filenameis the name of the file for which the permissions need to change. This parameter can also be a list if files to change permissions in bulk.
We can change permissions using two modes:
- Symbolic mode: this method uses symbols like
u,g,oto represent users, groups, and others. Permissions are represented asr, w, xfor read write and execute, respectively. You can modify permissions using +, — and =. - Absolute mode: this method represents permissions as 3-digit octal numbers ranging from 0-7.
Now, let’s see them in detail.
How to Change Permissions using Symbolic Mode
The table below summarize the user representation:
| User representation | Description |
|---|---|
| u | user/owner |
| g | group |
| o | other |
We can use mathematical operators to add, remove, and assign permissions. The table below shows the summary:
| Operator | Description |
|---|---|
| + | Adds a permission to a file or directory |
| – | Removes the permission |
| = | Sets the permission if not present before. Also overrides the permissions if set earlier. |
Example:
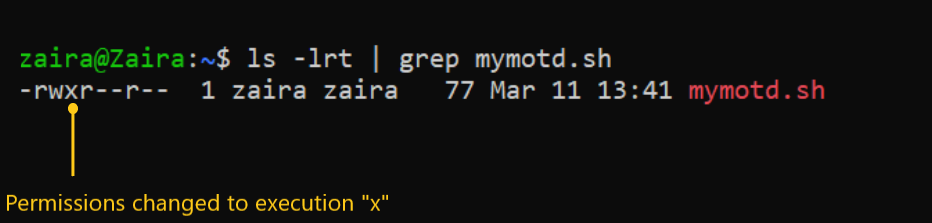
Suppose, I have a script and I want to make it executable for owner of the file zaira.
Current file permissions are as follows:

Let’s split the permissions like this:
To add execution rights (x) to owner (u) using symbolic mode, we can use the command below:
chmod u+x mymotd.shOutput:
Now, we can see that the execution permissions have been added for owner zaira.
Additional examples for changing permissions via symbolic method:
- Removing
readandwritepermission forgroupandothers:chmod go-rw. - Removing
readpermissions forothers:chmod o-r. - Assigning
writepermission togroupand overriding existing permission:chmod g=w.
How to Change Permissions using Absolute Mode
Absolute mode uses numbers to represent permissions and mathematical operators to modify them.
The below table shows how we can assign relevant permissions:
| Permission | Provide permission |
|---|---|
| read | add 4 |
| write | add 2 |
| execute | add 1 |
Permissions can be revoked using subtraction. The below table shows how you can remove relevant permissions.
| Permission | Revoke permission |
|---|---|
| read | subtract 4 |
| write | subtract 2 |
| execute | subtract 1 |
Example:
- Set
read(add 4) foruser,read(add 4) andexecute(add 1) for group, and onlyexecute(add 1) for others.
chmod 451 file-name
This is how we performed the calculation:
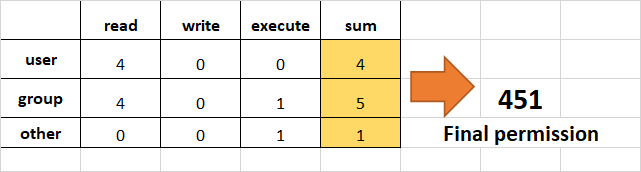
Note that this is the same as r--r-x--x.
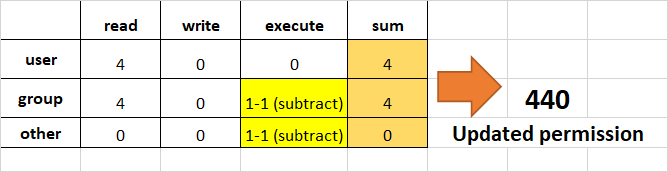
- Remove
executionrights fromotherandgroup.
To remove execution from other and group, subtract 1 from the execute part of last 2 octets.
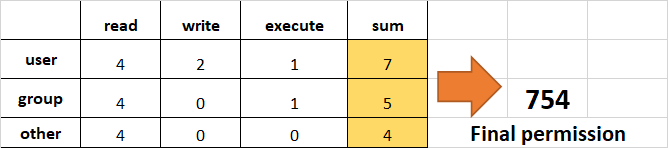
- Assign
read,writeandexecutetouser,readandexecutetogroupand onlyreadto others.
This would be the same as rwxr-xr--.
How to Change Ownership using the chown Command
Next, we will learn how to change the ownership of a file. You can change the ownership of a file or folder using the chown command. In some cases, changing ownership requires sudo permissions.
Syntax of chown:
chown user filename
How to change user ownership with chown
Let’s transfer the ownership from user zaira to user news.
chown news mymotd.sh

Command to change ownership: sudo chown news mymotd.sh
Output:

How to change user and group ownership simultaneously
We can also use chown to change user and group simultaneously.
chown user:group filenameHow to change directory ownership
You can change ownership recursively for contents in a directory. The example below changes the ownership of the /opt/script folder to allow user admin.
chown -R admin /opt/scriptHow to change group ownership
In case we only need to change the group owner, we can use chown by preceding the group name by a colon :
chown :admins /opt/scriptLinux Permissions Guided Exercise
Up until now we have explored permissions, ownerships, and the methods to change them. Now we will reinforce our learning with a guided exercise.
Goal: To create groups and assign relevant permissions to its members. Verify access by accessing it from unauthorized users.
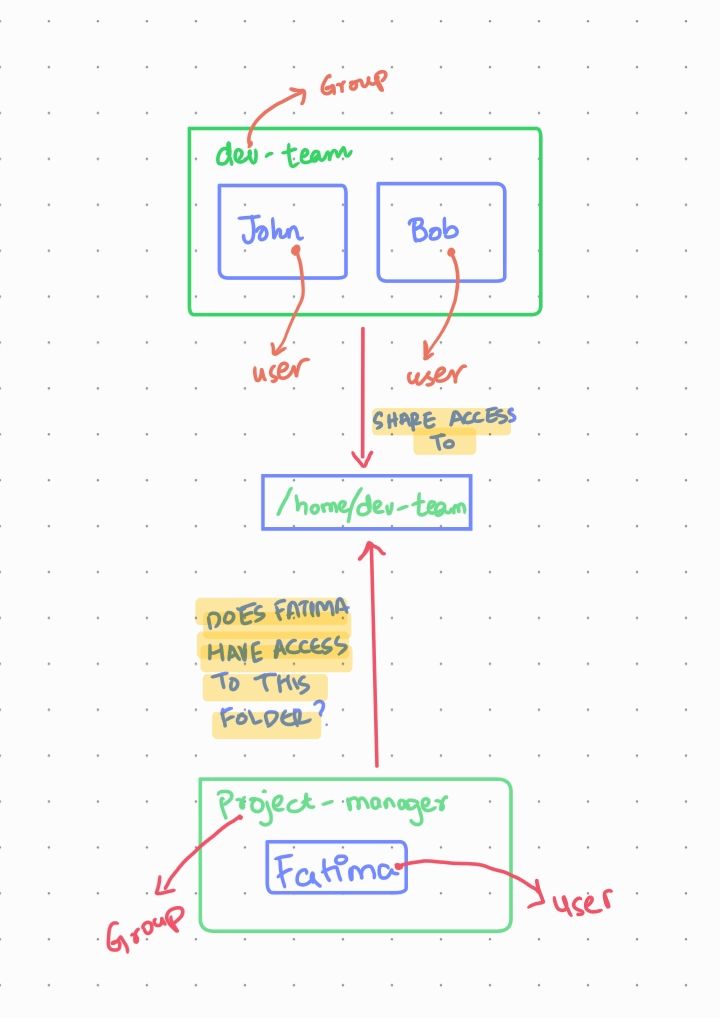
Task: Create a group called dev-team and add two members (John and Bob) to it. Create a folder /home/dev-team and change ownership to group dev-team. Verify that both users in the dev-team group have read and write access to the folder.
Create another group project-manager and add a user Fatima to it. Verify if the folder /home/dev-team is accessible by Fatima.
Visualization of the problem
We can visualize the problem like this:
Step 1: Switch to root user.
Switch to root user so that we have the rights to create new users and groups.
Show hint
Use the sudo command with flag i.
If you have the root password, you can login using that as well.
Show solution
Enter sudo -i to switch to the root user.
Enter whoami to find out if you are the root user:

If you do not have root access, use the commands with appending sudo.
Step 2: Create a group dev-team
Show hint
Use the groupadd command.
Syntax: groupadd group-name
Show solution
Enter groupadd dev-team to create the dev-team group
Verify: cat /etc/group | grep dev-team
Step 3: Create two new users John and Bob and add them to the dev-team group
Show hint
Use command useradd.
useradd creates a new user and adds to the specified group.
Syntax: useradd -G groupname username
Where -G specifies the group.
Show solution
useradd -G dev-team John
useradd -G dev-team Bob
Verify: cat /etc/group | grep dev-team

Step 4: Provide passwords for users John and Bob
Show hint
Use command passwd
passwd creates a password for users.
Syntax: passwd username
Show solution
passwd John
passwd Bob
Step 5: Create a directory in /home and name it dev-team
Show hint
Use command mkdir
mkdir creates a directory.
Syntax: mkdir directory-name
Show solution
mkdir /home/dev-team
Verify:

Step 6: Change the group ownership of the folder dev-team to group dev-team
Show hint
Use command chown
Syntax: chown :group-name folder
Show solution
chown :dev-team /home/dev-team/
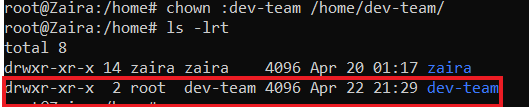
Step 7: Make sure the permissions of folder dev-team allow group members to create and delete files.
Show hint
Use command chmod
Write permissions allow users and groups to create and delete files.
Syntax: chmod permissions folder
Show solution
chmod g+w /home/dev-team/

Step 8: Ensure that ‘others’ don’t have any access to the files of dev-team folder.
Show hint
Use command chmod
Remove read, write, execute permissions from ‘others’ if they exist.
Syntax: chmod permissions folder
Show solution
chmod o-rx dev-team

Step 9: Exit the root session and switch to John
Show hint
Use command exit to logout of the root user.
Use su to switch users.
Syntax: su - user
To confirm current user, use command whoami.
Show solution
exit
su - John
Verify with command whoami.
Step 10: Navigate to folder: /home/dev-team
Show hint
Use command cd to switch folders.
Syntax: cd /path/to/folder
Confirm current path with pwd.
Show solution
cd /home/dev-team
Step 11: Create an empty file in the folder: /home/dev-team
Show hint
Use command touch to create an empty file.
Syntax: touch filename
Show solution
touch john-file.txt
Verify: ls -lrt

Step 12: Change the group ownership of the created file to dev-team and verify.
Show hint
Use command chown to change ownership.
Syntax: chown :group file-name
Show solution
chown :dev-team john-file.txt
Once group ownership is modified, all members of the group can access this file.
Verify ls -lrt

Step 13: Exit the shell and switch to user Bob
Show hint
Use command exit to exit the terminal.
Use su to switch users.
Syntax: su - user
To confirm current user, use command whoami.
Show solution
exit
su - Bob
Verify the current user with command whoami.
Step 14: Navigate to the path /home/dev-team
Show hint
Use command cd to switch folders.
Syntax: cd /path/to/folder
Confirm current path with pwd.
Show solution
cd /home/dev-team
Step 15: Find out Bob's privileges to access john-file.txt
Show hint
Use command ls -l for long listing.
Syntax: ls -l | grep file-name
Does group have rw- permissions?
Show solution
ls -l | grep john-file.txt

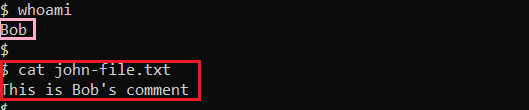
Step 16: Modify the file john-file.txt while logged in as Bob
Show hint
Use command echo to add some text to the file.
Syntax: echo "Some text" >>file-name
This would redirect the quoted text to end of the file.
Show solution
echo "This is Bob's comment" > john-file.txt
If all the permissions are correctly set, Bob would be allowed to edit and save this file. Otherwise you would get an error like this: Permission denied.
Verify cat john-file.txt
Step 17: Create another group project-manager and assign a member Fatima to it
Show hint
Use command groupadd to add a new group.
Syntax: groupadd group-name
Create a new user with command useradd.
Use flag -G to assign a user to it.
Show solution
groupadd project-manager
useradd -G project-manager Fatima
passwd Fatima
Step 18: Navigate to folder /home/dev-team and verify if Fatima can access it
Show hint
Use cd to navigate to /home/dev-team.
Show solution
cd /home/dev-team.
We get this error:

This is because, others don’t have any access to the folder dev-team.
If we recall, below are the rights of the dev-team folder.

Wrapping up
Permissions and ownerships are useful concepts for enforcing security across multi-user operating systems. I hope you were able to learn about changing permissions and ownerships in depth.
What’s your favorite thing you learned from this tutorial? Let me know on Twitter!
You can also read my other posts here.
Thanks to Tom Mondloch for his help with the guided exercise.
Learn to code for free. freeCodeCamp’s open source curriculum has helped more than 40,000 people get jobs as developers. Get started
Linux is a multi user OS which means that it supports multiple users at a time.
As many people can access the system simultaneously and some resources are shared, Linux controls access through ownership and permissions.
In Linux, there are three types of owners: user, group, and others .
Linux User
A user is the default owner and creator of the file. So this user is called owner as well.
Linux Group
A user-group is a collection of users. Users that belonging to a group will have the same Linux group permissions to access a file/ folder.
You can use groups to assign permissions in a bulk instead of assigning them individually. A user can belong to more than one group as well.
Other
Any users that are not part of the user or group classes belong to this class.
Linux File Permissions
File permissions fall in three categories: read, write, and execute.
Read permission
For regular files, read permissions allow users to open and read the file only. Users can’t modify the file.
Similarly for directories, read permissions allow the listing of directory content without any modification in the directory.
Write permission
When files have write permissions, the user can modify (edit, delete) the file and save it.
For folders, write permissions enable a user to modify its contents (create, delete, and rename the files inside it), and modify the contents of files that the user has write permissions to.
Execute permission
For files, execute permissions allows the user to run an executable script. For directories, the user can access them, and access details about files in the directory.
Below is the symbolic representation of permissions to user, group, and others.
Note that we can find permissions of files and folders using long listing (ls -l) on a Linux terminal.
In the output above, d represents a directory and- represents a regular file.
How to Change Permissions in Linux Using the chmod Command
Now that we know the basics of ownerships and permissions, let’s see how we can modify permissions using the chmod command.
Syntax of chmod:
chmod permissions filenameWhere,
permissionscan be read, write, execute or a combination of them.filenameis the name of the file for which the permissions need to change. This parameter can also be a list if files to change permissions in bulk.
We can change permissions using two modes:
- Symbolic mode: this method uses symbols like
u,g,oto represent users, groups, and others. Permissions are represented asr, w, xfor read write and execute, respectively. You can modify permissions using +, — and =. - Absolute mode: this method represents permissions as 3-digit octal numbers ranging from 0-7.
Now, let’s see them in detail.
How to Change Permissions using Symbolic Mode
The table below summarize the user representation:
| User representation | Description |
|---|---|
| u | user/owner |
| g | group |
| o | other |
We can use mathematical operators to add, remove, and assign permissions. The table below shows the summary:
| Operator | Description |
|---|---|
| + | Adds a permission to a file or directory |
| – | Removes the permission |
| = | Sets the permission if not present before. Also overrides the permissions if set earlier. |
Example:
Suppose, I have a script and I want to make it executable for owner of the file zaira.
Current file permissions are as follows:
Let’s split the permissions like this:
To add execution rights (x) to owner (u) using symbolic mode, we can use the command below:
chmod u+x mymotd.shOutput:
Now, we can see that the execution permissions have been added for owner zaira.
Additional examples for changing permissions via symbolic method:
- Removing
readandwritepermission forgroupandothers:chmod go-rw. - Removing
readpermissions forothers:chmod o-r. - Assigning
writepermission togroupand overriding existing permission:chmod g=w.
How to Change Permissions using Absolute Mode
Absolute mode uses numbers to represent permissions and mathematical operators to modify them.
The below table shows how we can assign relevant permissions:
| Permission | Provide permission |
|---|---|
| read | add 4 |
| write | add 2 |
| execute | add 1 |
Permissions can be revoked using subtraction. The below table shows how you can remove relevant permissions.
| Permission | Revoke permission |
|---|---|
| read | subtract 4 |
| write | subtract 2 |
| execute | subtract 1 |
Example:
- Set
read(add 4) foruser,read(add 4) andexecute(add 1) for group, and onlyexecute(add 1) for others.
chmod 451 file-name
This is how we performed the calculation:
Note that this is the same as r--r-x--x.
- Remove
executionrights fromotherandgroup.
To remove execution from other and group, subtract 1 from the execute part of last 2 octets.
- Assign
read,writeandexecutetouser,readandexecutetogroupand onlyreadto others.
This would be the same as rwxr-xr--.
How to Change Ownership using the chown Command
Next, we will learn how to change the ownership of a file. You can change the ownership of a file or folder using the chown command. In some cases, changing ownership requires sudo permissions.
Syntax of chown:
chown user filename
How to change user ownership with chown
Let’s transfer the ownership from user zaira to user news.
chown news mymotd.sh
Command to change ownership: sudo chown news mymotd.sh
Output:
How to change user and group ownership simultaneously
We can also use chown to change user and group simultaneously.
chown user:group filenameHow to change directory ownership
You can change ownership recursively for contents in a directory. The example below changes the ownership of the /opt/script folder to allow user admin.
chown -R admin /opt/scriptHow to change group ownership
In case we only need to change the group owner, we can use chown by preceding the group name by a colon :
chown :admins /opt/scriptLinux Permissions Guided Exercise
Up until now we have explored permissions, ownerships, and the methods to change them. Now we will reinforce our learning with a guided exercise.
Goal: To create groups and assign relevant permissions to its members. Verify access by accessing it from unauthorized users.
Task: Create a group called dev-team and add two members (John and Bob) to it. Create a folder /home/dev-team and change ownership to group dev-team. Verify that both users in the dev-team group have read and write access to the folder.
Create another group project-manager and add a user Fatima to it. Verify if the folder /home/dev-team is accessible by Fatima.
Visualization of the problem
We can visualize the problem like this:
Step 1: Switch to root user.
Switch to root user so that we have the rights to create new users and groups.
Show hint
Use the sudo command with flag i.
If you have the root password, you can login using that as well.
Show solution
Enter sudo -i to switch to the root user.
Enter whoami to find out if you are the root user:
If you do not have root access, use the commands with appending sudo.
Step 2: Create a group dev-team
Show hint
Use the groupadd command.
Syntax: groupadd group-name
Show solution
Enter groupadd dev-team to create the dev-team group
Verify: cat /etc/group | grep dev-team
Step 3: Create two new users John and Bob and add them to the dev-team group
Show hint
Use command useradd.
useradd creates a new user and adds to the specified group.
Syntax: useradd -G groupname username
Where -G specifies the group.
Show solution
useradd -G dev-team John
useradd -G dev-team Bob
Verify: cat /etc/group | grep dev-team
Step 4: Provide passwords for users John and Bob
Show hint
Use command passwd
passwd creates a password for users.
Syntax: passwd username
Show solution
passwd John
passwd Bob
Step 5: Create a directory in /home and name it dev-team
Show hint
Use command mkdir
mkdir creates a directory.
Syntax: mkdir directory-name
Show solution
mkdir /home/dev-team
Verify:
Step 6: Change the group ownership of the folder dev-team to group dev-team
Show hint
Use command chown
Syntax: chown :group-name folder
Show solution
chown :dev-team /home/dev-team/
Step 7: Make sure the permissions of folder dev-team allow group members to create and delete files.
Show hint
Use command chmod
Write permissions allow users and groups to create and delete files.
Syntax: chmod permissions folder
Show solution
chmod g+w /home/dev-team/
Step 8: Ensure that ‘others’ don’t have any access to the files of dev-team folder.
Show hint
Use command chmod
Remove read, write, execute permissions from ‘others’ if they exist.
Syntax: chmod permissions folder
Show solution
chmod o-rx dev-team
Step 9: Exit the root session and switch to John
Show hint
Use command exit to logout of the root user.
Use su to switch users.
Syntax: su - user
To confirm current user, use command whoami.
Show solution
exit
su - John
Verify with command whoami.
Step 10: Navigate to folder: /home/dev-team
Show hint
Use command cd to switch folders.
Syntax: cd /path/to/folder
Confirm current path with pwd.
Show solution
cd /home/dev-team
Step 11: Create an empty file in the folder: /home/dev-team
Show hint
Use command touch to create an empty file.
Syntax: touch filename
Show solution
touch john-file.txt
Verify: ls -lrt
Step 12: Change the group ownership of the created file to dev-team and verify.
Show hint
Use command chown to change ownership.
Syntax: chown :group file-name
Show solution
chown :dev-team john-file.txt
Once group ownership is modified, all members of the group can access this file.
Verify ls -lrt
Step 13: Exit the shell and switch to user Bob
Show hint
Use command exit to exit the terminal.
Use su to switch users.
Syntax: su - user
To confirm current user, use command whoami.
Show solution
exit
su - Bob
Verify the current user with command whoami.
Step 14: Navigate to the path /home/dev-team
Show hint
Use command cd to switch folders.
Syntax: cd /path/to/folder
Confirm current path with pwd.
Show solution
cd /home/dev-team
Step 15: Find out Bob's privileges to access john-file.txt
Show hint
Use command ls -l for long listing.
Syntax: ls -l | grep file-name
Does group have rw- permissions?
Show solution
ls -l | grep john-file.txt
Step 16: Modify the file john-file.txt while logged in as Bob
Show hint
Use command echo to add some text to the file.
Syntax: echo "Some text" >>file-name
This would redirect the quoted text to end of the file.
Show solution
echo "This is Bob's comment" > john-file.txt
If all the permissions are correctly set, Bob would be allowed to edit and save this file. Otherwise you would get an error like this: Permission denied.
Verify cat john-file.txt
Step 17: Create another group project-manager and assign a member Fatima to it
Show hint
Use command groupadd to add a new group.
Syntax: groupadd group-name
Create a new user with command useradd.
Use flag -G to assign a user to it.
Show solution
groupadd project-manager
useradd -G project-manager Fatima
passwd Fatima
Step 18: Navigate to folder /home/dev-team and verify if Fatima can access it
Show hint
Use cd to navigate to /home/dev-team.
Show solution
cd /home/dev-team.
We get this error:
This is because, others don’t have any access to the folder dev-team.
If we recall, below are the rights of the dev-team folder.
Wrapping up
Permissions and ownerships are useful concepts for enforcing security across multi-user operating systems. I hope you were able to learn about changing permissions and ownerships in depth.
What’s your favorite thing you learned from this tutorial? Let me know on Twitter!
You can also read my other posts here.
Thanks to Tom Mondloch for his help with the guided exercise.
Learn to code for free. freeCodeCamp’s open source curriculum has helped more than 40,000 people get jobs as developers. Get started
Команда chown позволяет вам изменить пользователя и / или группу, владеющую данным файлом, каталогом или символической ссылкой.
В Linux все файлы связаны с владельцем и группой и им назначаются права доступа для владельца файла, членов группы и других.
В этом руководстве мы покажем вам, как использовать команду chown на практических примерах.
Как использовать chown
Прежде чем перейти к использованию команды chown , давайте начнем с обзора основного синтаксиса.
Выражения команды chown имеют следующую форму:
chown [OPTIONS] USER[:GROUP] FILE(s)
USER — это имя пользователя или идентификатор пользователя (UID) нового владельца. GROUP — это имя новой группы или идентификатор группы (GID). FILE(s) — это имя одного или нескольких файлов, каталогов или ссылок. Цифровые идентификаторы должны начинаться с символа + .
USER— Если указан только пользователь, указанный пользователь станет владельцем данных файлов, принадлежность группы не изменится.-
USER:— Если после имени пользователя ставится двоеточие:и имя группы не указано, пользователь становится владельцем файлов, а права собственности группы файлов изменяются на группу входа пользователя. -
USER:GROUP— Если указаны и пользователь, и группа (без пробелов между ними), право собственности пользователя на файлы изменяется на данного пользователя, а право собственности на группу изменяется на данную группу. -
:GROUP— Если пользователь не указан, а группа имеет префикс двоеточия:то для данной группы изменяется только групповое владение файлами. -
:Если указано только двоеточие:без указания пользователя и группы, никаких изменений не производится.
По умолчанию в случае успеха chown не производит никакого вывода и возвращает ноль.
Используйте команду ls -l чтобы узнать, кому принадлежит файл или к какой группе принадлежит файл:
ls -l filename.txt-rw-r--r-- 12 linuxize users 12.0K Apr 8 20:51 filename.txt
|[-][-][-]- [------] [---]
| |
| +-----------> Group
+-------------------> Owner
Обычные пользователи могут изменять группу файла только в том случае, если они владеют файлом, и только в группе, членом которой они являются. Пользователи с правами администратора могут изменять групповое владение всеми файлами.
Как изменить владельца файла
Чтобы изменить владельца файла, используйте команду chown за которой следует имя пользователя нового владельца и целевой файл в качестве аргумента:
Например, следующая команда изменит владельца файла с именем file1 на нового владельца с именем linuxize :
chown linuxize file1Чтобы изменить владельца нескольких файлов или каталогов, укажите их в виде списка, разделенного пробелами. Приведенная ниже команда меняет владельца файла с именем file1 и каталога dir1 на нового владельца с именем linuxize :
chown linuxize file1 dir1Вместо имени пользователя можно использовать числовой идентификатор пользователя (UID). В следующем примере будет изменено право собственности на файл с именем file2 новому владельцу с UID 1000 :
chown 1000 file2Если числовой владелец существует как имя пользователя, то право собственности будет передано имени пользователя. Чтобы избежать этого префикса ID с + :
chown 1000 file2Как изменить владельца и группу файла
Для того, чтобы изменить владельца и группу с использованием файловом chown команды следуют новым владельцем и группой , разделенных двоеточием ( : ) без пробелов и целевого файла.
Следующая команда изменит владельца файла с именем file1 на нового владельца с именем linuxize и сгруппирует users :
chown linuxize:users file1Если опустить имя группы после двоеточия ( : ) группа файла изменяется на указанного пользователя группы входа в систему :
chown linuxize: file1Как изменить группу файла
Чтобы изменить только группу с использованием файловом chown команды , за которым следует двоеточие ( : ) и новое название группы (без пробела между ними) и целевого файла в качестве аргумента:
Следующая команда изменит группу владельцев файла с именем file1 на www-data :
chown :www-data file1Еще одна команда, которую вы можете использовать для изменения группового владения файлами, — это chgrp .
Как изменить право собственности на символические ссылки
Когда рекурсивная опция не используется, команда chown изменяет групповое владение файлами, на которые указывают символические ссылки , а не сами символические ссылки .
Например, если вы попытаетесь изменить владельца и группу символической ссылки symlink1 которая указывает на /var/www/file1 , chown изменит владельца файла или каталога, на который указывает символическая ссылка:
chown www-data: symlink1Скорее всего, вместо смены целевого владельца вы получите ошибку «невозможно разыменовать символическую ссылку1: разрешение отклонено».
Ошибка возникает из-за того, что по умолчанию в большинстве дистрибутивов Linux символические ссылки защищены, и вы не можете работать с целевыми файлами. Этот параметр указан в /proc/sys/fs/protected_symlinks . 1 означает включен, а 0 отключен. Мы рекомендуем не отключать защиту символических ссылок.
Чтобы изменить групповое владение самой символической ссылкой, используйте параметр -h :
chown -h www-data symlink1Как рекурсивно изменить право собственности на файл
Чтобы рекурсивно работать со всеми файлами и каталогами в данном каталоге, используйте параметр -R ( --recursive ):
chown -R USER:GROUP DIRECTORY
В следующем примере будет изменено владение всеми файлами и подкаталогами в каталоге /var/www новому владельцу и группе с именем www-data :
chown -R www-data: /var/wwwЕсли каталог содержит символические ссылки, передайте параметр -h :
chown -hR www-data: /var/wwwДругие параметры, которые можно использовать при рекурсивном изменении владельца каталога, — это -H и -L .
Если аргумент, переданный команде chown является символической ссылкой, указывающей на каталог, опция -H заставит команду пройти по нему. -L указывает chown по каждой символической ссылке на обнаруженный каталог. Обычно вы не должны использовать эти параметры, потому что вы можете испортить свою систему или создать угрозу безопасности.
Использование справочного файла
Параметр --reference=ref_file позволяет вам изменить права собственности пользователя и группы на данные файлы, чтобы они были такими же, как у указанного справочного файла ( ref_file ). Если справочный файл является символической ссылкой, chown будет использовать пользователя и группу целевого файла.
chown --reference=REF_FILE FILE
Например, следующая команда назначит пользователю и группе владение file1 для file2
chown --reference=file1 file2Выводы
chown — это утилита командной строки Linux / UNIX для изменения владельца файла и / или группы.
Чтобы узнать больше о команде chown посетите страницу руководства chown или введите man chown в своем терминале.
Если у вас есть какие-либо вопросы или отзывы, не стесняйтесь оставлять комментарии.