This article aim is to provide a step-by-step guide on how to create a new hero for Heroes of Might and Magic 5. Game engine loads heroes from AdvMapHeroShared files. Only the necessary steps to create functional hero and add it in the game as a mod are provided.
Credit: }{0TT@6bI4[1]
For the purpose of this guide a new Inferno faction hero will be created with the following settings:
- Name: Mefisofel
- Character: He will look like Inferno Tier 7 Devil creature
- Class: Demon Lord
- Specialization: Gate Keeper
- Main secondary skill: Advanced Gating
- Hero default attack: Melee
Hero files will be created via the Map Editor and exported in «<Game folder>/Maps/New_Hero_Mefisofel.h5m».
Create mod space
- Download this 128×128 Devil.tga[2] icon and put it in <Game folder>/Complete/icon/Inferno/Devil.tga. Create the folder if necessary, this is where Map editor looks for icons of various objects.
- Launch Map Editor and configure it in game editor mode[3]
- Select «Resource» -> «New MOD» to create mod environment[4].
- Use «New_Hero_Mefisofel» for name. You can also add description.
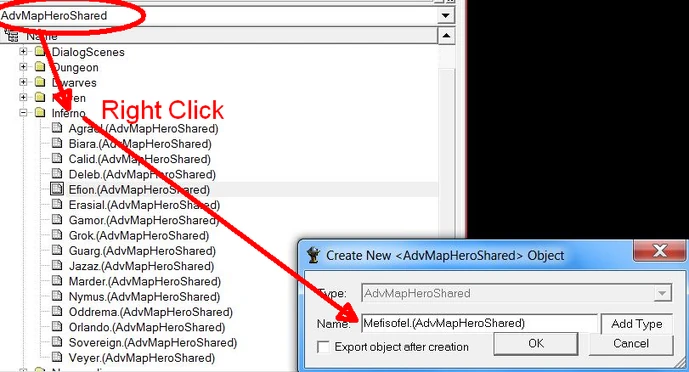
- In the game database window select AdvMapHeroShared.
- Select + to browse the MapObjects folder. A list of folders will appear, one for each faction.
- Right click on the Inferno folder -> «New Object»
- In the new window fill «Mefisofel» and select «Add Type» so the final name will be «Mefisofel.(AdvMapHeroShared)«
- Select «OK«.
New hero will appear in the folder within the other hero files.
Define AdvMapHeroShared object parameters
Explanation of parameters can be found on AdvMapHeroShared[5] object page. For the purpose of this guide, parameters existing within the game will be chosen but the modder is free to create and add new such elements (Models, Animations, Texts, etc..).
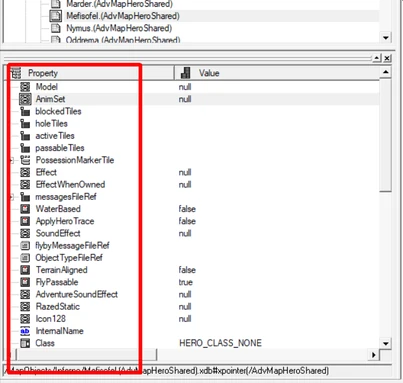
- Select the hero file entry at «MapObjects» -> «Inferno» -> «Mefisofel.(AdvMapHeroShared)«
All hero variables will be presented in the Property Control window.
In the A functional hero model requires a model and animations to be functional on adventure and combat maps. For the purpose of this example we will use existing game models. Creating/importing custom models will not be a part of this article.
- Model — Select the browse button «…» and choose «Model:CharactersCreaturesInfernoAlternativeUpgradeT7_Arch_Demon» and choose «OK«.
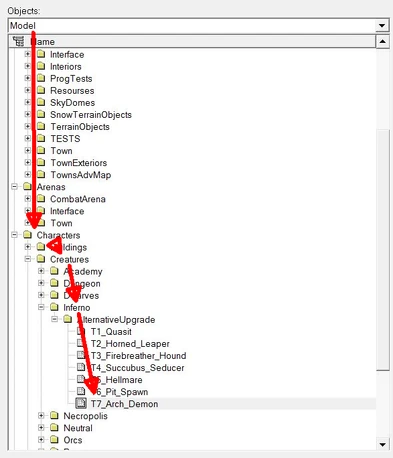
- AnimSet — Select the browse button «…» and choose «AnimSet:CharactersCreaturesInfernoAlternativeUpgradeT7_Arch_Demon-arena» and choose «OK«.
- Blocked tiles, Hole tiles, Passable Tiles — should be left empty.
- Active tiles — Right cick -> «Add» to add 1 new entry with X,Y coordinates of 0,0.

- PossessionMarker tiles — One entry with X, Y coordinates of 0,0 is required. It should be created by default so no need to add new.
- WaterBased — set to «False«
- ObjectTypeFileRef — set to «/Text/Visibility_Types/Units.txt«
- TerrainAligned — set to «False»
- FlyPassable — set to «True»
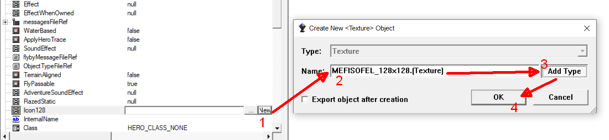
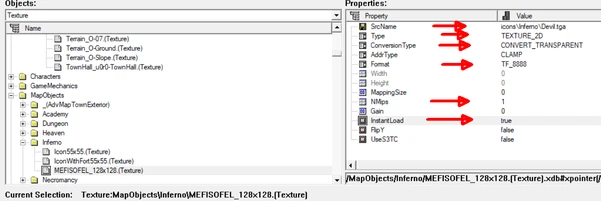
- Icon128 — a 128×128 icon for the hero portrait. Create a new one.
- Select «New» -> «Mefistoel_128x128» -> «Add Type» -> «OK«
- Select browse button «…«, a window will open of the new entry. Set the following parameters
- SrcName browse to file <Game Folder>/Complete/Inferno/Devil.tga
- Type set to «TEXTURE_2D»
- Conversion Type set to «CONVERT_TRANSPARENT»
- Format set to «TF_8888″
- NMips set to «1″
- Instant Load set to «true»
- Hover over the Mefistoel_128x128.(Texture) -> Right Click -> «Export«.
- InternalName — Enter «Mefisofel»
- Class — From the drop down menu choose «HERO_CLASS_DEMON_LORD»
- Specialization — From the drop down menu choose «HERO_SPEC_GATE_KEEPER»
Note: If hero specialization function will be defined by script, it is recommended to select «HERO_SPEC_NONE».
- PrimarySkill
- Mastery — From the drop down menu choose «MASTERY_ADVANCED»
- SkillID — From the drop down menu choose «HERO_SKILL_GATING»
- SpecializationNameFileRef
- Select «New» -> MefisofelSpecName -> «OK«
- Type the game visible name of the hero specialization -> «Gate Keeper«
- Select «OK» and agree to save changes.
- SpecializationDescFileRef
- Select «New» -> «MefisofelSpecDesc» -> «OK«
- Type the game visible name of the hero specialization -> «Hero specialization improves Gating ability«
- Select «OK» and agree to save changes.
- SpecializationIcon — Browse «Textures» -> «HeroScreen» -> «Specializations» -> «Inferno» -> «Gate_Keeper» to add 128×128 icon.
- FaceTexture — Use Icon128 parameter value — «Texture:MapObjectsInfernoMEFISOFEL_128x128.(Texture)». Copy/Paste the value and select Enter to apply. If nothing happens press CTRL+S to save the current state and try again.
Note: Editor only allows values to point to existing files. As Icon128 was created this session state needs to be saved in order the file to be created.
- FaceTextureSmall — (Optional) Same as FaceTexture but uses images of size 64×64 icon.
Note: Icon128, SpecializationIcon, FaceTexture, FaceTextureSmall can use either in-game icons or externally imported icons. If imported the values for the texture configuration file are the same as shown in Icon128 example above.
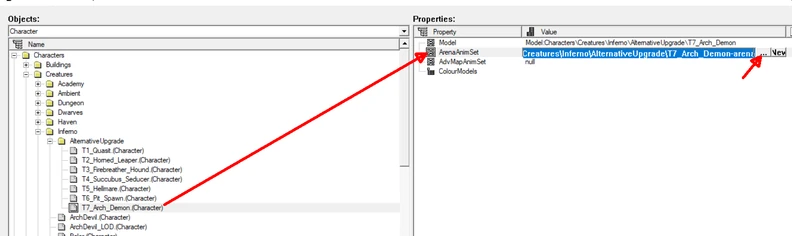
- HeroCharacterArena — Select the browse button «…» and choose «Character:CharactersCreaturesInfernoAlternativeUpgradeT7_Arch_Demon.(Character)».
- Mark HeroCharacterArena value and select browse button «…«. This will open the value properties window on the right.
- Find ArenaAnimSet property, it will have a value of «AnimSet:CharactersCreaturesInfernoAlternativeUpgradeT7_Arch_Demon-arena«
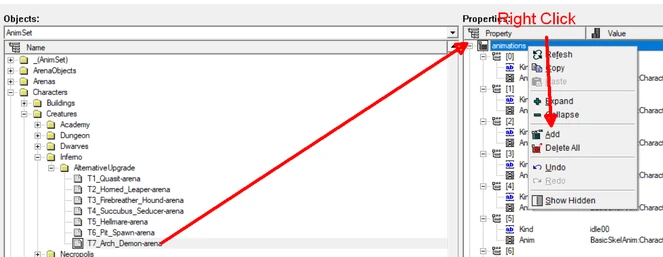
HeroCharacterArena file defines hero actions animations. Important for gameplay are:
- Move — already exists for Devil.
- Cast — already exists for Devil
- Happy — already exists for Devil
- Defeat — We will create it. Devil death animation will be used
- Select it and choose browse button «…«.
- Right click on «animations» -> «Add«. Set the new entry properties as follow:
- Kind set to «defeat«
- Anim browse Devil death animation «BasicSkelAnim:CharactersCreaturesInfernoAlternativeUpgradeT7_Arch_Demon-arena-death«
- Right click on «animations» -> «Add«. Set the new entry properties as follow:
- Select it and choose browse button «…«.
- Attack animation — Hero can attack either with range attack or with melee attack. Chose ONE of the variants below
-
Ranged attack is created by adding animation entry with Kind parameter of type «rangeattack«. It is easy to configure as it looks more neutral and existing range attacks of other heroes or units can be used (Sylvan shooters, Academy and Dungeon mages).
- Right click on «animations» -> «Add«. Set the new entry properties as follow:
- Kind set to «rangeattack«
- Anim browse Dungeon hero range attack animation «BasicSkelAnim:CharactersHeroesShadya-arena-rangeattack«
- Right click on «animations» -> «Add«. Set the new entry properties as follow:
-
Melee attack is created by adding animation entry with Kind parameter of type «strike«. it requires animation for the character attacking and his mount running. We can use existing Devil attack animation. Note: melee animation may require changing of the Melee Camera position. Currently it is unknown how this can be done so hero model may not fit properly in the frame.
- Right click on «animations» -> «Add«. Set the new entry properties as follow:
- Kind set to «strike«
- Anim browse Devil Attack animation «BasicSkelAnim:CharactersCreaturesInfernoAlternativeUpgradeT7_Arch_Demon-arena-attack00«
- Right click on «animations» -> «Add«. Set the new entry properties as follow:
Note: Melee animation may require changing of the Melee Camera position. Currently it is unknown how this can be done so hero model may not fit properly in the frame during attack.
- Select «OK» to close AnimSet window.
- Select «OK» to close Character window.

- HeroCharacterArenaMelee — Leave this empty if hero will use range attack. if hero will use melee attack use the same value as HeroCharacterArena entry.
- HeroCharacterAdventure — use the same value as HeroCharacterArena entry.
- CombatVisual — Select the browse button «…» and choose «GameMechanics» -> «CreatureVisual» -> «Creatures» -> «Inferno» -> «3rd» -> «ArchDemon.(CreatureVisual)«
- TownType — From the drop down menu select «TOWN_INFERNO«
- Editable
- NameFileRef
- Select «New» -> «MefisofelName» -> «OK«
- Type the game visible name of the hero specialization -> «Mefisofel«
- Select «OK» and agree to save changes.
- BiographyFileRef
- Select «New» -> «MefisofelDesc» -> «OK«
- Type the game visible name of the hero specialization -> «Demon Lord and Prince of Darkness»
- Select «OK» and agree to save changes.
- Offence, Defence, Spellpower, Knowledge — set all values to 6.
- NameFileRef
- Selection — browse Inferno selection circle at «/_(Model)/Heroes/DemonLord_Path/Symbol.(Model)«
- ScenarioHero — set to «False» if hero will be used for any game mode and not just campaign.
- HideInEditor — set to «False» so hero is available in Map Editor.
Save your work.
- From Map Editor menu select «Resource» -> «Pack MOD«.
- Find the mod file in <game folder>/Map/New_Hero_Mefisofel.h5m
Example Template
To gain a practical idea of the files that are modified an example template is provided.
- Download the template file New_Hero_Mefisofel.h5m[6]
- Extract its contents and put them in any map.h5m archive root folder.
- Launch Map Editor and put any hero on the map.
- Select it and find «Shared» parameter in the properties window.
- Set the value to «AdvMapHeroShared:MapObjectsInfernoMefisofel.(AdvMapHeroShared)«
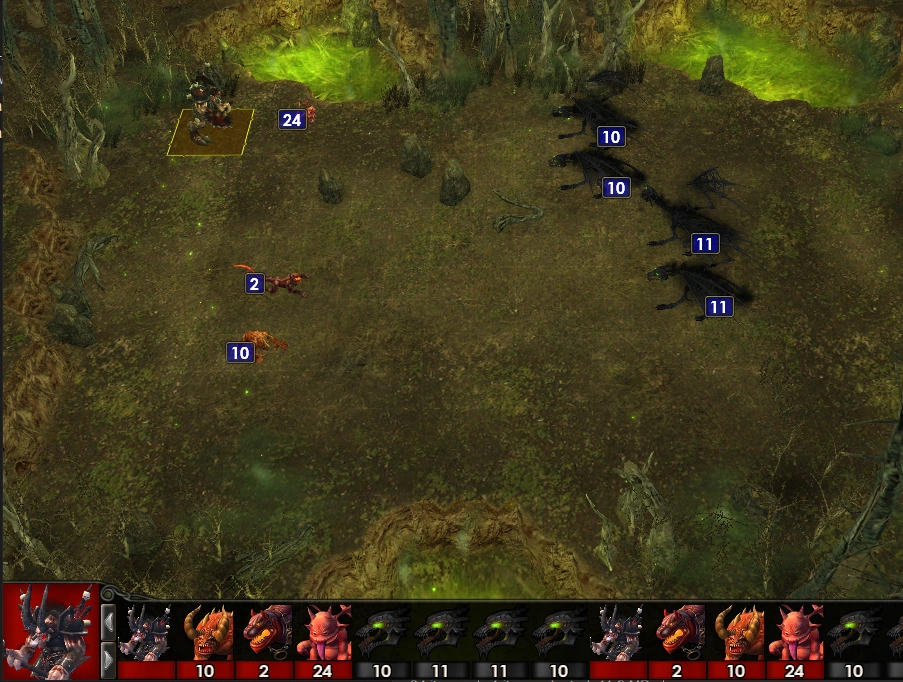
The hero model on adventure map should change to Devil. Save the map launch it and test.
Reference List
- ↑ Credit: }{0TT@6bI4
- ↑ Devil.tga image
- ↑ Configure Map Editor in Game editor mode
- ↑ Create Save Export or Load mod environment
- ↑ AdvMapHeroShared object
- ↑ New_Hero_Mefisofel.h5m download
This article aim is to provide a step-by-step guide on how to create a new hero for Heroes of Might and Magic 5. Game engine loads heroes from AdvMapHeroShared files. Only the necessary steps to create functional hero and add it in the game as a mod are provided.
Credit: }{0TT@6bI4[1]
For the purpose of this guide a new Inferno faction hero will be created with the following settings:
- Name: Mefisofel
- Character: He will look like Inferno Tier 7 Devil creature
- Class: Demon Lord
- Specialization: Gate Keeper
- Main secondary skill: Advanced Gating
- Hero default attack: Melee
Hero files will be created via the Map Editor and exported in «<Game folder>/Maps/New_Hero_Mefisofel.h5m».
Create mod space
- Download this 128×128 Devil.tga[2] icon and put it in <Game folder>/Complete/icon/Inferno/Devil.tga. Create the folder if necessary, this is where Map editor looks for icons of various objects.
- Launch Map Editor and configure it in game editor mode[3]
- Select «Resource» -> «New MOD» to create mod environment[4].
- Use «New_Hero_Mefisofel» for name. You can also add description.
- In the game database window select AdvMapHeroShared.
- Select + to browse the MapObjects folder. A list of folders will appear, one for each faction.
- Right click on the Inferno folder -> «New Object»
- In the new window fill «Mefisofel» and select «Add Type» so the final name will be «Mefisofel.(AdvMapHeroShared)«
- Select «OK«.
New hero will appear in the folder within the other hero files.
Define AdvMapHeroShared object parameters
Explanation of parameters can be found on AdvMapHeroShared[5] object page. For the purpose of this guide, parameters existing within the game will be chosen but the modder is free to create and add new such elements (Models, Animations, Texts, etc..).
- Select the hero file entry at «MapObjects» -> «Inferno» -> «Mefisofel.(AdvMapHeroShared)«
All hero variables will be presented in the Property Control window.
In the A functional hero model requires a model and animations to be functional on adventure and combat maps. For the purpose of this example we will use existing game models. Creating/importing custom models will not be a part of this article.
- Model — Select the browse button «…» and choose «Model:CharactersCreaturesInfernoAlternativeUpgradeT7_Arch_Demon» and choose «OK«.
- AnimSet — Select the browse button «…» and choose «AnimSet:CharactersCreaturesInfernoAlternativeUpgradeT7_Arch_Demon-arena» and choose «OK«.
- Blocked tiles, Hole tiles, Passable Tiles — should be left empty.
- Active tiles — Right cick -> «Add» to add 1 new entry with X,Y coordinates of 0,0.
- PossessionMarker tiles — One entry with X, Y coordinates of 0,0 is required. It should be created by default so no need to add new.
- WaterBased — set to «False«
- ObjectTypeFileRef — set to «/Text/Visibility_Types/Units.txt«
- TerrainAligned — set to «False»
- FlyPassable — set to «True»
- Icon128 — a 128×128 icon for the hero portrait. Create a new one.
- Select «New» -> «Mefistoel_128x128» -> «Add Type» -> «OK«
- Select browse button «…«, a window will open of the new entry. Set the following parameters
- SrcName browse to file <Game Folder>/Complete/Inferno/Devil.tga
- Type set to «TEXTURE_2D»
- Conversion Type set to «CONVERT_TRANSPARENT»
- Format set to «TF_8888″
- NMips set to «1″
- Instant Load set to «true»
- Hover over the Mefistoel_128x128.(Texture) -> Right Click -> «Export«.
- InternalName — Enter «Mefisofel»
- Class — From the drop down menu choose «HERO_CLASS_DEMON_LORD»
- Specialization — From the drop down menu choose «HERO_SPEC_GATE_KEEPER»
Note: If hero specialization function will be defined by script, it is recommended to select «HERO_SPEC_NONE».
- PrimarySkill
- Mastery — From the drop down menu choose «MASTERY_ADVANCED»
- SkillID — From the drop down menu choose «HERO_SKILL_GATING»
- SpecializationNameFileRef
- Select «New» -> MefisofelSpecName -> «OK«
- Type the game visible name of the hero specialization -> «Gate Keeper«
- Select «OK» and agree to save changes.
- SpecializationDescFileRef
- Select «New» -> «MefisofelSpecDesc» -> «OK«
- Type the game visible name of the hero specialization -> «Hero specialization improves Gating ability«
- Select «OK» and agree to save changes.
- SpecializationIcon — Browse «Textures» -> «HeroScreen» -> «Specializations» -> «Inferno» -> «Gate_Keeper» to add 128×128 icon.
- FaceTexture — Use Icon128 parameter value — «Texture:MapObjectsInfernoMEFISOFEL_128x128.(Texture)». Copy/Paste the value and select Enter to apply. If nothing happens press CTRL+S to save the current state and try again.
Note: Editor only allows values to point to existing files. As Icon128 was created this session state needs to be saved in order the file to be created.
- FaceTextureSmall — (Optional) Same as FaceTexture but uses images of size 64×64 icon.
Note: Icon128, SpecializationIcon, FaceTexture, FaceTextureSmall can use either in-game icons or externally imported icons. If imported the values for the texture configuration file are the same as shown in Icon128 example above.
- HeroCharacterArena — Select the browse button «…» and choose «Character:CharactersCreaturesInfernoAlternativeUpgradeT7_Arch_Demon.(Character)».
- Mark HeroCharacterArena value and select browse button «…«. This will open the value properties window on the right.
- Find ArenaAnimSet property, it will have a value of «AnimSet:CharactersCreaturesInfernoAlternativeUpgradeT7_Arch_Demon-arena«
HeroCharacterArena file defines hero actions animations. Important for gameplay are:
- Move — already exists for Devil.
- Cast — already exists for Devil
- Happy — already exists for Devil
- Defeat — We will create it. Devil death animation will be used
- Select it and choose browse button «…«.
- Right click on «animations» -> «Add«. Set the new entry properties as follow:
- Kind set to «defeat«
- Anim browse Devil death animation «BasicSkelAnim:CharactersCreaturesInfernoAlternativeUpgradeT7_Arch_Demon-arena-death«
- Right click on «animations» -> «Add«. Set the new entry properties as follow:
- Select it and choose browse button «…«.
- Attack animation — Hero can attack either with range attack or with melee attack. Chose ONE of the variants below
-
Ranged attack is created by adding animation entry with Kind parameter of type «rangeattack«. It is easy to configure as it looks more neutral and existing range attacks of other heroes or units can be used (Sylvan shooters, Academy and Dungeon mages).
- Right click on «animations» -> «Add«. Set the new entry properties as follow:
- Kind set to «rangeattack«
- Anim browse Dungeon hero range attack animation «BasicSkelAnim:CharactersHeroesShadya-arena-rangeattack«
- Right click on «animations» -> «Add«. Set the new entry properties as follow:
-
Melee attack is created by adding animation entry with Kind parameter of type «strike«. it requires animation for the character attacking and his mount running. We can use existing Devil attack animation. Note: melee animation may require changing of the Melee Camera position. Currently it is unknown how this can be done so hero model may not fit properly in the frame.
- Right click on «animations» -> «Add«. Set the new entry properties as follow:
- Kind set to «strike«
- Anim browse Devil Attack animation «BasicSkelAnim:CharactersCreaturesInfernoAlternativeUpgradeT7_Arch_Demon-arena-attack00«
- Right click on «animations» -> «Add«. Set the new entry properties as follow:
Note: Melee animation may require changing of the Melee Camera position. Currently it is unknown how this can be done so hero model may not fit properly in the frame during attack.
- Select «OK» to close AnimSet window.
- Select «OK» to close Character window.
- HeroCharacterArenaMelee — Leave this empty if hero will use range attack. if hero will use melee attack use the same value as HeroCharacterArena entry.
- HeroCharacterAdventure — use the same value as HeroCharacterArena entry.
- CombatVisual — Select the browse button «…» and choose «GameMechanics» -> «CreatureVisual» -> «Creatures» -> «Inferno» -> «3rd» -> «ArchDemon.(CreatureVisual)«
- TownType — From the drop down menu select «TOWN_INFERNO«
- Editable
- NameFileRef
- Select «New» -> «MefisofelName» -> «OK«
- Type the game visible name of the hero specialization -> «Mefisofel«
- Select «OK» and agree to save changes.
- BiographyFileRef
- Select «New» -> «MefisofelDesc» -> «OK«
- Type the game visible name of the hero specialization -> «Demon Lord and Prince of Darkness»
- Select «OK» and agree to save changes.
- Offence, Defence, Spellpower, Knowledge — set all values to 6.
- NameFileRef
- Selection — browse Inferno selection circle at «/_(Model)/Heroes/DemonLord_Path/Symbol.(Model)«
- ScenarioHero — set to «False» if hero will be used for any game mode and not just campaign.
- HideInEditor — set to «False» so hero is available in Map Editor.
Save your work.
- From Map Editor menu select «Resource» -> «Pack MOD«.
- Find the mod file in <game folder>/Map/New_Hero_Mefisofel.h5m
Example Template
To gain a practical idea of the files that are modified an example template is provided.
- Download the template file New_Hero_Mefisofel.h5m[6]
- Extract its contents and put them in any map.h5m archive root folder.
- Launch Map Editor and put any hero on the map.
- Select it and find «Shared» parameter in the properties window.
- Set the value to «AdvMapHeroShared:MapObjectsInfernoMefisofel.(AdvMapHeroShared)«
The hero model on adventure map should change to Devil. Save the map launch it and test.
Reference List
- ↑ Credit: }{0TT@6bI4
- ↑ Devil.tga image
- ↑ Configure Map Editor in Game editor mode
- ↑ Create Save Export or Load mod environment
- ↑ AdvMapHeroShared object
- ↑ New_Hero_Mefisofel.h5m download
Содержание
- 1 Специализация
- 2 Формулы расчёта эффекта специализации
- 2.1 Специализация по навыку
- 2.2 Специализация по заклинанию
- 2.3 Специализация по школе магии
- 2.4 Специализация по юнитам
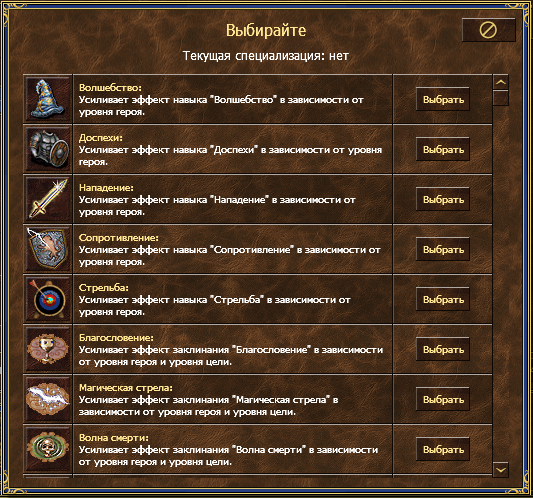
Специализация
Любой герой, достигший пятого уровня, может выбрать любую из специализаций, доступных его типу.
Герои могут специализироваться в навыке (эффективность навыка повышается с ростом уровня героя, заклинании (эффект от заклинания увеличивается в зависимости от уровня героя и уровня цели), школе магии (уменьшается расход маны на заклинания школы) или юнитах (в бою юниты получают дополнительную единицу скорости, а их базовые параметры «Атака» и «Защита» увеличиваются с ростом уровня героя).
Посмотреть специализацию у героя можно в Портрете, и в общей информации, и на странице выбора навыков.
Специализация «Благословение» доступна только Клерикам, «Поднятии нежити» — только Рыцарям смерти и Некромантам.
Нет специализации по Копейщикам, Кентаврам, Гремлинам, Феям, Медузам, воздушным элементалиям и всем седьмым уровням.
Специализация в состязании не учитывается.
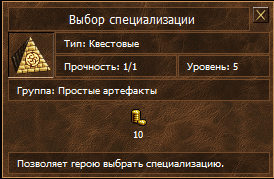
Для того, чтобы выбрать специализацию или изменить уже имеющуюся, герой должен воспользоваться артефактом «Выбор специализации» (раздел квестовые). Один такой артефакт будет выдаваться каждому герою при получении пятого уровня.
Один артефакт «Выбор специализации» выдаётся герою каждый нечетный уровень после пятого. Этот артефакт вечный.
Также, этот артефакт выдается:
- одному из героев, закончивших квест «Приключение друзей» (сроком на неделю).
- герою, закончившему любой ПвП-турнир и имеющему хотя бы одну победу, получает не только Сундук с сюрпризом, но и Выбор специализации на сутки
- герою, победившему вольного _Sandro на острове Ворра и в Реликтовых пещерах. Шансы выпадения 5 и 20%.
- героям по обмену в Таверне ( Обмен медадей за pvp- рейтинг).
Формулы расчёта эффекта специализации
Специализация по навыку
Значение выбранного навыка (Волшебство, Доспехи, Нападение, Сопротивление или Стрельба) увеличивается по формуле
k*(1 + 0,05*N), где
k — стандартное значение навыка (отображается в подсказке к навыку в окне информации о герое),
N — уровень героя.
Для специализации Сопротивление значение коэффициента перед N снижено до 0,03, а для специализации Волшебство — до 0,02.
Специализация по заклинанию
Эффект заклинания (Магическая стрела, Волна смерти, Инферно, Кольцо холода, Ледяная молния, Метеоритный дождь, Огненный шар, Цепная молния, Стена огня, Воскрешение, Гипноз или Поднятие нежити) увеличивается по формуле:
k*(1 + N/n*0,05), где
k — стандартное значение,
N — уровень героя,
n — уровень юнита-цели.
Эффект заклинания «Благословение» рассчитывается по формуле k*(1 + N/n*0,03).
Специализация по школе магии
Заклинания соответствующей школы получают -20% к стоимости по мане, при этом стоимость снижается не менее чем на 1 маны, а итоговая стоимость заклинания не может быть ниже 1 маны.
Специализация по юнитам
Юнит единовременно получает +2 к скорости и ~10% НР, а его базовые атака и защита увеличиваются (с округлением всегда вверх) на
k*(1 + N/n*0,05), где
k — стандартное значение,
N — уровень героя,
n — уровень юнита.

![]()
Внимание!!! Те кто это знает, я рад за вас,поэтому не надо засорять страницу комментариями: «Автор» и зачем ты это написал это все знают! ; И зачем это вообще нужно,надо играть честно! ну и втом же духе. Предлагаю вам исходить пеной изо рта и захлёбываться слюной дома перед вашими мониторами. Спасибо за Внимание!!!
Должен сразу предупредить, что я предлагаю создать существ на основе оригинальных 3D моделях войск. Лепите 3D модели сами, я же могу рассказать как менять основные их характеристики, добавлять им перки, менять название и разве что изменить текстуры.
Все основные файлы лежат в архиве data.pak открываете его и перед вами появятся папки например Artefacts Skill Spell Creature. Я рассмотрю папку Creatures. В этой папке все существа рампределены по городам (так даже удобней). Чтобы проще было редактировать извлеките файл в папку, которую создаст сам архиватор, к примеру возьмём Creatures -> Necropolis -> Demilich.xdb открывается всё это дело блокнотом и далее перед нами предстаёт обширный набор латинских букв, если вы владеете хотя бы базовым англ. языком то сами разберёте что есть что. Далее пишу для тех кто не знает
В директории X:X3Heroes of Might & Magic Vdata (после извлечения) должны появиться папки dataGameMechanicsCreatureCreaturesNecropolis где и будет лежать Demilich.xdb
нажав правой клавишей по файлу внизу выберите Свойства и уберите галочку «Только чтение» (как отредактируете лучше верните галочку обратно) и открывайте сам файл.
Далее что есть что:
19 — Навык атаки
19 — Навык защиты
6 — Кол-во выстрелов
16 — Минимальный ущерб
20 — Максимальный ущерб
3 — Скорость передвижения
10 — Инициатива (это насколько быстро право действовать дойдёт именно до этого юнита)
false — Летающий/нелетающий , соответственно true/false
55 — Здоровье
— это те заклинания которые использует юнит (все заклинания лежат в папке Spell)
SPELL_CURSE — собственно заклинание
MASTERY_EXPERT — Мастерство в заклинании
SPELL_PLAGUE
MASTERY_ADVANCED
SPELL_WEAKNESS
MASTERY_ADVANCED
16 — Кол-во маны
…
— стоимость этого юнита
0 — дерево
0 — Руда
0 — Ртуть
0 — Кристаллы
0 — Сера
0 — Самоцветы
900 — Золото
В графе TOWN_NECROMANCY вы можете конечно изменить город в котором будет обитать это существо, но надо это делать осторожно или игра вылитать будет.
Ну, теперь дело за малым надо как то по-свойски обозвать наш новоиспечённый продукт деятельности, а то как-то «заводское» Архилич уже не катит. Для этого в папке X:X3Heroes Vdata открываем архив texts.pak далее в архиве TextGameCreaturesNecropolis
Demilich.txt — Само название можно например «Верховный лич» «Лич-колдун», ну сами додумаете
Demilich_Abilities.txt — Краткое описание
Demilich_desc.txt — История.
Успехов вам в создании!!!
