
Raspberry Pi is a great tool that helps you develop your computing skills and new technologies.
It has become widely popular among computer enthusiasts to help them improve their coding skills.
However, if you’re logged out of your account and can’t remember your password, you may be in trouble.
That’s because of the way passwords and usernames are stored, making them difficult to retrieve.
However, you’re not entirely out of luck, as there are different ways to help you log in.
1. Reset The Password Via Commands

The passwords are stored in /etc/passwd on Linux.
However, if you’ve forgotten your password, there’s no way you can access this file and see your password.
Therefore, the best way to recover your data is to reset your password.
However, the methods for resetting a password differ depending on whether you can log in to your account or not.
For example, you can log in with your default username and password and reset your password if you haven’t changed them already.
If you have a user with sudo rights, you can log in with that user without providing a password.
All you need to do is run the following command:
sudo passwd
This command will prompt you to provide a new password without requiring your current one.
Another option would be to log in via the startup config.
Open a terminal window and type in sudo raspi-config.
This command will bring up a menu on which you can find the Change User Password option.
2. Eliminate The Need For A Password

Another workaround helps you change the settings so that Raspberry Pi doesn’t require you to provide a password.
Then you can enter the system and change your password via the command line.
This method requires unmounting the SD card and connecting it to a computer running on Linux, Windows, or macOS.
When you insert the SD card, you can see the file explorer on the window.
Look for /etc/passwd and edit it.
You should look for a line that starts with pi:x:1000:1000… and remove the x, leaving the two colons.
This edit will eliminate the need to provide a password.
Unmount the SD card, reinsert it into the Raspberry Pi and log in normally.
Then, use the passwd command to change your credentials.
3. Reset The Password By Removing The SD Card

This method helps you reset your password without contacting Raspberry Pi support.
Although it requires some hardware work, it’s pretty straightforward.
Please note that, like the above method, this method requires physical access to the Raspberry Pi and its SD card.
You also need a monitor, another PC with a microSD reader, and adapters for Pi Zero.
First, you need to remove Raspberry Pi’s SD card and insert it into your PC.
Before removing the microSD card, you need to turn off Raspberry Pi, which is impossible if it’s not connected to a monitor.
In that case, you should just unplug it.
Open the file explorer, open the memory card file, and look for a file named cmdline.txt in the root directory.
Open the file through one of your installed text editors and copy and paste the following command at the end of the text inside the file, making sure all of them are in one line:
init=/bin/sh
Save the file and unmount the SD card.
Now, insert it into the Raspberry Pi and turn on the device to see the blinking cursor in the single-user mode.
Remember that the Raspberry Pi should be connected to a monitor and a keyboard.
You’ll see a series of command lines scrolling quickly, and when it stops, you can start typing new commands.
If you’re using root credentials, you need to unmount and remount the root.
Type mount -o remount, rw / in the window, and
Type su in after the blinking cursor and enter the following command in the window:
passwd pi
Here, you’re prompted to enter your new password and press Enter twice.
Enter sync exec /sbin/init in the new window.
This command will restart Raspberry Pi while keeping your information inside the memory.
After the system reboots, turn it off, remove the SD card, and reinsert it into the computer.
Open the cmdline.txt again and delete the init = / bin / sh line to go back to normal settings.
If you want to change the password belonging to the pi user, you should type the following command:
Sudo passwd pi
Otherwise, you’ll just change the root password.
4. Resetting The Raspberry Pi Password For NOOBs

You can also reset the password via the NOOBs through steps different from those described above.
To do so:
- Boot the system in the recovery mode by pressing the Shift key while the system is booting up.
- Choose your Raspbian image and click on Edit config (e).
- Go to the cmdline.txt tab and type init-/bin/sh at the end of the command line.
- Press Ok to reboot the system.
When the system reboots, press Enter to see a line with #.
Here, you should type:
mount -o remount, rw /
passwd pi
Here, you’ll be prompted to enter your new password.
After entering the new password, enter sync:
Then, enter exec /sbin/init.
Now, repeat the process and remove the init=/bin/sh line.
Note: When you type the new password, it will be shown in *****.
Carefully watch for typos, or you won’t be able to use your new password.
How To Change Raspberry Pi’s Root Password

Changing the root password requires logging into your account.
If you’ve lost your password, you may want to go through the above methods.
To change the Pi’s root password, you need to log in as a root user upon boot up.
After logging into the root account, run the command line.
Access the account as a supervisor by entering sudo du and pressing Enter.
After typing in passwd root in the command line, you’ll receive system prompts to change the password.
Follow the instructions to finish the process.
How To Change Raspberry Pi’s Default Password

When you use the Raspberry Pi for the first time, it comes with a default username and password that you should change to boost your system’s security.
That’s because these credentials are universally used on all Raspberry devices by default, and if you don’t change them, you’ll leave your account vulnerable.
The new updates even ask you to change your password after the first boot.
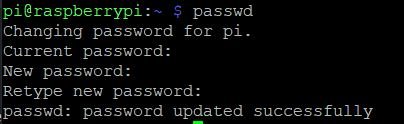
First, log into your account using the default credentials and open a command window.
Type passwd in the command line and press Enter.
You should provide your current password and after verification, enter your new password.
Press Enter to change and apply it right away.
1. Change Default Root Username
The default username for Raspberry Pi is pi, and the default password is Raspberry.
It’s advisable to change your default user name and password via the Linux command, usermod.
However, it requires some settings enabled beforehand.
You should first log into your root user account since you can’t change these credentials through your Pi session.
Since you normally don’t log in with the root user, you’ll enter the Pi session upon boot up.
As a result, you should first disable this default setting and change the root password.
Otherwise, the system will show a message that your Pi username is currently in use.
Here’s how to disable your Pi session (you could skip this step for the Raspberry Pi Lite as it doesn’t have an auto-login):
Open the main menu and click on Preferences > Raspberry Pi Configuration > System > Auto login > Disable.
Now, you should enable SSH via the above route: Preferences > Raspberry Pi Configuration > Interfaces > Enable SSH.
The next step is to enable root to make another user with privileges that allow it to change the default username.
To do so:
Open a Pi session using SSH, a desktop terminal, or a Lite version session, and type the following command:
sudo passwd
This command will prompt you to set a new password for root.
You could also change the default username via SSH, for which root access to SSH should be enabled.
Here’s how to do it:
Enter this command to open the SSH configuration file:
sudo nano /etc/ssh/sshd_config
replace #PermitRootLogin prohibit-password with PermitRootLogin yes
After saving and exiting the file, restart SSH:
sudo service ssh restart
Note: After creating the new username, disable root access for security reasons.
Now, you can change the default username by first logging in with root by opening a session or using SSH, depending on the version you have installed.
Type usermod -l <new_user> pi in the session and replace “new_user” with your preferred username.
Then, it’s time to change the home directory’s name:
usermod -m -d /home/<new_user> <new_user>
And replace new_user with the new username.
Now, you can test the new password and username without rebooting the system to see if you’ve done the steps properly.
After entering your new account, it’s better to undo the changes you made with the auto-login and enable the SSH root access.
2. Changing Default Passwords For Other Usernames
You can use other users’ passwords on Pi provided that they have sudo permissions.
Enter the following command in the command line: passwd username.
You should replace “username” with the actual username you want to change the password for.
Type sudo passwd username, replacing “username” with the actual name.
You’ll need to provide the new password and confirm it one more time, and you’ll receive a message saying the password has been successfully changed.
How To Run Raspberry Pi Hardware Via Passwordless Sudo

The root user in a Linux system becomes a superuser that can access all parts and components of the server.
You can’t find these privileges with standard users because they can access only specific server parts and run limited commands.
By using the sudo command, you can give the standard user root access.
However, this access can be granted without requiring a password, which can be more convenient than providing a password every time you log in.
You can make a passwordless sudo account without compromising your security.
In addition, you’ll need this passwordless sudo account if you want to run specific hardware on Raspberry Pi, such as Simulink models.
The process of enabling passwordless sudo access is pretty straightforward, as follows:
Open the command-line interface and type in the following command:
sudo nano /etc/sudoers
You can simply enable passwordless sudo access by typing <user name> ALL=(ALL:ALL) NOPASSWD:ALL.
(Replace <username> with your intended username.)
Save changes and enter sudo reboot in the command line to restart Raspberry Pi and start it with the new settings.
You could also allow a specific user to use the passwordless sudo privileges only for specific commands.
Suppose you want to allow a user to run the fdisk-I command with passwordless sudo privileges.
In that case, you should type the following command in the command line:
nano /etc/sudoers
and add this line at the end of the file:
<username> ALL=(ALL:ALL) NOPASSWD: /sbin/fdisk -l
Creating A New Raspberry Pi User

You may decide to create another username and password for a new user on Raspberry Pi for different reasons.
The first reason is security concerns, as it’s not safe to use the default username and password.
Although many users prefer to use the same default username and password on different operating systems, such as root and pi, it’s not advisable for security reasons.
Creating another user can prevent hackers from attacking your systems via default credentials.
Another reason for creating new users is if you have multiple users working on the same system.
This way, you can assign each person a unique username and password with specific permissions.
You can create a new user via the adduser command by typing the following command:
Sudo adduser <username>
Again, the <username> section is replaced by the user’s name you want to set.
At this point, you’re prompted to enter other login information.
After answering the questions and pressing Enter, the new user will be created instantly with their own home folder located in /home/.
However, this user has no specific permissions, and you can grant them other permissions, such as passwordless sudo, as described above.
You could also add them to a group using the same adduser command.
All you need to do is enter the following command line:
sudo adduser <username> <group>
replacing the username and group with your intended names.
If you want to add the user to multiple groups, you can list the name of all groups instead of <group>.
Deleting A Raspberry User

You may want to delete some users from your Raspberry Pi for different reasons.
For example, you’ve added too many users and made things confusing for you, or you don’t need them anymore.
In such cases, you can delete these users through a simple command.
However, you need to take an extra step before deleting the user.
If you’ve already used these deleted accounts, you must have some home directory folders belonging to the users.
You may want to decide if you need to keep or delete these home files because deleting the account will remove these files, too.
You could copy them to the home directory of the new user through a simple command:
cp -R [SOURCE]/. [DESTINATION]
After copying the files, you can delete the use by running the following command:
sudo deluser –remove-home pi
This command will delete the user and its home directory.
However, you could still keep the home directory if you don’t have a backup of the folders.
You could just enter the following command to delete the user without its home directory:
sudo deluser pi
Adding A New Raspberry Pi Group

Raspberry Pi allows you to share it with different family members, enabling them to create their own files and home directories without having permission to delete or alter other members’ files.
You can easily add a new group with the addgroup command.
To do so, open a new command line by opening up a terminal window on the desktop or log in remotely over SSH.
Type in $ sudo addgroup robots and provide your password when required.
When the group is created, you’ll get a message confirming the group and giving you a GID value, which can be different across different devices.
Next, you should verify the group via the following command:
$ getent group robots
The system will verify the group by giving you the same GID value you received above.
After creating the group, you can add users via the steps described above.
I want to SSH into my Raspberry Pi, but for security reasons also don’t want to keep the standard password raspberry for the standard user pi. There fore I used passwd to change pi‘s password. However, when I then try to ssh I get the errors
Permission denied, please try again.
Permission denied, please try again.
Permission denied (publickey,password)
These errors are also the subject of a number of other threads, but none have answers that solve the problem for me.
I think it has something to do with the public key and it not changing with the password when one uses passwd. The reason being that if I change the password back to raspberry I can SSH just fine.
-EDIT- Verbose ssh added
-bash-4.1$ ssh -v pi@xxx.xxx.xxx.xxx
OpenSSH_5.3p1, OpenSSL 1.0.1e-fips 11 Feb 2013
debug1: Reading configuration data /etc/ssh/ssh_config
debug1: Applying options for *
debug1: Connecting to xxx.xxx.xxx.xxx [xxx.xxx.xxx.xxx] port 22.
debug1: Connection established.
debug1: identity file /home/nfs/shijgenaar/.ssh/identity type -1
debug1: identity file /home/nfs/shijgenaar/.ssh/identity-cert type -1
debug1: identity file /home/nfs/shijgenaar/.ssh/id_rsa type -1
debug1: identity file /home/nfs/shijgenaar/.ssh/id_rsa-cert type -1
debug1: identity file /home/nfs/shijgenaar/.ssh/id_dsa type -1
debug1: identity file /home/nfs/shijgenaar/.ssh/id_dsa-cert type -1
debug1: identity file /home/nfs/shijgenaar/.ssh/id_ecdsa type -1
debug1: identity file /home/nfs/shijgenaar/.ssh/id_ecdsa-cert type -1
debug1: Remote protocol version 2.0, remote software version OpenSSH_6.7p1 Raspbian-5+deb8u3
debug1: match: OpenSSH_6.7p1 Raspbian-5+deb8u3 pat OpenSSH*
debug1: Enabling compatibility mode for protocol 2.0
debug1: Local version string SSH-2.0-OpenSSH_5.3
debug1: SSH2_MSG_KEXINIT sent
debug1: SSH2_MSG_KEXINIT received
debug1: kex: server->client aes128-ctr hmac-sha1 none
debug1: kex: client->server aes128-ctr hmac-sha1 none
debug1: SSH2_MSG_KEX_DH_GEX_REQUEST(1024<2048<8192) sent
debug1: expecting SSH2_MSG_KEX_DH_GEX_GROUP
debug1: SSH2_MSG_KEX_DH_GEX_INIT sent
debug1: expecting SSH2_MSG_KEX_DH_GEX_REPLY
debug1: Host 'xxx.xxx.xxx.xxx' is known and matches the RSA host key.
debug1: Found key in /home/nfs/shijgenaar/.ssh/known_hosts:4
debug1: ssh_rsa_verify: signature correct
debug1: SSH2_MSG_NEWKEYS sent
debug1: expecting SSH2_MSG_NEWKEYS
debug1: SSH2_MSG_NEWKEYS received
debug1: SSH2_MSG_SERVICE_REQUEST sent
debug1: SSH2_MSG_SERVICE_ACCEPT received
debug1: Authentications that can continue: publickey,password
debug1: Next authentication method: publickey
debug1: Trying private key: /home/nfs/shijgenaar/.ssh/identity
debug1: Trying private key: /home/nfs/shijgenaar/.ssh/id_rsa
debug1: Trying private key: /home/nfs/shijgenaar/.ssh/id_dsa
debug1: Trying private key: /home/nfs/shijgenaar/.ssh/id_ecdsa
debug1: Next authentication method: password
pi@xxx.xxx.xxx.xxx's password:
debug1: Authentications that can continue: publickey,password
Permission denied, please try again.
pi@xxx.xxx.xxx.xxx's password:
Forgetting your password is never a good experience, especially when it’s the main password, the one to unlock your operating system. But no worries, there are different ways to recover it (or rather reset it), and it doesn’t have to be complicated, unlike what other tutorials on this topic try to tell you.
Raspberry Pi OS has auto-login enabled by default, so most of the time, you can get access to the main user session without typing any password, and reset users passwords from there. If this isn’t possible, you can edit the /etc/passwd file to allow users to sign in without a password.
I thought of 5 ways to reset a password on Raspberry Pi, and I’ll now explain all of them, in order of the easiest method to the most complicated. So, go through this article in the logical order. If the first solutions don’t work in your situation, check the next one on the list.
If you are looking to quickly progress on Raspberry Pi, you can check out my e-book here. It’s a 30-day challenge, where you learn one new thing every day until you become a Raspberry Pi expert. The first third of the book teaches you the basics, but the following chapters include projects you can try on your own.
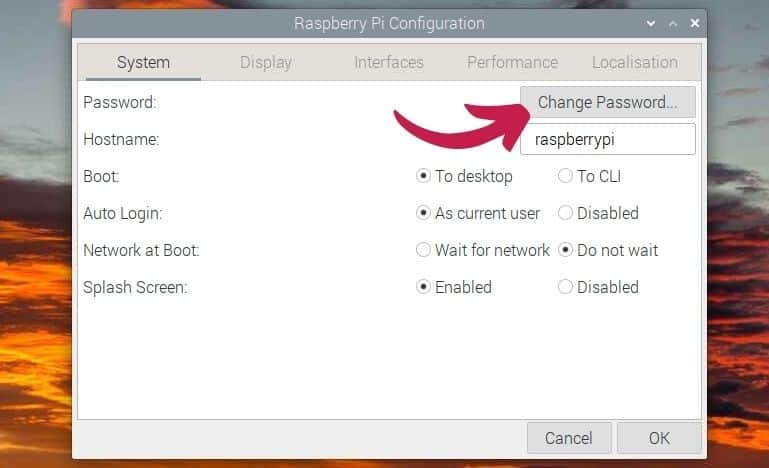
1 – Change your password via Raspi-Config or GUI
Use this method if you have a desktop environment installed, and the session opens automatically on boot. In this case, you can directly change the password, without knowing the old one.
Once the session opens, go to Preferences > Raspberry Pi Configuration.
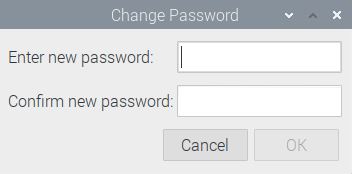
In the first tab, you’ll see a button to change the password for the current user:
It will ask you for a new password, without having to type the current one:
So, this solution works even if you don’t know the current password.
It’s perfect if you’re still able to use your system, but have no idea which password to type when the system asks it for more permissions (when you install new applications, for example).
Download the Pi Glossary!
If you are lost in all these new words and abbreviations, request my free Raspberry Pi glossary here (PDF format)!
If you are on Raspberry Pi OS, you can use raspi-config to do the same thing. You’ll find the “Change password” item under the “System” menu.
If you are stuck on the login page, this method won’t help. But I prefer starting with the easy solutions first, so that you don’t break your system if there is no need to :-). Check the following solutions if this method didn’t work for you.
2 – Log in with another user to change the password
Use this method, if you created several users on your system, but lost the password for only one of them. If you have other users with administrator privileges, they can reset any user’s password on the Raspberry Pi.
Even if we generally use a Raspberry Pi with only one main user (pi or the one created during the installation), you can easily create new users for different roles and tasks, or even set a password for the administrator account (root).
If you had other users set up on the system where you forgot the password, you might be lucky! If you can access your system with another account that can use “sudo” to get administrator permissions, you can reset the password from there:
- Get access to a command line (open a terminal, log in on a lite version or use SSH).
- Type the following command:
sudo passwd <username>For example:sudo passwd pi - You should get a prompt to set a new password for this user.
- Once done, you can log out and sign in with this username and the new password you just set.
It only works if you have created other users on your system. If this isn’t the case for your system, take a look at the next option, which is the last “easy” one before we start editing files on your SD card.
3 – Use an SSH connection to access your account
Use this method if you can still connect to your Raspberry Pi via SSH because the password is saved on your client (or you use SSH keys), but have no idea what the password is. In this case, you can reset the password via SSH.
If, like me, you are using a smart SSH client (I use Termius) which saves all session credentials, you almost never type your password. And when you need it to install new applications, you might get stuck, as you don’t remember it.
It would be the same if you created SSH keys to log in from other computers without password authentication. In this case, you can still access your account on the Raspberry Pi, but have no idea what the password is.
Well, this is still an easy solution, as you can use the same command as in the previous solution to reset the password. Use raspi-config or type the following command to set a new password:sudo passwd pi
Now that we have explored all the easy solutions when you still have a way to access your system, what can you do when you are stuck on the login page with no idea what the password is? The two last solutions will help you with this.
4 – Clear the password from another Linux system
If you can access the SD card content from another Linux system, you can edit the /etc/passwd file from your Raspberry Pi system to allow you to log in to your account without any password. Use this method if you have no access to the current system, but can boot on another SD card or USB key to reset the password.
Download the Pi Glossary!
If you are lost in all these new words and abbreviations, request my free Raspberry Pi glossary here (PDF format)!
So, if you have a computer running Linux, just plug your SD card (or USB key) into it, and follow the instructions below.
If your computer is running Windows, you can’t edit the files on the SD card directly. In this case, your best option is to boot the Raspberry Pi with another media, and follow the instructions from there.
To give you an example, I have Windows on my computer.
So, I tested this solution with Raspberry Pi OS installed on a SD card (that’s the system where I forgot the password). I have a USB drive with Manjaro installed on it, so I booted it, and plugged the SD card once logged in on Manjaro. I can now follow the instructions below from Manjaro.
Whatever the way you choose, here is the procedure to edit the SD card content and disable the need of a password:
You can now halt your current (temporary) system, and boot again on the one where you lost the password.
In my case, I rebooted the Raspberry Pi, removed the USB key, and let only the SD card.
On the login screen, you can type the username (“pi” in my example) and it won’t ask for a password. The session will open directly. From there, you can set a new password, using the GUI, raspi-config or the command line directly:passwd
Are you a bit lost in the Linux command line? Check this article first, for the most important commands to remember, and a free downloadable cheat sheet so you can have the commands at your fingertips.
Get My Commands Cheat Sheet!
Grab your free PDF file with all the commands you need to know on Raspberry Pi!
Reminder: Remember that all the members of my community get access to this website without ads, exclusive courses and much more. You can become part of this community for as little as $5 per month & get all the benefits immediately.
5 – Boot in single-user mode to reset the password (cmdline.txt)
Use this method if all the other solutions are not possible for you. If you only have one SD card or USB key and no Linux system available, this is your best option (not the easiest, but it works).
The idea here, is to boot a minimal version of your system, with access to a command line as root. This way, you can use it to reset your password. It’s not straightforward, but it’s your best option if the previous solutions didn’t work for you.
First, insert the SD card (or USB key) on another computer. It can be any operating system (even Windows), it can even be another Raspberry Pi, it doesn’t matter.
In the boot partition, find the “cmdline.txt” file and open it, it looks like this:

I have an in-depth article on this website about cmdline.txt, and everything about it. I highly recommend reading it first, but I’ll give you the summary of what you can do to reset your password here.
Just add the highlighted text at the end of the line, as in my screenshot:init=/bin/shSave the file, and eject the media.
Put it back on your Raspberry Pi, and start it.
The system will boot almost as usual, but stop with a cursor, where you can type command lines.
The partition is not mounted automatically, so you will need to do it with:mount -o remount, rw /
Warning: the keyboard layout will be in QWERTY, so good luck if (like me) you use another keyboard :-).
Once done, you can change the password with the same command previously used:passwd <username>
For example:passwd piWe are logged in as root, so you don’t need “sudo”.
Make sure the changes are saved on the disk with:syncAnd then power off the Raspberry Pi (halt and reboot commands don’t work).
Before restarting the Raspberry Pi, you need to put the SD card back into your other computer, and remove the text you added in the cmdline.txt file.
So, remove “init=/bin/sh” at the end of the line, save the file, eject the SD card and put it back in your Raspberry Pi.
On the next boot, use the password you just set, and it should work.
That’s it! You can now continue with your main project, and don’t forget your password again :-).
And if you want to avoid losing your passwords all the time, you should check this project (it’s a password manager that you can host on a Raspberry Pi).
Get My Commands Cheat Sheet!
Grab your free PDF file with all the commands you need to know on Raspberry Pi!
Additional Resources
Not sure where to start?
Understand everything about the Raspberry Pi, stop searching for help all the time, and finally enjoy completing your projects.
Watch the Raspberry Pi Bootcamp course now.
Master your Raspberry Pi in 30 days
Don’t want the basic stuff only? If you are looking for the best tips to become an expert on Raspberry Pi, this book is for you. Learn useful Linux skills and practice multiple projects with step-by-step guides.
Download the e-book.
VIP Community
If you just want to hang out with me and other Raspberry Pi fans, you can also join the community. I share exclusive tutorials and behind-the-scenes content there. Premium members can also visit the website without ads.
More details here.
Need help building something with Python?
Create, understand and improve any Python script for your Raspberry Pi.
Learn the essentials, step-by-step, without losing time understanding useless concepts.
Get the e-book now.
You can also find all my recommendations for tools and hardware on this page.
Are you logged out of your system because you don’t know the Raspberry Pi default login and are now searching for ways to reset it? If yes, then rest assured! We will provide you with all the information you need regarding resetting and securing your Raspberry Pi OS.
Like other devices, there is also an inbuilt Raspberry Pi default login when you install your Raspberry Pi OS. However, as these default logins are readily available on the internet, anyone with harmful intentions might try to access them. Thus, it’s not secure to keep working with the default login.
On that account, if you haven’t changed your default password yet. Then we will help you reset your password and everything related to it. So, what are you waiting for? Let’s get into it!
In older versions of the Raspberry Pi OS, there were a default username and password; Username pi, password raspberry. This is no longer the case. However, if you are using an older version of the operating system or are working with an existing installation, this default user may still be present. If you haven’t already done so, you should change the default password immediately to ensure your Raspberry Pi is secure. How to do that is described in this article.
Set Raspberry Pi default password via RPi Imager (Headless)
In newer Raspberry Pi OS versions, we have to set the password ourselves. We have two options:
- After the first boot (requires keyboard and monitor)
- Directly during installation (headless). Let’s look at this case in detail.
To do this, we load the Raspberry Pi Imager and choose an operating system that we want to install. This can be downloaded directly via the downloader.
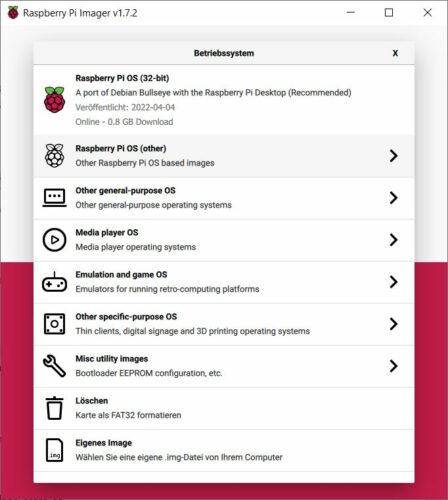
Then we click the options symbol (alternatively via CTRL + Shift + X) and check the box “Set username and password”. We can also configure other settings (Wi-Fi, language, etc.) directly.
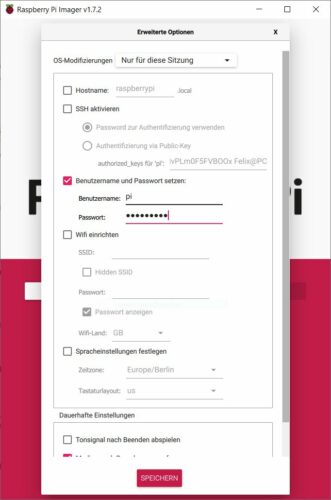
After flashing, you can start right away and do not need any further Raspberry Pi standard access data.
The Default Username and Password on all Raspberry Pi OS (deprecated)
Most of the Raspberry Pi operating systems have default passwords to access through SSH. For instance, in Raspberry OS, the default username is “pi” and the default password: “raspberry“. However, other distributions have their default usernames and passwords that are not similar always to Raspberry Pi OS.
The following table consists of the default usernames and passwords of the most renowned Raspberry Pi’s distributions:
| Raspberry Pi Distributions | Username | Password |
|---|---|---|
| Raspberry Pi OS | pi | raspberry |
| DietPi | root | dietpi |
| Lakka Linux | root | root |
| Kali Linux | root | toor |
| OpenELEC | root | openelec |
| Arch Linux ARM | root | root |
| Debian | pi | raspberry |
| LibreELEC | root | libreelec |
| OSMC | osmc | osmc |
| QtonPi | root | rootme |
| Ubuntu Server | ubuntu | ubuntu |
| ROKOS | rokos | rokos |
| Retropie | pi | raspberry |
How To Change The Raspberry Pi Default Password?
The Raspberry Pi default login is incorporated to make the setup easy for new users. Nevertheless, it’s better to change the default login to keep your system secure. With the recent update, Raspberry Pi OS prompts the users to set up a new password right after installation. However, if you still haven’t changed your password, this is how you do it.
Go through the following instructions to change your password:
- You can log in using the default username: “pi” and the default password: “raspberry”.
- After logging in, use the
passwdcommand to change your password instantly. - Open the command line, type
passwd, and press “Enter.” - You’ll get asked to enter your current password for verification.
- After verification, you can type in your new password and press “Enter.”
- Once you’ve successfully verified your password, it’ll get applied right away.
Note:
You’ll not be able to see any characters on the display while entering the password. So, don’t panic; just type in your password and press “Enter.”
How To Change Other User’s Passwords?
In case your user has “sudo” permissions (which the default user “pi” has), you can change any of the user’s passwords by following the steps mentioned below.
- Enter
passwdon the command line along with the user’s name. - Type in
sudo passwd jackto get permitted to set the userjack‘s password. - The process is similar to changing the (default) password of your own user.
Note:
You can even remove the user’s password by entering the command sudo passwd bob -d in the command line. However, this practice is not recommended as it will weaken your system’s security.
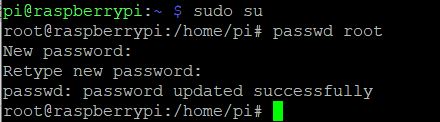
How To Change The Root Password?
You don’t usually log in as a root user on startup. However, you can log in as a root user and change the root password on Raspberry Pi through the following steps:
- In the command line, type in
sudo suand press “Enter” to access as supervisor. - Now use the
passwd rootcommand to get prompted to change the root password.
- Type in the new root password and press “Enter”.
How To Create A New User?
If you want to create new users on your operating system, then you can follow the three basic steps mentioned below:
Add new (Default) User Login in Linux or Raspberry Pi OS
- Type in
adduserin the command line and press “Enter”. - Now, insert the new user’s name such as:
sudo adduser jackand press “Enter”. - You’ll have to enter the login information for the new user “jack”.
- After inputting the required information, press “Enter” to continue.
- The new user will get added instantly.
Location of the Home Folder
- The newly added user will have a home folder in
/home/. - The default Raspberry Pi user’s home folder is located as
/home/pi/.
Skel
- The contents of
/etc/skel/will get transferred to the new user’s home folder. - All the modifications you make to the files with extensions such as;
.bashrcin/etc/skel/will get automatically applied to the recently added users.
How To Add A New Member To The Sudo Group?
The default Raspberry Pi user belongs to a “sudo” group. Belonging to a “sudo” group allows the default user to run commands as a root (super) user. It also permits the user to switch to the root user with sudo su
Following instructions will help you add a new member to the sudo group:
- Type in
sudo adduser jackin the command line. - The user “jack” will get prompted to enter their password to run “sudo.”
In case you want to remove this prompt:
- Create a sudoer file using
sudo visudo /etc/sudoers.d/010_jack-nopasswd. - Place it in
/etc/sudoers.dindex. - Type in
jack ALL= (ALL) NOPASSWD: ALLin a single command line. - Save and exit.
After this process, your file will get checked for errors. In case there are any errors,
- A dialogue box will pop up stating, “what now?”. Press the “Enter” key.
- You’ll see various options; just press “e” to edit the sudoers file to fix the problem.
How To Delete A User?
If there are a lot of users on your system, and you feel like removing some of them. Then you can delete the unwanted users by just one command, which is as follows:
- Type
userdelin the command line and press “Enter”. - You can add
-rin the same command to delete the user’s home folder as well.sudo userdel -r jack. - Be careful to not delete anything that you are not sure of.
Conclusion
Summing up, it is crucial to reset the Raspberry Pi default login (meaning its password) as soon as you access it the first time. In case you are new to this system and don’t know how to reset the password, then here in this article, we have covered all the basics of resetting the default password. Moreover, you’ll find some additional help and information as well.
В последнее время получил распространение отдельный класс устройств, предназначенный целям управления оборудованием, использования в качестве малых рабочих станций или создания простых серверов. Речь идет об компьютерах на одной плате, таких как Raspberry Pi. Несмотря на свои размеры применять их можно и в роли контроллера аппаратуры, и в качестве небольшого мультимедийного, почтового, файлового или web-сервера, не считая уже случаев работы тонкими клиентами. Остается только вопрос управления одноплатником. Можно конечно отдавать команды непосредственно в консоль или контролировать рабочий стол используя монитор, клавиатуру и мышь. Но, каждый раз подключение для каких-либо действий дополнительного оборудования создает излишние затраты времени и труда. Выход есть и имя ему Secure shell. Изначальный сетевой протокол, используемый для доступа к консоли, удаленной *-NIX подобной системы, со временем резвившейся в удобное средство управления и файловой передачи ОС Linux.

Все приведенные далее сведения в основном будет относиться к Raspberry PI 3 и более старшим моделям одноплатников одноименной фирмы.

Secure shell
Как уже описано ранее SSH — протокол передачи информации, используемый в Linux, который в свою очередь устанавливается на Raspberry PI 3 под именем Raspbian. Причем речь идет не только о текстовых данных, но и потоковом видео и аудио вещании, изображениях, бинарных файлах. В полноформатных *NIX (Linux) системах он используется для доступа к экранным элементам управления и окнам X-ов, с возможностью их запуска на главной машине и отображения результата на клиентской. К сожалению, для малины подобная функция не доступна в рамках стандартного Raspbian. Все же названый клон Debian обладает определенными ограничениями по функциональности ОС, непосредственно связанными с относительно слабой аппаратной начинкой одноплатника. Если все же требуется получить доступ к рабочему столу, тут официальная документация системы рекомендует присмотреться к средствам контроля по протоколу VNC, использование которого, как и Secure Shell изначально заложено в малинку.

Что отличает SSH от того же TELNET, — наличие шифрования канала. Используя протокол можно не беспокоится о безопасности передаваемой информации, так как весь обмен единовременно кодируется. Еще одной из множества возможностей, заложенных в Secure shell можно упомянуть сжатие передаваемых данных, которое активируется соответствующей опцией на стороне сервера или клиента. Функция в некоторых случаях позволяет разгрузить канал обмена по протоколу SSH уменьшив объем потока информации за счет компрессии.
Активация и установка на Raspberry PI
Организация интерфейсного доступа к консоли или возможностям протокола SSH начинается с запуска его серверной части на Raspberry PI. Сделать можно названую процедуру аж тремя методами при прямом подключении и одном «безголовом». Конечно, для первых изначально потребуется непосредственный доступ к консоли Raspbian Pi, с аппаратными клавиатурой и монитором. И во всех случаях, после того, как установлен параметр активации, нужно перегрузить Raspberry Pi для запуска сервиса.

Итак, последовательность действий:
Первый
Классический метод, работающий в любом Linux использующем systemd в качестве системы инициализации. Вводим в консоли:
sudo -s

# активируем сервис:

sudo systemctl enable ssh

sudo systemctl start ssh
Второй
Выполняется непосредственно из оконной системы Raspberry PI 3. В меню «Preferences» находящейся в своеобразном «пуск» на панели, нужно выбрать «Raspberry Pi Configuration». В открывшемся окне надо перейти на вкладку «Interfaces». В пункте SSH устанавливаем рядом расположенный переключатель в значение «Enabled». Далее делается подтверждение действия нажатием «Ок» внизу окна.

Третий
Активация сервера названным методом подойдет для случаев, когда графический интерфейс в Raspbian отключен. В консоли нужно набрать:
sudo raspi-config
После нажатия «Enter», по требованию, вводится пароль администратора (для случаев, когда его использование включено правилами, указанными файлом /etc/sudoers.d/010_pi-nopasswd). По умолчанию запрос безопасности отключен.
После откроется текстовая система меню настройки, в которой нужно перейти в раздел «Interface Options», используя клавиши стрелок клавиатуры и кнопку «Enter».
Зайдя в названый пункт конфигурации надо переместится в раздел SSH, и следом активировать внизу экрана «Enable», или для некоторых версий Raspbian «Yes». Затем «Ok». В последующем открывшемся текстовом окне со списком настроек «Finish».

Четвертый
И наконец, метод работающий для тех случаев, когда физическое подключение к одноплатному компьютеру отсутствует и есть только сетевое. Здесь понадобиться внести небольшие изменения на SD-карту с установленной системой Raspbian. На ней нужно найти загрузочный раздел. Если ставить «вчистую» операционку, то он будет меньшим среди двух находящихся на карте. В корень помещается файл без расширения и с любым содержанием, по имени «ssh». Обнаружив его при загрузке, Raspbian запустит Secure shell сервер, с пустым паролем безопасности, и пользователем «pi» (без кавычек).
Работает функция только до перезагрузки Raspberry PI и для постоянного последующего сетевого доступа по протоколу, требуется непосредственно указать запуск SSH одним из способов, описанных ранее. Происходит названное по причине удаления файла в загрузочном разделе Raspbian, после обнаружения его системой и однократного старта требуемой службы.

К вопросу об осуществлении доступа к названой части Raspbian из Windows. Проблемы в конкретном случае нет, по причине использования на загрузочном разделе файловой системы FAT32, родной для старших ОС от Microsoft. Здесь главное — наличие самого физического устройства чтения SD-карт.
Соединение
Итак, с моментом активации Secure shell на малинке разобрались. Осталось подключиться к ней через сеть и опробовать возможности протокола по управлению консолью Raspberry Pi.
Из Linux или MacOS
В составе дистрибутивов Linux или MacOS стандартно идет в поставке утилита «ssh», запуск которой производится из терминалов названых операционных систем. Для присоединения к малинке потребуется знать IP-адрес самого одноплатника в сети. Итак, в целях организации доступа к Raspberry Pi ssh набираем в консоли:
ssh pi@<ip адрес одноплатника>
Ответом будет запрос пароля, который по умолчанию проходится нажатием «Enter». Следом уже откроется командная строка малинки, предоставляя доступ к консоли одноплатника.

В том случае, когда стандартное имя пользователя было изменено, новое указывается в продемонстрированной ранее командной строке, вместо «pi». Хотя можно сделать проще, вообще убрав все что написано до «@», с ним включительно, из параметров запуска ssh и ввести логин и пароль (если установлен) непосредственно в высветившееся приглашение «login as:».
Из Windows
Контроль по протоколу Secure shell из Microsoft Windows производится с использованием сторонней и бесплатной программы «PuTTY». Найти ее достаточно легко, введя название в строку поиска Яндекс или Google и скачав архив, предлагаемый на страницах по высветившимся ссылкам.

Открыв программу (можно от обычного пользователя), для подключения переходят в раздел «Session». Далее, во вкладке окна на экране, ставится выбор переключателя групп «Connection type» в позицию «SSH». Следом заполняется поле «Host Name (or IP-adress)» собственно адресом малинки. «Port» должен быть равен 22. «Saved session» вводится по желанию — потом можно использовать сохраненную информацию методом двух кликов без ручного ввода. Окончательным действием с целью осуществления подключения будет нажатие кнопки «Open», после которого уже высветится присоединенное окно консоли к Raspberry PI с предложением ввести имя пользователя.

Некоторые замечания
После настройки доступа по Secure shell рекомендуется озаботиться безопасностью подключения, даже в том случае, если малинка будет использоваться в качестве не присоединяемого к internet оборудования. Как говорится — в безопасности нужно предусмотреть все. Рано или поздно, возможно будет сделан глобальный выход в сеть. А уж там зависит организация безопасного доступа от элементарной забывчивости. Можно попросту поленится или «забегаться» и не установить пароль для логина или sudo, оставив все по умолчанию. Соответственно, другими словами, предоставив в собственное распоряжение потенциального злоумышленника, вычислительные мощности Raspberry PI работающего в локальной сети.
Основные рекомендации по безопасности, все команды в отношении которых выполняются в консоли малинки:
- Установка пароля root. Делается одним из двух методов, через
sudo raspi-config
с выбором второго пункта программы и действиями в рамках инструкций на экране. Другой способ проще — в командной строке набирается
sudo passwd root
с последующим вводом пароля и его подтверждения, устанавливаемого в строках «Enter new UNIX password» и «Retype new UNIX password»: Последняя приведенная на скриншоте команда «sudo passwd — unlock root» разблокирует учетную запись администратора, которая в свою очередь еще пригодится впоследствии.
 - Ограничение использования sudo без пароля. Выполняется, открыв файл конфигурации доступа для редактирования командой
sudo visudo /etc/sudoers.d/010_pi-nopasswd
и заменив в строке с пользователем по умолчанию запись на pi ALL=(ALL) PASSWD: ALL. В том случае, если был внесен новый логин требуется приведенную строку указать и для него, вписав ее после имени внесенного, используемого при входе в систему. - Добавление нестандартного пользователя (вписывается вместо <логин>) и удаление старого. Здесь требуется дать следующие команды:
sudo -s

# добавляем пользователя. После ввода команды будет спрошен пароль

# для нового пользователя строкой, содержащей «password»

adduser <логин>

# даем ему права (участие в группах доступа)

usermod -a -G

adm,dialout,cdrom,sudo,audio,video,plugdev,games,users,input,netdev,gpio,i2c,spi <логин>

# удаление стандартного pi. Но есть нюанс – в документации к

# Raspberry PI выражена рекомендации этого не делать, так как в

# некоторых приложениях он должен присутствовать в системе

pkill -u pi

deluser -remove-home pi

 Последняя приведенная на скриншоте команда «sudo passwd — unlock root» разблокирует учетную запись администратора, которая в свою очередь еще пригодится впоследствии.
Если стандартного пользователя не удалять (последние две строки игнорировать к вводу), — рекомендуется задать ему пароль, отличный от установленного по умолчанию. Выполняется действие набором «sudo passwd pi» в консоли.
Что еще
Отдельно хотелось бы рассмотреть случай подключенных пользователей по SSH с возможностью сжатия трафика. В Linux и MacOS для запуска режима компрессии используется модификатор команды с опцией «-C». Соответственно вызов программы доступа приобретает вид:
ssh -C <адрес малинки>
Работает метод сжатия не только в случаях удаленного контроля консоли по SSH, но и отправки файлов с использованием протокола Secure shell. Здесь применяется команда scp, входящая в общий пакет программ удаленного контроля. Формат со сжатием, для копирования файла из малинки:
scp -C pi@<адрес малинки>:<путь к файлу вместе с его именем> /куда/положить/файл
Ну или с использование ssh обратно, на Raspberry PI:
spc -C <имя файла> pi@<адрес малинки>:/куда/положить/файл

Проблемы соединения
Казалось бы, подключились после настройки. А, нет, иногда случается ошибка «Raspberry pi ssh connection refused». При этом до малинки пинг в сети идет. Причина тут может быть только одна — Secure shell не запущен или блокируется фаерволом внутреннего роутера или самой ОС. Требуется вначале проверить состояние SSH подключившись к Raspberry Pi непосредственно, затем посмотреть настройки операционной системы клиента на предмет поиска ограничений сетевых протоколов. Ну и если не поможет — разбираться конкретно с блокировками маршрутизатора.