Steam – уникальная игровая онлайн-платформа, собравшая под своей «крышей» миллионы пользователей. Здесь представлена огромная коллекция не только игр, но и различных программ, видеоинформации. Для использования платформы нужно быть зарегистрированным пользователем системы. Пользователю также необходимо установить на свой компьютер или мобильное устройство приложение Стим, либо использовать его в веб-браузере.
Обратите внимание: В данной статье речь пойдёт о нюансах установки Steam на компьютер, работающий под операционной системой Windows. Данная информация вряд ли понадобится тому, кто при установке приложения полагается исключительно на файл-инсталлятор. Данная инструкция пригодится тем, кто предпочитает управлять процессом установки программ, выбирая для её файлов конкретную папку на своём компьютере.
Изменение пути установки и загрузки файлов
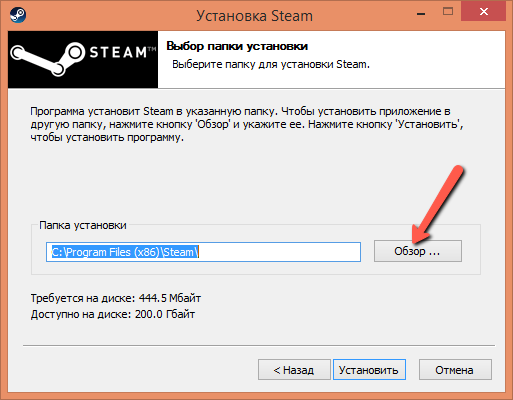
Итак, путь установки в Steam. По умолчанию файлы приложения инсталлируются в системный каталог C:Program FilesSteam(x86), но, к радости многих пользователей, этот процесс управляемый, и пользователь сам может выбрать путь – другой диск и конкретную папку, которую пожелает.
Это что касается самого приложения Стим. Но, как известно, работая в программе, пользователь загружает из базы данных Стима различный контент, который по логике должен складываться в одну из дочерних папок самого Стима. По умолчанию все игры падают в папку «Commons», но и её при желании можно изменить.
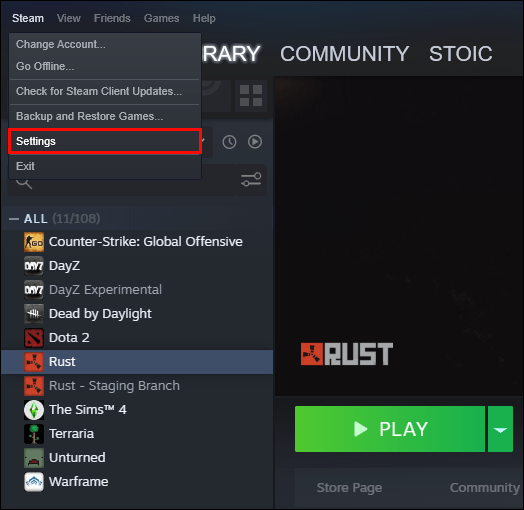
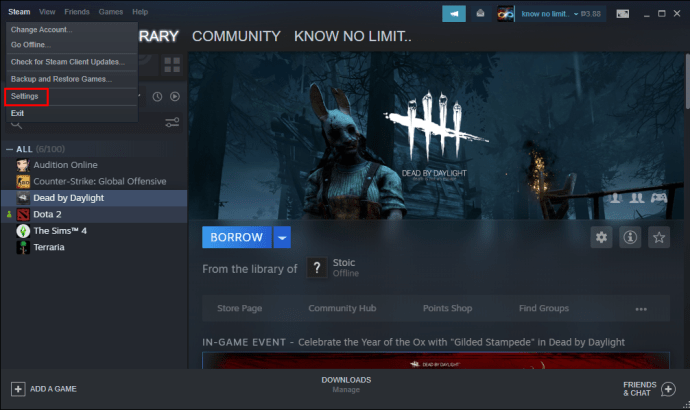
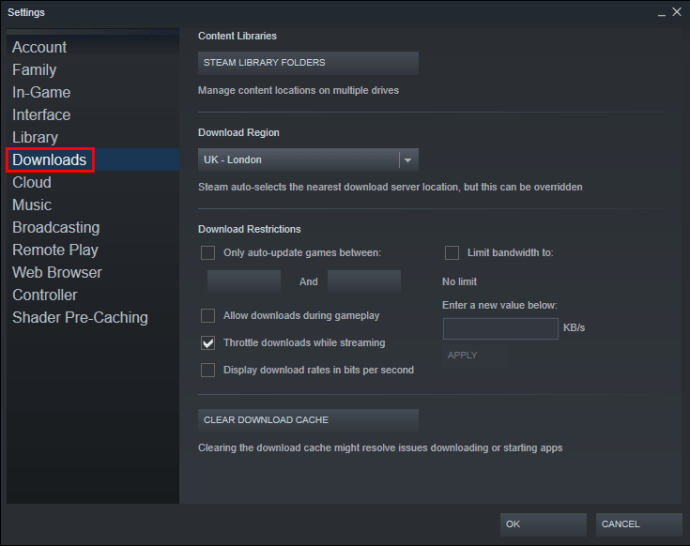
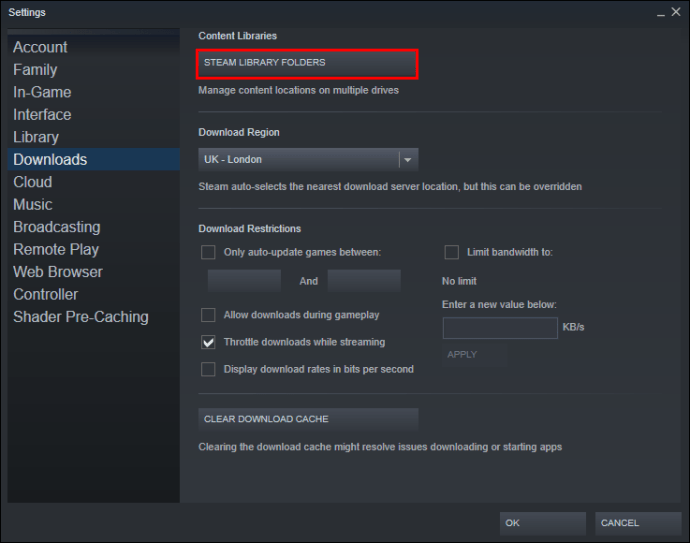
Для того, чтобы в программе изменить папку загрузки необходимо кликнуть мышь по слову Steam в левом верхнем экране десктопного приложения и перейти в раздел «Настройки». В данном разделе нужно выбрать пункт «Загрузки» и в нём кликнуть по слову «Библиотеки» в правом окне сверху. Это и есть тот самый раздел, который отвечает за сохранность игр на компьютере пользователя.
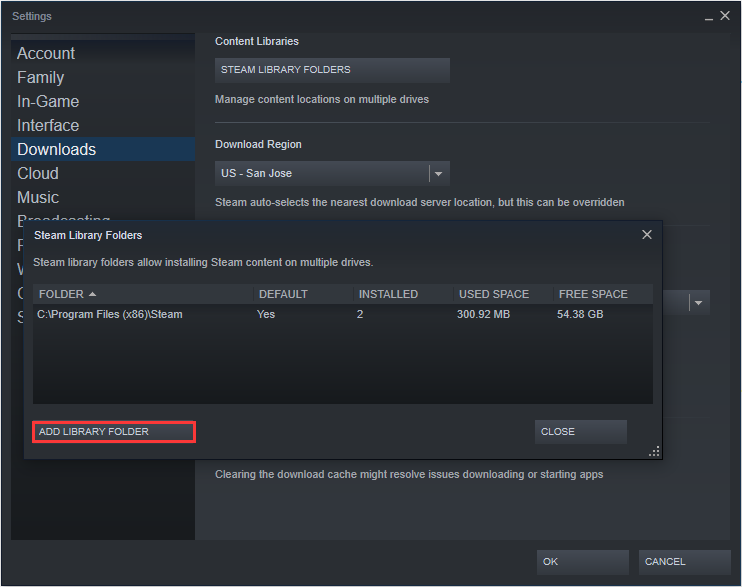
Следующий шаг – нажать на кнопку «Папки библиотеки Steam» (1), затем нажать на кнопку «Добавить папку» (2), которая располагается ниже.
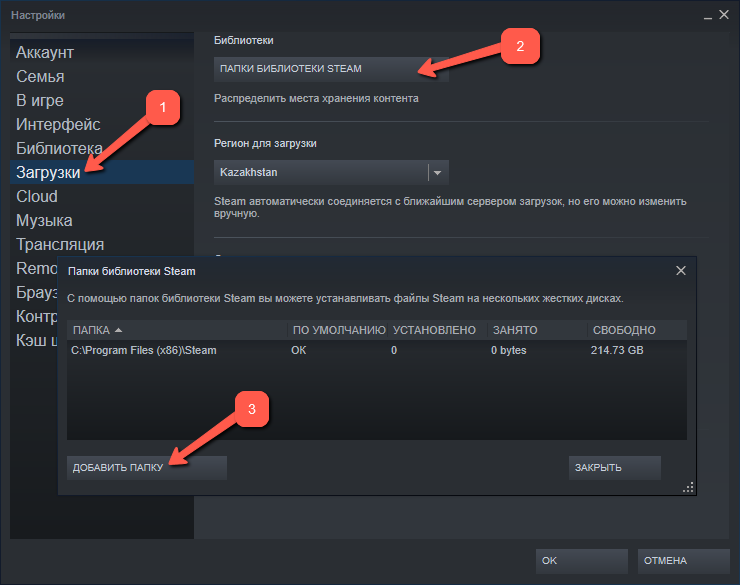
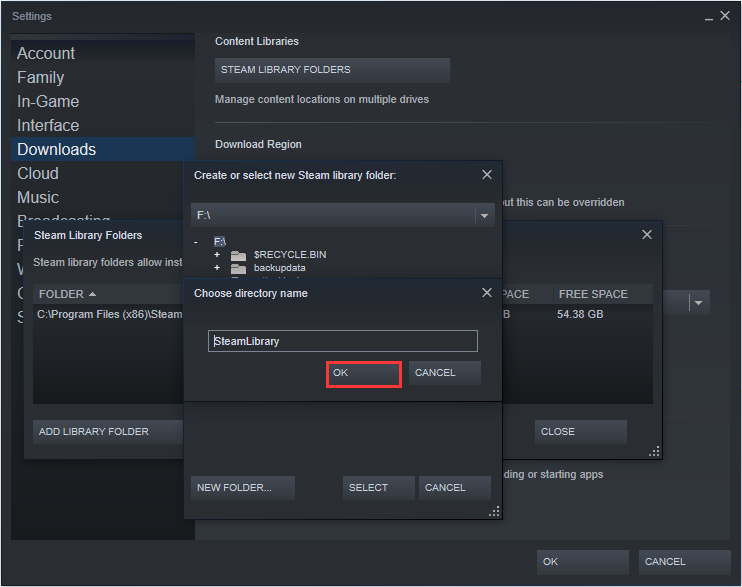
Откроется аналог проводника, в котором будет отображён список папок. Нужно выбрать нужную папку. Чтобы сделать какую-то библиотеку по умолчанию, пользователю необходимо выделить её название правой кнопкой мыши.
Перемещение библиотеки
Желание изменить путь сохранения информации у пользователя может возникнуть спонтанно. Но за его плечами – года игрового опыта, а значит богатейшая коллекция библиотек, которые хранятся по традиции во вложенных папках приложения. Наверное, будет разумным переместить всё нажитое добро по новому месту «проживания» контента – в ту папку, которая была указана пользователем в предыдущем пункте.
Внимание: данный алгоритм требует особого внимания, так как никто не застрахован от ошибки при переносе данных. Чтобы обезопасить себя от возможных ошибок, рекомендуется сделать копию папки с библиотеками, чтобы можно было исправить ситуацию.
Чтобы переместить коллекцию игр, необходимо:
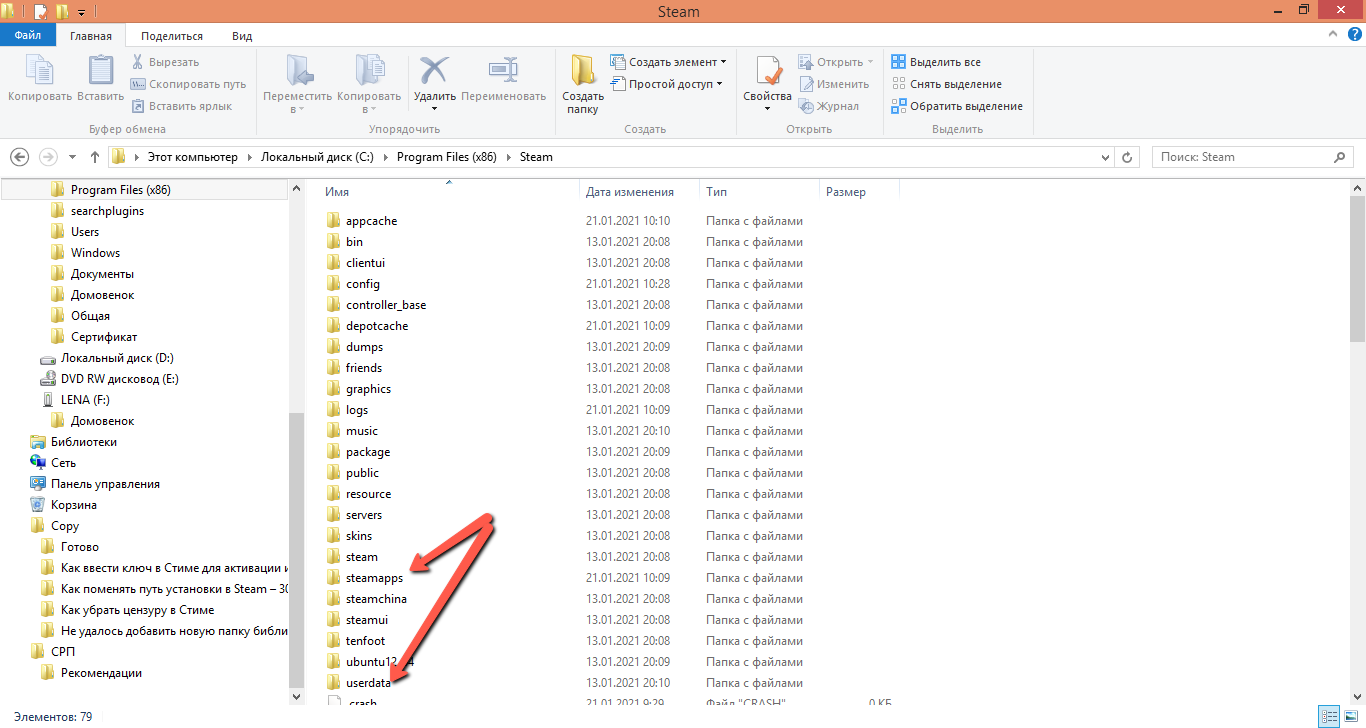
- Открыть папку с файлами Steam по старому «адресу»,
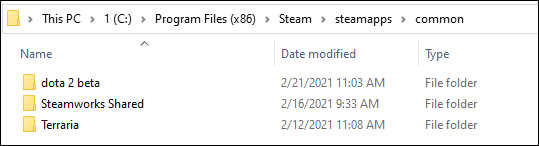
- Удалить в ней всё содержимое, кроме SteamApps, Userdata и Steam.exe,
- Вырезать папку из старого месторасположения и вставить в ту папку, где теперь располагаются файлы Стима,
- Запустить приложение, авторизоваться в аккаунте и проверить доступ к старым библиотекам.
И всё-таки смена «местожительства» файлов Steam – это не то действие, которое рекомендуется пользователям выполнять часто. Навести порядок в файлах лучше всего раз. Также это можно сделать, к примеру, тогда, когда жёсткий диск переполнен и требуется перемещение информации на другой диск. А ещё лучше – довериться разработчику и оставить всё, как есть!
( 4 оценки, среднее 2 из 5 )
В последние годы игры стали намного больше и занимают значительную часть вашего накопителя. В результате Steam решил предоставить своим пользователям возможность перемещать выбранные игры на другой диск. Таким образом, нет необходимости повторно загружать огромное количество гигабайт для переноса нескольких файлов игры в другое место. Однако многие геймеры могут быть не знакомы с этой функцией. Вот почему мы придумали простое руководство, которое покажет вам, как перенести игры Steam на другой диск.
Поскольку Steam позволяет использовать несколько папок библиотек, вы можете решить, где будут установлены ваши игры после их загрузки. Кроме того, теперь компания позволяет своим пользователям перемещать эти игры после завершения загрузки. До недавнего времени этот процесс был очень сложным, но сейчас история совсем другая.
Перемещение Steam-игры на другой внутренний или внешний диск — простой процесс, но время, необходимое для переноса файлов игры, зависит от скорости диска и размера игры. Этот процесс создает новую папку в выбранном вами разделе или накопителе.
Примечание. При использовании внешнего накопителя на нескольких компьютерах операционная система должна быть одинаковой на каждом устройстве, поскольку каждая операционная система имеет разные коды Steam, плагины и данные для работы. Если вы подключите диск к Ubuntu, он перезапишет файлы Windows, чтобы заставить его работать в Linux. То же самое касается и наоборот.
Вот как перенести игры Steam на другой драйвер.
Как перенести сразу несколько игр Steam на другой диск
Если вы хотите переместить все свои игры Steam или пакетно переместить некоторые из них на другой диск, выполните следующие действия:
Как переместить все игры Steam с помощью проводника Windows
Как изменить местоположение вашей библиотеки Steam
Вы также можете изменить расположение своей библиотеки Steam:
Дополнительные часто задаваемые вопросы
Если мы оставили некоторые вопросы без ответа, обратитесь к разделу часто задаваемых вопросов ниже.
Почему вы перемещаете игры Steam на другой диск?
Пользователи обычно решают перенести свои Steam-игры на другой диск по двум причинам. Первая причина в том, что на диске с установленными играми steam больше нет свободного места.
По умолчанию ваши стим-игры будут установлены на диск C, но ваши программы и игры могут запросто занять все его место. Со временем панель разделов станет красной или диск будет заполнен до краев. Чтобы предотвратить этот сценарий, пользователи Steam предпочитают перемещать свои игры Steam в раздел с большим количеством свободного места.
Другая причина заключается в том, что геймеры хотят перенести свои игры на твердотельный накопитель (SSD), чтобы сократить время загрузки. Это связано с тем, что твердотельные накопители имеют гораздо более высокую скорость передачи данных, чем жесткие диски (HDD). В результате игры, перенесенные на SSD, будут загружаться намного быстрее.
Как перенести существующую установку Steam?
Вот как вы можете перенести существующую установку Steam на другой жесткий диск:
• Выйдите из своей учетной записи Steam и закройте приложение.
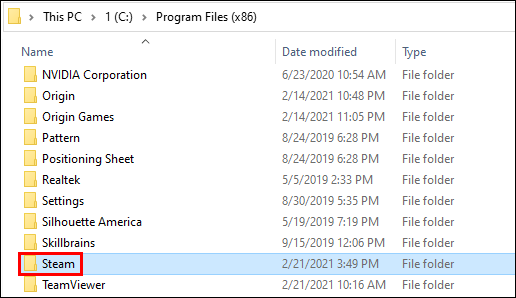
• Перейдите в папку, содержащую вашу установку Steam. Он должен быть в ваших Program Files на диске C.
• Удалите находящиеся там папки и файлы, но сохраните папки Steam.exe File и SteamApps Userdata.
• Вырежьте папку Steam и вставьте ее в другое место. Например, вы можете разместить его где-нибудь на диске D. Когда вы загружаете свои будущие игры, они будут сохраняться в вашей новой папке.
• Откройте Steam, введите данные для входа и подождите, пока программа завершит обновление. После этого вам нужно будет проверить целостность ваших файлов.
• Для этого перезагрузите компьютер и откройте Steam.
• Выберите «Управление», а затем «Свойства».
• Нажмите «Локальные файлы» и нажмите «Проверить целостность файлов игры…».
Как перенести файлы сохранения из Steam?
Если вы перемещаете игру в другое место, хорошей идеей будет также перенести сохраненные файлы.
• Найдите папку с игрой, щелкнув правой кнопкой мыши по названию в библиотеке Steam.
• Выберите «Свойства» и нажмите «Локальные файлы».
• Нажмите «Обзор локальных файлов», чтобы перейти к расположению файлов игры. Открой это.
• Скопируйте файлы папки хранилища и вставьте их в место на другом диске.
• Удалите содержимое вашей предыдущей папки хранения.
• Запустите игру с нового диска, и сохраненные файлы должны загрузить ваш текущий прогресс.
Как я могу переместить всю папку Steam на другой диск?
Перемещение всей папки Steam работает так же, как перемещение установки Steam:
• Выйдите из своей учетной записи и закройте приложение.
• Просмотрите текущую папку установки Steam в Program Files.
• Удалите все файлы и папки, кроме папок Userdata и SteamApps и файла Steam.exe.
• Вырежьте папку Steam и вставьте ее в новое место.
• Откройте клиент и войдите в свою учетную запись. Дождитесь завершения обновления и проверьте целостность ваших файлов.
Повысьте свой игровой опыт
Перенести паровые игры на другой диск можно несколькими быстрыми и простыми шагами. Большинство из них сводятся к созданию дополнительной библиотеки и перемещению ваших игр в новое место. Итак, если вам нужно освободить место или вы хотите запускать игры на более быстрых настройках, теперь вы знаете, как сделать и то, и другое.
Пробовали ли вы перенести игру Steam на другой диск? Сталкивались ли вы с трудностями на пути? Расскажите нам в разделе комментариев ниже.
Главная » Уроки и статьи » Софт
Многие начинающие пользователи не знают, как изменить место установки игр в Steam. Сделать это довольно просто. Однако важно понимать, что это не изменит расположения уже установленных приложений.
Выбор места хранения
По умолчанию сервис всегда создает библиотеку на диске C. Чтобы это изменить, следует зайти в параметры, которые можно найти, нажав по самой первой кнопке в левом углу.

В левой части открывшегося окна можно увидеть вкладку «Загрузки». Кликнув по ней, нужно обратиться к верхней правой части окна: там будет выбор библиотек. Если нажать по кнопке, можно заметить список папок, свободное место и прочие показатели. В этом маленьком окне есть возможность добавить новую папку.

Выбранный путь изначально не будет стоять по умолчанию. Чтобы игры сразу же устанавливались по нему, следует в перечне библиотек кликнуть по нему ПКМ и выбрать соответствующий пункт.
Как в Steam поменять расположение уже установленной игры
Данная процедура уже считается более сложной. Кроме того, в некоторых случаях она может приводить к нестабильной работе сервиса или приложения. Поэтому перед тем, как перемещать игру, рекомендуется создать резервную копию всех файлов или хотя бы папки SteamApps. В противном случае может понадобиться переустановка всех приложений.
Осуществлять процедуру обязательно следует, предварительно выключив сервис. После нужно найти папку сервиса. Ее местонахождение может варьироваться в зависимости от усмотрений пользователя, однако чаще всего она располагается в Program Files. В папке требуется удалить все файлы, за исключением ярлыка и папок, подчеркнутых на скриншоте ниже:

После этого папку Steam можно спокойно вырезать и вставить в желаемое место. Перед тем, как запускать какую-либо игру, рекомендуется проверить, не повредились ли ее файлы. Для этого необходимо кликнуть по игре и выбрать «Свойства». В новом окне требуется выбрать следующий раздел:

В нем можно заметить соответствующую кнопку. Проверка может занимать некоторое время.
Необходимо отметить, что при подобном перемещении все игры, которые будут устанавливаться в будущем, тоже будут располагаться по новому адресу. При этом старое место хранения использоваться не будет.
Изменить место установки очень просто: требуется только найти нужный раздел в настройках. А вот сменить место «жительства» уже установленных приложений не такая легкая задача. Поэтому, чтобы избежать негативных последствий, следует всегда создавать копию наиболее важных папок.
Понравилось? Поделись с друзьями!
Дата: 23.06.2021
Автор/Переводчик: Wolf
Many users install Steam games to the default C drive. However, they realize that games usually occupy a lot of space. When they realize the issue, they may find the drive is full. And they want to move steam games to another drive. How to move steam games to another drive? You may find answers in this post.
Steam is a video game digital distribution platform developed by Valve Corporation. It was launched in September 2003 as a way for Valve to provide automatic updates to their games, but eventually expanded to include non-Valve games from third-party publishers.
You can browse the newest and most popular games on Steam. You can download or purchase the game you like. Many PC gamers download a lot of games through Steam.
However, they may face some issues as well, such as steam not opening, unable to move steam games to another drive or steam disk write error while installing/updating. Among the issue they encountered with steam, many users are asking how to move steam games to another drive on the Internet.
Well, at this time, some people may be confused: why do you need to move steams games to another drive? To get the answers to the question and find out effective solutions, you may continue to read this article.
Why Do You Move Steam Games to Another Drive
There are two main reasons that users want to move steam games to another drive.
Reason 1. The drive that has steam installed run out of free space.
By default, Steam will drop the game files into your C drive, but C drive is easily to run out of space due to various installation files and desktop files. Gradually, the C drive will be filled up or the partition bar gets red. To avoid this situation, users would like to move steam games to a larger partition.
Reason 2. Users want to move the games to SSD so as to enjoy faster speed and better performance.
Moving and installing games to an SSD can reduce the load times, because the data transfer speed of SSDs is significantly higher than that of HDDs. You can test the speed of SSD and HDD via third-party disk benchmarking tool.
The games will load faster if you move steam games to SSD. So that’s the reason why some users want to move steam games to anther drive.
According to the above reasons, you should know the reasons for moving steam games to another drive. Well, how to move steam games to another drive? If you think that moving steam games to another drive is necessary for you, you can follow the steps below to start moving steam games.
For a quick guide, watch this video:
Method 1. Move Games with the built-in Move Install Folder Feature
Steam’s embedded feature enables you to move individual games to a new library or drive. Want to learn the detailed steps? Please continue to read.
With the Move Install Folder feature, you can move individual games to new library or drive, but if you want to move multiple games to another drive at once, you will need the assistant of tools like Steam Library Manager and Steam Mover.
Steam also allows you to have multiple download folders via Add Library Folder, which means you can store the games to another drive by adding a steam library on the drive you want.
After creating a new steam library folder on another drive, you can easily move steam games to another drive without re-downloading it via Move Install Folder feature. Make sure your Steam is up to date in order for the below instructions to work.
Now let’s see the detailed steps toward the question how to move steam games to another drive without redownloading.
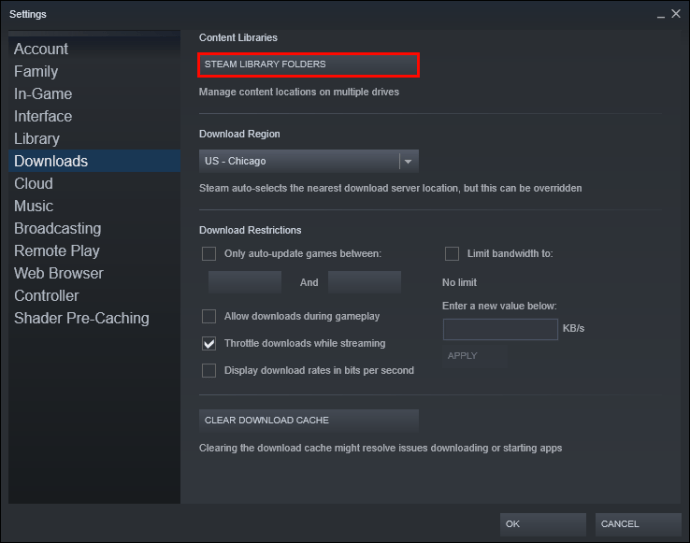
Step 1. Open Steam, and locate to Settings > Downloads > Steam Library Folders > Add Library Folder.
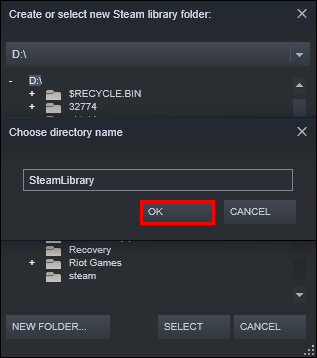
Step 2. Then choose a different drive and create a new folder. Name it and then click OK and SELECT to continue.
Step 3. Then you will find the folder listed in the Steam Library folders list. You can now close this window. Once you have created the new path, all future installations can be installed there.
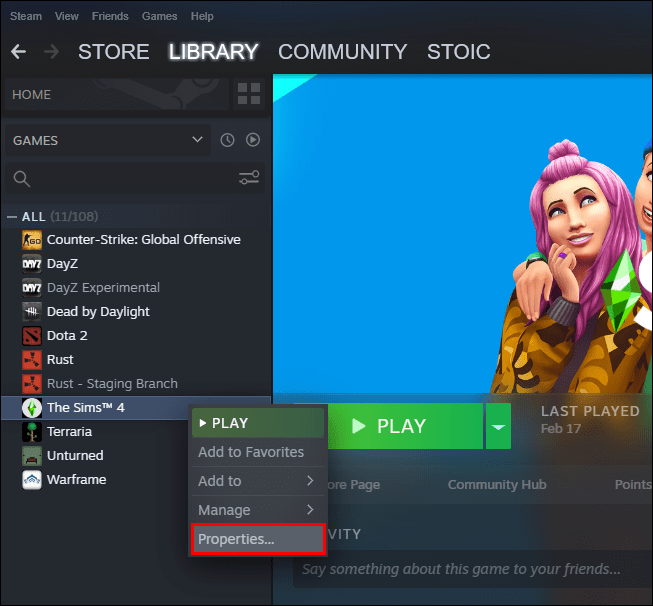
Step 4. Click LIBRARY to pen your Games library, and right click on the game you want to move, and then choose Properties.
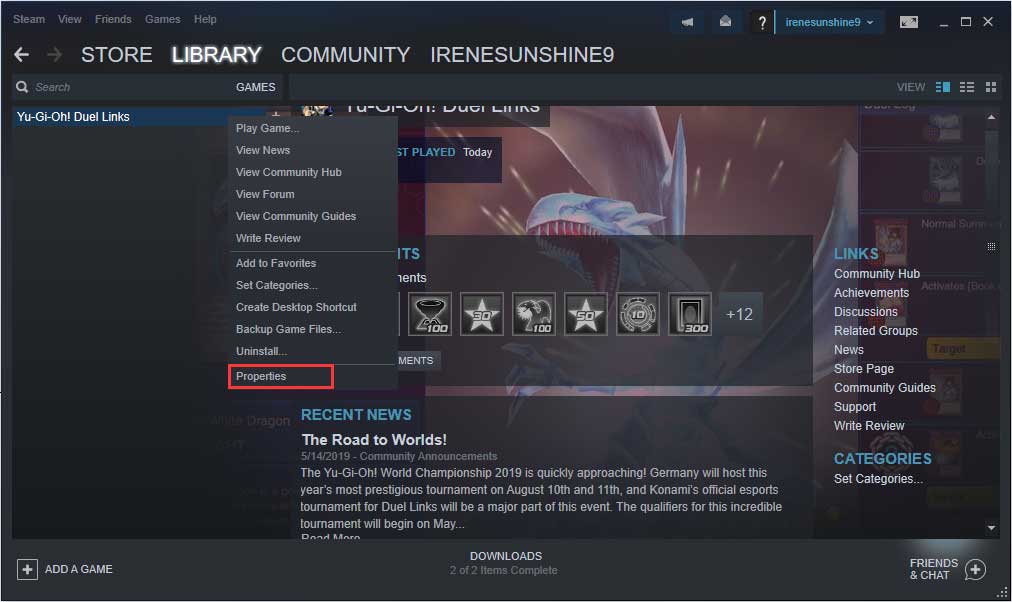
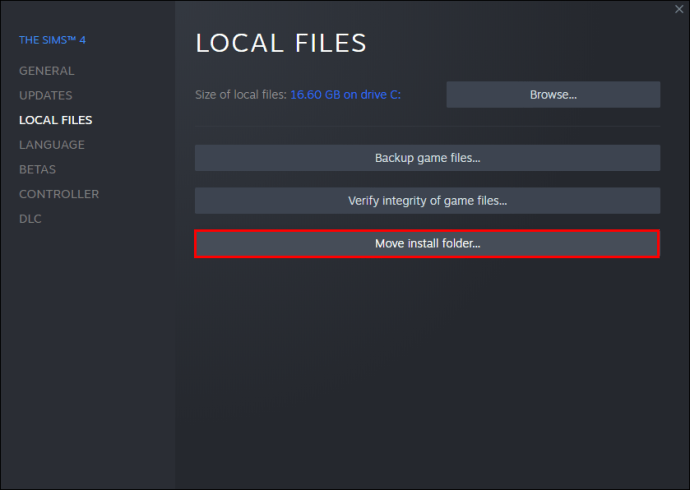
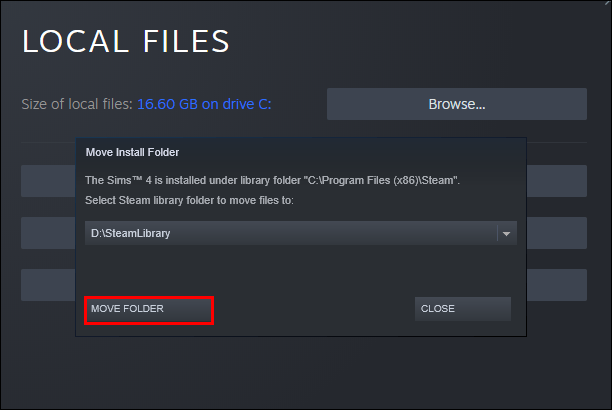
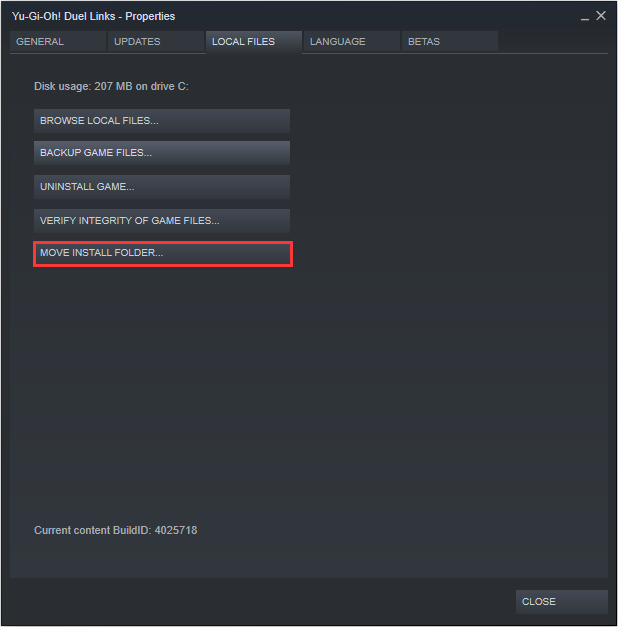
Step 5. Switch to the Local Files tab and click the button Move Install Folder.
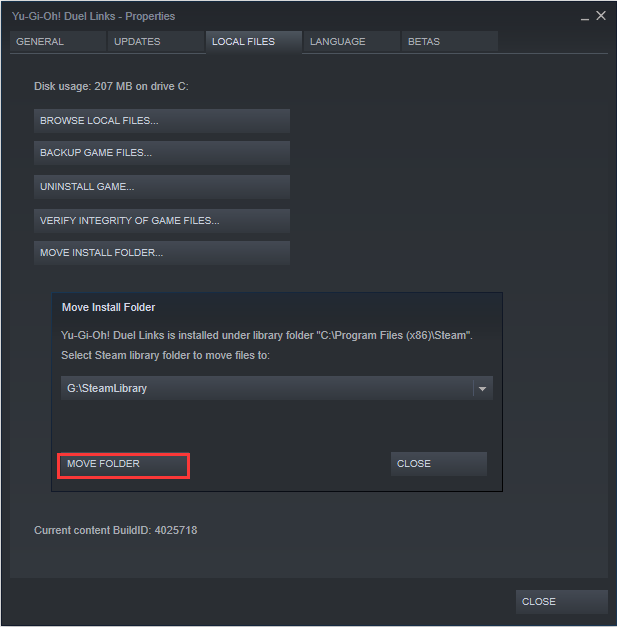
Step 6. Click on Move Folder, and it will start moving steam games to another drive. Completion time will depend on the size of the game.
You can try this way to move steam games to another drive one by one. However, if you want to move multiple games to another drive, you may try the following methods.
Method 2. Move Steam Games to Another Drive with Steam Library Manager
Steam Library Manager is a tool that can help you manage Steam libraries. On the main interface of Steam Library Manager, it lists all the Libraries on your PC, and games available in each of these libraries. Steam Library Manager can help you copy, move or backup your games.
Steam Library Manager enables you to drag and drop the games from one library to another at ease. You can use the Task Manager section to move in batches. The detailed steps about how to move steam games to another drive with Steam Library Manager are shown as below.
Step 1. Download Steam Library Manager via the official website.
Step 2. On the main interface of Steam Library Manager, you can see the created steam library and what games they stored. Drag the game to the library you want to move it to.
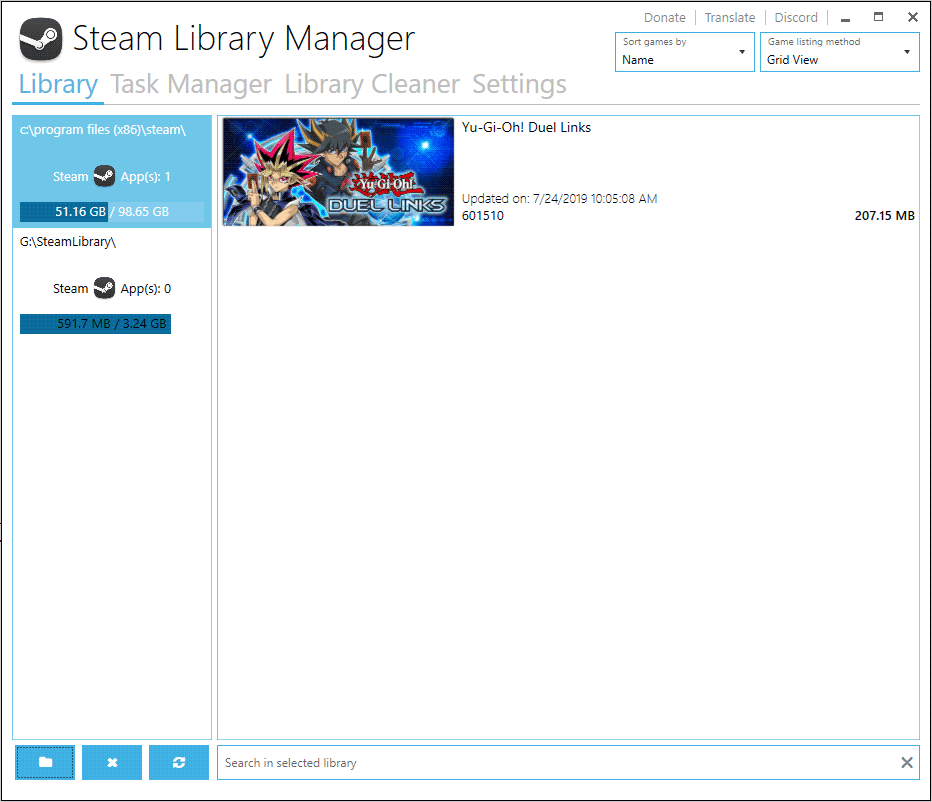
Step 3. Locate to Task Manager tab. The games you are going to move will be listed here. You can move multiple games and then click Start button to move steam games to another drive.
Step 4. When the games are moving, you will see a log getting generated. If there is a problem, it will make it clear to you.
Steam Library Manager makes it easy to move Steam games. You can download the Steam Library Manager from its official site and have a try if you don’t know how to move a steam game to another drive.
Try using the tool Steam Library Manager to move steam games to another drive or backup Steam games now.
Method 3. Move Your Entire Steam Install
You can move your entire Steam to another drive, which will move all your Steam games to another drive. If you don’t know how to move steam to another drive, you can refer the following steps.
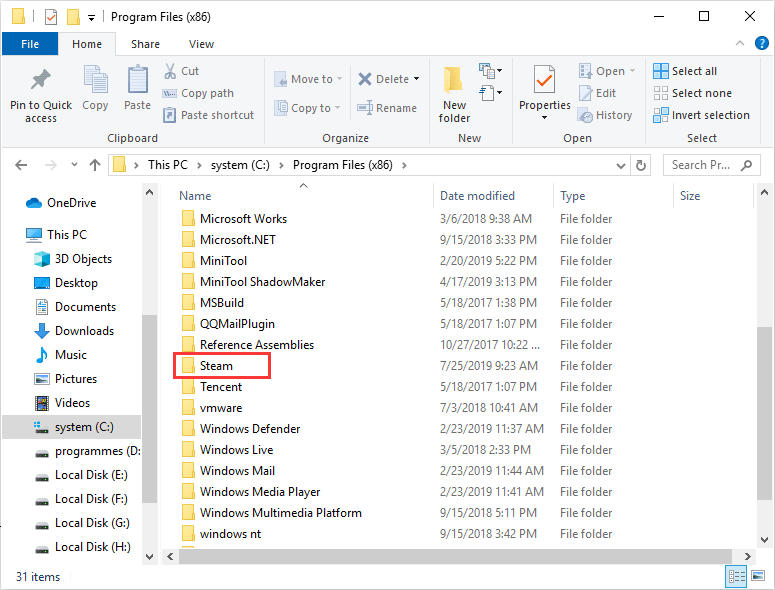
Step 1. Close Steam and locate to your Steam folder via Windows File Explorer. The path could be C:Program Files(x86)Steam.
Step 2. Copy and paste your Steam folder to the new drive.
Step 3. Rename the old folder and leave it in the original directory as a backup — or you can delete it later.
Step 4. Run the Steam.exe from the new location and create a new shortcut.
To move steam to another drive is very simple. After it is completed, you can check if your games can be launched as normal.
Extend the Partition with Steam Games Installed
Actually, apart from the above methods to move steam games to another drive, you can also extend the drive that you store steam games.
If not enough free space is the reason that you move steam games to another drive, you can follow the steps as below to extend partition. And the procedures are very simple. In this case, you don’t need to move steam to another drive.
Here is the tutorial
MiniTool Partition Wizard Pro Edition is a professional partition manager for Windows users with many advanced features included. You can utilize this partition manager to extend partition, resize partition, recover lost partition, convert NTFS to FAT32 without data loss, copy disk, rebuild MBR and so on.
If you want to extend C drive, it is recommended to use the MiniTool Partition Wizard Bootable Edition, which can be created by the Bootable Media embedded in MiniTool Partition Wizard Pro Edition.
If your game files are not stored in C drive, you can use MiniTool Partition Wizard Free Edition to extend other partitions in Windows 10/8/7 directly. Choose the one you need to download by clicking the following button.
Buy Now
Free Download
After installing MiniTool Partition Wizard on your PC, you can launch it to get the main interface and then follow the steps below.
Step 1. Create a bootable USB drive with MiniTool Partition Wizard Pro Edition. And boot from the drive ( if you are not extending C drive, you can skip this step.).
- Click Bootable Media on the upper right corner of the main interface
- Select WinPE-based media with MiniTool plug-in to continue
- Follow the prompts to create a bootable USB drive
- Enter BIOS to set the USB as the first boot order and boot from it
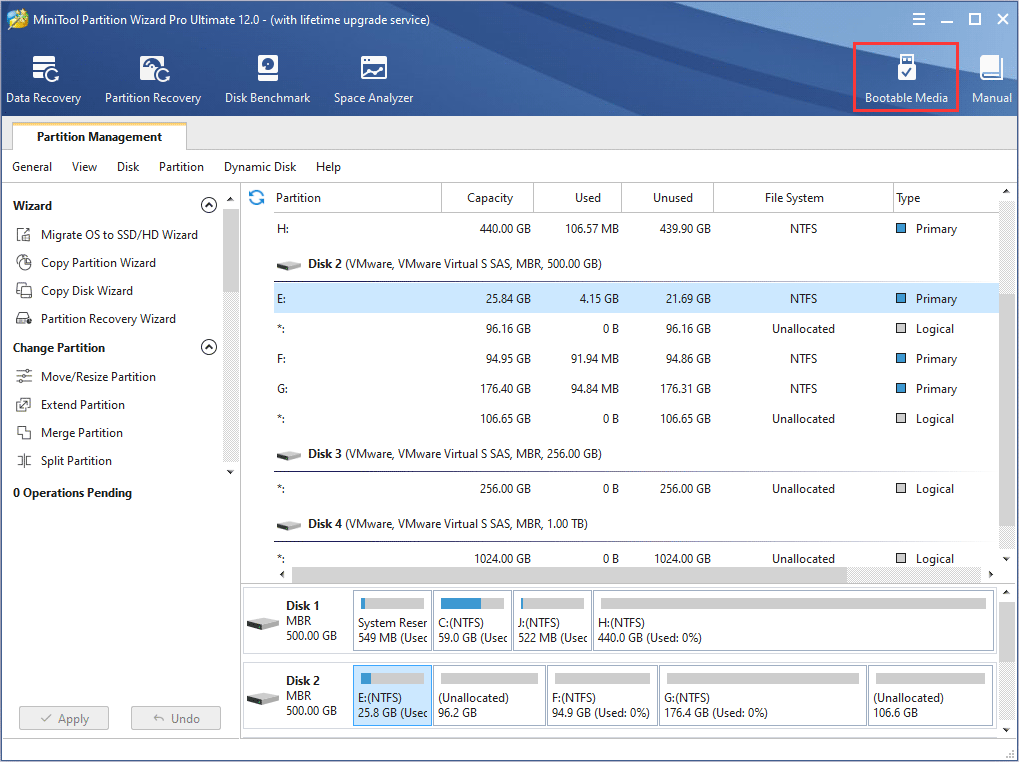
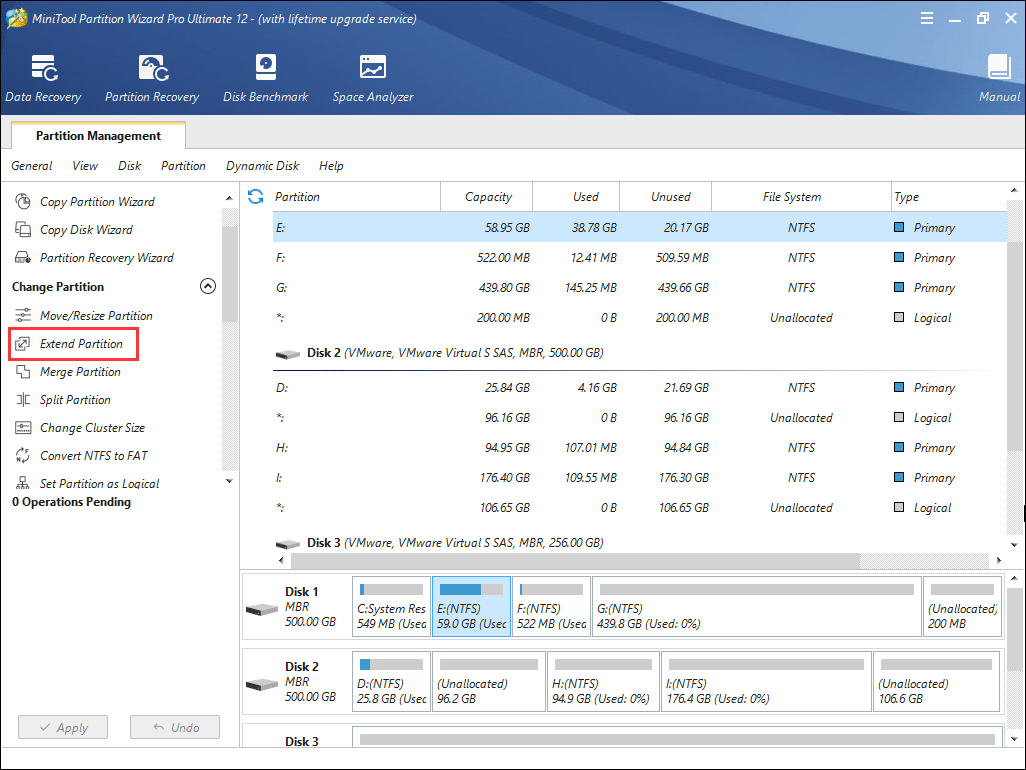
Step 2. When you get the main interface of MiniTool Partition Wizard Bootable Edition, you can choose the partition and click Extend Partition.
Tip: In the MiniTool Partition Wizard Bootable Edition, all partitions will be assigned a drive letter including system reserved partition and EFI partition. So all the partition’s drive letter has been changed. You can explore the partition to check if you choose the right partition.
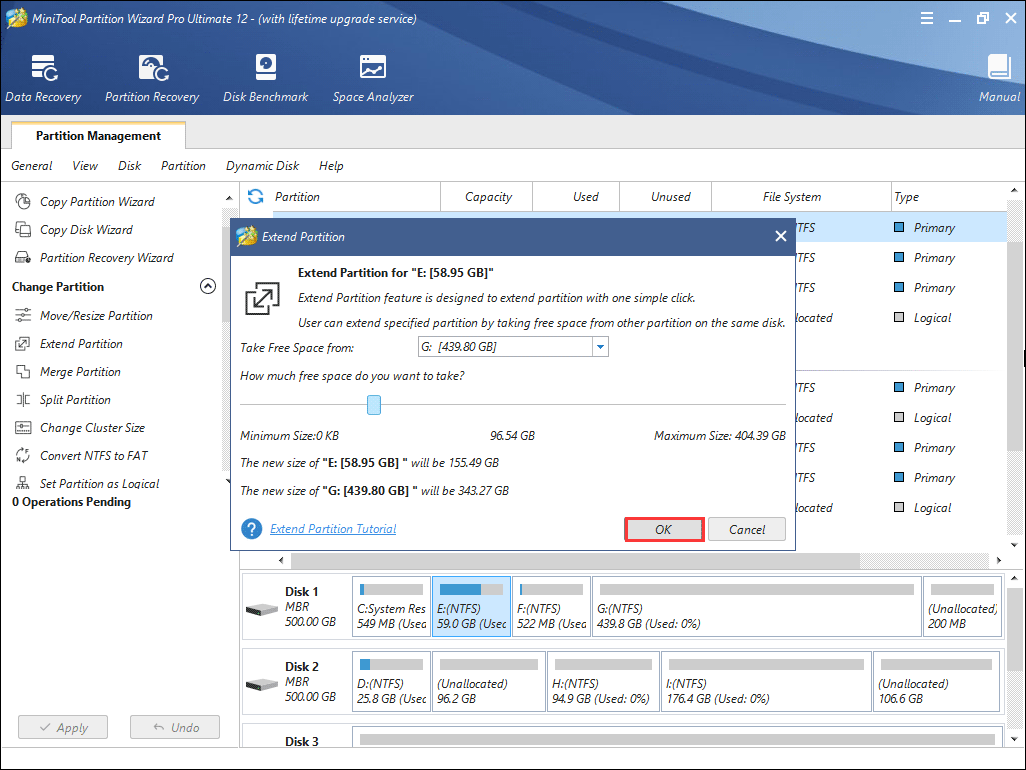
Step 3. Choose a partition or unallocated space to take some free space from it. Then click OK to continue.
Step 4. At last, click Apply to allow the pending operations.
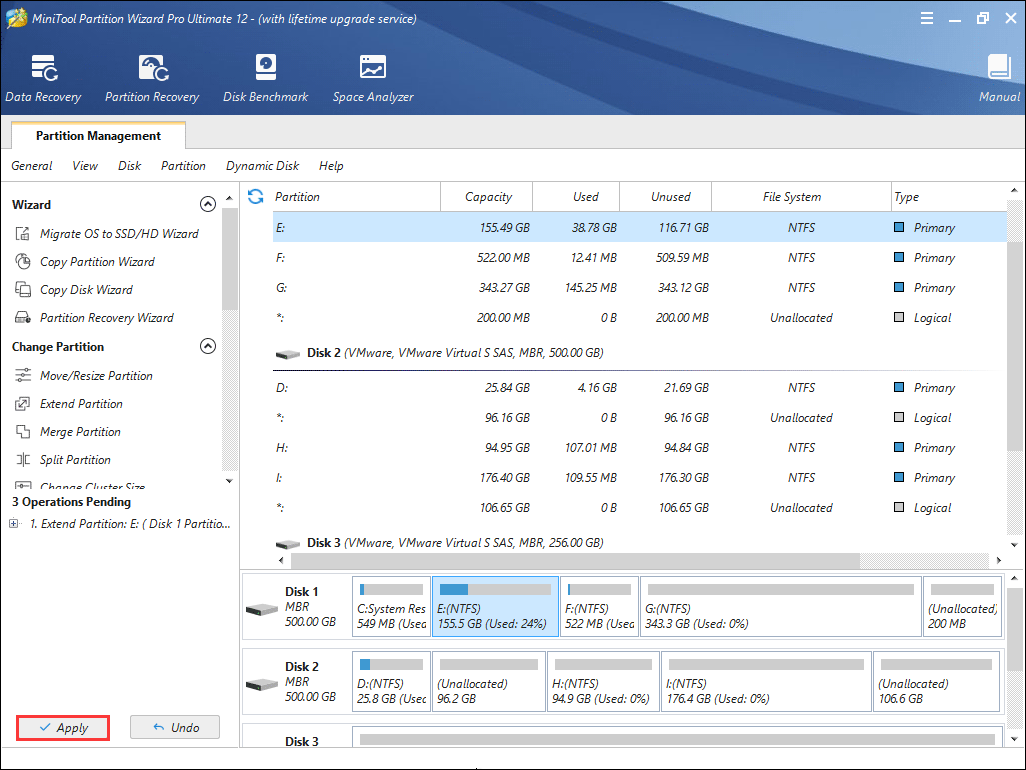
When it is completed, you can see that the C drive has been enlarged. You don’t need to move steam games to another drive and the running speed of your PC will be boosted. It is a good solution if you find that the process of moving steam games to another drive is complicated for you.
With the help of MiniTool Partition Wizard, I successfully extended my C drive without data loss. Now I no longer need to move steam games to another drive because my C drive has enough free space.Click to Tweet
Bottom Line
You see, with very simple steps, you can move steam games to another drive or extend C drive easily. If you want to move steam games to SSD or extend C drive to get more free space to store games, you can follow the detailed steps and screenshots above.
If you have any question about how to move steam games to another drive or if you have other better solutions, you can leave a message in the following comment zone and we will reply as soon as possible. If you need any help when using MiniTool software, you may contact us via [email protected].
Move Steam Games to Another Drive FAQ
Can I move Steam games to another drive?
Launch Steam client, and locate to Settings > Downloads > Steam Library Folders > Add Library Folder. Select a different drive to create a new folder. Name the folder and it and click OK and SELECT. Click LIBRARY to open the Games library and right click on the game you want to move, and then choose Properties. Click Move Install Folder under the Local Files tab. Then click Move Folder to move Steam games to another drive.
How do I move my installed games to another drive?
You can move installed games with the built-in Move Install Folder Feature in Steam client. You can move installed Steam games to another drive with the application Steam Library Manager. You can also move your entire Steam to another drive, which will move all the installed Steam games to another drive.
How do I move Steam games to my SSD?
Go to Settings > Downloads > Steam Library Folders > Add Library Folder to create a new Steam library folder on SSD drive. Then utilize the Steam built-in Move Install Folder Feature or install Steam Library Manager to move your Steam games to SSD.
How do I change the location of fortnite?
Create a new Steam library folder on the drive that you want to move fortnite to. Open Games library, right click on the fortnite game and choose Properties. Under the Local Files, choose Move Install Folder and then click Move Folder tochange the location of fortnite to another drive.
Many users install Steam games to the default C drive. However, they realize that games usually occupy a lot of space. When they realize the issue, they may find the drive is full. And they want to move steam games to another drive. How to move steam games to another drive? You may find answers in this post.
Steam is a video game digital distribution platform developed by Valve Corporation. It was launched in September 2003 as a way for Valve to provide automatic updates to their games, but eventually expanded to include non-Valve games from third-party publishers.
You can browse the newest and most popular games on Steam. You can download or purchase the game you like. Many PC gamers download a lot of games through Steam.
However, they may face some issues as well, such as steam not opening, unable to move steam games to another drive or steam disk write error while installing/updating. Among the issue they encountered with steam, many users are asking how to move steam games to another drive on the Internet.
Well, at this time, some people may be confused: why do you need to move steams games to another drive? To get the answers to the question and find out effective solutions, you may continue to read this article.
Why Do You Move Steam Games to Another Drive
There are two main reasons that users want to move steam games to another drive.
Reason 1. The drive that has steam installed run out of free space.
By default, Steam will drop the game files into your C drive, but C drive is easily to run out of space due to various installation files and desktop files. Gradually, the C drive will be filled up or the partition bar gets red. To avoid this situation, users would like to move steam games to a larger partition.
Reason 2. Users want to move the games to SSD so as to enjoy faster speed and better performance.
Moving and installing games to an SSD can reduce the load times, because the data transfer speed of SSDs is significantly higher than that of HDDs. You can test the speed of SSD and HDD via third-party disk benchmarking tool.
The games will load faster if you move steam games to SSD. So that’s the reason why some users want to move steam games to anther drive.
According to the above reasons, you should know the reasons for moving steam games to another drive. Well, how to move steam games to another drive? If you think that moving steam games to another drive is necessary for you, you can follow the steps below to start moving steam games.
For a quick guide, watch this video:
Method 1. Move Games with the built-in Move Install Folder Feature
Steam’s embedded feature enables you to move individual games to a new library or drive. Want to learn the detailed steps? Please continue to read.
With the Move Install Folder feature, you can move individual games to new library or drive, but if you want to move multiple games to another drive at once, you will need the assistant of tools like Steam Library Manager and Steam Mover.
Steam also allows you to have multiple download folders via Add Library Folder, which means you can store the games to another drive by adding a steam library on the drive you want.
After creating a new steam library folder on another drive, you can easily move steam games to another drive without re-downloading it via Move Install Folder feature. Make sure your Steam is up to date in order for the below instructions to work.
Now let’s see the detailed steps toward the question how to move steam games to another drive without redownloading.
Step 1. Open Steam, and locate to Settings > Downloads > Steam Library Folders > Add Library Folder.
Step 2. Then choose a different drive and create a new folder. Name it and then click OK and SELECT to continue.
Step 3. Then you will find the folder listed in the Steam Library folders list. You can now close this window. Once you have created the new path, all future installations can be installed there.
Step 4. Click LIBRARY to pen your Games library, and right click on the game you want to move, and then choose Properties.
Step 5. Switch to the Local Files tab and click the button Move Install Folder.
Step 6. Click on Move Folder, and it will start moving steam games to another drive. Completion time will depend on the size of the game.
You can try this way to move steam games to another drive one by one. However, if you want to move multiple games to another drive, you may try the following methods.
Method 2. Move Steam Games to Another Drive with Steam Library Manager
Steam Library Manager is a tool that can help you manage Steam libraries. On the main interface of Steam Library Manager, it lists all the Libraries on your PC, and games available in each of these libraries. Steam Library Manager can help you copy, move or backup your games.
Steam Library Manager enables you to drag and drop the games from one library to another at ease. You can use the Task Manager section to move in batches. The detailed steps about how to move steam games to another drive with Steam Library Manager are shown as below.
Step 1. Download Steam Library Manager via the official website.
Step 2. On the main interface of Steam Library Manager, you can see the created steam library and what games they stored. Drag the game to the library you want to move it to.
Step 3. Locate to Task Manager tab. The games you are going to move will be listed here. You can move multiple games and then click Start button to move steam games to another drive.
Step 4. When the games are moving, you will see a log getting generated. If there is a problem, it will make it clear to you.
Steam Library Manager makes it easy to move Steam games. You can download the Steam Library Manager from its official site and have a try if you don’t know how to move a steam game to another drive.
Try using the tool Steam Library Manager to move steam games to another drive or backup Steam games now.
Method 3. Move Your Entire Steam Install
You can move your entire Steam to another drive, which will move all your Steam games to another drive. If you don’t know how to move steam to another drive, you can refer the following steps.
Step 1. Close Steam and locate to your Steam folder via Windows File Explorer. The path could be C:Program Files(x86)Steam.
Step 2. Copy and paste your Steam folder to the new drive.
Step 3. Rename the old folder and leave it in the original directory as a backup — or you can delete it later.
Step 4. Run the Steam.exe from the new location and create a new shortcut.
To move steam to another drive is very simple. After it is completed, you can check if your games can be launched as normal.
Extend the Partition with Steam Games Installed
Actually, apart from the above methods to move steam games to another drive, you can also extend the drive that you store steam games.
If not enough free space is the reason that you move steam games to another drive, you can follow the steps as below to extend partition. And the procedures are very simple. In this case, you don’t need to move steam to another drive.
Here is the tutorial
MiniTool Partition Wizard Pro Edition is a professional partition manager for Windows users with many advanced features included. You can utilize this partition manager to extend partition, resize partition, recover lost partition, convert NTFS to FAT32 without data loss, copy disk, rebuild MBR and so on.
If you want to extend C drive, it is recommended to use the MiniTool Partition Wizard Bootable Edition, which can be created by the Bootable Media embedded in MiniTool Partition Wizard Pro Edition.
If your game files are not stored in C drive, you can use MiniTool Partition Wizard Free Edition to extend other partitions in Windows 10/8/7 directly. Choose the one you need to download by clicking the following button.
Buy Now
Free Download
After installing MiniTool Partition Wizard on your PC, you can launch it to get the main interface and then follow the steps below.
Step 1. Create a bootable USB drive with MiniTool Partition Wizard Pro Edition. And boot from the drive ( if you are not extending C drive, you can skip this step.).
- Click Bootable Media on the upper right corner of the main interface
- Select WinPE-based media with MiniTool plug-in to continue
- Follow the prompts to create a bootable USB drive
- Enter BIOS to set the USB as the first boot order and boot from it
Step 2. When you get the main interface of MiniTool Partition Wizard Bootable Edition, you can choose the partition and click Extend Partition.
Tip: In the MiniTool Partition Wizard Bootable Edition, all partitions will be assigned a drive letter including system reserved partition and EFI partition. So all the partition’s drive letter has been changed. You can explore the partition to check if you choose the right partition.
Step 3. Choose a partition or unallocated space to take some free space from it. Then click OK to continue.
Step 4. At last, click Apply to allow the pending operations.
When it is completed, you can see that the C drive has been enlarged. You don’t need to move steam games to another drive and the running speed of your PC will be boosted. It is a good solution if you find that the process of moving steam games to another drive is complicated for you.
With the help of MiniTool Partition Wizard, I successfully extended my C drive without data loss. Now I no longer need to move steam games to another drive because my C drive has enough free space.Click to Tweet
Bottom Line
You see, with very simple steps, you can move steam games to another drive or extend C drive easily. If you want to move steam games to SSD or extend C drive to get more free space to store games, you can follow the detailed steps and screenshots above.
If you have any question about how to move steam games to another drive or if you have other better solutions, you can leave a message in the following comment zone and we will reply as soon as possible. If you need any help when using MiniTool software, you may contact us via [email protected].
Move Steam Games to Another Drive FAQ
Can I move Steam games to another drive?
Launch Steam client, and locate to Settings > Downloads > Steam Library Folders > Add Library Folder. Select a different drive to create a new folder. Name the folder and it and click OK and SELECT. Click LIBRARY to open the Games library and right click on the game you want to move, and then choose Properties. Click Move Install Folder under the Local Files tab. Then click Move Folder to move Steam games to another drive.
How do I move my installed games to another drive?
You can move installed games with the built-in Move Install Folder Feature in Steam client. You can move installed Steam games to another drive with the application Steam Library Manager. You can also move your entire Steam to another drive, which will move all the installed Steam games to another drive.
How do I move Steam games to my SSD?
Go to Settings > Downloads > Steam Library Folders > Add Library Folder to create a new Steam library folder on SSD drive. Then utilize the Steam built-in Move Install Folder Feature or install Steam Library Manager to move your Steam games to SSD.
How do I change the location of fortnite?
Create a new Steam library folder on the drive that you want to move fortnite to. Open Games library, right click on the fortnite game and choose Properties. Under the Local Files, choose Move Install Folder and then click Move Folder tochange the location of fortnite to another drive.