![]()
Download Article
![]()
Download Article
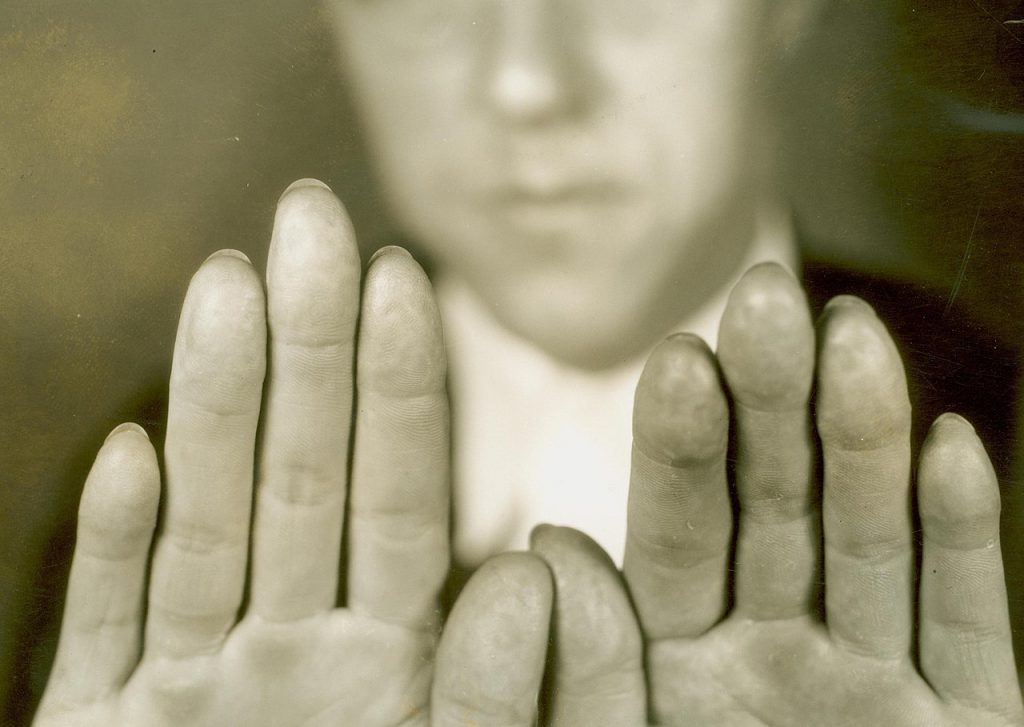
In order to fake a fingerprint, one needs an original first. For most home experimenters, this starts by pressing a finger into a piece of putty. Latent fingerprints, or the invisible residue left by fingers, can be used to create a fake fingerprint, but this takes significantly more effort and equipment.
-

1
Get a fingerprint mark on a putty-like material. Putty, Play-doh, or modeling clay are all good options, as long as they are clean and new.[1]
Roll a small piece of your chosen material into a ball, and press the finger you wish to imitate into the putty.[2]
- A hot, flattened piece of paraffin wax will leave a better impression, but only after five or ten minutes of pressing.[3]
- A hot, flattened piece of paraffin wax will leave a better impression, but only after five or ten minutes of pressing.[3]
-
2
Refrigerate or freeze the putty. This will keep the impression of the fingerprint as hard as possible while you work with it. Different materials and brands will react differently to cold, and may not be usable as putty afterward — but that’s fine for this purpose.
Advertisement
-
3
Make extra-thick gelatin. Boil a small pot of water, then add an equal amount of gelatin powder by volume.[4]
Stir constantly for several minutes, dissolving as much of the powder as you can. Let the mixture cool. -
4
Microwave the gelatin. Once the gelatin has cooled to a thick gel, melt it in the microwave, then let cool to a gel again. Microwave repeatedly until the gelatin has no bubbles, and when a drop acts thick and rubbery.[5]
-
5
Pour the gelatin onto the fingerprint mold. Once the gelatin is rubbery and bubble-free, melt it one final time, then pour the hot, liquid gelatin into the fingerprint mold you made from putty.
-
6
Freeze the putty. Put the putty and gelatin into the freezer. Within a few minutes, the gelatin should harden into a solid, rubbery substance. Peel the gelatin carefully off the putty. You now have a fake fingertip, with the impression of a real fingerprint marked on the surface.


Advertisement
-
1
Read through the method before attempting. This method can make a much more accurate fingerprint, and does not require an impression in putty, but it requires specialized equipment. Do not attempt this unless you have access to these tools, including a high-quality scanner or camera, and a printed circuit board (PCB). An overhead transparency can be used instead of the PCB, but this is less effective.[6]
-
2
Dust to find fingerprints. This method can create a fake fingerprint from nothing more than a fingerprint left on a touchscreen, a doorknob, or another dry, glossy surface. To locate these, you can dust a surface with crushed, powdered graphite from mechanical pencil lead, or use a fingerprinting kit with a black powder.
- A white surface will work best with this method.
-
3
Take a high quality scan or photograph. For best results, photograph or scan the fingerprint with a quality of at least 2400 dpi.[7]
Load the resulting image into a computer with photo editing software. -
4
Invert the image’s direction and color. Use the photo editing software to «flip» the image from left to right, creating its mirror image. Reverse the color of the image as well, so the raised fingerprint is white and the background of the image is black.[8]
-
5
Transfer this to a printed circuit board or overhead transparency. For best results, print out your fingerprint onto tracing paper, then use a UV etching machine to transfer the fingerprint onto a printed circuit board (PCB).[9]
If you do not have access to these materials, you can try the less effective method of printing out the fingerprint directly onto an overhead transparency sheet. -
6
Make your fake finger from graphite and wood glue. The fingerprint image on the PCB or overhead transparency is actually slightly raised, and can be used to make a fake fingertip. To do this, cover the image with graphite powder, then smear it with a thin layer of white wood glue or light-colored latex milk.[10]
- A small dash of glycerin in the wood glue will make it slightly more moist and workable, creating a more effective material.
-
7
Remove the dried glue fingerprint. Once the wood glue has dried, carefully peel it off the surface beneath and take a look at your new fingerprint. You can even trim this to fingertip size, then use theatrical glue to attach it to your own finger.


Advertisement
Add New Question
-
Question
Is this illegal?

No, this is not illegal.
-
Question
I want to host a murder mystery activity for my family and I have images of fingerprints, but how do I put them on surfaces?
Cut them out and stick them onto furniture or whereve you want to put them.

Ask a Question
200 characters left
Include your email address to get a message when this question is answered.
Submit
Advertisement
-
The mark on the piece of putty can’t be used directly, since the fingerprint will be a mirror image of the actual finger.
Thanks for submitting a tip for review!
Advertisement
References
About This Article
Article SummaryX
If you want to make fake fingerprints, start by pressing your finger into a putty-like material, like play-doh or modeling clay. For a better impression, use a flattened piece of paraffin wax and press into it for 5 to 10 minutes. Once you have a clear fingerprint in the putty, place it in the refrigerator or freezer to get the material as hard as possible. As the putty hardens, boil a small pot of water and add an equal amount of gelatin powder by volume. Stir until the gelatin dissolves before letting the mixture cool. To get the bubbles out of your gelatin, alternate microwaving and cooling it until it becomes thick and rubbery. Then, pour the gelatin into the mold and freeze the putty again to form a fake fingertip you can use to make fake fingerprints. For more help, like how to copy fingerprints you found on a doorknob, scroll down.
Did this summary help you?
Thanks to all authors for creating a page that has been read 463,309 times.
Did this article help you?
![]()
Download Article
![]()
Download Article
In order to fake a fingerprint, one needs an original first. For most home experimenters, this starts by pressing a finger into a piece of putty. Latent fingerprints, or the invisible residue left by fingers, can be used to create a fake fingerprint, but this takes significantly more effort and equipment.
-
1
Get a fingerprint mark on a putty-like material. Putty, Play-doh, or modeling clay are all good options, as long as they are clean and new.[1]
Roll a small piece of your chosen material into a ball, and press the finger you wish to imitate into the putty.[2]
- A hot, flattened piece of paraffin wax will leave a better impression, but only after five or ten minutes of pressing.[3]
- A hot, flattened piece of paraffin wax will leave a better impression, but only after five or ten minutes of pressing.[3]
-
2
Refrigerate or freeze the putty. This will keep the impression of the fingerprint as hard as possible while you work with it. Different materials and brands will react differently to cold, and may not be usable as putty afterward — but that’s fine for this purpose.
Advertisement
-
3
Make extra-thick gelatin. Boil a small pot of water, then add an equal amount of gelatin powder by volume.[4]
Stir constantly for several minutes, dissolving as much of the powder as you can. Let the mixture cool. -
4
Microwave the gelatin. Once the gelatin has cooled to a thick gel, melt it in the microwave, then let cool to a gel again. Microwave repeatedly until the gelatin has no bubbles, and when a drop acts thick and rubbery.[5]
-
5
Pour the gelatin onto the fingerprint mold. Once the gelatin is rubbery and bubble-free, melt it one final time, then pour the hot, liquid gelatin into the fingerprint mold you made from putty.
-
6
Freeze the putty. Put the putty and gelatin into the freezer. Within a few minutes, the gelatin should harden into a solid, rubbery substance. Peel the gelatin carefully off the putty. You now have a fake fingertip, with the impression of a real fingerprint marked on the surface.
Advertisement
-
1
Read through the method before attempting. This method can make a much more accurate fingerprint, and does not require an impression in putty, but it requires specialized equipment. Do not attempt this unless you have access to these tools, including a high-quality scanner or camera, and a printed circuit board (PCB). An overhead transparency can be used instead of the PCB, but this is less effective.[6]
-
2
Dust to find fingerprints. This method can create a fake fingerprint from nothing more than a fingerprint left on a touchscreen, a doorknob, or another dry, glossy surface. To locate these, you can dust a surface with crushed, powdered graphite from mechanical pencil lead, or use a fingerprinting kit with a black powder.
- A white surface will work best with this method.
-
3
Take a high quality scan or photograph. For best results, photograph or scan the fingerprint with a quality of at least 2400 dpi.[7]
Load the resulting image into a computer with photo editing software. -
4
Invert the image’s direction and color. Use the photo editing software to «flip» the image from left to right, creating its mirror image. Reverse the color of the image as well, so the raised fingerprint is white and the background of the image is black.[8]
-
5
Transfer this to a printed circuit board or overhead transparency. For best results, print out your fingerprint onto tracing paper, then use a UV etching machine to transfer the fingerprint onto a printed circuit board (PCB).[9]
If you do not have access to these materials, you can try the less effective method of printing out the fingerprint directly onto an overhead transparency sheet. -
6
Make your fake finger from graphite and wood glue. The fingerprint image on the PCB or overhead transparency is actually slightly raised, and can be used to make a fake fingertip. To do this, cover the image with graphite powder, then smear it with a thin layer of white wood glue or light-colored latex milk.[10]
- A small dash of glycerin in the wood glue will make it slightly more moist and workable, creating a more effective material.
-
7
Remove the dried glue fingerprint. Once the wood glue has dried, carefully peel it off the surface beneath and take a look at your new fingerprint. You can even trim this to fingertip size, then use theatrical glue to attach it to your own finger.
Advertisement
Add New Question
-
Question
Is this illegal?
No, this is not illegal.
-
Question
I want to host a murder mystery activity for my family and I have images of fingerprints, but how do I put them on surfaces?
Cut them out and stick them onto furniture or whereve you want to put them.
Ask a Question
200 characters left
Include your email address to get a message when this question is answered.
Submit
Advertisement
-
The mark on the piece of putty can’t be used directly, since the fingerprint will be a mirror image of the actual finger.
Thanks for submitting a tip for review!
Advertisement
References
About This Article
Article SummaryX
If you want to make fake fingerprints, start by pressing your finger into a putty-like material, like play-doh or modeling clay. For a better impression, use a flattened piece of paraffin wax and press into it for 5 to 10 minutes. Once you have a clear fingerprint in the putty, place it in the refrigerator or freezer to get the material as hard as possible. As the putty hardens, boil a small pot of water and add an equal amount of gelatin powder by volume. Stir until the gelatin dissolves before letting the mixture cool. To get the bubbles out of your gelatin, alternate microwaving and cooling it until it becomes thick and rubbery. Then, pour the gelatin into the mold and freeze the putty again to form a fake fingertip you can use to make fake fingerprints. For more help, like how to copy fingerprints you found on a doorknob, scroll down.
Did this summary help you?
Thanks to all authors for creating a page that has been read 463,309 times.
Did this article help you?
![]()
Загрузить PDF
![]()
Загрузить PDF
Для того чтобы создать поддельные отпечатки пальцев, нужны оригинальные отпечатки. В большинстве случаев их можно получить, надавив на кусок замазки. Невидимые отпечатки пальцев тоже могут быть использованы для создания поддельных отпечатков пальцев, но на это потребуется больше усилий и оборудование.
-
1
Оставьте отпечаток пальца на чистой и новой замазке (шпатлевке, глине или аналогичном материале).[1]
Скатайте замазку в шарик и надавите на шарик пальцем, отпечаток которого вы хотите подделать.[2]
- На горячем и плоском куске парафина отпечатки получатся четче, но вам нужно прижимать палец в течение 5-10 минут.[3]
- На горячем и плоском куске парафина отпечатки получатся четче, но вам нужно прижимать палец в течение 5-10 минут.[3]
-
2
Заморозьте замазку, чтобы сохранить отпечаток пальца для дальнейшей работы с ним (после заморозки в большинстве случае вы больше не сможете использовать материал, на котором оставили отпечаток).
-
3
Сделайте толстый желатин. Для этого добавьте порошок желатина в кипящую воду.[4]
В течение нескольких минут помешивайте смесь, чтобы порошок полностью растворился в воде. Дайте смеси остыть. -
4
После того, как желатин остынет до состояния густого геля, растопите его в микроволновой печи, а затем дайте остыть еще раз. Повторяйте процесс до тех пор, пока в желатине не останется пузырьков воздуха.[5]
-
5
Растопите желатин еще раз и вылейте его в отпечаток, оставленный на замазке.
-
6
Поставьте замазку с желатином в морозильную камеру. Через несколько минут желатин затвердеет до состояния резины. Аккуратно снимите желатин с замазки. Вы сделали поддельный отпечаток пальца.
Реклама


-
1
Этот метод позволит вам сделать гораздо более точные отпечатки пальцев, и он не требует использования замазки, но вам понадобится специальное оборудование, например, сканер или камера и печатная плата.[6]
-
2
Проверьте поверхность на наличие отпечатков пальцев. Под поверхностью понимается сенсорный экран, дверная ручка или любая другая глянцевая поверхность. Для проверки нанесите на поверхность порошок графита (от механического карандаша) или используйте специальное средство.
- На белой поверхности найти отпечатки легче.
-
3
Отсканируйте или сфотографируйте отпечатки пальцев с разрешением как минимум 2400 точек на дюйм.[7]
Загрузите изображение в компьютер с хорошим графическим редактором. -
4
При помощи графического редактора поверните изображение вдоль вертикальной оси, а также инвертируйте его цвета (отпечатки сделайте белыми, а фон черным).[8]
-
5
Распечатайте отпечаток пальца на кальке, а затем используйте травильную машину, чтобы передать отпечаток на печатную плату. [9]
Если у вас нет указанных материалов, распечатайте отпечаток на прозрачной пленке (но это менее эффективно). -
6
Изображение отпечатка пальца на печатной плате или прозрачной пленке является рельефным, поэтому оно может быть использовано для создания «фальшивого пальца». Для этого покройте изображение графитовым порошком, а затем смажьте его тонким слоем белого столярного клея или белого жидкого латекса.[10]
- В столярный клей добавьте каплю глицерина, чтобы разбавить клей; это сделает его более эффективным материалом.
-
7
Когда столярный клей высохнет, аккуратно снимите его; вы получили отпечаток пальца, который можете обрезать по форме подушечки пальца и приклеить его на ваш палец при помощи театрального клея.
Реклама


Советы
- Отпечаток на замазке не может быть использован, так как представляет собой повернутое изображение реального отпечатка пальца.
Реклама
Об этой статье
Эту страницу просматривали 53 324 раза.
Была ли эта статья полезной?
В 1930-х годах до гангстеров, наемных убийц и грабителей дошло: их работа уже никогда не будет такой беззаботной, как прежде. В распоряжении копов теперь были обширные картотеки с данными, СМИ и дактилоскопия (черт бы ее побрал!). Первыми спохватились особо опасные преступники, вроде «врага общества номер один» Джона Диллинджера. Они принялись удалять узоры на своих пальцах. Кто-то обращался к помощи хирургов, а кто-то делал все сам — брутально и психопатично.
Рассказываем про три самых ярких случая времен золотой эпохи американских гангстеров:
«Враг общества номер один»
Джон Диллинджер
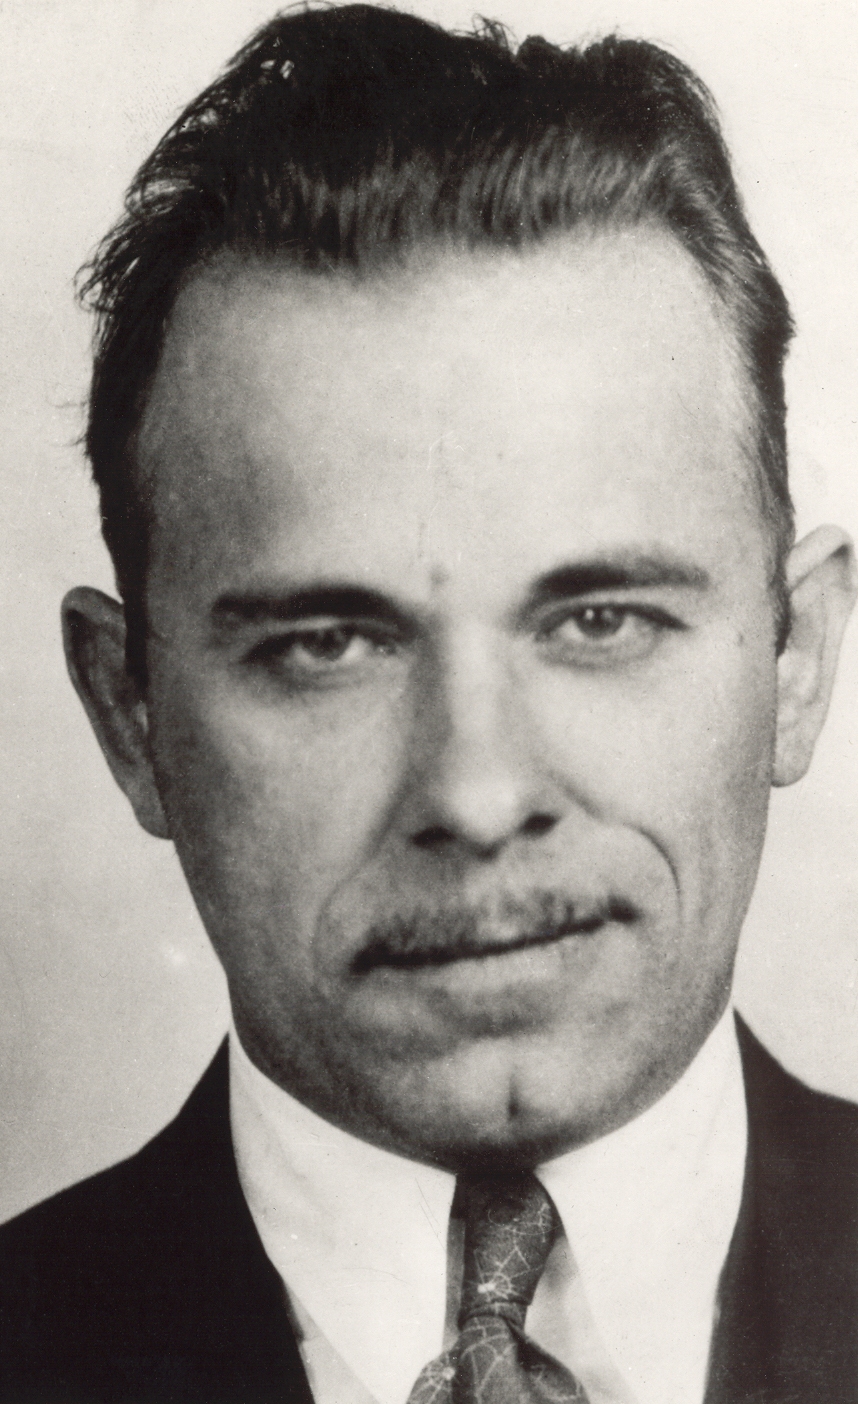
В 1930-е Джон Диллинджер был настоящей супер-звездой преступного мира. ФБР называло его «врагом номер один» американского общества. Он ограбил около 20 банков и 4 полицейских участка, дважды бежал из тюрьмы и «отличился» убийством полицейских при исполнении.
С таким послужным списком к 1934-у году Диллинджеру было практически не скрыться. О его «подвигах» писали все крупнейшие газеты, его лицо знала каждая собака. Он был мишенью номер один для каждого полицейского и детектива. Однако спрятаться Джон решил своеобразно: на самом виду, в Чикаго. Для этого он встретился с известным в криминальных кругах доктором Вильгельмом Лозером. Диллинджер заплатил его 5000 долларов, чтобы тот провел две пластические операции: лица и пальцев рук.
Чтобы изменить отпечатки пальцев Диллинджера, Лозер срезал внешний слой кожи и обработал кончики пальцев соляной кислотой. Наверняка это было чертовски больно. Затем Лозер соскреб все оставшиеся видимые бугорки на коже скальпелем. Процедура была экспериментальной, но Лозер чувствовал себя уверенно, потому что первым человеком, на котором он ее опробовал, был он сам.
Операция прошла не совсем успешно. Когда руки Диллинджера зажили, отпечатки пальцев в целом восстановились. Середина оказалось размытой, но по краям его отпечатки все еще можно было идентифицировать. В конечном итоге операции доктора Лозера не спасли Джона Диллинджера. Он был застрелен агентами ФБР в Чикаго 22 июля 1934 года.
Одиозный доктор Джозеф Моран
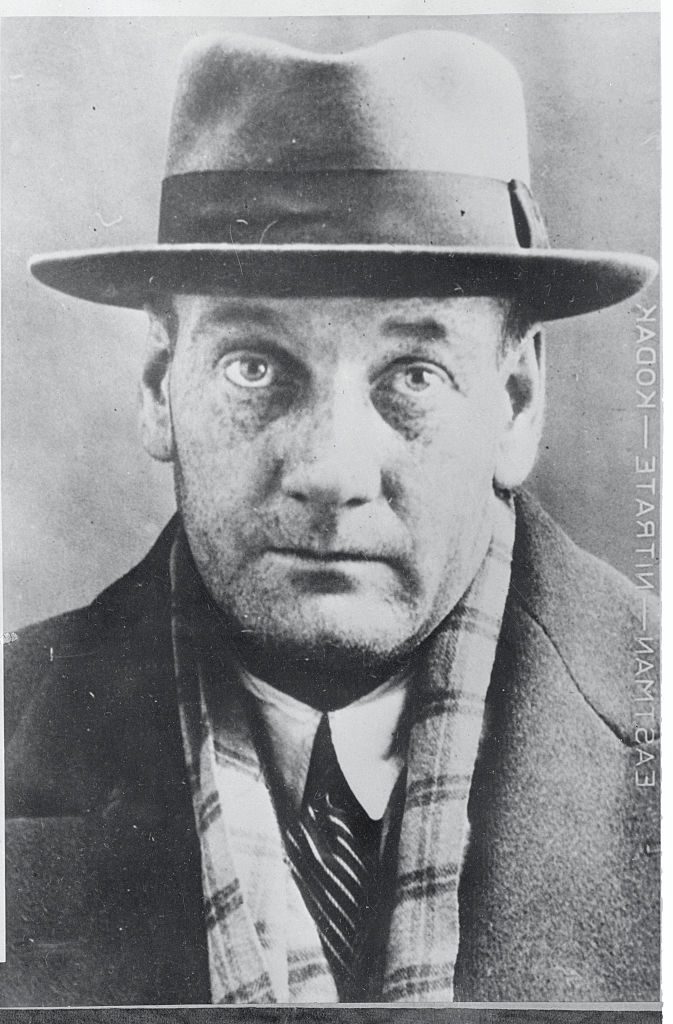
К началу 1930-х дактилоскопия из новомодной маргинальной дисциплины превратилась в незаменимую помощницу криминалиста. Даже самым ортодоксальным преступникам стало ясно: беззаботные деньки прошли, с наукой придется считаться.
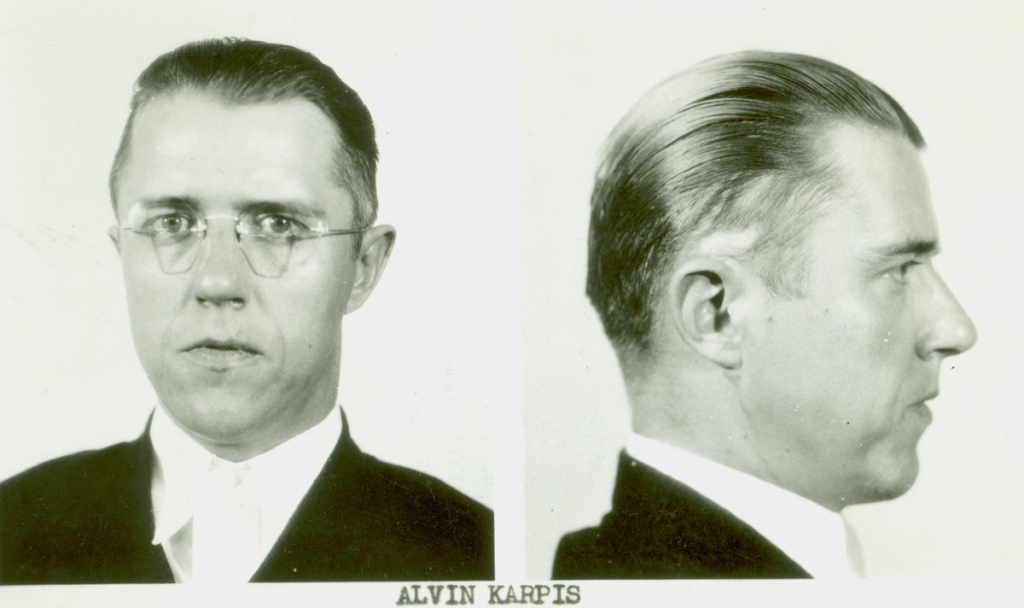
Наряду с упомянутым доктором Лозером на паранойе гангстеров наживался еще один известный в криминальном мире хирург Джозеф Моран. Можно сказать, они были злейшими конкурентами и изо всех сил боролись за клиентуру. Оба проводили эксперименты на себе, изобретали новые методы и невероятно ценились преступниками.
На «прием» к доктору Морану записывались целыми бандами. Например, участники шайки Баркера-Карписа. Группировка была названа в честь ее основателей — Фреда Баркера и Элвина «Жуткого» Карписа. В 1933 году хирург провел бандитам операции на пальцах. Да так эффективно, что впоследствии, спустя пару десятилетий, «Жуткий» Карпис не мог въехать в родную Канаду. На таможне у него попытались снять отпечатки пальцев, а их попросту не было. Таможенники не распознали знаменитого гангстера, но чертовски напряглись из-за этой аномалии.
Однако доктор Моран зазнался. Он начал много трепаться. В Чикагских барах он строил из себя крутого криминального авторитета и рассказывал, как гангстеры из разных банд ходят у него по струнке. Те не стали терпеть. В сентябре 1935 года тело Морана выбросило на берег Кристал-Бич в Онтарио.
Как и у преступников, с которыми работал доктор, у него не было отпечатков пальцев. Правда, гангстеры сработали несколько грубее, чем Моран: ему отрубили руки и ноги.
Август «Гас» Винклер
Одним из первых известных мафиози операцию по удалению узора на пальцах провел гангстер Август Винклер, известный как «Гас». Он был грабителем и наемным убийцей, которого связывали с Аль Капоне. В 1933 году он удалил себе кожу с пальцев, причем, в отличие от остальных героев этой истории, самостоятельно. И гораздо более брутально.
На его кончиках пальцев не было живого места. Он прижигал их сигаретой, сдирал кожу ножом, стирал наждачкой, резал и кромсал. В общем, либо у этого парня был развит мазохизм, либо он был окончательным психопатом и любил доводить начатое до конца.
Впрочем, Винклера операция также не спасла. В том же 1933 году его подельники выяснили, что Гас стучит ФБР, и его застрелили из дробовика — несколько нападавших расстреляли его из окон проезжавшего грузовика. Совсем как в кино.
банды