Значки на рабочем столе можно скрыть. Для их просмотра щелкните правой кнопкой мыши рабочий стол, выберите Вид, а затем щелкните Отображать значки рабочего стола. Чтобы добавить значки, например «Этот компьютер», «Корзина» и т. д., на рабочий стол:
-
Выберите Начните , откройте Параметры , а затем в области Персонализация выберите Темы
. -
В разделе Темы прокрутите вниз и выберите Параметры значков на рабочем столе.
-
Выберите значки, которые должны отображаться на рабочем столе, а затем нажмите кнопки Применить и ОК.

Открыть параметры персонализации
Значки на рабочем столе можно скрыть. Для их просмотра щелкните правой кнопкой мыши рабочий стол, выберите Вид, а затем щелкните Отображать значки рабочего стола. Чтобы добавить значки, например «Этот компьютер», «Корзина» и т. д., на рабочий стол:
-
Нажмите кнопку Пуск и выберите Параметры > Персонализация > Темы.
-
В разделе Темы > Связанные параметры выберите Параметры значков рабочего стола.
-
Выберите значки, которые должны отображаться на рабочем столе, а затем нажмите кнопки Применить и ОК.
-
Примечание.Если вы работаете в режиме планшета, значки рабочего стола могут отображаться неправильно. В таких случаях можно найти нужные программы по имени в проводнике. Чтобы отключить режим планшета, выберите центр уведомлений на панели задач (рядом с датой и временем), а затем выберите Режим планшет, чтобы включить или отключить этот режим.
Открыть параметры персонализации
![]()
Download Article
An in-depth guide to editing the size and image of your Windows desktop icons
![]()
Download Article
- Showing or Hiding Desktop Icons
- Resizing Desktop Icons
- Changing System Desktop Icons
- Changing Shortcut and Folder Icons
- Adding Shortcuts to the Desktop
- Creating Icon Images
- Downloading Icons
- Q&A
- Tips
- Warnings
|
|
|
|
|
|
|
|
|
Do you want to customize the appearance of the icons on your Windows desktop? You can adjust icons by using the «Properties» options or you make new desktop icons entirely. You’ll only be able to change the icon for system desktop icons, folders, and shortcuts. This wikiHow will show you how to change a desktop icon’s appearance and how to download or create a custom icon on your Windows computer.
Things You Should Know
- Right-click the desktop. Hover over «View», then uncheck «Show desktop icons» to hide them.
- Right-click the desktop, hover over «View», then select a new icon size.
- To change icons, right-click the folder or shortcut. Click «Properties» → «Customize/Shortcut» → «Change Icon».
-
1
-
2
Hover your cursor over «View». This will be at the very top of the menu.
Advertisement
-
3
Click Show desktop icons. When this option in unchecked, all desktop icons will be hidden.
- To show desktop icons again, click Show desktop icons.
Advertisement
-
1
Right-click your desktop. For easier navigation, be sure to minimize all open windows.
- A pop-up menu will open.
-
2
Hover your cursor over «View». This will be at the very top of the menu.
-
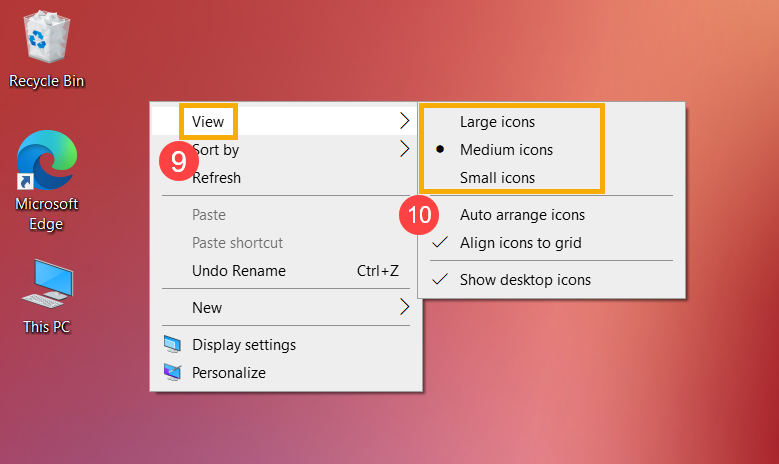
3
Select your icon size. You can click Large icons, Medium icons, or Small icons. After clicking, your desktop icons will be changed immediately.
- You can also hold CTRL and scroll up or down on your mouse to increase or decrease the icon size.
Advertisement
-
1
Open Start
. Click the Windows logo in the bottom-left corner of the screen, or press the Windows key.[2]
-
2
Click Settings
. It’s in the lower-left side of the Start window.
-
3
Click Personalization. This is the monitor-shaped icon on the Windows Settings page.
- You can also access this page by right-clicking a blank space on the desktop and then clicking Personalization in the drop-down menu.
-
4
Click Themes. It’s a tab on the left side of the Personalization window.
-
5
Click Desktop icon settings. This link is in the upper-right side of the Themes page. Clicking it opens the Desktop Icon Settings window.
- If you haven’t edited your theme at all, this link will be in the middle of the page beneath the «Related Settings» heading.
- You can also click Get more themes in the Store below the «Apply a theme» heading to browse desktop themes. Some themes will change your desktop icons’ appearances.
-
6
Click an icon you want to change. This will select the icon.
- For example, you might click This PC or Recycle Bin.
- You can also check the box next to a desktop icon’s name at the top of the window to make it appear on your desktop, or uncheck the box to remove it from the desktop.
- Check the «Allow themes to change desktop icons» box on this window to enable theme-related icon changes.
-
7
Click Change Icon. It’s near the bottom of the window.
-
8
Select an icon. You can select two different types of icons:
- System icon: Click an icon in the window.
- Custom icon: Click Browse, then click the folder that your custom icons are in on the left side of the window. Select the icon you want to use, then click Open.
-
9
Click OK. This will assign your selected icon to the desktop program.
-
10
Click Apply, then click OK. Doing so confirms your decision and changes the desktop program’s icon to your selected icon.


Advertisement
-
1
Open the File Explorer
. You can find this icon at the lower-left side of your taskbar, or you can press the Start menu and search for File Explorer.
- You cannot change the icons of specific files (e.g., Notepad files or .exe files) using this method. You’ll only be able to customize desktop shortcuts and folders with this method.
-
2
Click Desktop. It’s a folder in the left-hand column of options in the File Explorer window.
- This may already be pinned under Quick access.
-
3
Click a shortcut or folder icon. Shortcut icons have a white box with an arrow in their lower-left corners.
-
4
Click the Home tab. It’s in the upper-left corner of the File Explorer window. Doing so will open a toolbar at the top of the window.
-
5
Click Properties. This is a white box with a red checkmark in the «Open» section of the toolbar.
- You can also right-click on the icon on your desktop and then click Properties to get to this menu.
- If the icon is pinned to your task bar, you can right-click it and click Properties to get this menu.
-
6
Click Customize or Shortcut. This will be located at the top of the Properties window.
- Shortcut: Click the Shortcut tab at the top of the Properties window.
- Folder: Click the Customize tab at the top of the Properties window.
-
7
Click Change Icon. This will be near the bottom of the window.
-
8
Select an icon. You can select two different types of icons:
- System icon — Click an icon in the window.
- Custom icon — Click Browse, then click the folder that your custom icons are in on the left side of the window. Select the icon you want to use, then click Open.
-
9
Click OK. This will assign your selected icon.
-
10
Click Apply, then click OK. Doing so confirms your decision and changes the original icon to your selected icon.

Advertisement
-
1
Open the File Explorer
. You can find this icon at the lower-left side of your taskbar, or you can press the Start menu and search for File Explorer.
-
2
Click the Desktop folder. It’s on the left side of the File Explorer window.
- This may already be pinned under Quick access.
-
3
Click the Home tab. You’ll find this tab in the upper-left side of the File Explorer window.
-
4
Click New item. It’s in the «New» section of the tool bar at the top of the window.
-
5
Click Shortcut. This option is in the New item drop-down menu. A window with options for your new shortcut will appear.
-
6
Click Browse. It’s in the middle of the page. Doing so opens a pop-up window.
-
7
Scroll down and click the program’s or file’s folder. For example, if the program or file is in the Documents folder, you’d click My Documents.
- You may have to click through several different folders to find the program or file for which you want to create a shortcut.
-
8
Click OK. Doing so sets the desktop shortcut’s target as your selected item.
- If you rename the desktop icon or move it to a new folder, your shortcut will no longer work.
-
9
Click Next, then enter a name. The default name for the shortcut is the same name as the program itself.
-
10
Click Finish. It’s in the bottom-right corner of the window. This will create your shortcut in the folder you selected.
Advertisement
-
1
Open the Paint application on your computer. If you don’t have the Paint application, you can download it from the Microsoft Store.
- Use this method if you want to create custom icons.
-
2
Click File. It’s a blue button in the upper-left corner of the Paint window.
-
3
Click Open. This option is in the File menu. Doing so opens a window where you can open a file location.
- If you’d rather create your own icon by drawing in Paint, skip this step and instead create your drawing.
-
4
Select a picture. You may have to click a location on the left side of the Open window (e.g., Pictures) to find the picture you want to open.
- Skip this step if you’re drawing your own icon.
-
5
Click Open. This will open your image in the Paint window.
- Skip this step if you’re drawing your own icon.
-
6
Click File again. It’s in the top-left corner of Paint.
-
7
Select Save as. This option is near the top of the File menu.
-
8
Click BMP picture. It’s an option to the right of the Save as button. Doing so opens a Save As window where you can name your file.
-
9
Type in your file’s name followed by
.ico. This will ensure that your file is saved as an icon file.- For example, you might name your file «shortcut.ico».
-
10
Navigate to a save location. Do so in the left-hand pane of the Save As window.
- The Pictures folder is a safe place to save your shortcut file.
-
11
Click Save. It’s at the bottom of the window. Doing so will save your icon in your selected folder.
-
12
Change a program’s icon using your created icon. You’ll use the Browse method and select your custom icon from the folder where you saved it.
Advertisement
-
1
Open a web browser. Microsoft Edge is the official Windows 10 browser, though you can use Google Chrome, Firefox, Opera, or another browser.
-
2
Search for Windows icons. Type «download windows desktop icons» into your browser’s address bar or a search engine and press Enter.
- You can narrow your search by entering the program’s name (e.g., «Windows my computer icon») or by using the icon file type (e.g., «ICO»).
- Some popular icon websites include:
- https://www.flaticon.com/
- https://feathericons.com/
- https://fontawesome.com/
- https://boxicons.com/
-
3
Download the icons you want. You can do this by opening a site that has your icons and clicking the Download button. Doing so will save the icons to your computer.
- If you download multiple icons at once, you may have to extract the icons to a regular folder before continuing.
-
4
Open the File Explorer
. You can find this icon at the lower-left side of your taskbar, or you can press the Start menu and search for File Explorer.
-
5
Click Desktop. This folder is on the left side of File Explorer.
-
6
Click your icons folder. Doing so selects it.
- If you just downloaded one icon, select the icon instead.
-
7
Click Home. This tab is in the upper-left corner of the File Explorer window.
-
8
Click Move to. It’s in the «Organize» section of the toolbar at the top of the File Explorer window.
-
9
Click Pictures. This folder is near the middle of the pop-up window.
- You can select any folder on your computer if you don’t want to place your icons in Pictures.
-
10
Click Move. This will send your icons to a folder where you won’t move or delete them.
-
11
Change a program’s icon using your downloaded icon. You’ll use the Browse method and then select an icon from within the Pictures folder to do this.
Advertisement
Add New Question
-
Question
I lost the icon for my email. How do I get it back on my desktop?

Click on your Windows key and type your email program. Then, just drag it onto your desktop.
-
Question
How do I change the background of icon names on my desktop in XP?
Highlight then right-click, and a list of things should pop up. Click on «change.»
-
Question
How do I put icons on my desktop from a program?
If on windows, search using the windows key for the program and then drag and drop it onto your desktop.
See more answers
Ask a Question
200 characters left
Include your email address to get a message when this question is answered.
Submit
Advertisement
-
Some themes will change your desktop icons. To enable this feature, open the Desktop Icon Settings window from within Personalization, then check the «Allow themes to change desktop icons» box and click OK.
-
You can find themes for Windows 10 in the Store, which is an app that comes preinstalled on Windows 10.
Thanks for submitting a tip for review!
Advertisement
-
If you move or delete an icon file, the program you were using the file with will stop displaying the icon.
Advertisement
About This Article
Article SummaryX
1. Click the Start menu and select Settings.
2. Click Personalization.
3. Click Themes.
4. Click Desktop icon settings.
5. Select an icon to change.
6. Click Change Icon.
7. Select a new icon and click OK.
8. Click OK.
Did this summary help you?
Thanks to all authors for creating a page that has been read 2,288,006 times.
Is this article up to date?
![]()
Download Article
An in-depth guide to editing the size and image of your Windows desktop icons
![]()
Download Article
- Showing or Hiding Desktop Icons
- Resizing Desktop Icons
- Changing System Desktop Icons
- Changing Shortcut and Folder Icons
- Adding Shortcuts to the Desktop
- Creating Icon Images
- Downloading Icons
- Q&A
- Tips
- Warnings
|
|
|
|
|
|
|
|
|
Do you want to customize the appearance of the icons on your Windows desktop? You can adjust icons by using the «Properties» options or you make new desktop icons entirely. You’ll only be able to change the icon for system desktop icons, folders, and shortcuts. This wikiHow will show you how to change a desktop icon’s appearance and how to download or create a custom icon on your Windows computer.
Things You Should Know
- Right-click the desktop. Hover over «View», then uncheck «Show desktop icons» to hide them.
- Right-click the desktop, hover over «View», then select a new icon size.
- To change icons, right-click the folder or shortcut. Click «Properties» → «Customize/Shortcut» → «Change Icon».
-
1
-
2
Hover your cursor over «View». This will be at the very top of the menu.
Advertisement
-
3
Click Show desktop icons. When this option in unchecked, all desktop icons will be hidden.
- To show desktop icons again, click Show desktop icons.
Advertisement
-
1
Right-click your desktop. For easier navigation, be sure to minimize all open windows.
- A pop-up menu will open.
-
2
Hover your cursor over «View». This will be at the very top of the menu.
-
3
Select your icon size. You can click Large icons, Medium icons, or Small icons. After clicking, your desktop icons will be changed immediately.
- You can also hold CTRL and scroll up or down on your mouse to increase or decrease the icon size.
Advertisement
-
1
Open Start
. Click the Windows logo in the bottom-left corner of the screen, or press the Windows key.[2]
-
2
Click Settings
. It’s in the lower-left side of the Start window.
-
3
Click Personalization. This is the monitor-shaped icon on the Windows Settings page.
- You can also access this page by right-clicking a blank space on the desktop and then clicking Personalization in the drop-down menu.
-
4
Click Themes. It’s a tab on the left side of the Personalization window.
-
5
Click Desktop icon settings. This link is in the upper-right side of the Themes page. Clicking it opens the Desktop Icon Settings window.
- If you haven’t edited your theme at all, this link will be in the middle of the page beneath the «Related Settings» heading.
- You can also click Get more themes in the Store below the «Apply a theme» heading to browse desktop themes. Some themes will change your desktop icons’ appearances.
-
6
Click an icon you want to change. This will select the icon.
- For example, you might click This PC or Recycle Bin.
- You can also check the box next to a desktop icon’s name at the top of the window to make it appear on your desktop, or uncheck the box to remove it from the desktop.
- Check the «Allow themes to change desktop icons» box on this window to enable theme-related icon changes.
-
7
Click Change Icon. It’s near the bottom of the window.
-
8
Select an icon. You can select two different types of icons:
- System icon: Click an icon in the window.
- Custom icon: Click Browse, then click the folder that your custom icons are in on the left side of the window. Select the icon you want to use, then click Open.
-
9
Click OK. This will assign your selected icon to the desktop program.
-
10
Click Apply, then click OK. Doing so confirms your decision and changes the desktop program’s icon to your selected icon.
Advertisement
-
1
Open the File Explorer
. You can find this icon at the lower-left side of your taskbar, or you can press the Start menu and search for File Explorer.
- You cannot change the icons of specific files (e.g., Notepad files or .exe files) using this method. You’ll only be able to customize desktop shortcuts and folders with this method.
-
2
Click Desktop. It’s a folder in the left-hand column of options in the File Explorer window.
- This may already be pinned under Quick access.
-
3
Click a shortcut or folder icon. Shortcut icons have a white box with an arrow in their lower-left corners.
-
4
Click the Home tab. It’s in the upper-left corner of the File Explorer window. Doing so will open a toolbar at the top of the window.
-
5
Click Properties. This is a white box with a red checkmark in the «Open» section of the toolbar.
- You can also right-click on the icon on your desktop and then click Properties to get to this menu.
- If the icon is pinned to your task bar, you can right-click it and click Properties to get this menu.
-
6
Click Customize or Shortcut. This will be located at the top of the Properties window.
- Shortcut: Click the Shortcut tab at the top of the Properties window.
- Folder: Click the Customize tab at the top of the Properties window.
-
7
Click Change Icon. This will be near the bottom of the window.
-
8
Select an icon. You can select two different types of icons:
- System icon — Click an icon in the window.
- Custom icon — Click Browse, then click the folder that your custom icons are in on the left side of the window. Select the icon you want to use, then click Open.
-
9
Click OK. This will assign your selected icon.
-
10
Click Apply, then click OK. Doing so confirms your decision and changes the original icon to your selected icon.
Advertisement
-
1
Open the File Explorer
. You can find this icon at the lower-left side of your taskbar, or you can press the Start menu and search for File Explorer.
-
2
Click the Desktop folder. It’s on the left side of the File Explorer window.
- This may already be pinned under Quick access.
-
3
Click the Home tab. You’ll find this tab in the upper-left side of the File Explorer window.
-
4
Click New item. It’s in the «New» section of the tool bar at the top of the window.
-
5
Click Shortcut. This option is in the New item drop-down menu. A window with options for your new shortcut will appear.
-
6
Click Browse. It’s in the middle of the page. Doing so opens a pop-up window.
-
7
Scroll down and click the program’s or file’s folder. For example, if the program or file is in the Documents folder, you’d click My Documents.
- You may have to click through several different folders to find the program or file for which you want to create a shortcut.
-
8
Click OK. Doing so sets the desktop shortcut’s target as your selected item.
- If you rename the desktop icon or move it to a new folder, your shortcut will no longer work.
-
9
Click Next, then enter a name. The default name for the shortcut is the same name as the program itself.
-
10
Click Finish. It’s in the bottom-right corner of the window. This will create your shortcut in the folder you selected.
Advertisement
-
1
Open the Paint application on your computer. If you don’t have the Paint application, you can download it from the Microsoft Store.
- Use this method if you want to create custom icons.
-
2
Click File. It’s a blue button in the upper-left corner of the Paint window.
-
3
Click Open. This option is in the File menu. Doing so opens a window where you can open a file location.
- If you’d rather create your own icon by drawing in Paint, skip this step and instead create your drawing.
-
4
Select a picture. You may have to click a location on the left side of the Open window (e.g., Pictures) to find the picture you want to open.
- Skip this step if you’re drawing your own icon.
-
5
Click Open. This will open your image in the Paint window.
- Skip this step if you’re drawing your own icon.
-
6
Click File again. It’s in the top-left corner of Paint.
-
7
Select Save as. This option is near the top of the File menu.
-
8
Click BMP picture. It’s an option to the right of the Save as button. Doing so opens a Save As window where you can name your file.
-
9
Type in your file’s name followed by
.ico. This will ensure that your file is saved as an icon file.- For example, you might name your file «shortcut.ico».
-
10
Navigate to a save location. Do so in the left-hand pane of the Save As window.
- The Pictures folder is a safe place to save your shortcut file.
-
11
Click Save. It’s at the bottom of the window. Doing so will save your icon in your selected folder.
-
12
Change a program’s icon using your created icon. You’ll use the Browse method and select your custom icon from the folder where you saved it.
Advertisement
-
1
Open a web browser. Microsoft Edge is the official Windows 10 browser, though you can use Google Chrome, Firefox, Opera, or another browser.
-
2
Search for Windows icons. Type «download windows desktop icons» into your browser’s address bar or a search engine and press Enter.
- You can narrow your search by entering the program’s name (e.g., «Windows my computer icon») or by using the icon file type (e.g., «ICO»).
- Some popular icon websites include:
- https://www.flaticon.com/
- https://feathericons.com/
- https://fontawesome.com/
- https://boxicons.com/
-
3
Download the icons you want. You can do this by opening a site that has your icons and clicking the Download button. Doing so will save the icons to your computer.
- If you download multiple icons at once, you may have to extract the icons to a regular folder before continuing.
-
4
Open the File Explorer
. You can find this icon at the lower-left side of your taskbar, or you can press the Start menu and search for File Explorer.
-
5
Click Desktop. This folder is on the left side of File Explorer.
-
6
Click your icons folder. Doing so selects it.
- If you just downloaded one icon, select the icon instead.
-
7
Click Home. This tab is in the upper-left corner of the File Explorer window.
-
8
Click Move to. It’s in the «Organize» section of the toolbar at the top of the File Explorer window.
-
9
Click Pictures. This folder is near the middle of the pop-up window.
- You can select any folder on your computer if you don’t want to place your icons in Pictures.
-
10
Click Move. This will send your icons to a folder where you won’t move or delete them.
-
11
Change a program’s icon using your downloaded icon. You’ll use the Browse method and then select an icon from within the Pictures folder to do this.
Advertisement
Add New Question
-
Question
I lost the icon for my email. How do I get it back on my desktop?
Click on your Windows key and type your email program. Then, just drag it onto your desktop.
-
Question
How do I change the background of icon names on my desktop in XP?
Highlight then right-click, and a list of things should pop up. Click on «change.»
-
Question
How do I put icons on my desktop from a program?
If on windows, search using the windows key for the program and then drag and drop it onto your desktop.
See more answers
Ask a Question
200 characters left
Include your email address to get a message when this question is answered.
Submit
Advertisement
-
Some themes will change your desktop icons. To enable this feature, open the Desktop Icon Settings window from within Personalization, then check the «Allow themes to change desktop icons» box and click OK.
-
You can find themes for Windows 10 in the Store, which is an app that comes preinstalled on Windows 10.
Thanks for submitting a tip for review!
Advertisement
-
If you move or delete an icon file, the program you were using the file with will stop displaying the icon.
Advertisement
About This Article
Article SummaryX
1. Click the Start menu and select Settings.
2. Click Personalization.
3. Click Themes.
4. Click Desktop icon settings.
5. Select an icon to change.
6. Click Change Icon.
7. Select a new icon and click OK.
8. Click OK.
Did this summary help you?
Thanks to all authors for creating a page that has been read 2,288,006 times.
Is this article up to date?
FAQ
Вы можете создавать, показывать, скрывать значки на рабочем столе или изменять их размер.
Пожалуйста, перейдите к соответствующей инструкции, исходя из текущей операционной системы Windows на вашем компьютере:
- Windows 11
- Windows 10
Windows 11
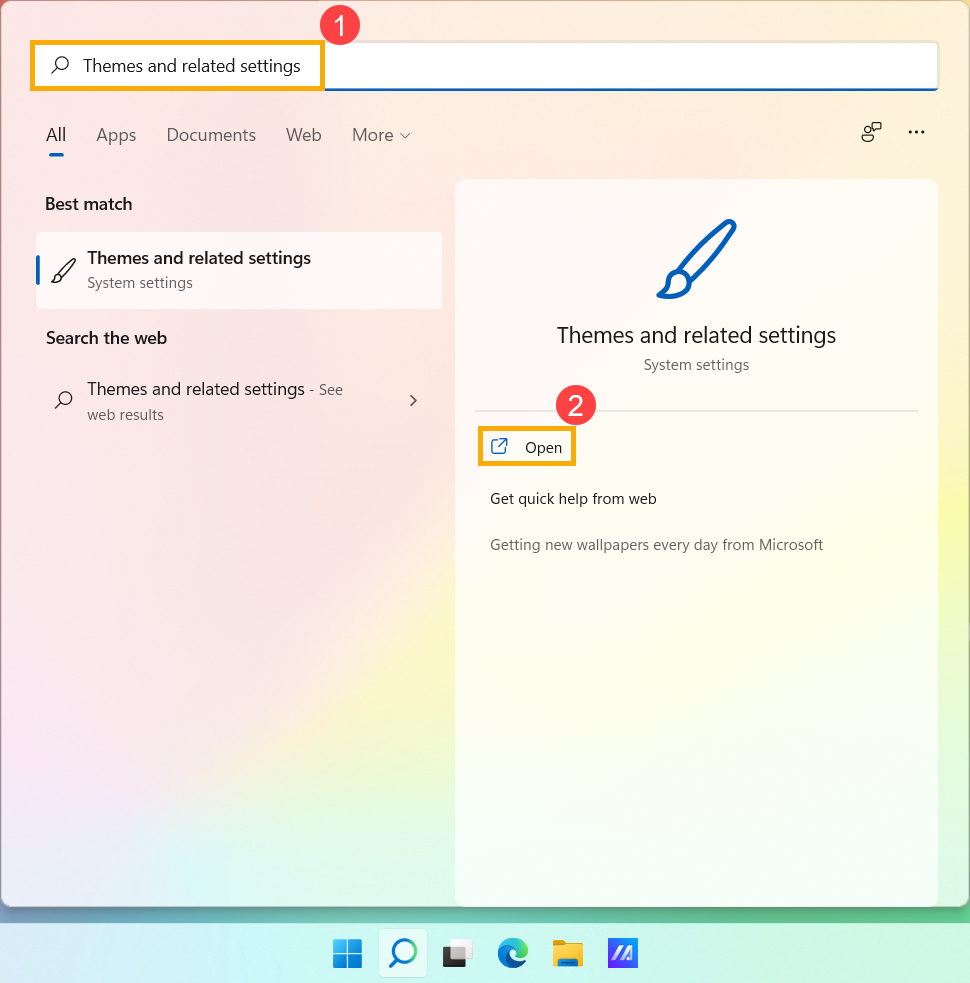
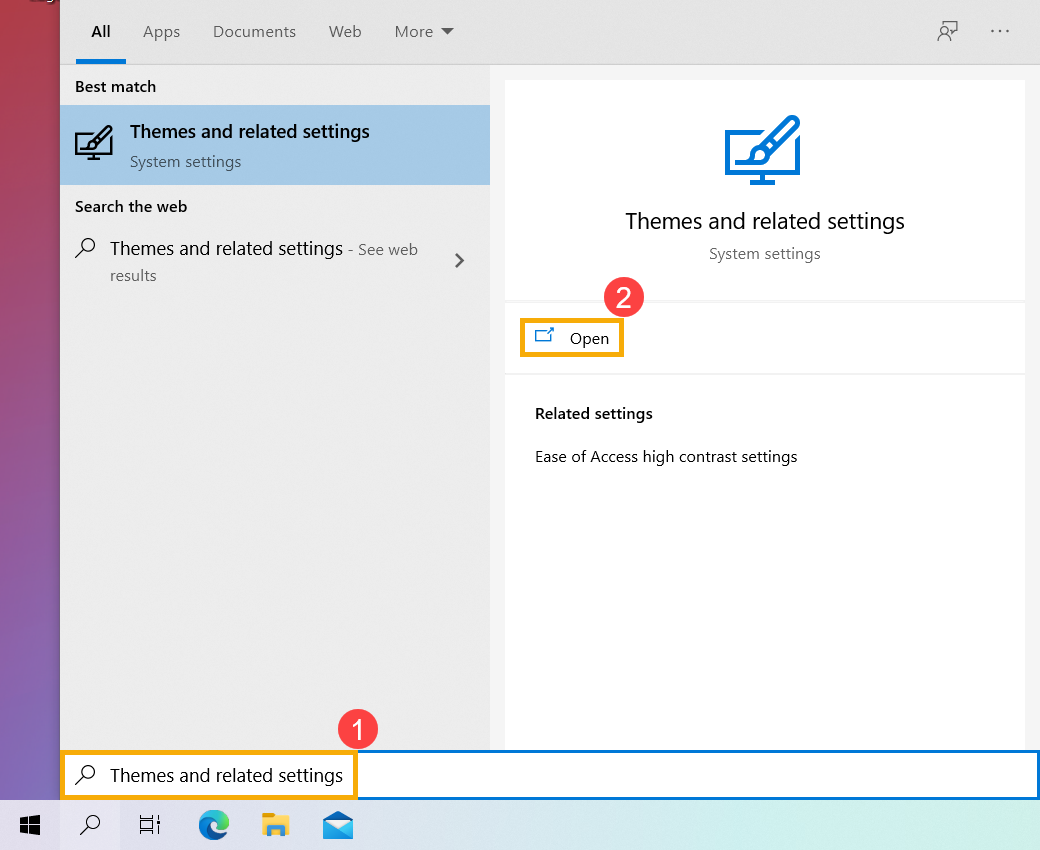
- Введите и найдите [Темы и связанные настройки] в строке поиска Windows ①, а затем нажмите [Открыть] ②.
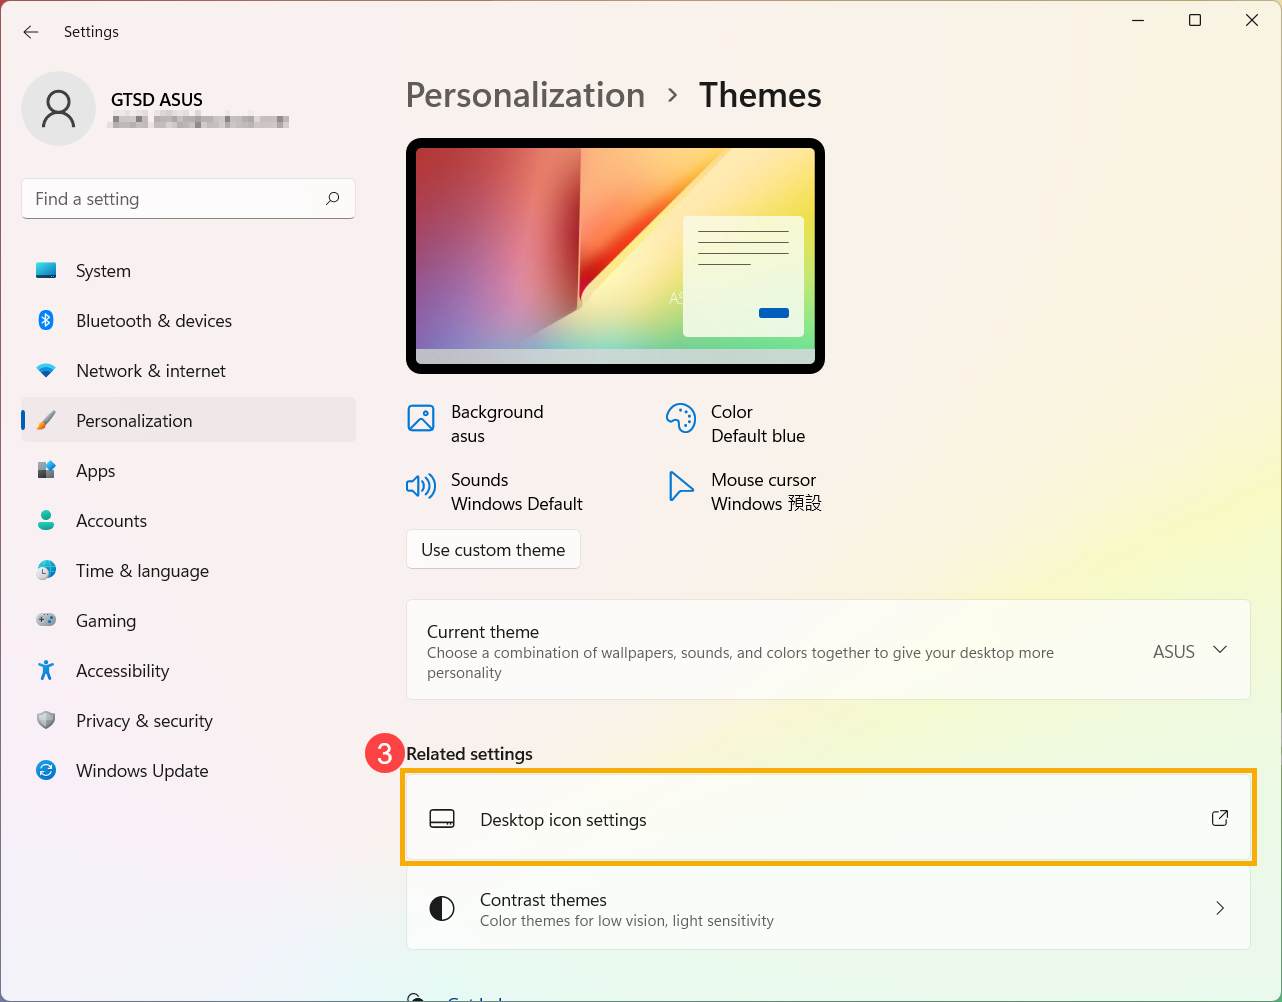
- В связанных настройках выберите [Настройки значка на рабочем столе]③.
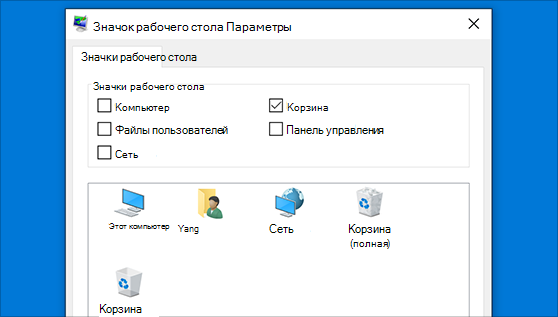
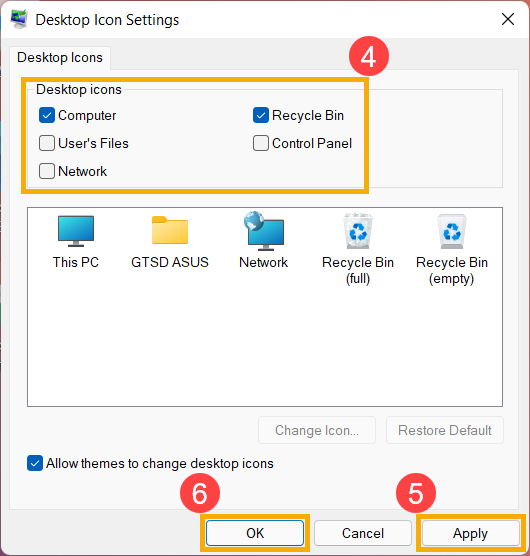
- Вы можете выбрать значки, которые хотите видеть на своем рабочем столе④, затем выберите [Применить]⑤ и [ОК]⑥, выбранные значки отобразятся на вашем рабочем столе.
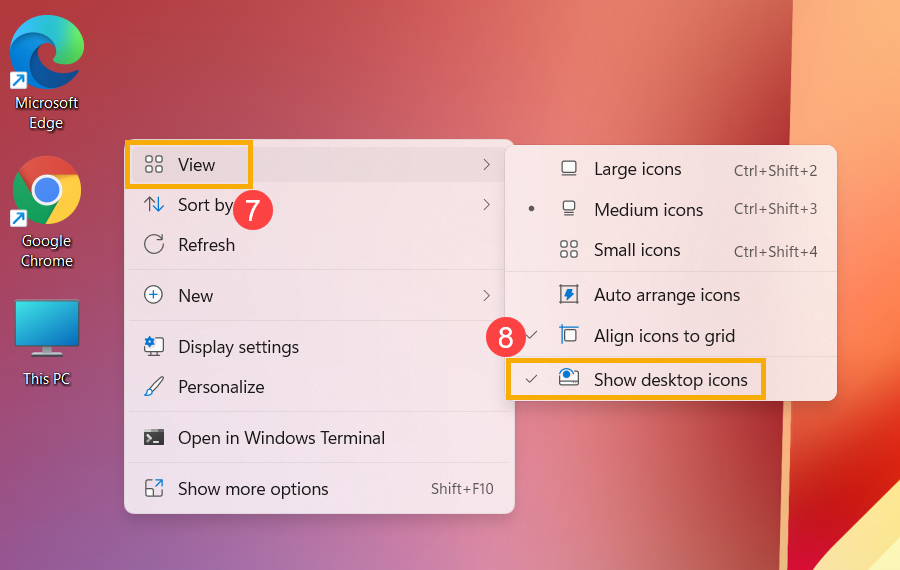
- Если вы хотите показать или скрыть значок на рабочем столе, щелкните правой кнопкой мыши в любом месте рабочего стола, выберите [Вид]⑦, а затем установите или снимите флажок [Показать значки на рабочем столе]⑧.
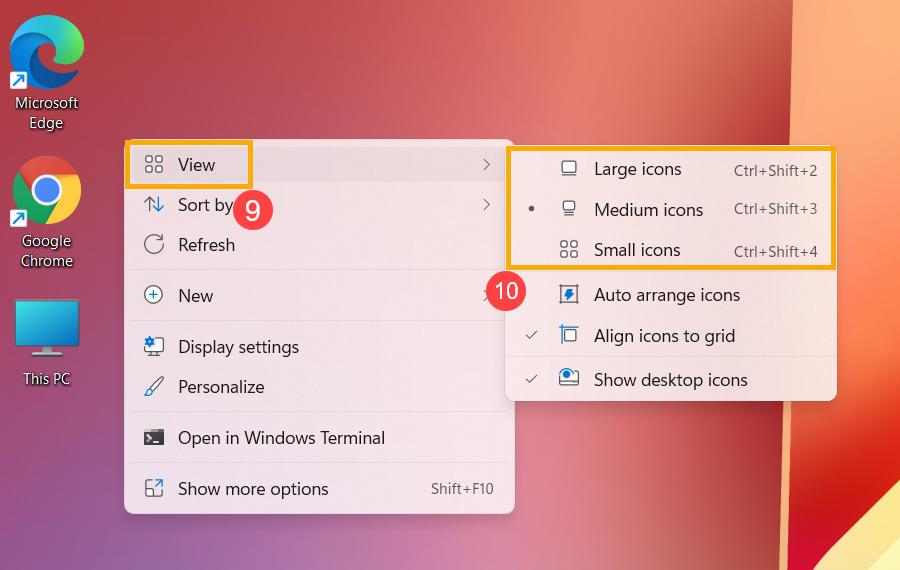
- Если вы хотите настроить размер значка на рабочем столе, щелкните правой кнопкой мыши в любом месте рабочего стола, выберите [Вид]⑨, а затем выберите [Крупные значки], [Средние значки] или [Маленькие значки]⑩.
Windows 10
- Укажите в поисковой строке Windows [Темы и сопутствующие параметры] ①, и выберите [Открыть]②.
- В связанных настройках выберите [Параметры значков рабочего стола]③.
- Вы можете выбрать значки, которые хотите разместить на рабочем столе ④, затем выберите [Применить] ⑤ и [OK] ⑥, выбранные значки отобразятся на рабочем столе.
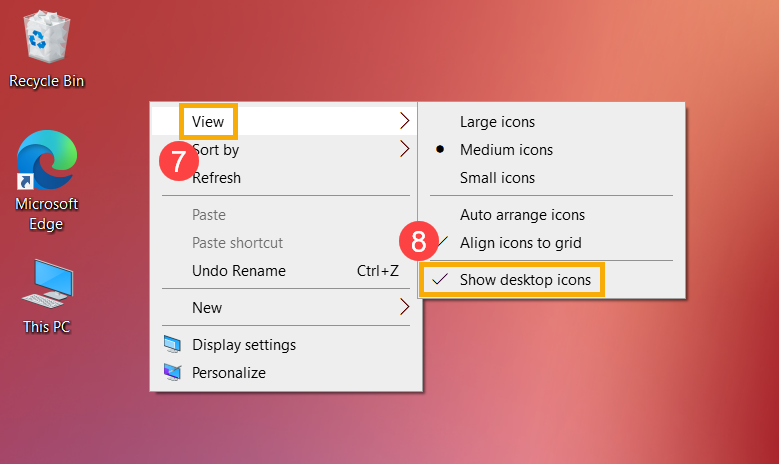
- Если вы хотите показать или скрыть значок рабочего стола, щелкните правой кнопкой мыши в любом месте рабочего стола, выберите [Вид] ⑦, а затем установите или снимите флажок [Показать значки рабочего стола] ⑧.
- Если вы хотите изменить размер значка на рабочем столе, щелкните правой кнопкой мыши в любом месте рабочего стола, выберите [Вид] ⑨, а затем выберите [Крупные значки], [Средние значки] или [Маленькие значки] ⑩.


-
Категория
Настройки Windows/ Система -
Тип
Product Knowledge
Эта информация была полезной?
Yes
No
- Приведенная выше информация может быть частично или полностью процитирована с внешних веб-сайтов или источников. Пожалуйста, обратитесь к информации на основе источника, который мы отметили. Пожалуйста, свяжитесь напрямую или спросите у источников, если есть какие-либо дополнительные вопросы, и обратите внимание, что ASUS не имеет отношения к данному контенту / услуге и не несет ответственности за него.
- Эта информация может не подходить для всех продуктов из той же категории / серии. Некоторые снимки экрана и операции могут отличаться от версий программного обеспечения.
- ASUS предоставляет вышеуказанную информацию только для справки. Если у вас есть какие-либо вопросы о содержании, пожалуйста, свяжитесь напрямую с поставщиком вышеуказанного продукта. Обратите внимание, что ASUS не несет ответственности за контент или услуги, предоставляемые вышеуказанным поставщиком продукта.
Содержание
- Выравнивание и сортировка
- Размер
- Добавление папок и ярлыков
- Отображение стандартных ярлыков
- Изменение оформления
- Вопросы и ответы

Выравнивание и сортировка
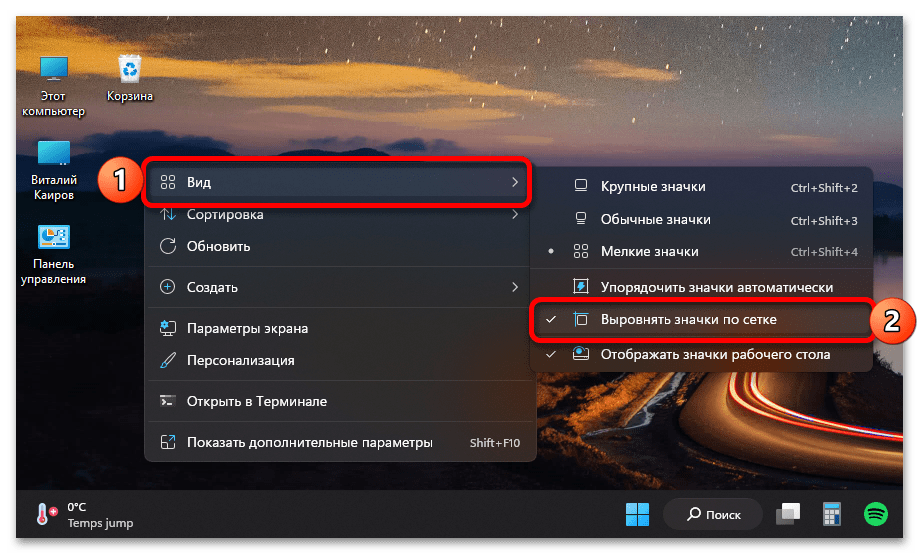
Первое, что стоит определить на этапе настройки значков рабочего стола в Windows 11 – это их расположение и выравнивание. Конечно, наиболее простым и удобным в контексте дальнейшего взаимодействия является размещение всех элементов, будь то ярлыки, файлы или папки, по собственному усмотрению. Однако, прежде чем перейти к этому, лучше обеспечить их выравнивание по сетке.
Для этого нажмите правой кнопкой мышки (ПКМ) в пустой области рабочего стола (РС) и последовательно перейдите по пунктам контекстного меню «Вид» — «Выровнять значки по сетке». Установите напротив указанной опции отметку, если вы хотите, чтобы значки располагались симметрично, то есть в одних и тех же (условных) строках и столбцах, либо снимите ее, если планируете размещать их произвольно и, что называется, неровно.
Далее, если вы хотите расположить ярлыки произвольным образом (так, как сочтете наиболее удобным для себя), последовательно переместите каждый из них в удобное место экрана, определите порядок и очередность. Делается это путем банального зажатия элемента левой кнопкой мышки (ЛКМ) и последующего перетаскивания.

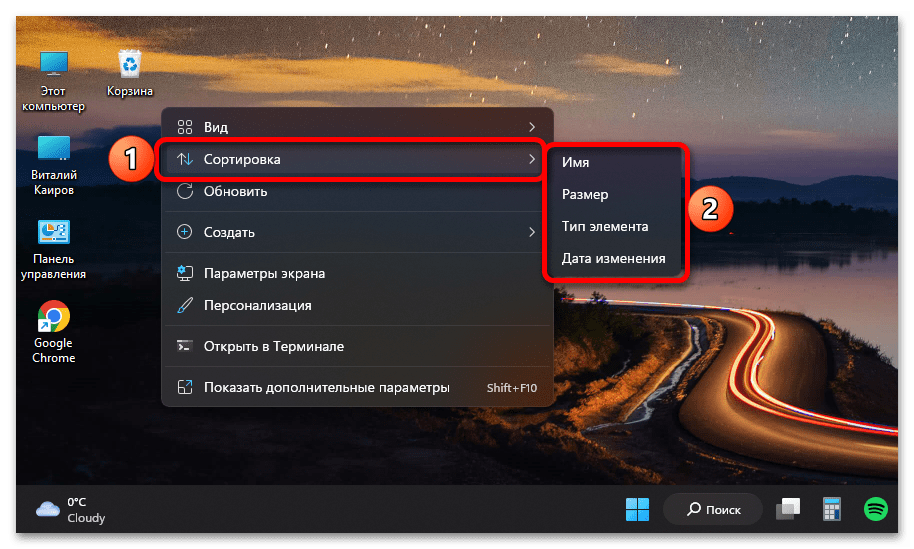
Существует и альтернативный, более «систематизированный» вариант – порядок ярлыков на РС можно отсортировать по одному из четырех параметров:
- «Имя»;
- «Размер»;
- «Тип»;
- «Дата изменения».
Для этого в контекстном меню предусмотрен пункт «Сортировка» — после выбора любого из соответствующих вариантов элементы рабочего стола будут упорядочены соответствующим образом.
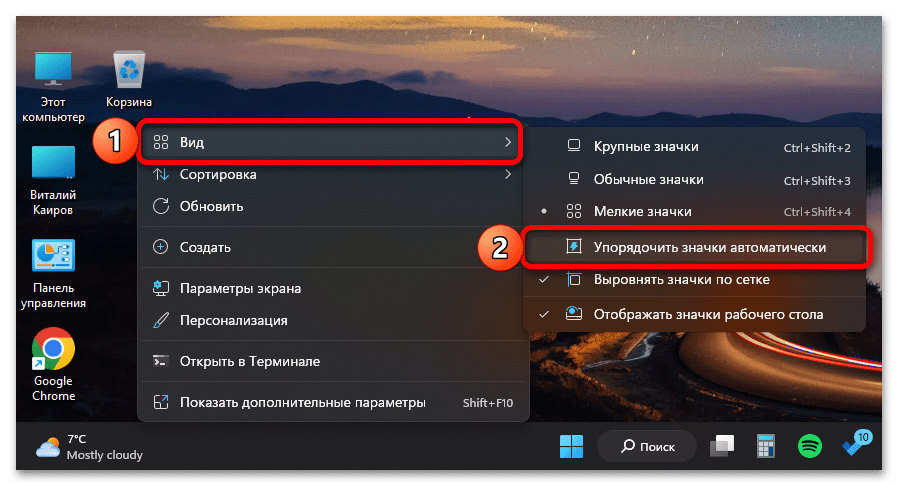
Примечание: Вы также можете «Упорядочить значки автоматически» для этого в разделе контекстного меню «Вид» предусмотрен соответствующий пункт. После его выбора элементы на РС будут расположены и отсортированы в порядке, определяемом операционной системой по умолчанию, их произвольное перемещение при этом станет недоступным до тех пор, пока соответствующая опция активна.
Размер
Следующий аспект настройки значков РС, который мы рассмотрим – это их размер. По умолчанию доступно три варианта (они представлены в рамках пункта контекстного меню «Вид», также доступны сочетания клавиш для более быстрого применения):
- «Крупные» («Ctrl+Shift+2»);
- «Обычные» («Ctrl+Shift+3»);
- «Мелкие» («Ctrl+Shift+4»).
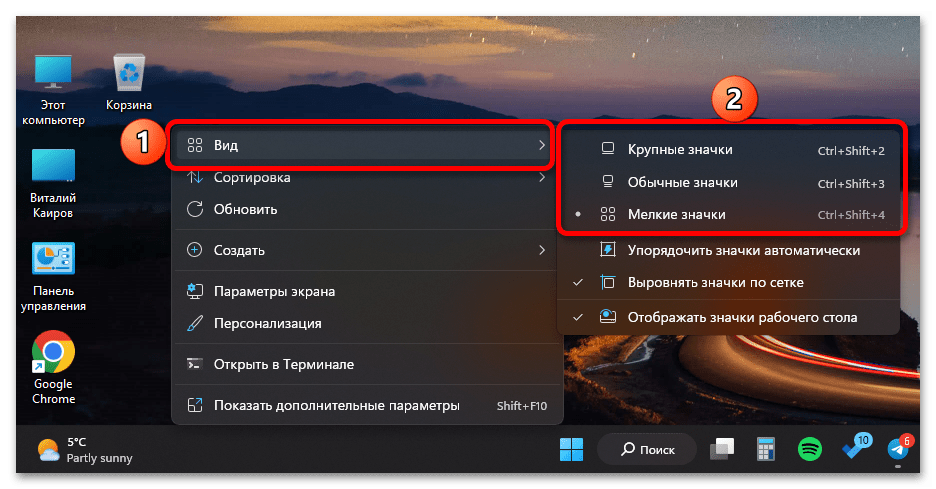
При этом размер элементов РС можно изменить и произвольно, с меньшим или большим шагом, чем указано выше. Для этого достаточно кликнуть по пустому месту области ЛКМ, затем зажать клавишу «Ctrl» и начать вращать колесико мышки вперед или назад, тем самым, соответственно, увеличивая или уменьшая отображаемые объекты.

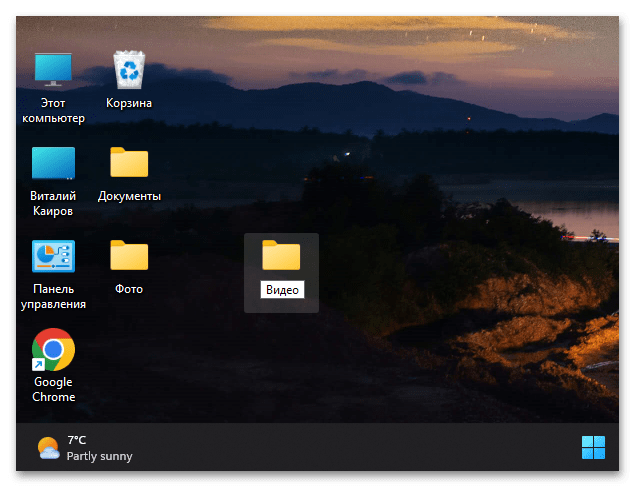
Добавление папок и ярлыков
Для большего удобства файлы и ярлыки, помещенные на рабочий стол, можно группировать по папкам, создание которых доступно в контекстном меню.
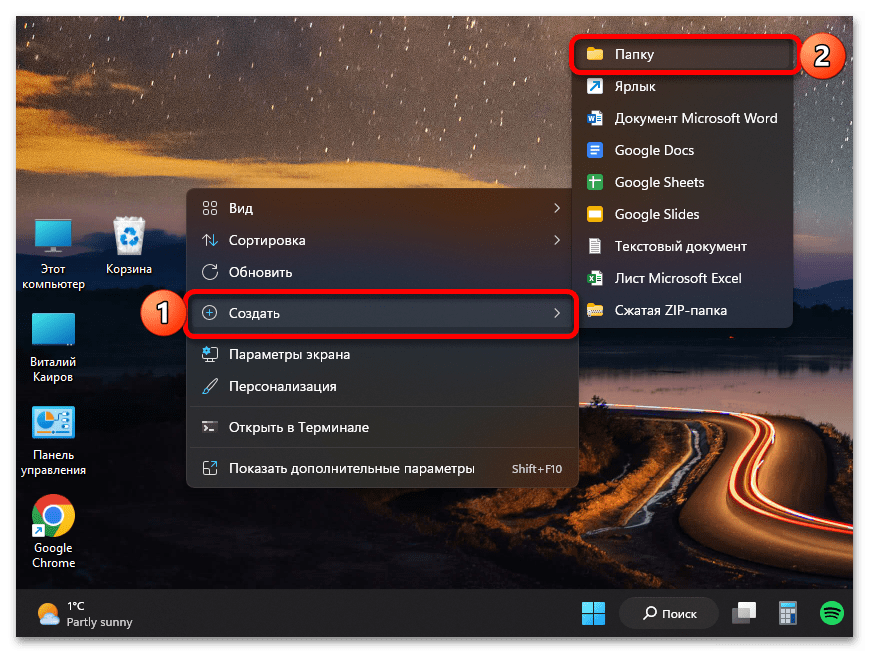

Так, если вы по каким-то причинам храните на рабочем столе документы, фотографии, музыку, видео и другой контент, его можно рассортировать по соответствующим директориям, задав им лаконичные и понятные названия, а также по необходимости изменив значок (об этом более подробно будет рассказано в последней части статьи).
Помимо стандартных ярлыков и тех, которые добавляются при установке различных программ, на РС можно создавать собственные ярлыки, предоставляющие как возможность быстрого запуска часто используемых приложений, так и те, что ведут к различным папкам на диске ПК.
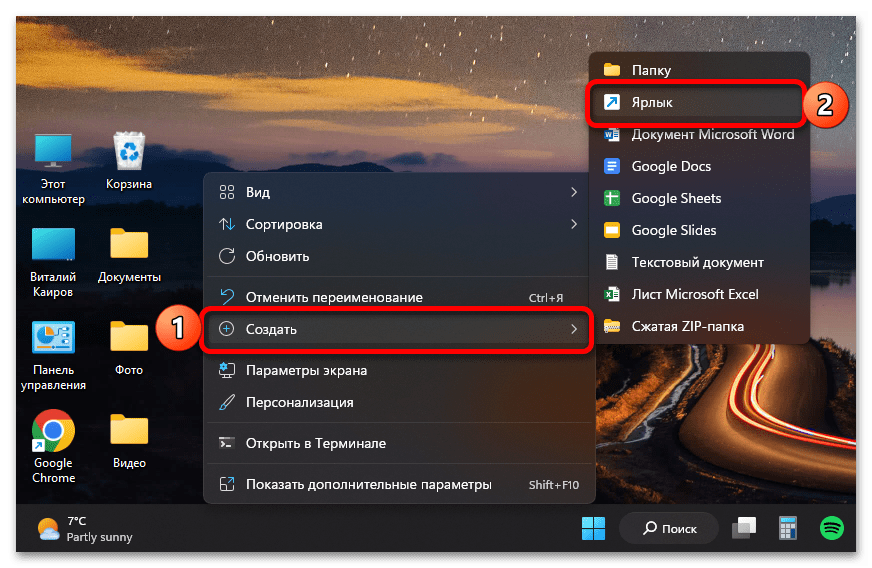
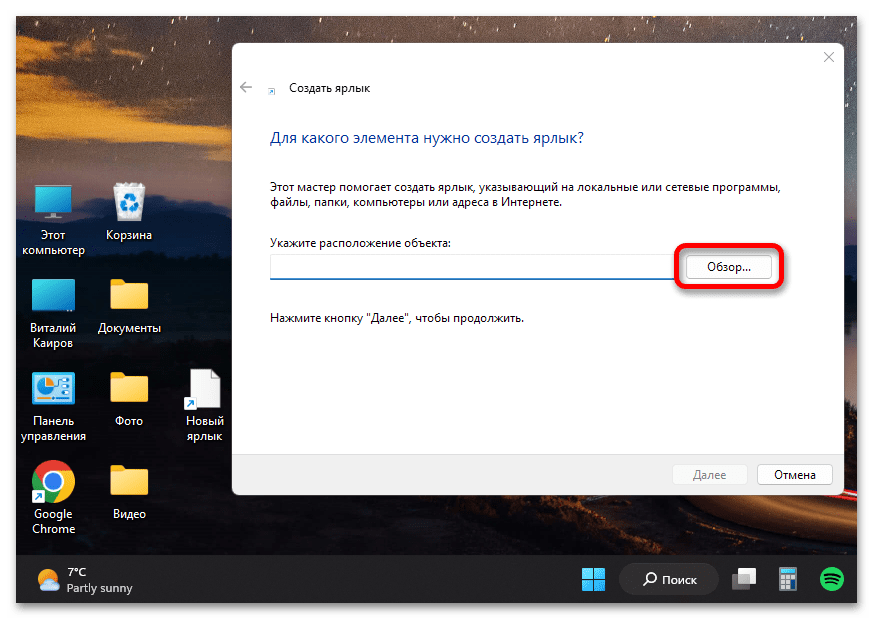
Все это тоже делается через контекстное меню, причем доступно два варианта – либо вы «отправляете» директорию или программу как ярлык на рабочий стол, либо создаете его полностью вручную, указывая нужное расположение в окне пошагового Мастера. Более детально обо всех нюансах данной процедуры мы рассказывали в следующей статье.
Подробнее: Как создать ярлык на РС в Виндовс
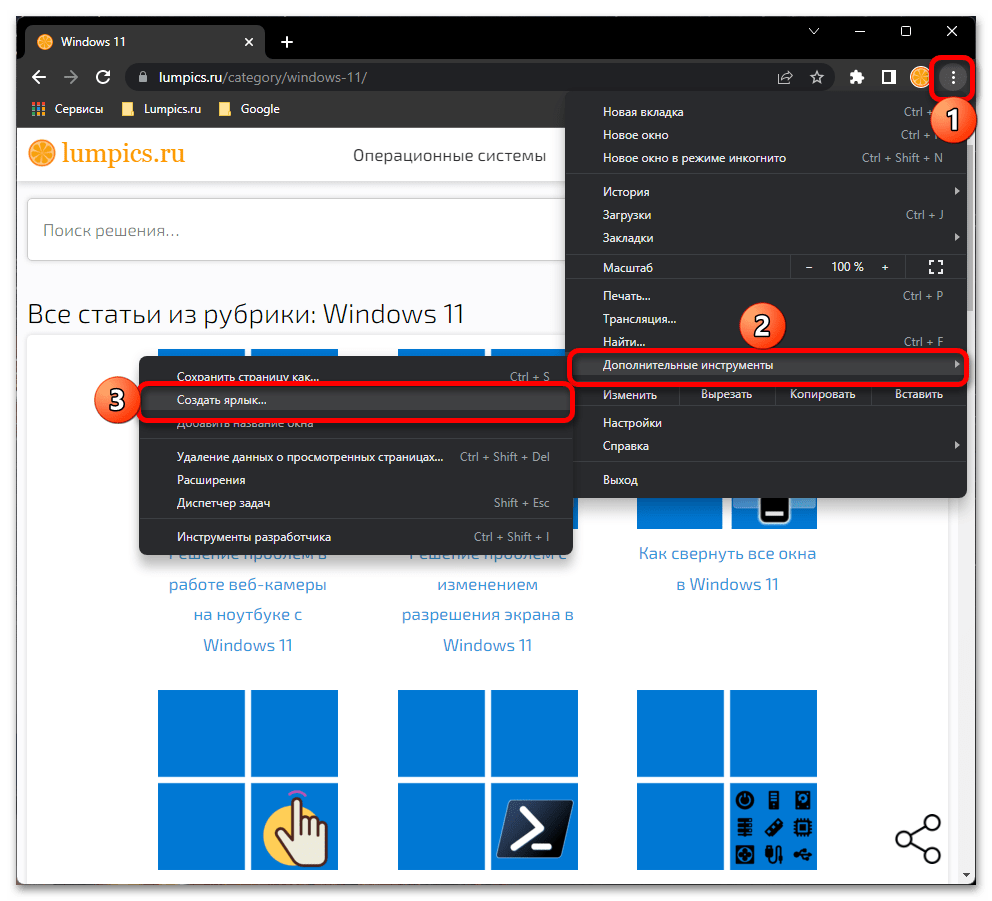
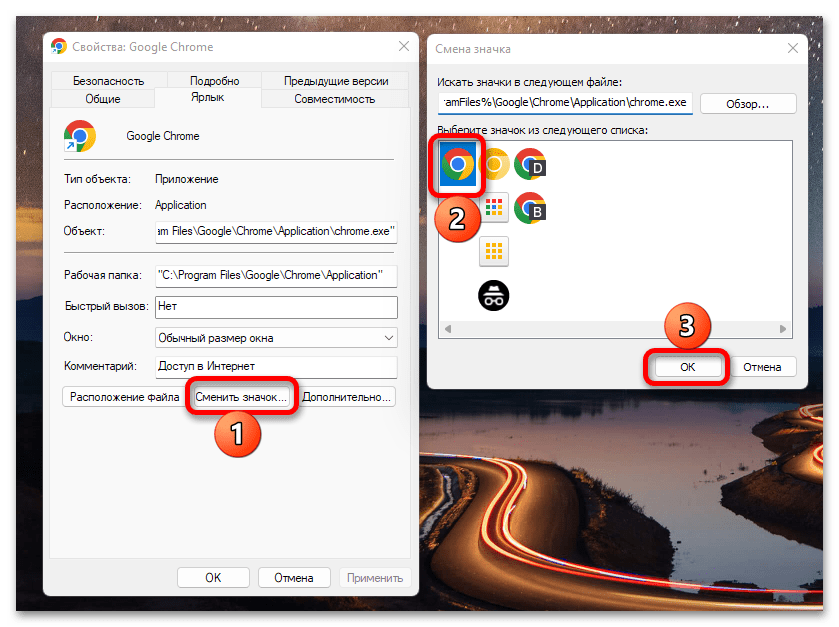
Отдельно стоит отметить то, что на рабочем столе можно создавать своего рода закладки – ярлыки, ведущие на часто используемые сайты и позволяющие, в зависимости от настроек, открывать их как в окне основного браузера, так и отдельно, в виде веб-приложения. Далее на примере Google Chrome покажем, как это делается.
- Откройте нужный сайт и перейдите на ту его страницу, которую хотите видеть в дальнейшем при запуске (например, главная или какой-то конкретный раздел). Вызовите меню веб-обозревателя, наведите курсор на пункт «Дополнительные инструменты» и выберите «Создать ярлык».
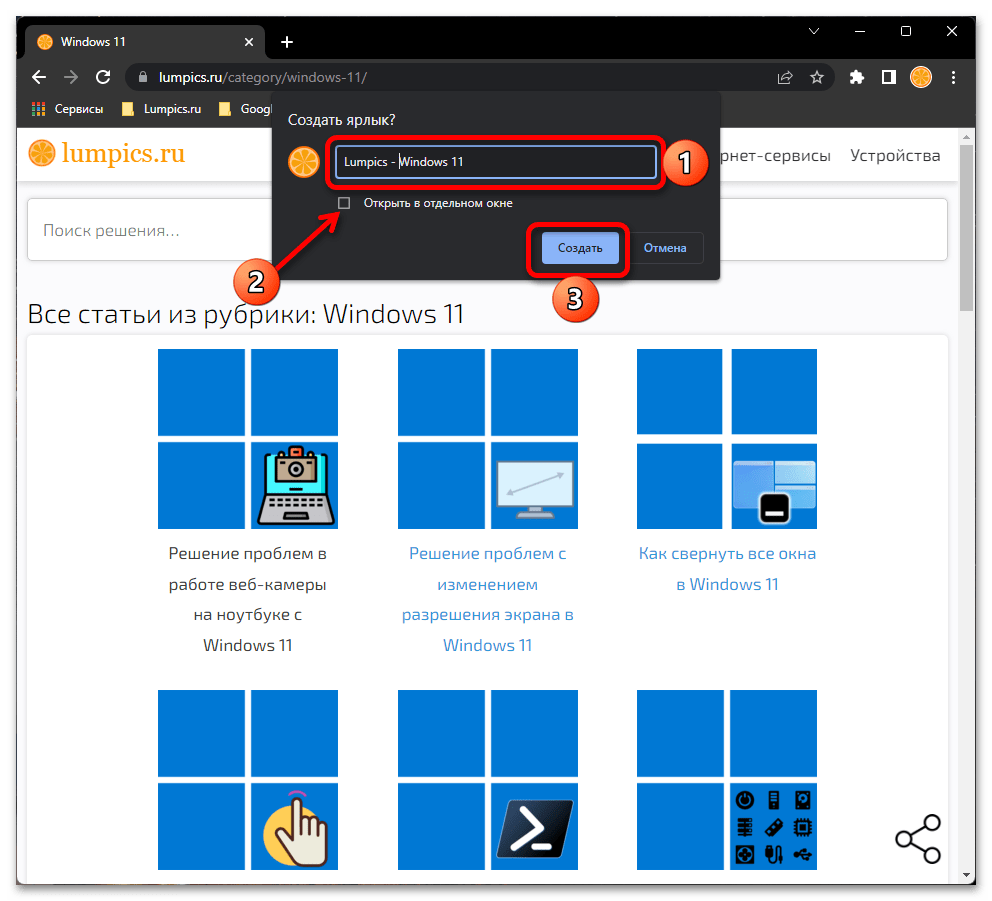
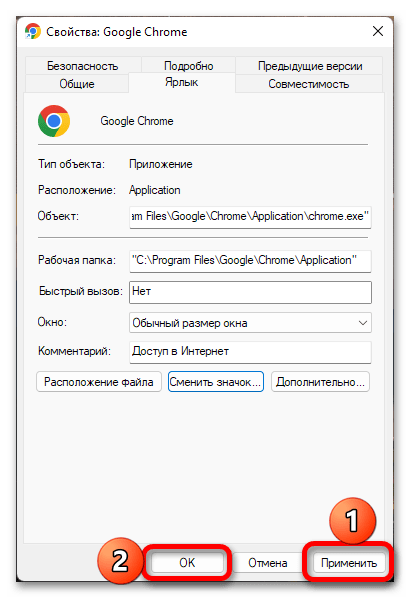
- Укажите желаемое название для будущего ярлыка. Если хотите, чтобы сайт открывался в отдельном окне, по сути, в виде независимого веб-приложения, а не просто как одна из вкладок в браузере, установите галочку напротив соответствующего пункта. Для подтверждения нажмите «Создать».
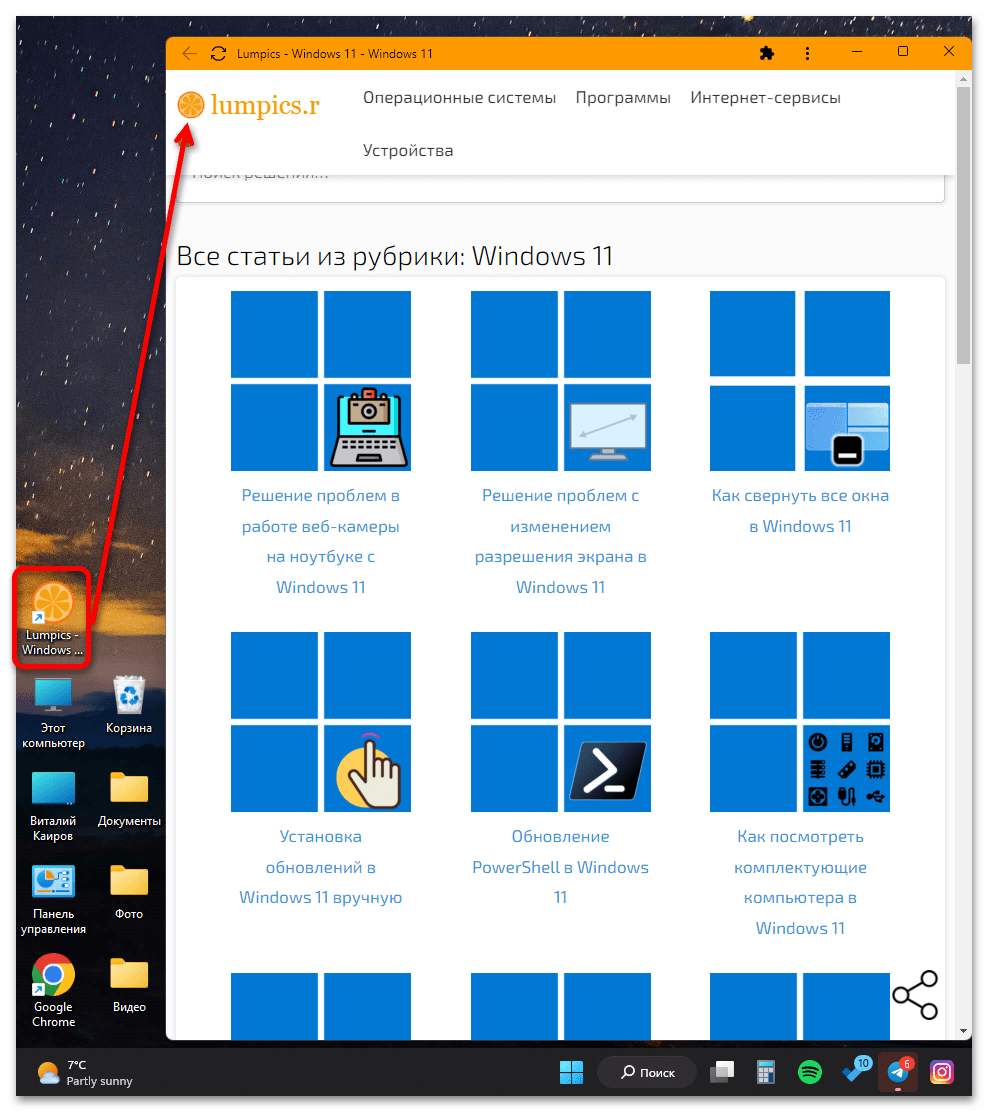
- Теперь вы сможете открывать выбранный сайт прямо с РС, а не переходить к нему из закладок веб-обозревателя.
Читайте также: Как добавить ярлык YouTube на рабочий стол
Отображение стандартных ярлыков
Большинство пользователей привыкли, что на рабочем столе отображаются ярлыки «Этот компьютер» и «Корзина», однако кому-то они не нужны, а кто-то, наоборот, может захотеть добавить еще несколько стандартных для операционной системы элементов. В Windows 11, как и в предыдущих версиях ОС от Microsoft, есть такая возможность, правда, весьма ограниченная.
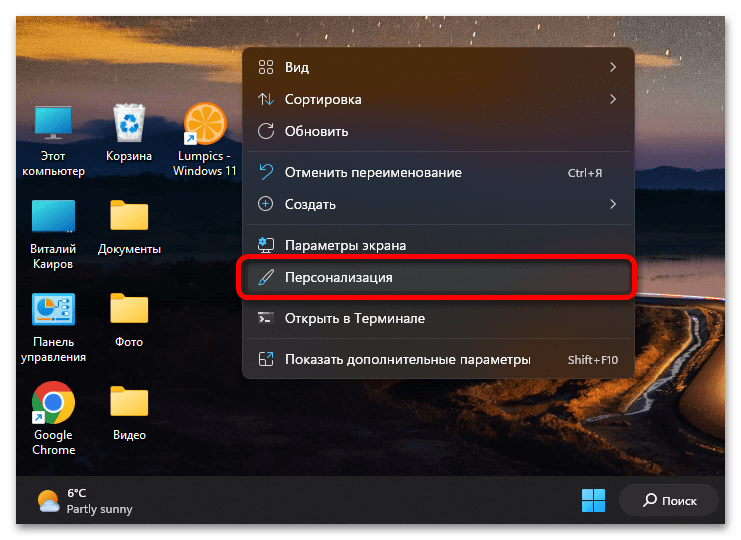
- Кликните ПКМ по пустому месту РС и выберите пункт «Персонализация».
- В «Параметрах», которые будут открыты, перейдите к разделу «Темы».
- Пролистайте вниз список с доступными в ОС вариантами оформления и нажмите на пункт «Параметры значков рабочего стола».
- Установите галочки напротив тех ярлыков, которые хотите видеть на рабочем столе и/или снимите с тех, что сочтете ненужными в данной области. Воспользуйтесь кнопками «Применить» и «ОК» для того, чтобы внесенные изменения вступили в силу.


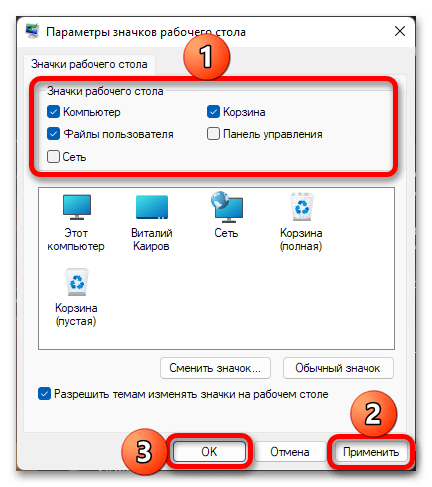
Обратите внимание! В показанном выше окне вы также можете изменить значок ярлыка на любой из множества доступных в стандартном наборе ОС, а также разрешить или запретить темам изменять значки на РС.

Читайте также: Параметры значков рабочего стола в ОС Виндовс 11
Изменение оформления
Последним, что касается темы настройки ярлыков на рабочем столе в Виндовс 11, является изменение их внешнего вида. Это может быть сделано, как минимум, двумя методами:
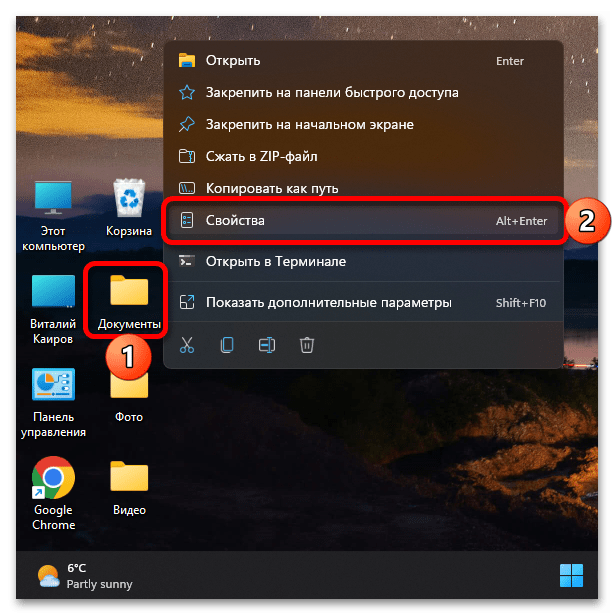
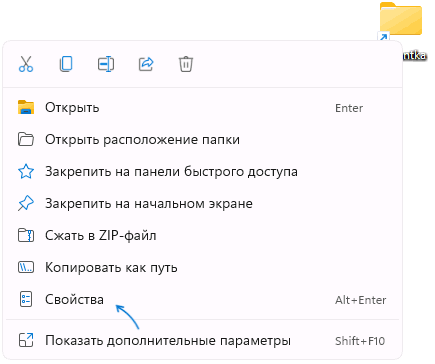
- Нажмите правой кнопкой мышки по ярлыку или папке, значок которой требуется изменить, и выберите в контекстном меню пункт «Свойства».
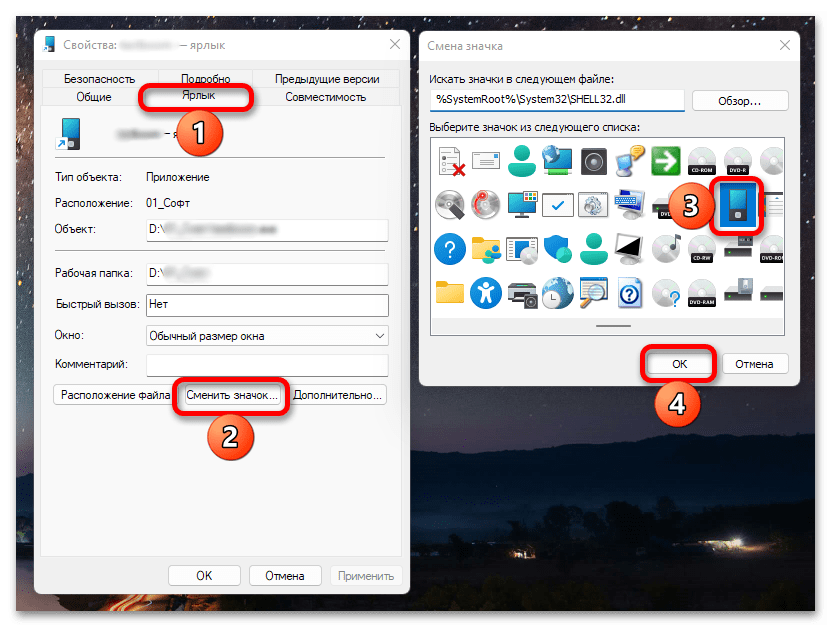
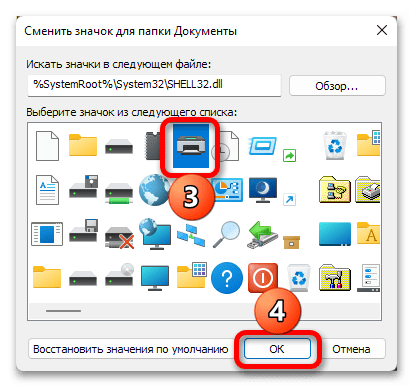
- Нажмите на кнопку «Сменить значок» и выберите предпочтительный из списка доступных или загрузите собственный графический файл с расширением ICO.

Примечание: Довольно простым и удобным методом создания собственных иконок является приложение Quick Icons Lite, с помощью которого можно уменьшить до нужных размеров и затем конвертировать в поддерживаемый формат любое изображение.
Установить Quick Icons Lite из Microsoft Store

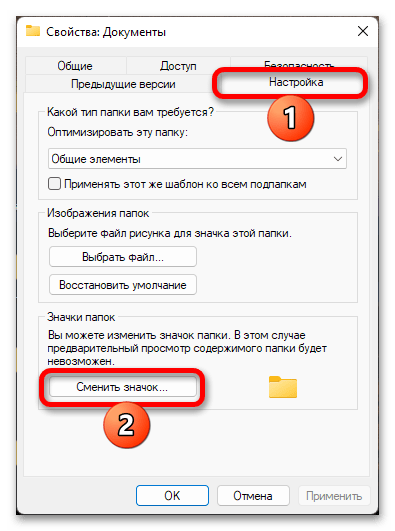
Если значок меняется для папки, потребуется перейти во вкладку ее свойств «Настройка», воспользоваться обозначенной кнопкой

и выбрать один из доступных вариантов.

Обратите внимание! Достаточно большой набор альтернативных иконок по умолчанию доступен только для системных приложений, при этом некоторые сторонние содержат собственные наборы.
- Для сохранения внесенных изменений нажмите «Применить» и «ОК».
Читайте также: Установка тем оформления в ОС Windows 11
Обратите внимание! Если вы захотите полностью скрыть все элементы на рабочем столе, снимите галочку напротив показанного ниже пункта контекстного меню. По сути, указанные ярлыки, папки и файлы останутся на своих местах и по-прежнему будут доступны (например из «Проводника»), но конкретно на главном экране операционной системы их не будет видно.

Читайте также: Как свернуть все окна в Виндовс 11
Сторонние наборы иконок
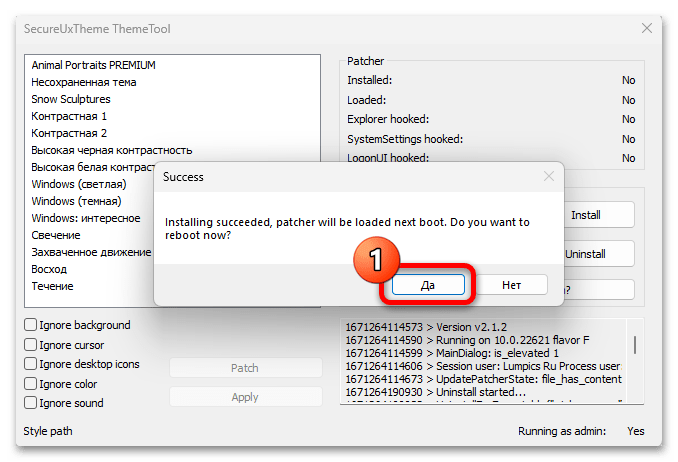
Наверняка стандартный набор значков, представленный в Windows 11, многим покажется недостаточно разнообразным и привлекательным, и уж тем более не каждый будет готов самостоятельно создавать подходящие изображения. Оптимальным решением в данном случае является установка иконок с помощью стороннего программного обеспечения, о чем мы ранее рассказывали в отдельной статье. Несмотря на то что написана она на примере десятой версии ОС от Майкрософт, все решения будут применимы и в более свежей.
Подробнее: Установка новых иконок в Виндовс
![]() В Windows 11 для различных элементов: значков «Этот компьютер» и «Корзина», папок, файлов, дисков и других элементов используются привычные и стандартные значки, слегка обновленные по сравнению с предыдущими версиями системы. При желании, эти значки (или иконки) можно поменять.
В Windows 11 для различных элементов: значков «Этот компьютер» и «Корзина», папок, файлов, дисков и других элементов используются привычные и стандартные значки, слегка обновленные по сравнению с предыдущими версиями системы. При желании, эти значки (или иконки) можно поменять.
В этой пошаговой инструкции подробно о том, как изменить значки для различных элементов в Windows 11, а также кратко о том, где взять файлы для значков/иконок.
Изменение значков системных элементов рабочего стола: Этот компьютер, Корзина, Папка пользователя, Сеть
На рабочем столе Windows 11 могут размещаться системные значки, не являющиеся папками или ярлыками: самые часто используемые — Этот компьютер (Мой компьютер) и Корзина. Изменить иконки для них можно в параметрах значков рабочего стола.
Шаги будут следующими:
- Откройте параметры значков рабочего стола, для этого можно нажать правой кнопкой мыши по кнопке «Пуск», выбрать пункт «Выполнить» и ввести desk.cpl ,5 (пробел перед запятой обязателен) или перейти в Параметры — Персонализация — Темы — Параметры значков рабочего стола. Подробнее на тему: Как включить значок компьютера на рабочем столе Windows 11.
- Выберите нужный элемент, иконку которого вы хотите изменить и нажмите «Сменить значок».

- Выберите нужный значок из файлов ICO, библиотек DLL или файлов EXE. Подробнее о том, где раздобыть значки — в конце инструкции.
- Примените сделанные настройки.
Аналогичным образом вы можете поменять другие системные значки, например, установить свои иконки полной и пустой корзины.
Как изменить значки папки или ярлыка
Изменение значков папок и ярлыков Windows 11 выполняется почти одинаково, необходимые шаги:
- Нажмите правой кнопкой мыши по папке или ярлыку и выберите пункт «Свойства» в контекстном меню.

- Если это папка, то перейдите на вкладку «Настройка» и нажмите кнопку «Сменить значок». Если это ярлык, то перейдите на вкладку «Ярлык» и нажмите кнопку «Сменить значок».

- Выберите нужный значок из файлов иконок (ICO) или содержащих значки библиотек DLL и файлов EXE, примените настройки.
В результате значок выбранного элемента будет изменён. Если этого не произошло, нажмите клавишу F5 на рабочем столе (если значок располагается на нём) или в нужной папке, чтобы обновить отображаемые значки. В контексте темы может пригодиться: Как убрать стрелки с ярлыков Windows 11.
Изменение значков дисков Windows 11
В отличие от выше рассмотренных элементов, изменение значков дисков выполняется не столь очевидными методами. Для выполнения этой задачи придётся использовать редактор реестра:
- Нажмите правой кнопкой мыши по кнопке «Пуск» и выберите пункт «Выполнить», введите regedit и нажмите Enter для открытия редактора реестра.
- Перейдите к разделу реестра
HKEY_LOCAL_MACHINESOFTWAREMicrosoftWindowsCurrentVersionExplorerDriveIcons
- Нажмите правой кнопкой мыши по разделу DriveIcons, выберите «Создать» — «Раздел» и создайте раздел с именем, соответствующим букве диска, например, C.
- Внутри созданного подраздела создайте ещё один с именем DefaultIcon.
- Выберите созданный подраздел и в правой панели редактора реестра дважды нажмите по значению «По умолчанию».

- В поле «Значение» укажите путь к файлу иконки (ICO) в кавычках, либо к индексу иконки в файле DLL без кавычек (пример: C:Windowssystem32imageres.dll,-55).
- Примените сделанные настройки. Может потребоваться перезапуск проводника.

В результате, когда вы повторно откроете проводник, вы увидите изменённый значок диска. Есть и другие способы сделать это, более подробно в инструкции Как изменить значок (иконку) диска или флешки в Windows.
Изменение значков для типов файлов
При необходимости вы можете изменить значки для типов файлов. Ранее это была сравнительно простая задача, которая выполнялась почти так же, как смена значков для дисков в реестре: путем замены значения по умолчанию DefaultIcon для типа файла. Сегодня, когда для стандартных типов файлов многие иконки берутся из приложений Microsoft Store, выполнение задачи в реестре возможно, но трудоёмко.
Я рекомендую использовать бесплатную утилиту NirSoft FileTypesMan — в ней достаточно будет дважды нажать по нужному типу файла и задать нужный значок в пункте «Default Icon», как на изображении ниже.
![]()
Останется лишь применить настройки, чтобы значок всех файлов с указанным расширением изменился на выбранный.
Где взять значки для Windows
Значки для Windows 11 можно найти как в системе, так и скачать из Интернета или даже сделать самостоятельно.
- В папке C:WindowsSystem32 есть несколько библиотек DLL с хорошими наборами системных значков: imageres.dll, shell32.dll, ddores.dll. Для определения индекса иконок в DLL можно использовать утилиту NirSoft IconsExtract.
- Файлы значков с расширением .ico можно найти в Интернете.
- Файлы PNG с прозрачным фоном можно найти в Интернете, а при необходимости — нарисовать самостоятельно, после чего использовать любой онлайн-конвертер PNG в ICO
- Есть программы для создания и редактирования иконок, причем в одном файле ICO могут быть значки с разными разрешениями. Можно обойтись и без программ, а с помощью онлайн-сервисов, например, xiconeditor.com
Если у вас остаются вопросы, касающиеся изменения значков различных элементов в Windows 11 — задавайте их в комментариях, не исключено, что решение найдётся.
Операционная система Windows 7 позволяет настраивать дизайн и другие тонкости под каждого пользователя лично.
Главная страница, которая чаще всего попадается на глаза и выполняет функцию быстрого доступа к приложениям и файлам — рабочий стол, тоже подлежит детальному редактированию, а его главные составляющие — ярлыки, можно изменить: уменьшить или увеличить, назначить другие свойства и значок.

Что такое «Ярлык» какую функцию он выполняет
Ярлык — это прямая ссылка на исполнительный модуль какой-либо программы. То есть в папке, в которую вы что-нибудь установили, находится специальное приложение, запустив которое можно открыть саму программу. Чтобы каждый раз не искать в многочисленных папках это приложение, создают его ярлык на рабочий стол или в другое удобное место.
Для еще более быстрого доступа к приложениям существует панель задач, которая не пропадает при открытии окон или программ, а все ярлыки на ней запускаются в одно нажатие.

Чтобы посмотреть, к какому приложению относится ярлык рабочего стола, кликнете по нему правой кнопкой мыши, а после выберите раздел «Расположение файла».

Чтобы узнать ту же информацию о ярлыке на панели задач, нажмите на него правой кнопкой мыши, затем нажмите правой кнопкой на его название или значок и кликнете по параметру «Свойства».

В появившемся окне путь до исходного приложения будет указан в разделе «Объект»:

Уменьшить или увеличить — настраиваем масштаб
Если на экране уже нет места, а удалить лишние ярлыки нет возможности, то можно уменьшить их размер. Если же вам по каким-то причинам некомфортно использовать ярлыки стандартного размера, то можно увеличить каждый из них. Но помните, что после изменений их размеров, распорядок может сбиться, так как поменяется формат сетки, и вам придется расставлять ярлыки заново.
Через редактирование свойств рабочего стола
Чтобы изменить размер ярлыков через встроенные настройки рабочего стола, сделайте следующее:
Используя колесико мыши
Есть еще один способ редактирования размеров ярлыков, который дает намного больше трех вариантов масштаба:
Видео: большие и маленькие — как изменить размер значков на рабочем столе Windows 7
Как удалить значки стрелок
Чтобы удалить стрелочку с иконки ярлыка, сделайте следующее:
Есть второй способ, позволяющий добиться цели:
Видео: как убрать ярлыки с рабочего стола
Удаление значка щита
Значок щита обозначает, что приложение работает, только если вы обладаете правами администратора. Чтобы отключить контроль учетных записей, а вместе с ними значок щита, пройдите эти шаги:
Как поменять свойства и внешний вид
Если вам по каким-то причинам доставляет дискомфорт внешний вид ярлыков, установленных вами программ, то воспользуйтесь этой инструкцией:
Чтобы сменить ярлыки системных программ, таких как «Корзина» или «Мой компьютер», выполните следующие действия:
Видео: меняем значок
Как удалить один ярлык или скрыть все сразу
Чтобы удалить определенный ярлык, кликнете по нему правой кнопкой мыши и выберите пункт «Удалить».

Если вы хотите скрыть все ярлыки разом, то сделайте следующее:
Как восстановить
Если с момента удаления ярлыка вы не производили очистки приложения «Корзина», то зайдите в нее и кликнете по нужному файлу правой кнопкой мыши и выберите пункт «Восстановить». Если корзина была очищена, то восстановить ярлык не получится.

Что делать, если ярлыки удаляются сами по себе
Причиной для таких происшествий может стать ошибка в приложении, к которому вел ярлык. После каждой перезагрузки Windows проверяет все ярлыки, находящиеся на рабочем столе, и если какой-то из них ведет к приложению с ошибкой, автоматически удаляет. Но если эта функция работает неправильно или мешает вам, то есть два выхода:
Снизить количество ярлыков на рабочем столе до четырех, вследствие чего самоочищение системы перестанет работать. Сделать это можно, сгруппировав все ярлыки по папкам, или удалив лишние.
Второй способ — отключить функцию самоочищения, выполнив следующие шаги:
Чтобы за компьютером было приятно и удобно работать, старайтесь не засорять лишний раз рабочий стол ярлыками и файлами. По возможности группируйте их в папки, это поможет как можно дольше не волноваться о количестве свободного места на экране. Если такой возможности нет, то уменьшите масштаб каждого ярлыка. Но помните, что система может самостоятельно принять решение об удалении ярлыка с рабочего стола, если уверена, что он не ведет к работающей программе.
Источник