Содержание
- Методы изменения
- Способ 1: CursorFX
- Способ 2: Создание собственного указателя
- Способ 3: Свойства мыши
- Вопросы и ответы

Многим нравится разнообразие и оригинальность, и пользователи ПК не исключение. В связи с этим некоторых юзеров не удовлетворяет стандартный вид курсора мышки. Давайте разберемся, как его поменять на Windows 7.
Читайте также: Как изменить курсор мыши на Виндовс 10
Методы изменения
Сменить указатели курсора можно, как и выполнить большинство других действий на компьютере, двумя способами: при помощи сторонних программ и используя встроенные возможности операционной системы. Рассмотрим подробнее возможности решения поставленной задачи.
Способ 1: CursorFX
Прежде всего, рассмотрим способы с использованием сторонних приложений. А начнем мы обзор, наверное, с самой популярной программы для смены курсора – CursorFX.
Установить CursorFX
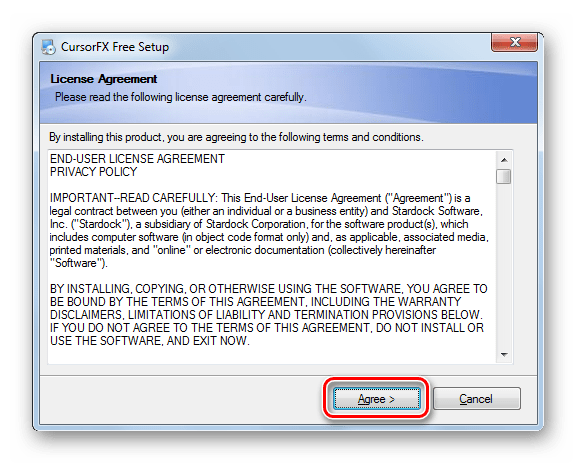
- После загрузки установочного файла данной программы следует её установить. Активируйте инсталлятор, в открывшемся окне нужно будет принять соглашение с разработчиком, нажав «Agree».
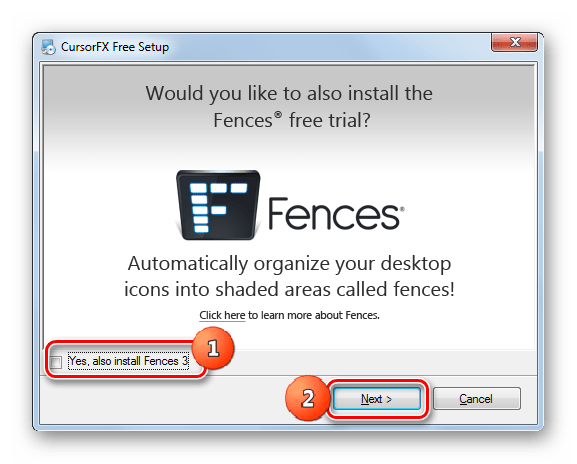
- Далее будет предложено установить дополнительный программный продукт. Так как нам этого не нужно, снимайте галочку около надписи «Yes» и жмите «Next».
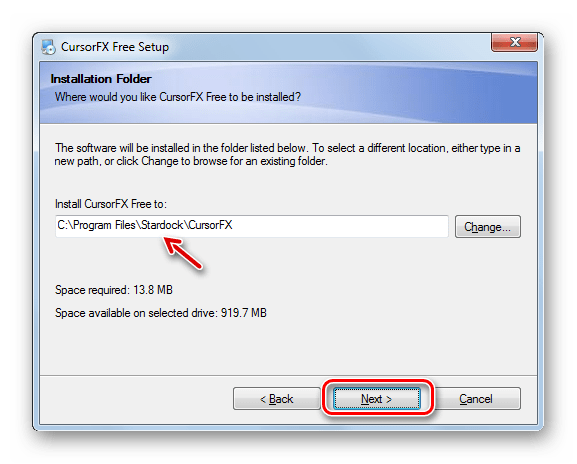
- Теперь следует указать, в какую именно директорию требуется установить приложение. По умолчанию каталогом установки является стандартная папка размещения программ на диске C. Рекомендуем не изменять данный параметр и нажать «Next».
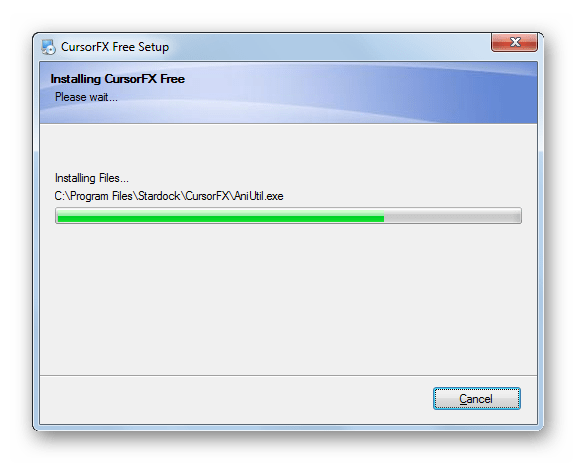
- После нажатия на указанную кнопку будет выполнена процедура инсталляции приложения.
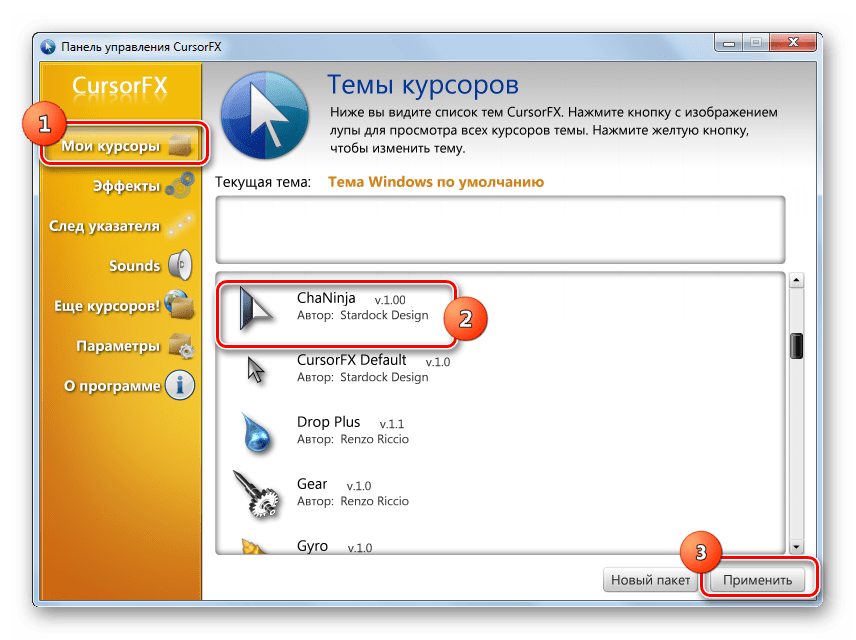
- После её окончания интерфейс программы CursorFX откроется автоматически. Перейдите в раздел «Мои курсоры» при помощи левого вертикального меню. В центральной части окна выберите форму указателя, который желаете установить, и жмите «Применить».
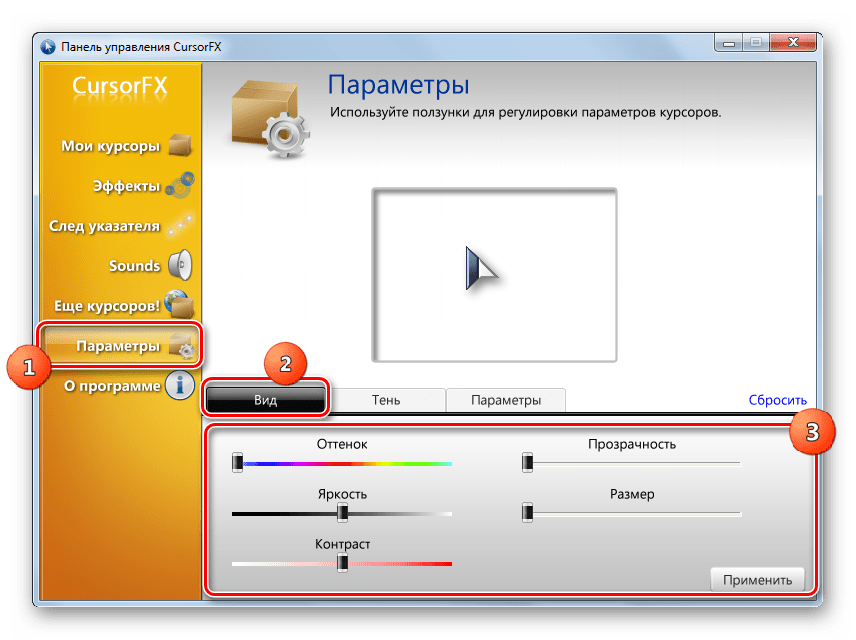
- Если простое изменение формы вас не удовлетворяет и вы хотите более точно настроить курсор под свои предпочтения, то перейдите в раздел «Параметры». Тут путем перетягивания ползунков во вкладке «Вид» можно задать следующие настройки:
- Оттенок;
- Яркость;
- Контраст;
- Прозрачность;
- Размер.
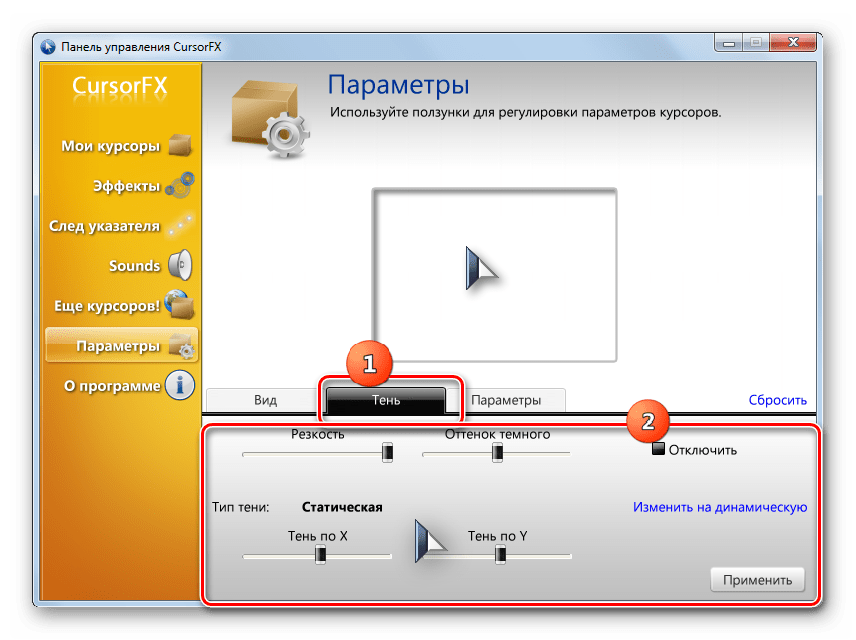
- Во вкладке «Тень» того же раздела путем перетягивания ползунков существует возможность регулировки тени, отбрасываемой указателем.
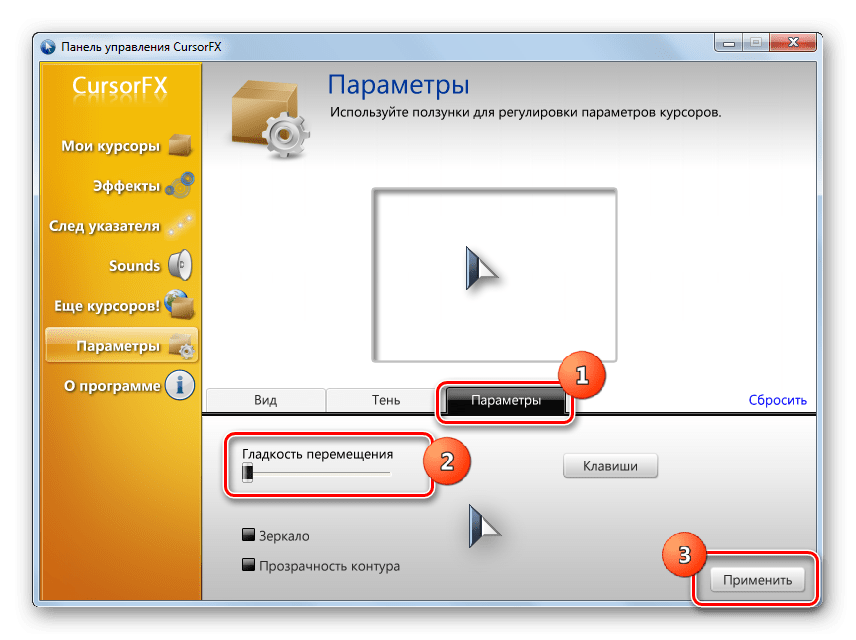
- Во вкладке «Параметры» можно настроить гладкость перемещения. После установки настроек не забывайте жать на кнопку «Применить».
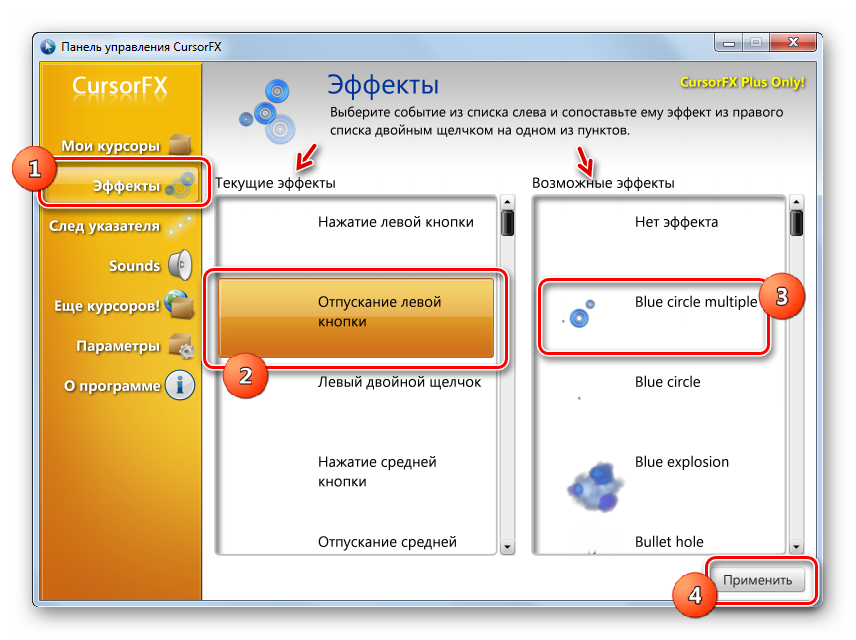
- Также в разделе «Эффекты» можно выбрать дополнительные сценарии отображения указателя при выполнении определенного действия. Для этого в блоке «Текущие эффекты» выберите действие, при котором будет выполняться сценарий. Затем в блоке «Возможные эффекты» выбирайте сам сценарий. После выбора жмите «Применить».
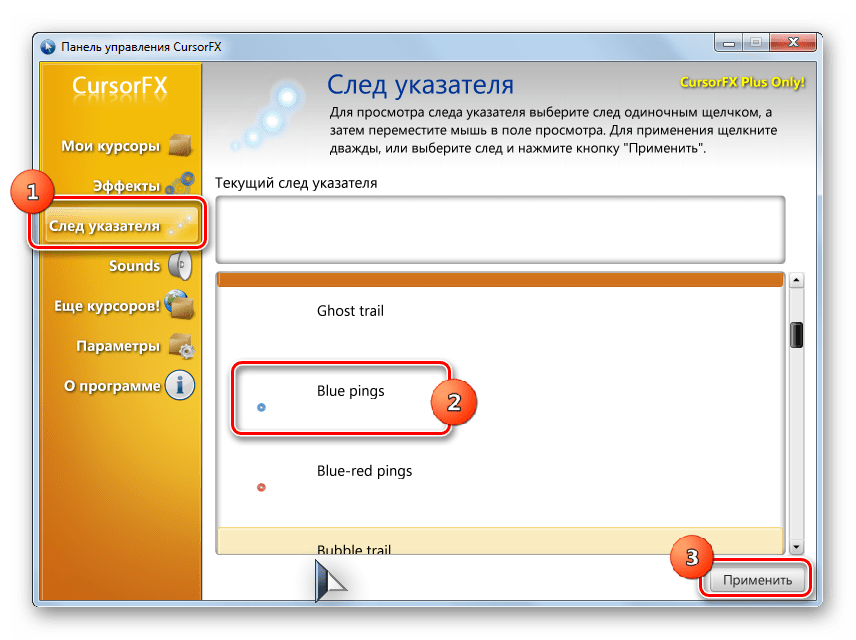
- Кроме того, в разделе «След указателя» можете выбрать след, который будет оставлять после себя курсор при перемещении по экрану. После выбора наиболее привлекательного варианта жмите «Применить».

Данный способ изменений курсоров является, наверное, наиболее вариативным из всех методов смены указателя, которые представлены в данной статье.
Способ 2: Создание собственного указателя
Существуют также программы, позволяющие пользователю самому нарисовать тот курсор, который он желает. К таким приложениям относится, например, RealWorld Cursor Editor. Но, конечно, данная программа сложнее в освоении, чем предыдущая.
Скачать RealWorld Cursor Editor
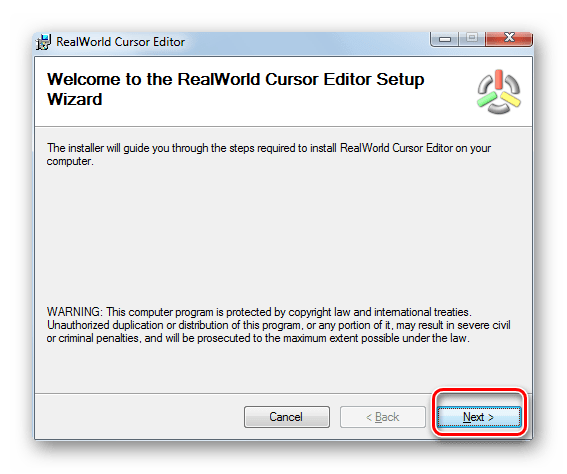
- После загрузки установочного файла, запустите его. Откроется окошко приветствия. Кликайте «Next».
- Далее нужно подтвердить согласие с лицензионными условиями. Установите радиокнопку в позицию «I Agree» и жмите «Next».
- В следующем окне установите пометку около пункта «Support translations via language packs». Это позволит вместе с установкой программы установить набор языковых пакетов. Если не выполнить данную операцию, то интерфейс программы будет англоязычным. Жмите «Next».
- Теперь открывается окно, где можете выбрать папку для установки программы. Советуем не менять базовые настройки и просто нажать «Next».
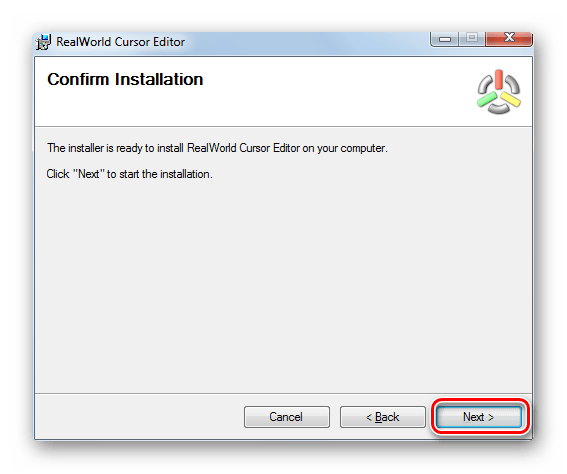
- В следующем окошке остается только подтвердить запуск процедуры инсталляции, нажав «Next».
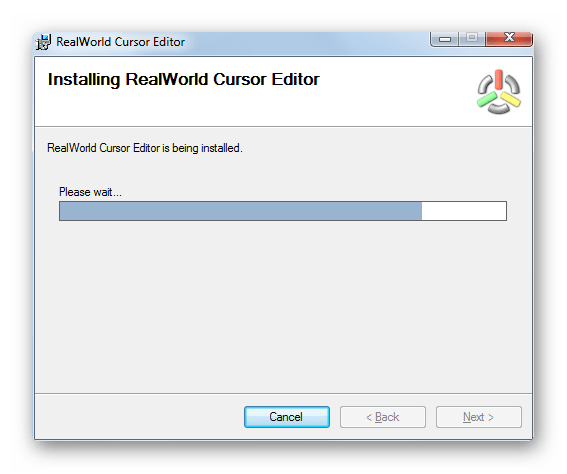
- Происходит процесс установки RealWorld Cursor Editor.
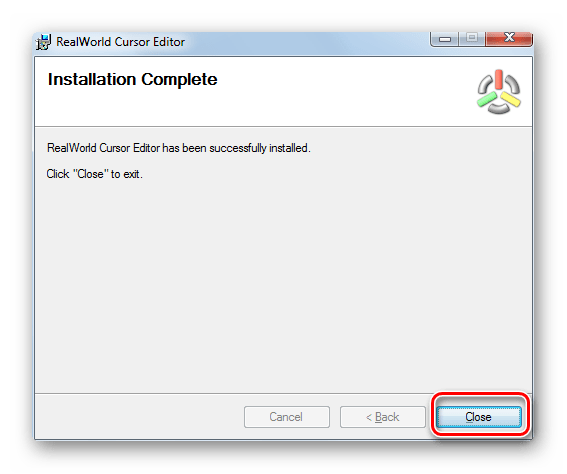
- После его окончания появится окошко, сообщающее об успешном завершении. Щелкайте «Close» («Закрыть»).
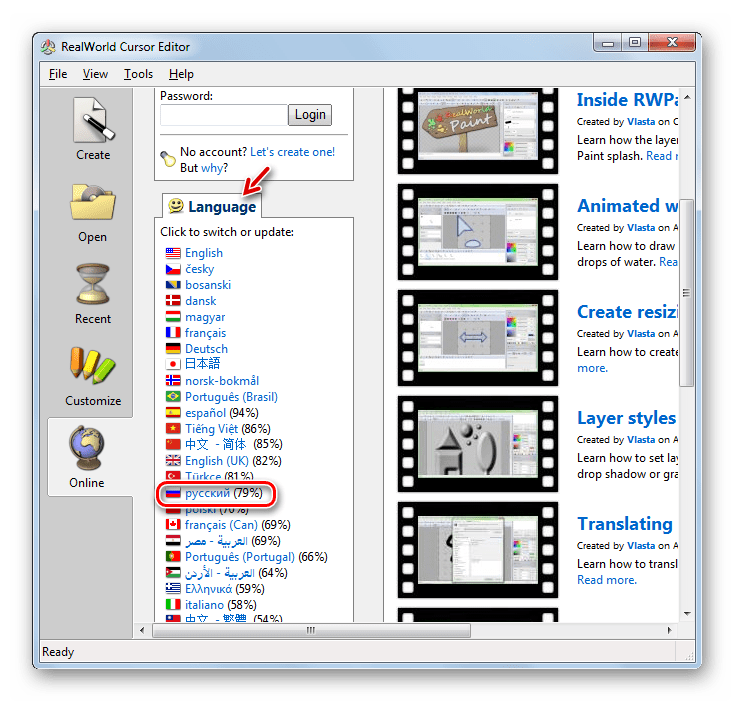
- Теперь запустите приложение стандартным способом кликом по его ярлыку на рабочем столе. Открывается главное окно RealWorld Cursor Editor. Прежде всего, следует изменить англоязычный интерфейс приложения на русскоязычный вариант. Для этого в блоке «Language» щелкайте «Русский».
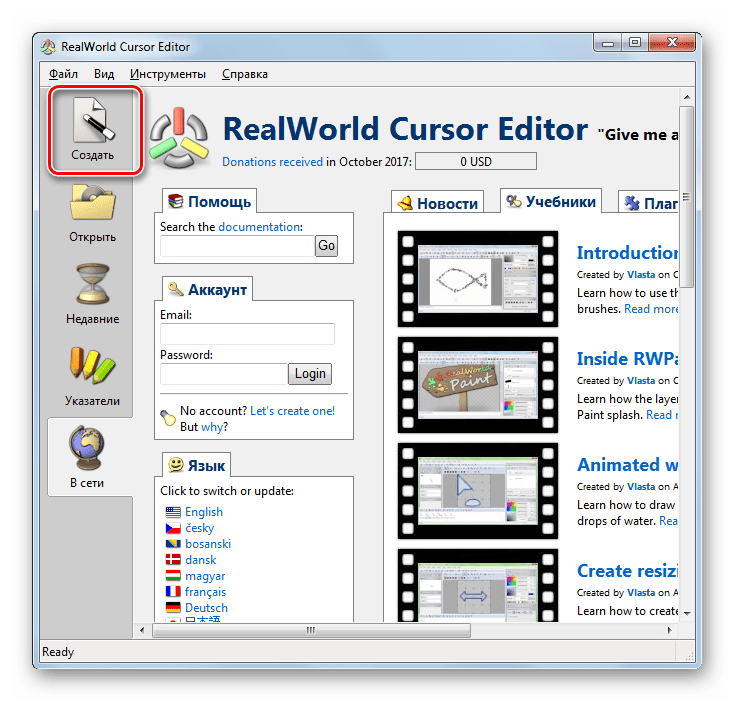
- После этого интерфейс будет изменен на русскоязычный вариант. Для того чтобы перейти к созданию указателя, щелкайте по кнопке «Создать» в боковом меню.
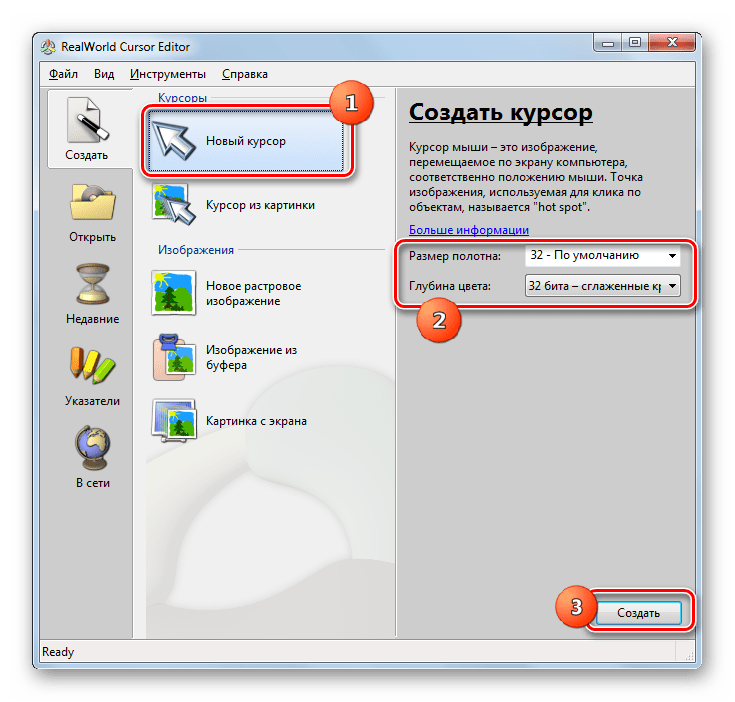
- Открывается окошко создания указателя, где вы можете выбрать, какой именно значок создать: обычный или из уже готовой картинки. Выберем, к примеру, первый вариант. Выделите пункт «Новый курсор». В правой части окна вы можете выбрать размер полотна и глубину цвета создаваемого значка. Далее жмите «Создать».
- Теперь с помощью инструментов редактирования вы рисуете свой значок, придерживаясь тех же правил рисования, что и в обычном графическом редакторе. После того, как он готов, для сохранения жмите на иконку дискеты на панели инструментов.
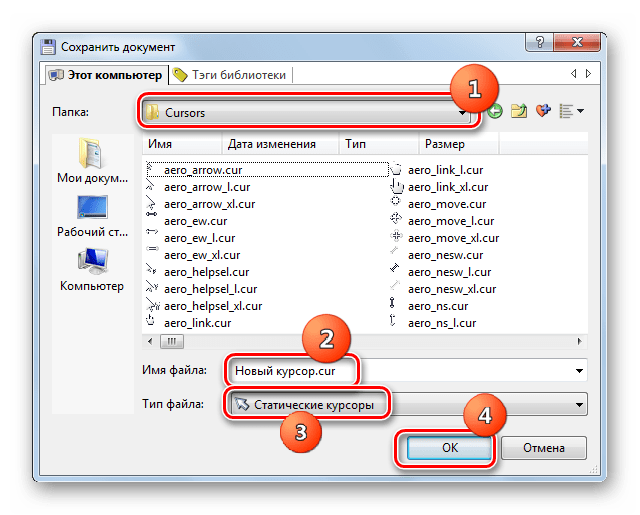
- Открывается окно сохранения. Перейдите в ту директорию, где вы желаете сохранить полученный результат. Можете использовать для хранения стандартную папку размещения указателей Windows. Так будет удобнее устанавливать курсор в дальнейшем. Размещен этот каталог по адресу:
C:WindowsCursorsВ поле «Имя файла» произвольно задайте наименование вашему указателю. Из списка «Тип файла» выберите нужный вариант формата файла:
- Статические курсоры (cur);
- Многослойные курсоры;
- Анимированные курсоры и т.д.
Затем применяйте «OK».


Указатель будет создан и сохранен. О том, как его установить на компьютер будет рассказано при рассмотрении следующего способа.
Способ 3: Свойства мыши
Изменить курсор можно также при помощи системных возможностей через «Панель управления» в свойствах мыши.
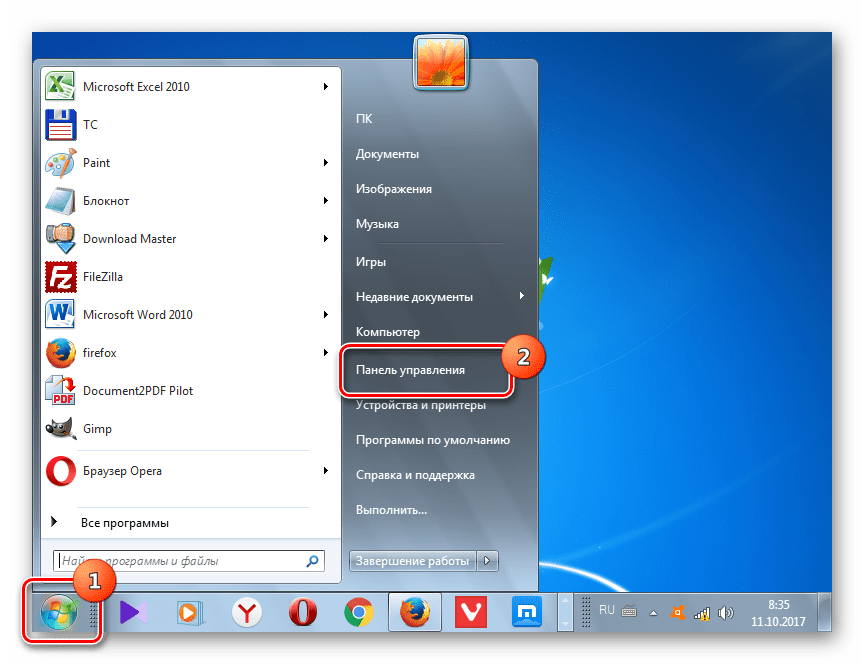
- Щелкайте «Пуск». Зайдите в «Панель управления».
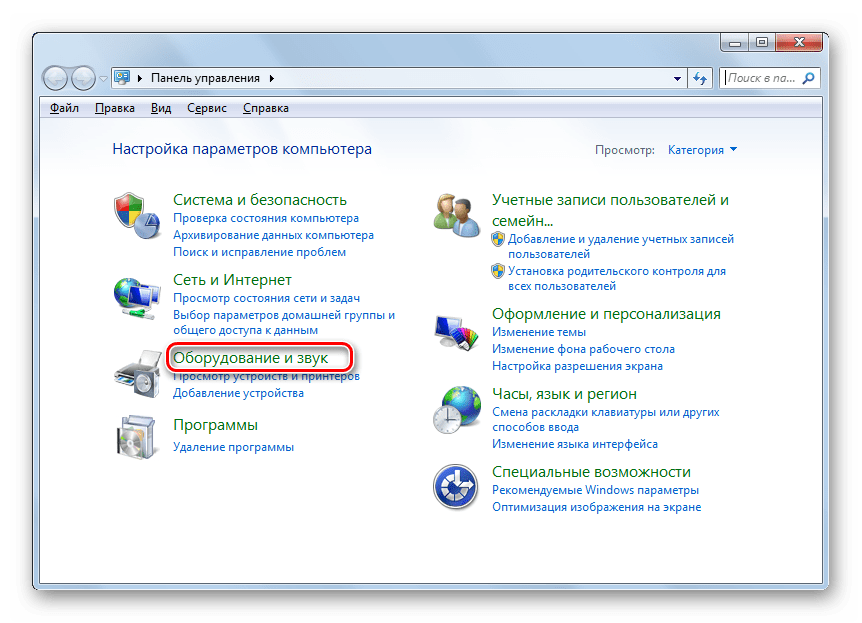
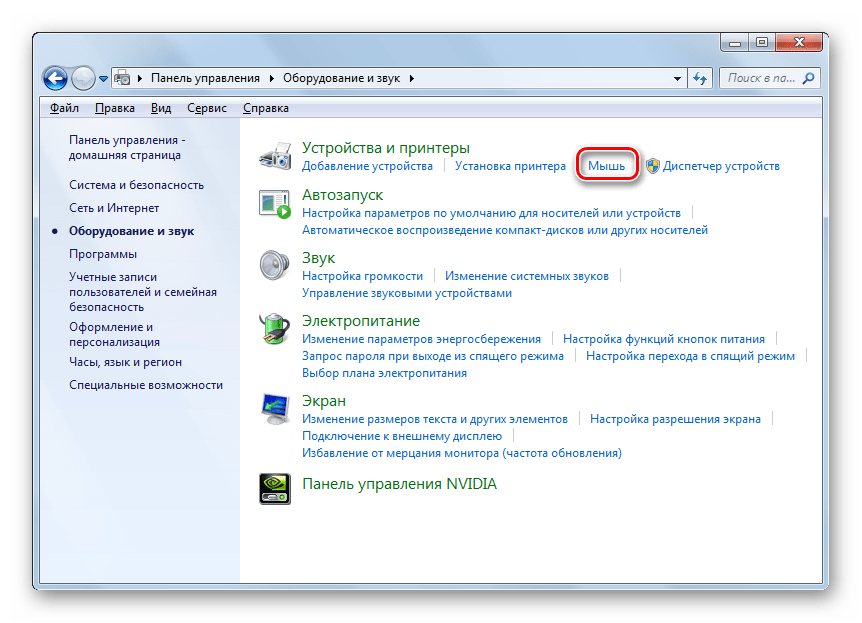
- Выберите раздел «Оборудование и звук».
- Переходите по пункту «Мышь» в блоке «Устройства и принтеры».
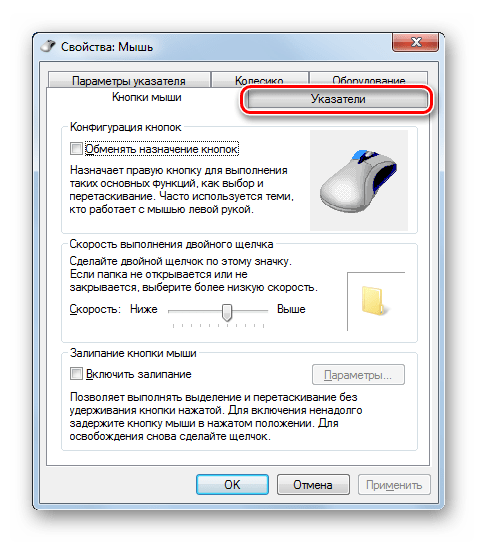
- Открывается окошко свойств мыши. Переместитесь во вкладку «Указатели».
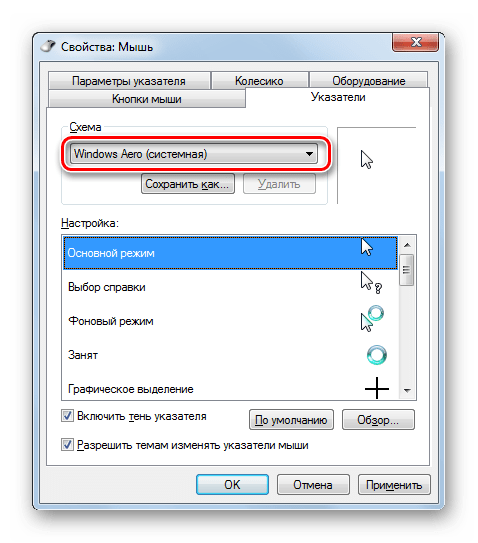
- Для выбора внешнего вида указателя кликните по полю «Схема».
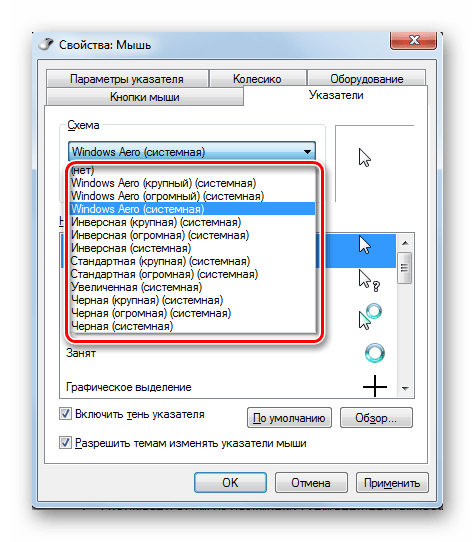
- Открывается список различных схем внешнего вида курсора. Выберите желаемый вариант.
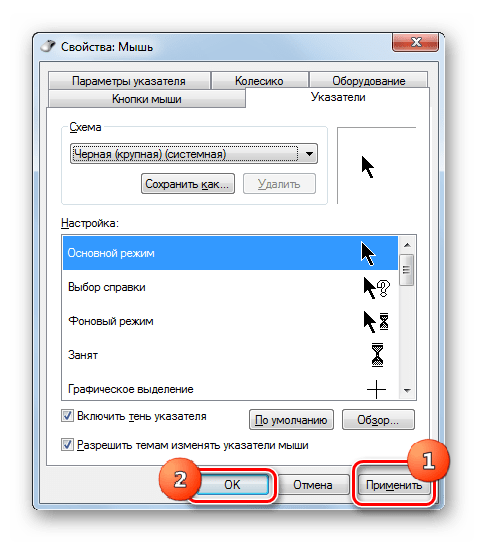
- После выбора варианта в блоке «Настройка» отобразится внешний вид курсора выбранной схемы при различных ситуациях:
- Основной режим;
- Выбор справки;
- Фоновый режим;
- Занят и т.д.

Если вас представленный внешний вид курсора не устраивает, то снова смените схему на другую, как было показано выше. Делайте это, пока не отыщите удовлетворяющий вас вариант.
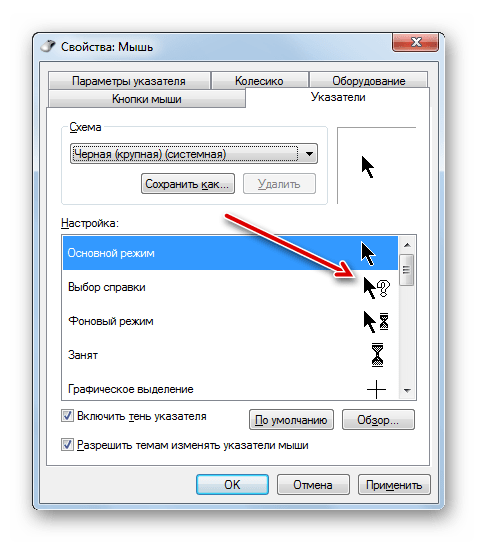
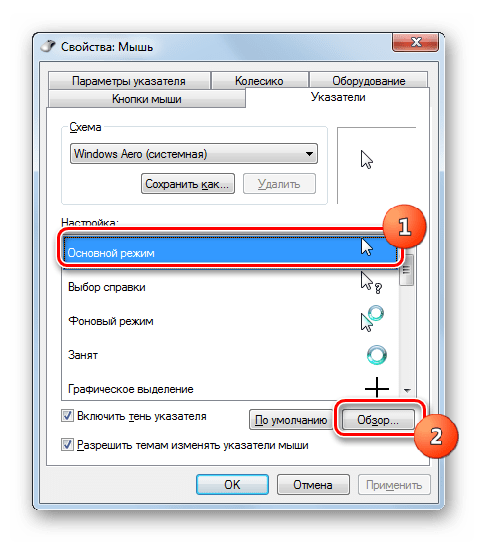
- Кроме того, можно сменить внешний вид указателя внутри выбранной схемы. Для этого выделите настройку («Основной режим», «Выбор справки» и т.д.), для которой желаете сменить курсор, и жмите на кнопку «Обзор…».
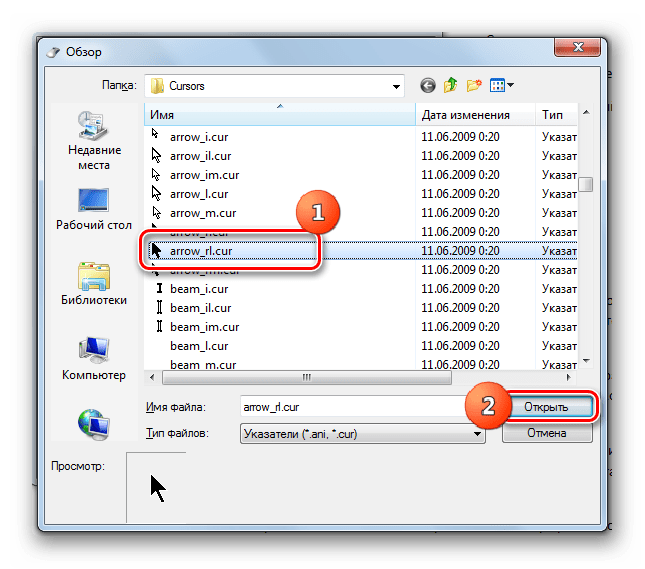
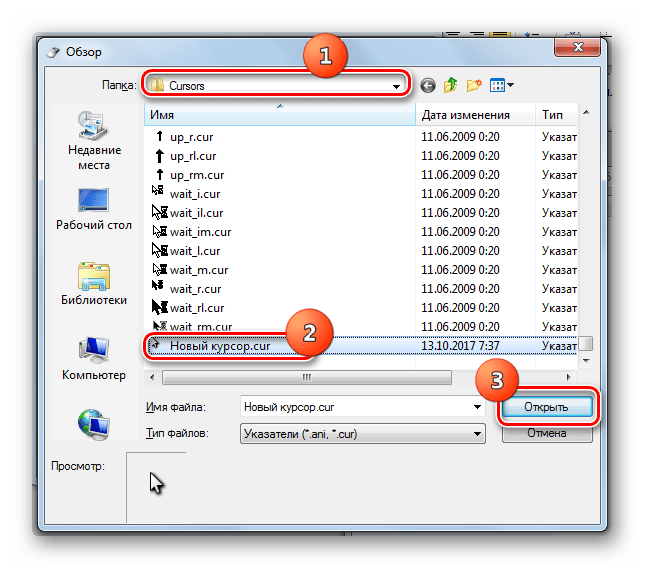
- Открывается окно выбора указателя в папке «Cursors» в директории «Windows». Выберите тот вариант курсора, который хотите видеть на экране при установке текущей схемы в указанной ситуации. Щелкайте «Открыть».
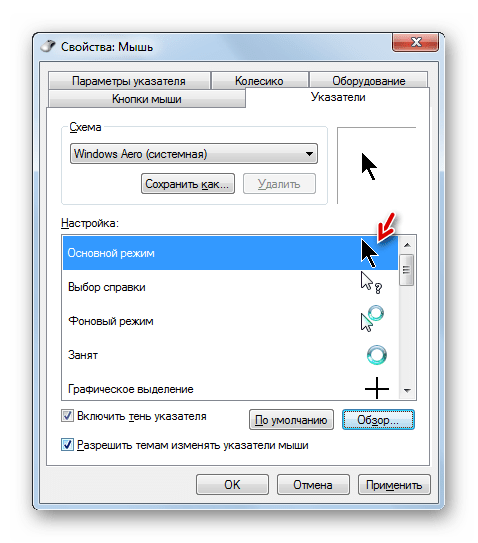
- Указатель будет изменен внутри схемы.
Таким же образом можно добавлять курсоры с расширением cur или ani, скачанные из интернета. Также можно устанавливать указатели, созданные в специализированных графических редакторах, как, например, RealWorld Cursor Editor, о котором мы говорили ранее. После того, как указатель создан или скачан из сети, соответствующую иконку нужно поместить в системную папку по следующему адресу:
C:WindowsCursors
Затем необходимо выбрать данный курсор, как было описано в предыдущих пунктах.
- Когда полученный внешний вид указателя вас устроит, то для того чтобы его задействовать, жмите по кнопкам «Применить» и «OK».
Как видим, указатель мышки в Виндовс 7 можно сменить как при помощи встроенных инструментов ОС, так и задействовав сторонние программы. Вариант с применением стороннего ПО предоставляет больше возможностей для изменений. Отдельные программы позволяют не только производить установку, но и создание курсоров через встроенные графические редакторы. В то же время, многим пользователям достаточно и того, что можно предпринять при помощи внутренних инструментов ОС для управления указателями.
Еще статьи по данной теме:
Помогла ли Вам статья?
Содержание:
- 1 Изменение внешнего вида курсора средствами Windows
- 2 Как скачать и установить новые курсоры мыши
- 3 Настройка и замена курсоров с помощью сторонних программ
С каждым новым мажорным обновлением Windows мало-помалу изменяется внешне. От минимализма интерфейс системы переходит к гламуру, от гламура снова к минимализму или смешению стилей, как это можно видеть на примере Windows 10. Графическая оболочка системы раз за разом получает новые элементы, практически неизменными в ней остаются только курсоры. Вид их вполне устраивает большинство пользователей, но среди них всё же есть и такие, кто предпочел бы видеть вместо ничем не примечательных указателей что-то более симпатичное.
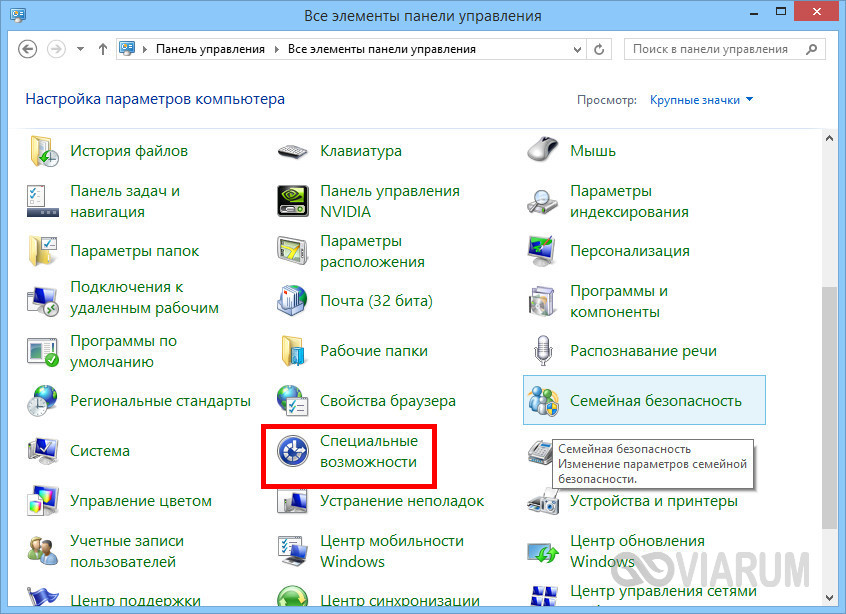
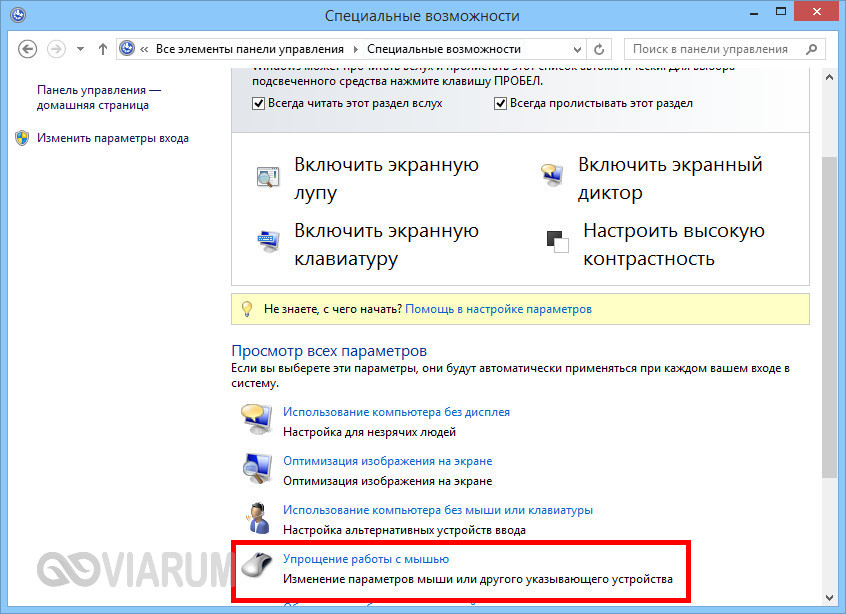
Поменять курсор мыши на Windows 7/10, к слову, не такая уж и проблема. Можно изменить размер курсора, сделав его крупнее, заменить цвет с белого на черный, добавить эффект инвертирования цвета и вообще заменить курсор другим, совсем непохожим. Все популярные версии Windows позволяют настраивать внешний вид указателя через стандартные настройки. Так, если вы хотите настроить курсор в Windows 7 или 8.1, зайдите в «Панель управления», запустите апплет «Специальные возможности» и нажмите ссылку «Упрощение работы с мышью».
В открывшемся окне вам будет предложено выбрать один из девяти режимов отображения курсора: обычный, большой и огромный белый, обычный, большой и огромный черный и обычный, большой и огромный инверсный. Это самый простой способ увеличить курсор в Windows.

Больше возможностей предлагает настройка «Свойства мыши» (апплет «Мышь»). Переключившись на вкладку «Указатели», вы можете не только выбрать одну из доступных схем, но и изменить любой ее элемент.
Например, вы выбрали схему «Стандартная крупная системная», но при этом хотите, чтобы вместо песочных часов (состояние «Занят») использовался голубой круг из схемы по умолчанию. Нет ничего проще. Кликните по изменяемому элементу и выберите в открывшемся окне тот курсор, который вам нужен.

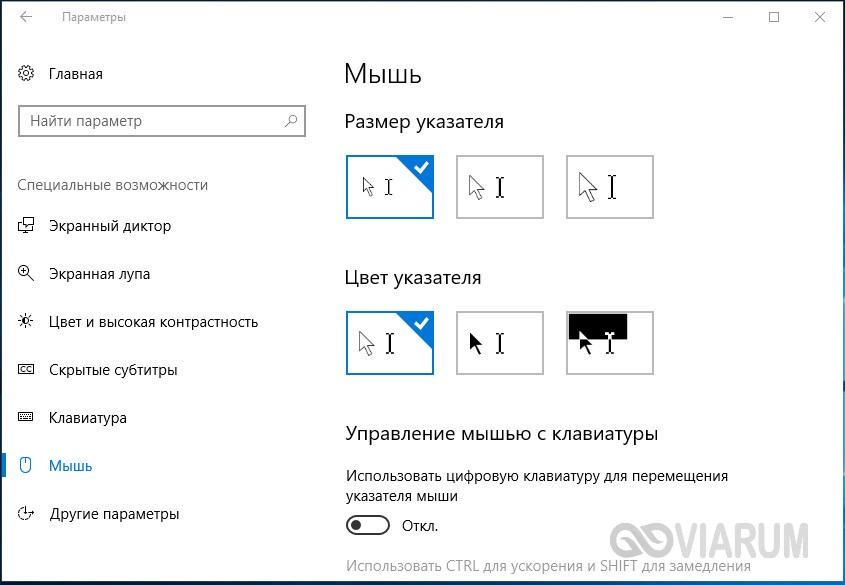
Аналогичным образом настраивается размер и форма курсора в Windows 10, кстати, в этой версии системы попасть в настройки указателя можно из приложения «Параметры», перейдя по цепочке Специальные возможности – Мышь.
Как скачать и установить новые курсоры мыши
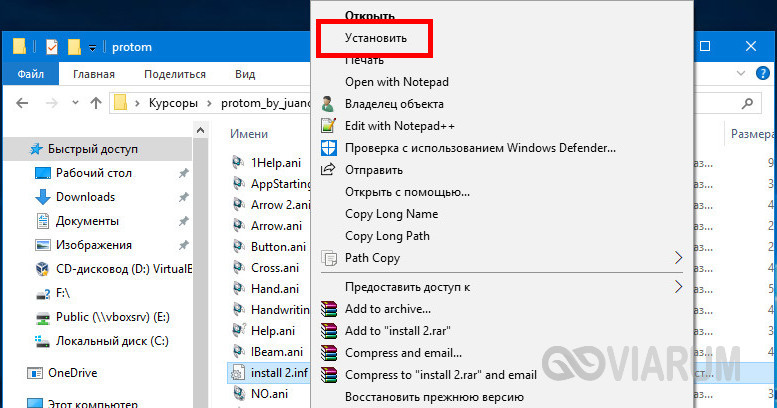
Если встроенных в систему указателей недостаточно, ничего не мешает вам скачать со специализированных сайтов наборы сторонних курсоров. Указатели имеются на любой вкус и цвет: большие и маленькие, минималистичные и самые изящные, статические и анимированные. Установить курсор мыши на Windows 7/10 не составляет особого труда. Как правило, распространяются наборы указателей в архивах. Каждый такой архив помимо файлов курсоров в формате ANI или CUR, содержат файл install.inf. Распаковываем архив, кликаем по файлу install.inf ПКМ и выбираем в меню «Установить».
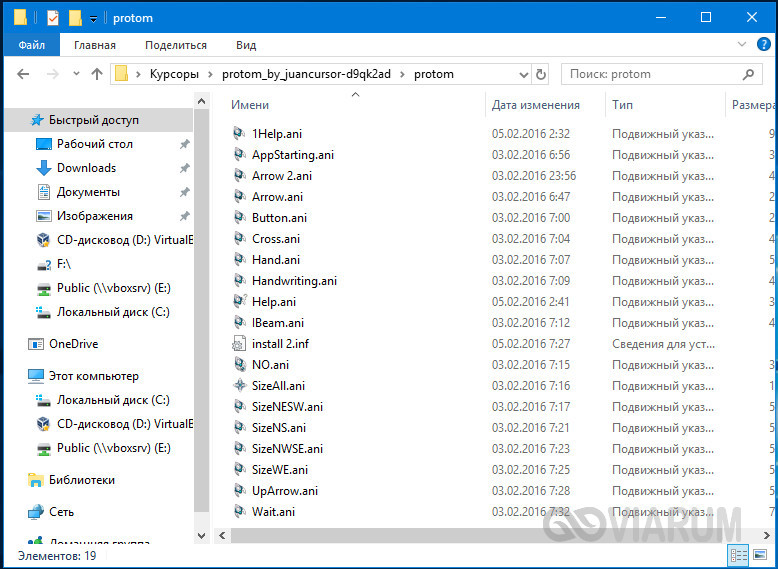
Скачивайте указатели по возможности с популярных источников, перед установкой содержимое архивов проверяйте на всякий случай антивирусом. Для справки: анимированные курсоры имеют расширение ANI, статические – CUR.
Курсоры тут же будут скопированы в системную папку C:/Windows/Cursors/Название_Схемы. За сим открываем свойства мыши (из «Панели управления» или быстрой командой main.cpl), на вкладке «Указатели» выбираем в списке название схемы и жмем «Применить» и «OK».

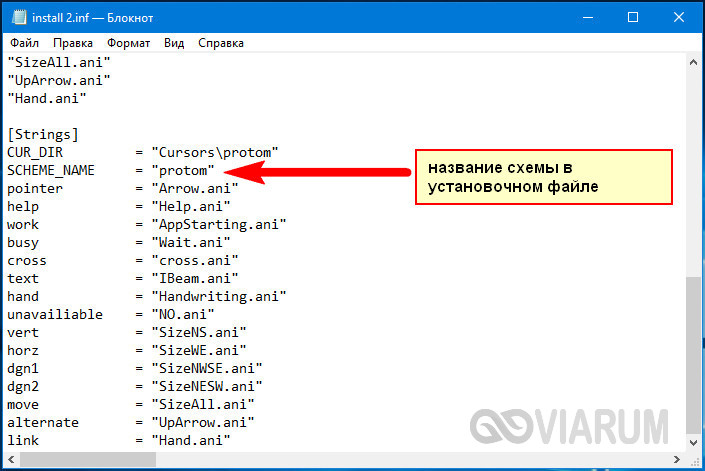
Если сомневаетесь в правильности названия схемы, можете подсмотреть его в файле install.inf, открыв его Блокнотом и найдя параметр SCHEME_NAME.
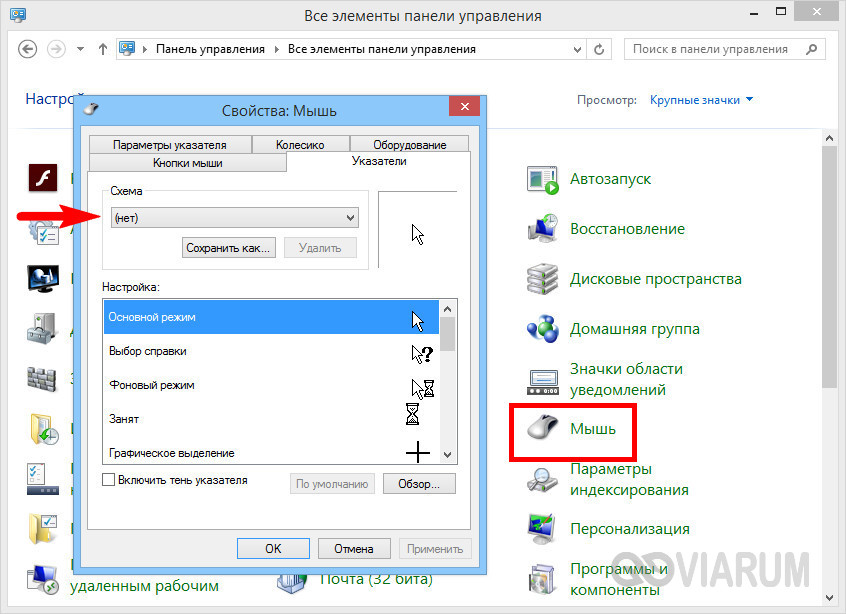
Может статься, что конфигурационного установочного файла в архиве не окажется. В этом случае устанавливать указатели придется вручную один за другим. Копируем папку с новыми курсорами в расположение C:/Windows/Cursors, в свойствах мыши выбираем схему «Нет» и начинаем по очереди заменять курсоры, кликая по каждому из них мышкой и указывая путь к соответствующему файлу ANI или CUR.

Произведя эту операцию, жмем в окошке свойств «Сохранить как» и сохраняем набор со своим именем. Вот так все просто.
Настройка и замена курсоров с помощью сторонних программ
Изменить курсор мыши в Windows 7/10 позволяют не только встроенные средства системы. Для этих целей также можно использовать специальные программы, из которых наиболее популярной является CursorFX.
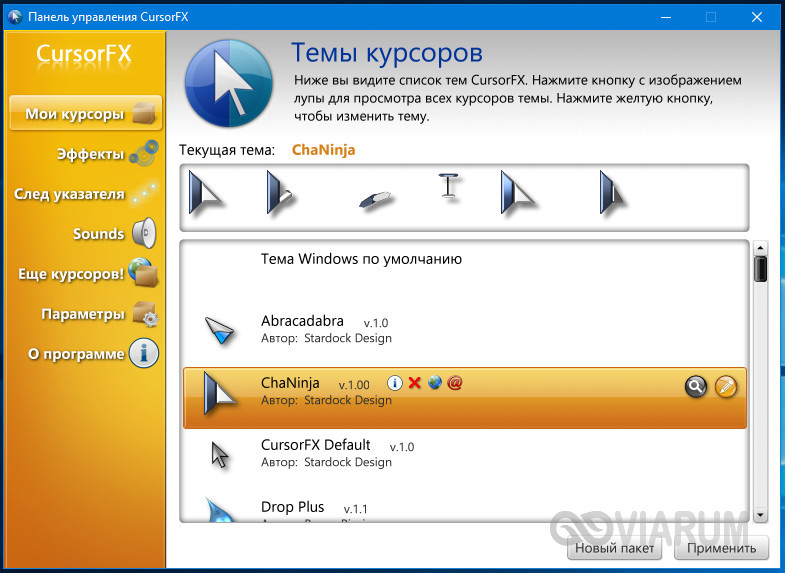
Возможности приложения включают быструю смену схемы (из встроенной библиотеки), добавление анимационных эффектов при нажатии кнопок и т.п., в программе есть даже собственный редактор курсоров. К сожалению, CursorFX не совсем корректно работает в Windows 10, с отображением курсора то и дело возникают проблемы, особенно в меню Пуск, поэтому в этой версии настраивать и изменять указатели мы рекомендуем штатными средствами системы.
Для преображения рабочего пространства и внешнего вида ОС пользователи стремятся поменять фон рабочего стола, экран приветствия Windows и иные параметры оформления, в том числе и указатель мыши. Сейчас рассмотрим, как изменить курсор мыши на Windows 7, 8, установить новый, а также включение настроек смены указателя.
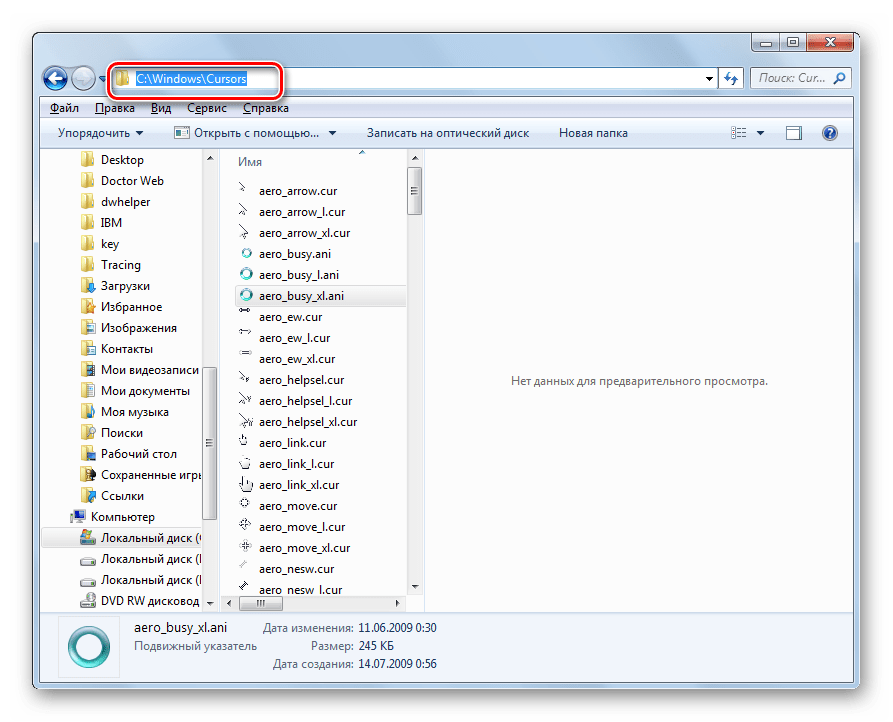
Все стандартные курсоры хранятся в папке Cursors, которая находится в папке Windows. Перейдя в каталог Cursors, Вы увидите файлы с расширениями ani (анимированные) и cur (обычные). Набор из нескольких таких файлов образует схему, при выборе которой задается стиль курсору, включающий все состояния указателя в зависимости от Ваших действий. Вручную можно также задать отдельное состояние курсора, не меняя схему.
Изменение курсора мыши на Windows 7, 8
Чтобы поменять курсор мыши на Виндовс 7, 8 надо перейти в свойства мыши. Запустите панель управления, выберите представление мелкие (крупные) значки. Среди параметров найдите «мышь», нажмите его.

Далее посетите вкладку «указатели», здесь и будет настройка внешнего вида курсора. Вверху окна Вы увидите текущую схему, нажав на которую выпадет список всех доступных схем. Выберите любую иную схему и ниже в поле «настройка» Вы сможете ознакомиться со всеми состояниями курсора.
Если не нашли любимую схему, то Вы можете изменить непонравившееся состояния выбранной схемы. В поле «настройка» дважды кликните левой кнопкой по состоянию или выберите его и нажмите «обзор». Затем из списка стандартных курсоров выберите один, кликните «открыть».
По вкусу Вы можете установить тень указателю, а также разрешить или запретить темам изменять курсор мыши. В соответствии своим требованиям установите или снимите флажки с данных опций.

Чтобы расширить список курсоров, скопируйте в каталог Cursors файлики с расширением ani, cur (скачайте с интернета). После изменения схемы кликните «сохранить как», задайте уникальное имя, затем щелкните OK. По желанию можно удалить созданные схемы, кроме стандартных.

После всех изменений нажмите OK в окошке свойств мыши, чтобы сразу увидеть смену курсора на Windows 7, 8.
Примечание: если после перезапуска компьютера, Вы наблюдаете старый курсор. Проделайте шаги выше еще раз и сохраните текущую тему еще раз.
Установка новых курсоров для Windows 7, 8
Все стандартное со временем надоедает, поэтому в этой части материала изучим, как установить курсоры мыши для Windows 7, 8. Есть несколько способов установки свежих указателей.
1. Скачайте и поставьте новую тему, поддерживающую изменение указателя мыши. Почитайте подробнее, как установить тему на Windows 7.
2. Скачайте архив со схемами здесь или на стороннем ресурсе, распакуйте архив. Пробежитесь по папкам, выберите понравившуюся совокупность курсоров. В той же папке найдите элемент расширение файла, которого inf, кликните на нем правой кнопкой и нажмите «установить».

Файлы переместятся в нужный каталог, после чего Вы сможете изменить курсор мыши на Windows 7, 8 способом, описанным в первой части, выбрав новую схему.
3. Если в схеме нет inf-файла, тогда закиньте в каталог Cursors папку с файлами указателей. Затем устанавливайте каждый курсор вручную для каждого состояния (читайте первый раздел).
Важно: качайте файлы курсоров, только с проверенных источников, дабы не подхватить вредоносное ПО.
Включение настроек смены указателя
Если нет возможности поменять курсор на Windows 7, 8 и в настройках мыши не доступна вкладка «указатели», значит, она отключена администратором. Есть 2 способа ее вернуть.
1. Скачайте архив тут, распакуйте его. Двойным щелчком мышки, запустите reg-файл, нажмите «да», «да», OK. Так, Вы активируете пропавшую вкладку.
2. Откройте редактор групповой политике. В окне команд Выполнить вбейте gpedit.msc, затем щелкните Enter. Выберите раздел «персонализация» (смотрите скриншот ниже). В правой панели дважды кликните параметр, отвечающий за запрет изменения курсора мыши.

В открытом окне задайте, либо «не задано», либо «отключить». Далее нажмите OK.

Теперь Вы знаете, как изменить курсор мыши на Windows 7, 8 и установить новые указатели. Здесь были захвачены во внимание многие аспекты преображения ОС, в дополнение к ним можете почитать, как изменить цвет панели задач в Windows 7, дабы преобразить ОС.
Вы можете пропустить чтение записи и оставить комментарий. Размещение ссылок запрещено.
![]()
Download Article
![]()
Download Article
This wikiHow teaches you how to adjust your computer’s cursor properties, and customize your pointer for your personal needs. If you’re a PC user, Windows allows you to choose from a selection of stock cursor sizes, colors, and schemes. On Mac, you can natively change your cursor’s size, but not it’s color or shape. If you’re not satisfied with your computer’s stock cursor sets, you can download custom cursors online, and add them to your computer. While Windows makes it easier to add custom cursors in the Mouse Properties menu, Mac users will need to use a third-party app to apply custom pointers and cursors.
-

1
Open the
Start menu on your computer. This button looks like the Windows icon in the lower-left corner of your screen. It will open your Start menu.
-
2
Click the
gear icon on the bottom-left. This is your Settings button in the lower-left corner of the Start menu. It will open your PC Settings in a new window.
- On some older versions of Windows, you can open Control Center from the Start menu, select Ease of Access here, and click Change how your mouse works. This will give you the same options as here.
Advertisement
-
3
Click Ease of Access in the Settings window. This will open your accessibility options on a new menu.
-
4
Click Mouse on the left-menu. You will find a navigation menu on the left-hand side of the Ease of Access menu. Select Mouse here to see your mouse and cursor options.
-
5
Select the size of pointer you want to use under «Pointer size.« Click one of the three options here to change your cursor’s size.
- You can select a small, medium or large cursor here.
-
6
Select a color for your cursor under «Pointer color.« Just click the option you want to use under this heading to change your cursor’s color. You can select a:
- White pointer, which will always be white.
- Black pointer, which will always be black.
- Inverting pointer, which will automatically adapt to the background color to look white on darker backgrounds, and black on lighter backgrounds.


Advertisement
-
1
Open the
Start menu on your computer. This button looks like the Windows icon in the lower-left corner of your screen. It will open your Start menu.
- Alternatively, you can click the search or Cortana button next to the Start menu icon.
-
2
Type Mouse on your keyboard. This will search your system, and show the matching results on the menu.
-
3
Click the Mouse Settings (Win 10) or Mouse option at the top. Your mouse settings should be the top result in the search.
-
4
Click Additional mouse options (Win 10 only) at the bottom. This is a blue link at the bottom of the Mouse Settings window on Windows 10. It will open Mouse Properties.
- You can skip this step if you’re using an older version of Windows.
-
5
Click the Pointers tab at the top of Mouse Properties. This button is next to Buttons at the top of the Mouse Properties window.
-
6
Click the drop-down menu below «Scheme.« This will open all your cursor options in a drop-down menu.
-
7
-
8
Check the
«Enable pointer shadow» box (optional). This option is in the lower-left corner of the pop-up window. When it’s checked, your cursor will always have a tiny shadow beneath the cursor icon.
-
9
Click the Apply button. This button is in the lower-right corner of the pop-up window. It will apply your new settings, and change your cursor to the selected scheme.


Advertisement
-
1
Open the
Apple menu on the menu bar. This button is in the upper-left corner of your screen. It will open a drop-down menu.
- MacOS only allows you to change the cursor size; it does not offer custom cursor designs. However, you can download and use third-party cursor icons.
-
2
Click System Preferences on the menu. This will open your Mac’s settings panel in a new window.
-
3
Click the Accessibility option in System Preferences. This option looks like a white human icon in a blue circle. You can find it on the fourth row of options.
- On older Mac versions, this option may be named Universal Access.
-
4
Click the Display option on the left-menu. In the Accessibility menu, find and click the Display option on the sidebar on the left-hand side.
-
5
Click and drag the Cursor size slider. This slider allows you to manually adjust your cursor’s size to your liking.
- Your new settings will be saved automatically. You can close System Preferences when you’re done adjusting.
-
6
Check the
«Shake mouse pointer to locate» option (optional). You can find this option below the «Cursor size» slider.
- When this option is enabled, you can quickly shake your mouse to temporarily make it bigger, and easily find its location on your screen.


Advertisement
-
1
Open http://www.rw-designer.com/gallery in your internet browser. Type or paste this URL into your browser’s address bar, and press ⏎ Return to open the RW-Designer cursor gallery.
- This is an online, community-driven cursor gallery. You can find and download a variety of popular cursor icons here.
- Alternatively, you can check out other websites and online galleries to find different cursor icons.
-
2
Click a cursor to see its details. When you find a cursor pack you like, click on it to see the pack details on a new page.
-
3
Scroll down and click the cursor you want to download. You can download and use any cursor that ends with the «.cur» format extension.
- Make sure to select a «.cur» cursor here. Animated cursor designs with the «.ani» format will not work on Mac.
-
4
Click the Download button. This will download the selected cursor design to your Downloads folder.
- You will now have to use a third-party app to apply this custom design to your cursor.
- You can use Mousecape — a tiny, free, open-source app to use these custom cursor images on Mac. You can check out the following methods to find out how.


Advertisement
-
1
-
2
Click Mousecape_0.0.6b2.zip under the «Assets» heading. You can find it at the bottom. This will download the Mousecape app to your computer in a compressed ZIP file.
- If you don’t see anything under «Assets», click the
drop-down icon to expand the «Assets» list.
- If you don’t see anything under «Assets», click the
-
3
Open the «Mousecape_0.0.6b2.zip» file in your Downloads folder. This will extract the Mousecape app to your computer.
-
4
Double-click the Mousecape app. After extracting the downloaded ZIP file, open the Mousecape app to use it on your Mac.
-
5
Click the File tab on the menu bar. After opening the Mousecape app, click this button on the menu bar in the upper-left corner of your screen.
-
6
Click New Cape on the «File» menu. This will create a new «Unnamed» entry in the Mousecape window.
-
7
Right-click the new «Unnamed» entry in Mousecape. This will open your right-click options.
-
8
Click Edit on the right-click menu. This will open the new entry’s properties in a dialogue box.
- This will open a new window to customize this new cursor cape.
- Make sure to check out the following methods in order to find out how to customize and use new cursors with Mousecape on Mac.


Advertisement
-
1
Enter a name for your new cursor in the «Name» field. In the editing window, you can delete «Unnamed» in the Name box, and give a custom name to your new cursor.
-
2
Click the + button on the bottom-left. This will add an «Unknown» cursor to this entry on the left menu.
-
3
Click Unknown on the left menu. You can add your custom cursor design here.
-
4
Click the Type drop-down. This will open a list of all the different cursor types and functions you can customize.
-
5
Select Arrow in the drop-down. When this option is selected, you can change your pointer cursor arrow’s design.
-
6
Drag and drop your downloaded «.cur» cursor design to the «1x» box. Find the «.cur» custom cursor you downloaded on your computer, and drag it to the «1x» box at the bottom of the Mousecape editing window.
- The new cursor design will now show up in the «1x» box here.
- Optionally, you can change the numbers in the «Size» box here, and adjust your custom cursor’s size.
-
7
Click the red close button on the top-left of the editing window. You will be asked if you want to save changes to your new design.
-
8
Click Save in the pop-up. This will save your new cursor design to Mousecape.
- You can now apply this new cursor, and start using it any time you want.


Advertisement
-
1
Find the cursor you want to use in the Mousecape window. All your custom cursors are saved and listed here.
- Once you create a custom cursor design, it’s saved in Mousecape. You can always go back and switch between different cursors any time you want.
-
2
Right-click a cursor entry in the Mousecape window. You will see your right-click options on a drop-down menu.
-
3
Click Apply on the right-click menu. This will instantly change your cursor to the selected design.
-
4
Click File on the menu bar. This will open a drop-down menu.
-
5
Click New Cape on menu. This will create a new, blank «Unnamed» entry in the Mousecape window.
-
6
Right-click the new «Unnamed» cursor entry. This will open your options on a right-click menu.
-
7
Click Apply on the right-click menu. This will switch your cursor to Mac’s default design.
- You can also right-click a cursor entry here, and select Remove to delete the selected design from your computer.


Advertisement
Add New Question
-
Question
I couldn’t find the cursor folder. Any ideas?

Click the Windows Start button, then click Run. Type in «Windows» then click enter and you will be in the «Windows» folder. The cursor folder should be somewhere in there.
-
Question
I changed my cursor with Custom Crust and now I can’t get it back. How do I set my cursor back to default?
In Mousecape, make a new cape with no picture. Use that and don’t change it.
-
Question
When I click away, why does the cursor go away?
Make sure that you right-clicked the cape and pressed apply. That should work.
Ask a Question
200 characters left
Include your email address to get a message when this question is answered.
Submit
Advertisement
Thanks for submitting a tip for review!
-
Avoid any banner ads or pop-ups that advertise cursors. These are often gateways for adware. Stick to trusted cursor libraries on reputable sites.
Advertisement
About This Article
Article SummaryX
1. Open the Start menu.
2. Click the gear or Settings button.
3. Click Ease of Access.
4. Click Mouse on the left-menu.
5. Select a cursor size.
6. Select a pointer color.
Did this summary help you?
Thanks to all authors for creating a page that has been read 167,325 times.
Is this article up to date?
![]()
Download Article
![]()
Download Article
This wikiHow teaches you how to adjust your computer’s cursor properties, and customize your pointer for your personal needs. If you’re a PC user, Windows allows you to choose from a selection of stock cursor sizes, colors, and schemes. On Mac, you can natively change your cursor’s size, but not it’s color or shape. If you’re not satisfied with your computer’s stock cursor sets, you can download custom cursors online, and add them to your computer. While Windows makes it easier to add custom cursors in the Mouse Properties menu, Mac users will need to use a third-party app to apply custom pointers and cursors.
-
1
Open the
Start menu on your computer. This button looks like the Windows icon in the lower-left corner of your screen. It will open your Start menu.
-
2
Click the
gear icon on the bottom-left. This is your Settings button in the lower-left corner of the Start menu. It will open your PC Settings in a new window.
- On some older versions of Windows, you can open Control Center from the Start menu, select Ease of Access here, and click Change how your mouse works. This will give you the same options as here.
Advertisement
-
3
Click Ease of Access in the Settings window. This will open your accessibility options on a new menu.
-
4
Click Mouse on the left-menu. You will find a navigation menu on the left-hand side of the Ease of Access menu. Select Mouse here to see your mouse and cursor options.
-
5
Select the size of pointer you want to use under «Pointer size.« Click one of the three options here to change your cursor’s size.
- You can select a small, medium or large cursor here.
-
6
Select a color for your cursor under «Pointer color.« Just click the option you want to use under this heading to change your cursor’s color. You can select a:
- White pointer, which will always be white.
- Black pointer, which will always be black.
- Inverting pointer, which will automatically adapt to the background color to look white on darker backgrounds, and black on lighter backgrounds.
Advertisement
-
1
Open the
Start menu on your computer. This button looks like the Windows icon in the lower-left corner of your screen. It will open your Start menu.
- Alternatively, you can click the search or Cortana button next to the Start menu icon.
-
2
Type Mouse on your keyboard. This will search your system, and show the matching results on the menu.
-
3
Click the Mouse Settings (Win 10) or Mouse option at the top. Your mouse settings should be the top result in the search.
-
4
Click Additional mouse options (Win 10 only) at the bottom. This is a blue link at the bottom of the Mouse Settings window on Windows 10. It will open Mouse Properties.
- You can skip this step if you’re using an older version of Windows.
-
5
Click the Pointers tab at the top of Mouse Properties. This button is next to Buttons at the top of the Mouse Properties window.
-
6
Click the drop-down menu below «Scheme.« This will open all your cursor options in a drop-down menu.
-
7
-
8
Check the
«Enable pointer shadow» box (optional). This option is in the lower-left corner of the pop-up window. When it’s checked, your cursor will always have a tiny shadow beneath the cursor icon.
-
9
Click the Apply button. This button is in the lower-right corner of the pop-up window. It will apply your new settings, and change your cursor to the selected scheme.
Advertisement
-
1
Open the
Apple menu on the menu bar. This button is in the upper-left corner of your screen. It will open a drop-down menu.
- MacOS only allows you to change the cursor size; it does not offer custom cursor designs. However, you can download and use third-party cursor icons.
-
2
Click System Preferences on the menu. This will open your Mac’s settings panel in a new window.
-
3
Click the Accessibility option in System Preferences. This option looks like a white human icon in a blue circle. You can find it on the fourth row of options.
- On older Mac versions, this option may be named Universal Access.
-
4
Click the Display option on the left-menu. In the Accessibility menu, find and click the Display option on the sidebar on the left-hand side.
-
5
Click and drag the Cursor size slider. This slider allows you to manually adjust your cursor’s size to your liking.
- Your new settings will be saved automatically. You can close System Preferences when you’re done adjusting.
-
6
Check the
«Shake mouse pointer to locate» option (optional). You can find this option below the «Cursor size» slider.
- When this option is enabled, you can quickly shake your mouse to temporarily make it bigger, and easily find its location on your screen.
Advertisement
-
1
Open http://www.rw-designer.com/gallery in your internet browser. Type or paste this URL into your browser’s address bar, and press ⏎ Return to open the RW-Designer cursor gallery.
- This is an online, community-driven cursor gallery. You can find and download a variety of popular cursor icons here.
- Alternatively, you can check out other websites and online galleries to find different cursor icons.
-
2
Click a cursor to see its details. When you find a cursor pack you like, click on it to see the pack details on a new page.
-
3
Scroll down and click the cursor you want to download. You can download and use any cursor that ends with the «.cur» format extension.
- Make sure to select a «.cur» cursor here. Animated cursor designs with the «.ani» format will not work on Mac.
-
4
Click the Download button. This will download the selected cursor design to your Downloads folder.
- You will now have to use a third-party app to apply this custom design to your cursor.
- You can use Mousecape — a tiny, free, open-source app to use these custom cursor images on Mac. You can check out the following methods to find out how.
Advertisement
-
1
-
2
Click Mousecape_0.0.6b2.zip under the «Assets» heading. You can find it at the bottom. This will download the Mousecape app to your computer in a compressed ZIP file.
- If you don’t see anything under «Assets», click the
drop-down icon to expand the «Assets» list.
- If you don’t see anything under «Assets», click the
-
3
Open the «Mousecape_0.0.6b2.zip» file in your Downloads folder. This will extract the Mousecape app to your computer.
-
4
Double-click the Mousecape app. After extracting the downloaded ZIP file, open the Mousecape app to use it on your Mac.
-
5
Click the File tab on the menu bar. After opening the Mousecape app, click this button on the menu bar in the upper-left corner of your screen.
-
6
Click New Cape on the «File» menu. This will create a new «Unnamed» entry in the Mousecape window.
-
7
Right-click the new «Unnamed» entry in Mousecape. This will open your right-click options.
-
8
Click Edit on the right-click menu. This will open the new entry’s properties in a dialogue box.
- This will open a new window to customize this new cursor cape.
- Make sure to check out the following methods in order to find out how to customize and use new cursors with Mousecape on Mac.
Advertisement
-
1
Enter a name for your new cursor in the «Name» field. In the editing window, you can delete «Unnamed» in the Name box, and give a custom name to your new cursor.
-
2
Click the + button on the bottom-left. This will add an «Unknown» cursor to this entry on the left menu.
-
3
Click Unknown on the left menu. You can add your custom cursor design here.
-
4
Click the Type drop-down. This will open a list of all the different cursor types and functions you can customize.
-
5
Select Arrow in the drop-down. When this option is selected, you can change your pointer cursor arrow’s design.
-
6
Drag and drop your downloaded «.cur» cursor design to the «1x» box. Find the «.cur» custom cursor you downloaded on your computer, and drag it to the «1x» box at the bottom of the Mousecape editing window.
- The new cursor design will now show up in the «1x» box here.
- Optionally, you can change the numbers in the «Size» box here, and adjust your custom cursor’s size.
-
7
Click the red close button on the top-left of the editing window. You will be asked if you want to save changes to your new design.
-
8
Click Save in the pop-up. This will save your new cursor design to Mousecape.
- You can now apply this new cursor, and start using it any time you want.
Advertisement
-
1
Find the cursor you want to use in the Mousecape window. All your custom cursors are saved and listed here.
- Once you create a custom cursor design, it’s saved in Mousecape. You can always go back and switch between different cursors any time you want.
-
2
Right-click a cursor entry in the Mousecape window. You will see your right-click options on a drop-down menu.
-
3
Click Apply on the right-click menu. This will instantly change your cursor to the selected design.
-
4
Click File on the menu bar. This will open a drop-down menu.
-
5
Click New Cape on menu. This will create a new, blank «Unnamed» entry in the Mousecape window.
-
6
Right-click the new «Unnamed» cursor entry. This will open your options on a right-click menu.
-
7
Click Apply on the right-click menu. This will switch your cursor to Mac’s default design.
- You can also right-click a cursor entry here, and select Remove to delete the selected design from your computer.
Advertisement
Add New Question
-
Question
I couldn’t find the cursor folder. Any ideas?
Click the Windows Start button, then click Run. Type in «Windows» then click enter and you will be in the «Windows» folder. The cursor folder should be somewhere in there.
-
Question
I changed my cursor with Custom Crust and now I can’t get it back. How do I set my cursor back to default?
In Mousecape, make a new cape with no picture. Use that and don’t change it.
-
Question
When I click away, why does the cursor go away?
Make sure that you right-clicked the cape and pressed apply. That should work.
Ask a Question
200 characters left
Include your email address to get a message when this question is answered.
Submit
Advertisement
Thanks for submitting a tip for review!
-
Avoid any banner ads or pop-ups that advertise cursors. These are often gateways for adware. Stick to trusted cursor libraries on reputable sites.
Advertisement
About This Article
Article SummaryX
1. Open the Start menu.
2. Click the gear or Settings button.
3. Click Ease of Access.
4. Click Mouse on the left-menu.
5. Select a cursor size.
6. Select a pointer color.
Did this summary help you?
Thanks to all authors for creating a page that has been read 167,325 times.