Гайд по моду [ProjectE]
(Equvialent Exchange 2)
(2 часть)
В этой части вы узнаете как пользоваться инструментами из ТёмнойКрасной материи, пьедесталом из тёмной материи и талисманамиамулетамикамнями.
Инструменты из Тёмной материи
( Никогда НЕ ломаются! )
Кирка из Тёмной материи.
Данная кирка имеет 4 режима работы: Стандартный (Обычная кирка)|| 3 блока в высоту || 3 блока в ширину || 3 блока в длинну. (Для переключения нажмите клавишу [Сменить Режим] ), также при нажатии [ПКМ] по руде, выкапывает всю руду данного типа, которая находится вплотную друг к другу.
Крафт:
Скрытый текст

Топор из тёмной материи.
Обычный топор, который имеет режим — Срубить все деревья площадью (11х11 || 21х21 ), для применения нажмите — [ПКМ]. Чтобы выбрать режим используйте кнопку [Разбег], для выключения [shift] + [Разбег].
Крафт:
Скрытый текст

Лопата из тёмной материи.
Обычная лопата, которая имеет режим — Копать травупесокгрязь областью 3х3х1, но если копать гравий, то добудет весь, в независимости от его колличества. Для применения используйте — [ПКМ]. Чтобы включить данный режим нажмите кнопку [Разбег], для выключения [shift] + [Разбег].
Крафт:
Скрытый текст

Меч из тёмной материи.
Обычный меч, который имеет режим — нанести урон враждебным мобам в области 1×1|| 3х3 || 6×6 блоков. Для увеличения радиуса нажми кнопку [Разбег], для уменьшения радиуса [shift]+[Разбег]. Чтобы применить данный режим нажмите кнопку [Доп.Функция].
Крафт:
Скрытый текст

Мотыга из тёмной материи.
Работает также как и обычная мотыга, но может за одно использование может вскопать большую область ( 1х1 || 3х3 || 5х5 ). Увеличение уменьшения радиуса так как и на других инструментах.
Крафт:

Ножницы из тёмной материи.
Позволяют подстричь всех овец в области ( 1х1 || 9х9 || 17х17 ), шерсть попадает сразу к вам в инвентарь.
Крафт:

Молот из тёмной материи.
Позволяет копать ( блоки которые может сломать кирка. Земля/гравия/песок и прочее — не копает) областью 1х1х1 || 3х3х2 || 5х5х3. Менять радиус действия, так же как и на других инструментах. Все добытые ресурсы складывает в сферу ( шарик черного цвета), чтобы забрать ресурсы из сферы, просто подойдите к ней. Для использования данной функции, нажмите [ПКМ] по блоку вокруг которого будет выкопано всё в определенной области.
Крафт:
Тёмный порошок:
Скрытый текст


Инструменты из Красной материи:
( Никогда НЕ ломаются! )
Кирка из красной материи.
Также как и кирка из тёмной материи может копать 4 режимами, но делает это быстрее.
Крафт:

Топор из красной материи.
Как и топор из тёмной материи срубает деревья в области, но область больше — (11х11 || 21х21 || 31×31 ), для применения нажмите — [ПКМ]. Чтобы выбрать режим используйте кнопку [Разбег], для выключения [shift] + [Разбег].
Крафт:

Лопата из красной материи.
Так же как и лопата из тёмной материи может копать область, но как и у всех предметов из красной материи, область эта будет больше. ( 1х1х1 || 3х3х1 || 5х5х1 || 7х7х1 ).
Крафт:

Меч из красной материи.
Так же как и меч из тёмной материи имеет дополнительную функцию но с увеличенным радиусом, а также появляется выбор ( убивать враждебных убивать всех ), менять режим так же как и у других инструментов. Ну и область действия дополнительной функции ( 1×1 || 3х3 || 6×6 || 9×9 ).
Крафт:

Мотыга из красной материи.
Может вскопать землю такими областями как ( 1х1 || 3×3 || 5×5 || 7×7 ). Увеличениеуменьшение радиуса так же как и всех инструментов.
Крафт:

Ножницы из красной материи.
Так же как и ножницы из тёмной материи подстригают всех овец, но имеют большую область работы ( 1х1 || 9х9 || 17х17 || 33х33 ).
Крафт:

Молот из красной материи.
Работает так же как и молот из тёмной материи, только имеет увелечинную площадь работы ( 1х1х1 || 3х3х3 || 5х5х3 || 7х7х4 ).
Крафт:

Красный катар.
Данный инструмент выполняет функцию сразу 4 инструментов из красной материи ( Меч || Топор || Ножницы || Мотыга ). Имеет разные режимы ( для убийств мобов ) убивать враждебных/ убивать всех. Также как и у всех инструментов из материи имеет возможность переключения радиуса действия. Менять режим и радиус действия, так как и на всех инструментах. Также стоит отметить , что дополнительная функция позволяет убить любого моба с одного использования (P.s Даже боссов из Galacticraft )
Крафт:

Самоцвет вечной плоти.
Позволяет мгновенно использовать накопленный ЕМС, для преобразования в ценный ресурс. К примеру из 256 булыжника, можно получить 1 слиток железа. Один булыжник имеет 1 ЕМС, один слиток железа имеет 256 ЕМС. Работа очень проста, вы выбираете предмет который хотите превращать в ЕМС — клавиша [Доп.Функция] > [White list], и поместите туда блоки которые вы хотите преобразовывать в ЕМС ( эти блоки будут автоматически попадать в самоцвет из вашего инвентаря и хранится в нем, до преобразования в ресурс). Чтобы выбрать ресурс в который вы хотите преобразовывать ЕМС нажмите на кнопку [Смена Режима].
Список всех возможных ресурсов:Позволяет мгновенно использовать накопленный ЕМС, для преобразования в ценный ресурс. К примеру из 256 булыжника, можно получить 1 слиток железа. Один булыжник имеет 1 ЕМС, один слиток железа имеет 256 ЕМС. Работа очень проста, вы выбираете предмет который хотите превращать в ЕМС — клавиша [Доп.Функция] > выбираете [White list] , и размещаете блоки которые вы хотите преобразовывать в ЕМС ( эти блоки будут автоматически попадать в самоцвет из вашего инвентаря и хранится в нем, до преобразования в ресурс). Чтобы выбрать ресурс в который вы хотите преобразовывать ЕМС нажмите на кнопку [Смена Режима].
Список всех возможных ресурсов:

Крафт:

Ртутное око.
Позволяет размножать любые блоки (Которые имеют ЕМС), используя энергию(ЕМС) накопленную в маленькой звезде. Есть 2 режима работы: стандартный — создаёт блоки на свободном месте, и режим трансмутации — заменяет блоки на тот который вы выбрали, поглащая их ЕМС для зарядки звезды. Для смены режима нажмите кнопку [Смена режима]. Также Ртутного око имеет разные радиусы работы ( 1х1х1 || 3х3х1 || 5х5х1 || 7х9х1 || 9x12x1 ) — если ставить блоки вертикально, ( 1x1x1 || 3x3x1 || 5x5x1 || 7x7x1 || 9x9x1 ) — если ставить блоки горизонтально. Чтобы увеличить радиус используйте кнопку [Разбег], чтобы уменьшить [shift] + [Разбег].
Для того чтобы открыть интерфейс Ртутного Ока, нажмите кнопку [Доп.Функции].
Крафт:
Скрытый текст

Интерфейс:
Скрытый текст

1 — слот для маленькой звезды
2 — слот для блока который вы хотите размножить.
Катализатор разрушения.
Разрушает любые блоки ( за исключением бедрока ) в определенной области ( 3х3х1 || 3х3х4 || 3x3x8 || 3x3x16 ). Для работы требуется энергия ЕМС. Поместите заряженную маленькую звезду в инвентарь, и катализатор будет работать до тех пор, пока звезда полностью не разрядится. Чтобы использовать просто нажмите [ПКМ] по блоку катализатором.
Предмет можно купить у торговца на /warp bank

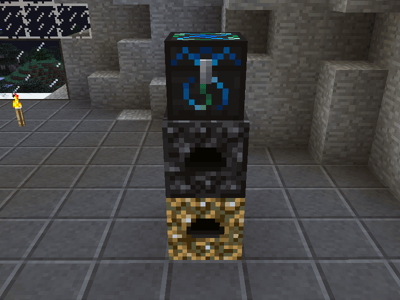
Пьедестал из Тёмной материи.
На данный пьедестал можно устанавливать амулеты/камни/кольца, которые в последствии будут давать определенные эффекты, если находиться рядом с пьедесталом. Также может быть использован как обычный пьедестал — показывает предмет который размещаем на нём.
Чтобы открыть интерфейс пьедестала, следует навести на него курсор и нажать [shift] + [ПКМ].
Крафт:

Интерфейс:

1 — Слот для предмета || камня || амулета || кольца || талисмана.
2 — камни || амулеты || талисманы которые можно сделать/купить.
КамниТалисманыАмулеты:
Камень тела.

Крафт:

Камень души.

Крафт:

Камень жизни.

Крафт:

Камень разума.

Данный камень может хранить в себе опыт, который вы потом сможете взять себе. Принцип работы прост, камень всасывает сферы опыта когда находится на пьедестале, затем вы берете камень себе в инвентарь и нажимаете [shift]+[ПКМ], до тех пор пока пока в камне не останется опыта. После чего снова можно установить камень на пьедестал.
Талисман восстановления.

Так же если носить талисман с собой, то он будет восстановить предметы которые находятся в инвентаре.
Талисман можно купить у торговца на /warp bank

Вулканический амулет.
Может создавать блок лавы в любом месте, а также может заполнять резервуары лавой, для использования [ПКМ] по пустому месту/ резервуару.
Для работы требует 32 ЕМС за одну операцию, значит нужно чтобы в инвентаре находилась заряженная маленькая звезда.
Амулет можно купить у торговца на /warp bank

Copy link Quote reply
Hi, i’m running a server for the ATLauncher pack Natural Magic, and there are a few modded items/blocks i’d like to add to the custom EMC list however my own coding skills are terrible, and i have no idea what information this code requires in order to sucseed. I was hoping someone wouldn’t mind either pointing me to a guide, or putting some examples here for me to copy or work from? I’d really appreciate it. Its mainly Thaumcraft and Ars Magica i’m looking to add items for, but it would obviously be useful for multiple mods to know how to have them have EMC values. Thanks in advance for any assistance offered.
Copy link Quote reply
First go into config ProjectE.cfg file and set both variables to true. So it looks like this:
B:»Show Ore-Dictionary names in tool-tips»=true
B:»Show unlocalized names in tool-tips»=true
Then get the OD name or UN name
then use command in game
/projecte_addEMC OD ingotCyanite 1020
with 1020 being the EMC you want the item to have.
Copy link Quote reply
Do these commands require a restart of a server to take effect? And thank you, i shall give it a try shortly.
Copy link Quote reply
The ingame commands do not require a restart but the config changes do.
Copy link Quote reply
I’ve set both values to true in the config and restarted my server, where will the OD and UN Names be displayed?
Copy link Quote reply
Search for the item in nei and mouse over it and the names will show in the item tooltip.
Copy link Quote reply
If i search for Thaumcraft shards in NEI and hover over i see «Air Shard 4115» followed by «Thaumcraft» as the mod, i’m guessing neither of those are the values i’m looking for as i’m fairly sure they showed up before.
Copy link Quote reply
no, air shard is OD shardAir
so you would type
/projecte_addEMC OD shardAir 256
if you want it to be worth 256 emc.
not sure why your not showing the un and od names if you set the configs right.
You can probably figure out the other shards (shardWater shardFire ETC..) but you
will need the configs to work to figure out others.
Did you remember to save the config file after you changed the values? Did you save it to the same place you opened it from? If so not sure why its not working.
Copy link Quote reply
Yeah i’ve double checked on the server, but i’ll restart the server and PC again and try once more, could it be related to WAILA?
Copy link Quote reply
no I have waila installed also. You should be able to mouse an item in nei or in your inventory and it will say
Air Shard 4362
UN: Thaumcraft:ItemShard
OD: shardAir
Thaumcraft
Did you enter that command and did it work?
Did you change the configs in both the server and your local configs?
Copy link Quote reply
Not my local ones no, That might have made more sense. I’ll try that quickly.
Copy link Quote reply
Managed to get them to display and added the code for the Chocobo feather from Chococraft using the items UN. Got the green text to say it had been added, but when i tried to test then with my tablet it still wasn’t a compatible item, i’ve restarted the server to see if that works.
Copy link Quote reply
Not sure what you mean by not compatible.
After you entered the command if you mouse over it again does it now show an EMC value?
Copy link Quote reply
Just tried with the air shard from thaumcraft which worked using the OD value, but using the UN value for the chocobo feather didn’t despite the green text message showing that both worked.
(By not compatible i mean it didn’t work, sorry poor way to describe the situation :D)
Copy link Quote reply
/projecte_addEMC UN chocoFeather 0 256
Not sure what choco feather UN name is actually called since i dont have it installed. Just replace that with the real UN for it and change 256 to whatever EMC you want it to cost again.
Copy link Quote reply
If you want an easy way to set EMC, download the latest Dev build (link in the main page).
Then, hold the item you want to add EMC to in your hand, and type the command /projecte_setEMC and the value you want.
Copy link Quote reply
WOW, you are the man dude. That is awsome.
Copy link Quote reply
how do you set ore dictionary entries in the dev version?
Автору эти координаты пригодятся для дальнейших разъяснений.
Если вы знаете английский, то после просмотра видео переходите к установке.
Эта сборка только и исключительно для версии Minecraft 1.2.5.
1) Вам необходимо скачать следующие файлы:
а) MinecraftForge 3.3.8.152 Эта программа необходимая для работы мода.
б) И сам мод
2) Зайти в папку с игрой:
C:Documents and SettingsAdminApplication Data.minecraft.
3) Заходим в папку «bin».
В ней находится файл minecraft.jar.
Правый щелчёк->Открыть с помощью->WinRAR archiver.
Находим папку META-INF и удаляем её. (ничего не закрываем).
4) Открываем MinecraftForge-3.3.8.152-Client.zip.
Перетаскиваем всё его содержимое в открытый вами minecraft.jar.
Закрываем minecraft.jar.
5) Запускаем Minecraft.
Ждём пока игра загрузится.
Выходим из игры.
6) В папке с игрой .minecraft должна появиться папка «mods».
Перетаскиваем в неё EE2ClientV1.4.6.6.jar.
7) Запускаем игру.
Создаём карту Creative Mode.
Если в инвентаре появились новые вещи — вы всё правильно сделали.
 Заходим в википедию мода смотрим рецепты.
9) Играем новую Survival с новыми возможностями.
Project EX [1.12.2]
Project EX — это дополнение к Project E, которое добавляет обновленные версии элементов PE.
ProjectE Recipe Difficulty Increase [1.12.2]
Увеличение сложности рецепта ProjectE. Этот скрипт был создан с помощью CraftTweaker для использования в моем приложении:…
Equivalent Storage [1.12.2]
Эквивалентное хранение производится для усовершенствованного хранилища 1.6 или более нового и Project E 1.3.1 или новее….

Equivalent Integrations [1.12.2]
Существуют отдельные версии для ProjectE 1.3.0 (последняя стабильная версия) и 1.3.1B (последняя бета-версия). Пожалуйста, убедитесь, что…

Thaumic Equivalence [1.12.2] [1.8.9] [1.7.10]
Добавление к ProjectE и Thaumcraft! Все, что он делает, это добавляет EMC в предметы Thaumcraft. Не…

Progressive Alchemy [1.12.2]
Прогрессивная алхимия. Это мод, что добавляет несколько уровней Конденсаторов, каждый из которых ограничивает значение EMC. Количество…
Equivalent Energistics [1.12.2] [1.10.2] [1.7.10]
Equivalent Energistics — это мод, который добавляет компоненты, позволяющие вам добавить автокранирование с помощью Equivalent Exchange…
Expanded Equivalence [1.12.2]
Expanded Equivalence — Это аддон ProjectE. Этот аддон добавляет интеграцию для ProjectE и множество других модов….
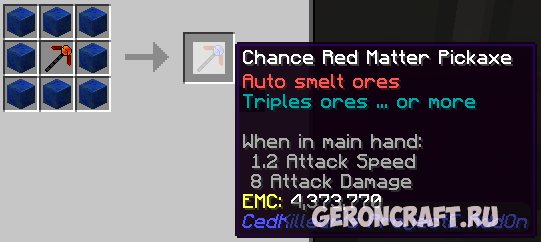
Ced Killeurs ProjectE AddOn [1.12.2]
CedKilleurs ProjectE AddOn — Мод добавляет две новых кирка, которые расширяют кирки ProjectE: Экстремальная темная маска…
ProjectE Aether Addon [1.7.10]
Добавляет новый контент, который соединяет ProjectE и Aether 2.
|
|
This article is a work-in-progress. It may be finished in the near future, check its history to see previous edits. |
This is a community-written guide. It was written to help players to get accustomed to ProjectE.
Introduction
ProjectE is a remake of Equivalent Exchange 2 and is a magic mod that allows players to convert almost any item into energy, and convert that energy into almost any other item. At its core is the concept of Energy-Matter Covalence, or EMC. Almost every vanilla item, and many modded items, have an EMC value (which will show up on a tooltip). If an item has an EMC value, it can be converted into EMC and stored in a Transmutation Table or created from EMC energy stored in the Table.
EMC values for base items such as Coal and Stick have been set by the mod author. EMC values for compound items, such as a Torch are calculated from their ingredient. Items from many popular mods have also been included but support is far from universal. The mod config files allow for adjustments to EMC values.
Tooltip displaying EMC value of a vanilla item.
About this Guide
This guide is not an exhaustive description of items, nor a tutorial on using each item. It is a helping hand to get you started with ProjectE. Throughout this guide you’ll find links to named items. Be sure to explore these links for full details, descriptions and illustrations.
The foundation
- Start by making a Philosopher’s Stone. This handy-dandy item functions as a portable crafting station, portable furnace and transmutator of materials.

- Next, make a Transmutation Table and place it somewhere convenient. You get your Philosopher’s Stone back. The Transmutation Table can be picked up and relocated at any time. It will not forget its contents—transmutation lists are bound to players and can be accessed through any Table placed by any player.
- Put something with an EMC value in the «flames» slot. The item will be destroyed, converted to EMC and memorised by the table (signified by «learned» popping up in the middle of the interface.) Now try putting some other things in. You’ll see the table learn them and see your EMC storage increase. Items without an EMC value will not be destroyed.

- Click on the item’s icon to create one from stored EMC. Shift-click to get a whole stack (or as much as it can create with the stored EMC.)
- Do this with anything else you come across. With time, you’ll build up a store of EMC and a growing list of items that you can create using EMC.
- Make yourself an Alchemical Chest and use it to make an Alchemical Bag (or two or three!) These large-capacity magical bags will help greatly in your adventuring.

Generating EMC
Now you know how useful EMC can be, you’ll be wanting more of it! There are two ways of generating EMC, converting items and collecting it passively from light.
Converting items
The Energy Condenser looks like a chest but converts any items put or piped into it into EMC . It will then create an item specified at the top from the stored EMC. Rather than simply trashing the mountains of dirt from your quarry, you might want to pipe them into an Energy Condenser. Note: Depending on your mod pack, ores may not have an EMC value. In this illustration, we see an ore-doubler / furnace chain feeding into an Energy Condenser where it is converted into an item with a high EMC value.
Passive EMC generation
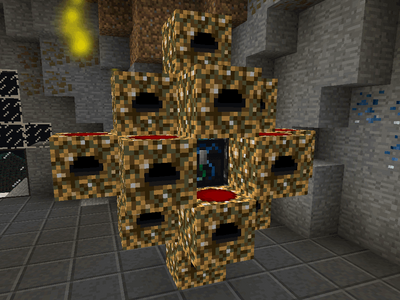
The Energy Collector absorbs light energy from its environment and converts it into EMC. There are three tiers of Energy Collector, each producing a higher amount of EMC per second.
Anti-Matter Relays are used to connect Energy Collectors to an Energy Condenser.
- Start with just a single Energy Collector MK1, placed adjacent to an Energy Condenser.
- Open the condenser and put a piece of Alchemical Coal in the top-left slot.
- Wait. You’ll see the EMC bar slowly climb. When it reaches 100%, a new piece of Alchemical Coal will be placed in the Condenser’s inventory. Congratulations! You’re now generating EMC without lifting a finger!
- Periodically clear out the Alchemical Coal and put it into your Transmutation Table.
- As you accumulate more EMC, make more Energy Collectors so you can gather EMC more quickly.
With time, your stored EMC will allow you to upgrade your machines to higher tiers, expand your setup and start producing fuels or materials with a higher EMC value. For example, start with making Alchemical Coal. Once you have a couple of MK2 or MK3 collectors, make Mobius Fuel or Aeternalis Fuel instead.
Once you have three or more Energy Collectors, you can think about building a «Power Flower».
Power flowers
A Power Flower is the most compact way of arranging Collectors, Relays and Condensers. It is not the only way to set things up, and you don’t need to do it all at once. You can make just one «petal» of the flower with 3 or 4 Energy Collectors, one Anti-Matter Relay and one Energy Condenser, then add additional relays and petals as you have the EMC to expand. If you follow this pattern, you’ll get the best efficiency of cost and space.
Using the following pattern, 17 Energy Collectors can be linked via 5 Anti-Matter Relays to a single Energy Condenser. Any combination of machine tiers can be used but be sure to upgrade your Anti-Matter Relays to ensure you have enough capacity to handle the EMC energy flow. For example, 5 x Energy Collector MK1 or Energy Collector MK2 produce less than an Anti-Matter Relay MK1’s capacity of 64 EMC/s. However two Energy Collector MK3s produce a total of 80 EMC/s which means a MK1 relay is inadequate. Don’t worry about making too many of the one thing, you can just convert it back into EMC!
- Start by placing an Energy Collector. Then place an Anti-Matter Relay on top of the collector, and an Energy Condenser on top of the relay.

- Next, place a relay on the top, left, right and rear face of the Condenser. Leave the front face clear so you can get to the Condenser.
- Now place your remaining Energy Collectors so they are in contact with the Relays.
- Finally, open the Energy Condenser and specify what it should create with all this EMC.

Afterword
ProjectE offers a wide variety of utility items, baubles, tools and armor. Be sure to explore the navbar below to explore this mod further.
| v · d · eProjectE | ||||||||||||||||||||||||||||||||||
|---|---|---|---|---|---|---|---|---|---|---|---|---|---|---|---|---|---|---|---|---|---|---|---|---|---|---|---|---|---|---|---|---|---|---|
|
||||||||||||||||||||||||||||||||||
|
|
|
This article is a work-in-progress. It may be finished in the near future, check its history to see previous edits. |
This is a community-written guide. It was written to help players to get accustomed to ProjectE.
Introduction
ProjectE is a remake of Equivalent Exchange 2 and is a magic mod that allows players to convert almost any item into energy, and convert that energy into almost any other item. At its core is the concept of Energy-Matter Covalence, or EMC. Almost every vanilla item, and many modded items, have an EMC value (which will show up on a tooltip). If an item has an EMC value, it can be converted into EMC and stored in a Transmutation Table or created from EMC energy stored in the Table.
EMC values for base items such as Coal and Stick have been set by the mod author. EMC values for compound items, such as a Torch are calculated from their ingredient. Items from many popular mods have also been included but support is far from universal. The mod config files allow for adjustments to EMC values.
Tooltip displaying EMC value of a vanilla item.
About this Guide
This guide is not an exhaustive description of items, nor a tutorial on using each item. It is a helping hand to get you started with ProjectE. Throughout this guide you’ll find links to named items. Be sure to explore these links for full details, descriptions and illustrations.
The foundation
- Start by making a Philosopher’s Stone. This handy-dandy item functions as a portable crafting station, portable furnace and transmutator of materials.
- Next, make a Transmutation Table and place it somewhere convenient. You get your Philosopher’s Stone back. The Transmutation Table can be picked up and relocated at any time. It will not forget its contents—transmutation lists are bound to players and can be accessed through any Table placed by any player.
- Put something with an EMC value in the «flames» slot. The item will be destroyed, converted to EMC and memorised by the table (signified by «learned» popping up in the middle of the interface.) Now try putting some other things in. You’ll see the table learn them and see your EMC storage increase. Items without an EMC value will not be destroyed.
- Click on the item’s icon to create one from stored EMC. Shift-click to get a whole stack (or as much as it can create with the stored EMC.)
- Do this with anything else you come across. With time, you’ll build up a store of EMC and a growing list of items that you can create using EMC.
- Make yourself an Alchemical Chest and use it to make an Alchemical Bag (or two or three!) These large-capacity magical bags will help greatly in your adventuring.
Generating EMC
Now you know how useful EMC can be, you’ll be wanting more of it! There are two ways of generating EMC, converting items and collecting it passively from light.
Converting items
The Energy Condenser looks like a chest but converts any items put or piped into it into EMC . It will then create an item specified at the top from the stored EMC. Rather than simply trashing the mountains of dirt from your quarry, you might want to pipe them into an Energy Condenser. Note: Depending on your mod pack, ores may not have an EMC value. In this illustration, we see an ore-doubler / furnace chain feeding into an Energy Condenser where it is converted into an item with a high EMC value.
Passive EMC generation
The Energy Collector absorbs light energy from its environment and converts it into EMC. There are three tiers of Energy Collector, each producing a higher amount of EMC per second.
Anti-Matter Relays are used to connect Energy Collectors to an Energy Condenser.
- Start with just a single Energy Collector MK1, placed adjacent to an Energy Condenser.
- Open the condenser and put a piece of Alchemical Coal in the top-left slot.
- Wait. You’ll see the EMC bar slowly climb. When it reaches 100%, a new piece of Alchemical Coal will be placed in the Condenser’s inventory. Congratulations! You’re now generating EMC without lifting a finger!
- Periodically clear out the Alchemical Coal and put it into your Transmutation Table.
- As you accumulate more EMC, make more Energy Collectors so you can gather EMC more quickly.
With time, your stored EMC will allow you to upgrade your machines to higher tiers, expand your setup and start producing fuels or materials with a higher EMC value. For example, start with making Alchemical Coal. Once you have a couple of MK2 or MK3 collectors, make Mobius Fuel or Aeternalis Fuel instead.
Once you have three or more Energy Collectors, you can think about building a «Power Flower».
Power flowers
A Power Flower is the most compact way of arranging Collectors, Relays and Condensers. It is not the only way to set things up, and you don’t need to do it all at once. You can make just one «petal» of the flower with 3 or 4 Energy Collectors, one Anti-Matter Relay and one Energy Condenser, then add additional relays and petals as you have the EMC to expand. If you follow this pattern, you’ll get the best efficiency of cost and space.
Using the following pattern, 17 Energy Collectors can be linked via 5 Anti-Matter Relays to a single Energy Condenser. Any combination of machine tiers can be used but be sure to upgrade your Anti-Matter Relays to ensure you have enough capacity to handle the EMC energy flow. For example, 5 x Energy Collector MK1 or Energy Collector MK2 produce less than an Anti-Matter Relay MK1’s capacity of 64 EMC/s. However two Energy Collector MK3s produce a total of 80 EMC/s which means a MK1 relay is inadequate. Don’t worry about making too many of the one thing, you can just convert it back into EMC!
- Start by placing an Energy Collector. Then place an Anti-Matter Relay on top of the collector, and an Energy Condenser on top of the relay.
- Next, place a relay on the top, left, right and rear face of the Condenser. Leave the front face clear so you can get to the Condenser.
- Now place your remaining Energy Collectors so they are in contact with the Relays.
- Finally, open the Energy Condenser and specify what it should create with all this EMC.
Afterword
ProjectE offers a wide variety of utility items, baubles, tools and armor. Be sure to explore the navbar below to explore this mod further.
| v · d · eProjectE | ||||||||||||||||||||||||||||||||||
|---|---|---|---|---|---|---|---|---|---|---|---|---|---|---|---|---|---|---|---|---|---|---|---|---|---|---|---|---|---|---|---|---|---|---|
|
||||||||||||||||||||||||||||||||||
|
Быстрое развитие с модами Project E и Project EX (Часть 2)
В этой статье мы разберёмся с генерацией EMC и ресурсов из EMC.
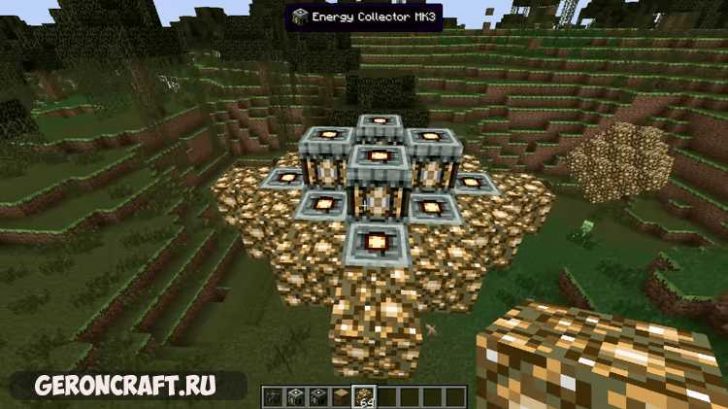
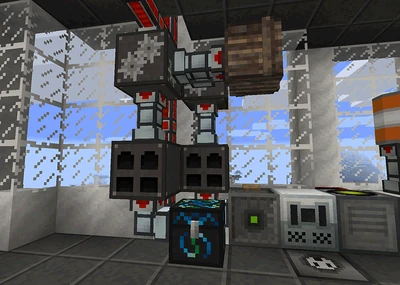
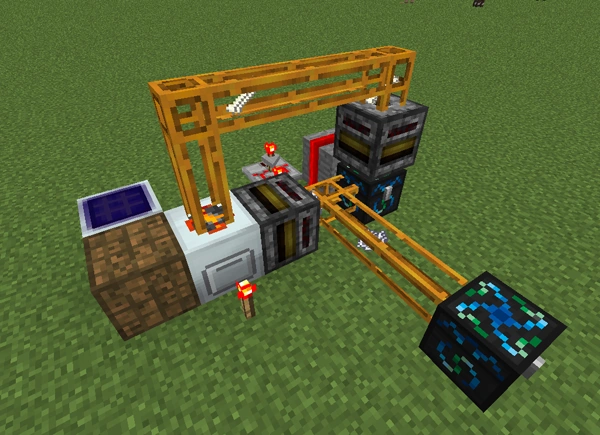
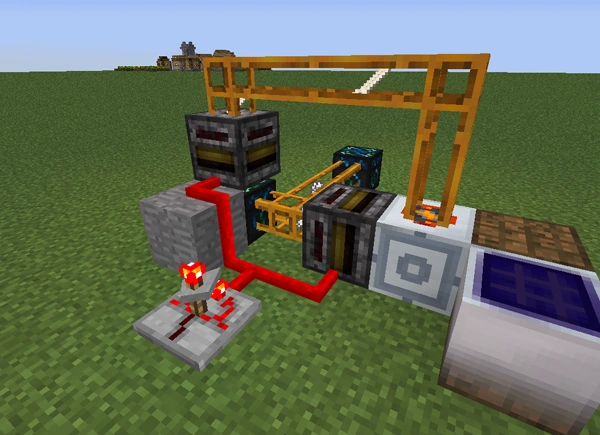
Генерировать первую EMC вам будет Сборщик энергии MK1 сборщиков бывает несколько уровней (MK1, MK2, MK3), но так, как у нас стоит мод Project EX добавляются ещё MK4 — MK15 (и самый крутой — Final).
Увы эта EMC, которую делает сборщик не идёт нам в карман, а копится в самом сборщике, но её можно использовать для генерации предметов в Конденсаторе энергии , который нужно поставить вплотную со сборщиком и положить в верхний правый слот предмет, который вы хотите создавать. Сборщиков можно ставить несколько, должно получиться так:
Генерация будет идти очень медленно, по этому я советую как можно скорее улучшать сборщики, а делается это с помощью тёмной материи, которая стоит очень дорого, а потом идёт красная материя, которая стоит ещё дороже.
Как только вы улучшите сборщики генерация пойдёт немного быстрее, а вам я советую отправиться в шахту и накопать побольше ценных ресурсов. Я вот например копал изумруды, которые благодаря моду cyclic очень часто генерируются в аду.
Когда вы наконец смогли добыть 4 тёмных материи сразу делайте Часы течения времени. Нажав на кнопку, которая указана в управлении, как «Сменить режим» часы загорятся жёлтым и станут ускорять всё, что происходит вокруг: печки, а главное — генерацию EMC сборщиками, так вы сможете получить заветную материю ещё быстрее. Делайте таких часов несколько, активируйте их и вставайте в АФК около конденсатора энергии.
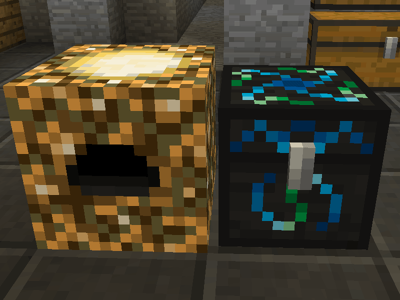
Когда вы накопите 32 тёмных материи вы можете сделать пьедестал из тёмной материи, поставить его рядом с конденсатором положить на нега часы и активировать его ПКМ. Теперь вам не надо всё время стоять рядом с генератором, пьедестал сделает это за вас.
Источник
Tutorial / Simple EMC Generator
This machine may be nerfed or banned on some servers. Check before building on an SMP server. You have been warned.
The EMC Generator, also known as a “mass-fab macerator”, is a great alternative to amassing EMC without using Energy Collectors. It is fully automatic and can use Bones or Blaze Rods as the conversion ingredient. Blaze Rods have a much higher EMC value than Bones and so is the preferred method, but both work on the same principle. Requiring two Energy Condensers, the EMC Generator is cheaper than a Power Flower and can be built much quicker.
Simple EMC Generator uses few material to get started quickly.
Reverse angle: Timer set on default matches the timing of the Macerator perfectly.
Contents
How It Works
Bones are worth 144 EMC, and Bonemeal is 48. One Bone yields five Bonemeal when macerated, and Blaze Rods produce Blaze Powder. By converting the Bonemeal back into Bones in an Energy Condenser, a surplus of 96 EMC is generated for every Bones used.
Blaze Rods are worth 1,536 EMC, and Blaze Powder is 768, half the value of Blaze Rods. Using Blaze Rods is a lot more efficient in generating EMC not just because it is worth over ten times that of Bone but also because it only takes TWO Blaze Powder to convert back into a Blaze Rod, leaving a surplus of three Blaze Powder.
Therefore, the net gain from using Bones is 96 EMC per cycle and the net gain from using Blaze Rods is 2304 EMC per cycle, making Blaze Rods 24 times more efficient.
From here on, the words «Bone / Bonemeal» are used interchangeably with «Blaze Rod / Blaze Powder».
A Bone is macerated and the Bonemeal is transferred to an Energy Condenser where it is converted back into Bones, with a net gain. Bones are then sent back to the Macerator to start the process again, with each cycle gaining more Bonemeal. Enough Bones are kept in the cycle to keep it going and the excess Bonemeal is diverted to another Energy Condenser to convert the EMC into desired items, such as Diamonds or Dark Matter.


Bones being macerated into bone meal


Blaze rods being macerated into blaze powder
Materials
Energy Condenser GUI showing bonemeal being converted back into bones. Non-EMC items fill the remaining slots so that bonemeal is diverted after the first slot is filled. All the items and quantities needed for the Simple EMC Generator are shown in the Hotbar.
The type of Macerator used is one of preference. A regular Macerator would need several Overclocker Upgrades, otherwise the process will be very slow. The speed of the Rotary Macerator is timed perfectly with the default speed of a Timer (2 seconds), is adequate for EMC generation and is recommended for its simplicity. Maximizing the speed of the Rotary Macerator with Overclockers requires only an adjustment of the Timer to ensure that bones are always queued up for processing. Place a redstone torch next to the Macerator as soon as it is powered to get it up to maximum speed.
Filters (as opposed to Transposers) are used for two reasons: First, so that Bonemeal doesn’t stack up inside the output slot of the Macerator, potentially clogging the system; and Second, to further enable efficient timing for the transfer of Bones to the Macerator. With nothing placed inside its GUI inventory, the first Filter will pull all the Bonemeal out of the Macerator at once. With the Timer set to default, placing two Bones in the second Filter (from the Condenser) is sufficient to supply the Macerator without creating a backlog or processing lag, and if you’re not sure, having too many is better than not enough.
The image (above right) is the inventory GUI of the Energy Condenser in the loop. A Bone is placed in the top-left slot to create Bones from Bonemeal. Two slots are left open and the rest are filled with an item that cannot be converted by Equivalent Exchange, this example shows Quarry Frame which can be plentiful and otherwise worthless (Ores will also work). Once the two open slots have filled from the process, excess Bonemeal will begin to divert to the second Energy Condenser, and begin EMC collection. Leaving the other 89 slots open prolongs the diversion into the second Condenser.
Place a Diamond (or any item you need more than enough of) in the top slot of the second Energy Condenser.
Expansion
The design in this tutorial is by no means the only way to configure the EMC Generator. Many Macerators can be placed side-by-side and the Timer and input Filter can be adjusted to ensure continuous operation. The output of the system can be connected to another system that requires raw materials or fuel. The possibilities are as varied as the imagination of the player.
If you have a setup that demonstrates a different idea, please upload a screenshot into this section so that others may benefit from your creation.
Still Confused? Here’s a map!
- Follow 1& 2.
- Open Finder
- Press Go in the Taskbar.
- Hold down Alt, and select Library.
- Enter Application Support
- Follow 4-8.
Источник
ProjectE
| ProjectE | |
|---|---|
| Current developers | sinkillerj |
| Version | 1.16.5: PE1.0.1B 1.15.2: PE1.0.4 1.14.4: PE1.0.1B 1.12.2: PE1.4.1 1.12.1: PE1.3.2h 1.12: PE1.3.2h 1.11.2: PE1.0.0B 1.10.2: PE1.3.1 1.9.4: PE1.0.5B 1.8.9: PE1.1.4 1.8: PE1.1.2 1.7.10: PE1.10.1 |
| Supported Minecraft versions | 1.7.10-1.16.5 |
| Needed for | Auxilium Equivalence Equivalent Additions Equivalent Bees Equivalent Energistics Equivalent Integrations Equivalent Storage Expanded Equivalence Progressive Alchemy Project EX ProjectE Integration Refined Exchange Thaumic Equivalence |
| URL | Link |
| Modpacks | |
| FTB Builders Paradise |
ProjectE is a magic mod in development by sinkillerj . It is an open-source remake of Equivalent Exchange 2, released for Minecraft 1.7.10 and newer. It allows users to transmute materials into other materials, using various items and machines. It adds a system known as Energy-Mass Currency, or EMC, which is used to represent the values of items. This value differs from item to item, and is used in determining how much of one material another requires. EMC can also be stored and produced through other means. EMC is also used by certain blocks and items to carry out powerful effects.
ProjectE originally used its own textures, however after community vote and permission from x3n0ph0b3 , original developer of Equivalent Exchange 2, ProjectE now uses original EE2 textures.
Guides
External links
«name» = «»Navbox ProjectE»» «state» = «»plain»»
Источник
Генератор emc project e
Put something with an EMC value in the «flames» slot. The item will be destroyed, converted to EMC and memorised by the table (signified by «learned» popping up in the middle of the interface.) Now try putting some other things in. You’ll see the table learn them and see your EMC storage increase. project emc mod
Ingame command for custom EMC guide · Issue #213
If you want an easy way to set EMC, download the latest Dev build (link in the main page). Then, hold the item you want to add EMC to in your hand, and type the command /projecte_setEMC and the value you want. MineKilla commented on … minecraft project emc
[ProjectE] Help adding custom Emc values : feedthebeast
E:2138. M:22. Try swapping the E: and M: lines— I think the issue here is your syntax. If that doesn’t work, go in-game, hold the processor in your hand, then use /projecte_setEMC to set the EMC …
Ten tips for successfully designing with automotive EMC
Ten tips for successfully designing with automotive EMC/EMI requirements Introduction The automotive industry and individual automobile manu-facturers must meet a variety of electromagnetic compati-bility (EMC) requirements. For example, two requirements are to …
Essential EMC Design Rules To Avoid The 7 Most Common EMC
It seemed possible. If you want to avoid some of the most common EMC pitfalls, learn some good EMC design tips, and avoid costly re-tests and launch delays, read on…. 1. EMC Design Tip #1 – Reduce RF Noise On The Cables. Cables act like antennas for radio noise. One of the top failure modes I saw at the lab were due partly or wholly to EM
changing emc value for items · Issue #500 · sinkillerj
when i try to use the command /projecte_setEMC on an item I’m holding , it doesn’t set the EMC on that item to the value i want it and changes it to some random number. example , i am holding an item that doesn’t have an EMC value , so i input ( /projecte_setEMC 512 ) and instead of changing its value to 512 , it clearly changes it to 217.
Five Steps for Successful Automotive EMC Design
II. Include EMC in design. It is often observed that EMC is taken into consideration at the final phase of the project, either after experiencing a compliance failure or at final sample stage. EMC design from the earliest stages of the project leads to easy …
[Request]ProjectE
I know EMC values are calculated somewhat automatic based on some base values. Many mods do crafting in their own way and therefore no EMC value is added. I know we have access to the command «/projecte setemc value». But using that command and figuring out the cost of every block in my game is tedious. The mod uses a custom EMC file just for this.
Automatic EMC Generation (faster than collectors
The completed pipes for the EMC Generator. Place the final Wooden Transport Pipe to the left of the Condenser that is in front of the Macerator. Place one Cobblestone Transport Pipe in between the two Condensers. With this setup, every Blaze Powder will have a 50/50 shot of going in either chest.
The Beginner’s Guide to EMC Empire Minecraft
Building your first EMC creation: Here’s my rule I lived by for my first month: Start small. Your first building doesn’t need to be 256 blocks high to be effective. By creating a small 8x8x8 setup, you will have enough space (2 levels) to sell all of the items you collect via the farms I’ll be showing you.
21 Tips on How to Be a Good and Effective Emcee / Master
e. Wish them well Just like the Olympic games opening ceremony, there will be an elaborate closing ceremony to close off the games. Now think of an “appropriate closing ceremony” to close off your event! So there you have it, 21 tips on how to be a good and effective emcee! The most important thing is to have fun on stage!
Adding EMC to items Gaming Masters
Some of the others are even more complicated, e.g., a single low voltage solar panel or even a high voltage one. Most of the modular force field blocks are very complex as well. All crafting, and running items through machines, must not increase the EMC value at all. A uranium block would merely cost 9*uranium ore.
7 tips to help you pass your EMC compliance test – Clever
EMC compliance testing is probably one of the most challenging types of testing because there are countless ways to fail it. However, in most of the cases, the problem of many products seems to be the lack of proper EMC design techniques. Because of that, I’ve created a list of 7 tips which, if taken into consideration during the product’s design phase, will help you pass the EMC
What Is an EMC Engineer
The engineers in each group, although all in EMC, would have different job functions and could require different skills to complete their part of the project. In a smaller company, the EMC engineer may handle design, test, and the regulatory issues to get the product to market.
Tutorial / Simple EMC Generator The Tekkit Classic Wiki
This machine may benerfed or banned on some servers. Check before building on an SMP server. You have been warned. The EMC Generator,also known as a “mass-fab macerator”, is a great alternative to amassing EMC without using Energy Collectors. It is fully automatic and can use Bones or Blaze Rods as the conversion ingredient. Blaze Rods have a much higher EMC value than Bones and so is the
Updating the EMC Client
After downloading the EMC client setup package (EMCSetup.exe), you can update the EMC to the latest Simphony version. EMCSetup.exe contains all files required by EMC to function.
Enterprise Management Console (EMC)
The Simphony remote EMC client now runs (by default) as a native 64-bit application. A remote EMC client can be run as a 32-bit or 64-bit application. The platform version run depends on the operating system of the computer where it is installed. The default installation path for remote EMC client files is now C:Program FilesOracle Hospitality.
EMC and EMI Testing Procedures Explained Compliance
EMC/EMI testing is broken down into two categories. Testing for emissions (Electromagnetic Interference, or EMI), and testing for immunity. Devices must not interfere with the safe operation of other electronic devices by producing Electromagnetic Interference. Testing for immunity is not usually required for consumer-grade products that are
How to Do an EMC Design Review
There are a specific set of pass/fail criteria that your product must meet, or you can’t sell it. It’s that simple. Without a clear specification of the tests your product is going to be subjected to at an EMC lab, you are lacking a functional specification that should really be taken into account at the design stage of your project.
3 Ways to Build an EMP Generator
A favorite device for science fiction and action movie writers is the EMP generator. An EMP (or electromagnetic pulse) has the power to knock out all electronic devices within its range. Be careful because this could be dangerous.
EMC and EMI – The Issues You Should Never Skip in Product
EMC and EMI Testing Comes Together. The common issues in electronic designs that you must face is the fact that if there are EMC/EMI issues you essentially will have thermal issues and with over powerful electronic emissions. Those emissions will cause interference with other devices.
Fastest EMC Generation Technic Pack Wiki Fandom
The iron pipe should be set so that the output of the macerators goes towards the condensers. Now simply add enough EMC to get the process going in the blaze rods condenser and turn on the timer. Now you will get infinite EMC so long as your EU is created.
EMP Generator : 5 Steps
EMP Generator : This is a easy, portable and cheap DIY project to make a electromagnetic pulse (EMP).Follow the few steps and you got yourself your own EMP to disable or destroy electronic devices (this EMP is only strong enough to destroy a calculator).
How to write an EMC Test Plan EMC Bayswater Pty Ltd
EMC Bayswater is a NATA accredited EMC testing facility in Melbourne. Equipped with state-of-the-art EMC test chambers. Experienced test engineers helping you achieve compliance and reducing market lead time. We can help you with how to write an EMC Test Plan and answer some of …
Electromagnetic Compatibility (EMC)
Electromagnetic compatibility (EMC) is the study of coordinating electromagnetic fields give off equipment, with the withstand (compatibility) of other equipment within the vicinity. In it’s simplest form, we endeavour to ensure that the magnitude of any electromagnetic fields generated are less than the withstand level of adjacent equipment.
Use AirPlay to stream video or mirror the screen of your
Use AirPlay to stream or share content from your Apple devices to your Apple TV or AirPlay 2-compatible smart TV. Stream a video. Share your …
How to improve EMC performance on 8 layer PCB design-Blog
For best EMC performance and Signal Integrity, when high frequency signals change layers (e.g., from layer 4 to 5) you should add a ground-to-ground via between the two ground planes, near the signal via, in order to provide an adjacent return path for the current.
EMC/EMI IN PRODUCT DEVELOPMENT
EMC/EMI filters have become an invaluable tool to ensure electronic products pass electromagnetic compliance (EMC) testing allowing a product to be introduced to market. EMI filters can be designed into a product during the early design and prototyping phase, which is an optimal time to account for product dimensions prior to manufacturing.
How to Work Effectively With Your EMC Test Lab
EMC Lab Testing Checklist. Choose a lab with all the necessary capabilities and credentials. Use a lab capable of EMC design and debugging support. Take advantage of quick-scans. Have the design engineer on-site. Prepare a thorough documentation package. Have at least two test specimens available. Ensure sufficient cable lengths for support
Guide to Internal Communication, the Basecamp Way
Day-to-day project work: In context. Effective communication requires context. Saying the right thing in the wrong place, or without proper detail, leads to double work and messages being missed. That’s why we spin up a separate Basecamp project for every project we work on. Everything related to that project is communicated inside that project.
EMC The Tekkit Classic Wiki Fandom
EMC, which stands for Energy-Matter Covalence, is the basic form of exchanging items in Equivalent Exchange.There are many different methods of obtaining EMC, such as using an Energy Condenser to condense items into more valuable ones. Another method is to use Energy Collectors, which create EMC from sunlight or artificial light, like glowstone.This EMC can be used by a variety of different
EMC Technic Pack Wiki Fandom
EMC (Energy Matter Covalence) is the Equivalent Exchange mod’s «currency» when using something like a Transmutation Tablet or Energy Condenser.Coincidentally or not, EMC may be a play on Einstein’s famous E=mc 2 equation, showing the equivalence of mass and energy.. The main way to create EMC in early game is by farming or mining. The materials can be placed either into a Transmutation Tablet
Project Mc² Netflix Official Site
Teenage spy McKeyla teams up with three other super-smart girls to become secret agents who use their science and tech skills to save the day. Watch trailers & learn more.
How to Write a Test Plan: 13 Steps (with Pictures)
Be sure to include a section on required resources, like hardware and testing tools. Write a section on the test’s risks and dependencies, as well as what data you’re going to provide for the client. List your strategy, pass/fail criteria, and documents you will …
Employee Self-Evaluation Examples and Tips Indeed.com
For example, a team supervisor is dissatisfied with an employee’s performance. The employee writes a self-evaluation that addresses their own propensity for missing deadlines. The employee acknowledges their weakness and posits some possible solutions that they intend to work on. After reading the self-evaluation, the supervisor then reaches
Technical Resources migrated from TechCenter Dell US
Technical Resources migrated from TechCenter. As of August 2018, the active TechCenter content has migrated to become part of the Dell Support on Dell.com and the forums have migrated to the Dell Communities.
14. Applying for Grants Community Tool Box
14. Applying for Grants. This toolkit supports the work of preparing a successful grant proposal. In this Toolkit, you will find supports for applying for grants. Part I gives a step-by-step overview of the grantwriting process. Part II provides a general template for writing a grant application. Completing Part II will give you a solid
How To Run A Workshop: Guidelines and Checklist
Set up the room for the facilitated workshop: Arrange chairs in a horseshoe shape. Create a “Parking Lot” flip chart and tape it to the wall. Create a “Ground Rules” flip chart and tape it to the wall. Create a “Prioritization Matrix” chart and tape it to the wall. Tape 5 to 6 blank flip chart sheets to the walls for brainstorming.
Certified Evaluation and Management Coder (CEMC
The Certified Evaluation and Management Coder exam was developed by a team of leading E/M coding professionals. Those coders with sufficient experience and expertise in E/M coding are encouraged to sit for the CEMC ™ exam.. The CEMC ™ examinee will be tested on:. The three key components with emphasis on MDM and other subjective aspects of the Documentation Guidelines
Источник