![]()
Download Article
![]()
Download Article
Repairing cracked plastic can seem like a difficult task, but most common plastics are thermoplastic, which means they can be heated and remolded. The key to fixing cracks in plastic is knowing which method is best to repair the crack. Smaller cracks can usually be fixed with glue, hot water, or plastic slurry, while larger cracks may require some welding with a soldering iron. With the right method, fixing a crack in plastic is easier than you think.
-

1
Use plastic glue to fix small cracks in plastic. If you need to reconnect a crack in plastic, you can use plastic glue, which is specially formulated to bond plastic surfaces. Plastic glue is often used for making models so it is easy to use and safe to handle for adults. Make sure you have enough to connect the whole crack, you don’t want to have to stop after you’ve started applying strong glue![1]
- You can use most super glues as well, but check the packaging to make sure it can be applied to plastic.
-
2
Apply the glue to the edges of the crack. Squeezing the tube gently, spread a layer over the edges you will reconnect. Keep a cloth or wipe nearby in case you pour too much and dab any excess glue immediately to prevent it from hardening. Glue dries fast to be sure you are ready to connect the cracked plastic before you start applying![2]
- Strong glues have strong fumes. Work in a well-ventilated area or wear a facemask when handling the glue.
- Wear gloves when using strong glue to prevent it from getting onto your skin and becoming painful to remove.
Advertisement
-
3
Connect the edges of the crack. With the glue spread on the edges, push them together to connect them. Line up the edges carefully. Apply pressure to the reconnected plastic for 1 minute to allow it to set and then gently release the pressure.[3]
- You can use a C-clamp to hold the plastic together.
-
4
Allow the glue to fully cure. Once you’ve connected the cracks in the plastic, it’s very important that you let glue fully set before using the plastic. Different glues have different drying times, so check the packaging for specific drying time. Wait at least 1 hour before using the repaired plastic.[4]
- You can make glue dry faster if you don’t have time to wait for it to cure.


Advertisement
-
1
Reconnect small cracks in plastic using hot water. Plastics often do not need extreme heat to become malleable enough to repair a crack. Soaking the plastic in hot water can make the plastic soft enough to mold and reconnect the edges of the crack. You can make the plastic set almost instantaneously by quickly submerging it in cold water.[5]
-
2
Fill a container of hot water and a container of cold water. Fill a bowl or container with enough hot water to submerge the cracked piece of plastic. Then fill a container with cold water and keep it nearby so you can set the plastic after you’ve repaired the crack.[6]
Make sure you don’t overfill the containers so the water doesn’t spill over the sides when you submerge the plastic.- The water should not be boiling when you submerge the plastic.
-
3
Place the cracked plastic in the hot water. You may not need to fully submerge the entire piece of plastic since you’re only repairing a crack and not remolding the whole piece. Different types of plastic may take longer to become malleable in the water. Leave the cracked plastic in the water for at least 30 seconds.[7]
- Take the plastic out of the water periodically to test if it is soft enough to mold.
- You can use tongs to hold the plastic in the hot water.
- Don’t slosh the plastic around in the water. Allow it to sit undisturbed.
-
4
Take the plastic out of the water and connect the cracked plastic. When the plastic starts to loosen and become malleable enough where you can mold it with your fingers, remove it from the water. Press the cracked edges together to reconnect them. Try not to squish the plastic edges so they don’t appear uneven.[8]
- Wear gloves or use tongs to pull the plastic out of the hot water.
-
5
Submerge the plastic in the cold water to set. Once you have reconnected the edges of the crack, it’s important that you quickly cool the warm plastic so that it sets into place. Fully submerge the plastic into the container of cool water. Do not move it around in the water and allow it to sit for at least 30 seconds.
- You can use a C-clamp to hold the crack together when you submerge it in the cold water, just be sure not to squish the plastic so it’s uneven when it sets.
- Take the plastic out of the water and check to see that it has hardened completely before using it.[9]
- Submerge as much as the plastic as you can. Cooling the entire piece will help the recently molded plastic set better.

Advertisement
-
1
Use acetone to make a plastic putty to fill in cracks. Acetone is a strong solvent that can dissolve plastic down completely. You can use acetone to make a putty of melted plastic that is great for filling in cracks. But you shouldn’t use it for large holes or gaps or it may not set evenly.[10]
-
2
Fill a glass container with acetone. Acetone melts plastic, so you don’t want to fill a plastic container like a cup or bucket with it.[11]
Use a glass or ceramic bowl and fill it with enough acetone to completely submerge a few pieces of scrap plastic. It may be difficult to fully clean the melted plastic when you’re finished, so use a bowl you don’t mind ruining.- Acetone can emit noxious fumes, so be sure you’re working in a well-ventilated area or wearing a facemask when you use it.
-
3
Submerge a few pieces of scrap plastic in the acetone. You’ll be melting down plastic to use to fill your crack, so use pieces that you don’t need. It doesn’t matter the shape, because it will melt completely before you use it.[12]
If possible, use scrap plastic that matches the cracked plastic you are repairing.- Do not get the acetone on your skin as it can irritate it.
- If you can’t match the same type of plastic, try to match the color as best as you can.
-
4
Let the plastic pieces dissolve in the acetone overnight. The plastic will slowly disintegrate into a thick slurry.[13]
Depending on the pieces of scrap plastic, the time it takes to fully break down may vary. A safe bet is to allow the plastic to sit in the acetone for over 8 hours.- You can speed up the time it takes the scrap plastic to break down by cutting it into smaller pieces.
- If the plastic sludge has any large lumps of plastic in it, it may need more time to disintegrate.
-
5
Pour out the extra acetone. Once the pieces of plastic have fully broken down in the acetone, they will separate and sink to the bottom of the container. Carefully drain the acetone in the sink, leaving only the melted plastic behind. Be careful not to breathe in the fumes.[14]
- Acetone can eat through plastic and damage your grass so do not empty the acetone in the garbage or outside!
- Any small amount of acetone left in the container will evaporate quickly.
-
6
Brush the plastic slurry over the crack to fill in the seam. With the acetone fully removed from the mixture, you can apply the plastic slurry made from your scrap plastic. Dip a small paintbrush or swab into the liquid plastic and use it to fill in the crack. Be sure to fill it in completely and apply the putty as evenly as you can.[15]
- Apply the liquified plastic to the underside of the crack so it won’t be as visible.
-
7
Allow the plastic slurry to harden completely. The slurry will quickly begin to bond with the plastic and start to harden. It’s important that you let it set completely before you use the plastic or the crack can reopen. Wait at least 1 hour before using the repaired plastic.[16]


Advertisement
-
1
Use a soldering iron to fix larger cracks in plastic. A simple soldering iron is a great way to fix a crack in plastic. The focused heat from the iron allows you to melt only the edges of the crack so you can reconnect them easily without melting or warping any of the rest of the plastic. They are also easy to use and do not require any extra material.[17]
- Soldering irons are available at hardware stores and the home improvement section of many stores for about $10.
-
2
Let the soldering iron heat up. Plug in and turn on your soldering iron and set it to the lowest setting. It may take a little while for the iron to heat up, but you can use this time to prepare the rest of your materials. You don’t want to use the soldering iron until it has reached the set temperature or your plastic may weld unevenly.[18]
- Do not rest the soldering iron on anything flammable while it heats up.
- Make sure the tip of the soldering iron is clean of any residue.
- Plastic melts much easier than metal, so your soldering iron does not need be higher than 400 °F (204 °C).
-
3
Connect and hold the crack together. When the iron is ready, push the edges of the crack together so that they connect, but don’t overlap each other. Try not to stretch or bend the rest of the plastic. If the edges of the crack cannot connect, you use a small piece of scrap plastic as a patch by melting the edges of the patch and the edges of the crack, and then fusing them together.[19]
- Use a clamp to hold the crack together and allow you to use both of your hands to solder.
- If you do use a piece of scrap plastic as a patch, cut the plastic to a size that fits the crack, and try to use the same type and color of plastic.
-
4
Melt the edges of the crack with the soldering iron. Lightly rake the hot tip of the soldering over the edges of the crack until they melt and fuse together. Be sure to heat the plastic evenly so it fuses together smoothly. Allow the plastic to fully cool before using it.[20]
There should not be a flame or a lot of smoke.- The soldering iron will be very hot, so take be careful not to burn yourself or anything around you when you’re handling it.
- Melting plastic can put off fumes that are harmful. Work in a well-ventilated area or wear a breathing mask to avoid breathing in the fumes.
-
5
Allow the plastic to cool completely. The plastic must cool completely in order for it to set. If you try to use the plastic before the crack is fully set, it may reopen and be harder to repair the next time. Remelting plastic can affect its appearance.[21]
- Wait at least 1 hour before using the repaired plastic.
-
6
Turn off and store the soldering iron. When you are done welding your plastic together, turn off and unplug your soldering iron and allow it to cool. Wipe the soldering tip clean of any plastic residue that may have collected there. Then store the iron in a safe location.
- You may need to scrub the tip of the soldering iron with a brush to remove the residue.
- You can use a cleaning solution to clean the tip, but make sure the iron is unplugged first.


Advertisement
Ask a Question
200 characters left
Include your email address to get a message when this question is answered.
Submit
Advertisement
Thanks for submitting a tip for review!
-
Acetone is a noxious chemical. Do not breathe in the fumes or get any of the liquid on your skin.
-
Strong glue can give off harmful fumes. Work in a well-ventilated area or wear a facemask when you are handling it.
Advertisement
References
About This Article
Thanks to all authors for creating a page that has been read 201,203 times.
Reader Success Stories
-

«I had a crack on the inside of a bottle cap. So after reading the article, I heated that area with a matchstick and…» more
Did this article help you?
Get all the best how-tos!
Sign up for wikiHow’s weekly email newsletter
Subscribe
You’re all set!
![]()
Download Article
![]()
Download Article
Repairing cracked plastic can seem like a difficult task, but most common plastics are thermoplastic, which means they can be heated and remolded. The key to fixing cracks in plastic is knowing which method is best to repair the crack. Smaller cracks can usually be fixed with glue, hot water, or plastic slurry, while larger cracks may require some welding with a soldering iron. With the right method, fixing a crack in plastic is easier than you think.
-
1
Use plastic glue to fix small cracks in plastic. If you need to reconnect a crack in plastic, you can use plastic glue, which is specially formulated to bond plastic surfaces. Plastic glue is often used for making models so it is easy to use and safe to handle for adults. Make sure you have enough to connect the whole crack, you don’t want to have to stop after you’ve started applying strong glue![1]
- You can use most super glues as well, but check the packaging to make sure it can be applied to plastic.
-
2
Apply the glue to the edges of the crack. Squeezing the tube gently, spread a layer over the edges you will reconnect. Keep a cloth or wipe nearby in case you pour too much and dab any excess glue immediately to prevent it from hardening. Glue dries fast to be sure you are ready to connect the cracked plastic before you start applying![2]
- Strong glues have strong fumes. Work in a well-ventilated area or wear a facemask when handling the glue.
- Wear gloves when using strong glue to prevent it from getting onto your skin and becoming painful to remove.
Advertisement
-
3
Connect the edges of the crack. With the glue spread on the edges, push them together to connect them. Line up the edges carefully. Apply pressure to the reconnected plastic for 1 minute to allow it to set and then gently release the pressure.[3]
- You can use a C-clamp to hold the plastic together.
-
4
Allow the glue to fully cure. Once you’ve connected the cracks in the plastic, it’s very important that you let glue fully set before using the plastic. Different glues have different drying times, so check the packaging for specific drying time. Wait at least 1 hour before using the repaired plastic.[4]
- You can make glue dry faster if you don’t have time to wait for it to cure.
Advertisement
-
1
Reconnect small cracks in plastic using hot water. Plastics often do not need extreme heat to become malleable enough to repair a crack. Soaking the plastic in hot water can make the plastic soft enough to mold and reconnect the edges of the crack. You can make the plastic set almost instantaneously by quickly submerging it in cold water.[5]
-
2
Fill a container of hot water and a container of cold water. Fill a bowl or container with enough hot water to submerge the cracked piece of plastic. Then fill a container with cold water and keep it nearby so you can set the plastic after you’ve repaired the crack.[6]
Make sure you don’t overfill the containers so the water doesn’t spill over the sides when you submerge the plastic.- The water should not be boiling when you submerge the plastic.
-
3
Place the cracked plastic in the hot water. You may not need to fully submerge the entire piece of plastic since you’re only repairing a crack and not remolding the whole piece. Different types of plastic may take longer to become malleable in the water. Leave the cracked plastic in the water for at least 30 seconds.[7]
- Take the plastic out of the water periodically to test if it is soft enough to mold.
- You can use tongs to hold the plastic in the hot water.
- Don’t slosh the plastic around in the water. Allow it to sit undisturbed.
-
4
Take the plastic out of the water and connect the cracked plastic. When the plastic starts to loosen and become malleable enough where you can mold it with your fingers, remove it from the water. Press the cracked edges together to reconnect them. Try not to squish the plastic edges so they don’t appear uneven.[8]
- Wear gloves or use tongs to pull the plastic out of the hot water.
-
5
Submerge the plastic in the cold water to set. Once you have reconnected the edges of the crack, it’s important that you quickly cool the warm plastic so that it sets into place. Fully submerge the plastic into the container of cool water. Do not move it around in the water and allow it to sit for at least 30 seconds.
- You can use a C-clamp to hold the crack together when you submerge it in the cold water, just be sure not to squish the plastic so it’s uneven when it sets.
- Take the plastic out of the water and check to see that it has hardened completely before using it.[9]
- Submerge as much as the plastic as you can. Cooling the entire piece will help the recently molded plastic set better.
Advertisement
-
1
Use acetone to make a plastic putty to fill in cracks. Acetone is a strong solvent that can dissolve plastic down completely. You can use acetone to make a putty of melted plastic that is great for filling in cracks. But you shouldn’t use it for large holes or gaps or it may not set evenly.[10]
-
2
Fill a glass container with acetone. Acetone melts plastic, so you don’t want to fill a plastic container like a cup or bucket with it.[11]
Use a glass or ceramic bowl and fill it with enough acetone to completely submerge a few pieces of scrap plastic. It may be difficult to fully clean the melted plastic when you’re finished, so use a bowl you don’t mind ruining.- Acetone can emit noxious fumes, so be sure you’re working in a well-ventilated area or wearing a facemask when you use it.
-
3
Submerge a few pieces of scrap plastic in the acetone. You’ll be melting down plastic to use to fill your crack, so use pieces that you don’t need. It doesn’t matter the shape, because it will melt completely before you use it.[12]
If possible, use scrap plastic that matches the cracked plastic you are repairing.- Do not get the acetone on your skin as it can irritate it.
- If you can’t match the same type of plastic, try to match the color as best as you can.
-
4
Let the plastic pieces dissolve in the acetone overnight. The plastic will slowly disintegrate into a thick slurry.[13]
Depending on the pieces of scrap plastic, the time it takes to fully break down may vary. A safe bet is to allow the plastic to sit in the acetone for over 8 hours.- You can speed up the time it takes the scrap plastic to break down by cutting it into smaller pieces.
- If the plastic sludge has any large lumps of plastic in it, it may need more time to disintegrate.
-
5
Pour out the extra acetone. Once the pieces of plastic have fully broken down in the acetone, they will separate and sink to the bottom of the container. Carefully drain the acetone in the sink, leaving only the melted plastic behind. Be careful not to breathe in the fumes.[14]
- Acetone can eat through plastic and damage your grass so do not empty the acetone in the garbage or outside!
- Any small amount of acetone left in the container will evaporate quickly.
-
6
Brush the plastic slurry over the crack to fill in the seam. With the acetone fully removed from the mixture, you can apply the plastic slurry made from your scrap plastic. Dip a small paintbrush or swab into the liquid plastic and use it to fill in the crack. Be sure to fill it in completely and apply the putty as evenly as you can.[15]
- Apply the liquified plastic to the underside of the crack so it won’t be as visible.
-
7
Allow the plastic slurry to harden completely. The slurry will quickly begin to bond with the plastic and start to harden. It’s important that you let it set completely before you use the plastic or the crack can reopen. Wait at least 1 hour before using the repaired plastic.[16]
Advertisement
-
1
Use a soldering iron to fix larger cracks in plastic. A simple soldering iron is a great way to fix a crack in plastic. The focused heat from the iron allows you to melt only the edges of the crack so you can reconnect them easily without melting or warping any of the rest of the plastic. They are also easy to use and do not require any extra material.[17]
- Soldering irons are available at hardware stores and the home improvement section of many stores for about $10.
-
2
Let the soldering iron heat up. Plug in and turn on your soldering iron and set it to the lowest setting. It may take a little while for the iron to heat up, but you can use this time to prepare the rest of your materials. You don’t want to use the soldering iron until it has reached the set temperature or your plastic may weld unevenly.[18]
- Do not rest the soldering iron on anything flammable while it heats up.
- Make sure the tip of the soldering iron is clean of any residue.
- Plastic melts much easier than metal, so your soldering iron does not need be higher than 400 °F (204 °C).
-
3
Connect and hold the crack together. When the iron is ready, push the edges of the crack together so that they connect, but don’t overlap each other. Try not to stretch or bend the rest of the plastic. If the edges of the crack cannot connect, you use a small piece of scrap plastic as a patch by melting the edges of the patch and the edges of the crack, and then fusing them together.[19]
- Use a clamp to hold the crack together and allow you to use both of your hands to solder.
- If you do use a piece of scrap plastic as a patch, cut the plastic to a size that fits the crack, and try to use the same type and color of plastic.
-
4
Melt the edges of the crack with the soldering iron. Lightly rake the hot tip of the soldering over the edges of the crack until they melt and fuse together. Be sure to heat the plastic evenly so it fuses together smoothly. Allow the plastic to fully cool before using it.[20]
There should not be a flame or a lot of smoke.- The soldering iron will be very hot, so take be careful not to burn yourself or anything around you when you’re handling it.
- Melting plastic can put off fumes that are harmful. Work in a well-ventilated area or wear a breathing mask to avoid breathing in the fumes.
-
5
Allow the plastic to cool completely. The plastic must cool completely in order for it to set. If you try to use the plastic before the crack is fully set, it may reopen and be harder to repair the next time. Remelting plastic can affect its appearance.[21]
- Wait at least 1 hour before using the repaired plastic.
-
6
Turn off and store the soldering iron. When you are done welding your plastic together, turn off and unplug your soldering iron and allow it to cool. Wipe the soldering tip clean of any plastic residue that may have collected there. Then store the iron in a safe location.
- You may need to scrub the tip of the soldering iron with a brush to remove the residue.
- You can use a cleaning solution to clean the tip, but make sure the iron is unplugged first.
Advertisement
Ask a Question
200 characters left
Include your email address to get a message when this question is answered.
Submit
Advertisement
Thanks for submitting a tip for review!
-
Acetone is a noxious chemical. Do not breathe in the fumes or get any of the liquid on your skin.
-
Strong glue can give off harmful fumes. Work in a well-ventilated area or wear a facemask when you are handling it.
Advertisement
References
About This Article
Thanks to all authors for creating a page that has been read 201,203 times.
Reader Success Stories
-
«I had a crack on the inside of a bottle cap. So after reading the article, I heated that area with a matchstick and…» more
Did this article help you?
Get all the best how-tos!
Sign up for wikiHow’s weekly email newsletter
Subscribe
You’re all set!
Доброго Вам дня и с прошедшими праздниками!
Последние несколько лет наблюдал, изучал и применял различные варианты ремонта пластиковых изделий.
В около автомобильной тематике распространены такие работы как:
Ремонт бампера, ремонт фары, ремонт радиатора (крыла, молдинга и т.д), ремонт мотопластика, ремонт пластика снегохода и т.д.
Прежде чем начать ремонт изделия необходимо определить из какого материала (пластика) он изготовлен.
Как правило на деталях есть обозначения вида пластика (PP, PPE, PPH (+ другие варианты PP (Полипропилена)), ABS), но встречаются детали и без обозначений, тут уже определять придется опытным путем. Так как данный пост все же о ремонте а не о том как определить вид пластика продолжим.
1-й метод: назову его «Дедовский это «пайка пластика паяльником и сеткой«
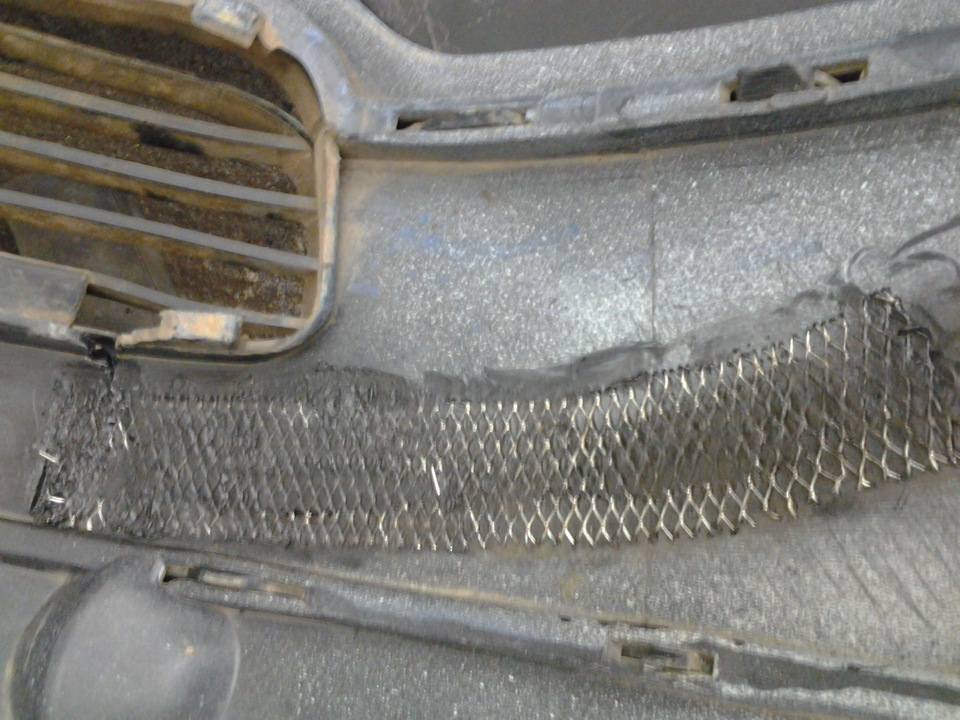
На мой взгляд основным и единственным его преимуществом является доступность.
Цена паяльника 100 руб + сетка.
Основной недостаток в том что материал меняет свои свойства (горит) и становиться хрупким.
Как показала практика однажды отремонтировав трещину или отверстие таким методом при последующем повреждении становиться восстановить очень проблематично или даже не реально.
Вывод: стоит применять в случае если других вариантов просто нет
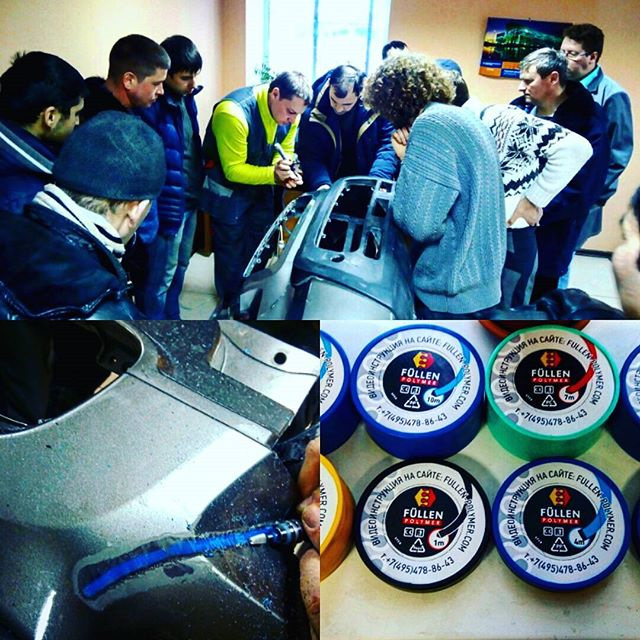
2-й метод: В данный момент набирает популярность в автомобильном сегменте»сварка пластика«
Тут главное правило сваривать материал необходимо подобным, если предстоит ремонт PP пластика то и электроды (присадочный материал) должен быть аналогичного состава.
На данный момент освоена сварка таких пластиков как PP (и его модификации), ABS, Plexiglas (он же акрил, поликарбонат, полиметилметакрилат, оргстекло), Полиамид (PA он пластик в радиаторах). В общем варятся все известные пластики кроме стеклопластика (так как это композитный материал.
Присадочный материал он же электрод можно изготовить самостоятельно из ненужных запчастей, либо использовать специальный (как заявляет производитель с повышенной адгезией).
На семинаре одного из них мне удалось побывать
3-й метод: Склеивание пластика «с армирующим порошком«.
Технология проста и токсична. Некоторые дельцы позиционируют ее компоненты как «НАНО-технологичные».
В основе ее лежит Цианакрилатный клей один из вариантов Cosmofen CA 12, аналогичные клеи есть и у 3M, Henkel и даже обычный «супер клей» имеет эту основу армирующим материалом выступает обычная чайная сода. Данный метод позволяет работать там где вариант сварки просто невозможен. Так же при данном методе ремонта можно склеить пластики разные по составу. Ремонтный шов крепкий и нагрузки на разрыв держит хорошо, но не стоит забывать что он не эластичный. Особое внимание требует уделить защите органов дыхания и зрения. Токсичен как во время склеивания так и во время обработки.
4-й метод: Склеивание пластика «Дихлорэтаном«
Дихлорэтан или дихлоэтановый клей, растворяет пластик до «жидкого» состояния. Благодаря своим свойствам позволяет быстро и максимально эстетично склеить однородные составы. Главное не дать обрабатываемым поверхностям потерять форму. Применим только с теми материалами которые растворяет (тестировали на PP и Плексиглас).
5-й метод: Ремонтные составы «3M«
Существуют и специальные составы (в формате жидкого пластика) от компании 3M. Но в данном формате не буду их рассматривать так как в живую не тестировал, а в виду высокой стоимости применение не вижу целесообразным на данном этапе
Какие бы технологии Вы не применяли главное помнить, что если сломалась деталь изготовленная в условиях завода (производства), то ремонтная деталь крепче не станет, схожие удары судьбы держать будет но большего ожидать не стоит!
С надеждой на обратную связь от людей применяющих технологии по ремонту пластика!
Пластик – один из самых распространенных материалов, что окружают человека сегодня. Многие предметы интерьера, детали бытовых приборов и производственных машин, домашняя утварь, игрушки и многое другое созданы на его основе. Несмотря на относительную прочность, изделия из этого сырья часто получают повреждения. Но удобную полочку или любимую машинку необязательно выбрасывать после неудачного падения. Можно просто заклеить трещину в пластмассе и продолжить пользоваться привычными вещами.Чтобы убрать трещину на пластике, есть 2 простых метода: склеивание и спаивание. Оба способа доступны для домашнего мастера. Они не требуют много времени, усилий, больших материальных затрат.

Склеивание
В связи с доступностью и распространенностью соединительных смесей этот способ ремонтировать пластик – самый популярный. Он помогает сохранить эстетику, делая скрепленное место менее заметным. Если вид не особо важен, то заклеить дырку в пластмассе можно, просто соединив разошедшиеся края, предварительно смазав их соединительным раствором.
В тех случаях, когда внешний вид имеет значение, можно заделать трещину в пластмассе путем наложения заплатки. Для этого кусочек плотной ткани или специальной стеклоткани необходимо предварительно пропитать эпоксидным клеем и дать просохнуть в течение суток. Подготовленную заплатку еще раз хорошо обработать скрепляющим составом и зафиксировать на повреждении с внутренней стороны изделия. Так можно склеить трещину в пластмассе бытовой техники или предметах декора без потери вида.

В случае такой обработки важно знать вид пластика, который предстоит склеивать. Ведь скрепляющие составы многочисленны, они по-разному взаимодействуют с тем или иным материалом. Чтобы качественно заклеить пластиковую бутылку, полку, шестеренку, бочку, понадобятся различные соединяющие смеси. Как правило, на упаковке клея можно найти перечень основ, с которыми он эффективно работает.
Соединяющие средства подразделяются на 3 группы, которые отличаются способом применения:
- Жидкие – самые распространенные основы для домашнего использования. Их наносят на разошедшиеся края, которые затем прижимают и фиксируют на время, указанное в инструкции. Ярким представителем группы является ПВА.
- Контактные – двухэтапные надежные клеи. Сначала наносят тонкий слой средства, который размягчает пластик, а спустя несколько минут стороны прижимают. Таким образом, материал соединяется в одно целое. К этому разряду относятся БФ-2, Момент для пластика.
- Реакционные – однокомпонентные и двухкомпонентные смеси, которые обеспечивают быстрое и очень прочное склеивание. Хорошо подходят для материалов с повышенной жесткостью. Так действует клей Секунда.
Пайка
Этот способ менее эстетичен, но он обеспечивает большую герметичность, чем клейка. Если необходимо заделать трещину в пластмассовом ведре, такой вариант ремонта будет самым разумным. Ведь для ведра не важна красота, оно должно быть целым и надежным.

Запаять трещину в пластике несложно. Для этого потребуется источник огня (например свечка или горелка) и ненужный кусочек пластмассы (старая зубная щетка, гребешок, часть игрушки и т. д.). Далее:
- Отобранный для починки предмет расплавить.
- Получившейся жидкой массой быстро залить повреждение, немного разровнять.
- Дать остыть.
Такой ремонт трещин в пластике полностью возвращает домашней утвари функциональность, но портит ее облик.
Оба способа хорошо работают и имеют свои преимущества. Поэтому заклеить пластмассовый тазик специальным средством или запаять его старой щеткой – дело вкуса и наличия ресурсов.
Подготовка и результат
Чтобы заклеить пластмассу намертво в домашних условиях, нужно не только правильно подобрать соединительные вещества. Важно хорошо подготовить разошедшиеся края.
Этапы работы:
- Выберите подходящее скрепляющее средство.
- Тщательно очистите края повреждения. Чтобы хорошо отремонтировать треснувший пластик, хорошенько промойте, высушите, обезжирьте трещину.
- Чистые края соедините с помощью клея или другого пластика.
- Обязательно дайте настояться изделию. Так заполненные пустоты приобретут стабильность, что позволит избавиться от трещин на пластмассе на длительный период. Преждевременная нагрузка на исправленный шов может привести к новой, более сложной поломке.
Если треснул пластик, починить его можно практически всегда. Не стоит расстраиваться. Немного времени, стараний и смекалки смогут вернуть целостность пострадавшим элементам. Ремонт пластмассовых изделий своими руками – это не только экономично. Еще это творческий интересный процесс.
Пластик, в отличие от дерева или бумаги, не получится склеить составом «Дракон» или ПВА. Проблема в том, что полимеры почти не имеют пор, из-за чего добиться адгезии сложно. Поэтому для склейки пластмассы разработаны собственные марки клеев, о которых и пойдет речь в этой статье.

Как подобрать клей для пластика
Итак, чем склеить пластик? Для пластмассы придумано несколько категорий клеев.

По марке состава
Нельзя склеивать разные виды пластиков одним клеем – высокого сцепления добиться не получится.

Подбирать нужно по марке, которая часто указывается аббревиатурой:
- РЕТЕ – полиэтилен;
- PVC – поливинилхлорид;
- РР – полипропилен;
- PS – полистирол.

Виды клеящих составов
Современный рынок строительных смесей предлагает большое разнообразие клеевых продуктов для пластика.

Растворители
Производятся на основе ацетона, дихлорэтана или дихлорметана. Лучше всего подходят для пористой пластмассы, вроде вспененного ПВХ для моделирования, но справятся и с акрилом, полиуретаном и полиэтиленом.

Попадая на пластик, начинают активно его растворять, слегка расплавляя верхний слой.

После испарения шов затвердевает без пор, поэтому склейка получается надежной. Работать с ними нужно аккуратно, так как дихлорэтан токсичен.

Реакционные
Такие смеси называются так потому, что вступают реакцию либо с пластиком, либо с отвердителем.

Распространены дешевые однокомпонентные клеи, такие как «505».

При контакте с пластиком начинается быстрозатухающая реакция, поэтому уже через 2 минуты клей превращается в сплошной камень. Шов получается твердым, но хрупким.

Данный состав подходит для склеивания любых изделий, на которых не оказывается нагрузка, например, пластиковые статуэтки.

Для работы с водопроводными трубами категорически не подходят.

Встречаются также двухкомпонентные клеящие смеси, состоящие из основы и отвердителя.

При смешивании начинается полимеризация. Производятся на основе полиэфирной и эпоксидной смолы.
Термоклеи
Это любые силиконовые составы, для работы с которыми нужен термопистолет.

Удобны для точечного нанесения или временной фиксации. В качестве клея используется силиконовый полимер.

По сути, это универсальный клей, который подходит и для дерева, и для пластика.

К сожалению, качество склейки весьма посредственное. Основные характеристики термоклея таковы:
- силикон не твердый, из-за чего соединение будет немного «плыть»;
- состав малотекучий, поэтому адгезия поверхностная.

Качество шва также нельзя назвать высоким – он не сможет выдержать даже нагрузку в 10 кг. Более того, найти хорошие силиконовые стрежни в продаже крайне сложно.

К тому же для работы обязательно понадобится электричество. Зато есть возможность окрасить силикон и прижать ему желаемый оттенок. Таким образом можно сделать незаметную склейку. Он также поможет, если вы не знаете, как заделать трещину в пластике.
Контактные
Контактные подходят для склейки почти всех сортов пластмассы, и нашли особенную популярность в рукоделии.

Эти составы работают так же, как и любые другие: склеиваемые поверхности смазываются и соприкасаются. Они, как правило, не предполагают высокой нагрузки, зато создают малозаметное соединение.

Самые известные представители – «Момент Пластик» и БФ.

Стоят они недорого, практически универсальны, но опасны для здоровья. Кроме едкого запаха, могут вызвать отравление или ожог слизистых.

Специалисты рекомендуют:
- работайте только в хорошо проветриваемом помещении;
- перед склейкой обязательно проведите подготовку поверхности – она затирается наждачкой и обезжиривается;
- перед тем как клеить пластик, стоит нанести немного клея на скрытую часть – некоторые составы растворяют пластмассу.

Подбор по составу и нагрузке
Клеи бывают трех видов:
- Однокомпонентые. Хорошо держат нагрузку на изгиб. Подойдут, чтобы склеить пластиковый стул или линейку. К ним относится цианокрилатовый и полимерный клеи.

- Двухкомпонентные. Полиэфирные и эпоксидные смолы. Лучше прочих держат нагрузку на сжатие и удар. Оба состава универсальны, и подходят для склеивания разнородных сортов пластика.

- Жидкие. В основе содержат растворитель, из-за чего склейка получается почти без швов. Хорошо держат и на сжатие, и на изгиб.

Чтобы склеить пластик намертво в домашних условиях, не берите специальные клеи вроде ультрафиолетового или термического.

Создать необходимые условия для полимеризации вам не удастся.

Инструкция по склеиванию
Чем клеить полистирол
Полистирол и акрил лучше клеить на стружку этих же пластиков, смешанных с дихлорэтаном.

Полученный шов отлично держит нагрузку. Но при этом следует учесть, что дихлорэтан токсичный и работать с ним дома не рекомендуется.

Поэтому пластик не всегда удается склеить. Лучше использовать готовые фабричные составы.
- Körapur 666. Универсальный клей для склейки древесины, стекловолокна, стали, алюминия и пластиков. Хорошо склеивает полистироловые детали между собой или с другими материалами.

- Акрид FS22. Двухкомпонентный клей на основе метакрилата, образующий жесткий шов. Как и предыдущий состав, «Акрид» – универсальное средство.

В отдельных случаях, например, в авиамоделировании, полистирол допускается склеивать ацетоном. Он растворяет кромку, создавая плотный шов. А поскольку ацетон не токсичный, он больше подходит для работы дома.

Клей для пластиков ПВХ
ПВХ используется повсеместно: это трубы, окна, мебель и даже одежда. Поэтому и видов клеев разработано много.

Quilosa SINTEX H44. Хорош для сваривания твердого поливинилхлорида. Работает так же, как и дихлорэтан – расплавляет пластик.

Обычно используется для оконных профилей, труб горячего и холодного водоснабжения, канализации, линолеума и другого ПВХ. Не подходит для пластикового кожзама.

Cosmofen Plus. Густой клей, который подходит не только для склейки ПВХ окон, но и заделки трещин и отверстий.

Часто используется как герметик для заделки щелей между подоконником и рамой. Шов герметичный, не пропускает воду и воздух.

Bailey L-6023. Трубный клей, предназначенный для ПВХ и АВС.

Подходит для ремонта водопровода, пищевой тары и мебели. Соединение выдерживает давление до 2,5 бар.

POLIGRIP M 328. Однокомпонентный клей для восстановления лодок, тканей, матрасов и бассейнов.

Легко склеивает дыры в ткани даже без латки.
Для склеивания ABS-пластика
Лучший клей для АБС-пластика – цианоакрилат, вроде «Секунды», «Момента» или «505». Он также хорошо склеивается любыми реакционными марками.

CUDO. Цианоакрилатный клей по типу «Секунда». Схватывается быстро, образуя твердый шов. Обладает очень резким запахом, что необходимо учитывать при покупке.

Griffon В25. Необходим для сварки труб из АБС. Растворяет пластик, создавая прочный, термостойкий стык. Состав нетоксичный, но может вызывать головокружение, кашель и раздражение глаз.

SikaFast®-555 L05. Двухкомпонентный универсальный клей для гибких соединений. Популярен в автомобильной промышленности.

Очень эластичный, поэтому часто используется для латки автомобильных салонов.

Перед тем как приступить к работе шов желательно армировать стеклотканью, поскольку он получается достаточно хрупким. Усиление заполнителями, вроде соды, не дадут желаемого эффекта!.

Клей для полиуретана
Полиуретан – материал эластичный, из-за чего жесткие швы в работе с ним недопустимы. Некоторые клеи делают его хрупким, особенно если в составе есть растворитель.

Мастера советуют:
- проще всего склеивать пластик полиуретановыми клеями – из-за схожего состава стык получится прочным;
- Для склейки мебельного молдинга подойдет AkFix – он продается в столярных магазинах, так как используется для дерева;
- лепнину или статуи хорошо восстанавливается монтажной пеной.

Чем склеить полиэтилен, силикон, полипропилен
Главное сходство полиэтилена, силикона и полипропилена – очень плохая адгезия. Даже краска на них практически не держится, из-за этого выбор клея сильно ограничивается.
Это связано с инертностью – они не реагируют с составом, поэтому контакт получается слабым.
Поэтому вопрос, чем намертво склеить пластмассу этих сортов в домашних условиях, до сих пор открыт. Универсального решения нет, но можно попробовать следующие составы.

TYTAN CLASSIC FIX. Эластичный, водостойкий клей, который условно подходит для РЕТЕ и РР пластиков. Нагрузка на шов оказываться не будет.

Körapren 88. Подходит для полиэтилена класса CSPE. В том числе используется для восстановления пластиковых скатертей.

Temonten. Своеобразный «скотч», оставляющий на поверхности липкую пленку. Шов средней прочности, но для лодок или палаток вполне годится. Стоит обратить внимание, что «Темонтен» набирает прочность постепенно, поэтому соединение нужно оставить на сутки.

АА 303. Единственный состав, хорошо склеивающий полиэтилен. Способен выдерживать большую нагрузку на излом и изгиб.

Permabond 2050. Цианакрилатный клей для эластичных соединений. Качество шва среднее, зато универсальный для всех 3 пластиков.

В отдельных случаях подойдут любые реакционные универсальные клеи, но прочность шва непредсказуема.
Как склеить надежно?
Вопрос о том, чем заклеить пластик, все еще не решен. Любые методы, кроме термической или химической сварки, не дают монолитного соединения. На этот случай подойдет армирование – усиление стыка. Способов справиться с задачей несколько.
- Дополнительное сшивание пластика. Два куска можно сшить раскаленной проволокой. Это упрочнит стык, особенно если планируется ремонтировать пластмассовую мебель. Способ кустарный и заметно портит вид, поэтому используется редко.

- Проклейка армирующей сетки. Проклейка стыка снижает подвижность шва, что улучшает сцепление и не портит вид. Подойдет строительная серпянка, металлическая сетка и стекловолокно.

- Горячий степлер. Применяется при ремонте салона автомобиля. Горячий степлер раскаляет скобы, которые затем и скрепляют металл. Поможет заклеить трещину в бардачке или на торпеде. Покупать его нет необходимости, тем более он дорогой. Можно раскалить скобы от канцелярского степлера и впаять в стык.

Есть безотказный метод, как склеить пластмассу намертво в домашних условиях и без армирования. Можно затереть пластик наждачкой и обезжирить спиртом или бензином. Это улучшит адгезию на 20-30%.
Чем склеить пластмассу с другими материалами
Склеить пластик намертво с другим материалом сложно, так как он не похож на металл или дерево. Универсальные составы редко дают нужный результат, но некоторые можно попробовать в деле.
Quilosa Fix Express Mounting. Подойдет для склейки полиуретана и АБС с деревом или стеклом.
Soudal Cyanofix 84 А. Просто хороший цианакрилатный клей для пластмассы, фарфора, бумаги, стекла и прочего. Не подходит для металлов, т.к. вызывает коррозию.

Эпоксидные смолы. Подходят для склеивания всех видов пластика. С этим заданием успешно справится даже самая обычная ЭД-20 с любым дешевым отвердителем. Разнородные трубы допускается склеивать «холодной сваркой». Она также сделана на эпоксидной основе, но адгезия у нее несколько слабее.

Эпоксидные смолы зачастую универсальны, а их высокая текучесть позволяет проникать в мельчайшие поры. Эти составы могут склеить пластик с деревом, металлом, керамикой и стеклом.