
- Project Description
- Features
- Command Line Interface
- Download
- Windows
- Linux
- Source
Project Description
The Error Message Generator (ErrorGen) is a simple program that lets you create
customized error dialogs. The idea was originally inspired by a web-based tool
called «Atom Smasher’s Error Message Generator» (RIP)
which created images of error boxes. My program, however, creates «real» error
boxes that can be dragged around the screen and interacted with.
🎁 NEW in January 2023: I have recreated my program from scratch and released
a new «2.0» version for the modern era — details below. My original 2006 version
is still available here.
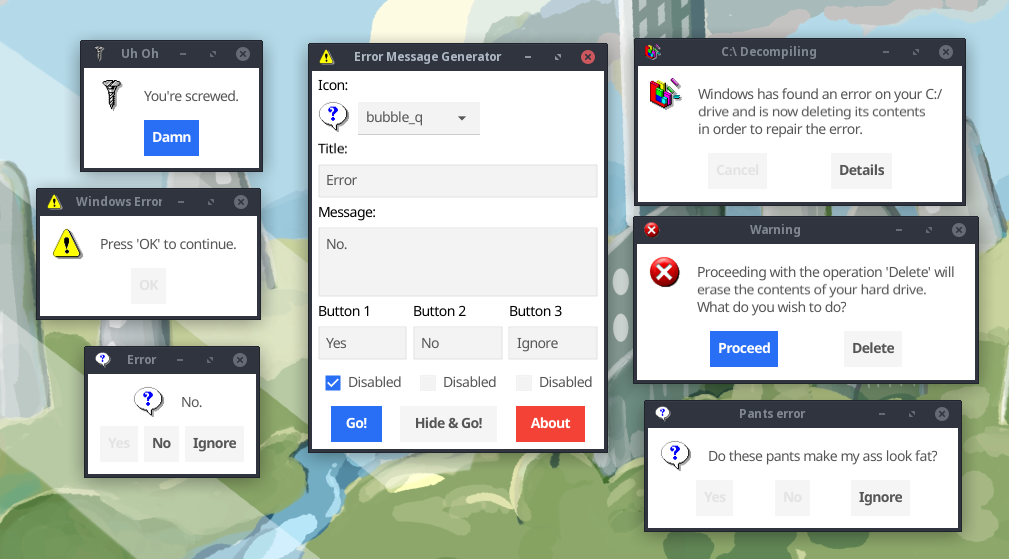
Way back in 2006 while I was still in high school, I had created my original ErrorGen
program (written in Perl/Tk)
in one afternoon and released it on my site. After Atom Smasher’s site went down in
2022, I have seen an uptick of interest for my ErrorGen program — which was last
compiled in 2008 for Windows XP and shows its age and doesn’t run very easily on
Windows 11 in 2023.
So, on January 21, 2023 I built a new successor to ErrorGen, this time in
Go and to explore the Fyne UI toolkit.
The «2.0.0» release of ErrorGen has equivalent functionality to my original Perl
app, and the command-line interface I previously called ZenMsg is built-in to the
same binary as the graphical ErrorGen tool. You can call ErrorGen from batch files
or shell scripts if you want to ask the user a quick question!
Looking for my classic Perl ErrorGen from 2006? See over here
for the original ErrorGen page.
Features
This program has two main use cases:
- The default, MainWindow Mode shows a graphical UI where users can configure
a custom error message dialog box to prank their friends with.- Select from one of the 72 original Atom Smasher icon images.
- Enter a custom Title and Message for your error dialog.
- Configure up to three buttons with custom text and mark some as disabled or greyed-out.
- Create as many pop-up error dialogs as you want. You can also hide the MainWindow
when your error box appears so that the control window is hidden and you can leave
the error on screen to prank your friends!
- It also has a command line interface where you can
invoke a custom dialog box from batch files or shell scripts, for example if you
want to ask the user a question.- The user’s selected answer is printed to ErrorGen’s standard output so can
be read by the calling program. - You can use a custom icon image (PNG).
- You can include more than three buttons if you want, and mark which ones
are disabled or the default (blue) button. - You can set a «cancel button» that is picked if the user hits the Escape
key or X’s out of the window without clicking on one of the buttons.
- The user’s selected answer is printed to ErrorGen’s standard output so can
The 2.0.0 release reproduces most of the features the original Perl version had,
including the command line interface which is now built-in to the one program
instead of having the separate ZenMsg binary. But I don’t plan on stopping there:
I have some fun ideas to add to ErrorGen in the future as well:
- Flesh out the command line interface further to create something even more
useful for shell scripts, with features on par with GNOME’s Zenity
and similar tools (e.g., file selection dialogs). - On the MainWindow add a «Save» button that can turn your custom error dialog into
a batch file or shell script that you can save to disk. The script would invoke the
command line interface to show your dialog — creating an easy shortcut that just
pops up your dialog without the MainWindow also appearing, for fun and pranks. - On the MainWindow extend the library of built-in icons and allow users to easily
browse and pick their own icon images. Similarly, the selectbox drop-down of icons
I want to change into a grid view like the Perl version had for
ease of use; this is my first Fyne GUI project in Go and still learning the ropes!
Command Line Interface
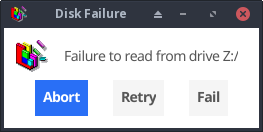
You can call this program from batch files or shell scripts to prompt the user with a graphical dialog box and read the button they chose from this program’s standard output.
For example, from a bash script:
#!/bin/bash
answer=`./errorgen --alert --title "Disk Failure"
    --text "Failure to read from drive Z:/"
    --icon defrag --button Abort --button Retry --button Fail
    --default 1 --cancel Fail`
echo "You have chosen: $answer"
The full documentation is included below. Running errorgen --help from
a text terminal will have the program print its documentation to you, but
this won’t work on the Windows version since a program must decide if it’s
a graphical or a command line app and can’t be both.
Download
I package this program for Windows and Linux for 64-bit and 32-bit x86 architectures.
Windows
 64-bit: Download Error Message Generator
7.0 MiB ZIP; Version 2.0.0
32-bit: Download Error Message Generator
6.8 MiB ZIP; Version 2.0.0
Linux
 64-bit: Download Error Message Generator
7.1 MiB tar.gz; Version 2.0.0
32-bit: Download Error Message Generator
6.8 MiB tar.gz; Version 2.0.0
Source
The source code to ErrorGen 2.0 is hosted on my Gitea instance at:
https://git.kirsle.net/apps/errorgen
The program should compile anywhere that Go and Fyne work, including on macOS.
It is released under the GNU General Public License version 3.
Copyright © 2023 Noah Petherbridge — All rights reserved
Hosted by DigitalOcean
Page generated in 0.0031s.

Download Article
Download Article
Do you want to create a custom Windows error message? Whether you’re an application developer or someone who wants to prank their coworker, knowing how to create a custom error message is an essential ability. To learn how to create a custom Windows error message, follow this guide.
-

1
Open the Notepad app.
- Press the ⊞ Win+R keys simultaneously.
- Type notepad into the Run dialog.
- Hit ↵ Enter or click OK.
-
2
Copy and paste the following code into Notepad:
- x=msgbox(«Your Message Here», Button+Icon, «Your Title Here»)
Advertisement
-
3
Customize the button(s) of your error message. Replace Button in the code you pasted into Notepad with one of the following:
- 0 — OK
- 1 — OK and Cancel
- 2 — Abort, Retry and Ignore
- 3 — Yes, No and Cancel
- 4 — Yes and No
- 5 — Retry and Cancel
-
4
Customize the icon of your error message. Replace Icon in the code that you pasted into Notepad with one of the following:
- 0 = No Icon
- 16 = Critical Icon (a.k.a. «X» icon)
- 32 = Question Icon (a.k.a. «?» icon)
- 48 = Warning Icon (a.k.a. «!» icon)
- 64 = Info Icon (a.k.a. «i» icon)
-
5
Customize the title of your error message. Replace Your Title Here in the code you pasted into Notepad with what you want the title of the error message to be.
-
6
Customize the contents of your error message. Replace Your Message Here in the code you pasted into Notepad with what you want the error message to say.
-
7
Open the Save As window. Press Ctrl+S on your keyboard.
-
8
Expand the combo box next to Save as type and select All Files.
-
9
Type a name for your file followed by a period and vbs.
-
10
Choose a location to save the file to.
-
11
Save the file. Click Save.
-
12
Display the error message. Double-click the file that was created.


Advertisement
Create a sequence of error messages. Messages will display one at a time, and closing a message will display the following one.
-
1
Open the Notepad app.
- Press the ⊞ Win+R keys simultaneously.
- Type notepad into the Run dialog.
- Hit ↵ Enter or click OK.
-
2
Copy and paste the following code into Notepad:
- x=msgbox(«Your Message Here», Button+Icon, «Your Title Here»)
-
3
Customize the button(s) of your error message. Replace Button in the code you pasted into Notepad with one of the following:
- 0 — OK
- 1 — OK and Cancel
- 2 — Abort, Retry and Ignore
- 3 — Yes, No and Cancel
- 4 — Yes and No
- 5 — Retry and Cancel
-
4
Customize the icon of your error message. Replace Icon in the code that you pasted into Notepad with one of the following:
- 0 — No Icon
- 16 — Critical Icon (a.k.a. «X» icon)
- 32 — Question Icon (a.k.a. «?» icon)
- 48 — Warning Icon (a.k.a. «!» icon)
- 64 — Info Icon (a.k.a. «i» icon)
-
5
Customize the title of your error message. Replace Your Title Here in the code you pasted into Notepad with what you want the title of the error message to be.
-
6
Customize the contents of your error message. Replace Your Message Here in the code you pasted into Notepad with what you want the error message to say.
-
7
Switch to a subsequent line position.
-
8
Create another error message (if desired). Repeat these steps, starting from Step 3.
- This error message will display after the previously created one has been closed.
-
9
Open the Save As window. Press Ctrl+S on your keyboard.
-
10
Expand the combo box next to Save as type and select All Files.
-
11
Type a name for your file followed by a period and vbs.
-
12
Choose a location to save the file to.
-
13
Save the file. Click Save.
-
14
Display the error message. Double-click the file that was created.


Advertisement
Add New Question
-
Question
Is there a way to make a custom icon for the error?

No, you can try using different numbers, but most likely a real error will pop up.
-
Question
How do I make it do actions to my computer?
You can’t do that. It’s a fake error, meaning it won’t do anything to your computer.
-
Question
How do I create an input text box in the message?
Do this: InputVariableName=InputBox(«Prompt»,»Title»,»Value which is optional»)

See more answers
Ask a Question
200 characters left
Include your email address to get a message when this question is answered.
Submit
Advertisement
Video
Thanks for submitting a tip for review!
About This Article
Thanks to all authors for creating a page that has been read 534,198 times.
Did this article help you?
Download Article
Download Article
Do you want to create a custom Windows error message? Whether you’re an application developer or someone who wants to prank their coworker, knowing how to create a custom error message is an essential ability. To learn how to create a custom Windows error message, follow this guide.
-
1
Open the Notepad app.
- Press the ⊞ Win+R keys simultaneously.
- Type notepad into the Run dialog.
- Hit ↵ Enter or click OK.
-
2
Copy and paste the following code into Notepad:
- x=msgbox(«Your Message Here», Button+Icon, «Your Title Here»)
Advertisement
-
3
Customize the button(s) of your error message. Replace Button in the code you pasted into Notepad with one of the following:
- 0 — OK
- 1 — OK and Cancel
- 2 — Abort, Retry and Ignore
- 3 — Yes, No and Cancel
- 4 — Yes and No
- 5 — Retry and Cancel
-
4
Customize the icon of your error message. Replace Icon in the code that you pasted into Notepad with one of the following:
- 0 = No Icon
- 16 = Critical Icon (a.k.a. «X» icon)
- 32 = Question Icon (a.k.a. «?» icon)
- 48 = Warning Icon (a.k.a. «!» icon)
- 64 = Info Icon (a.k.a. «i» icon)
-
5
Customize the title of your error message. Replace Your Title Here in the code you pasted into Notepad with what you want the title of the error message to be.
-
6
Customize the contents of your error message. Replace Your Message Here in the code you pasted into Notepad with what you want the error message to say.
-
7
Open the Save As window. Press Ctrl+S on your keyboard.
-
8
Expand the combo box next to Save as type and select All Files.
-
9
Type a name for your file followed by a period and vbs.
-
10
Choose a location to save the file to.
-
11
Save the file. Click Save.
-
12
Display the error message. Double-click the file that was created.
Advertisement
Create a sequence of error messages. Messages will display one at a time, and closing a message will display the following one.
-
1
Open the Notepad app.
- Press the ⊞ Win+R keys simultaneously.
- Type notepad into the Run dialog.
- Hit ↵ Enter or click OK.
-
2
Copy and paste the following code into Notepad:
- x=msgbox(«Your Message Here», Button+Icon, «Your Title Here»)
-
3
Customize the button(s) of your error message. Replace Button in the code you pasted into Notepad with one of the following:
- 0 — OK
- 1 — OK and Cancel
- 2 — Abort, Retry and Ignore
- 3 — Yes, No and Cancel
- 4 — Yes and No
- 5 — Retry and Cancel
-
4
Customize the icon of your error message. Replace Icon in the code that you pasted into Notepad with one of the following:
- 0 — No Icon
- 16 — Critical Icon (a.k.a. «X» icon)
- 32 — Question Icon (a.k.a. «?» icon)
- 48 — Warning Icon (a.k.a. «!» icon)
- 64 — Info Icon (a.k.a. «i» icon)
-
5
Customize the title of your error message. Replace Your Title Here in the code you pasted into Notepad with what you want the title of the error message to be.
-
6
Customize the contents of your error message. Replace Your Message Here in the code you pasted into Notepad with what you want the error message to say.
-
7
Switch to a subsequent line position.
-
8
Create another error message (if desired). Repeat these steps, starting from Step 3.
- This error message will display after the previously created one has been closed.
-
9
Open the Save As window. Press Ctrl+S on your keyboard.
-
10
Expand the combo box next to Save as type and select All Files.
-
11
Type a name for your file followed by a period and vbs.
-
12
Choose a location to save the file to.
-
13
Save the file. Click Save.
-
14
Display the error message. Double-click the file that was created.
Advertisement
Add New Question
-
Question
Is there a way to make a custom icon for the error?
No, you can try using different numbers, but most likely a real error will pop up.
-
Question
How do I make it do actions to my computer?
You can’t do that. It’s a fake error, meaning it won’t do anything to your computer.
-
Question
How do I create an input text box in the message?
Do this: InputVariableName=InputBox(«Prompt»,»Title»,»Value which is optional»)
See more answers
Ask a Question
200 characters left
Include your email address to get a message when this question is answered.
Submit
Advertisement
Video
Thanks for submitting a tip for review!
About This Article
Thanks to all authors for creating a page that has been read 534,198 times.
Did this article help you?
Windows Error Message Creator – создать окно ошибки или синий экран

Windows Error Message Creator (WEMC)– портативная программа для создания поддельных сообщений об ошибках, «синий экран смерти» экраны, диалоги «форматирование» и многое другое.
Если близкий друг оставляет свой ноутбук или ПК без присмотра на некоторое время, запустите программу с USB-накопителя, и в течение нескольких секунд Вы можете иметь систему, отображающую фиктивный экран «синий экран смерти», диалоговое окно «форматирование C:» или какое-либо другое поддельное предупреждение с любым пользовательским текстом и значком, который вам нужен. Затем сидите и наблюдайте за их лицами, когда они возвращаются.

Текст, заголовок и три кнопки
Программа даёт вам значительный контроль над дизайном диалогового окна. На главном экране вы можете выбрать тип диалогового окна (вопрос / информация / восклицательный знак / критический / пользовательский), установить свой собственный заголовок и одну или две пользовательские строки текста, включить до трёх кнопок с вашим собственным текстом для каждого, а также выбрать подходящий предустановленный значок (“заблокирован”, “предупреждение”, “низкий уровень заряда батареи” и т.д.) или определить свой собственный.

Форматирование диска
Но это ещё не все. Нажмите на меню «Create», и вы найдёте варианты, чтобы создать диалоговое окно «Форматирование», это выглядит как это форматирование выбранного диска.

Вызов синего экрана
Выбрав меню «BSOD» можно оставить систему, отображающую синий экран смерти, которая скрывает все остальное и не уходит, пока пользователь не нажимает «Enter».
Единственное неудобство, это невозможность сохранять созданные сообщения, и каждый раз нужно по новой вводить данные.
Вместо выводов: 😉 если вы хотите подшутить над кем то, то Windows Error Message Creator-отличный способ заставить пользователей понервничать! Но будьте осторожны, если пользователь подумает, что произошло что – то катастрофическое – например, настоящий BSOD – то, возможно, попытается перезагрузить систему кнопкой ресет, и из-за этого могут потеряться какие либо данные. Не используйте это, если вы не собираетесь быть рядом и внимательно наблюдать.
Размер: 109 МБ
Интерфейс: Английский
Платформа: Windows XP/Vista/7/8/10
Скачать Windows Error Message Creator
Почтовая рассылка о новых программах: