
- Manuals
- Brands
- Bentone Manuals
- Industrial Equipment
- BG 300LN
- Installation and maintenance instruction
-
Contents
-
Table of Contents
-
Bookmarks
Quick Links
Installation- and maintenance instruction
BG300LN
172 115 07 05-01
1
Related Manuals for Bentone BG 300LN
Summary of Contents for Bentone BG 300LN
-
Page 1
Installation- and maintenance instruction BG300LN 172 115 07 05-01… -
Page 2
178 026 72… -
Page 3
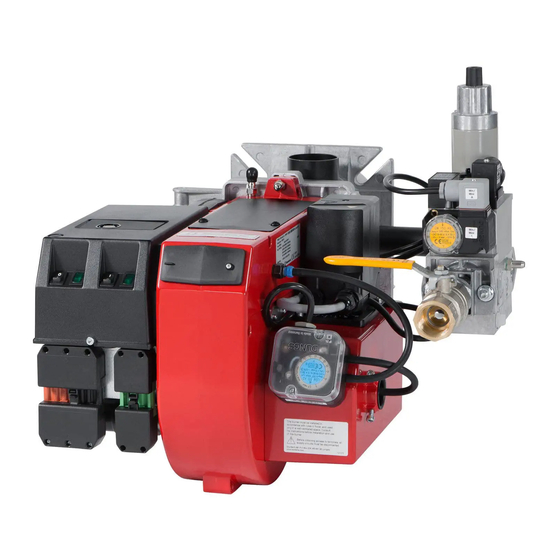
DESCRIPTION BG300/400LN 1. Switch man-aut 9. Blast tube 16. Transformer 2. Switch 0-1 10. Gas nozzle 17. Gas burner control 3. Change -over switch 11. Connection gas fittings 18. Electric panel increasedecrease 12. Multibloc 19. Electrical connection 4. Indicating lamp Stage 1 13. -
Page 4
TECHNICAL DATA Type designation BG 300LN ø110 Length of Measure A Standard The above dimensions are max. measurements. Depending on the com ponents used, the measurements may vary. 172 215 53 03-01… -
Page 5: Output Range
TECHNICAL DATA Type designation BG 300LN Output range Capacity Gas volume at a min. Gas volume at a max Max. inlet Rated inlet pressure output Nm output Nm pressure mbar mbar G20 51-120 kW G25 45-120 kW 14,6 Connection Motor…
-
Page 6
9. Air pressure switch 10. Gas burner control Pos. 5b, 7: Components not required according to EN 676. Required over 1200 kW according to EN 676. Incorporated in the MultiBloc When biogas is used, Bentone shall always be contacted. 172 415 05 03-01… -
Page 7: Installation Example
MOUNTING ON THE BOILER Fit the burner to the boiler by means of 4 bolts M10 (do not forget the flange gasket). For flange and bolt dimensions see Technical Data or use the fixing flange as a pattern. If for some reason you want to separate the combustion part from the fan housing part to mount the burner on the boiler, see General Instructions.
-
Page 8: Electric Equipment
ELECTRIC EQUIPMENT Gas burner control: LMG22/LME22 Wiring diagram 1(2) 172 425 51 08-01…
-
Page 9: Operating Position
ELECTRIC EQUIPMENT List of components A1 Gas burner control S12 Change-over switch, Increase- A2 Power control Reduce B1 Ionization electrode S15 Control thermostat, 3-pole F1 Operating fuse (only for 2-stage sliding) H1 Operating lamp Ignition transformer H3 Alarm signal 230 V Connection terminal board M1 Burner motor Earth terminal…
-
Page 10: Error Code Table
ELECTRIC EQUIPMENT Control diagnosis under fault conditions and lockout indication Gas burner control: LMG … Diagnosis of cause of fault After lockout, the red fault LED is steady on. For reading the cause of fault, refer to the blink code given in the following table: Red LED on Press lockout reset button for >…
-
Page 11: Electrical Equipment
ELECTRICAL EQUIPMENT Control program when disruption; disruption display Gas burner control: LME..Colour codes Colour code table for multi-coloured signal lamps (Light diodes) Status Colour codes Colours Waiting time «tw», other waiting times Ignition phase, ignition checked Flashing yellow Normal operation Green Operation, poor flame signal Flashing green…
-
Page 12
ELECTRICAL EQUIPMENT Control program when disruption; disruption display Gas burner control: LME..Alarm control table Red flashing code on Possible causes signal lamp (LED) Flashing 2 x No flame at End of «TSA» •• — Defective or obscured flame monitor — Defective or obscured fuel valves — Poor burner installation — Defective ignition unit… -
Page 13: Leakage Control
MEASURES AND CHECKS BEFORE START-UP 2-Stage or modulating burners General rules Care should be taken by the installer to ensure that no electrical cables or fuel/gas pipes are trapped or damaged during installation or service/ maintenance. Inner assembly Ensure that the ignition and ionisation electrodes are correctly adjusted. The sketch (see separate page) shows the correct measurements.
-
Page 14
EASURES AND CHECKS BEFORE START-UP BG300 / 400LN Gas nozzle assembly Natural gas 12-14 172 155 05 01- 01… -
Page 15
DETERMINATION OF GAS VOLUME FOR THE INSTALLATION Specifications on natural gas, town gas and biogas vary. For more exact information please contact the gas distributor. Net calorific value Gas quality kWh/Nm kJ/Nm kcal/Nm Natural gas 10.3 37 144 8 865 Propane 26.0 93 647… -
Page 16
DUNGS COMBI BLOC WITH RATIO ADJUSTMENT MB-VEF BO1, 407 View 1. Electrical connection gas pressure switch mini 2. Electrical connection gas valve 3. Pressure switch mini 4. Flange connection inlet 5. Test point connection 1/8″ before V 6. Filter 7. Data plate 8. -
Page 17: Adjustment Possibilities
MULTI-BLOC, MB-VEF 412 — 425 B01 Technical data Max inlet pressure 360 mbar Valves V class A group 2 in accordance with EN 161 Governor class A group 2 in accordance with EN88 Ratio V P 0,75:1-3:1 Filter according to DIN 3386 Ambient temperature -15°C- +70°C Protection standard type IP54 (according to IEC 529, DIN 40050) Gas family 1 +2 +3…
-
Page 18
ADJUSTMENT OF GAS FLOW — Before the burner starts vent the lines to make sure that there is gas available at the multibloc — Use an allen key size 2,5 mm for adjusting N and V. — Connect a pressure gauge for measur-ing P , (advisable to find out if the valves are open) — Set the switch in position MAN. -
Page 19: General Instructions
GENERAL INSTRUCTIONS General instructions The installation of the gas burner must be carried out in accordance with current regulations and standards. The installers of gas burners should therefore be acquainted with all regulations and ensure that the installation complies with the requirements. The installation, mounting and adjustment should be made with the greatest care and only the correct gas should be used Operating instructions…
-
Page 20
GENERAL INSTRUCTIONS Adjustment of shrouded disc and burner head The burner head is firm adjusted and there are no possibilities of settings besides the adjustment and the inspection of the ignition electrode and the ionisation electrode. Inspection of burner head when multi-bloc MB…407 The burner head, the shrouded disc and the electrodes can be inspected by following the instructions below: Loosen the nut a, the nut b to the impulse line P… -
Page 21: General Instruction
GENERAL INSTRUCTION Flame monitoring and measurement of ionisation current The burner is monitored according to the ionisation principle. Check the ionisation current on start-up and on each service call. The reason for a low ionisation current may be leaking currents, bad connection to earth, dirt or a faulty position of the flame electrode in the burner head.
-
Page 22: Uv-Detector
GENERAL INSTRUCTION UV-detector This should not be exposed to temperatures exceeding 60°C. The current passing through the UV-detector, when it is being illuminated, should be at least 70 μ A for LFL1.. This current can be measured by means of a moving coil instrument.
-
Page 23
GENERAL INSTRUCTION Adjustment of air pressure switch The air pressure switch should stop the burner, if the air volume is reduced. The air proving device shall be adjusted in such a way that if there is insufficient air supply at the highest or lowest burner operating stage, the device operates before the supervised pressure is less than 80% of the pressure at the controlled stage and the CO content of the combustion products exceeds 1% by volume. -
Page 24
HANDING OVER OF THE INSTALLATION — Make repeated start attempts to ensure that the adjustments function. — Close the ball valve during operation to check that the gas switch switches off at the set value. — Remove the hose for the air pressure switch to check that the burner locks out. -
Page 25: Gas Burner
FAULT LOCATION GUIDE Gas burner The basis for a trouble free operation can only be ensured by the correct combined effect of the three factors: electricity, gas flow and combustion air. Should any of these factors change, troubles may arise. It has been proved that many troubles have rather simple causes.
-
Page 26
Cause Remedy No flame establishment despite a trouble free start The gas solenoid valve defective Replace The gas solenoid valve does not open despite Replace coil or the whole valve if necessary. its obtaining voltage No voltage to the solenoid valve Check the contact No electrical connection through Test the adjustment and the function of the air pres-… -
Page 27
Cause Remedy Pulsations at start The ignition electrodes are wrongly adjusted Re-adjust. The gas pressure is too high Check and adjust by means of a pressure gauge and a pressure adjustment valve. The flue gas side is blocked Check the chimney flue. Pulsations during operation The burner is not correctly adjusted Re-adjust… -
Page 28: Declaration Of Conformity
(name, type or model, batch or serial number, possible sources and number of items) BG 100, BG 150, BG 200, STG 120, STG 146, BG 300,BG 300LN, BG 400, BG 400LN BG 450,BG 450LN, ………………………………..
This manual is also suitable for:
Bg 400ln
- Manuals
- Brands
- Bentone Manuals
- Industrial Equipment
- BG 300LN
- Installation and maintenance instruction
-
Contents
-
Table of Contents
-
Bookmarks
Quick Links
Installation- and maintenance instruction
BG300LN
172 115 07 05-01
1
Related Manuals for Bentone BG 300LN
Summary of Contents for Bentone BG 300LN
-
Page 1
Installation- and maintenance instruction BG300LN 172 115 07 05-01… -
Page 2
178 026 72… -
Page 3
DESCRIPTION BG300/400LN 1. Switch man-aut 9. Blast tube 16. Transformer 2. Switch 0-1 10. Gas nozzle 17. Gas burner control 3. Change -over switch 11. Connection gas fittings 18. Electric panel increasedecrease 12. Multibloc 19. Electrical connection 4. Indicating lamp Stage 1 13. -
Page 4
TECHNICAL DATA Type designation BG 300LN ø110 Length of Measure A Standard The above dimensions are max. measurements. Depending on the com ponents used, the measurements may vary. 172 215 53 03-01… -
Page 5: Output Range
TECHNICAL DATA Type designation BG 300LN Output range Capacity Gas volume at a min. Gas volume at a max Max. inlet Rated inlet pressure output Nm output Nm pressure mbar mbar G20 51-120 kW G25 45-120 kW 14,6 Connection Motor…
-
Page 6
9. Air pressure switch 10. Gas burner control Pos. 5b, 7: Components not required according to EN 676. Required over 1200 kW according to EN 676. Incorporated in the MultiBloc When biogas is used, Bentone shall always be contacted. 172 415 05 03-01… -
Page 7: Installation Example
MOUNTING ON THE BOILER Fit the burner to the boiler by means of 4 bolts M10 (do not forget the flange gasket). For flange and bolt dimensions see Technical Data or use the fixing flange as a pattern. If for some reason you want to separate the combustion part from the fan housing part to mount the burner on the boiler, see General Instructions.
-
Page 8: Electric Equipment
ELECTRIC EQUIPMENT Gas burner control: LMG22/LME22 Wiring diagram 1(2) 172 425 51 08-01…
-
Page 9: Operating Position
ELECTRIC EQUIPMENT List of components A1 Gas burner control S12 Change-over switch, Increase- A2 Power control Reduce B1 Ionization electrode S15 Control thermostat, 3-pole F1 Operating fuse (only for 2-stage sliding) H1 Operating lamp Ignition transformer H3 Alarm signal 230 V Connection terminal board M1 Burner motor Earth terminal…
-
Page 10: Error Code Table
ELECTRIC EQUIPMENT Control diagnosis under fault conditions and lockout indication Gas burner control: LMG … Diagnosis of cause of fault After lockout, the red fault LED is steady on. For reading the cause of fault, refer to the blink code given in the following table: Red LED on Press lockout reset button for >…
-
Page 11: Electrical Equipment
ELECTRICAL EQUIPMENT Control program when disruption; disruption display Gas burner control: LME..Colour codes Colour code table for multi-coloured signal lamps (Light diodes) Status Colour codes Colours Waiting time «tw», other waiting times Ignition phase, ignition checked Flashing yellow Normal operation Green Operation, poor flame signal Flashing green…
-
Page 12
ELECTRICAL EQUIPMENT Control program when disruption; disruption display Gas burner control: LME..Alarm control table Red flashing code on Possible causes signal lamp (LED) Flashing 2 x No flame at End of «TSA» •• — Defective or obscured flame monitor — Defective or obscured fuel valves — Poor burner installation — Defective ignition unit… -
Page 13: Leakage Control
MEASURES AND CHECKS BEFORE START-UP 2-Stage or modulating burners General rules Care should be taken by the installer to ensure that no electrical cables or fuel/gas pipes are trapped or damaged during installation or service/ maintenance. Inner assembly Ensure that the ignition and ionisation electrodes are correctly adjusted. The sketch (see separate page) shows the correct measurements.
-
Page 14
EASURES AND CHECKS BEFORE START-UP BG300 / 400LN Gas nozzle assembly Natural gas 12-14 172 155 05 01- 01… -
Page 15
DETERMINATION OF GAS VOLUME FOR THE INSTALLATION Specifications on natural gas, town gas and biogas vary. For more exact information please contact the gas distributor. Net calorific value Gas quality kWh/Nm kJ/Nm kcal/Nm Natural gas 10.3 37 144 8 865 Propane 26.0 93 647… -
Page 16
DUNGS COMBI BLOC WITH RATIO ADJUSTMENT MB-VEF BO1, 407 View 1. Electrical connection gas pressure switch mini 2. Electrical connection gas valve 3. Pressure switch mini 4. Flange connection inlet 5. Test point connection 1/8″ before V 6. Filter 7. Data plate 8. -
Page 17: Adjustment Possibilities
MULTI-BLOC, MB-VEF 412 — 425 B01 Technical data Max inlet pressure 360 mbar Valves V class A group 2 in accordance with EN 161 Governor class A group 2 in accordance with EN88 Ratio V P 0,75:1-3:1 Filter according to DIN 3386 Ambient temperature -15°C- +70°C Protection standard type IP54 (according to IEC 529, DIN 40050) Gas family 1 +2 +3…
-
Page 18
ADJUSTMENT OF GAS FLOW — Before the burner starts vent the lines to make sure that there is gas available at the multibloc — Use an allen key size 2,5 mm for adjusting N and V. — Connect a pressure gauge for measur-ing P , (advisable to find out if the valves are open) — Set the switch in position MAN. -
Page 19: General Instructions
GENERAL INSTRUCTIONS General instructions The installation of the gas burner must be carried out in accordance with current regulations and standards. The installers of gas burners should therefore be acquainted with all regulations and ensure that the installation complies with the requirements. The installation, mounting and adjustment should be made with the greatest care and only the correct gas should be used Operating instructions…
-
Page 20
GENERAL INSTRUCTIONS Adjustment of shrouded disc and burner head The burner head is firm adjusted and there are no possibilities of settings besides the adjustment and the inspection of the ignition electrode and the ionisation electrode. Inspection of burner head when multi-bloc MB…407 The burner head, the shrouded disc and the electrodes can be inspected by following the instructions below: Loosen the nut a, the nut b to the impulse line P… -
Page 21: General Instruction
GENERAL INSTRUCTION Flame monitoring and measurement of ionisation current The burner is monitored according to the ionisation principle. Check the ionisation current on start-up and on each service call. The reason for a low ionisation current may be leaking currents, bad connection to earth, dirt or a faulty position of the flame electrode in the burner head.
-
Page 22: Uv-Detector
GENERAL INSTRUCTION UV-detector This should not be exposed to temperatures exceeding 60°C. The current passing through the UV-detector, when it is being illuminated, should be at least 70 μ A for LFL1.. This current can be measured by means of a moving coil instrument.
-
Page 23
GENERAL INSTRUCTION Adjustment of air pressure switch The air pressure switch should stop the burner, if the air volume is reduced. The air proving device shall be adjusted in such a way that if there is insufficient air supply at the highest or lowest burner operating stage, the device operates before the supervised pressure is less than 80% of the pressure at the controlled stage and the CO content of the combustion products exceeds 1% by volume. -
Page 24
HANDING OVER OF THE INSTALLATION — Make repeated start attempts to ensure that the adjustments function. — Close the ball valve during operation to check that the gas switch switches off at the set value. — Remove the hose for the air pressure switch to check that the burner locks out. -
Page 25: Gas Burner
FAULT LOCATION GUIDE Gas burner The basis for a trouble free operation can only be ensured by the correct combined effect of the three factors: electricity, gas flow and combustion air. Should any of these factors change, troubles may arise. It has been proved that many troubles have rather simple causes.
-
Page 26
Cause Remedy No flame establishment despite a trouble free start The gas solenoid valve defective Replace The gas solenoid valve does not open despite Replace coil or the whole valve if necessary. its obtaining voltage No voltage to the solenoid valve Check the contact No electrical connection through Test the adjustment and the function of the air pres-… -
Page 27
Cause Remedy Pulsations at start The ignition electrodes are wrongly adjusted Re-adjust. The gas pressure is too high Check and adjust by means of a pressure gauge and a pressure adjustment valve. The flue gas side is blocked Check the chimney flue. Pulsations during operation The burner is not correctly adjusted Re-adjust… -
Page 28: Declaration Of Conformity
(name, type or model, batch or serial number, possible sources and number of items) BG 100, BG 150, BG 200, STG 120, STG 146, BG 300,BG 300LN, BG 400, BG 400LN BG 450,BG 450LN, ………………………………..
This manual is also suitable for:
Bg 400ln
- Manuals
- Brands
- Bentone Manuals
- Burner
- BG 300-2
- Installation and maintenance instruction
-
Contents
-
Table of Contents
-
Troubleshooting
-
Bookmarks
Quick Links
178 001 72-4
2018-03-23
Providing sustainable energy solutions worldwide
Installation- and maintenance instruction
BG 300-2
Related Manuals for Bentone BG 300-2
Summary of Contents for Bentone BG 300-2
-
Page 1
178 001 72-4 2018-03-23 Providing sustainable energy solutions worldwide Installation- and maintenance instruction BG 300-2… -
Page 2
Bentone… -
Page 3: Table Of Contents
9.2 Wiring diagram LME _________________________________________ 34 9.3 List of components __________________________________________ 35 9.4 Control program at faults; fault mode indicator LME ..___________ 36 10. Troubleshooting _____________________________________________ 38 11. EU Declaration of conformity _________________________________ 41 13. General instructions for gasburners ____________________________ 42 Bentone…
-
Page 4: General Information
• Burner pipes, fan wheels and air dampers may contain sharp edges. • The surface temperature of the burner’s components can exceed 60 °C. • Caution: The burner has moving parts, and there is risk of crushing injuries. 172 515 01 2018-01-02 Bentone…
-
Page 5
Open windows and doors. Close the gas ball valve. Warn residents; do not use doorbells. Evacuate the building. Notify the installer or gas supplier once the building has been evacuated. Bentone… -
Page 6
Delivery check • Make sure everything is delivered and the goods have not been damaged during transit. • If something is wrong with a delivery, report it to the supplier. • Transport damage must be reported to the shipping company. Bentone… -
Page 7: Technical Data
BG 300 * The above dimensions are max. measurements. Depending on the components used, the measurements may vary. ** Min. recommended distance to loor. ***Dimensions when installing blast tubes from the inside of the boiler 172 515 62 2018-02-02 Bentone…
-
Page 8
BG, CZ, DE, EE, ES, FR, GR, HU, IS, 2R/3R IT, LU, LV, NO, PT, SI, All countries 20-360mBar AT, CH, CY, DK, FI, LT, RO, SE, 2H3B/P 20-360mBar GB, IE, 2H3P 20-360mBar NL, RO 2L3B/P 20-360mBar 2E3B/P 20-360mBar 2E(R)B 20-360mBar Bentone… -
Page 9
Alt.2 The burner’s noise level can be reduced by connecting the burner’s air intake to the air duct that opens into an appropriate location. Installation must be done so it does not prevent air supply to the burner. Bentone… -
Page 10: Description Bg 300
Cover, inspection glass Air damper Ionization electrode Reset button Air intake Transformer Air pressure switch Ignition electrode Inner assembly Damper motor Electric panel Nozzle Brake plate Inner assembly adjustment Indicating lamp Stage 2 (not town gas) Indicating lamp Stage 1 Bentone…
-
Page 11: General Instruktions
Adjust the burner to appr. 20% excess air in accordance with the table. Check the lue gas temperature. Calculate the eficiency. Check also the actual gas volume on the gas meter so that the correct input is achieved. 172 515 03 2018-01-02 Bentone…
-
Page 12: Installation
If not, use the connectors included. (Refer to connection under Electric equipment) If an electric connection other than the one recommended by Enertech is used, a risk of damage and injury can arise. 172 515 03 2018-01-02 Bentone…
-
Page 13: Skeleton Diagrams
Safety valve 1)7. Valve proving system Air pressure switch Gas burner control Pos. 5b, 7: Components not required according to EN 676. Required over 1200 kW according to EN 676.hhh 172 515 05 2018-01-02 Bentone…
-
Page 14: Mounting On The Boiler
Connect the gas to the burner by means of the ball valve. Ensure that the union nut, ball valve and tubing make it easy to remove the burner for inspection and service. Check the gas tightness. 172 515 06 2018-01-02 Bentone…
-
Page 15: Inspection Of Gas Nozzle Before Commissioning
2 and just before the end of the pre-purging period it goes down to the air setting for stage 1. On some burners under 350kW the pre-purging mainly takes place with the air damper set for stage 1. 172 515 08 2018-01-02 Bentone…
-
Page 16: Gas Nozzle
4.8 Gas nozzle Natural gas Propan Biogas (UV detector) 172 515 08 2018-01-02 Bentone…
-
Page 17: Setting Air Damper
This function facilitates an exchange of damper motor. Solenoid valve High capacity (black) High capacity (red) Low capacity (orange) Closed damper (blue) Releasing button N.B! The upper position is the standard positiont 172 515 14 2018-01-02 Bentone…
-
Page 18: Setting The Burner
Loosen the nuts a. Swing out the burner. Remove the screw b and the knob for adjustment of burner head. Loosen the screw c so much so that the inner assembly can be pulled out. Control of burner head 172 515 10 2018-01-02 Bentone…
-
Page 19
Howerer, study the sections dealing with adjustments of multi-bloc, combustion air and combustion head. Gas quality max. CO lambda 1,2 Open the ball valve and switch on the main switch. If the Natural gas 10,0 11,9 burner starts the actual adjustment can be made. 11,5 13,9 Bentone… -
Page 20: Setting The Air Pressure Switch
This is to ensure the reliable function of the burner. If breakdowns or interruptions occur, the air pressure switch is probably set to a too narrow position. Fit the protective cover, screw (Y). Bentone…
-
Page 21: Setting The Min. Gas Pressure Switch
The tolerance on the scale for the min. gas pressure switch is approx. ±15%. Open the ball valve. Remove the pressure gauge and close the pressure outlet (X). Check the gas tightness. Fit the protective cover, screw (Y). Bentone…
-
Page 22: Multiblock Mb-Zrdle 405-412
2. Knob for adjustment of stage 1 Turn to the left = the start gas l ow is Test nipple, pressure after governor increased. Test nipple for nozzle pressure Filter Fixing l ange Ball valve 172 515 11 2018-01-03 Bentone…
-
Page 23
Turn to the right = the outlet pressure is increased Turn to the left = the outlet pressure is reduced Adjustment of start gas low Adjustment of governor Multi-bloc MB-ZRDLE 405-420 Flow adjustment 172 515 11 2018-01-03 Bentone… -
Page 24
5.5.1 Pressure taps 1,2,3,4,5 1/8 screwed sealing plug 5.5.2 Electrical connection S 20/S 50 172 515 11 2018-01-03 Bentone… -
Page 25: Recommended Excess Air When Using Default Setting
Lower heat value Hu at normal state 15°C and 1013.25 mbar EN676 Grade of gas kWh/Nm MJ/Nm kcal/Nm Natural gas 34.02 8126 Natural gas 29.25 6986 Propane 24.6 88.00 21019 Butane 32.5 116.09 27728 172 515 13 2018-01-02 Bentone…
-
Page 26
Temperature of gas at the gas meter [°C] Barometer reading [mbar] Pressure of gas at the gas meter [mbar] Factor calculated for multiplication with low in Nm /h to arrive at actual low in Nm Actual low · 273+T 1013.25 Bentone… -
Page 27: Calculating The Quantity Of Gas Supplied
= Time for a certain quantity of gas consumed by the burner. M = Quantity of gas consumed. V = Actual gas low Calculation example: t = 1 min 10 s M = 330 dm (litre) 0.33 m 1000 0.0194 h 3600 0,33 ≈ 17 m 0.0194 Bentone…
-
Page 28: Service
Check the ionisation electrode (see chapter Gas nozzle). Replace if necessary. Fit the combustion assembly in reverse order. Press the burner together and lock using the nuts (B). Fit the Euro plugs and turn on the main power supply. Check/adjust the combustion. 172 615 08 2018-01-03 Bentone…
-
Page 29: Replacement Of Damper Motor, Air
Re-install the damper motor and mounting plate on the air intake. Ensure that the damper shaft and control arm are connected correctly. Connect the damper motor cable. Fit the Euro plugs and turn on the mains power. Check/adjust the combustion. Bentone…
-
Page 30: Flame Monitoring And Ionisation Current Check
Min. DC 1.5 µA Required current to ensure Min. DC 3 µA detection Possible detection current Max. DC 20 µA Operational indicator lamp <5 µA DC lashes green Operational indicator lamp >5 µA DC shines green 172 615 02 2018-01-02 Bentone…
-
Page 31: Uv-Detector
AGQ3…A27 is mandatory. Correct functioning of aged UV cells can be checked as UV test with a higher supply voltage across the UV cell after controlled shutdown until terminal 3 ON. Connection diagram Measuring circuit for measuring the UV lame current Measurement made at the lame detector QRA… Bentone…
-
Page 32: Handing Over Of The Installation
• Is the circulation pump in operation? • Is there a supply of fresh air to the installation? • If integral components are of a different make from what is stated in this manual, see the enclosed loose-leaf. 172 615 04 2018-01-02 Bentone…
-
Page 33: Electric Equipment
Signals must be in different harnesses for safety reasons. Safety system as door switches, water level, pressure, temperature and other safety limiters must be installed in safety loop according to process. 172 615 13 2018-01-12 Bentone…
-
Page 34: Wiring Diagram Lme
If there is no Plug-in If S6 is missing connect T6 and T8. contact (X4,X6) on the boiler, connect to the contact enclosed. 1N~50/60Hz 230V…
-
Page 35: List Of Components
The operation of the burner can now be stopped with the control switch or thermostat If the gas burner control is blocked Red light in the gas burner control is lit. The burner is restarted by pushing the reset button Bentone…
-
Page 36: Control Program At Faults; Fault Mode Indicator Lme
(waiting period ≥ 10 s) 9.4.1.2 Limiting of starting repetitions LME 11… has a function with start repetition if the lame is not created at start or disappears during operation.. LME 11… allows max. three repetitions during continuous starting cycle. Bentone…
-
Page 37
3 s. To go back to the normal position, press and hold the reset button longer than 3 s. If the gas burner control is in the alarm position, it is reset by pressing the reset button 0.5…3 s. Bentone… -
Page 38: Troubleshooting
Replace solenoid valve terminals, or entire valve No power to solenoid valve Check the connection No electrical connection through air pressure gauge Check the air pressure gauge’s settings and functions Ignition load incorrectly set Increase/decrease gas supply Reduce airlow 172 615 06 2018-01-10 Bentone…
-
Page 39
Incorrectly set or faulty air sensor Check the settings and reset, or replace Ignition electrode overload Replace Burner control ambient temperature too high Insulate for heat, Max. 60 ° Ignition spark too weak Check the transformer Poor combustion Poor draught conditions Check the chimney Bentone… -
Page 40
Flame at incorrect angle due to combustion head out of position Check the combustion head and readjust Condensation build up in boiler and chimney Flue gas temperature too low or gas volume too low Raise the lue gas temperature by increasing gas volume Insulate the chimney Bentone… -
Page 41: Eu Declaration Of Conformity
11. EU Declaration of conformity Bentone Gasburners 172 905 04 2018-02-15…
-
Page 42: General Instructions For Gasburners
13. General instructions for gasburners 13.3.1 Installation Follow standards and instructions applicable to the Check that the burner is adapted to the gas quality in installation of gas burners question Ensure that the electric installation is made in accordance Check that the input pressure of the gas is correct with existing regulations Check that the dampers of the boiler are open Check that the fresh air intake of the boiler room is…
-
Page 43
Service- and inspection card Installation Boiler Name: Type: Eficiency kW: Address: Burner Type: Eficiency kW: Installed by: Date: Date gas/h Governor Fluegas Ionisation Pressure Eficiency temp current Fire Chimney room Measu- rement Before After °C µ A mbar mbar Small Flame Large Flame… -
Page 48
Enertech AB. P.O Box 309, SE-341 26 Ljungby. www.bentone.se, www.bentone.com…
- Manuals
- Brands
- Bentone Manuals
- Burner
- BG 300-2
- Installation and maintenance instruction
-
Contents
-
Table of Contents
-
Troubleshooting
-
Bookmarks
Quick Links
178 001 72-4
2018-03-23
Providing sustainable energy solutions worldwide
Installation- and maintenance instruction
BG 300-2
Related Manuals for Bentone BG 300-2
Summary of Contents for Bentone BG 300-2
-
Page 1
178 001 72-4 2018-03-23 Providing sustainable energy solutions worldwide Installation- and maintenance instruction BG 300-2… -
Page 2
Bentone… -
Page 3: Table Of Contents
9.2 Wiring diagram LME _________________________________________ 34 9.3 List of components __________________________________________ 35 9.4 Control program at faults; fault mode indicator LME ..___________ 36 10. Troubleshooting _____________________________________________ 38 11. EU Declaration of conformity _________________________________ 41 13. General instructions for gasburners ____________________________ 42 Bentone…
-
Page 4: General Information
• Burner pipes, fan wheels and air dampers may contain sharp edges. • The surface temperature of the burner’s components can exceed 60 °C. • Caution: The burner has moving parts, and there is risk of crushing injuries. 172 515 01 2018-01-02 Bentone…
-
Page 5
Open windows and doors. Close the gas ball valve. Warn residents; do not use doorbells. Evacuate the building. Notify the installer or gas supplier once the building has been evacuated. Bentone… -
Page 6
Delivery check • Make sure everything is delivered and the goods have not been damaged during transit. • If something is wrong with a delivery, report it to the supplier. • Transport damage must be reported to the shipping company. Bentone… -
Page 7: Technical Data
BG 300 * The above dimensions are max. measurements. Depending on the components used, the measurements may vary. ** Min. recommended distance to loor. ***Dimensions when installing blast tubes from the inside of the boiler 172 515 62 2018-02-02 Bentone…
-
Page 8
BG, CZ, DE, EE, ES, FR, GR, HU, IS, 2R/3R IT, LU, LV, NO, PT, SI, All countries 20-360mBar AT, CH, CY, DK, FI, LT, RO, SE, 2H3B/P 20-360mBar GB, IE, 2H3P 20-360mBar NL, RO 2L3B/P 20-360mBar 2E3B/P 20-360mBar 2E(R)B 20-360mBar Bentone… -
Page 9
Alt.2 The burner’s noise level can be reduced by connecting the burner’s air intake to the air duct that opens into an appropriate location. Installation must be done so it does not prevent air supply to the burner. Bentone… -
Page 10: Description Bg 300
Cover, inspection glass Air damper Ionization electrode Reset button Air intake Transformer Air pressure switch Ignition electrode Inner assembly Damper motor Electric panel Nozzle Brake plate Inner assembly adjustment Indicating lamp Stage 2 (not town gas) Indicating lamp Stage 1 Bentone…
-
Page 11: General Instruktions
Adjust the burner to appr. 20% excess air in accordance with the table. Check the lue gas temperature. Calculate the eficiency. Check also the actual gas volume on the gas meter so that the correct input is achieved. 172 515 03 2018-01-02 Bentone…
-
Page 12: Installation
If not, use the connectors included. (Refer to connection under Electric equipment) If an electric connection other than the one recommended by Enertech is used, a risk of damage and injury can arise. 172 515 03 2018-01-02 Bentone…
-
Page 13: Skeleton Diagrams
Safety valve 1)7. Valve proving system Air pressure switch Gas burner control Pos. 5b, 7: Components not required according to EN 676. Required over 1200 kW according to EN 676.hhh 172 515 05 2018-01-02 Bentone…
-
Page 14: Mounting On The Boiler
Connect the gas to the burner by means of the ball valve. Ensure that the union nut, ball valve and tubing make it easy to remove the burner for inspection and service. Check the gas tightness. 172 515 06 2018-01-02 Bentone…
-
Page 15: Inspection Of Gas Nozzle Before Commissioning
2 and just before the end of the pre-purging period it goes down to the air setting for stage 1. On some burners under 350kW the pre-purging mainly takes place with the air damper set for stage 1. 172 515 08 2018-01-02 Bentone…
-
Page 16: Gas Nozzle
4.8 Gas nozzle Natural gas Propan Biogas (UV detector) 172 515 08 2018-01-02 Bentone…
-
Page 17: Setting Air Damper
This function facilitates an exchange of damper motor. Solenoid valve High capacity (black) High capacity (red) Low capacity (orange) Closed damper (blue) Releasing button N.B! The upper position is the standard positiont 172 515 14 2018-01-02 Bentone…
-
Page 18: Setting The Burner
Loosen the nuts a. Swing out the burner. Remove the screw b and the knob for adjustment of burner head. Loosen the screw c so much so that the inner assembly can be pulled out. Control of burner head 172 515 10 2018-01-02 Bentone…
-
Page 19
Howerer, study the sections dealing with adjustments of multi-bloc, combustion air and combustion head. Gas quality max. CO lambda 1,2 Open the ball valve and switch on the main switch. If the Natural gas 10,0 11,9 burner starts the actual adjustment can be made. 11,5 13,9 Bentone… -
Page 20: Setting The Air Pressure Switch
This is to ensure the reliable function of the burner. If breakdowns or interruptions occur, the air pressure switch is probably set to a too narrow position. Fit the protective cover, screw (Y). Bentone…
-
Page 21: Setting The Min. Gas Pressure Switch
The tolerance on the scale for the min. gas pressure switch is approx. ±15%. Open the ball valve. Remove the pressure gauge and close the pressure outlet (X). Check the gas tightness. Fit the protective cover, screw (Y). Bentone…
-
Page 22: Multiblock Mb-Zrdle 405-412
2. Knob for adjustment of stage 1 Turn to the left = the start gas l ow is Test nipple, pressure after governor increased. Test nipple for nozzle pressure Filter Fixing l ange Ball valve 172 515 11 2018-01-03 Bentone…
-
Page 23
Turn to the right = the outlet pressure is increased Turn to the left = the outlet pressure is reduced Adjustment of start gas low Adjustment of governor Multi-bloc MB-ZRDLE 405-420 Flow adjustment 172 515 11 2018-01-03 Bentone… -
Page 24
5.5.1 Pressure taps 1,2,3,4,5 1/8 screwed sealing plug 5.5.2 Electrical connection S 20/S 50 172 515 11 2018-01-03 Bentone… -
Page 25: Recommended Excess Air When Using Default Setting
Lower heat value Hu at normal state 15°C and 1013.25 mbar EN676 Grade of gas kWh/Nm MJ/Nm kcal/Nm Natural gas 34.02 8126 Natural gas 29.25 6986 Propane 24.6 88.00 21019 Butane 32.5 116.09 27728 172 515 13 2018-01-02 Bentone…
-
Page 26
Temperature of gas at the gas meter [°C] Barometer reading [mbar] Pressure of gas at the gas meter [mbar] Factor calculated for multiplication with low in Nm /h to arrive at actual low in Nm Actual low · 273+T 1013.25 Bentone… -
Page 27: Calculating The Quantity Of Gas Supplied
= Time for a certain quantity of gas consumed by the burner. M = Quantity of gas consumed. V = Actual gas low Calculation example: t = 1 min 10 s M = 330 dm (litre) 0.33 m 1000 0.0194 h 3600 0,33 ≈ 17 m 0.0194 Bentone…
-
Page 28: Service
Check the ionisation electrode (see chapter Gas nozzle). Replace if necessary. Fit the combustion assembly in reverse order. Press the burner together and lock using the nuts (B). Fit the Euro plugs and turn on the main power supply. Check/adjust the combustion. 172 615 08 2018-01-03 Bentone…
-
Page 29: Replacement Of Damper Motor, Air
Re-install the damper motor and mounting plate on the air intake. Ensure that the damper shaft and control arm are connected correctly. Connect the damper motor cable. Fit the Euro plugs and turn on the mains power. Check/adjust the combustion. Bentone…
-
Page 30: Flame Monitoring And Ionisation Current Check
Min. DC 1.5 µA Required current to ensure Min. DC 3 µA detection Possible detection current Max. DC 20 µA Operational indicator lamp <5 µA DC lashes green Operational indicator lamp >5 µA DC shines green 172 615 02 2018-01-02 Bentone…
-
Page 31: Uv-Detector
AGQ3…A27 is mandatory. Correct functioning of aged UV cells can be checked as UV test with a higher supply voltage across the UV cell after controlled shutdown until terminal 3 ON. Connection diagram Measuring circuit for measuring the UV lame current Measurement made at the lame detector QRA… Bentone…
-
Page 32: Handing Over Of The Installation
• Is the circulation pump in operation? • Is there a supply of fresh air to the installation? • If integral components are of a different make from what is stated in this manual, see the enclosed loose-leaf. 172 615 04 2018-01-02 Bentone…
-
Page 33: Electric Equipment
Signals must be in different harnesses for safety reasons. Safety system as door switches, water level, pressure, temperature and other safety limiters must be installed in safety loop according to process. 172 615 13 2018-01-12 Bentone…
-
Page 34: Wiring Diagram Lme
If there is no Plug-in If S6 is missing connect T6 and T8. contact (X4,X6) on the boiler, connect to the contact enclosed. 1N~50/60Hz 230V…
-
Page 35: List Of Components
The operation of the burner can now be stopped with the control switch or thermostat If the gas burner control is blocked Red light in the gas burner control is lit. The burner is restarted by pushing the reset button Bentone…
-
Page 36: Control Program At Faults; Fault Mode Indicator Lme
(waiting period ≥ 10 s) 9.4.1.2 Limiting of starting repetitions LME 11… has a function with start repetition if the lame is not created at start or disappears during operation.. LME 11… allows max. three repetitions during continuous starting cycle. Bentone…
-
Page 37
3 s. To go back to the normal position, press and hold the reset button longer than 3 s. If the gas burner control is in the alarm position, it is reset by pressing the reset button 0.5…3 s. Bentone… -
Page 38: Troubleshooting
Replace solenoid valve terminals, or entire valve No power to solenoid valve Check the connection No electrical connection through air pressure gauge Check the air pressure gauge’s settings and functions Ignition load incorrectly set Increase/decrease gas supply Reduce airlow 172 615 06 2018-01-10 Bentone…
-
Page 39
Incorrectly set or faulty air sensor Check the settings and reset, or replace Ignition electrode overload Replace Burner control ambient temperature too high Insulate for heat, Max. 60 ° Ignition spark too weak Check the transformer Poor combustion Poor draught conditions Check the chimney Bentone… -
Page 40
Flame at incorrect angle due to combustion head out of position Check the combustion head and readjust Condensation build up in boiler and chimney Flue gas temperature too low or gas volume too low Raise the lue gas temperature by increasing gas volume Insulate the chimney Bentone… -
Page 41: Eu Declaration Of Conformity
11. EU Declaration of conformity Bentone Gasburners 172 905 04 2018-02-15…
-
Page 42: General Instructions For Gasburners
13. General instructions for gasburners 13.3.1 Installation Follow standards and instructions applicable to the Check that the burner is adapted to the gas quality in installation of gas burners question Ensure that the electric installation is made in accordance Check that the input pressure of the gas is correct with existing regulations Check that the dampers of the boiler are open Check that the fresh air intake of the boiler room is…
-
Page 43
Service- and inspection card Installation Boiler Name: Type: Eficiency kW: Address: Burner Type: Eficiency kW: Installed by: Date: Date gas/h Governor Fluegas Ionisation Pressure Eficiency temp current Fire Chimney room Measu- rement Before After °C µ A mbar mbar Small Flame Large Flame… -
Page 48
Enertech AB. P.O Box 309, SE-341 26 Ljungby. www.bentone.se, www.bentone.com…
Страница 1 из 5
-

- Регистрация:
- 11.04.14
- Сообщения:
-
30
- Благодарности:
- 1
Alex kao
Участник
- Регистрация:
- 11.04.14
- Сообщения:
- 30
- Благодарности:
- 1
- Адрес:
- Санкт-Петербург
Горелка встает в режим блокировкиВсем привет! Нужна помощь в поиске причины режима блокировки.
Котел Saint Roch Ultra PF56, горелка Benton ST 133 KA.
Проблема вот в чем: периодически горелка встает в режим блокировки. Может неделю-две работать без проблем, а может несколько раз в сутки вставать в режим блокировки. Причину искали несколько разных мастеров, но все заканчивалось нулевым результатом. Горелка запускается, некоторое время работает (бывает что и через 30 сек остановка, и до недели/двух).
Каждый новый мастер начинает говорить про кривые руки предыдущего и т. д.
Что сделали:
заменил топливный фильтр, поставил с воздухоотводчиком.
поменяли насос горелки
пробовали менять блок управления
меняли контактную группу блока управления.
настраивали горелку с газоанализатором несколько раз
удлинял трубу дымохода, но сказали, что горелка с наддувом и высота трубы не принципиальна.Не хочется покупать другую горелку ради попробовать.
Если у кого есть в запасе — готов взять в аренду дабы отсечь вариант проблемы в горелке.
Мастера уже в полном ступоре, сами не понимают где копать/искать причину.Предлагают теперь рыть со стороны электрики, попробовать заменить стабилизатор. Сейчас стоит Ресанта LUX.
У кого какие мысли?
Устали уже от постоянных мыслей про горелку
-
- Регистрация:
- 07.09.15
- Сообщения:
-
314
- Благодарности:
- 106
Hawker123
Живу здесь
- Регистрация:
- 07.09.15
- Сообщения:
- 314
- Благодарности:
- 106
Форсунку меняли ? Что с электродами розжига ?
-
- Регистрация:
- 11.04.14
- Сообщения:
-
30
- Благодарности:
- 1
Alex kao
Участник
- Регистрация:
- 11.04.14
- Сообщения:
- 30
- Благодарности:
- 1
- Адрес:
- Санкт-Петербург
Изначально, с завода горелка была укомплектована форсункой с размером 1,25.
Пробовали ставить 0,65, сейчас стоит 0,85.
Результат тот жеЭлектроды чистые
Зазор регулировали, прошлый мастер делал -
- Регистрация:
- 04.04.11
- Сообщения:
-
942
- Благодарности:
- 207
servisnik
Живу здесь
- Регистрация:
- 04.04.11
- Сообщения:
- 942
- Благодарности:
- 207
- Адрес:
- Архангельск
@Alex kao, Блокировка во время работы или перед запуском? Что сигнал показывает?
-
- Регистрация:
- 11.04.14
- Сообщения:
-
30
- Благодарности:
- 1
Alex kao
Участник
- Регистрация:
- 11.04.14
- Сообщения:
- 30
- Благодарности:
- 1
- Адрес:
- Санкт-Петербург
В те моменты когда это происходило при мне, вставала во время работы.
Т. е. происходит запуск, поджиг и секунд через 20-30 остановка.
Вопрос про сигнал не понял. На этой горелке коды ошибок не показывает. -
- Регистрация:
- 07.09.15
- Сообщения:
-
314
- Благодарности:
- 106
Hawker123
Живу здесь
- Регистрация:
- 07.09.15
- Сообщения:
- 314
- Благодарности:
- 106
Пламя в контрольном окошке котла появляется ? У меня когда форсунка засорилась, похоже было. Продувка, зажигание, подача топлива и … остановка. На всё — секунд 20.
Давление выставлено под новую форсунку ? Такой тип форсунки, что поставили, в инструкции есть?
Фотоэлемент протирали ? -
- Регистрация:
- 07.09.15
- Сообщения:
-
314
- Благодарности:
- 106
Hawker123
Живу здесь
- Регистрация:
- 07.09.15
- Сообщения:
- 314
- Благодарности:
- 106
Кстати, после неудавшегося запуска, следы солярки на форсунке или подпорной шайбе есть ?
-
- Регистрация:
- 11.04.14
- Сообщения:
-
30
- Благодарности:
- 1
Alex kao
Участник
- Регистрация:
- 11.04.14
- Сообщения:
- 30
- Благодарности:
- 1
- Адрес:
- Санкт-Петербург
@Hawker123,
Я наверное не совсем корректно написал…
Запуск происходит нормально, иногда в блокировку встает после 20-30 сек именно работы, т. е. Не при запуске, а именно во время горения. Соответственно и пламя есть.
Фотоэлемент чистый, полная настройка горелки именно под эту форсунку делалась. Давление в том числе. Снизили до 10 атм, было 12,5. -
- Регистрация:
- 04.04.11
- Сообщения:
-
942
- Благодарности:
- 207
servisnik
Живу здесь
- Регистрация:
- 04.04.11
- Сообщения:
- 942
- Благодарности:
- 207
- Адрес:
- Архангельск
Признак подсоса воздуха. Чаще всего бывает в самом фильтре.
Попробуйте дать поработать горелке с другим топливом, с заправки, с канистры.автомат горения какой? Бывает фотоэлемент мозги выносит, хрен определишь, пока не поменяешь.
-
- Регистрация:
- 11.04.14
- Сообщения:
-
30
- Благодарности:
- 1
Alex kao
Участник
- Регистрация:
- 11.04.14
- Сообщения:
- 30
- Благодарности:
- 1
- Адрес:
- Санкт-Петербург
Извиняюсь, но не понял:
Что такое автомат горения?По поводу подсоса воздуха:
Сейчас стоит фильтр с воздухоотводчиком. Если только после фильтра подсос идет. -
- Регистрация:
- 11.04.14
- Сообщения:
-
30
- Благодарности:
- 1
Alex kao
Участник
- Регистрация:
- 11.04.14
- Сообщения:
- 30
- Благодарности:
- 1
- Адрес:
- Санкт-Петербург
Топливо менять пробовал.
С канистры запускал,Без изменений. Встает в блок непредсказуемо, алгоритм не выявить.
И ночью и вечером, и днем. -
- Регистрация:
- 07.09.15
- Сообщения:
-
314
- Благодарности:
- 106
Hawker123
Живу здесь
- Регистрация:
- 07.09.15
- Сообщения:
- 314
- Благодарности:
- 106
Автомат горения — это электронный блочок, на кнопку которого Вы нажимаете для перезапуска горелки.
Если у Вас нет пузырей воздуха в фильтре и всё настроено нормально, то может действительно фотоэлемент глючит ? Ещё бывает что лабиринт подогревателя со временем забивается отложениями топлива, но это если у Вас горелка с подогревом топлива… -
- Регистрация:
- 04.04.11
- Сообщения:
-
942
- Благодарности:
- 207
servisnik
Живу здесь
- Регистрация:
- 04.04.11
- Сообщения:
- 942
- Благодарности:
- 207
- Адрес:
- Архангельск
-
- Регистрация:
- 21.01.10
- Сообщения:
-
32.055
- Благодарности:
- 14.310
Ortodox
Живу здесь
- Регистрация:
- 21.01.10
- Сообщения:
- 32.055
- Благодарности:
- 14.310
- Адрес:
- Москва
А воздухоотводчик закрыт?
Ага, значит раньше его ваще не было.У вас однотрубная подача топлива или обратка есть.
Или закольцовка от фильтра до горелки.
Или от фильтра до горелки тоже одна труба. -
- Регистрация:
- 11.04.14
- Сообщения:
-
30
- Благодарности:
- 1
Alex kao
Участник
- Регистрация:
- 11.04.14
- Сообщения:
- 30
- Благодарности:
- 1
- Адрес:
- Санкт-Петербург
Сначала стоял простой фильтр, 2х трубная система. Когда начали заниматься проблемой, то сначала заменил фикспакет на топливной емкости. Вторым заменил фильтр. Сейчас стоит фильтр с однотрубной подачей топлива. Обратка с горелки идет на фильтр.


Страница 1 из 5

Общее описание
видов узлов и деталей во время профилактики и технического обслуживания горелок Bentone на жидком и газовом топливе.
Данная горелочная техника рассматривается как совместная установка для отопления с напольными котлами CTC (Швеция), так и для других отопительных агрегатов, камер и печей.
Естественно, для устройств, работающих на газообразном топливе, позиции для жидкотопливного оборудования пропускаются. Проконсультируйтесь с вашим сервисным центром. Остались вопросы, звоните нам.

Сервисный центр Bentone
8 (495) 761 16 82

Аварийно-диспетчерская служба
8 (901) 540 45 21
круглосуточно (Договор)

Во время техобслуживания
ремонта и профилактики дутьевых горелок Bentone (Бентоне) на объекте мы проводим технические мероприятия и настройку для следующих компонентов горелок:
1. Жаровая труба для горелки — удаление смолы и сажи со стальной поверхности;
2. Диск рассекателя пламени — чистка от нагара и сажи;
3. Сопло — проверка подачи газов или жидкости с определённой скоростью, сверка типоразмера сопла, верное значение давления топливного насоса ;
4. Сопловая сборка — профилактика для рабочего состояния и удаления окисленных отложений, регулировка подачи воздуха и значений настройки СС; наладка узла по инструкции производителя;
5. Электроды ионизации и розжига для горелок солярочных и газовых котлов — выставление зазоров и проверка токов ионизации на котле,
6. Провода трансформатора для поджигания топлива — контроль утечки и замена комплекта при необходимости на новые кабельные соединения; анализ системного соединения;
7. Трансформатор поджига — диагностика по кодам ошибок, проверка, замена, наладка;
8. Фоторезистор горелки — осмотр, чистка и проверка работоспособности;
9. Реле управления горелкой — проверка функциональности, высвечивания индикации неисправностей по кодам и блокировки на реле; отсечение топлива по безопасности проверяется до настройки устройства;
10. Цоколь реле управления;
11. Демпферный мотор — профилактика мотора сервопривода, экспресс-проверка соленоидного клапана, настройка расхода воздуха;
12. Индикатор включения 1-2-3 ступени;
13. Крыльчатка вентилятора;
14. Пускатель;
15. Термозащита: прослеживание параметров цикла;
16. Электродвигатель: профилактика, чистка, центрование механизма вращения;
17. Блок соленоидных клапанов, соленоидный клапан безопасности;
18. Топливопровод — химическая промывка при необходимости;
19. Воздухозаборник;
20. Воздушная заслонка;
21. Топливный насос — проверяем подачу топлива (солярки), регулировка давления, при однотрубной топливной системе осуществляем продувку топливного насоса, замена фильтра насоса жидкого топлива;
22. Узел настройки сопловой сборки;
23. Топливопровод гидропривода — проверяется;
24. Гидропривод — сервис подключений и рабочего состояния;
25. Переключатель II-III ступени (для конкретной модели отопителя);
26. Переключатель I-II ступени (для конкретной модели);
27. Тумблер включения горелки — проверяем состояние на включение и выключение;
28. Топливный бак — при эксплуатации отопления на жидком топливе обязательно проверяется на загрязнения до настройки горелки газоанализатором и манометром.
В противном случае настройка не приведёт к положительным результатам.

Если у вас остались вопросы, обращайтесь в нашу компанию.
Звоните по телефонам специализированного предприятия по наладке и обслуживанию жидкотопливного оборудования для автономного отопления.
Вся информация указана на страницах официального сайта фирмы.
Для дополнительного чтения:
Настройка газовых горелок Bentone на котлах СТС.
Выезд сервисного инженера в любой город Московской области.
Сервисный центр CTC-Bentone в Москве и области.
12.01.2022
12.01.2022
11.01.2022
10.01.2022
07.11.2019