Hi!
Firstly, thanks for this plugin!
I would like to know the reason to a refused connection but I can’t find an error log for it.
I’m trying to publish and subscribe using the terminal and the result is like this:
root@MQTT-Server:~# mosquitto_sub -d -u fernandogarcia -P 123456 -t «topic/command»
Error: Connection refusedroot@MQTT-Server:~# mosquitto_pub -d -u fernandogarcia -P 123456 -t «topic/command» -m «hello»
Error: Connection refused
My mosquitto.conf is like this:
#auth_plugin
auth_plugin /etc/mosquitto/auth-plug.so
auth_opt_backends mysql
auth_opt_redis_host localhost
auth_opt_redis_port 12885
auth_opt_host localhost
auth_opt_port 3306
auth_opt_dbname myDB
auth_opt_user mqtt_userauth_opt_pass mypass
auth_opt_userquery SELECT pw FROM mqtt_users WHERE username = ‘%s’auth_opt_superquery SELECT COUNT(*) FROM mqtt_users WHERE username = ‘%s’ AND super = 1
auth_opt_aclquery SELECT topic FROM mqtt_acls WHERE (username = ‘%s’) AND (rw >= %d)
auth_opt_anonusername AnonymouS
Running this command:
/usr/local/sbin/mosquitto -c /etc/mosquitto/mosquitto.conf
The result is:
1478615526: mosquitto version 1.4.10 (build date 2016-11-06 20:16:49+0000) starting
1478615526: Config loaded from /etc/mosquitto/mosquitto.conf.
1478615526: |— *** auth-plug: startup
1478615526: |— ** Configured order: mysql1478615526: |— }}}} MYSQL
1478615526: Opening ipv4 listen socket on port 1883.
1478615526: Opening ipv6 listen socket on port 1883.
Using verbose mode (mosquitto -v) in a terminal I have this:
root@MQTT-Server:~# mosquitto_pub -d -u fernandogarcia -P 123456 -t «topic/command» -m «hello»
Client mosqpub/9003-MQTT-Serve sending CONNECT
Client mosqpub/9003-MQTT-Serve received CONNACK
Client mosqpub/9003-MQTT-Serve sending PUBLISH (d0, q0, r0, m1, ‘topic/command’, … (5 bytes))
Client mosqpub/9003-MQTT-Serve sending DISCONNECT
In another:
1478615833: mosquitto version 1.4.10 (build date 2016-11-06 20:16:49+0000) starting
1478615833: Using default config.
1478615833: Opening ipv4 listen socket on port 1883.
1478615833: Opening ipv6 listen socket on port 1883.
1478615842: New connection from 127.0.0.1 on port 1883.
1478615842: New client connected from 127.0.0.1 as mosqpub/9003-MQTT-Serve (c1, k60, u’fernandogarcia’).
1478615842: Sending CONNACK to mosqpub/9003-MQTT-Serve (0, 0)
1478615842: Received PUBLISH from mosqpub/9003-MQTT-Serve (d0, q0, r0, m0, ‘topic/command’, … (5 bytes))
1478615842: Received DISCONNECT from mosqpub/9003-MQTT-Serve
1478615842: Client mosqpub/9003-MQTT-Serve disconnected.
Can someone give me a suggestion about where to look to find the error?
How can I enable the error log?
Thanks in advance.
-
#1
@Victor mqtt мне понравилось, интересная штука, но я не могу разобраться с сервером(mosquitto), как его настроить, создать публикации и смотреть их данные…

-
#2
Укажите платформу, на которой вы настраиваете mosquitto (я пробовал Win7 x64 и OpenWRT Chaos Calmer 15.05-rc1)
Укажите версию mosquitto (у меня 1.4.2, в более ранних версиях много проблем с bridge)
Включите логгирование и пришлите логи
Попытайтесь подключиться к mosquitto с помощью mqtt-spy
Ну и собственно самое важное: что именно не получается?
Полная конфигурация mosquitto из статьи во вложении
-
36.2 KB
Просмотры: 1,485
-
#3
OpenWrt Barrier Breaker 14.07
Mosquitto 1.3.5
На первый взгляд все сделано как в примерах, запущено и включено в автозагрузку..
НО никак не удается подключиться к брокеру..
Причем даже с консоли:
root@OpenWrt:~# mosquitto_sub -t test
Error: Connection refused
-
#4
Решено: пришлось ставить из другого репозитория Chaos Calmer 15.05-rc3 версию 1.4.2
-
#5
По поводу ошибки «Error: Connection refused» — у меня дело было в конфиге mosquitto. Можно протестировать так (для Debian):
1.сделать бэкап своего конфига
cp /etc/mosquitto/conf.d/mosquitto.conf{,.old}
2.запустить напрямую mosquitto с настройками по умолчанию
/usr/sbin/mosquitto -c /etc/mosquitto/mosquitto.conf -d
3.проверить порт
lsof -i:1883
4.если строчка с процессом mosquitto есть, запустить
mosquitto_sub -t test
Если после этого видим вывод команды, значит проблема была в конфиге, если нет нужно думать дальше)
-
#6
Всем привет!
Ребят не подскажите, почему когда я создаю второго юзера в пасворд листе, у меня не подключается вообще к москито?
Не могу понять где ошибка…
-
#7
Всем привет!
Ребят не подскажите, почему когда я создаю второго юзера в пасворд листе, у меня не подключается вообще к москито?
Не могу понять где ошибка…
В /overlay/mosquitto/mosquitt.acl добавили юзера?
-
#8
Да юзера добавил, вопрос в другом есть файл с паролями:
user : pass
user1 : pass1
И файл с разрешением читатьзаписывать топики
user
topic /MyHome/#
user1
topic /MyHome/#
user1 не видит топики, хотя user видит и пишет во все топики
-
#9
Да юзера добавил, вопрос в другом есть файл с паролями:
user : pass
user1 : pass1
И файл с разрешением читатьзаписывать топики
user
topic /MyHome/#
user1
topic /MyHome/#
user1 не видит топики, хотя user видит и пишет во все топики
Только что проверил, все работает именно при таком раскладе. Пароли делаете чем? mosquitto_passwd?
-
#10
Только что проверил, все работает именно при таком раскладе. Пароли делаете чем? mosquitto_passwd?
Да, делаю именно им, если в настройках openHAB указать user : pass, а в mqtt-spy подключиться под user1 : pass1 и отправлять с esp от имени user1, то mqtt-spy видит данные а вот openHAB нет…
-
#11
Да, делаю именно им, если в настройках openHAB указать user : pass, а в mqtt-spy подключиться под user1 : pass1 и отправлять с esp от имени user1, то mqtt-spy видит данные а вот openHAB нет…
Попробуйте везде user1
-
#12
Так все работает, я попробовал сразу)
-
#14
PavelNikolaevich,
Опечатка. Можно хоть как этот файл (mosquitto.acl) назвать, главное в конфиге его прописать.
-
#15
PavelNikolaevich,
Опечатка. Можно хоть как этот файл (mosquitto.acl) назвать, главное в конфиге его прописать.
понял. спасибо. просто делал все по инстркции и не заметил сразу, просидел пол дня и не мог понять что не так.. )
-
#16
всем добрый день! есть еще вопрос, пробую делать по статье (http://esp8266.ru/esp8266-openwrt-m…mail-android-ios-twitter-cloudmqtt/#mosquitto).. дошел до пункта где загружаем скетч mqtt.ino .. прописал свой сервер и пароль.. при компиляции выдает ошибку
Код:
mqtt:8: error: no matching function for call to 'PubSubClient::PubSubClient(IPAddress&, int)'
mqtt.ino:8:32: note: candidates are:
In file included from mqtt.ino:2:0:
C:ArduinoSketchlibrariespubsubclient-mastersrc/PubSubClient.h:89:4: note: PubSubClient::PubSubClient(Client&, String, uint16_t)
  PubSubClient(Client& c, String hostname, uint16_t port = 1883);
  ^
C:ArduinoSketchlibrariespubsubclient-mastersrc/PubSubClient.h:89:4: note:  no known conversion for argument 1 from 'IPAddress' to 'Client&'
C:ArduinoSketchlibrariespubsubclient-mastersrc/PubSubClient.h:87:4: note: PubSubClient::PubSubClient(Client&, IPAddress&, uint16_t)
  PubSubClient(Client& c, IPAddress &ip, uint16_t port = 1883);
  ^
C:ArduinoSketchlibrariespubsubclient-mastersrc/PubSubClient.h:87:4: note:  no known conversion for argument 1 from 'IPAddress' to 'Client&'
C:ArduinoSketchlibrariespubsubclient-mastersrc/PubSubClient.h:84:4: note: PubSubClient::PubSubClient(Client&)
  PubSubClient(Client& c);
  ^
C:ArduinoSketchlibrariespubsubclient-mastersrc/PubSubClient.h:84:4: note:  candidate expects 1 argument, 2 provided
C:ArduinoSketchlibrariespubsubclient-mastersrc/PubSubClient.h:20:7: note: PubSubClient::PubSubClient(const PubSubClient&)
 class PubSubClient {
  ^
C:ArduinoSketchlibrariespubsubclient-mastersrc/PubSubClient.h:20:7: note:  candidate expects 1 argument, 2 provided
C:ArduinoSketchlibrariespubsubclient-mastersrc/PubSubClient.h:20:7: note: PubSubClient::PubSubClient(PubSubClient&&)
C:ArduinoSketchlibrariespubsubclient-mastersrc/PubSubClient.h:20:7: note:  candidate expects 1 argument, 2 provided
mqtt.ino:13:18: warning: deprecated conversion from string constant to 'char*' [-Wwrite-strings]
mqtt.ino:14:22: warning: deprecated conversion from string constant to 'char*' [-Wwrite-strings]
mqtt.ino:15:19: warning: deprecated conversion from string constant to 'char*' [-Wwrite-strings]
no matching function for call to 'PubSubClient::PubSubClient(IPAddress&, int)'
на строке PubSubClient client(server,1883);
подскажите, ему нужны доополнительные параметры в функцию передать или что?
-
#17
Можно еще так попробывать, но не обещаю, что будет работать)
const char* mqtt_server = «192.168.1.5»;
WiFiClient espClient;
PubSubClient client(espClient);
…
client.setServer(mqtt_server, 1883);
UPD:
В общем там небольшая путаница, или я запутался. Есть два проекта PubSubClient:
для Arduino — https://github.com/knolleary/pubsubclient
для ESP8266 — https://github.com/Imroy/pubsubclient
Нам нужна последняя. Но Arduino IDE ее обновляет до последней версии. Нужно в папке библиотек удалить PubSubClient, скачать https://github.com/Imroy/pubsubclient/archive/master.zip и установить эту версию (1.99.1). Тогда в mqtt.ino нужно заменить
IPAddress server(192, 168, 1, 100); // mosquitto address
PubSubClient client(server, 1883);
на
WiFiClient espClient;
IPAddress server(192, 168, 1, 100); // mosquitto address
PubSubClient client(espClient, server);
У меня так заработало.
Последнее редактирование: 22 Ноя 2015
-
#18
Можно еще так попробывать, но не обещаю, что будет работать)
const char* mqtt_server = «192.168.1.5»;
WiFiClient espClient;
PubSubClient client(espClient);
…
client.setServer(mqtt_server, 1883);
Эх… спасибо за совет.. дейтсвительно на строке
Код:
client.setServer(mqtt_server, 1883);выдает такую ощибку
Код:
mqtt:12: error: 'client' does not name a typeзакоментировал её
компиляция прошла
Так же попробовал строку
Код:
PubSubClient client(espClient);заменить на
Код:
PubSubClient client(espClient,mqtt_server,1883);компиляция проходит, в работе проверить не успел.. как что отпишусь
-
#19
в итоге оставил такой вариант
Код:
const char* mqtt_server = "192.168.1.200";
WiFiClient espClient;
PubSubClient client(espClient,mqtt_server,1883);
//client.setServer(mqtt_server, 1883);
последняя строка закоментирована, так как ней компилятор выдает ошибку.
работает, приходят сообщения. буду настраивать дальше. спасибо M-a-x-x за помощь
-
#20
Еще раз всем добрый день!
в инструкции такая строка
Далее создаем в /overlay/mosquitto файл mqttwarn.ini следующего содержания:
……….
там текст настроек…
а ниже, где получаем данные с ТинСпик.. идет такая строка:
Тут же получаем Write API Key. Добавляем в /overlay/mosquitto/mqttwarn.init
Вопрос в следующем:
mqttwarn.ini и mqttwarn.init — это разные файлы? или опечатка? и если опечатка, то какой файл должен быть
заранее спасибо
UPD
с именем разобрался.. судя по тексту ниже — это опечатка и имя должно быть mqttwarn.ini
-
bkirkby
- Posts: 34
- Joined: Sat Sep 15, 2018 3:34 pm
- Location: Near Zion N.P. — Utah
MQTT Broker help
I am trying to set up an MQTT broker on my rPi (v3 Model B) but I am not sure what I am doing. I have successfully installed the broker but am not able to use the «mosquito_pub» in the terminal window. I have tried:
Code: Select all
mosquitto_pub -h localhost -m "message" -t ticand
Code: Select all
mosquitto_pub -h 192.168.1.16 -m "message" -t ticbut both of these give me the same error:
Connection Refused: not authorised.
Error: the connection was refused.
I read a post somewhere about how someone had set up two versions of the broker? I have no idea how this really though.
Is there any way to delete all versions of the broker and start over?
A little more about what I am trying to do:
I want to set up a rPi as an MQTT broker in my house. I have a few other devices that I would like to connect to it on the same network. One device is a rPi that controls my chicken coop. I would like to be able to connect a website to the MQTT broker so that I can effectively control the chicken coop from the website. Any advice that anyone can give me with this project would be greatly appreciated.
-

DougieLawson
- Posts: 42328
- Joined: Sun Jun 16, 2013 11:19 pm
- Location: A small cave in deepest darkest Basingstoke, UK

Re: MQTT Broker help
Sat Mar 21, 2020 9:01 pm
Is the broker running?
ps -ef | grep mosq
sudo netstat -tlnpu | grep mosq
Languages using left-hand whitespace for syntax are ridiculous
DMs sent on https://twitter.com/DougieLawson or LinkedIn will be answered next month.
Fake doctors — are all on my foes list.
The use of crystal balls and mind reading is prohibited.
-
bkirkby
- Posts: 34
- Joined: Sat Sep 15, 2018 3:34 pm
- Location: Near Zion N.P. — Utah
Re: MQTT Broker help
Sat Mar 21, 2020 10:16 pm
DougieLawson wrote: ↑
Sat Mar 21, 2020 9:01 pm
Is the broker running?ps -ef | grep mosq
sudo netstat -tlnpu | grep mosq
It appears to be:
Code: Select all
pi@raspberrypi:~ $ ps -ef | grep mosq
mosquit+   411     1  0 16:06 ?        00:00:00 /usr/sbin/mosquitto -c /etc/mosquitto/mosquitto.conf
pi         899   883  0 16:15 pts/0    00:00:00 grep --color=auto mosq
pi@raspberrypi:~ $ sudo netstat -tlnpu | grep mosq
tcp        0      0 0.0.0.0:1883            0.0.0.0:*               LISTEN      411/mosquitto
tcp6       0      0 :::1883                 :::*                    LISTEN      411/mosquitto
pi@raspberrypi:~ $
and
Code: Select all
pi@raspberrypi:~ $ sudo systemctl status mosquitto
● mosquitto.service - Mosquitto MQTT v3.1/v3.1.1 Broker
   Loaded: loaded (/lib/systemd/system/mosquitto.service; enabled; vendor preset
   Active: active (running) since Sat 2020-03-21 13:49:12 MDT; 2h 24min ago
     Docs: man:mosquitto.conf(5)
           man:mosquitto(8)
 Main PID: 411 (mosquitto)
    Tasks: 1 (limit: 2200)
   Memory: 2.8M
   CGroup: /system.slice/mosquitto.service
           └─411 /usr/sbin/mosquitto -c /etc/mosquitto/mosquitto.conf

Mar 21 13:49:12 raspberrypi systemd[1]: Starting Mosquitto MQTT v3.1/v3.1.1 Brok
Mar 21 13:49:12 raspberrypi systemd[1]: Started Mosquitto MQTT v3.1/v3.1.1 Broke
lines 1-13/13 (END)
-
DougieLawson
- Posts: 42328
- Joined: Sun Jun 16, 2013 11:19 pm
- Location: A small cave in deepest darkest Basingstoke, UK
Re: MQTT Broker help
Sat Mar 21, 2020 10:24 pm
What’s in /etc/mosquitto/mosquitto.conf?
My Mosquitto config has:
Code: Select all
# Place your local configuration in /etc/mosquitto/conf.d/
#
# A full description of the configuration file is at
# /usr/share/doc/mosquitto/examples/mosquitto.conf.example

pid_file /var/run/mosquitto.pid

persistence true
persistence_location /var/lib/mosquitto/

log_dest file /var/log/mosquitto/mosquitto.log

include_dir /etc/mosquitto/conf.d
In /etc/mosquito/conf.d I’ve got
Code: Select all
root@apollo:/etc/mosquitto/conf.d# ls -la
total 20
drwxr-xr-x 2 root root 4096 Jan  6 22:19 .
drwxr-xr-x 5 root root 4096 Jan  6 22:19 ..
-rw-r--r-- 1 root root  142 Feb 18  2019 README
-rw-r--r-- 1 root root  293 Jul  8  2019 tls.conf~
-rw-r--r-- 1 root root   63 Jul  8  2019 ws.conf
root@apollo:/etc/mosquitto/conf.d#
We can ignore tls.conf~ as it’s not used (due to the name not ending with .conf) and ws.conf has this
Code: Select all
listener 1883
protocol mqtt

listener 9001
protocol websockets
to enable normal MQTT on port 1883 and websockets on port 9001.
Languages using left-hand whitespace for syntax are ridiculous
DMs sent on https://twitter.com/DougieLawson or LinkedIn will be answered next month.
Fake doctors — are all on my foes list.
The use of crystal balls and mind reading is prohibited.
-
bkirkby
- Posts: 34
- Joined: Sat Sep 15, 2018 3:34 pm
- Location: Near Zion N.P. — Utah
Re: MQTT Broker help
Sun Mar 29, 2020 11:05 pm
Hi Dougie,
Thanks for the response and my apologies for taking so long to respond. I set my /etc/mosquitto.conf file to:
Code: Select all
# Place your local configuration in /etc/mosquitto/conf.d/
#
# A full description of the configuration file is at
# /usr/share/doc/mosquitto/examples/mosquitto.conf.example

pid_file /var/run/mosquitto.pid

persistence true
persistence_location /var/lib/mosquitto/

log_dest file /var/log/mosquitto/mosquitto.log

include_dir /etc/mosquitto/conf.d
and my ws.conf file to:
Code: Select all
allow_anonymous false
password_file /etc/mosquitto/pwfile

listener 1883
protocol mqtt

listener 9001
protocol WebSockets
When I try something like:
I get an error that says » Connection refused: not authorized».
Any ideas? I have been thinking I could just re-image the card and start from scratch but that seems like a good way to solve this problem without learning anything.
One quick question; I want to have a website and a different RPi using this RPi broker. Is mosquito the best thing to use for this project?
Last edited by bkirkby on Mon Mar 30, 2020 4:47 pm, edited 2 times in total.
-
DougieLawson
- Posts: 42328
- Joined: Sun Jun 16, 2013 11:19 pm
- Location: A small cave in deepest darkest Basingstoke, UK
Re: MQTT Broker help
Sun Mar 29, 2020 11:10 pm
So what’s your client doing? Post your code.
Languages using left-hand whitespace for syntax are ridiculous
DMs sent on https://twitter.com/DougieLawson or LinkedIn will be answered next month.
Fake doctors — are all on my foes list.
The use of crystal balls and mind reading is prohibited.
-
bkirkby
- Posts: 34
- Joined: Sat Sep 15, 2018 3:34 pm
- Location: Near Zion N.P. — Utah
Re: MQTT Broker help
Mon Mar 30, 2020 4:46 pm
DougieLawson wrote: ↑
Sun Mar 29, 2020 11:10 pm
So what’s your client doing? Post your code.
I assumed the client would not be doing anything since it was giving me the «connection refused» error. Would I use something like?
-
DougieLawson
- Posts: 42328
- Joined: Sun Jun 16, 2013 11:19 pm
- Location: A small cave in deepest darkest Basingstoke, UK
Re: MQTT Broker help
Mon Mar 30, 2020 5:18 pm
You’re not doing any thing to help yourself here. If you can’t post your program that fails I can’t help you. There’s something you’re not telling us.
Try calling mosquitto_sub and/or mosquitto_pub with -h 192.168.3.14 (obviously with the address of your broker) or -h 127.0.0.1 or -h localhost (if the client and the broker are on the same machine).
Languages using left-hand whitespace for syntax are ridiculous
DMs sent on https://twitter.com/DougieLawson or LinkedIn will be answered next month.
Fake doctors — are all on my foes list.
The use of crystal balls and mind reading is prohibited.
-
bkirkby
- Posts: 34
- Joined: Sat Sep 15, 2018 3:34 pm
- Location: Near Zion N.P. — Utah
Re: MQTT Broker help
Mon Mar 30, 2020 5:30 pm
My apologies for not clarifying. Maybe I am not sure what you are asking. As I mentioned in an earlier post, I tried running the following code in a terminal window:
and I get an error:
Code: Select all
pi@raspberrypi:~ $ mosquitto_sub -t test1
Connection Refused: not authorised.
pi@raspberrypi:~ $
I opened up a second terminal window and tried this:
Code: Select all
pi@raspberrypi:~ $ mosquitto_pub -t test1 -m "hello"
Connection Refused: not authorised.
Error: The connection was refused.
pi@raspberrypi:~ $
but obviously got an error there.
Could I be getting these errors because I have a password file included in my mosquitto.conf file?
-
bkirkby
- Posts: 34
- Joined: Sat Sep 15, 2018 3:34 pm
- Location: Near Zion N.P. — Utah
Re: MQTT Broker help
Mon Mar 30, 2020 5:33 pm
I tried your suggestion and got this:
Code: Select all
pi@raspberrypi:/ $ mosquitto_pub -h localhost
Error: Both topic and message must be supplied.
mosquitto_pub is a simple mqtt client that will publish a message on a single topic and exit.
mosquitto_pub version 1.5.7 running on libmosquitto 1.5.7.

Usage: mosquitto_pub {[-h host] [-p port] [-u username [-P password]] -t topic | -L URL}
                     {-f file | -l | -n | -m message}
                     [-c] [-k keepalive] [-q qos] [-r]
                     [-A bind_address]
                     [-i id] [-I id_prefix]
                     [-d] [--quiet]
                     [-M max_inflight]
                     [-u username [-P password]]
                     [--will-topic [--will-payload payload] [--will-qos qos] [--will-retain]]
                     [{--cafile file | --capath dir} [--cert file] [--key file]
                      [--ciphers ciphers] [--insecure]]
                     [--psk hex-key --psk-identity identity [--ciphers ciphers]]
                     [--proxy socks-url]
       mosquitto_pub --help

 -A : bind the outgoing socket to this host/ip address. Use to control which interface
      the client communicates over.
 -d : enable debug messages.
 -f : send the contents of a file as the message.
 -h : mqtt host to connect to. Defaults to localhost.
 -i : id to use for this client. Defaults to mosquitto_pub_ appended with the process id.
 -I : define the client id as id_prefix appended with the process id. Useful for when the
      broker is using the clientid_prefixes option.
 -k : keep alive in seconds for this client. Defaults to 60.
 -L : specify user, password, hostname, port and topic as a URL in the form:
      mqtt(s)://[username[:password]@]host[:port]/topic
 -l : read messages from stdin, sending a separate message for each line.
 -m : message payload to send.
 -M : the maximum inflight messages for QoS 1/2..
 -n : send a null (zero length) message.
 -p : network port to connect to. Defaults to 1883 for plain MQTT and 8883 for MQTT over TLS.
 -P : provide a password
 -q : quality of service level to use for all messages. Defaults to 0.
 -r : message should be retained.
 -s : read message from stdin, sending the entire input as a message.
 -t : mqtt topic to publish to.
 -u : provide a username
 -V : specify the version of the MQTT protocol to use when connecting.
      Can be mqttv31 or mqttv311. Defaults to mqttv311.
 --help : display this message.
 --quiet : don't print error messages.
 --will-payload : payload for the client Will, which is sent by the broker in case of
                  unexpected disconnection. If not given and will-topic is set, a zero
                  length message will be sent.
 --will-qos : QoS level for the client Will.
 --will-retain : if given, make the client Will retained.
 --will-topic : the topic on which to publish the client Will.
 --cafile : path to a file containing trusted CA certificates to enable encrypted
            communication.
 --capath : path to a directory containing trusted CA certificates to enable encrypted
            communication.
 --cert : client certificate for authentication, if required by server.
 --key : client private key for authentication, if required by server.
 --ciphers : openssl compatible list of TLS ciphers to support.
 --tls-version : TLS protocol version, can be one of tlsv1.2 tlsv1.1 or tlsv1.
                 Defaults to tlsv1.2 if available.
 --insecure : do not check that the server certificate hostname matches the remote
              hostname. Using this option means that you cannot be sure that the
              remote host is the server you wish to connect to and so is insecure.
              Do not use this option in a production environment.
 --psk : pre-shared-key in hexadecimal (no leading 0x) to enable TLS-PSK mode.
 --psk-identity : client identity string for TLS-PSK mode.
 --proxy : SOCKS5 proxy URL of the form:
           socks5h://[username[:password]@]hostname[:port]
           Only "none" and "username" authentication is supported.

See http://mosquitto.org/ for more information.

pi@raspberrypi:/ $
and also this:
Code: Select all
pi@raspberrypi:/ $ mosquitto_pub -h localhost -t test1 -m "test is working"
Connection Refused: not authorised.
Error: The connection was refused.
pi@raspberrypi:/ $
-
DougieLawson
- Posts: 42328
- Joined: Sun Jun 16, 2013 11:19 pm
- Location: A small cave in deepest darkest Basingstoke, UK
Re: MQTT Broker help
Mon Mar 30, 2020 6:21 pm
Languages using left-hand whitespace for syntax are ridiculous
DMs sent on https://twitter.com/DougieLawson or LinkedIn will be answered next month.
Fake doctors — are all on my foes list.
The use of crystal balls and mind reading is prohibited.
-
bkirkby
- Posts: 34
- Joined: Sat Sep 15, 2018 3:34 pm
- Location: Near Zion N.P. — Utah
Re: MQTT Broker help
Mon Mar 30, 2020 7:20 pm
I added «log_type all» directly in the mosquitto.conf file and then tried to publish again. It doesn’t appear to have done anything. I tried removing the «allow_anonymous» from we.conf and ran the pub command again. Here are the results:
Code: Select all
pi@raspberrypi:/etc/mosquitto/conf.d $ mosquitto_sub -h localhost -t test1 -m "hey there"
Error: Unknown option '-m'.

Use 'mosquitto_sub --help' to see usage.
In the help section, «-m» is listed as «message payload to send». Not sure why this is not working but I didn’t get the access denied error. I think that may be from me removing the «allow_anonymous» bit?
-
bkirkby
- Posts: 34
- Joined: Sat Sep 15, 2018 3:34 pm
- Location: Near Zion N.P. — Utah
Re: MQTT Broker help
Mon Mar 30, 2020 7:20 pm
Oops, I just realized that should have been mosquitto_pub…
**EDIT**
Nope:
Code: Select all
pi@raspberrypi:/ $ mosquitto_pub -h localhost -t test1 -m "hey there"
Connection Refused: not authorised.
Error: The connection was refused.
pi@raspberrypi:/ $
-
DougieLawson
- Posts: 42328
- Joined: Sun Jun 16, 2013 11:19 pm
- Location: A small cave in deepest darkest Basingstoke, UK
Re: MQTT Broker help
Mon Mar 30, 2020 8:09 pm
What’s in /var/log/mosquitto/mosquitto.log?
Languages using left-hand whitespace for syntax are ridiculous
DMs sent on https://twitter.com/DougieLawson or LinkedIn will be answered next month.
Fake doctors — are all on my foes list.
The use of crystal balls and mind reading is prohibited.
-
bkirkby
- Posts: 34
- Joined: Sat Sep 15, 2018 3:34 pm
- Location: Near Zion N.P. — Utah
Re: MQTT Broker help
Mon Mar 30, 2020 10:02 pm
DougieLawson wrote: ↑
Mon Mar 30, 2020 8:09 pm
What’s in /var/log/mosquitto/mosquitto.log?
Code: Select all
1584734894: mosquitto version 1.5.7 starting
1584734894: Config loaded from /etc/mosquitto/mosquitto.conf.
1584734894: Opening ipv4 listen socket on port 1883.
1584734894: Opening ipv6 listen socket on port 1883.
1584735533: mosquitto version 1.5.7 terminating
1584735540: mosquitto version 1.5.7 starting
1584735540: Config loaded from /etc/mosquitto/mosquitto.conf.
1584735540: Opening ipv4 listen socket on port 1883.
1584735540: Opening ipv6 listen socket on port 1883.
1584735666: New connection from ::1 on port 1883.
1584735666: New client connected from ::1 as mosqsub|844-raspberrypi (c1, k60, $
1584735729: New connection from ::1 on port 1883.
1584735729: New client connected from ::1 as mosqpub|845-raspberrypi (c1, k60, $
1584735729: Client mosqpub|845-raspberrypi disconnected.
1584735770: Socket error on client mosqsub|844-raspberrypi, disconnecting.
1584736052: mosquitto version 1.5.7 terminating
1584736060: mosquitto version 1.5.7 starting
1584736060: Config loaded from /etc/mosquitto/mosquitto.conf.
                               [ Read 378 lines ]
-
DougieLawson
- Posts: 42328
- Joined: Sun Jun 16, 2013 11:19 pm
- Location: A small cave in deepest darkest Basingstoke, UK
Re: MQTT Broker help
Mon Mar 30, 2020 10:11 pm
So something is connecting OK from localhost (IPv6 equivalent of 127.0.0.1 is ::1).
My normal way to test mosquitto is
mosquitto_sub -t «#» -h 192.168.3.14 &
mosquitto_pub -t «test/tester» -h 192.168.3.14 -m «Hello, World!»
Code: Select all
1585606607: mosquitto version 1.6.8 starting
1585606607: Config loaded from /etc/mosquitto/mosquitto.conf.
1585606607: Opening ipv4 listen socket on port 1883.
1585606607: Opening ipv6 listen socket on port 1883.
1585606623: New connection from 127.0.0.1 on port 1883.
1585606623: New client connected from 127.0.0.1 as mosq-PZMLkiMxQRCSAwOZzv (p2, c1, k60).
1585606623: No will message specified.
1585606623: Sending CONNACK to mosq-PZMLkiMxQRCSAwOZzv (0, 0)
1585606623: Received SUBSCRIBE from mosq-PZMLkiMxQRCSAwOZzv
1585606623:     # (QoS 0)
1585606623: mosq-PZMLkiMxQRCSAwOZzv 0 #
1585606623: Sending SUBACK to mosq-PZMLkiMxQRCSAwOZzv
1585606648: New connection from ::1 on port 1883.
1585606648: New client connected from ::1 as mosq-zbKh9nDJPe83qgeczE (p2, c1, k60).
1585606648: No will message specified.
1585606648: Sending CONNACK to mosq-zbKh9nDJPe83qgeczE (0, 0)
1585606648: Received PUBLISH from mosq-zbKh9nDJPe83qgeczE (d0, q0, r0, m0, 'test/tester', ... (5 bytes))
1585606648: Sending PUBLISH to mosq-PZMLkiMxQRCSAwOZzv (d0, q0, r0, m0, 'test/tester', ... (5 bytes))
1585606648: Received DISCONNECT from mosq-zbKh9nDJPe83qgeczE
1585606648: Client mosq-zbKh9nDJPe83qgeczE disconnected.
1585606650: New connection from ::1 on port 1883.
1585606650: New client connected from ::1 as mosq-u04HKtGVI50UposM2j (p2, c1, k60).
1585606650: No will message specified.
1585606650: Sending CONNACK to mosq-u04HKtGVI50UposM2j (0, 0)
1585606650: Received PUBLISH from mosq-u04HKtGVI50UposM2j (d0, q0, r0, m0, 'test/tester', ... (5 bytes))
1585606650: Sending PUBLISH to mosq-PZMLkiMxQRCSAwOZzv (d0, q0, r0, m0, 'test/tester', ... (5 bytes))
1585606650: Received DISCONNECT from mosq-u04HKtGVI50UposM2j
1585606650: Client mosq-u04HKtGVI50UposM2j disconnected.
1585606658: mosquitto version 1.6.8 terminating
1585606658: Saving in-memory database to /var/lib/mosquitto/mosquitto.db.
Languages using left-hand whitespace for syntax are ridiculous
DMs sent on https://twitter.com/DougieLawson or LinkedIn will be answered next month.
Fake doctors — are all on my foes list.
The use of crystal balls and mind reading is prohibited.
-
DougieLawson
- Posts: 42328
- Joined: Sun Jun 16, 2013 11:19 pm
- Location: A small cave in deepest darkest Basingstoke, UK
Re: MQTT Broker help
Mon Mar 30, 2020 10:20 pm
I’ve just spotted that your version is back-level to mine. What version of Raspbian are you running.
Can you run sudo apt update; sudo apt dist-upgrade -y to get things up to date (if you’re on Buster)?
Languages using left-hand whitespace for syntax are ridiculous
DMs sent on https://twitter.com/DougieLawson or LinkedIn will be answered next month.
Fake doctors — are all on my foes list.
The use of crystal balls and mind reading is prohibited.
-
bkirkby
- Posts: 34
- Joined: Sat Sep 15, 2018 3:34 pm
- Location: Near Zion N.P. — Utah
Re: MQTT Broker help
Mon Mar 30, 2020 10:51 pm
Code: Select all
pi@raspberrypi:~ $ sudo apt dist-upgrade -y
Reading package lists... Done
Building dependency tree
Reading state information... Done
Calculating upgrade... Done
0 upgraded, 0 newly installed, 0 to remove and 0 not upgraded.
pi@raspberrypi:~ $ cat /etc/os-release
PRETTY_NAME="Raspbian GNU/Linux 10 (buster)"
NAME="Raspbian GNU/Linux"
VERSION_ID="10"
VERSION="10 (buster)"
VERSION_CODENAME=buster
ID=raspbian
ID_LIKE=debian
HOME_URL="http://www.raspbian.org/"
SUPPORT_URL="http://www.raspbian.org/RaspbianForums"
BUG_REPORT_URL="http://www.raspbian.org/RaspbianBugs"
pi@raspberrypi:~ $
Return to “Networking and servers”
I have to install MQTT Broker Mosquitto on an Ubuntu EC2 instance. The port 1883 is opened via console, but I am still getting the error:
Error: Connection refused
![]()
asked Oct 11, 2019 at 6:55
![]()
0
According to this post, you need to run mosquitto as a daemon by running:
mosquitto -d
To have it start at boot time, you can enable the mosquitto service by running:
sudo systemctl enable mosquitto.service
answered Oct 11, 2019 at 12:45
![]()
BeastOfCaerbannogBeastOfCaerbannog
11.7k10 gold badges43 silver badges72 bronze badges
В данном руководстве рассмотри, как запустить брокера Mosquitto для работы протокола MQTT на базе виртуальной машины с Ubuntu и виртуального хостинга Digital Ocean. Использование брокера через хостинг позволит подключаться к нескольким платам ESP32/ESP8266 и другим устройствам IoT отовсюду, где есть интернет. Также рассмотрим, как подключать платы к брокеру в Arduino IDE.
Для чего нужен протокол MQTT?
MQTT или Message Queue Telemetry Transport – это легкий, компактный и открытый протокол обмена данными созданный для передачи данных на удалённых локациях, где требуется небольшой размер кода и есть ограничения по пропускной способности канала.
Брокер MQTT в основном отвечает за получение всех сообщений, отправленных по этому протоколу, их фильтрацию, определение получателей и передачу их конечным устройствам.
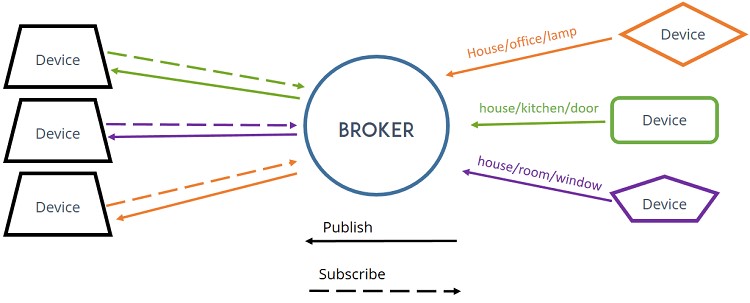
Брокеров достаточно много, мы используем один из самых популярных – Mosquitto MQTT Broker. Он очень прост в установке, конфигурации и использовании.
В данном руководстве мы установим его на виртуальную машину Linux Ubuntu, запущенной на хостинге Digital Ocean.
Обзор облачного MQTT брокера
В чем преимущества данного брокера? Как его использовать?
Использование облачного брокера позволяет нескольким устройствам IoT (например, платы ESP32/ESP8266) взаимодействовать друг с другом используя протокол MQTT, даже если они работают в разных сетях и разнесены в пространстве.
Собственно, как работает данная сеть? Платы подключены к одному и тому же брокеру, включенному на хостинге. Так они могут взаимодействовать друг с другом (отправлять данные путем публикации данных в топик на брокере и получать их путем подписки на соответствующий топик)
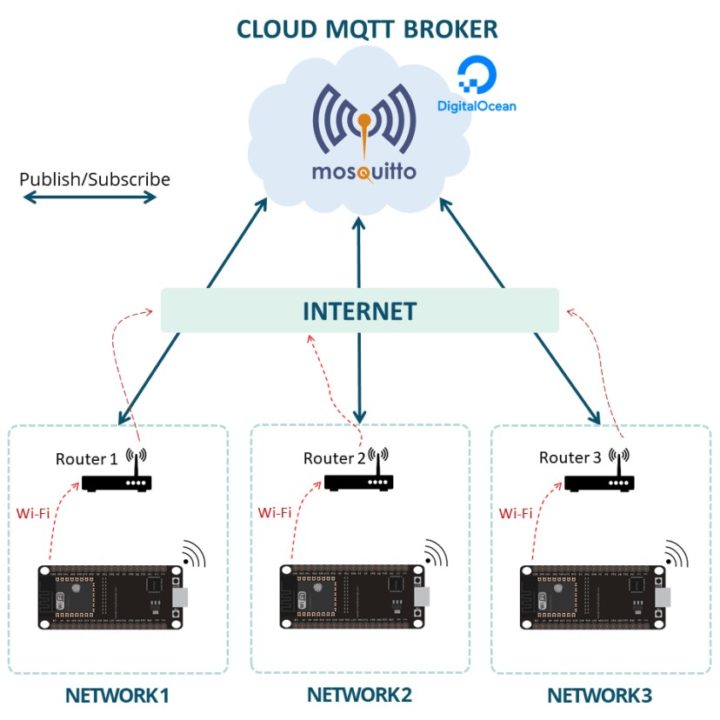
На следующей схеме изображен пример приложения с использованием облачного брокера.
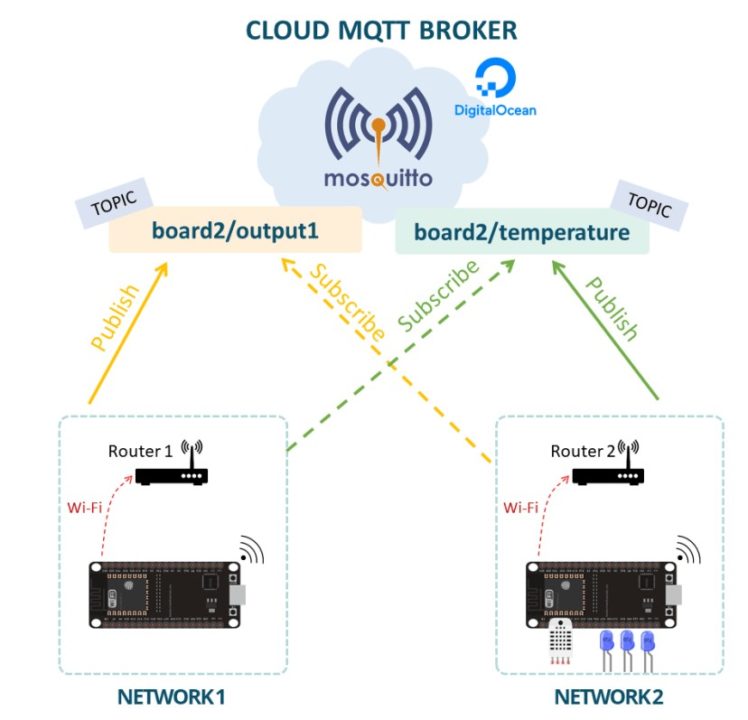
Из чего состоит данное приложение?
- Две платы ESP32, подключенные к разным сетям;
- Облачный брокер, на котором есть пара топиков – board2/output и board2/temperature;
- Плата №1 публикует данные, определяющие включение и выключение выходов платы №2, в топике board2/output1, на который подписана плата №2. Таким образом, плата №1 управляет платой №2.
- Похожим образом плата №2 публикует показания температуры в топике, на который подписана плата №1. Таким образом, плата №1 получает показания, снимаемые платой №2.
Вы также можете установить Node-RED на этом же хостинге для управления и мониторинга ваших плат с компьютера или смартфона.
Digital Ocean
Для подключения облачного брокера потребуется хостинг, на котором можно использовать командную строке и устанавливать любой софт. Digital Ocean удовлетворяет этим требованиям.
Примечание: Вы также можете запустить брокер в локальной сети используя плату Raspberry Pi. Тем не менее, цель данного руководства заключается именно в создании облачного брокера.
Создаем аккаунт в Digital Ocean
Переходим по ссылке Digital Ocean и нажимаем кнопку «Sign up»
Создав аккаунт, вы получите 100$ на счет, их вы можете потратить на 60-дневный пробный период. Потребуется привязать карту, но если вы можете отменить подписку в течение пробного периода, если она больше вам не потребуется.
Создайте аккаунт:
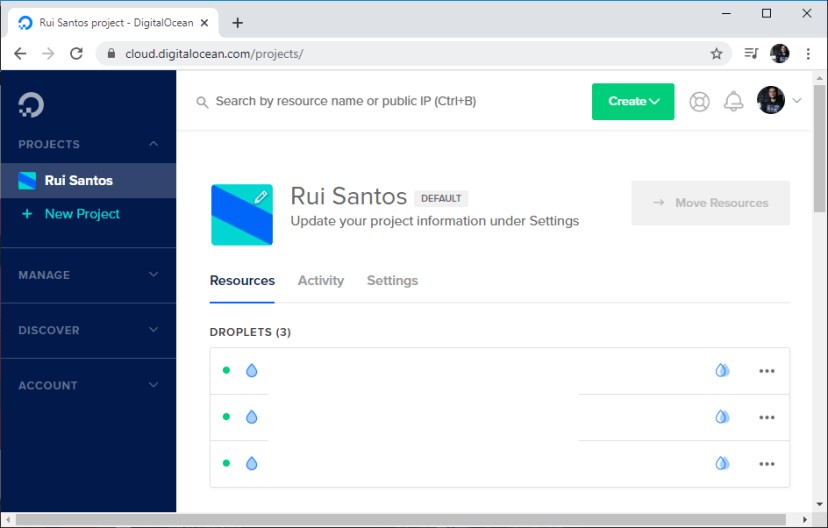
После подтверждения аккаунта, зайдите в него:
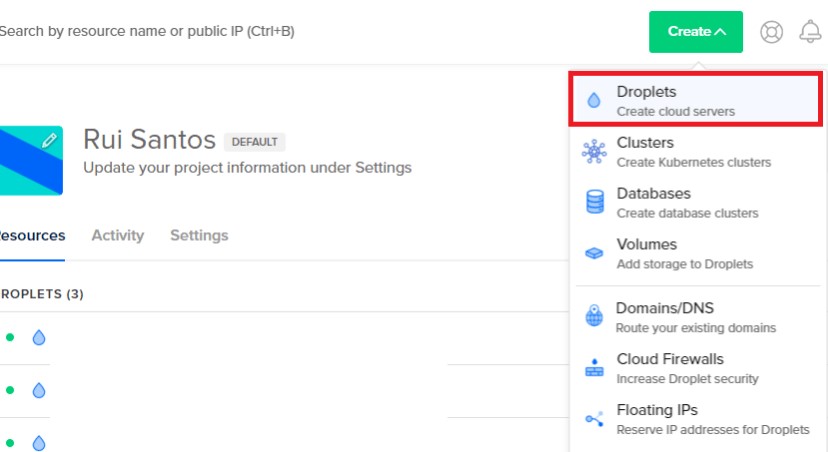
Создаем дроплет (Linux Ubuntu VM)
Нажимаем «Create» для создания виртуальной машины и выбираем «Droplets» (так Digital Ocean называет виртуальные машины).
Важно: Если у вас уже есть дроплет с установленной Node RED, вы можете пропустить создание виртуальной машины. На одном сервере можно запустить одновременно и Mosquitto MQTT и Node RED.
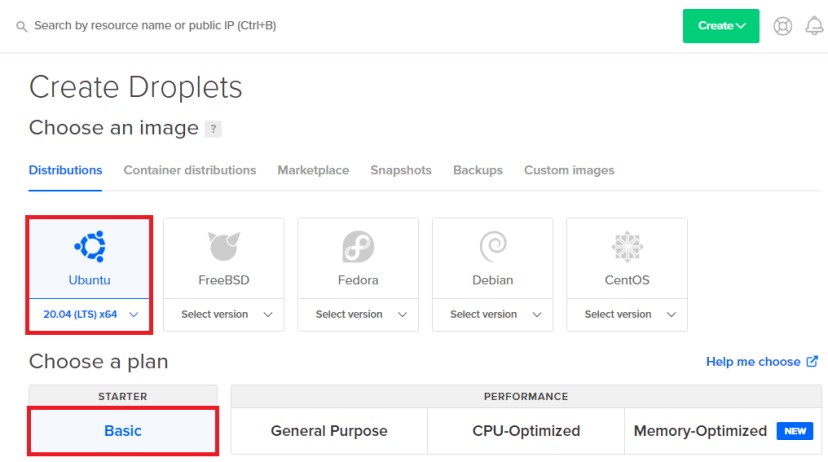
В этом руководстве мы будем использовать Ubuntu 20.04 (LTS) x64. Вы можете использовать либо эту ОС, либо выбрать план «Basic»:
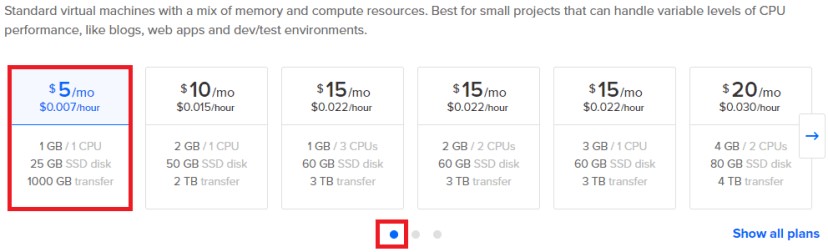
В меню ресурсов виртуальной машины стоит выбрать самый дешевый план за 5$ в месяц. Наш брокер будет нормально работать даже при таких ресурсах.
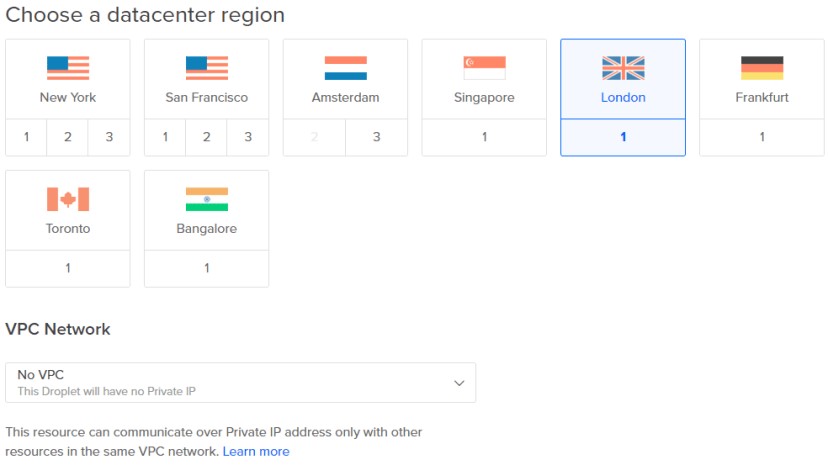
Выбираем местоположение ближайшего датацентра для виртуальной машины:
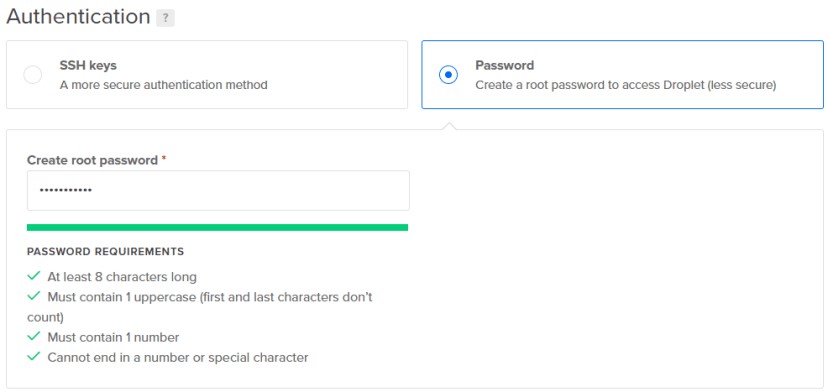
Создаем пароль для доступа к дроплету:
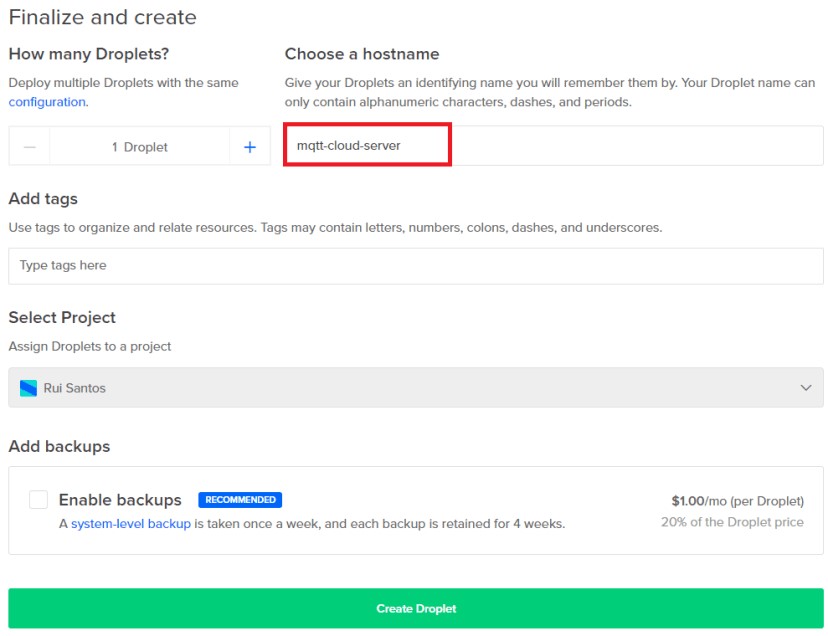
Ну и наконец, выбираем имя хоста для идентификации виртуальной машины (в нашем случае – «mqtt-cloud-server»). Осталось нажать большую зеленую кнопку «Create Droplet».
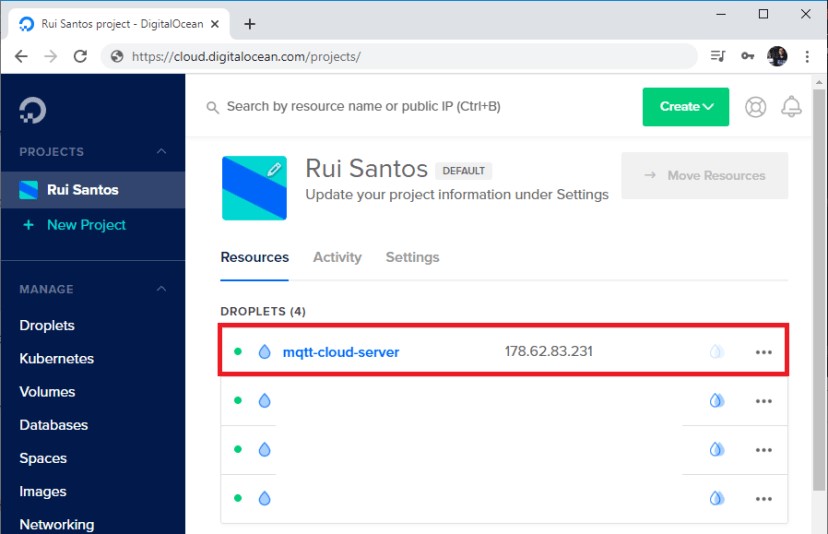
Ждем окончания процесса создания виртуальной машины.
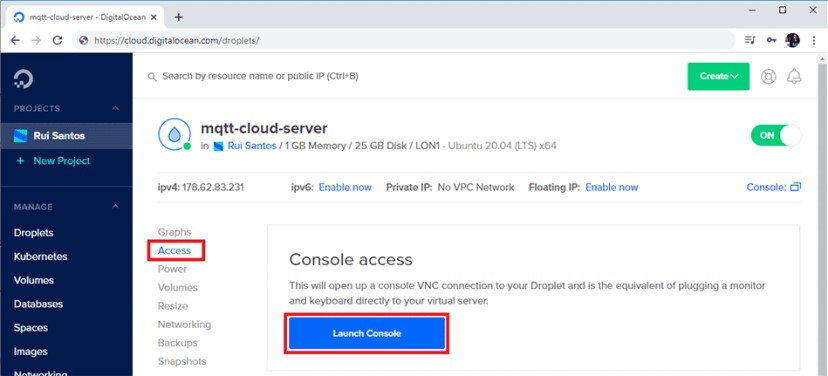
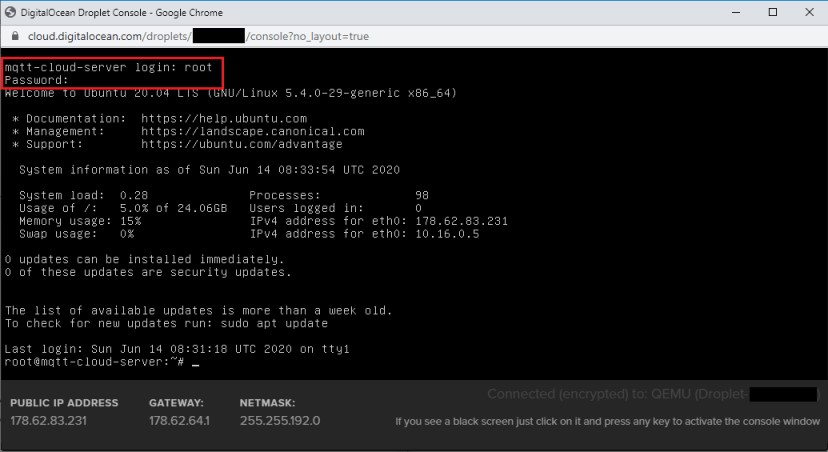
Доступ к консоли Linux Ubuntu VM
Открываем созданный сервер:
Выбираем меню «Access» и нажимаем «Launch console»:
Откроется новое окно в браузере:
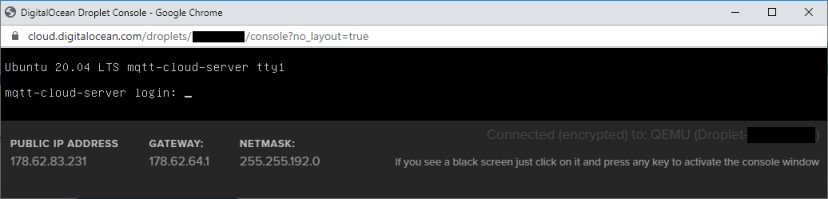
Введите логин и пароль для сервера и нажмите Enter:
Установка брокера Mosquitto MQTT на сервер с Linux Ubuntu VM

Перед установкой софта обновите ваш сервер
|
sudo apt update && sudo apt upgrade -y |
Для установки брокера введите команду:
|
sudo apt install mosquitto mosquitto-clients -y |
Проверка правильности установки брокера
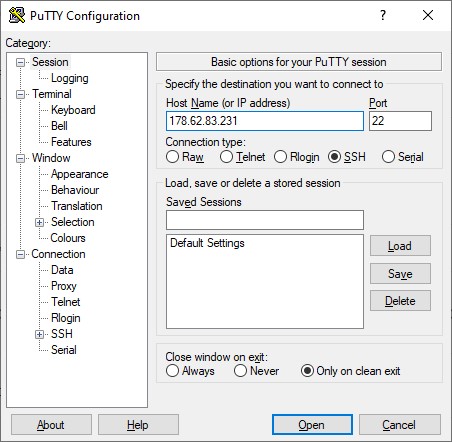
Для проверки установки вы можете открыть второе окно терминала и установить SSH соединение с сервером (можно использовать PuTTY или любой другой SSH клиент):
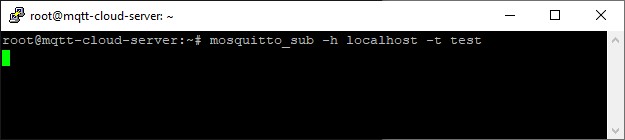
Вводим логин и пароль от сервера. Затем вводим следующую команду подписки для проверки работы топика:
|
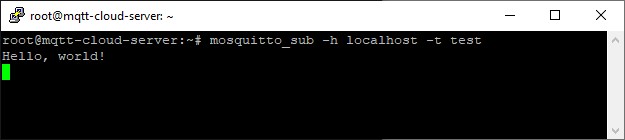
mosquitto_sub -h localhost -t test |
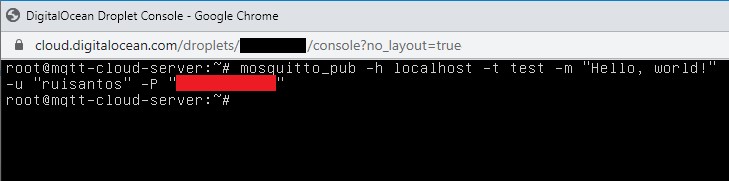
В первом окне терминала вводим команду для публикации тестового сообщения в топик:
|
mosquitto_pub -h localhost -t test -m «Hello, world!» |
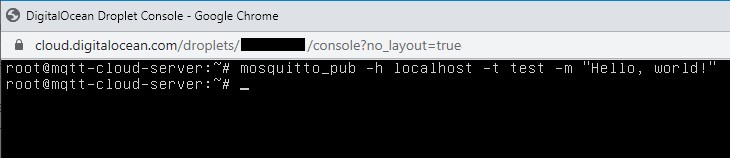
Оно должно появиться во втором терминале:
Защита брокера MQTT
Пока что любой, кто знает IP адрес вашего брокера может публиковать или подписываться на ваши топики. Мы можем добавить аутентификацию через логин и пароль на наш сервер.
Вводим простую команду (нужно заменить YOUR_USERNAME на логин, который вы будете использовать):
|
sudo mosquitto_passwd -c /etc/mosquitto/passwd YOUR_USERNAME |
Когда вы отправите эту команду, система потребует ввести пароль. Введите его и запомните.
Наконец, открываем файл default.conf для редактирования:
|
sudo nano /etc/mosquitto/conf.d/default.conf |
Добавляем в файл следующие две строки (они отвечают за требование авторизации для публикации/подписки)
|
allow_anonymous false password_file /etc/mosquitto/passwd |
Файл должен выглядеть следующим образом:
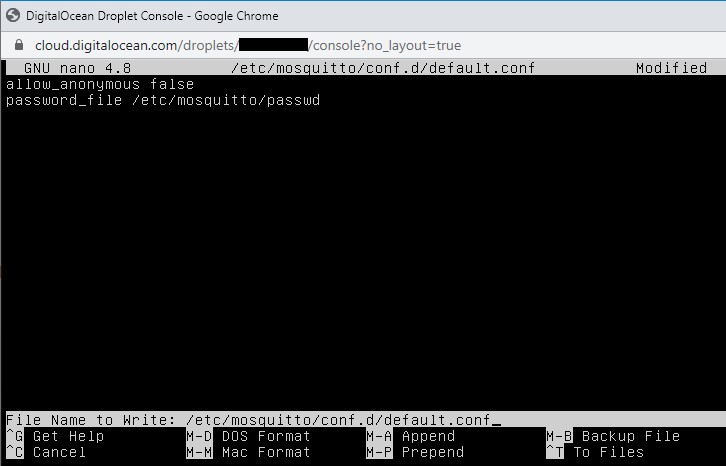
Сохраняем и закрываем файл (Ctrl+X, Y, Enter) и перезапускаем брокера.
|
sudo systemctl restart mosquito |
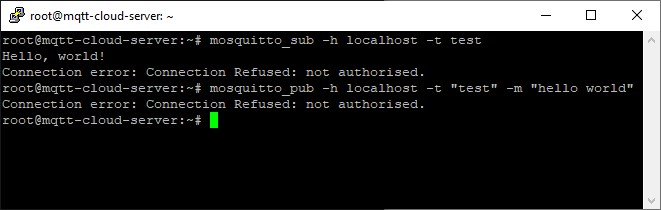
Теперь при попытке опубликовать тестовое сообщение без ввода логина и пароля:
|
mosquitto_pub -h localhost -t test -m «Hello, world!» |
Вы получите сообщение «Connection error: Connection refused: not authorised»
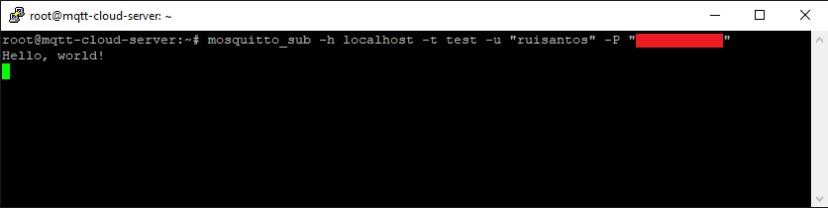
Попробуем подписаться на топик брокера с использованием аргументов –u и –P (проведение аутентификации):
|
mosquitto_sub -h localhost -t test -u «ruisantos» -P «YOUR_PASSWORD» |
Делаем то же самое для публикации сообщения:
|
mosquitto_pub -h localhost -t test -m «Hello, world!» -u «ruisantos» -P «YOUR_PASSWORD» |
Вот краткий список аргументов для брокера Mosquitto:
| -h | Hostname |
| -t | MQTT топик |
| -m | MQTT сообщение |
| -u | MQTT логин |
| -P | MQTT пароль |
Подключение платы ESP32 к брокеру
Для этого нам сначала нужно выполнить следующее:
Arduino IDE
Мы используем Arduino IDE, поэтому убедитесь, что плата ESP32 установлена в среде разработки.
Библиотеки MQTT
Для использования MQTT используем библиотеку Async MQTT Client:
- Скачайте библиотеку;
- Разархивируйте папку;
- Переименуйте папку в «async_mqtt_client»;
- Переместите ее в папку библиотек Arduino;
- И наконец, откройте заново среду разработки.
Вы также можете перейти Скетч>Подключить библиотеку> Добавить .ZIP библиотеку и выбрать только что скачанную библиотеку.
Установка библиотеки Async TCP
Эта библиотека также нам потребуется для работы брокера.
- Скачайте библиотеку;
- Разархивируйте папку;
- Переименуйте папку в «AsyncTCP»;
- Переместите ее в папку библиотек Arduino;
- И наконец, откройте заново среду разработки.
Вы также можете перейти Скетч>Подключить библиотеку> Добавить .ZIP библиотеку и выбрать только что скачанную библиотеку.
Публикация сообщений в облачном брокере с платы ESP32
Скопируйте следующий код в вашу среду разработки. Для того, чтобы код у вас работал, потребуется ввести свои учетные данные сети, IP адрес дроплета, логин и пароль от брокера.
|
1 2 3 4 5 6 7 8 9 10 11 12 13 14 15 16 17 18 19 20 21 22 23 24 25 26 27 28 29 30 31 32 33 34 35 36 37 38 39 40 41 42 43 44 45 46 47 48 49 50 51 52 53 54 55 56 57 58 59 60 61 62 63 64 65 66 67 68 69 70 71 72 73 74 75 76 77 78 79 80 81 82 83 84 85 86 87 88 89 90 91 92 93 94 95 96 97 98 99 100 101 102 103 104 105 106 107 108 109 110 111 112 113 114 115 116 117 118 119 120 121 122 123 124 125 126 127 128 129 130 131 132 133 134 135 136 137 138 139 140 141 142 143 144 145 146 147 148 149 150 151 152 153 154 155 156 157 158 159 160 161 162 163 164 165 166 167 168 169 170 171 172 173 174 175 176 177 178 179 180 181 182 183 184 185 186 187 188 189 190 191 192 193 194 195 196 197 198 199 200 201 202 203 204 205 206 207 208 209 210 211 212 213 214 215 216 217 218 219 220 221 222 223 224 225 226 227 228 229 230 231 232 233 234 235 236 237 238 239 240 241 242 243 244 245 246 247 248 249 250 251 252 253 254 255 256 257 258 259 260 261 262 263 264 265 266 267 268 269 270 271 272 273 274 275 276 277 |
/* Rui Santos Complete project details at https://RandomNerdTutorials.com/cloud-mqtt-mosquitto-broker-access-anywhere-digital-ocean/ Permission is hereby granted, free of charge, to any person obtaining a copy of this software and associated documentation files. The above copyright notice and this permission notice shall be included in all copies or substantial portions of the Software. */ #include <WiFi.h> extern «C» { #include «freertos/FreeRTOS.h» #include «freertos/timers.h» } #include <AsyncMqttClient.h> #define WIFI_SSID «УКАЖИТЕ_СВОЙ_SSID» #define WIFI_PASSWORD «УКЖИТЕ_ПАРОЛЬ_СЕТИ» // Указываем IP адрес дроплета #define MQTT_HOST IPAddress(XXX, XXX, XXX, XXX) // Для облачного брокера вводим доменное имя //#define MQTT_HOST «example.com» #define MQTT_PORT 1883 #define MQTT_USERNAME «ВВЕДИТЕ_ЛОГИН_БРОКЕРА» #define MQTT_PASSWORD «УКАЖИТЕ_ПАРОЛЬ_БРОКЕРА» // Тестируем брокера #define MQTT_PUB_TEST «test» AsyncMqttClient mqttClient; TimerHandle_t mqttReconnectTimer; TimerHandle_t wifiReconnectTimer; unsigned long previousMillis = 0; // Переменная хранит время //последнего снятия показаний температуры const long interval = 5000; // Задаёт интервал, через который //публикуются показания датчика int i = 0; void connectToWifi() { Serial.println(«Connecting to Wi-Fi…»); WiFi.begin(WIFI_SSID, WIFI_PASSWORD); } void connectToMqtt() { Serial.println(«Connecting to MQTT…»); mqttClient.connect(); } void WiFiEvent(WiFiEvent_t event) { Serial.printf(«[WiFi-event] event: %dn», event); switch(event) { case SYSTEM_EVENT_STA_GOT_IP: Serial.println(«WiFi connected»); Serial.println(«IP address: «); Serial.println(WiFi.localIP()); connectToMqtt(); break; case SYSTEM_EVENT_STA_DISCONNECTED: Serial.println(«WiFi lost connection»); xTimerStop(mqttReconnectTimer, 0); //при попытке переподключения к WiFi //система не будет пытаться подключиться к MQTT xTimerStart(wifiReconnectTimer, 0); break; } } void onMqttConnect(bool sessionPresent) { Serial.println(«Connected to MQTT.»); Serial.print(«Session present: «); Serial.println(sessionPresent); } void onMqttDisconnect(AsyncMqttClientDisconnectReason reason) { Serial.println(«Disconnected from MQTT.»); if (WiFi.isConnected()) { xTimerStart(mqttReconnectTimer, 0); } } /*void onMqttSubscribe(uint16_t packetId, uint8_t qos) { Serial.println(«Subscribe acknowledged.»); Serial.print(» packetId: «); Serial.println(packetId); Serial.print(» qos: «); Serial.println(qos); } void onMqttUnsubscribe(uint16_t packetId) { Serial.println(«Unsubscribe acknowledged.»); Serial.print(» packetId: «); Serial.println(packetId); }*/ void onMqttPublish(uint16_t packetId) { Serial.print(«Publish acknowledged.»); Serial.print(» packetId: «); Serial.println(packetId); } void setup() { Serial.begin(115200); Serial.println(); mqttReconnectTimer = xTimerCreate(«mqttTimer», pdMS_TO_TICKS(2000), pdFALSE, (void*)0, reinterpret_cast<TimerCallbackFunction_t>(connectToMqtt)); wifiReconnectTimer = xTimerCreate(«wifiTimer», pdMS_TO_TICKS(2000), pdFALSE, (void*)0, reinterpret_cast<TimerCallbackFunction_t>(connectToWifi)); WiFi.onEvent(WiFiEvent); mqttClient.onConnect(onMqttConnect); mqttClient.onDisconnect(onMqttDisconnect); /*mqttClient.onSubscribe(onMqttSubscribe); mqttClient.onUnsubscribe(onMqttUnsubscribe);*/ mqttClient.onPublish(onMqttPublish); mqttClient.setServer(MQTT_HOST, MQTT_PORT); mqttClient.setCredentials(MQTT_USERNAME, MQTT_PASSWORD); connectToWifi(); } void loop() { unsigned long currentMillis = millis(); // Каждые X секунд (у нас интервал 5 секунд) // публикует новое сообщение if (currentMillis — previousMillis >= interval) { // Сохраняем время последней публикации previousMillis = currentMillis; String testString = «Hello, world! #» + String(i); // Публикуем тестовое сообщение uint16_t packetIdPub1 = mqttClient.publish(MQTT_PUB_TEST, 1, true, String(testString).c_str()); Serial.printf(«Publishing on topic %s at QoS 1, packetId: %i», MQTT_PUB_TEST, packetIdPub1); Serial.printf(» Message: %.2f n», testString); i++; } } |
Для работы кода введите учетные данные сети в этих строках:
|
#define WIFI_SSID «УКАЖИТЕ_СВОЙ_SSID» #define WIFI_PASSWORD «УКАЖИТЕ_ПАРОЛЬ” |
Вводим IP адрес дроплета ( в нашем случае 178.62.83.231).
|
#define MQTT_HOST IPAddress(178, 62, 83, 231) |
Если ваш брокер требует авторизации, то вводим логин и пароль:
|
#define MQTT_USERNAME «ЛОГИН» #define MQTT_PASSWORD «ПАРОЛЬ» |
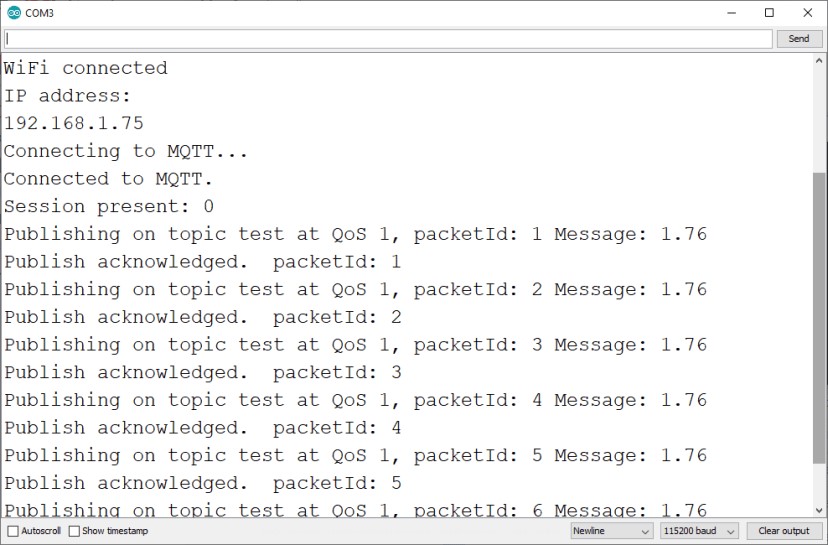
Тестирование публикации сообщений платой
Если вы загрузили код и открыли монитор порта, вы увидите, что плата публикует сообщения каждые 5 секунд:
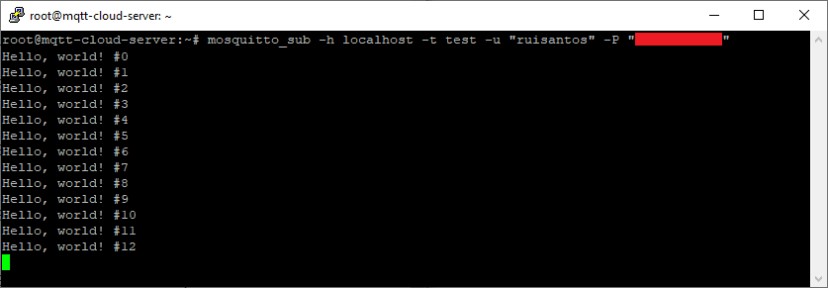
Установите SSH соединение с помощью SSH клиента (например, PuTTY) и введите:
|
mosquitto_sub —h localhost —t test —u «YOUR_USER» —P «YOUR_PASSWORD» |
Вы должны начать получать сообщения, опубликованные вашей платой:
Подписка на топик брокера
Следующий скетч реализует подписку платы к облачному брокеру для получения сообщения. Скопируйте его в свою среду разработки, укажите свои учетные данные сети, IP адрес дроплета, логин и пароль брокера.
|
1 2 3 4 5 6 7 8 9 10 11 12 13 14 15 16 17 18 19 20 21 22 23 24 25 26 27 28 29 30 31 32 33 34 35 36 37 38 39 40 41 42 43 44 45 46 47 48 49 50 51 52 53 54 55 56 57 58 59 60 61 62 63 64 65 66 67 68 69 70 71 72 73 74 75 76 77 78 79 80 81 82 83 84 85 86 87 88 89 90 91 92 93 94 95 96 97 98 99 100 101 102 103 104 105 106 107 108 109 110 111 112 113 114 115 116 117 118 119 120 121 122 123 124 125 126 127 128 129 130 131 132 133 134 135 136 137 138 139 140 141 142 143 144 145 146 147 148 149 150 151 152 153 154 155 156 157 158 159 160 161 162 163 164 165 166 167 168 169 170 171 172 173 174 175 176 177 178 179 180 181 182 183 184 185 186 187 188 189 190 191 192 193 194 195 196 197 198 199 200 201 202 203 204 205 206 207 208 209 210 211 212 213 214 215 216 217 218 219 220 221 222 223 224 225 226 227 228 229 230 231 232 233 234 235 236 237 238 239 240 241 242 243 244 245 246 247 248 249 250 251 252 253 254 255 256 257 258 259 260 261 262 263 264 265 266 267 268 269 270 271 272 273 274 275 276 277 278 279 280 281 282 283 284 285 286 287 288 289 290 291 292 293 294 295 296 297 298 299 300 301 302 303 304 305 306 307 308 309 310 311 312 313 314 315 316 317 318 319 320 321 322 323 324 325 326 |
/* Rui Santos Complete project details at https://RandomNerdTutorials.com/cloud-mqtt-mosquitto-broker-access-anywhere-digital-ocean/ Permission is hereby granted, free of charge, to any person obtaining a copy of this software and associated documentation files. The above copyright notice and this permission notice shall be included in all copies or substantial portions of the Software. */ #include <WiFi.h> extern «C» { #include «freertos/FreeRTOS.h» #include «freertos/timers.h» } #include <AsyncMqttClient.h> #define WIFI_SSID «УКАЖИТЕ_СВОЙ_SSID» #define WIFI_PASSWORD «УКАЖИТЕ_ПАРОЛЬ» // Указываем IP адрес брокера #define MQTT_HOST IPAddress(XXX, XXX, XXX, XXX) // Для облачного брокера указываем доменное имя //#define MQTT_HOST «example.com» #define MQTT_PORT 1883 #define MQTT_USERNAME «УКАЖИТЕ_ЛОГИН_БРОКЕРА» #define MQTT_PASSWORD «УКАЖИТЕ_ПАРОЛЬ_БРОКЕРА» // Тестируем брокера #define MQTT_SUB_TEST «test» AsyncMqttClient mqttClient; TimerHandle_t mqttReconnectTimer; TimerHandle_t wifiReconnectTimer; unsigned long previousMillis = 0; // Хранит последнее время публикации const long interval = 5000; // Интервал публикации показаний int i = 0; void connectToWifi() { Serial.println(«Connecting to Wi-Fi…»); WiFi.begin(WIFI_SSID, WIFI_PASSWORD); } void connectToMqtt() { Serial.println(«Connecting to MQTT…»); mqttClient.connect(); } void WiFiEvent(WiFiEvent_t event) { Serial.printf(«[WiFi-event] event: %dn», event); switch(event) { case SYSTEM_EVENT_STA_GOT_IP: Serial.println(«WiFi connected»); Serial.println(«IP address: «); Serial.println(WiFi.localIP()); connectToMqtt(); break; case SYSTEM_EVENT_STA_DISCONNECTED: Serial.println(«WiFi lost connection»); xTimerStop(mqttReconnectTimer, 0); // при переподключении к WiFi // система не переподключается к MQTT xTimerStart(wifiReconnectTimer, 0); break; } } // Добавляем топики, на которые нужно подписать плату void onMqttConnect(bool sessionPresent) { Serial.println(«Connected to MQTT.»); Serial.print(«Session present: «); Serial.println(sessionPresent); // Подписываем плату на тестовый топик uint16_t packetIdSub = mqttClient.subscribe(MQTT_SUB_TEST, 0); Serial.println(«Subscribing at QoS 0»); } void onMqttDisconnect(AsyncMqttClientDisconnectReason reason) { Serial.println(«Disconnected from MQTT.»); if (WiFi.isConnected()) { xTimerStart(mqttReconnectTimer, 0); } } void onMqttSubscribe(uint16_t packetId, uint8_t qos) { Serial.println(«Subscribe acknowledged.»); Serial.print(» packetId: «); Serial.println(packetId); Serial.print(» qos: «); Serial.println(qos); } void onMqttUnsubscribe(uint16_t packetId) { Serial.println(«Unsubscribe acknowledged.»); Serial.print(» packetId: «); Serial.println(packetId); } // Вы можете изменить эту функцию для получения информации о конкретном //сообщении в конкретном топике void onMqttMessage(char* topic, char* payload, AsyncMqttClientMessageProperties properties, size_t len, size_t index, size_t total) { String messageTemp; for (int i = 0; i < len; i++) { //Serial.print((char)payload[i]); messageTemp += (char)payload[i]; } // Проверяем наличие новых сообщений if (strcmp(topic, MQTT_SUB_TEST) == 0) { Serial.println(«TRUE»); } Serial.println(«Publish received.»); Serial.print(» message: «); Serial.println(messageTemp); Serial.print(» topic: «); Serial.println(topic); Serial.print(» qos: «); Serial.println(properties.qos); Serial.print(» dup: «); Serial.println(properties.dup); Serial.print(» retain: «); Serial.println(properties.retain); Serial.print(» len: «); Serial.println(len); Serial.print(» index: «); Serial.println(index); Serial.print(» total: «); Serial.println(total); } /*void onMqttPublish(uint16_t packetId) { Serial.print(«Publish acknowledged.»); Serial.print(» packetId: «); Serial.println(packetId); }*/ void setup() { Serial.begin(115200); Serial.println(); mqttReconnectTimer = xTimerCreate(«mqttTimer», pdMS_TO_TICKS(2000), pdFALSE, (void*)0, reinterpret_cast<TimerCallbackFunction_t>(connectToMqtt)); wifiReconnectTimer = xTimerCreate(«wifiTimer», pdMS_TO_TICKS(2000), pdFALSE, (void*)0, reinterpret_cast<TimerCallbackFunction_t>(connectToWifi)); WiFi.onEvent(WiFiEvent); mqttClient.onConnect(onMqttConnect); mqttClient.onDisconnect(onMqttDisconnect); mqttClient.onSubscribe(onMqttSubscribe); mqttClient.onUnsubscribe(onMqttUnsubscribe); //mqttClient.onPublish(onMqttPublish); mqttClient.onMessage(onMqttMessage); mqttClient.setServer(MQTT_HOST, MQTT_PORT); // Указываем логин и пароль брокера mqttClient.setCredentials(MQTT_USERNAME, MQTT_PASSWORD); connectToWifi(); } void loop() { } |
Для работы кода введите учетные данные сети в этих строках:
|
#define WIFI_SSID «УКАЖИТЕ_СВОЙ_SSID» #define WIFI_PASSWORD «УКАЖИТЕ_ПАРОЛЬ” |
Вводим IP адрес дроплета ( в нашем случае 178.62.83.231).
|
#define MQTT_HOST IPAddress(178, 62, 83, 231) |
Если ваш брокер требует авторизации, то вводим логин и пароль:
|
#define MQTT_USERNAME «ЛОГИН» #define MQTT_PASSWORD «ПАРОЛЬ» |
Тестируем подписку платы на топик
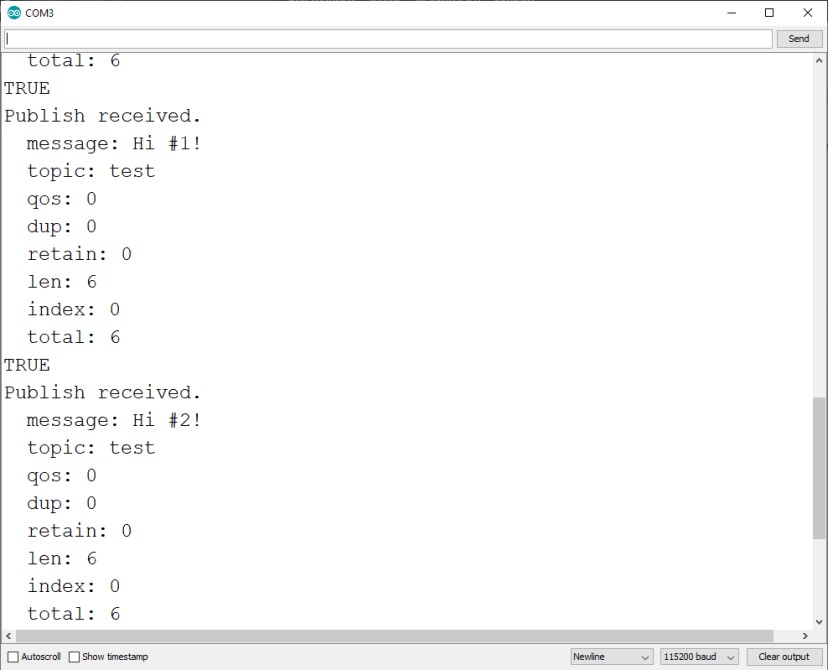
Для проверки получения сообщений платой запустите консоль на сервере и отправьте несколько разных сообщений:
|
mosquitto_pub —h localhost —t test —m «Hi #1!» —u «ruisantos» —P «YOUR_PASSWORD» mosquitto_pub —h localhost —t test —m «Hi #2!» —u «ruisantos» —P «YOUR_PASSWORD» mosquitto_pub —h localhost —t test —m «Hi #3!» —u «ruisantos» —P «YOUR_PASSWORD» |
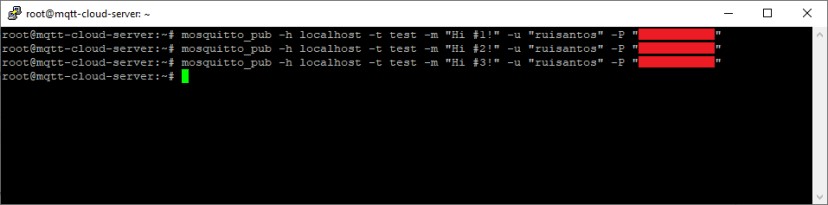
Ваша плата должна получать эти сообщения и выводить их в монитор порта:
В этих примерах мы разобрали. как публиковать сообщения и подписываться на топики с помощью облачного брокера. Идея в том, чтобы использовать разные платы для публикации и приема сообщений для взаимодействия между платами.
Заключение
В этом руководстве мы разобрали как работает протокол MQTT и брокеры, а также что нужно сделать для публикации и приема сообщений на платах ESP32.
Если у вас неправильно работает сервер или брокер, вы можете написать в поддержку Digital Ocean (у них очень активная техподдержка).
Данный материал был переведен с сайта RandomNerdTutorials.com. Авторские права принадлежат ее автору — Rui Santos. Автор продает очень полезные и толковые курсы по ESP8266 / ESP32 (на английском языке), ознакомиться с которыми можно по ссылке.
Вопросы по прошивке и работе с кодом лучше писать напрямую автору в комментариях к статье (на англ. языке)
