Сообщение «failed to initialize Steam» часто появляется при запуске PUBG, CS GO, GTA 5 и других игр. Распространенные причины:
- повреждение файлов игры;
- неправильная установка системных библиотек;
- плохая оптимизация кода игры со стороны разработчика.
Расскажем о четырех способах решения проблемы.
Важно: если ошибка появилась после очередного обновления, сначала ничего не делайте – просто подождите. Скорее всего разработчик в ближайшие часы выпустит патч, который все исправит.
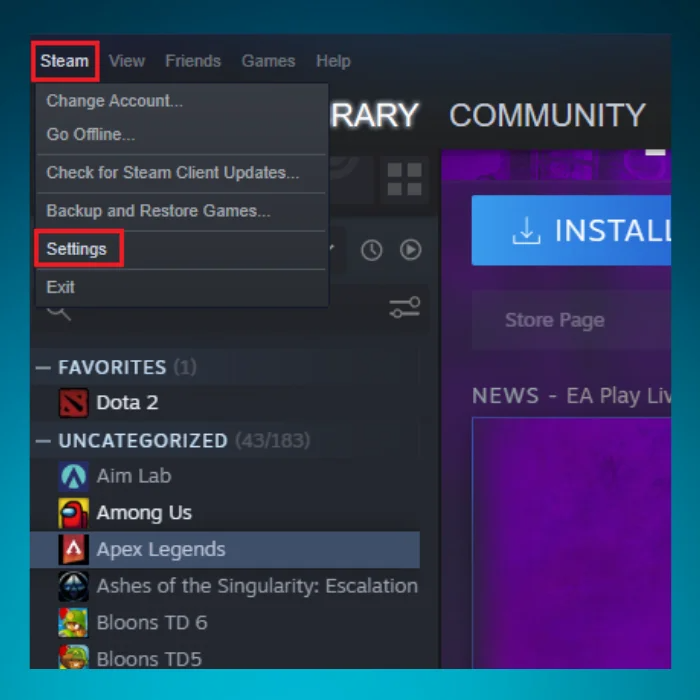
Способ 1. Перезапустите Steam
Простой перезапуск Steam решает проблему в 50% случаев. Кликните по значку программы в системном трее и выберите «Выход».
![Как исправить ошибку [failed to initialize Steam]](https://steam-ru.ru/img/screenshots/15/1.jpg "Как исправить ошибку [failed to initialize Steam]")
Затем заново откройте клиент. После старта он может начать скачивать файлы обновлений – это нормально. Дождитесь окончания процесса и пробуйте запустить игру.
Если это не помогло, перезагрузите компьютер, и попробуйте запустить игру снова.
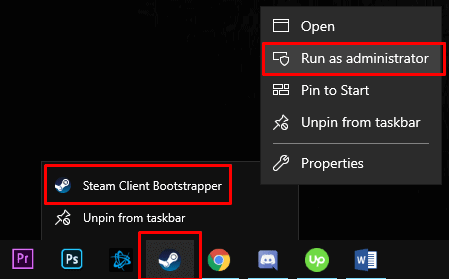
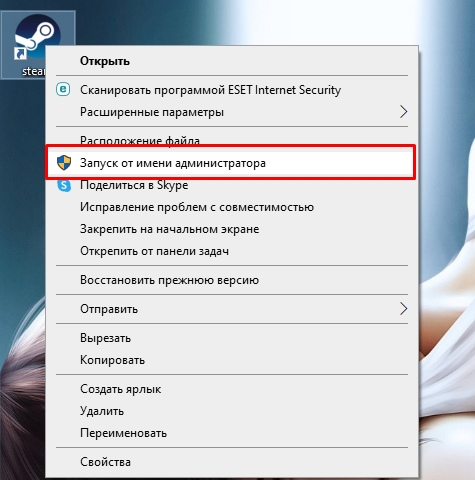
Способ 2. Войдите в Steam с правами администратора
Кликните правой кнопкой мыши по значку программы и выберите команду «Запуск от имени администратора».

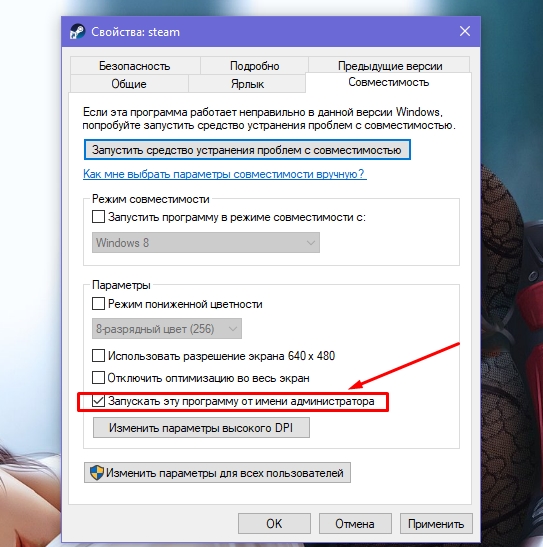
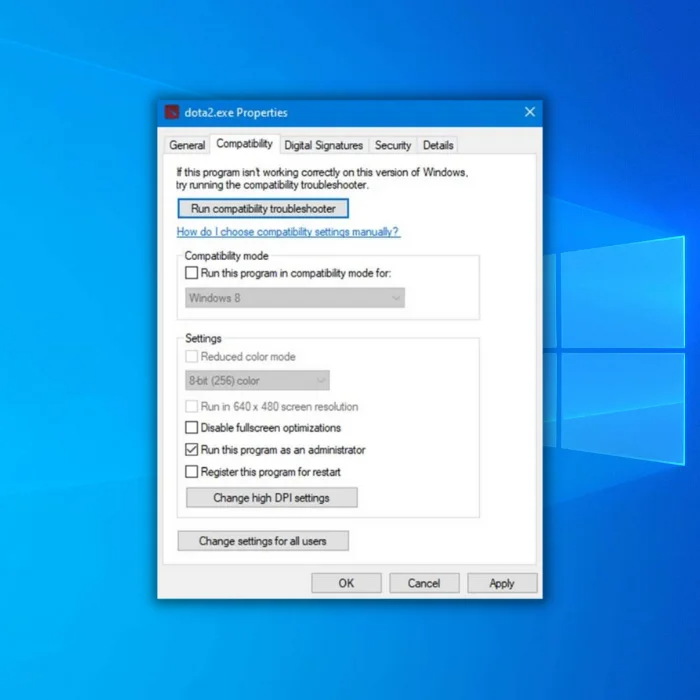
Попробуйте поиграть. Если проблема решилась, можно сделать так, чтобы Steam работал с правами администратора всегда. Перейдите в папку с программой, кликните правой кнопкой мыши по файлу Steam.exe и выберите «Свойства». Затем перейдите в раздел «Совместимость», отметьте пункт «Запускать эту программу от имени администратора» и нажмите «Применить».

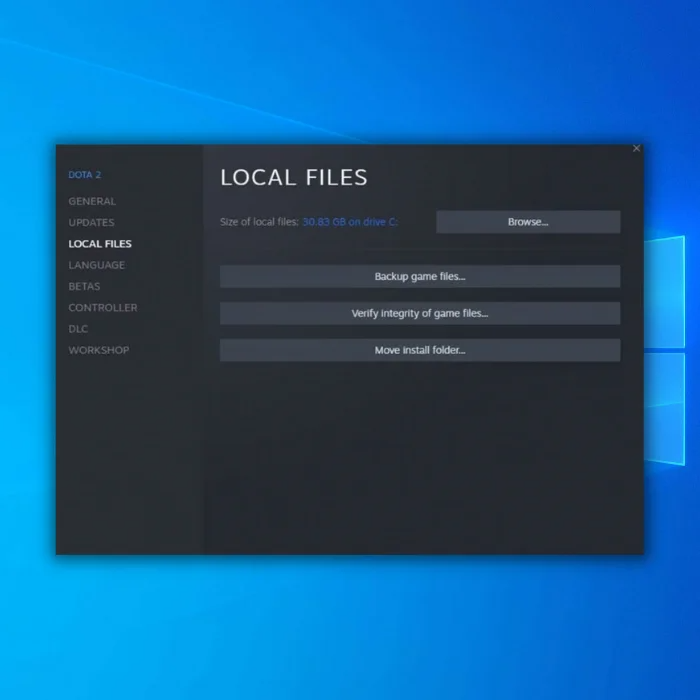
Примечание: вы можете выставить права администратора и для самой игры. Для этого проделайте аналогичные действия с файлом .exe, который ее запускает. Быстрый способ его найти – открыть свойства игры в библиотеке Steam, перейти во вкладку «Локальные файлы» и нажать кнопку «Просмотреть локальные файлы».
Способ 3. Проверьте файлы – не повреждены ли они
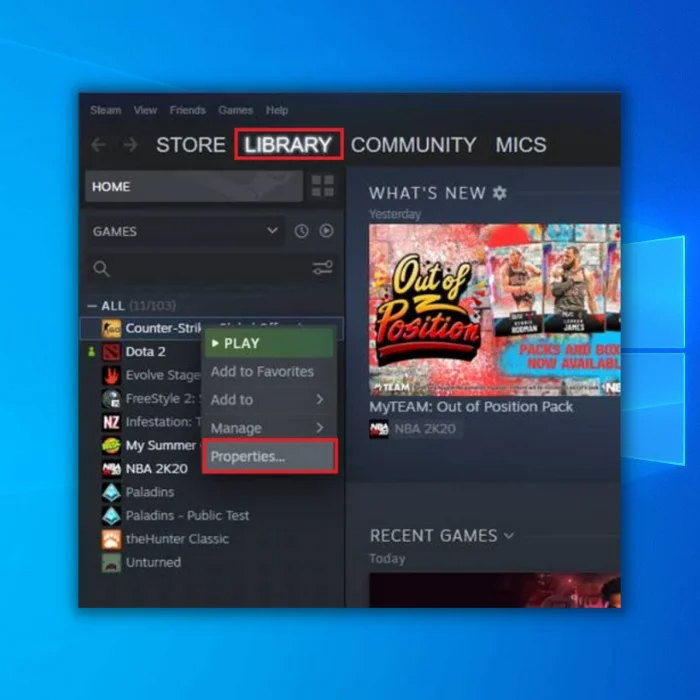
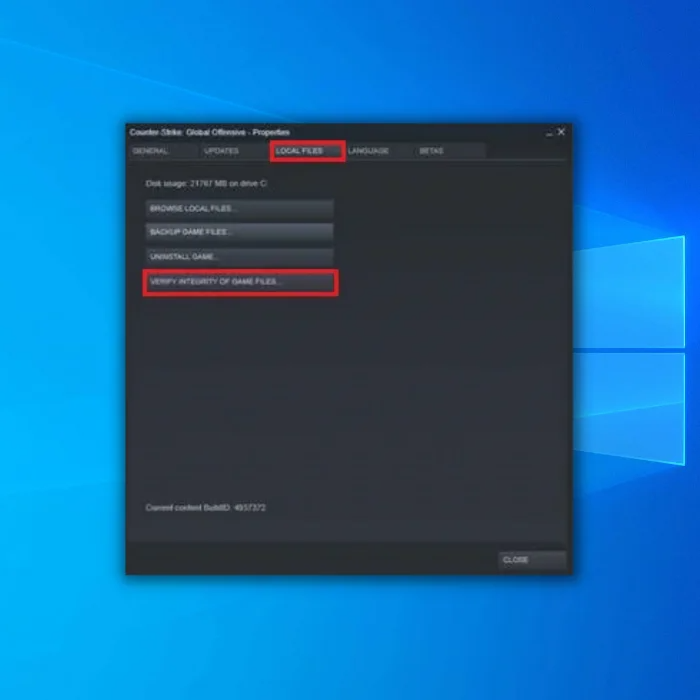
Откройте библиотеку в клиенте Steam, кликните правой кнопкой мыши по названию неработающей игры и выберите «Свойства».

В появившемся окне откройте раздел «Локальные файлы» и кликните по кнопке «Проверить целостность файлов…».

Дождитесь окончания проверки. Программа заменит поврежденные файлы автоматически, если такие будут обнаружены. Перезагружать компьютер после этого не обязательно.
Способ 4. Переустановите игру
Если предыдущие способы не помогли, попробуйте переустановить игру. Кликните по ее названию в библиотеке правой кнопкой мыши и выберите «Удалить».

В следующем окне нажмите «Удалить» еще раз. Дождитесь окончания процесса деинсталляции, затем перезагрузите компьютер. После этого установите игру снова и попробуйте ее запустить.
Важно: возможно, перед первым запуском появится окно с предложением установить или обновить Microsoft Visual c++ Redistributable или другой компонент Windows. Обязательно соглашайтесь, не отменяйте процесс.
Также вы можете переустановить требуемые библиотеки и компоненты самостоятельно. Их инсталляторы хранятся в папке с игрой (…Steamsteamappscommonназвание_игры). Зайдите в эту папку и установите их по очереди.
Ошибка Не удалось подключиться к сети Steam (или Could Not Connect To Steam Network) устраняется стандартно: проверяем подключение и перезапускаем Steam. Но иногда это не помогает…
То есть, и со связью вроде как всё ОК, и клиент нормально перезапустился. И даже комп и роутер для пущей надежности перезагружены. А ошибка ‘Не удалось подключиться к сети Steam‘ всё равно никуда не девается.
Если угораздило оказаться именно в такой ситуации, то сейчас будем рассказывать, как из неё выпутываться.
Итак,..
что делать, когда ‘ Не удалось подключиться к сети Steam ‘ и никакие перезагрузки не помогают
Значит, по порядку:
#1 — перезапускаем клиент Steam и Bootstrapper Server
А для этого:
- открываем Диспетчер задач (Ctrl+Shift+Esc);
- в списке приложений находим и закрываем Steam Launcher (кнопка «Снять задачу«);
- ниже в списке процессов находим и точно так же закрываем прогу Steam Client Bootstrapper;
- после этого запускаем Steam и проверяем результат.
Если ошибка повторяется снова, то идем дальше:
Не пропустите: НЕОФИЦИАЛЬНЫЕ, ПИРАТСКИЕ И ПР: КАК СТАВИТЬ НА STEAM DECK ИГРУШКИ НЕ ИЗ МАГАЗИНА
#2 — перепрописываем адрес Steam в системе
Делаем следующее:
- на Панели задач или в меню «Пуск» находим значок Steam, кликаем по нему правой кнопкой мыши и далее жмем «Свойства«;
- в окне свойств переходим во вкладку «Ярлык«;
- находим поле «Объект» и в нем к адресу расположения exe-файла Steam, в самом конце ставим пробел и далее дописываем -tcp
- жмем «Применить«.
Снова запускаем Steam. Если опять видим ошибку Не удалось подключиться к сети Steam, то далее
#3 — сбрасываем IP
- открываем командную строку Windows (в строке поиска меню «Пуск» вводим cmd, далее в результатах выше кликаем правой кнопкой мыши по «Командная строка» и в меню жмем «Запуск от имени администратора»);
- в окне командной строки вводим команду Ipconfig /flushdns и жмем Enter — система в ответ должна выдать «Кэш сопоставителя DNS успешно очищен«;
- после этого там же вводим команду Ipconfig /registerdns, жмем Enter и дожидаемся завершения процедуры настройки;
- ну и наконец вводим команду Ipconfig /renew, жмем Enter и проверяем, как будет работать Steam.
Не пропустите: STEAM ЧАТ: КАК СДЕЛАТЬ, ЧТОБЫ САМ ОН БОЛЬШЕ НЕ ОТКРЫВАЛСЯ
Если и после этого он нормально работать не желает, то в таком случае
#4 — чистим кэш и переустанавливаем клиент Steam
Процедура стандартная:
- полностью закрываем Steam (лучше, через Диспетчер задач);
- на Панели задач или в меню «Пуск» находим значок Steam, кликаем по нему правой кнопкой мыши и далее жмем «Свойства«;
- в окне свойств переходим во вкладку «Ярлык» и жмем кнопку «Расположение файла«;
- из папки приложение удаляем папки app cache, bin и config;
Важно! Но НЕ УДАЛЯЕМ файлы:
Steamapps
Userdata
Skins
Steam.exe
ssfn…
- запускаем steam.exe и дожидаемся, когда клиент докачает все нужные файлы и обновится.
Теперь всё должно заработать.
Войти
Магазин
Сообщество
Поддержка
Изменить язык
Полная версия
![]()
© Valve Corporation. Все права защищены. Все торговые марки являются собственностью соответствующих владельцев в США и других странах.
Политика конфиденциальности
| Правовая информация
| Соглашение подписчика Steam
| #footer_refunds

![]()
![]()
МАГАЗИН
СООБЩЕСТВО
О STEAM
ПОДДЕРЖКА
Установить Steam
войти
|
язык

© 2023 Valve Corporation. Все права защищены. Все торговые марки являются собственностью соответствующих владельцев в США и других странах.
НДС включён во все цены, где он применим.
Политика конфиденциальности
|
Правовая информация
|
Соглашение подписчика Steam
О Valve
| Steamworks
| Вакансии
| Дистрибуция Steam
| Подарочные карты
Steam is the largest video game distribution platform in the world, offering many amazing features and endless hours of fun, but as expected, comes with its own set of flaws.
Like many other computer programs, Steam might eventually greet you with the misfortune of an unexpected error just when you’re about to do something important, such as downloading a new game.
One of the most infamous errors users experience on Steam is the “Could not connect to Steam Network” error, also known for the “Steam Not Connecting” message in the error panel.
In this guide, you will find everything you need to fix this Steam connection problem in 2023.

Note that this error may often be on Steam's end (caused by irregular server maintenance or other issues), in which case there's not much you can do to fix it.

We recommend checking Down Detector's Steam page to ensure you don't spend time trying to solve a problem that's not on your end.
Fix 1: Check Your Internet Connection
It might sound obvious, but a poor internet connection may be why you cannot connect to the Steam Network.
It’s easy for a connection error to go unnoticed at times, so your internet access might already have failed before you tried loading Steam in the first place.

It’s worth crossing this one off the list before moving on to the other fixes below.
Do not waste your time re-installing the client or doing anything else if the issue is related to your internet connection.
Fix 2: Run Steam Client As An Administrator
We recommend trying this as the second solution on the list as it’s also a straightforward method that doesn’t take much time but managed to solve the problem for other users.
Simply right-click the Steam shortcut and choose the “Run as Administrator” option, then log in to your account.
Some users noted that a lack of administrator rights can cause Steam to behave strangely, sometimes resulting in problems such as the “Could Not Connect To Steam Network” error reported by many.
This will most likely work for you, as it has worked for numerous other users. You can see the necessary steps below:

Fix 3: Change UDP To TCP In Your Steam Executable File
Another well-known fix for the “Could not connect to Steam Network” error is to change how your computer communicates with the Steam network from the UDP protocol to TCP. It may sound daunting at first, but don’t worry, it’s actually really easy to do.
Here is how you do it:
Find the directory where Steam is installed on your computer, then right-click the Steam shortcut and select “Properties.”

In the Properties window, navigate to the “Shortcut” tab, as shown in the screenshot below. This will sometimes be selected automatically.

In the “Target” section, add “-tcp” to the end of what’s already written in the field. Remember to click “Apply” before pressing “OK.”
Remember to do this while the Steam app isn’t running. Once you complete the process, rerun Steam and log into your account. The problem should be fixed.
For The Curious
If you’re technically minded, you might want to know what changes when you switch from UDP to TCP.
Read on for the explanation. Skip this section if you only want to solve the problem and aren’t interested in the tech part.
By adding the “-tcp” suffix, you force Steam to use TCP Packets for your connection exclusively. There are two primary types of packets used to send data over the net. UDP (User Datagram Protocol) and TCP (Transmission Control Protocol). Steam uses UDP unless you tell it otherwise.
What are the main differences between TCP and UDP?
TCP means that, after the connection is established, the built-in systems check for errors and ensure data will be successfully transferred. It is more reliable, but it’s also slower and results in greater bandwidth and network usage.
UDP, on the other hand, doesn’t use the “handshake” method. This means data transfer always happens, regardless of whether or not the intended recipient receives it.
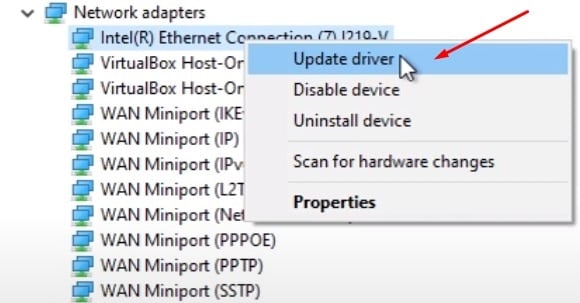
Fix 4: Make Sure Your Network Drivers Are Up To Date
Using outdated drivers for any PC component is a potential issue and can significantly impact performance. To make the most of your hardware, you should always ensure that all of your drivers are up to date!
Steam users have reported that updating your network drivers can fix the “Could not connect to Steam Network” issue.
We will explain how to achieve this, step by step.
Manually updating your drivers is recommended but not always necessary. If you aren’t very tech-savvy or you simply can’t be bothered, use an automatic driver update software instead.
If you decide to update manually, here is how you do it:
Use the search box on your Windows taskbar and type in “Device Manager,” as shown in the screenshot below. Click the top result that appears.

Once inside the Device Manager section, left-click the “Network Adapters” tab. The menu will automatically drop down, and you can select the adapter you want to update the driver for.
Right-click the adapter and select “Update driver.” You should see a menu similar to the screenshot below.
Fix 5: Uninstall The Steam Client And Re-Install It
Sometimes, the simplest solutions help the most. However, before you re-install the Steam app, you need to back up your games.
Steam is not a large app by itself, but re-downloading all of your games and their latest updates or DLCs can consume more than a terabyte of download data if you have a rich collection.
We suggest looking at our detailed Steam game backup guide if you haven’t done this before.
Once you complete the backup, re-installing Steam is very easy.
Simply uninstall the client from the control panel and re-download its latest version from the official Steam website.
If you already have an installation file downloaded, you can use that instead. It doesn’t make much difference, as the app automatically downloads the latest version and updates itself on launch, and you can also save some bandwidth which is a nice bonus.

We also recommend restarting your computer after uninstalling Steam and when you install it again.
Conclusion
Getting excited to play a game only to be greeted by the common “Could not connect to Steam Network” error can be a frustrating experience. However, you shouldn’t feel discouraged as this is a well-known issue among the Steam community, and you’re not alone with it.
In this guide, we put together simple solutions found to be of great use to many users, so hopefully, they’ll solve your problem too.
Last but not least, it’s worth noting that the Steam network will sometimes be down for regular or unexpected maintenance. If none of the above fixes solve your problem, the issue may be on Steam’s end, as already mentioned above.
PSA: Regular Steam maintenance takes place on Tuesdays.
Failed to initialize Steam – невероятно популярная ошибка, возникающая в клиенте дистрибуции Steam. Появляется данная ошибка сразу же после запуска той или иной игры из библиотеки пользователя. Этой игрой может оказаться GTA 5, PUGB или Dota 2 – буквально любая игра. В сегодняшней статье мы попытаемся разъяснить вам, как избавляться от ошибки Failed to initialize Steam, когда та возникает на вашем компьютере.
«Failed to initialize Steam»: способы по устранению ошибки

Способ №1 Перезапуск Steam
Самый элементарный, тем не менее эффективный способ – перезапуск Steam. В клиенте данного магазина частенько возникают всевозможные баги, проблемы или ошибки, но решается все крайне просто – обычным перезапуском. Попробуйте перезапустить клиент Steam, а затем запустите нужную вам игру, чтобы проверить, была ли устранена ошибка «Failed to initialize Steam».
Способ №2 Запуск от имени Администратора
Следующий способ – запуск клиента Steam от имени Администратора. Огромное множество пользователей по всему миру утверждают, что избавиться от ошибки «Failed to initialize Steam» можно попросту запустив клиент с правами администраторской учетной записи системы. Чтобы это сделать, вам нужно следующее:
- закрыть работающий клиент Steam;
- пройти в корневую папку клиента Steam;
- найти там исполнительный файл Steam.exe;
- нажать правой кнопкой мыши на этот файл и выбрать «Запуск от имени Администратора».
Попробуйте запустить нужную игру из вашей библиотеки еще раз. Возможно, ошибка «Failed to initialize Steam» на этот раз исчезнет.
Способ №3 Проверка целостности файлов игры
Порой, ошибка «Failed to initialize Steam» может быть вызвана повреждением файлов запускаемой вами игры. Проверить это крайне просто с помощью встроенной в клиент Steam проверки целостности файлов игры. Чтобы запустить проверку, вам потребуется сделать следующее:
- запустите Steam;
- войдите в библиотеку игр и найдите нужную вам;
- нажмите на нее правой кнопкой мыши и перейдите в «Свойства»;
- перейдите во вкладку «Локальные файлы»;
- нажмите на кнопку «Проверить целостность файлов игры…».
Как только будет нажата вышеуказанная кнопка, перед вами появится маленькое окошко с прогрессом проверки файлов игры. Если какие-то файлы игры не пройдут проверки, то они будут повторно загружены. В свою очередь, если какие-то файлы не прошли проверки и были повторно загружены – попробуйте вновь открыть нужную вам игру, чтобы проверить наличие ошибки «Failed to initialize Steam».

Steam – удобная игровая платформа, которая пользуется огромной популярностью у геймеров со всего мира. Она дает доступ к каталогу платных/бесплатных игр, позволяет оплачивать подписки на любимые проекты удобным способом, продавать внутриигровые предметы (например, скины из CS:GO или Dota 2) и многое другое. В целом, можно сказать, что Steam не имеет недостатков, за исключением одного – иногда в работе программы возникают сбои, из-за чего пользователь не может запустить ее на своем компьютере. В этом гайде мы расскажем, почему не запускается Стим, что делать в этом случае и как исправить различные ошибки.
Содержание:
- 1. Не запускается Steam на Windows 7, 8, 10 и 11 – закрываем активные процессы в диспетчере задач
- 2. Не открывается Стим – запускаем от имени администратора
- 3. Проблемы с запуском Steam на Windows 7, 8, 10 и 11 – обновляем систему
- 4. Программы, которые мешают запустить Стим
- 5. Не работает Стим – переустанавливаем программу
- 6. Исправляем ошибки Steam, которые не позволяют запустить программу
- 7. Не работает Steam – другие способы решения проблемы
1. Не запускается Steam на Windows 7, 8, 10 и 11 – закрываем активные процессы в диспетчере задач
Во время своей работы Steam может запускать различные дополнительные процессы, которые отображаются в диспетчере задач. Иногда они не завершаются автоматически после выхода из программы, из-за чего та не открывается повторно – после клика по ярлыку Стима ничего не происходит.
Если вы ранее нормально пользовались приложением, а теперь не можете войти в него, проверьте, не остались ли в диспетчере задач активные процессы, связанные со Steam:
- Нажмите на клавиатуре сочетание клавиш Ctrl + Alt + Delete. В появившемся окне выберите «Диспетчер задач».
- Перейдите на вкладку «Процессы» и отыщите все, что связано со Steam. Обычно нужные процессы называются steam.exe. Далее кликните по выбранному процессу правой кнопкой мышки и нажмите на строчку «Снять задачу». Сделайте это со всеми активными процессами Стима, которые есть в диспетчере задач.

- После этого дважды кликните по ярлыку программы. Все должно заработать.
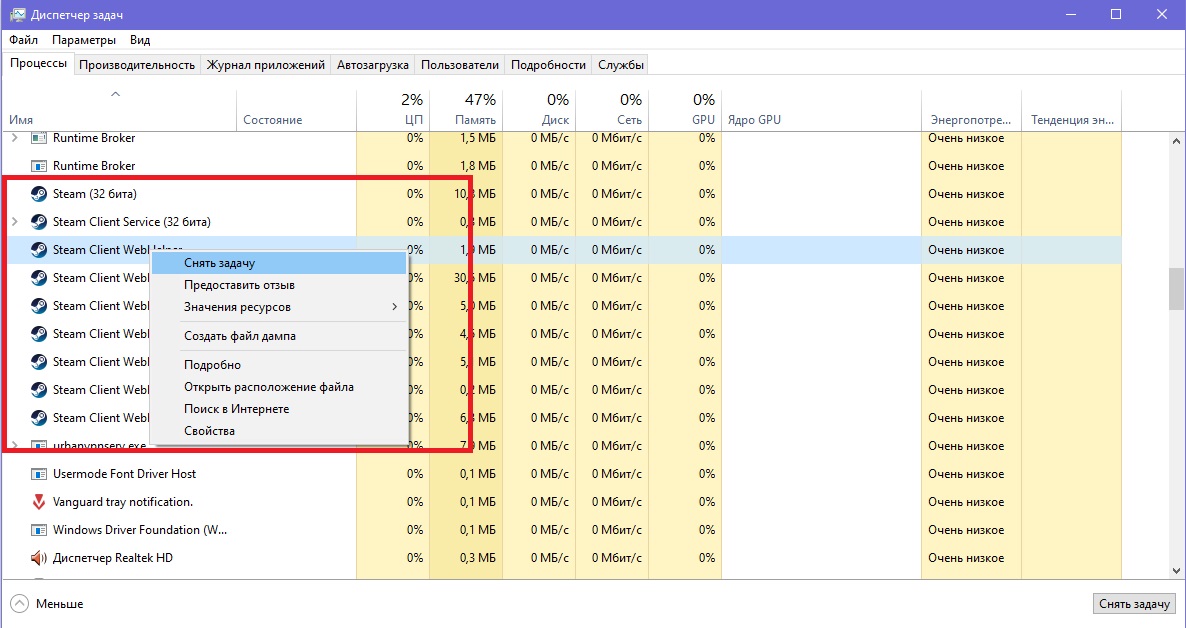
Также вы можете завершить все процессы steam.exe c помощью этой команды:
taskkill /f /IM steam.exe
Чтобы использовать ее, вам нужно вставить указанный выше текст в строку поиска на компьютере. Как только вы нажмете Enter, все процессы Steam завершатся.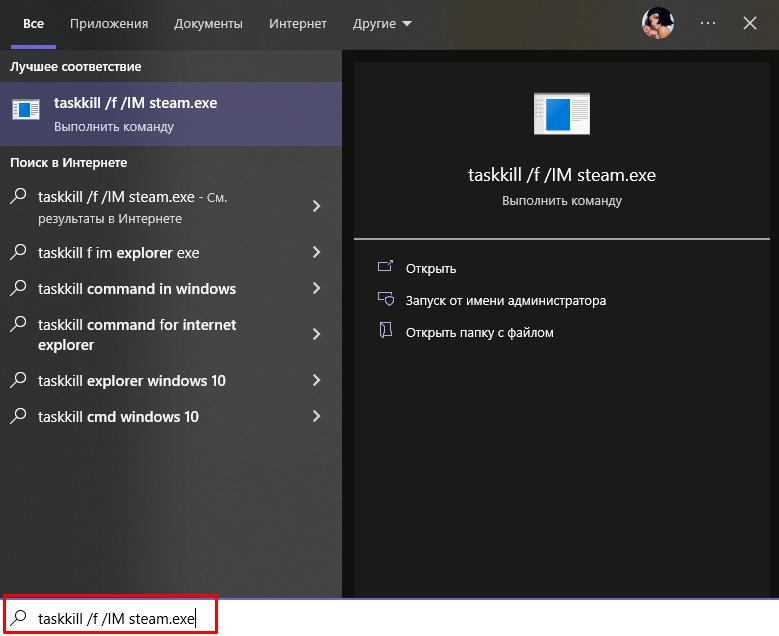
Альтернативный способ – перезагрузка компьютера
Перезагрузка ПК зачастую решает многие проблемы в работе не только Steam, но и других программ. В этом случае вам нужно полностью выключить компьютер или перезагрузить его, а не выйти из учетной записи администратора. Если вы просто выйдите из аккаунта админа и войдете снова, все активные процессы в диспетчере задач продолжат работать и проблема не решится. После полного перезапуска ПК попробуйте запустить Steam. Если у программы нет никаких серьезных сбоев, то она откроется.
2. Не открывается Стим – запускаем от имени администратора
Иногда запуск Steam требует разрешения от администратора ПК. Если его нет, приложение не откроется. Вам нужно выполнить запуск Стима от имени администратора:
- Кликните по ярлыку программы правой кнопкой мышки.
- Выберите в выпадающем меню строчку «Запустить от имени администратора».

- Подождите, пока Steam запустится.
Если ничего не произошло, пробуйте другие способы, перечисленные в этой статье.
Как сделать, чтобы Steam всегда запускался от имени администратора?
Если совет выше помог, и программа заработала нормально, но вы не хотите каждый раз открывать ее кликом правой кнопкой мышки по строке «Запустить от имени администратора», вам надо сделать следующее:
- Кликните по ярлыку Стима правой кнопкой мышки.
- В выпадающем меню нажмите строчку «Свойства».
- Откройте раздел «Совместимость».
- Найдите почти в самом низу окошка пункт «Запускать эту программу от имени администратора» и поставьте флажок рядом.

- Сохраните изменения.
Теперь Steam будет запускаться от имени администратора по умолчанию.
3. Проблемы с запуском Steam на Windows 7, 8, 10 и 11 – обновляем систему
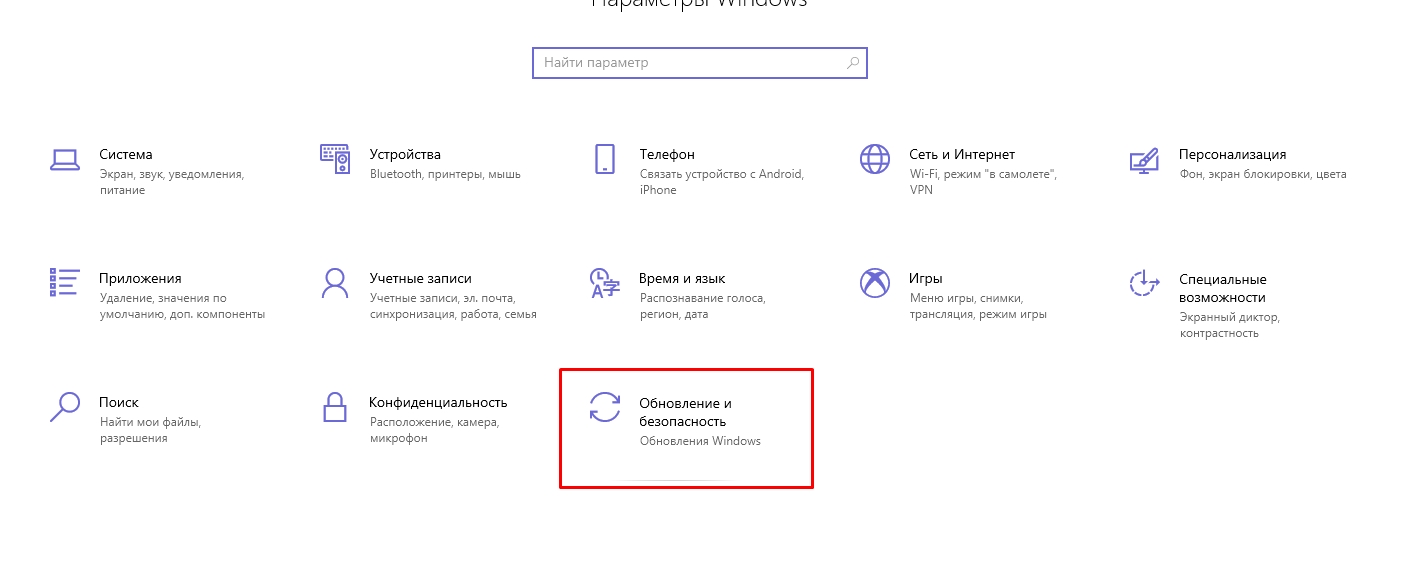
Так как Steam постоянно дорабатывается и улучшается, он требует регулярного обновления Windows. Во время обновлений системы загружаются важные файлы, от которых зависит нормальное функционирование большинства современных приложений и игр. Если вы давно не обновляли Windows и Стим внезапно перестал работать, проверьте наличие новых обновлений вручную:
- Откройте меню «Пуск» (значок Windows на клавиатуре или на панели задач).
- Перейдите в параметры Windows (значок в виде шестеренки).
- Найдите раздел «Обновление и безопасность».

- Нажмите «Проверить наличие обновлений».

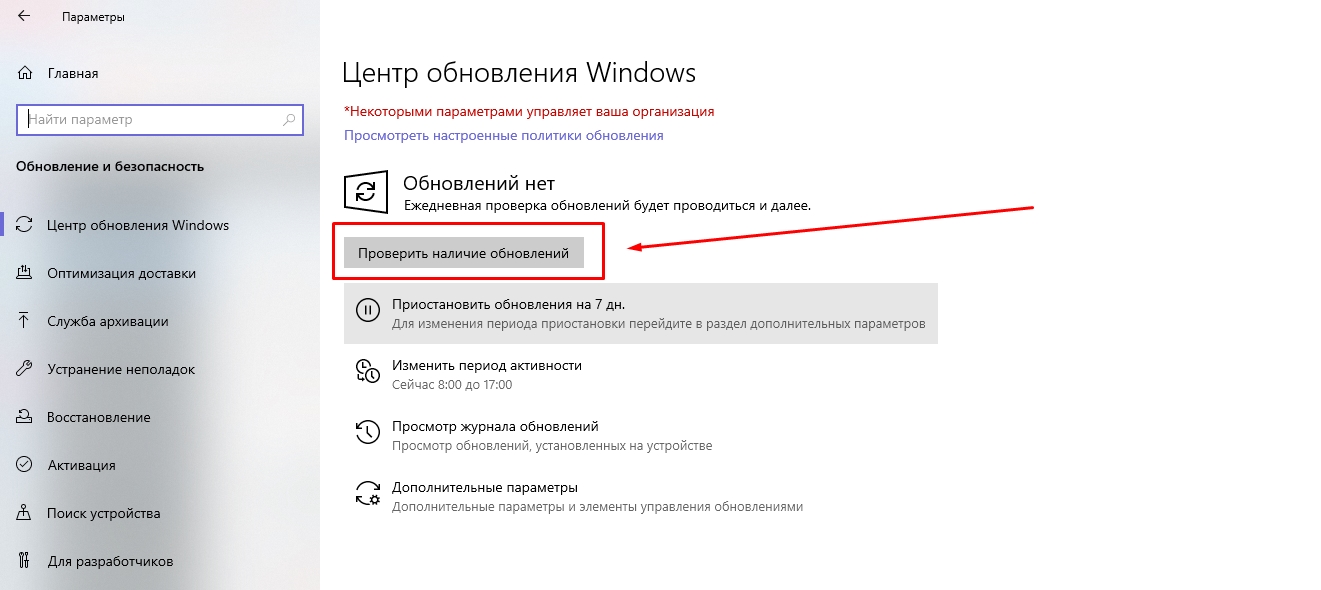
Если новые обновления системы найдены, установите их, а потом перезагрузите компьютер. После установки важных файлов Steam может заработать.
Как откатить обновления Windows?
В некоторых случаях обновление системы приносит больше вреда, чем пользы. Если обновления для Windows как-то негативно повлияли на работу вашего ПК (компьютер стал дольше загружаться, перестали работать какие-то программы и т. д.) и при этом не решили проблему с запуском Steam, выполните их откат:
- Откройте меню «Пуск» (значок Windows на клавиатуре или на панели задач).
- Перейдите в параметры Windows (значок в виде шестеренки).
- Найдите раздел «Обновление и безопасность».
- Перейдите на вкладку «Восстановление»;
- Нажмите «Начать» под пунктом «Вернуть компьютер в исходное состояние».

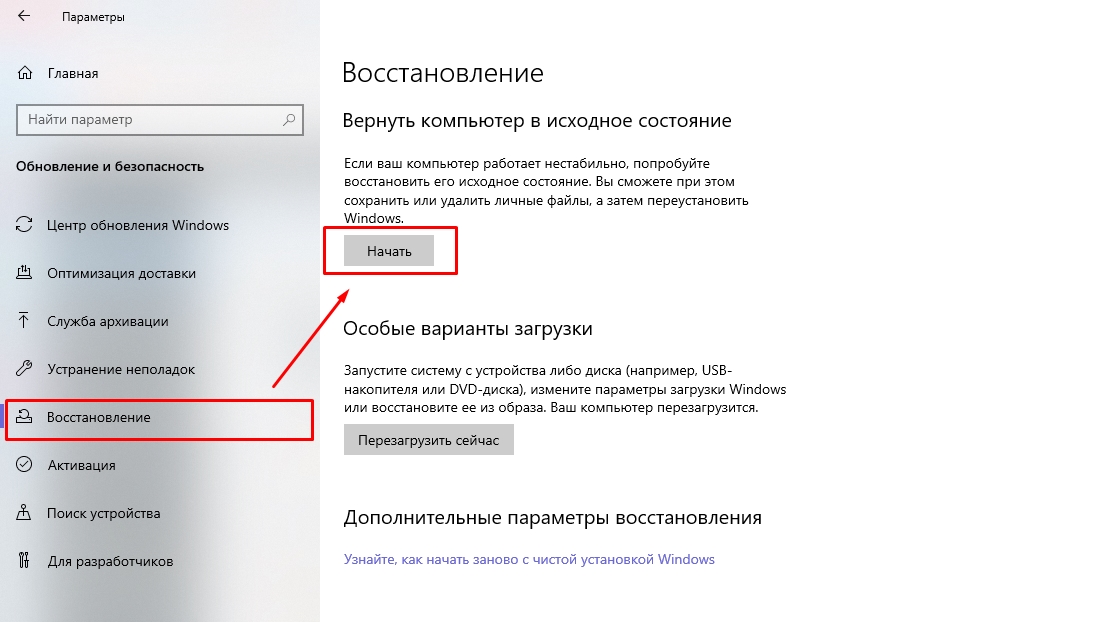
После возврата системы в первоначальное состояние произойдет перезагрузка ПК. Далее попробуйте запустить Стим. Возможно, он заработает.
4. Программы, которые мешают запустить Стим – находим и решаем проблему
Если вы не можете открыть Steam, убедитесь, что на вашем компьютере нет программ, которые мешают его работе. В списке ниже мы перечислим, какой софт с большой вероятностью может заблокировать запуск Стима:
- Антивирусные программы (ESET NOD32, Avast Antivirus, 360 Total Security, Kaspersky и их аналоги);
- Антишпионское ПО (Norton, Spybot, Bitdefender, SUPERAntiSpyware и т. д.);
- Брандмауэры (Tiny Firewall, Windows Firewall, iSafer и проч.);
- VPN (список популярных VPN вы можете найти по этой ссылке);
- Программы IP-фильтрации;
- Приложения FTP/веб-сервера;
- P2P-клиенты (SharkTorrent, BitTornado и т. д.).
Вы недавно устанавливали какое-либо приложение из категорий, перечисленных выше? Мы расскажем, что делать.
Удаление ненужных сторонних программ
Если недавно установленная программа вам не нужна, например, вы скачали VPN, а он вам не подошел, либо она загрузилась без вашего ведома вместе с установкой другого ПО, то просто удалите ее со своего компьютера:
- Откройте меню «Пуск» (значок Windows на клавиатуре или на панели задач).
- Перейдите в параметры Windows (значок в виде шестеренки).
- Найдите раздел «Приложения».
- Выберите конкретную программу из списка и нажмите кнопку «Удалить».

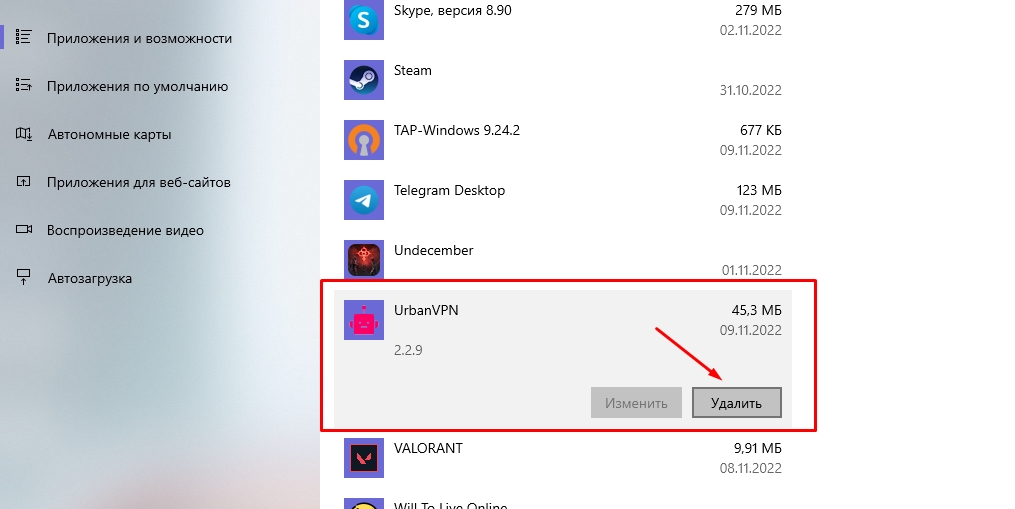
После проверьте, заработал ли Steam.
Отключение антивирусного ПО
Если никаких программ вы не скачивали в последнее время, но на вашем компьютере установлен антивирус, отключите его в настройках или временно приостановите защиту ПК. После этого попробуйте запустить Steam. Заработал? Значит дело в вашем антивируснике. Добавьте приложение Стим в список исключений антивирусного ПО, чтобы оно не блокировало его работу. Если вы не знаете, как добавить программу в список исключений вашего антивирусника, посмотрите инструкцию на официальном сайте его разработчика.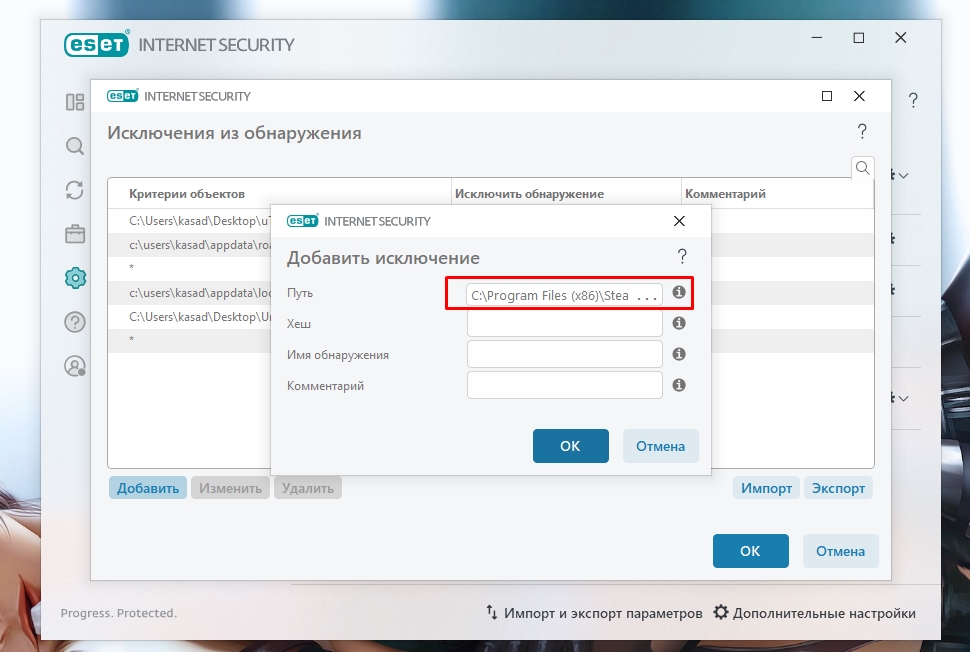
Обратите внимание! Мы категорически рекомендуем не оставлять ваш компьютер без защиты. Если ваш антивирус препятствует запуску Steam и вы вынуждены удалить его, скачайте другое антивирусное ПО или включите стандартный Защитник Windows.
5. Не работает Стим – переустанавливаем программу
Если Steam перестал открываться или антивирусное ПО удалило некоторые файлы программы, посчитав их вредоносными, из-за чего Стим больше не запускается, удалите его со своего компьютера:
- Откройте меню «Пуск» (значок Windows на клавиатуре или на панели задач).
- Перейдите в параметры Windows (значок в виде шестеренки).
- Найдите раздел «Приложения».
- Выберите в списке Steam и нажмите «Удалить».

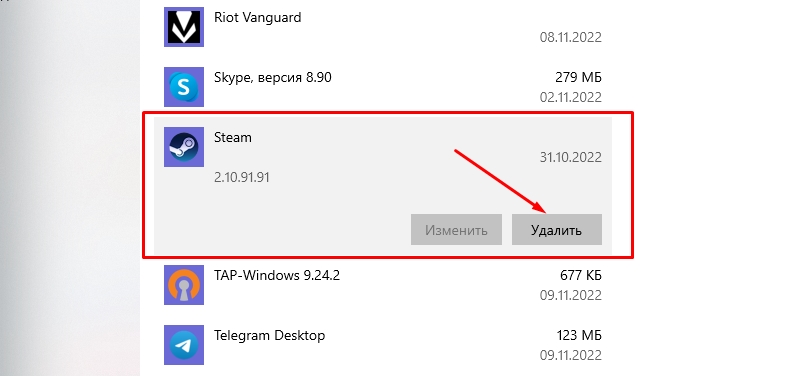
После этого отключите антивирусник (если он у вас есть), перейдите на официальный сайт Steam и загрузите программу, кликнув по кнопке «Установить Steam» в правом верхнем углу.
Важно! Не стоит переживать за свои игры, которые были установлены на компьютер через Стим. При удалении программы они остаются на ПК (путь к игровым файлам находится тут – …SteamLibrarysteamappscommon).
Как добавить игры в библиотеку после переустановки Steam?
В том случае, если папка установки приложения Стим отличается от папки, где хранятся файлы скачанных вами игр, после переустановки программы в ней могут не появиться загруженные игры. При попытке запустить игру, которая есть на ПК, через библиотеку Steam вам будет предложено скачать ее заново. Делать это не нужно. Выполните следующие действия:
- В левом верхнем углу программы открываем выпадающее меню Steam.
- Кликаем по пункту «Настройки».
- В открывшемся окне выбираем раздел «Загрузки».
- Нажимаем кнопку «Папки библиотеки Steam».
- Кликаем по значку плюсика и добавляем путь к папке, куда вы ранее загружали игры со Стима: …SteamLibrarysteamappscommon.
После этого программа автоматически определит местонахождение файлов ваших игр, подгрузит обновления, если это требуется, и они станут доступны для запуска в библиотеке без необходимости повторной установки.
Иногда при попытке войти в Стим пользователь видит одну из следующих ошибок:
- Timeout expired;
- Failed to load steam.dll;
- FATAL ERROR: Failed to Connect with Local Steam Client Process;
- Steam needs to be online to update.
Ниже мы подробно расскажем, как справиться с этими ошибками и наконец-то запустить Steam на своем компьютере.
Ошибка «Timeout expired»
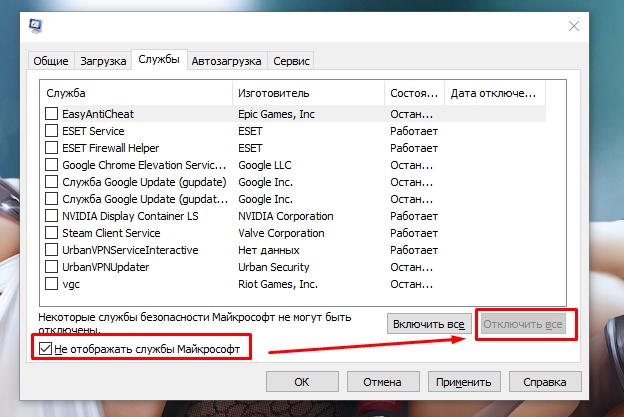
- Нажмите сочетание клавиш WIN+R.
- В появившемся окошке введите msconfig и нажмите Enter.
- Перейдите в раздел «Службы».
- Напротив «Не отображать службы Майкрософт» поставьте галочку.
- Кликните по «Отключить все» и перезагрузите свой компьютер.
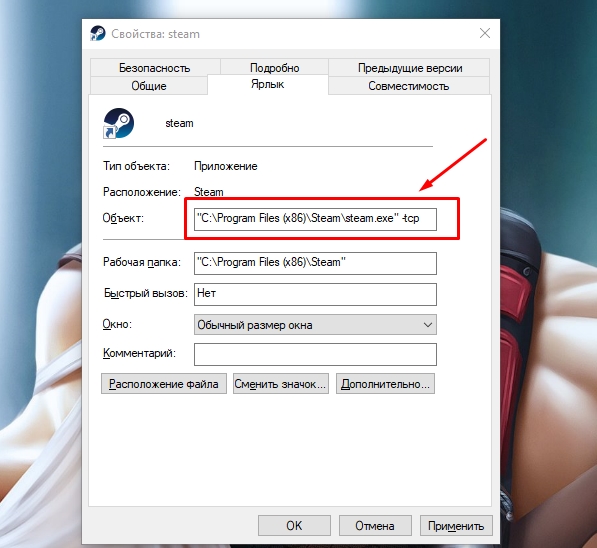
Альтернативный вариант решения проблемы с ошибкой «Timeout expired»:
- Кликните по ярлыку Стим правой кнопкой мышки.
- В выпадающем меню выберите «Свойства».
- В строчке «Объект» после «C:Program Files (x86)SteamSteam.exe» поставьте пробел и добавьте -tcp.
- Сохраните изменения и попробуйте запустить Steam с правами администратора.

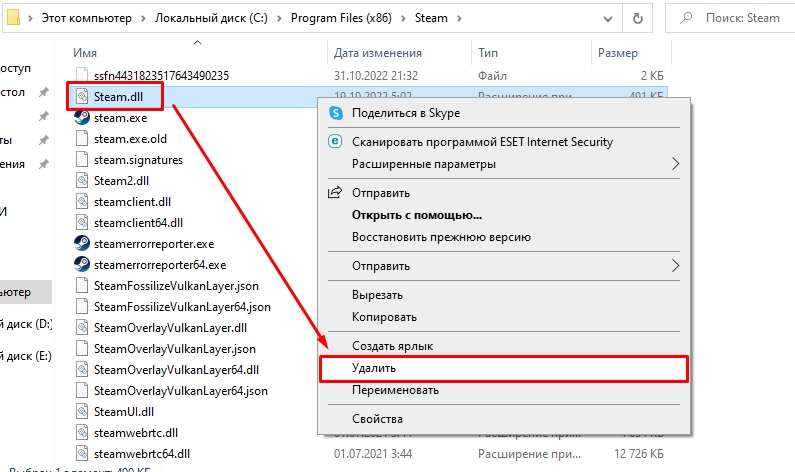
Ошибка «Failed to load steam.dll»
- Перейдите в папку, куда вы устанавливали Стим (пример: C:Program Files (x86)Steam).
- Найдите в списке файлов «steam.dll» и удалите его с последующей очисткой корзины.

- Запустите Steam с помощью ярлыка программы и дождитесь, пока пройдет проверка файлов и steam.dll загрузится самостоятельно.
Если указанный выше способ не помог, переустановите Стим полностью: сначала удалите его с компьютера через «Установка и удаление программ», а потом установите приложение заново, скачав файл-установщик с официального сайта.
Ошибка «FATAL ERROR: Failed to Connect with Local Steam Client Process»
Данная ошибка появляется в том случае, если файлы Steam повреждены. Избавиться от нее можно путем полной переустановки программы. Также можете попытаться удалить папку appcache, которая находится тут – C:Program Files (x86)SteamSteam.exe или в той папке, куда вы устанавливали Стим.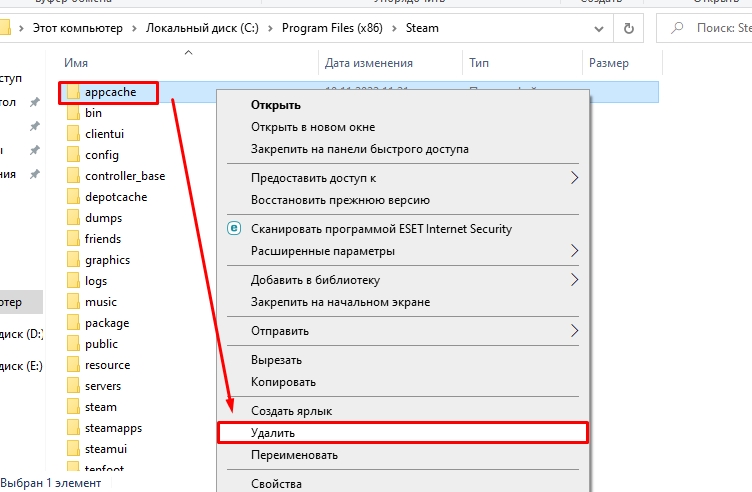
Важно! Если подобная ошибка появляется, когда вы пытаетесь запустить игру из библиотеки Steam, то выберите ее в списке ваших игр, кликните правой кнопкой мышки по названию, нажмите «Свойства» -> «Локальные файлы» и выберите «Проверить целостность игровых файлов». Система обнаружит поврежденные игровые файлы и восстановит их, после чего ошибка исчезнет.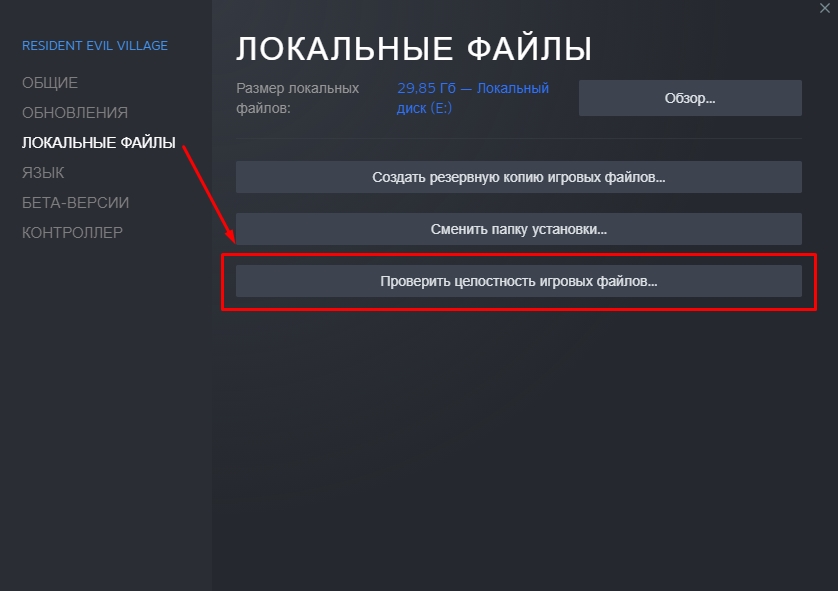
Ошибка «Steam needs to be online to update»
Подобная ошибка зачастую возникает при проблемах с интернетом, но иногда вы можете столкнуться с нею, даже если сеть работает без нареканий. Что можно сделать:
Последний совет мы рекомендуем использовать в последнюю очередь. Обычно первые две рекомендации помогают избавиться от ошибки «Steam needs to be online to update».
7. Не работает Steam – другие способы решения проблемы
Проверка содержимого файла «hosts»
«hosts» – системный файл, который могут редактировать вредоносные программы, из-за чего пользователь компьютера теряет возможность заходить на определенные сайты или пользоваться некоторыми приложениями. Если у вас внезапно начали появляться проблемы с доступом на сайты или Steam перестал запускаться, убедитесь, что в файле hosts нет никаких изменений. Для этого:
- Перейдите в папку C:WindowsSystem32driversetc.
- Найдите в списке файл «hosts» и откройте его с помощью стандартного блокнота;
- Отыщите строчки #127.0.0.1 localhost и #::1 localhost.
- Удалите весь текст, который находится ниже этих строчек.
- Сохраните изменения в файле.

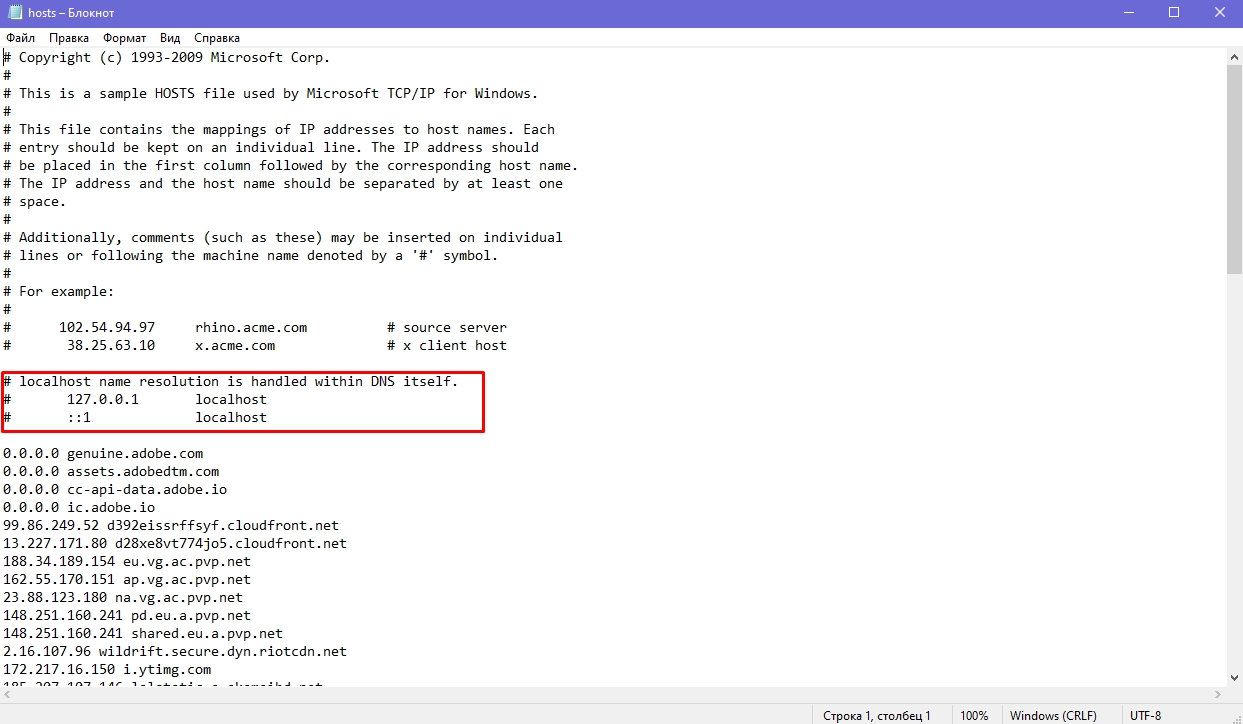
Если эти действия не помогли, вставьте после строчек #127.0.0.1 localhost и #::1 localhost этот текст:
68.142.122.70 cdn.steampowered.com
208.111.128.6 cdn.store.steampowered.com
208.111.128.7 media.steampowered.com
И сохраните изменения. Проверяйте, теперь Steam должен заработать.
Обновление драйверов
Отсутствие «свежих» драверов для каких-либо комплектующих ПК в некоторых случаях приводит к тому, что Steam не запускается. Проверить актуальность драйверов можно следующими способами:
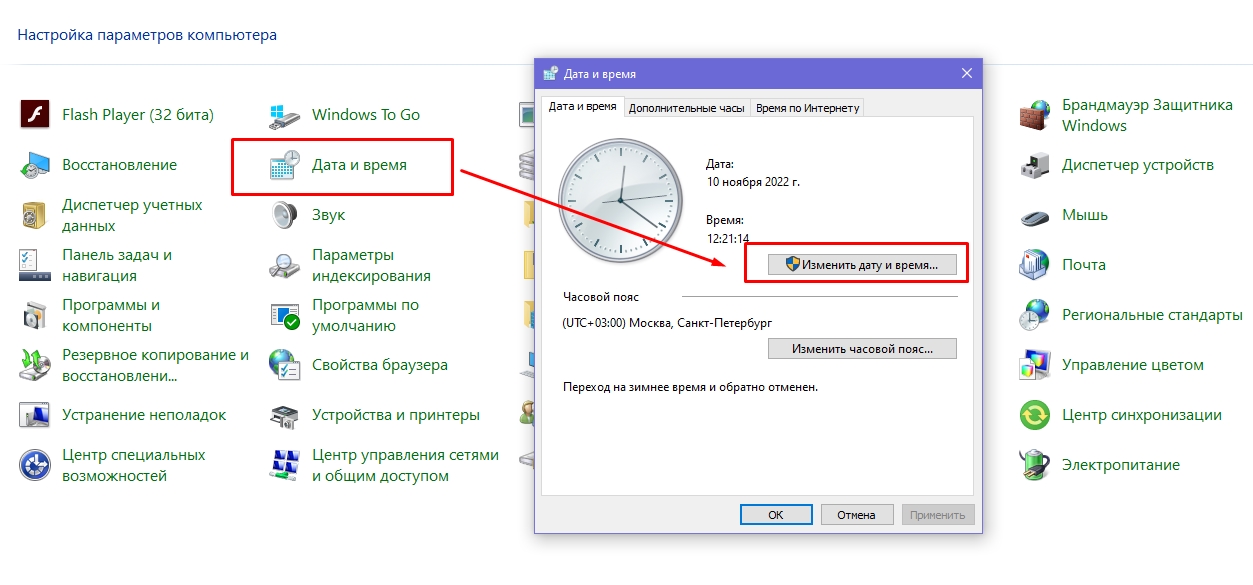
Проверка настроек даты и времени на ПК
Неправильно выставленные дата и время на компьютере нередко приводят к сбоям в работе различных приложений. И Стим не стал исключением. Если по какой-то причине время и дата на вашем компьютере сбились, сделайте их актуальными и попробуйте зайти в Steam. Возможно, это решит вашу проблему. Как изменить дату и время на компьютере:
- Нажмите сочетание клавиш WIN+R.
- Введите в строку Control Panel и нажмите Enter.
- Выберите в списке «Дата и время».
- В открывшемся окне установите актуальную дату и время.
Отключение лишних устройств от компьютера
Некоторые устройства, подключенные к вашему компьютеру, могут работать неправильно и стать основной причиной, по которой Steam не запускается. Если недавно вы использовали USB-флешку, новые наушники, внешние накопители, колонки или другие гаджеты, то отключите их от ПК и проверьте, работает ли Стим теперь.
Проверка жесткого диска на наличие ошибок
Один из способов найти причину, по которой не запускается Steam – выполнить проверку жесткого диска на ошибки:
- Нажмите сочетание клавиш WIN+R.
- Введите в строку cmd и нажмите Enter.
- В консоли введите sfc /scannow и нажмите Enter.
- Дождитесь окончания процедуры.
- После введите в консоли chkdsk /f /r и нажмите Enter.
- Далее введите Y и еще раз нажмите Enter.

- Перезагрузите компьютер и дождитесь проверки жесткого диска на ошибки.
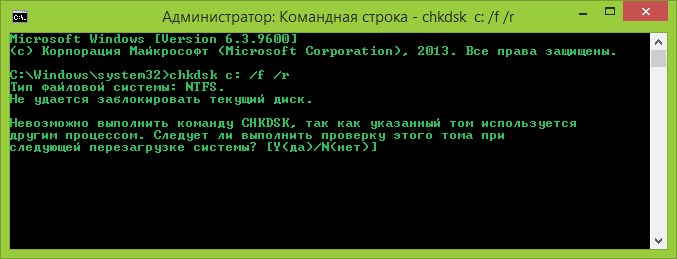
После этого попробуйте зайти в Стим.
Отключение режима совместимости
Если вы пытались исправить какую-либо ошибку, возникающую во время работы Steam и выбрали режим совместимости с другой операционной системой, после чего программа вообще перестала запускаться, сделайте следующее:
- Кликните по ярлыку программы правой кнопкой мышки.
- Перейдите в «Свойства».
- Нажмите «Расположение файла».
- Выберите в списке файлов steam.exe.
- Перейдите в свойства steam.exe (ПКМ по файлу).
- Откройте раздел «Совместимость».
- Напротив «Запустить программу в режиме совместимости с:» снимите галочку.

- Примените изменения.
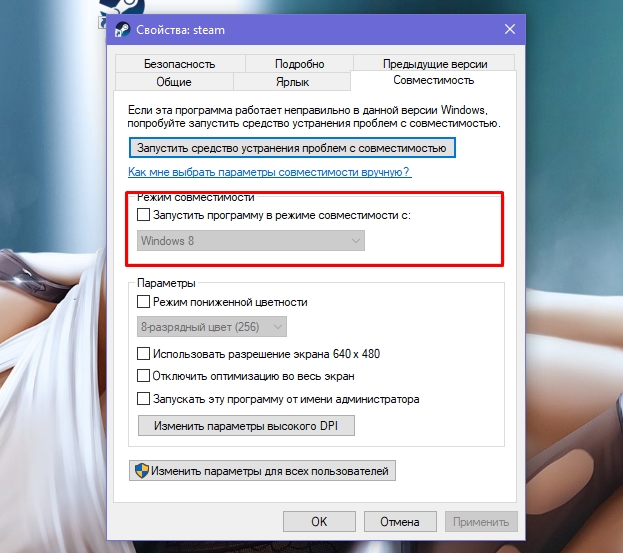
Теперь Steam должен запуститься, как и раньше.
- Steam’s game files can run into errors due to issues while downloading or updating.
- Ensure you check the integrity of your game files, as they may have become corrupted.
- If you are only experiencing the issue on a specific game on Steam, try running that game as an administrator.
- To repair Steam Errors, Download Restoro PC Repair Tool
Automatically Repair Windows Errors
Recommended: To easily install drivers automatically, use the tool below.

If you find yourself stuck on Steam’s library page and unable to launch any Steam games, try to relax. We got you covered.
Steam’s extracted game files can run into errors due to issues while downloading or updating. This can also occur when you have just upgraded to Windows 10.
To get back to playing your favorite game fast, follow the simple guide below to troubleshoot this problem with Steam.
Don’t Miss:
- Steam Won’t Open? Here’s how to fix it!
- Steam Download Speed Slow? 8 Methods to Speed Up Steam
- How to Fix Steam Keeps Crashing on Windows
- [SOLVED] Steam Update is Stuck
Fix 1: Restart the Steam Client
If you are experiencing a problem where Steam games are not launching, you can try restarting the Steam client to ensure that all of its resources and Steam’s extracted game files are correctly loaded.
Recommended: Restoro System Repair Tool – Fix Errors & Speed Up Windows Automatically
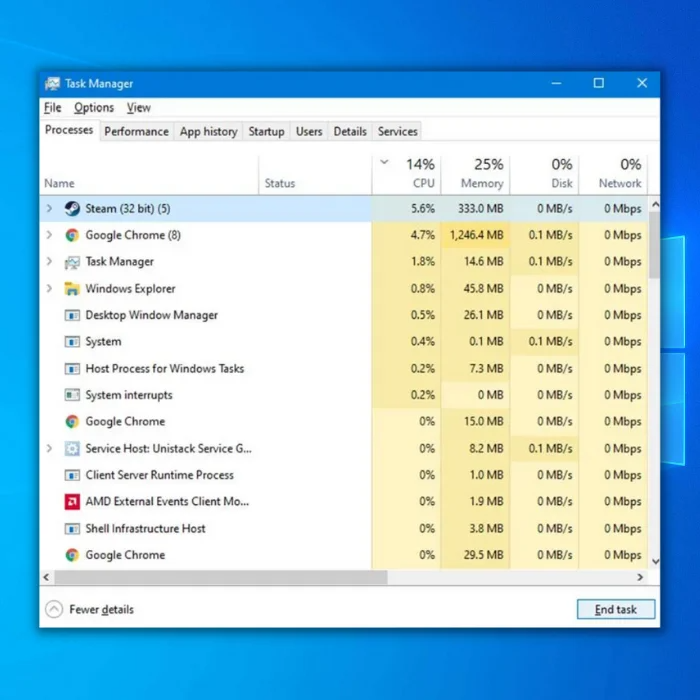
- Press the Windows Key + X on your keyboard and select Task Manager.
- Go to the Processes tab and find the Steam client from the list.
- Click on the Steam client and press the End Task button to stop it from running.
Go back to your desktop, Run Steam and re-login to your Steam account, and check if your games will now launch on your computer.
Fix 2: Verify the Integrity of Game Files
Steam has a built-in tool to verify and check for missing or broken game files. You can use the Steam Verify Integrity of game files options to let the Steam client recognize which game files are damaged or missing, and it will automatically download the game files.
Step 1: Launch Steam
Step 2: Log in to your account
Step 3: Go to the Steam Library Folders
Step 4: Right Click on any game that you are having problems launching
Step 5: Select Properties
Step 6: Click on the Local Files
Step 7: Click Verify Integrity of game files
Step 8: Wait for Steam to complete the file verification process.
Once Steam has verified the integrity of game files, try to launch the Steam games that are having issues and see if it is fixed. If you are still experiencing the Steam games not launching problem, proceed to the following method below.
Fix 3: Restart Your Computer
You can reboot your computer if you are experiencing issues such as Steam games not launching. A temporary error may have occurred on your system, which causes problems such as Steam games not launching. It is also possible that some drivers were not loaded when Windows booted the first time and needed a restart.
Follow the steps below to restart your system:
- First, click on the Windows icon on the Taskbar to access the Start Menu.
- Click on the Power button and select Restart.

3. Wait for your system to reboot.
Launch the Steam client once your computer has restarted, and check if the Steam games are now launching correctly. If Steam somehow fails to fix the Steam games not launching problem still occurs, continue to the next step.
- See Also: Why won’t my Taskbar work?
Fix 4: Run Steam Games As an Administrator
If you are only experiencing the issue on a specific game on Steam, try running that game as an administrator to bypass any restrictions preventing the game from launching and fix Steam game issues.
See the steps below to guide you through the process:
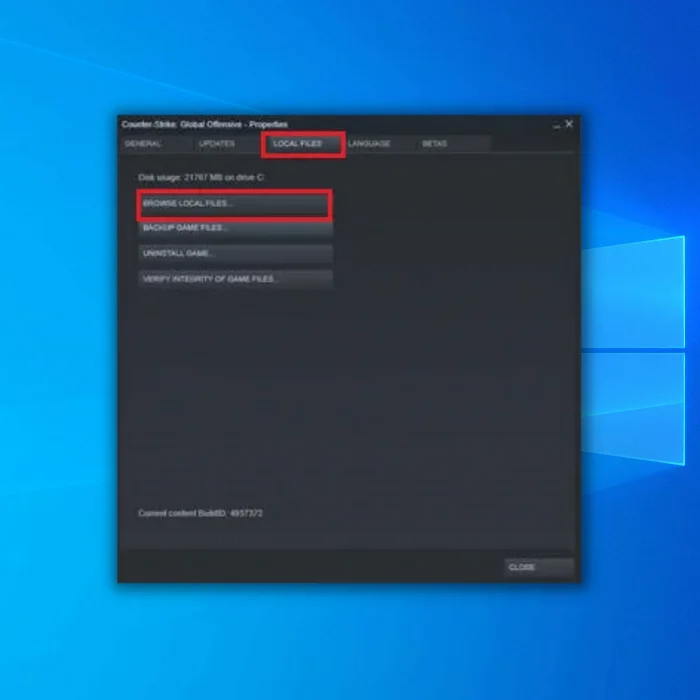
- On Steam, go to the Steam Library folders and right-click on the Steam games you are having issues with to browse local files.
- Select Properties and click on Local Files.
- Click the Browse button to access the Steam installation folder.
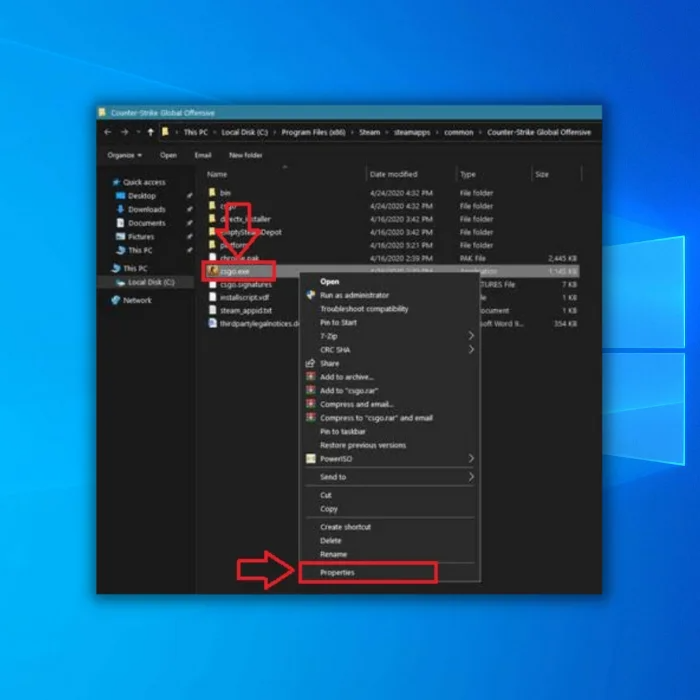
4. Locate the game’s.EXE file, which is usually located in “C Program Files x86,” and right-click on it.
5. Access its Properties and go to the Compatibility tab.
6. Enable ‘Run this Program as an Administrator‘ and click OK to save the changes.
Open the Steam shortcut in the Steam game folder located in “C Program Files x86” and try relaunching the game to check if the Steam games not launching issue has been fixed. However, if the Steam games not launching issue still occurs, continue to the next step.
Fix 5: Run the Game in Compatibility Mode
By running your Steam game in compatibility mode, you are enabling a game designed for an old version of Windows to a newer one, or vice-versa.
Step 1: Go to the Library.
Step 2: Right Click on the Steam games that you are having problems launching
Step 3: Select Properties
Step 4: Click on the Local Files tab
Step 5: Click on Browse
Step 6: Right Click on the .exe file of the game
Step 7: Click on Properties
Step 8: On Properties, Click on Compatibility
Step 9: Check Run this program in compatibility mode for:
Step 10: After checking Compatibility Mode, select Windows 8.
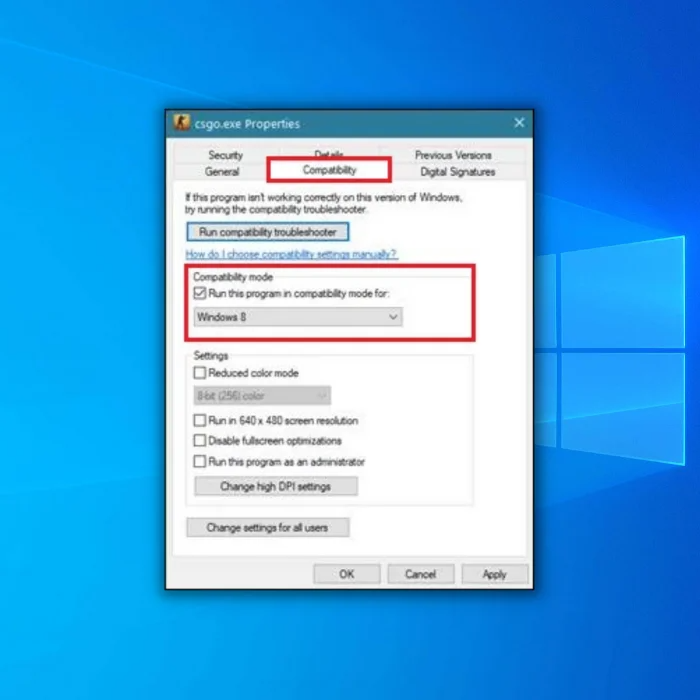
Step 11: Click on Apply, then close the properties
Step 12: After setting your games to run in Compatibility Mode, try to launch the game that is experiencing launching issues and see if the problem is fixed. If the Steam games not launching issue still occurs, continue to the next step.
Fix 6: Check for New Windows Update
The version of Windows currently installed on your computer may not be compatible with the Steam games you are trying to play. It is also possible that there’s an underlying issue with the Windows operating system version that prevents applications or Steam games from launching.
To check for any available Windows updates, follow the steps below:
- First, open the Start Menu and click on Settings.
- Inside Windows Settings, click on Update & Security.
- Lastly, wait for Windows to check for updates and follow the on-screen prompts if there’s a newer version available.

After updating Windows, restart your computer and check if games are now launching on Steam.
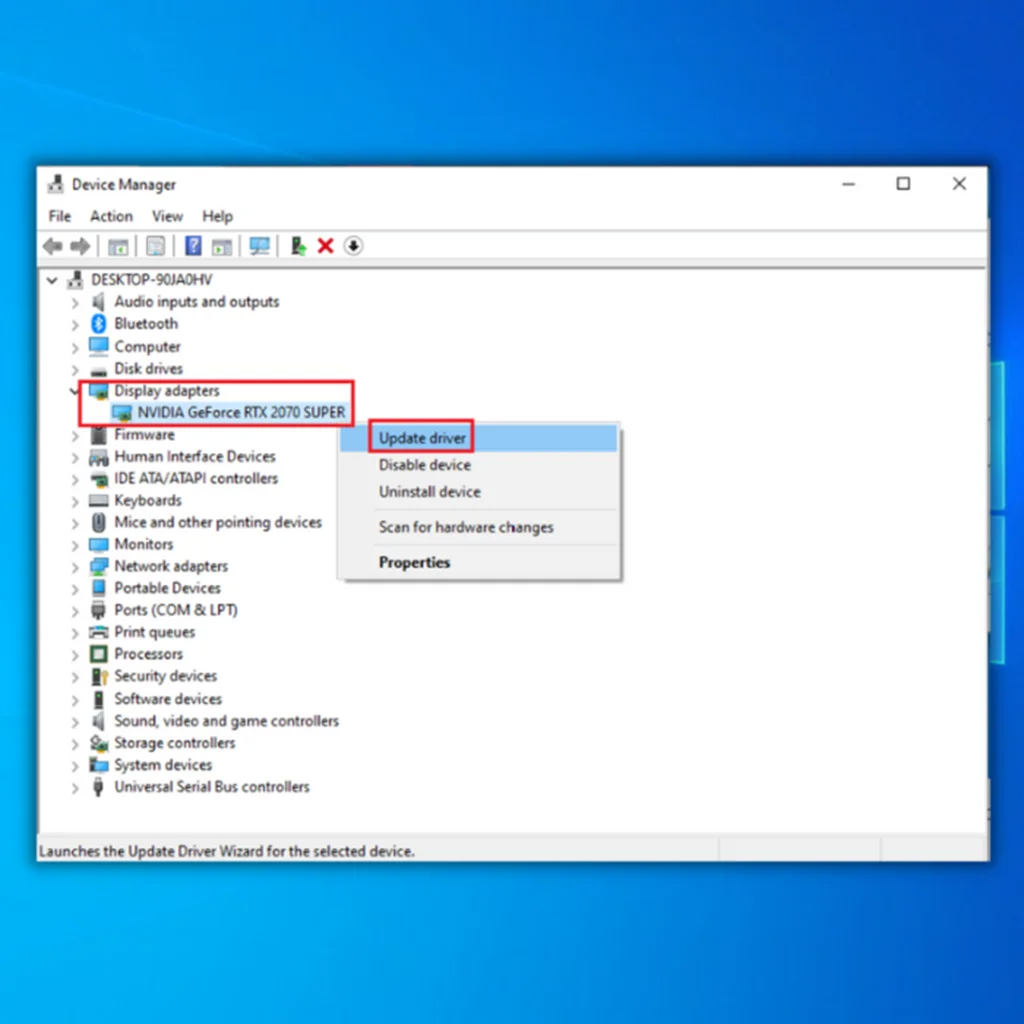
Fix 7: Update Your Graphics Drivers
When you play Steam games on your computer, you must have the correct drivers for your graphics card to maximize its performance. If your Steam games are not launching on Steam, your graphics card drivers may be corrupted or outdated.
To fix this, follow the steps below to update your graphics card drivers:
- First, press Windows Key + X on your keyboard to access the Quick Menu.
- Click on Device Manager and select Display Adapters.
- Right-click on your Graphics card driver and select Update Driver. Follow the on-screen prompts to install the latest drivers for your system.
Go back to Steam and try launching another game to check if the problem is solved. If the Steam games not launching issue still occurs, continue to the next step. You may also visit the video card manufacturer’s website to download the latest driver for your video card.
Recommended: Restoro System Repair Tool – Fix Errors & Speed Up Windows Automatically
Fix 8: Reinstall the Game
While this solution seems inconvenient, especially if you don’t have good internet or your ISP has a bandwidth limit, this will surely fix launching problems with Steam games. Before doing this, ensure you have tried the other solutions above this article.
Step 1: Go to the Library.
Step 2: Right Click on the game that you are having problems launching
Step 3: Click on Properties
Step 4: Click on the Local Files tab
Step 5: Click on Uninstall game

Step 6: After uninstalling the Steam games, go to the Steam store and search for the Steam games
Step 7: Download and reinstall the game.
Fix 9: Clear the Steam Download Game Cache Files
Another possible reason your Steam games won’t launch is a corrupted download cache in your Steam client. This is usually caused when a Steam update is interrupted and prevents games from launching. The only way to fix it is to clear the Steam game cache files.
Step 1: Launch Steam and click on the “Steam” option in the upper right corner of the Steam homepage and then click settings.
Step 2:
Click on the “Downloads” option and click “Clear Download Cache.” Click “OK” to confirm.

Step 3: Reboot your computer, open Steam, and check if the issue has been fixed.
Fix 10: Reinstall Steam
Reinstalling the Steam client may fix any issues with Steam. By removing the old version of Steam, you are also deleting the potentially corrupted Steam folder causing the Steam issue.
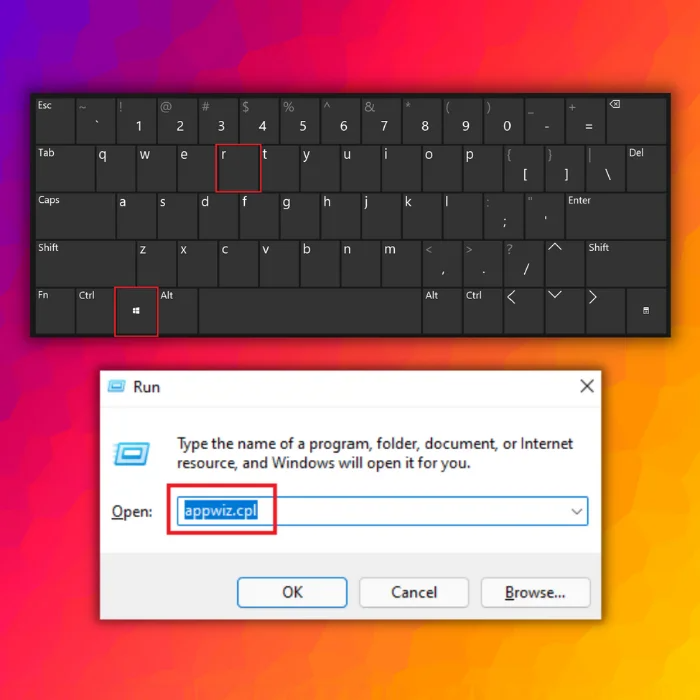
Step 1:
Open the “Uninstall or change a program” window by pressing the “Windows” and “R” keys to bring up the run line command. Type in “appwiz.cpl” and press “enter.”
Step 2: In the “Uninstall or change a program,” look for the Steam client in the program list and click “uninstall,” and click “uninstall” once again to confirm
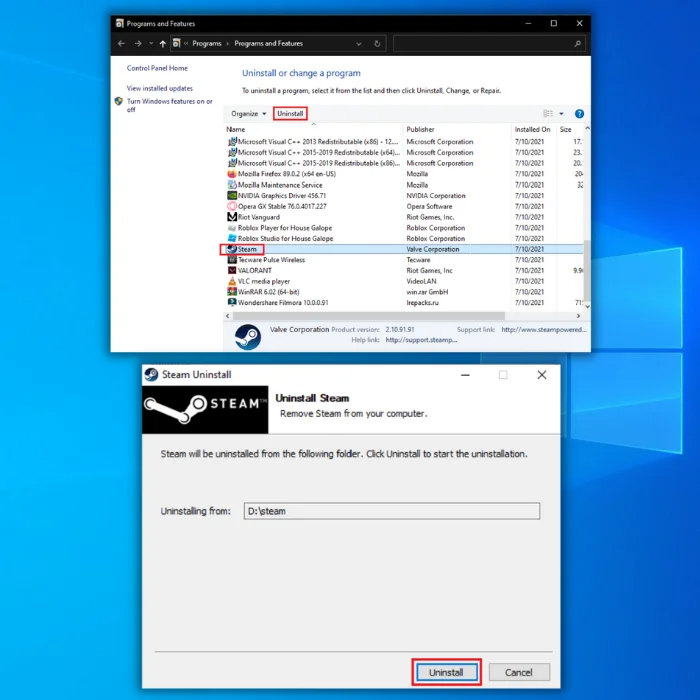
Step 3:
After successfully uninstalling Steam from your computer, download the latest installer by clicking here.
Step 4:
Once the download is complete, double-click the executable file of Steam and follow the installation wizard.
Step 5:
Sign in to Steam, download and install the problematic game and launch the game to confirm if the problem is fixed.
Conclusion
If your game won’t launch still, contact Steam’s customer support and report the problem. Issues within their server could cause it, and everyone is having problems launching the game.
See Also: How to Fix VAC Unable to Verify your Game Session
Windows Automatic Repair Tool

System Information
-
Your machine is currently running Windows 10 -
Restoro is compatible with your operating system.
Recommended: To repair Windows Errors, use this software package; Restoro System Repair. This repair tool has been proven to identify and fix these errors and other Windows problems with very high efficiency.

-
100% safe as confirmed by Norton. -
Only your system and hardware are evaluated.
Frequently Asked Questions
How do I fix a Steam game that won’t launch on Steam?
If Steam games do not launch, you may be able to resolve the issue by confirming the game files’ integrity. There is a chance that the game files and data will get corrupted, which will affect how the game behaves. However, the issue can be resolved by merely checking the integrity of the game files.
Why won’t the game start on Steam?
When a game doesn’t start, the extracted game files are frequently the culprit. Please consult our article on how to check the game files’ integrity. If you have software running that conflicts with Steam, games cannot start.
Why isn’t my game opening?
Numerous consumers complained that when their Steam game starts, nothing happens. You should momentarily disable your antivirus program because it can prevent the app from working. To resolve this issue, you should always ensure that Steam runs with administrator rights.
Why will my game not load?
You won’t be able to launch any game if there are any pending updates left to download. When updates are available, the “PLAY” button will be replaced with an “UPDATE” button.
If Steam itself is outdated, you may not be able to play games. The Steam client should always be kept up-to-date, even if it doesn’t function for you. Open the Steam app and go to the Steam menu to check for updates. Here, click Check for Updates to the Steam Client.
How do I fix Steam games not working on Windows 10?
The solution to this problem depends on what is causing it. You may need to update your whole Operating System, update drivers, run a virus scan, uninstall and reinstall the game, and more.
How do I repair a Steam game?
To repair corrupt game files, you can try verifying the integrity of the game files or uninstalling and reinstalling a fresh copy. While doing this, ensure you have a stable internet connection to avoid corrupting the game files.
How do I see steam processes in the task manager window?
To see steam processes in the task manager window, you must open the task manager first. Then, click on the “Processes” tab. Next, click on the “Show processes from all users” button. Finally, scroll down until you see the “Steam Client Bootstrapper” process.
Can third party antivirus software block Steam client updates?
Third-party antivirus software can block Steam client updates, and steam uses a self-updating mechanism incompatible with some antivirus software. When an update is blocked, the Steam client cannot download or install the update.
What is the default location of the steamapps folder?
The default location of the steamapps folder is “C:Program Files (x86)Steamsteamapps”. This is the location where Steam will automatically install games.
What is the steam client bootstrapper?
The bootstrapper is a program that helps you install Steam. It checks for updates to the steam client and downloads them if they are available. It also allows you to create shortcuts to steam games and start them without opening the steam client.
What is the process for restarting Steam?
The process for restarting Steam is relatively simple. First, you need to locate the steam directory. Once you have located the steam directory, you need to find the file named “steam.exe.”
Right-click on this file and select “run as administrator.” This will launch the steam game files. Finally, click the “restart” button in the steam window’s upper-left corner.
We focus on troubleshooting techniques, not just restarting the Steam. Here are some straightforward tips to fix Steam errors: Could not connect to Steam Network.
by Jennifer | Jan 13, 2022
While releasing the Steam Client, you may experience a network issue that refuses you to connect the Steam Network. The error appears whenever you try to log-in to your account. As usual, you can get rid of all types of errors by merely restarting or re-installing the Steam, but you should focus on other troubleshooting techniques also to solve your issue once and for all. Before making any action, once assure Steam servers aren’t down.

Another action you must take is that to log in your Steam account via the website to check your account is working properly and steam hasn’t banned it. Let’s started with a simple solution, whenever you discover such type of error, try to power-up your system, as well as network, and after 30 seconds make them on to see is your problem gets solved or not. If the problem is still there, then try to use Steam client in offline mode and then take it online to solve the connecting problem.
If your problem is still, then we have compiled a list of four possible solutions which are the following:
- Try to Change the IP (Internet Protocol) that Steam uses
- Use Troubleshoot feature to detect the issue
- Check Your Internet Connection Works Well
- Reinstall Steam Client
- Try to Change the IP (Internet Protocol) that Steam uses
- Use Troubleshoot feature to detect the issue
- Check Your Internet Connection Works Well
- Reinstall Steam Client
Try to Change the IP (Internet Protocol) that Steam uses
If you find such type of error message below, you are most likely dealing with software and network issue. No one knows as it could be anything from a network problem a Steam update, to even damaged entries. One of the most prominent reasons for this likely cause is because of not connecting to Steam by entering a bad password. The application shows a different password for inputting incorrect passwords as shown in the image below.
The UDP (User Datagram Protocol) is used by the Steam Client to transmit data. However, the protocol sometimes becomes unstable and in return display you an error. In this case, you should try to change your protocol from UDP to TCP (Transmission Control Protocol), which is more stable, reliable, and faster as compared to UDP. Upon having an error “Couldn’t connect to the Steam Network”, try to change it by following the method given below:
1. For sure, there’s a Steam shortcut on Desktop. Make a right-click on Steam’s Icon, and choose properties.
2. Next to that, click on the Shortcut Tab.
3. A dialogue box will be there right after “Target,” try to add “-tcp” at the end of the link to switch the protocol.
4. Now, launch Steam Client to see that the error is fixed or not.
Use Troubleshoot feature to detect the issue
Before going with any solution, try to check your network status would be a good option. You can check network status by simply clicking on the internet icon available in the task right before time. Right-click on Internet Icon, go with “Open Network & Internet Settings.” You also need to check the network hardware like Router, Adapter, and Modem is working well.
Check Your Internet Connection Works Well
Additionally, the issue may be appearing because of a bad internet connection; therefore, you should check at once either your connection is stable or not. It’s quite simple to check and requires a few steps to detect the issue. First of all, if you don’t have much information about your PC, a straightly open browser and type something to check that your computer is connecting with the internet or not. Secondly, you can check your network adapter, how?
1. Hold “Windows Key” and press “X” to open a context menu and left-click on “Device Manager.”
2. The windows display you a popup containing several choices, from which you have to navigate the Network Adapters and expand by merely clicking on it. Next to that, you will discover a list of WIFI/LAN adapters with their titles.
3. Next to that in the third step, you must double click on any adapter to check properties whether the device is working properly. You should check all available adapters one by one.
4. Mistakenly, if you made any change to your network connection, you should revert them by typing the given commands. Hold “Windows Key” and Press “R” to launch the Run box, and type “cmd” and hit enter.
5. Now, in the last step, type all the given commands and press “Enter” after each one:
· Netsh in tip set DNS
· Ipconfig/all
· Ipconfig/release
· Ipconfig/renew
· Ipconfig/flushdns
· Netsh winsock reset
6. After checking all of your commands, you should make a restart to your PC and check whether your problem is get solved.
Reinstall Steam Client
Chances are there that some faulty files take place in Steam and lead you to an error “Could not connect to Steam network error.” You may get rid of this error by merely uninstalling Steam client from your PC and then re-install it to see whether the problem gets resolved or still existed there.
· If you have lots of games and applications downloaded on your Steam Client, then you should make a back-up before uninstalling the program to prevent data loss. Go to the primary drive where Steam client is installed, find a folder, “Steamapps” and move it from Steam Directory to a safe place.
· Hold “Win” key and press R simultaneously to launch Run box and then type “Control” and press enter once run box appeared.
· Hit “Programs & Features” and find the Steam program to uninstall. Once Steam gets completely removed, restart your PC and download the Steam client from the official Site.
· After installing the Steam Client, try to restore your Backup by moving the file “Steamapp” to the Steam directory and release the Client to see that the error is gone.
-

PC Performance Tweaks for Gaming – Boost Your Gaming Rig
-
Best Free Games on Steam for Home Quarantine during the Coronavirus (COVID-19)?
-
Steam Keeps Crashing – Here are Some Quick Ways to fix it
-
Steam Won’t Open – What to Do when Steam Doesn’t Open?

Стим не заходит в сеть, но подключение настроено корректно? Странная ошибка, которую можно решить – не переживайте, мы подготовили самые действенные способы борьбы с возникающей проблемой!
Повреждение файлов конфигурации
Внутри системной папки есть несколько файлов – если в них закрались ошибки, вы сразу увидите неприятные последствия. Именно поэтому Стим не видит интернет! Рекомендуем сразу проверять целостность файлов – сэкономите массу времени. Если этот способ не сработает – переходите к другим.
Что нужно делать? Откройте папку, куда было установлено приложение – если вы не помните, куда загружали сервис, воспользуйтесь небольшой хитростью:
- Кликните по ярлыку правой кнопкой мышки;
- Из появившегося меню выберите «Показать расположение файла».

Готово – вы оказались в нужной директории. Стим не видит сеть, поэтому мы ищем два следующих файла:
- ClientRegistry.blob
- Steam.dll

И безвозвратно удаляем оба! Не переживайте, на работоспособность программы это не повлияет. Файлы будут автоматически восстановлены, но сервис перезапустить придется. При желании можете даже перезагрузить компьютер.
Антивирус или брандмауэр/фаерволл
Второй ответ на вопрос, почему Steam не видит интернет, хотя подключение стабильно – работу программы блокирует защитное ПО. Привести единую инструкцию сложно, так как пользователи устанавливают разные брандмауэры и антивирусы.
Очевидно, стоит предпринять такие действия. Отключите защитное ПО и попробуйте войти в игровой клиент. Если все работает, становится понятна причина возникновения ошибки. Необходимо внести приложение в список исключений антивируса/ фаерволла.
Ошибка файла hosts
Другая причина, почему Стим не заходит в сеть – внутренняя ошибка в файле hosts. Если документ поврежден, происходит блокировка работы приложения. Хорошо, что проблема быстро решается!
Воспользуемся такой инструкцией:
- Щелкните ПКМ по кнопке меню «Пуск» и откройте панель управления;
- Найдите раздел параметров проводника;

- Войдите во вкладку «Вид»;
- Ищите строчку «Скрывать расширения для зарегистрированных типов файлов»;

- Сохраняем изменения, закрываем окно и заходим непосредственно в проводник;
- Переходим в директорию C:Windows/System32/drivers/etc;
- Открываем файл hosts и проверяем внутри наличие названия программы (на английском);

- Если строчки со словом «Стим» найдутся, их нужно полностью удалить.
Если проблема звучала так: «Я не могу войти в сеть в Стиме», она должна решиться! Не забудьте сохранить изменения, внесенные в документ.
Неправильные настройки сети
Когда Стим не видит интернет, но он есть – неприятно. Хочется открыть приложение и поиграть, пообщаться с друзьями! Часто причиной возникновения ошибки становятся неверные настройки операционной системы – доступ к интернету блокируется автоматически для определенных программ.
Трудности можно исправить – если Стим не заходит в в сеть, просто поставьте корректные настройки:
- Жмите на кнопку меню «Пуск» и переходите в панель управления;
- Открывайте раздел «Центр управления сетями и общим доступом»;

- Кликните по разделу «Изменение параметров адаптера»;
- Найдите нужную сеть и кликните правой кнопкой мышки;
- В открывшемся окне есть кнопка «Свойства», нажимаем;

- Ищем строчку «Планировщик пакетов QoS» и убираем птичку напротив;
- Переходим к разделу «IP версии 4 TCP/IPv4» и выделяем курсором;
- Снова жмем на значок «Свойства»;

- Находим вкладку «Альтернативная конфигурация» и прописываем «8.8.8.8» или «4.4.4.4» в строке «Предпочитаемый DNS-сервер»;

- Жмем «ОК».
Что делать, если Стим не видит интернет – узнали. Проблема решается за несколько минут. Наши советы обязательно пригодятся, поэтому сохраняйте статью в закладки. В любой момент с легкостью восстановите приложение и сможете играть в любимые игры!