Содержание
- Fix Error Code 3, Ошибка компиляции фильма, Ошибка экспорта в Premiere Pro для Windows 11/10
- Published by IT Info on February 5, 2022
- Код ошибки 3, Ошибка компиляции фильма, Ошибка экспорта в Premiere Pro
- 1] Отключить настройки аппаратного кодирования
- 2] Установите для режима управления питанием значение Максимум
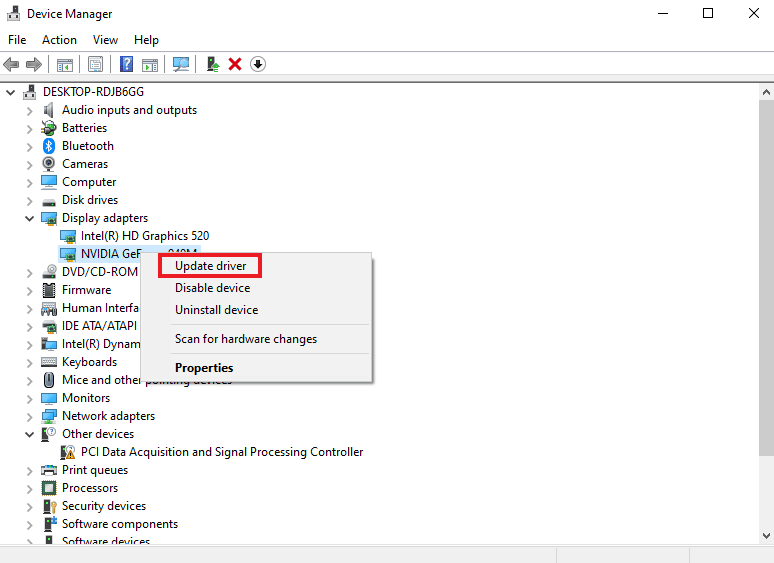
- 3] Обновите графические драйверы
- 4] Обновите Premiere Pro
- Как исправить код ошибки 3 в Premiere?
- Как включить аппаратное кодирование в Premiere Pro?
- How to fix selector: 9 error code: 3
- How can I use the information in the error dialog box to find and fix the problematic clip or effect?
- Unable to export a specific sequence?
Fix Error Code 3, Ошибка компиляции фильма, Ошибка экспорта в Premiere Pro для Windows 11/10
Published by IT Info on February 5, 2022
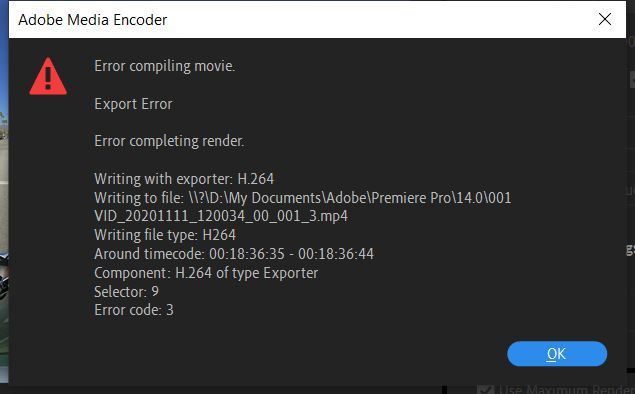
Adobe Premiere Pro — отличная программа для профессионального редактирования видео. Его используют миллионы пользователей вместе с After Effects по всему миру. Хотя это программное обеспечение премиум-класса с ежемесячной подпиской, пользователи никогда не разочаровываются, поскольку функции и возможности редактирования видео, которые оно дает вашей машине, нельзя упустить. При экспорте видео в Premiere Pro некоторые пользователи видят код ошибки 3, ошибка компиляции фильма, ошибка экспорта, ошибка завершения рендеринга на ПК с Windows 11/10. В этом руководстве у нас есть некоторые исправления.
Код ошибки 3 появляется на недавно установленных ПК, где параметры, необходимые для Premiere Pro, настроены неправильно. Эта ошибка в основном возникает, когда пользователь пытается отобразить видео в формате H264. Давайте посмотрим, как мы можем решить эту проблему.
Код ошибки 3, Ошибка компиляции фильма, Ошибка экспорта в Premiere Pro
Если вы не можете обработать видео в формате H264 и видите Код ошибки 3, ошибка компиляции фильма, ошибка экспорта, ошибка завершения рендеринга в Premiere Pro, следуйте приведенным ниже инструкциям.
Отключите настройки аппаратного кодирования, установите для режима управления питанием значение «Максимум»Обновите графические драйверыОбновите Premiere Pro
Давайте узнайте подробности о каждом методе.
1] Отключить настройки аппаратного кодирования
Это исправление, которое сработало лично для меня. Вам необходимо отключить настройки аппаратного кодирования. Чтобы отключить их,
откройте Premiere Pro, нажмите Изменить в строке меню и наведите указатель мыши на Настройки в нижней части списка. Затем выберите Медиа в настройках Снимите флажки рядом с кнопками Аппаратное ускорение декодирования H264/HEVC (требуется перезагрузка) и Аппаратное ускорение кодирования H264/HEVC (требуется перезагрузка) Нажмите ОК и закройте Premiere Pro. Затем перезагрузите компьютер.
Проверьте, помогло ли исправление устранить проблему.
2] Установите для режима управления питанием значение Максимум
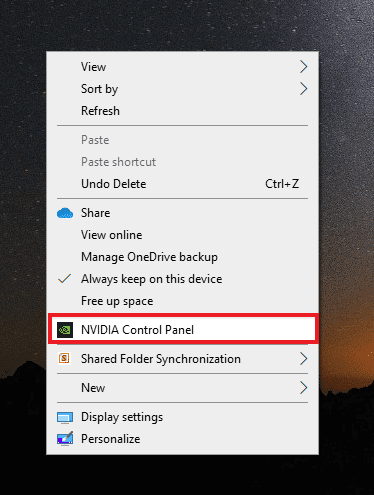
Чтобы избавиться от этой проблемы, вам необходимо установить максимальное управление питанием на графическом процессоре. Вы можете сделать это с помощью панели управления NVIDIA или программного обеспечения AMD Radeon на своем ПК. Если вы являетесь пользователем NVIDIA,
щелкните правой кнопкой мыши на рабочем столе. Нажмите Показать дополнительные параметры. Выберите Панель управления NVIDIA в контекстном меню. Нажмите Управление настройками 3D. Найдите Режим управления питанием в разделе”Настройки”и установите для него максимальную производительность с помощью раскрывающегося меню.
3] Обновите графические драйверы
Некоторые пользователи видят эту ошибку из-за устаревших графических драйверов. Вам необходимо обновить графические драйверы на вашем ПК и устранить проблему.
Вы можете обновить графические драйверы,
4] Обновите Premiere Pro
Проверьте, есть ли доступны ли какие-либо обновления для Premiere Pro. Откройте Adobe Application Updater на своем ПК и нажмите кнопку «Обновить» рядом с Premiere Pro. Он проверит наличие обновлений, загрузит и установит их автоматически.
Как исправить код ошибки 3 в Premiere?
Код ошибки 3 в Premiere Pro можно легко исправить, отключив оборудование ускоренные настройки, обновление графических драйверов, обновление Premier Pro и установка режима управления питанием на максимум.
Как включить аппаратное кодирование в Premiere Pro?
Чтобы включить аппаратное ускорение кодирование в Premiere Pro, нажмите «Редактировать» в строке меню Premiere Pro, наведите указатель мыши на «Настройки» и выберите «Мультимедиа». Затем отметьте кнопку рядом с кодированием с аппаратным ускорением H264/HEVC (требуется перезагрузка). Затем перезагрузите компьютер.
По теме: Как стабилизировать дрожащие видеоматериалы в Adobe Premiere Pro.
Источник
How to fix selector: 9 error code: 3
How to fix selector: 9 error code: 3 Error code 3 premiere pro-How to Fix Error Compiling Movie errors in Premiere Pro. selector: 9 error code: 3,error code 3 premiere pro reddit,error code 3 premiere pro mac,wraptor dcp error code 3,adobe premiere rush error code 3,adobe error code 3,error code 4 premiere pro,premiere pro error code
 How to Fix Error Compiling Movie errors in Premiere Pro
If these general steps did not work for you, you can inspect the Error Compiling Movie error dialog box more closely for clues on how to fix your issue.
Table of Contents
How can I use the information in the error dialog box to find and fix the problematic clip or effect?
Reading the error dialog box from top to bottom helps discern essential details and potential causes of the issue. First, note which Error Compiling Movie export error classification is listed for your case at the top of the dialog box:
- Import error: the clip(s) you imported and edited are not supported for export. Transcoding might be necessary.
- GPU render error: the GPU you have installed cannot perform the GPU accelerated processes you applied
- Out of memory error: out of RAM for the export. Rebooting the computer may help.
- Export error: issue with an effect or other unknown error
- I/O error: not enough disk space or some other hardware limitation
- Accelerated render error: problem with hardware encoding or decoding and specific formats like H.264
- Render error: error with rendering video preview files or effects prior to encoding
How do I know which clip to fix?
Near the bottom of the Error Compiling Movie dialog box, there is a timecode value or timestamp where you can inspect that location on your Timeline for errors. This is where you should focus your efforts on potential fixes. Once you address these problematic items at the timecode location, you should now be able to export your movie.
What items need to be fixed?
Several things could be related to the item preventing the export. Error classifications can give you an idea of the general problem going on, and timecode timestamps can help you hone in on the location, but here are the things you may be faced with once you locate the issue:
- Corrupt clip: The clip is corrupt and not encoding well. Perhaps the footage came from an unusual source.
- Solution: transcode the clip in Media Encoder to a new format, like ProRes. If the clip has a variable frame rate, use Shutter Encoder to transcode. Replace the clip in question with a new copy of the clip.
- Media not supported: Clip format, frame rate, codec, etc., is not supported or is of poor quality.
- Solution: transcode the clip, as you did with the above. Replace the clip in question with a new copy of the clip.
- The third-party effect is unsupported: applied is an outdated or unsupported effect at that location.
- Solution: Update plug-ins; if unsupported, use an alternative effect. You can also remove the effect.
- Too many video effects and GPU intensive processes: were applied to a clip at that location.
- Solution: Remove effects or use less taxing alternative effects on the clip.
- Corrupt Render Files: The video preview (render) file is corrupt and needs to be deleted at that location.
- Solution: Remove preview files by deleting render files in the Sequence menu > Delete Render Files In to Out.
- Corrupt edit point: Roll the edit point by a frame at the Timecode value.
- Corrupt frame hold: add the frame hold at the Timecode value once more.
- Corrupt transition: remove the transition at the edit point and remove or replace it.
- Corrupt sequence: Copy and paste the existing sequence into a new sequence.
- Corrupt media cache:
- Solution: Delete media cache files.
- Corrupt preferences:
- Solution: Reset preferences
- Out of disk space:
- Solution: Delete files to allow room for the files.
What do I do if I keep getting the error at different locations in the Timeline?
If you’ve removed the effect or changed the clip in question and are still getting the same warning, but with a new timecode location, you likely have too many GPU effects and processes applied throughout the Timeline for a given GPU. Probably, overloading the bandwidth of the GPU is causing an overall failure of the operation. Potential Solutions:
- Software Encoding: Use Software Encoding in the Export Settings dialog box (note: slower exporting time than Hardware Encoding).
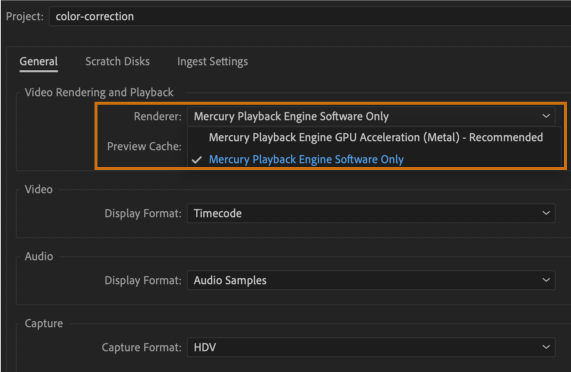
- Change to the Software Only Renderer: If the issue persists, change the renderer of the Mercury Playback Engine to Software Only.
- Choose File > Project Settings > General . The Project Settings dialog box opens.
- Choose Renderer > Mercury Playback Engine Software Only in the Video Rendering and Playback section.

- Fix a corrupt sequence: Copy and paste the existing sequence into a new sequence.
- Update drivers: Download and update video drivers for your GPU from the AMD or NVIDIA site (Windows) or update macOS.
- Remove effects: Remove GPU accelerated effects.
- Avoid the overuse of Adjustment Layers: Limit the number of adjustment layer stacks and duration of adjustment layers containing GPU accelerated effects, like Lumetri Color.
- Application of effects to long clips: Apply effects to shorter individual clips. Remove GPU accelerated effects from longer clips.
- Effect Settings: Change the setting of a GPU accelerated effect.
- Round-trip clips with heavy effects: Export clips containing heavy effects individually, then reimport them with the effects already baked in. Edit them back into the Timeline.
- Reduce GPU processes: Reduce or remove any unnecessary Mercury Playback Engine GPU accelerated processes like scaling, frame rate conversion, and blending modes. FYI: if you are using 4K footage in an HD sequence, you are scaling.
- Disable Hardware Decoding: For H.264 or HEVC exports, try switching off hardware decoding:
- Choose Preferences > Media and d eselect Enable hardware-accelerated decoding (requires restart) . After restarting, try encoding once more.
- Export the sequence to a different file format. For a list of supported file formats, see Formats exported directly from Premiere Pro. Tip: an export to ProRes 422 or ProRes LT can be used as a master file that you can use to create H.264 files and other formats for uploading to sites like YouTube. This is a very reliable way to export should you be having trouble otherwise.
- Export via Media Encoder. Select Queue to open Media Encoder to export your project using Adobe Media Encoder.
- Smart rendering: Use the smart rendering process. This offloads any GPU effects export processes during the effects rendering process, so they are not tasked at export time.
- Buy a better GPU: Purchase a more powerful GPU for your desktop computer or a laptop that has a more powerful GPU.
Unable to export a specific sequence?
If you suspect that the issue could be with a specific sequence (Timeline), try exporting a different sequence and see if it works. If you can export other sequences, your existing sequence could have a problem rendering third-party plugins, transitions, or LUTs. To attempt a resolution for this issue, copy and paste the contents of the sequence into a new sequence in the same project. Still not working? Try importing the sequence into a new project and then exporting again.
What are Error codes and Selectors? Error codes and Selectors can also provide information to help you solve your issue. This info is located at the bottom of the Error Compiling Movie error dialog box.
Error codes are triggered for specific problems. The most common error code, by far, is “Error Code 3, Unknown Error.” In the following chart, you’ll see a few errors that Premiere assigns to something it simply does not know how to deal with. When an “Error Code” number is triggered as unknown, engineering cannot explain it explicitly in the error dialog box.
The following is a key to error codes that you may experience when experiencing issues with exporting your sequence. You’ll note that each error code gives a general idea of the issue in your sequence that triggered the error and timed out your export. See the list of error codes below if you have an unusual error code.
Editors need to do some investigation to solve the issue, unfortunately. The editor can use the essential details within the dialog box to find a fix that works.
There are other Error Compiling Movie errors, but these are known and say as much when the dialog box is triggered. It’s Error Code 3 that gives editors the most trouble because some investigation is usually involved.
Here are the error codes that I have compiled so far.
Solution: Open task manager, close all the Adobe creative cloud services running in the background. Reopen the Premiere Pro project, and select CUDA or OpenCL in the project settings. It should work properly now. The issue was the Creative Cloud Coresync running in the background, just end all creative cloud services running in the background
| Error Compiling Movie Code | Cause of Error | Potential Solution(s) |
| No error | ||
| 1 | User aborted the export | |
| 2 | Export finished normally | |
| 3 | Unknown Error | Fix error or effect at timecode location indicated |
| 4 | Out of disk space error | Delete disk space or choose a drive with more space |
| 5 | Audio Buffer error | |
| 6 | Unknown Error | Choose File > Save As for the project file |
| 7 | Ran out of memory | |
| 8 | File not found | |
| 9 | Too many open files | |
| 10 | Permission violation | |
| 11 | Unable to open the file | |
| 12 | Drive isn’t valid | |
| 13 | Duplicate Filename | |
| 14 | File I/O error | Delete disk space or choose a drive with more space |
| 15 | File is in use | |
| 16 | Exporter Issue | |
| 17 | No more Exporters can be found | |
| 18 | Silent error code | |
| 19 | Video codec issue | |
| 20 | Exporter Error display issue | |
| 21 | Exporter Display warning issue | |
| 22 | Exporter setting issue | |
| 23 | Exporter – the job is too large | |
| 24 | Video codec issue | |
| 25 | Audio codec issue | |
| 26 | Audio channels issue | |
| 27 | Invalid codec issue | |
| 28 | Invalid preset issue | |
| 29 | User canceled export | |
| 30 | Exporter codec issue | |
| 31 | Exporter error related to video encoder | |
| 32 | Exporter error for the audio issue | |
| 33 | Exporter video codec configuration | |
| 34 | Exporter pixel format error | |
| 35 | Error for native encoder output buffer | |
| 36 | Queuing to encoder failure | |
| 37 | Audio codec failure | |
| 38 | Video codec failure | |
| 39 | Muxer failure error | |
| 40 | Versioning error | |
| 41 | Error with color space | |
| 42 | Error when an adaptor cannot be created | |
| 43 | Unknown Error | |
| 44 | Unknown Error | |
| 45 | Unknown Error | |
| 46 | Unknown Error | |
| 47 | Unknown Error | |
| 48 | Unknown Error | |
| 49 | Unknown Error | |
| 50 | Unknown Error | |
| 50 | Unknown Error | |
| -1609629695 | Unknown Error | User Voice Link |
| -1609629690 | Unknown Error | |
| -1610153867 | Unknown Error | |
| -1609760768 | Unknown Error | |
| -2174287036 | Unknown Error | |
| -1 | Unknown Error | |
| 512 | Unknown Error |
Selectors: From what I’ve seen, Selectors appear to refer to a subset of these error codes. I do need to get verification on engineering on specific Selector numbers. Right now, you see some common Selectors, and they can be grouped into cases and solutions for such cases.
Источник
Adobe Premiere Pro — отличная программа для профессионального редактирования видео. Его используют миллионы пользователей вместе с After Effects по всему миру. Хотя это программное обеспечение премиум-класса с ежемесячной подпиской, пользователи никогда не разочаровываются, поскольку функции и возможности редактирования видео, которые оно дает вашей машине, нельзя упустить. При экспорте видео в Premiere Pro некоторые пользователи видят код ошибки 3, ошибка компиляции фильма, ошибка экспорта, ошибка завершения рендеринга на ПК с Windows 11/10. В этом руководстве у нас есть некоторые исправления.
Код ошибки 3 появляется на недавно установленных ПК, где параметры, необходимые для Premiere Pro, настроены неправильно. Эта ошибка в основном возникает, когда пользователь пытается отобразить видео в формате H264. Давайте посмотрим, как мы можем решить эту проблему.
Если вы не можете обработать видео в формате H264 и видите Код ошибки 3, ошибка компиляции фильма, ошибка экспорта, ошибка завершения рендеринга в Premiere Pro, следуйте приведенным ниже инструкциям.
Отключите настройки аппаратного кодирования, установите для режима управления питанием значение «Максимум»Обновите графические драйверыОбновите Premiere Pro
Давайте узнайте подробности о каждом методе.
1] Отключить настройки аппаратного кодирования
Это исправление, которое сработало лично для меня. Вам необходимо отключить настройки аппаратного кодирования. Чтобы отключить их,
откройте Premiere Pro, нажмите Изменить в строке меню и наведите указатель мыши на Настройки в нижней части списка. Затем выберите Медиа в настройках Снимите флажки рядом с кнопками Аппаратное ускорение декодирования H264/HEVC (требуется перезагрузка) и Аппаратное ускорение кодирования H264/HEVC (требуется перезагрузка) Нажмите ОК и закройте Premiere Pro. Затем перезагрузите компьютер.
Проверьте, помогло ли исправление устранить проблему.
2] Установите для режима управления питанием значение Максимум
.
Чтобы избавиться от этой проблемы, вам необходимо установить максимальное управление питанием на графическом процессоре. Вы можете сделать это с помощью панели управления NVIDIA или программного обеспечения AMD Radeon на своем ПК. Если вы являетесь пользователем NVIDIA,
щелкните правой кнопкой мыши на рабочем столе. Нажмите Показать дополнительные параметры. Выберите Панель управления NVIDIA в контекстном меню. Нажмите Управление настройками 3D. Найдите Режим управления питанием в разделе”Настройки”и установите для него максимальную производительность с помощью раскрывающегося меню.
3] Обновите графические драйверы
Некоторые пользователи видят эту ошибку из-за устаревших графических драйверов. Вам необходимо обновить графические драйверы на вашем ПК и устранить проблему.
Вы можете обновить графические драйверы,
4] Обновите Premiere Pro
Проверьте, есть ли доступны ли какие-либо обновления для Premiere Pro. Откройте Adobe Application Updater на своем ПК и нажмите кнопку «Обновить» рядом с Premiere Pro. Он проверит наличие обновлений, загрузит и установит их автоматически.
Как исправить код ошибки 3 в Premiere?
Код ошибки 3 в Premiere Pro можно легко исправить, отключив оборудование ускоренные настройки, обновление графических драйверов, обновление Premier Pro и установка режима управления питанием на максимум.
Как включить аппаратное кодирование в Premiere Pro?
Чтобы включить аппаратное ускорение кодирование в Premiere Pro, нажмите «Редактировать» в строке меню Premiere Pro, наведите указатель мыши на «Настройки» и выберите «Мультимедиа». Затем отметьте кнопку рядом с кодированием с аппаратным ускорением H264/HEVC (требуется перезагрузка). Затем перезагрузите компьютер.
По теме: Как стабилизировать дрожащие видеоматериалы в Adobe Premiere Pro.
Adobe Premiere Pro — это программное обеспечение для редактирования видео, которое выполняет необходимые задачи для создания видео высокой четкости и хорошего качества. Программное обеспечение представляет собой систему нелинейного монтажа, которая идеально подходит профессионалам и любителям. Это отмеченное наградами программное обеспечение отлично справляется со своими задачами, включая импорт видео, аудио и графики, добавление эффектов, экспорт видео в различных форматах и компоновку всех элементов вместе, чтобы они соответствовали визуальной временной шкале. Таким образом, его можно использовать практически для всех распространенных задач редактирования, хотя при экспорте видео есть проблема с программным обеспечением: код ошибки Premiere Pro 3. С этим кодом ошибки сталкиваются многие пользователи, когда они пытаются экспортировать свое видео или контент после редактировать его. Если вы также столкнулись с той же проблемой и ищете решения, вы попали в нужное место. У нас есть идеальное руководство по устранению кода ошибки 3 в Premiere Pro, и мы также познакомим вас с причинами ошибки. Итак, давайте сразу приступим к работе с нашим документом, чтобы исправить код ошибки 3 при компиляции фильма.
Код ошибки 3 в Адоб Премьер Про возникает в системе, когда параметры, необходимые для Premiere Pro, не настроены должным образом. Код ошибки обычно появляется, когда видео обрабатывается в формате H264, оставляя все редактирование на ветер и оставляя видео не полностью скомпилированными. Это также может быть ошибка компиляции фильма, ошибка экспорта или ошибка завершения рендеринга в Windows 10/11.
Что вызывает код ошибки 3?
Некоторые причины вышеупомянутой проблемы перечислены ниже:
- Устаревшие графические драйверы
- Устаревшее программное обеспечение Premiere Pro
- Дубликат файла с тем же названием и форматом
- Недостаточно места на жестком диске
- Неверный выходной диск
- Низкое или среднее использование графического процессора
- Неправильная проекционная нагрузка
Теперь, когда вы знаете причины, которые обычно приводят к ошибке с кодом 3 при экспорте видео в Premiere Pro, пришло время рассмотреть некоторые из лучших методов устранения неполадок, которые идеально подходят для устранения указанных выше причин.
Способ 1: переименовать файл
Основной способ исправить код ошибки 3 — переименовать файл, который вы пытаетесь отобразить. Многие коды ошибок обычно связаны с именами файлов, содержащими специальные символы. Кроме того, специальный символ может помешать компиляции вашего файла, поскольку система не может его прочитать. Поэтому вы должны убедиться, что ваше имя файла имеет обычный алфавит и не содержит специальных символов.
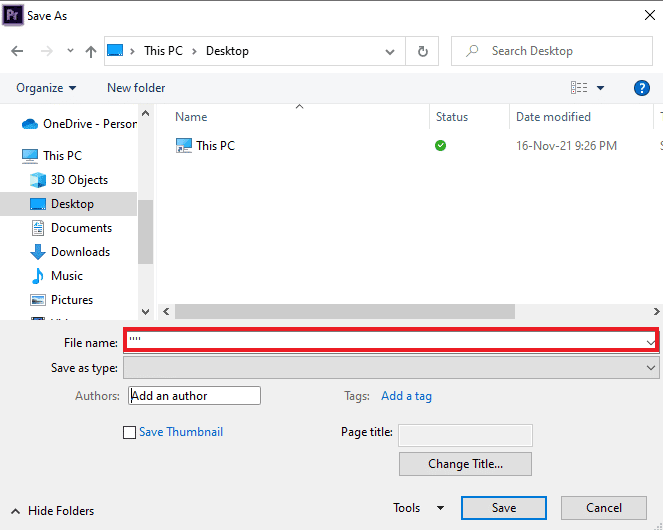
Кроме того, переименование файла отлично подходит для решения проблемы дублирования файлов. Если в вашей системе уже есть файл с похожим именем, форматом и заголовком, он может стать препятствием для экспорта вашего текущего файла. Итак, убедитесь, что вы изменили имя, добавив букву или слово.
Способ 2: перезапустите Adobe Premiere Pro
Еще один простой, но эффективный способ — перезапустить программу. Это очень полезно в тех случаях, когда незначительный сбой или ошибка вызывают проблемы с рендерингом видео.
Примечание. Сохраните отредактированный файл перед его закрытием, чтобы не потерять сделанные изменения.
1. Нажмите одновременно клавиши Ctrl + Shift + Esc, чтобы открыть диспетчер задач.
2. Найдите процесс Adobe Premiere Pro и щелкните его правой кнопкой мыши.
3. Выберите параметр «Завершить задачу», чтобы закрыть приложение.
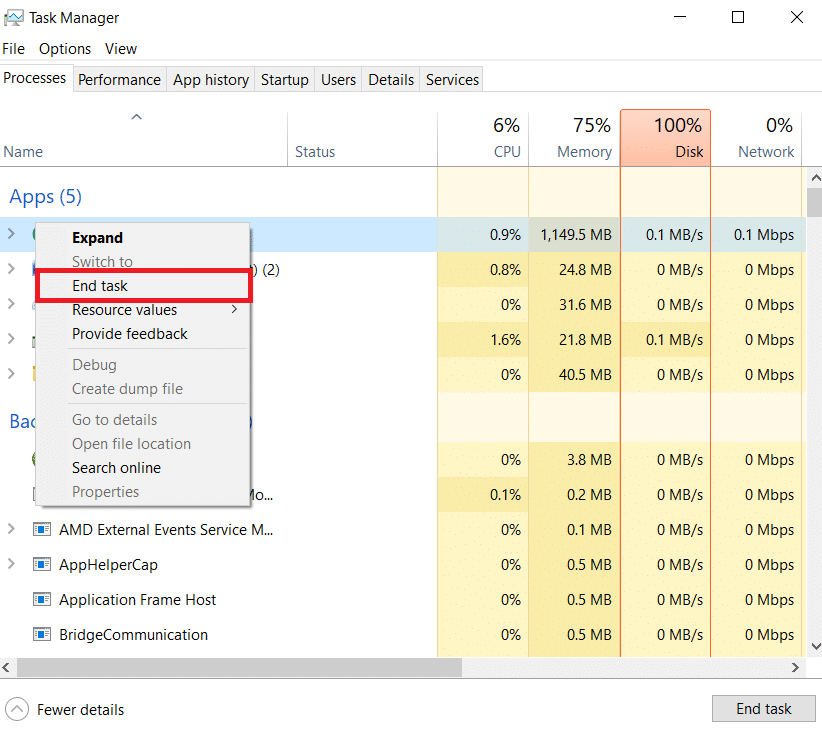
4. Теперь перезапустите приложение и проверьте, можете ли вы теперь экспортировать видео без кода ошибки.
Способ 3: удалить эффекты
Если вы использовали слишком много эффектов в своем видео и добавили специальные функции, такие как интеллектуальный рендеринг или рендеринг с помощью графического процессора, они могут вызвать код ошибки 3 в Premiere Pro. ошибка. Вы также можете попробовать удалить клипы между видео, так как они могут быть несовместимы. Поэтому убедитесь, что вы не добавляете ненужных эффектов в свое видео.
Способ 4: проверить местоположение сбоя экспорта
Вы также можете устранить код ошибки Premiere Pro 3 при экспорте видео, если точно знаете, где сбой привел к ошибке. Это можно сделать, перемотав видео на несколько кадров назад или на несколько кадров вперед с помощью меню в нижней части экрана. Вы можете сначала экспортировать небольшой сегмент, чтобы проверить, сохраняется ли проблема. В противном случае вы не сможете экспортировать остальную часть файла. Переходите к следующему способу.
Способ 5: изменить местоположение файла проекта
Следующий метод, который следует учитывать, если вы по-прежнему сталкиваетесь с проблемами с кодом ошибки 3, — изменить расположение файла проекта. Кроме того, для многих пользователей изменение местоположения экспортируемого видео вместе с файлом проекта было чрезвычайно полезным. Итак, давайте рассмотрим методы, которые могут вам помочь:
1. Когда ваш проект будет готов, выберите параметр «Файл» в верхнем левом углу и нажмите «Сохранить как».
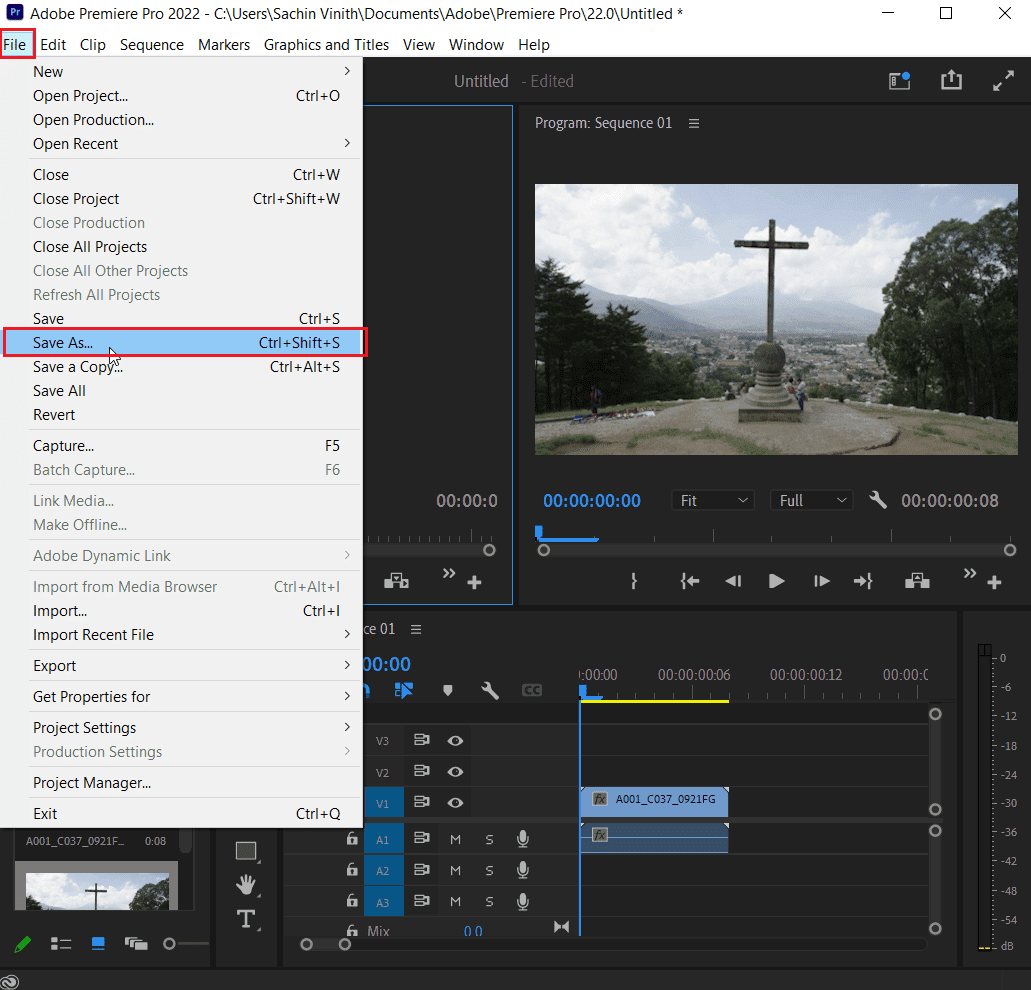
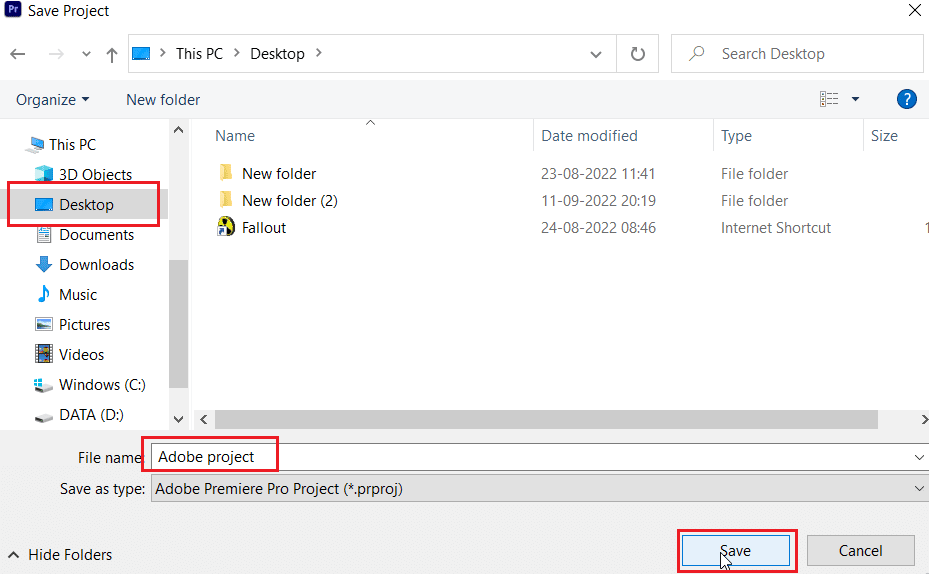
2. Затем укажите местоположение файла на рабочем столе или в другом месте и нажмите «Сохранить».
3. Теперь откройте «Настройки экспорта», выберите вкладку «Вывод» и нажмите «Экспорт».
После выполнения шагов проверьте, можно ли теперь выполнить действие, которое вы пытались обработать ранее, без кода ошибки 3.
Способ 6: обновить Premiere Pro
Если вы все еще пытаетесь исправить ошибку с кодом ошибки 3 при компиляции фильма, вы можете попробовать обновить само приложение. Если вся проблема вызвана ошибкой, ее можно легко решить, установив новую версию Premiere Pro. Чтобы сделать это вручную, вам сначала нужно удалить приложение из вашей системы и установить его последнюю версию с официального сайта. Вы можете легко выполнить следующие шаги для того же самого:
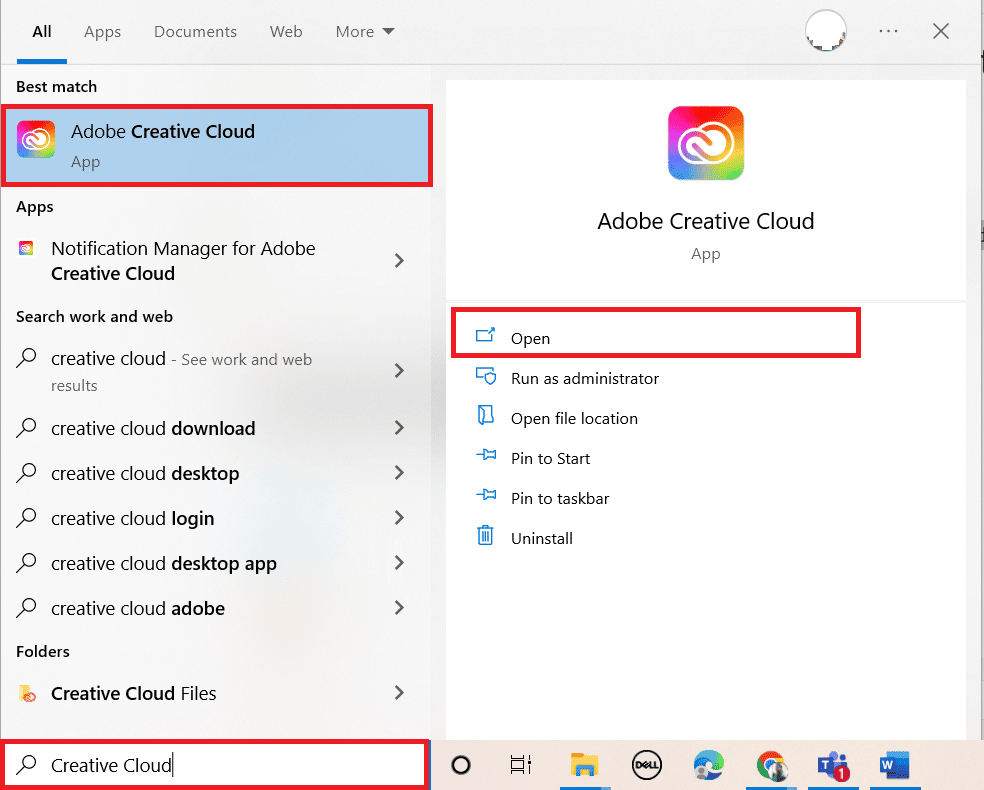
1. Нажмите клавишу Windows. Введите Creative Cloud и нажмите «Открыть».
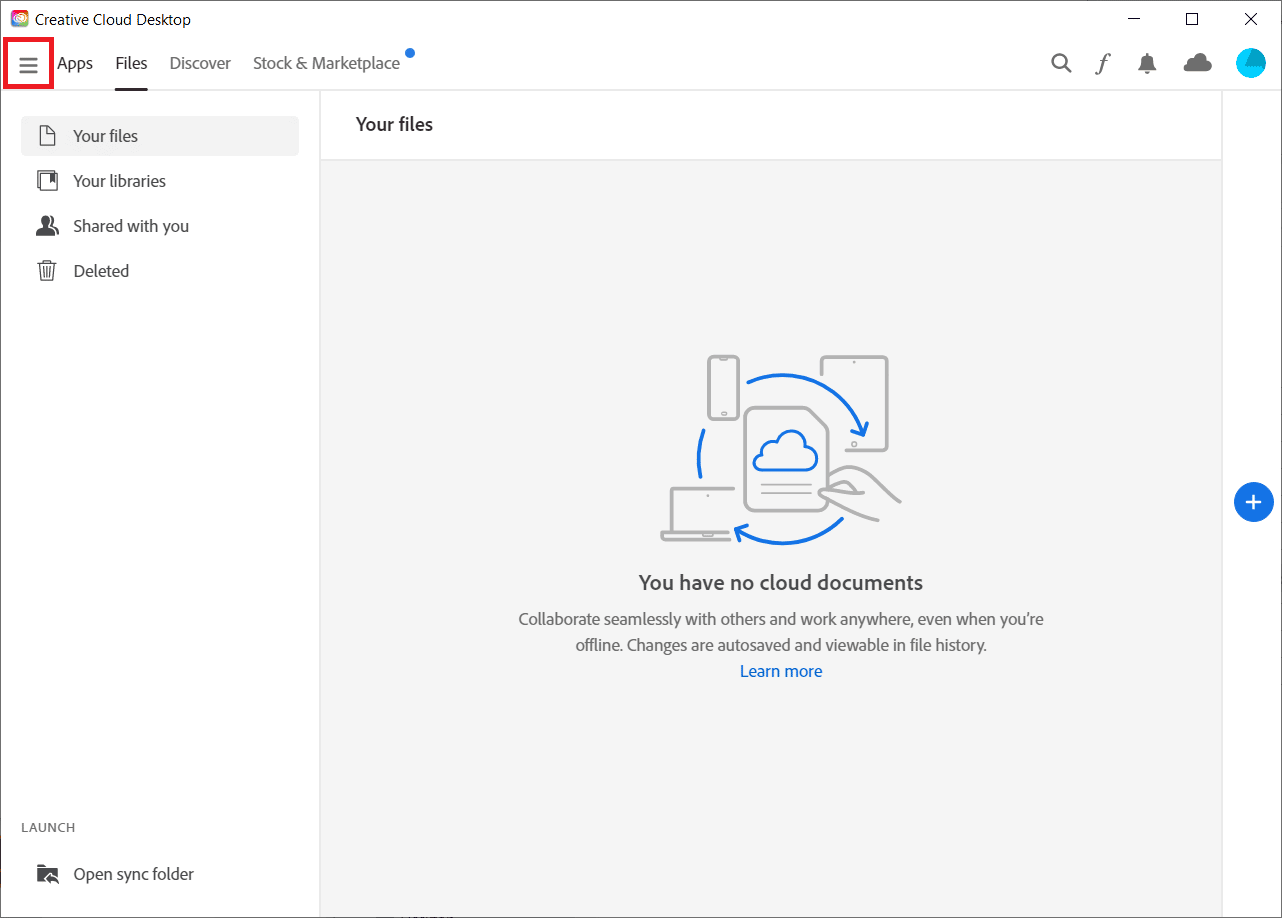
2. Нажмите на три горизонтальные линии в верхнем левом углу.
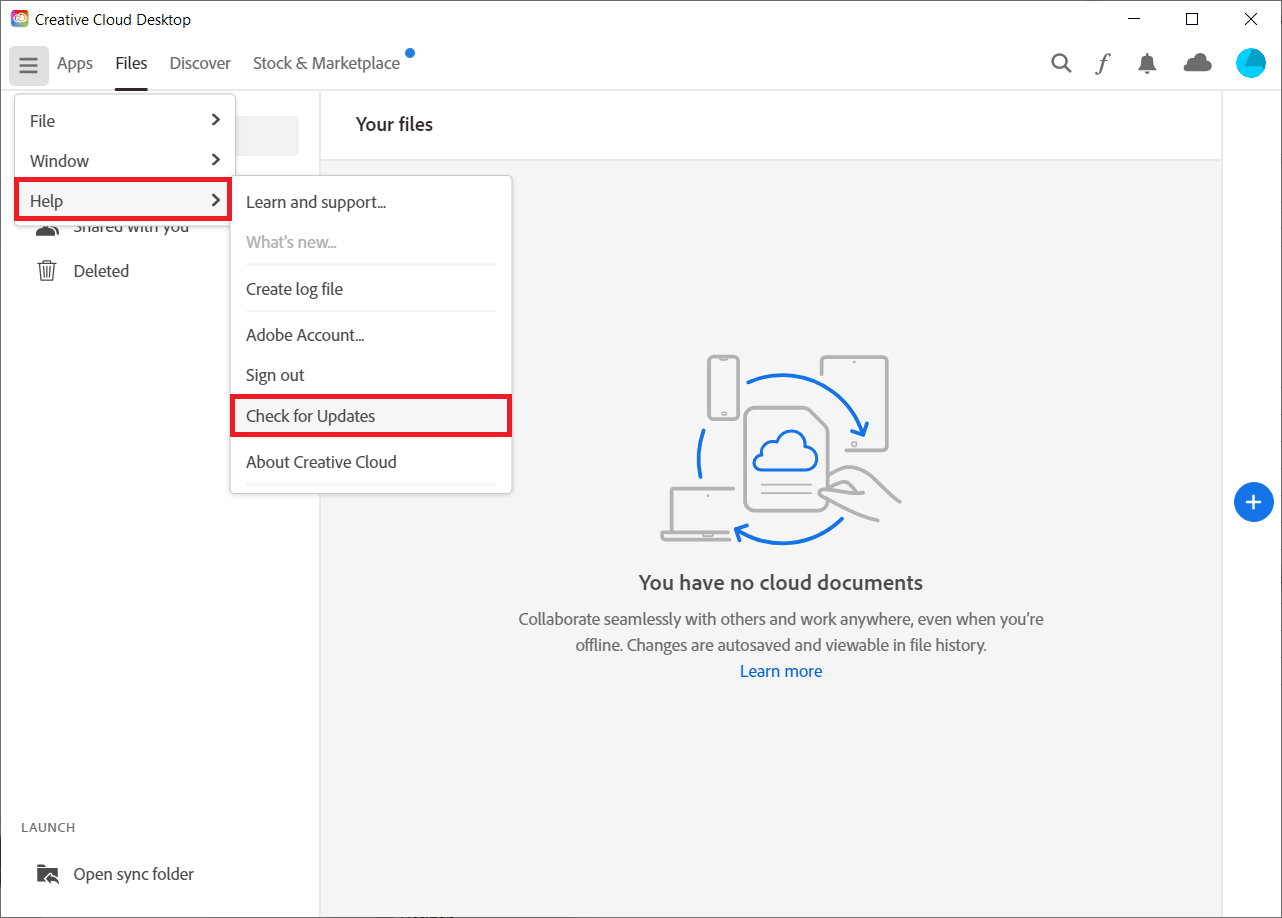
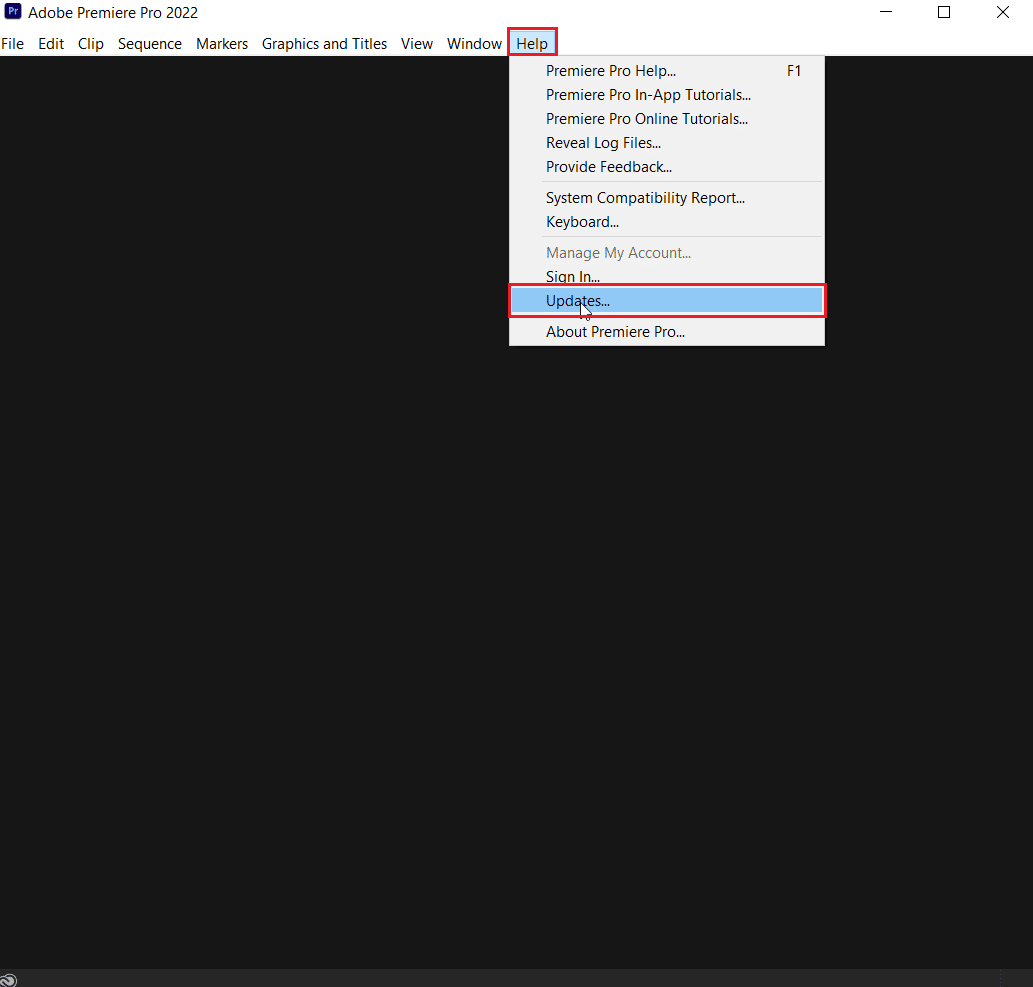
3. Выберите «Справка» > «Проверить наличие обновлений».
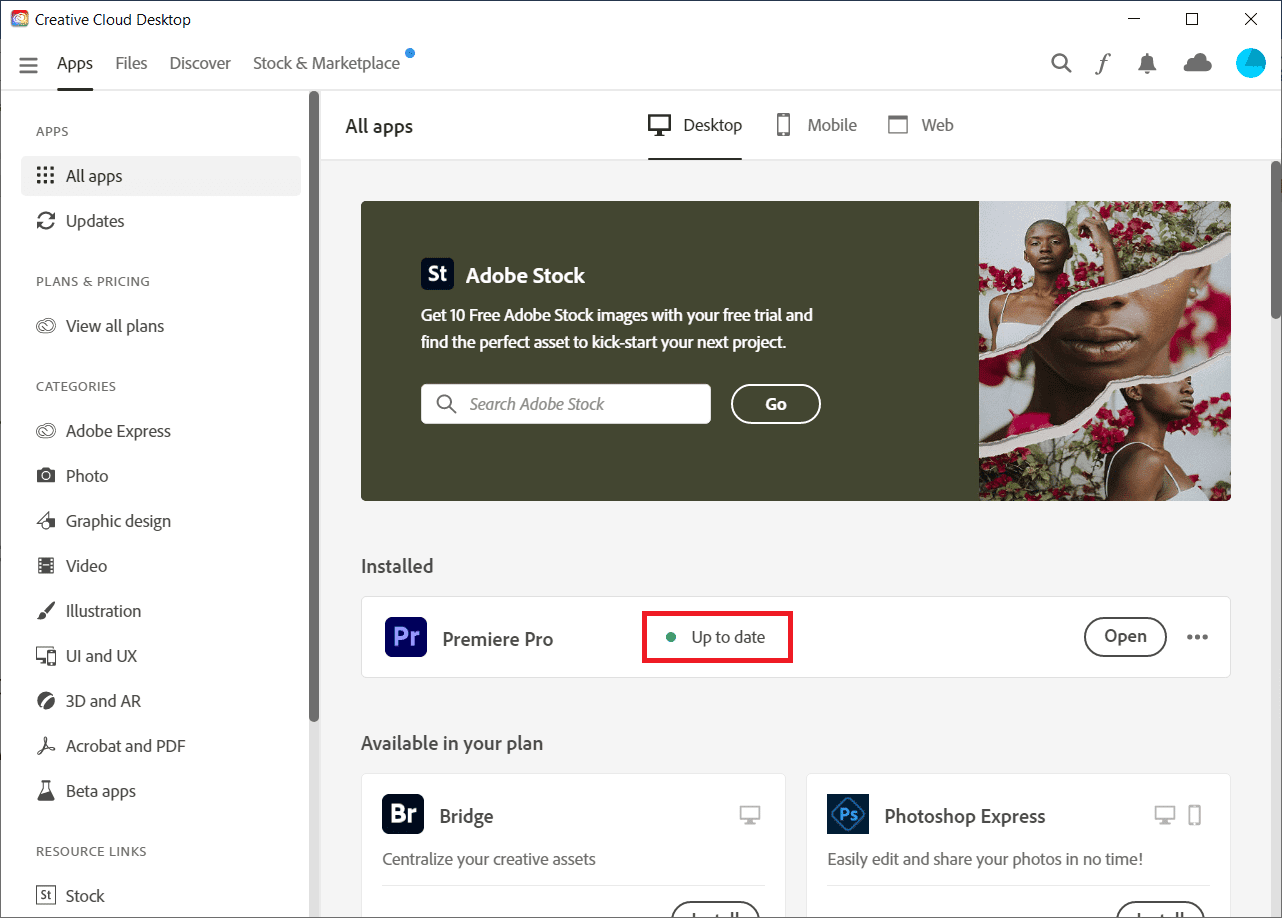
4А. Если доступно обновление, нажмите «Обновить» рядом с Premiere Pro.
4Б. Если программное обеспечение обновлено, рядом с Premiere Pro будет отображаться «Обновлено».
Примечание. В качестве альтернативы вы можете напрямую обновить приложение, перейдя в меню «Справка» > «Обновления…» в приложении Adobe Premiere Pro.
Способ 7: создать новый проект
Вы также можете попробовать создать новый проект для того же файла, так как это удобное и полезное исправление. Следуйте инструкциям ниже для получения подробной информации:
1. Откройте Adobe Premiere Pro, перейдите в «Файл» и выберите «Создать» > «Проект…».
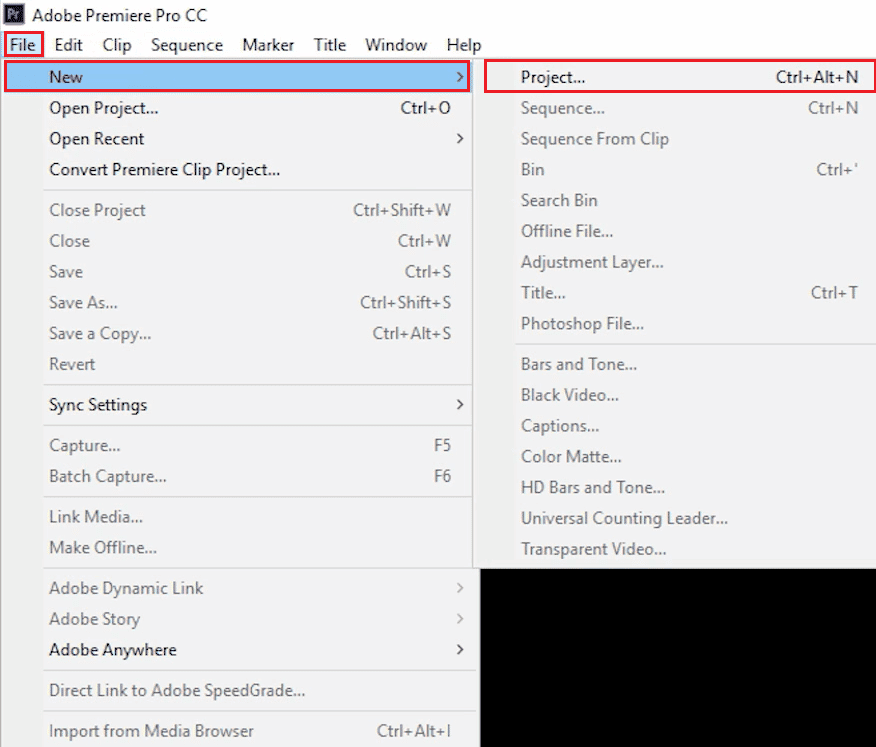
2. Назовите проект и нажмите OK.

3. После создания нового проекта импортируйте предыдущий проект в новый с помощью функции перетаскивания.
После того, как вы закончите импорт, проверьте, не сталкиваетесь ли вы с тем же кодом ошибки при рендеринге или экспорте видео.
Способ 8: изменить настройки кодирования
Для пользователей, которые боролись с экспортом видео в Premiere Pro, отключение настроек аппаратного кодирования очень помогло в устранении кода ошибки Premiere Pro 3. Вы можете сделать то же самое, выполнив шаги, описанные ниже:
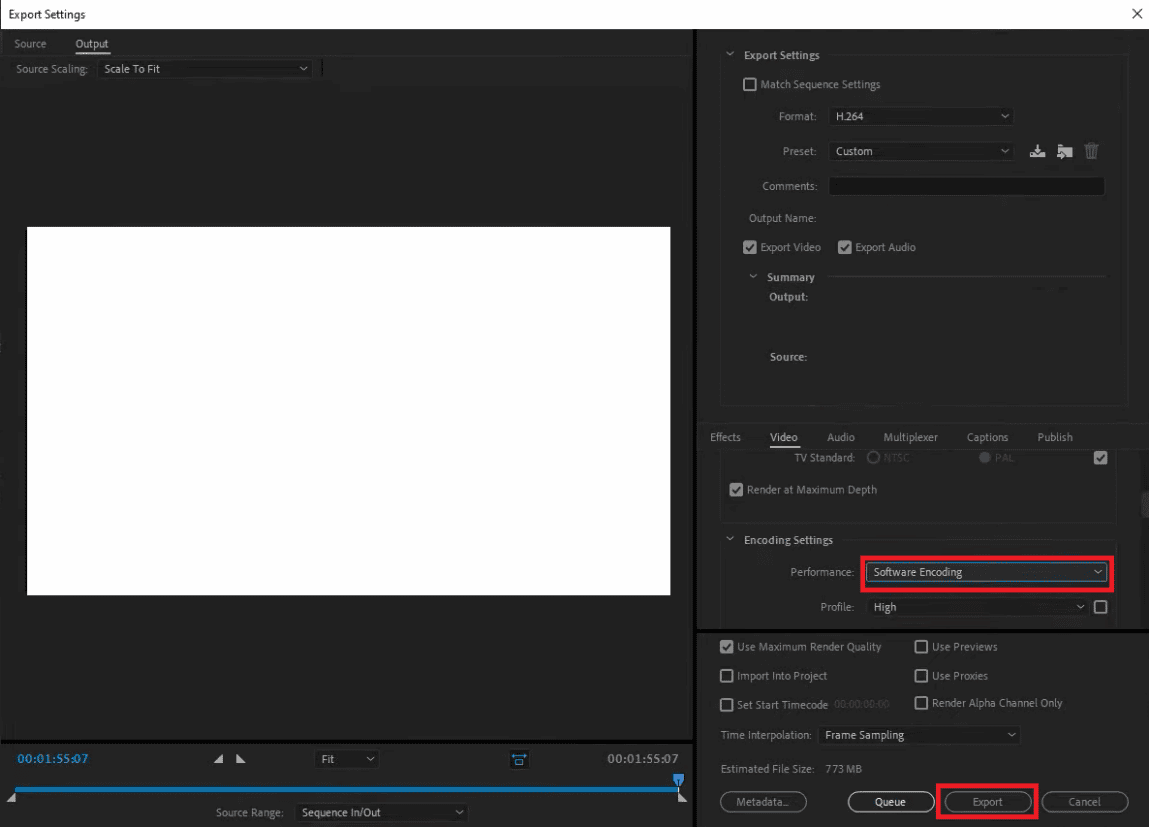
1. В мастере настроек экспорта прокрутите вниз раздел Видео.
2. Выберите «Кодирование программного обеспечения» в разделе «Производительность» в разделе «Настройки кодирования».
3. Затем нажмите кнопку «Экспорт».
Способ 9: сменить средство визуализации видео
Если вы столкнулись с кодом ошибки Premiere Pro 3 при рендеринге видео, вы можете решить проблему, изменив модуль рендеринга видео. Это эффективное решение, которое можно попробовать, если ни один из методов не помог вам до сих пор.
Примечание. Программное обеспечение Mercury Playback Engine может вызывать проблемы со стабильностью на некоторых конфигурациях ПК.
1. Откройте в Premiere Pro видео, которое вызывает ошибку, и нажмите «Файл» в левом верхнем углу.
2. Выберите «Настройки проекта» и нажмите «Общие».
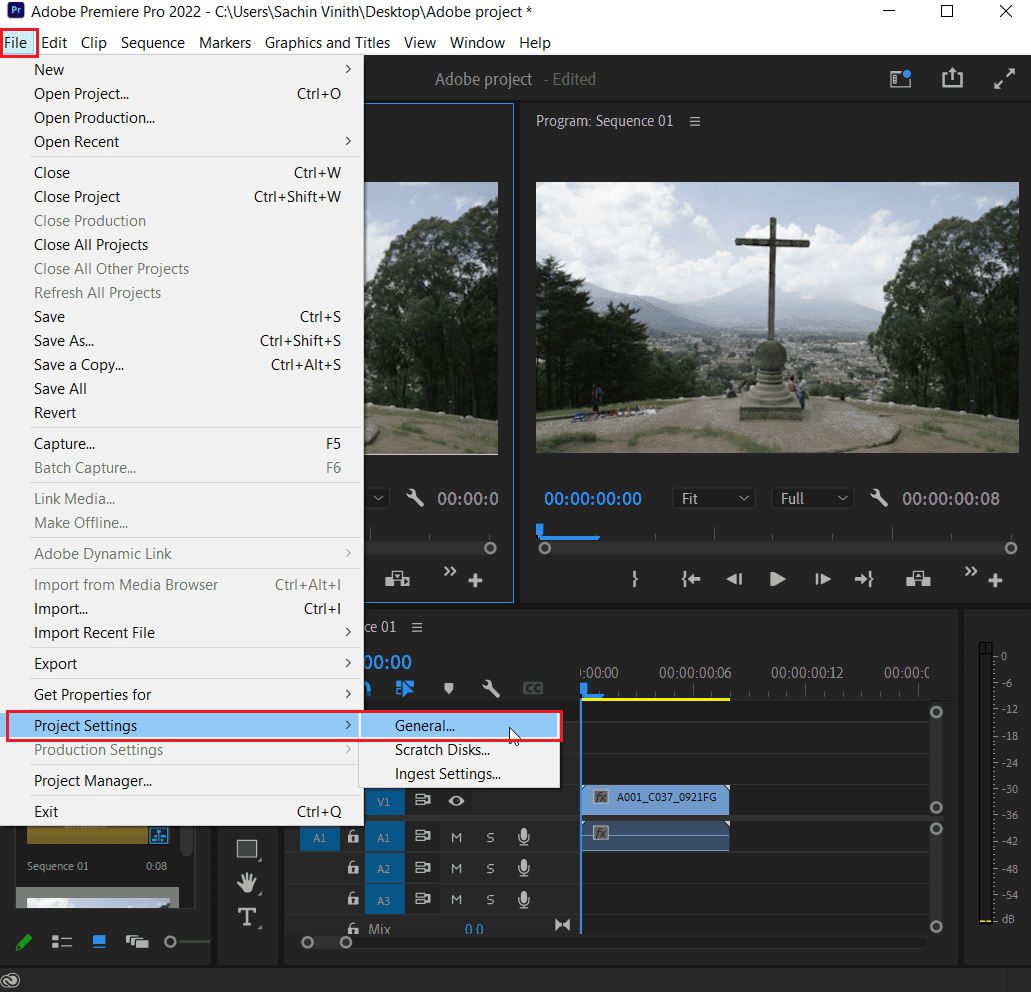
3. Затем перейдите в раздел «Обработка и воспроизведение видео» и нажмите «Обработчик», чтобы открыть раскрывающееся меню.
4. Затем выберите вариант «Только ПО Mercury Playback Engine» и нажмите «ОК».
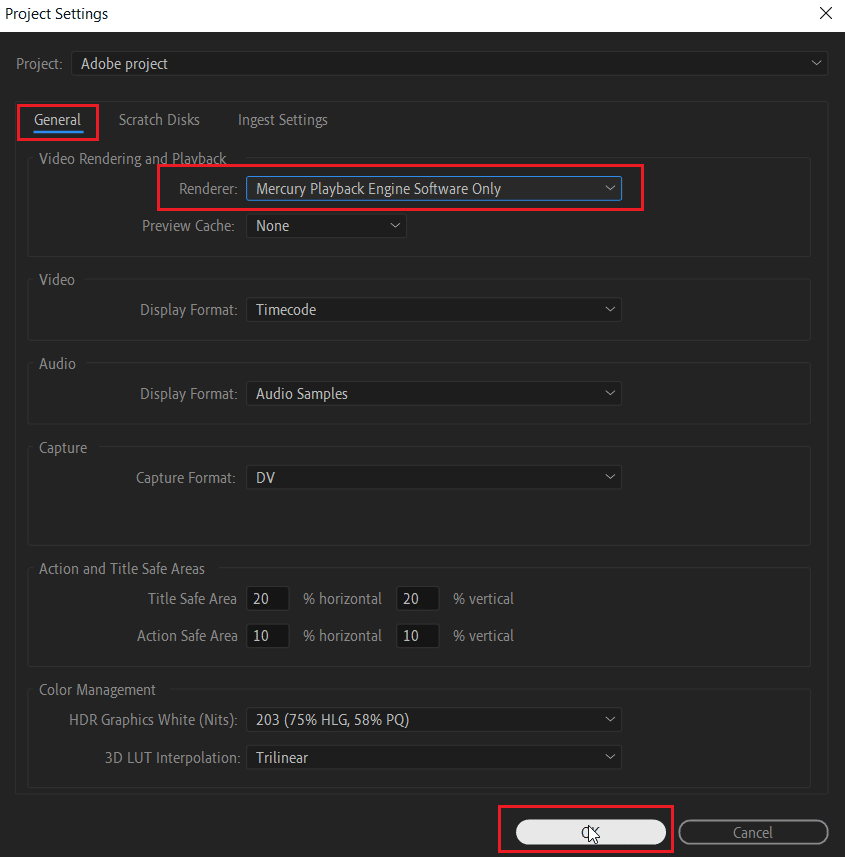
5. Повторно выполните рендеринг видео и проверьте, устранена ли проблема.
Способ 10: обновить графический драйвер
Также возможно, что графический драйвер вашей системы является основной причиной ошибки с кодом 3 в Premiere Pro. Если это так, то важно обновить их. Несмотря на то, что драйверы вашей системы каждый раз получают новые обновления, вы устанавливаете новое обновление для Windows. Если их обновление по какой-либо причине пропускается, вы можете сделать это вручную, используя наше руководство по 4 способам обновления графических драйверов в Windows 10. В общем, всегда рекомендуется поддерживать графический драйвер вашей системы в актуальном состоянии для поддержания стабильности, безопасности, и оптимизированное выполнение системных задач.
Способ 11: установите режим управления питанием на максимум
Для пользователей с панелью управления NVIDIA или программным обеспечением AMD Radeon установка максимального режима управления питанием в графическом процессоре может быть чрезвычайно полезной для исправления кода ошибки 3 в Premiere Pro. Итак, если вы являетесь пользователем NVIDIA, выполните следующие действия:
1. Щелкните правой кнопкой мыши на рабочем столе и выберите Панель управления NVIDIA.
2. Выберите параметр «Управление параметрами 3D» на левой боковой панели.
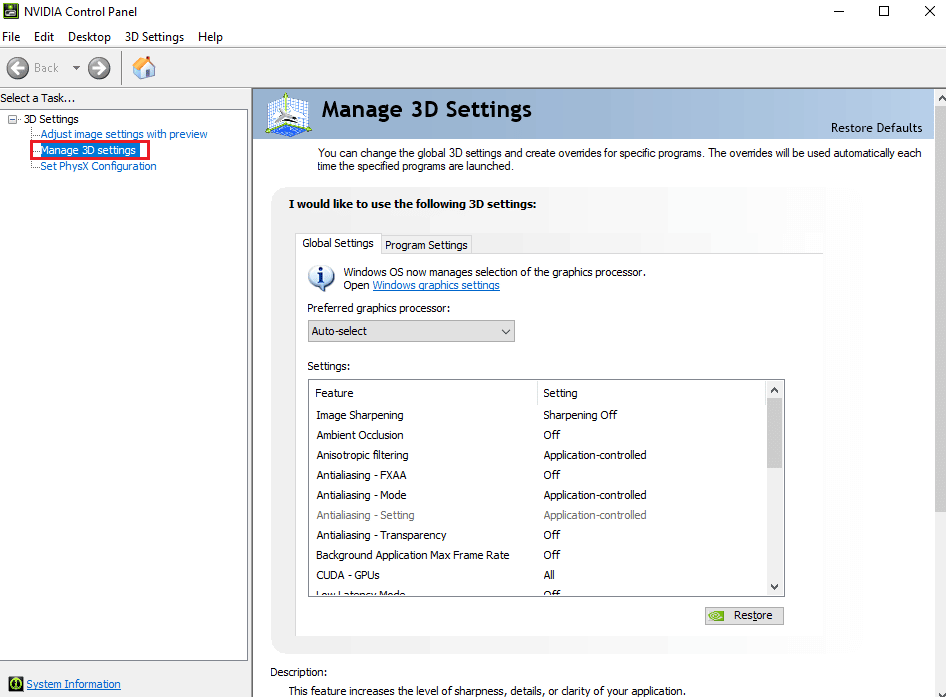
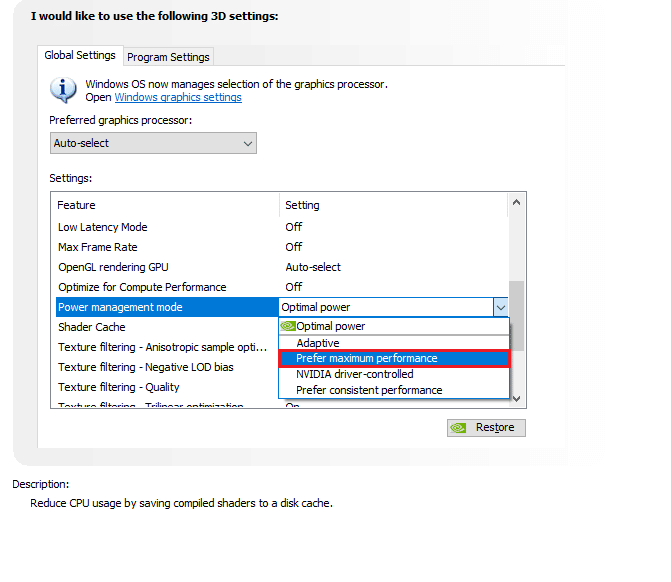
3. Найдите режим управления питанием в разделе «Настройки» и разверните его меню.
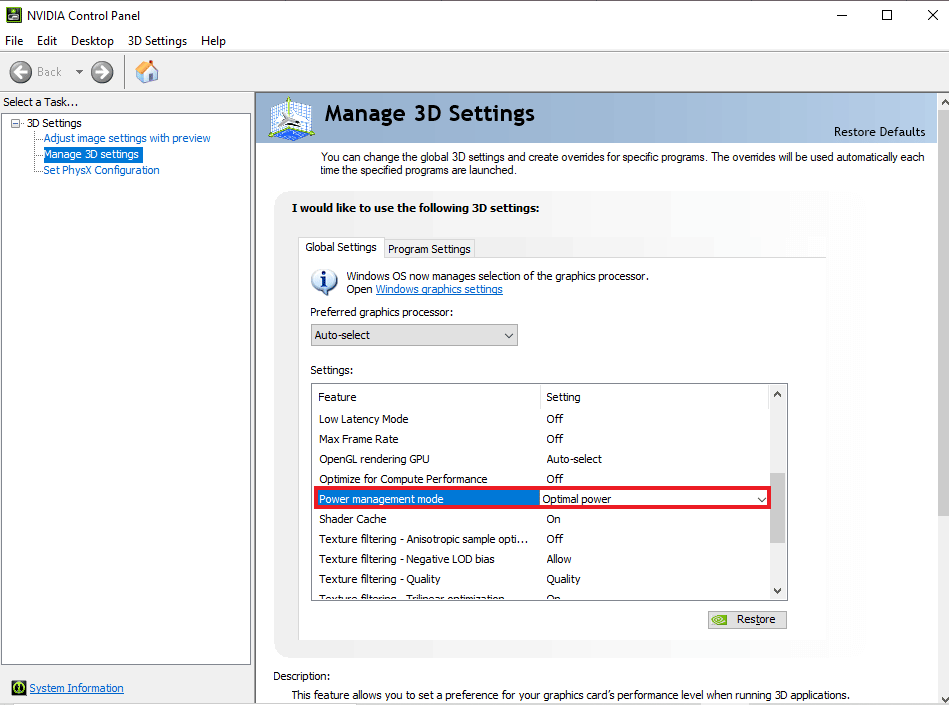
4. Теперь выберите Предпочитать максимальную производительность в раскрывающемся меню.
***
Adobe Premiere Pro — лучшая программа для профессионального редактирования видео. Функции и содержимое приложения делают его одной из лучших программ для редактирования. Однако такие проблемы, как код ошибки Premiere Pro 3, могут быть спойлерами для редакторов, которые часами добавляют эффекты и в конечном итоге получают код ошибки при экспорте своей работы. Мы надеемся, что наше руководство поможет нуждающимся найти решение этой проблемы. Дайте нам знать, как наш документ может быть вам полезен. По вопросам или предложениям вы можете связаться с нами, оставив свои комментарии ниже.
Download PC Repair Tool to quickly find & fix Windows errors automatically
Adobe Premiere Pro is a great program for professional video editing. It is used by millions of users along with After Effects around the world. Though it is a premium software with a monthly subscription, users are never discouraged as the features and video editing capabilities it gives to your machine are unmissable. While exporting a video on Premiere Pro, some users are seeing Error Code 3, Error compiling movie, Export error, Error completing render on their Windows 11/10 PC. In this guide, we have some fixes.

Error Code 3 is seen on recently installed PCs where the settings that are required for Premiere Pro are not configured properly. This error is primarily seen when a user is trying to render a video in H264 format. Let’s see how we can fix the issue.
When you are unable to render a video in H264 format and see Error Code 3, Error compiling movie, Export error, Error completing render on Premiere Pro, follow the below fixes.
- Disable Hardware Encoding Preferences
- Set Power management mode to Maximum
- Update Graphics drivers
- Update Premiere Pro
Let’s get into the details of each method.
Fix Premiere Pro Error Code 3
1] Disable Hardware Encoding Preferences

This is a fix that worked for me personally. You need to disable Hardware encoding preferences. To disable them,
- Open Premiere Pro
- Click on Edit in the Menu bar and hover over Preferences at the bottom of the list
- Then select Media in the Preferences
- Uncheck the buttons beside H264/HEVC hardware accelerated decoding (requires restart), and H264/HEVC hardware accelerated encoding (requires restart)
- Click OK and close Premiere Pro
- Then, restart your PC
Check if the fix has helped you fix the issue.
2] Set Power management mode to Maximum

You need to set the power management on your GPU to the maximum to get rid of the issue. You can do it through NVIDIA Control Panel or AMD Radeon Software on your PC. If you are an NVIDIA user,
- Right-click on the desktop
- Click on Show more options
- Select NVIDIA Control Panel in the context menu
- Click on Manage 3D settings
- Find Power management mode under Settings and set it to prefer maximum performance using the drop-down menu.
3] Update Graphics drivers
Some users are seeing this error due to outdated graphics drivers. You need to update the graphics drivers on your PC and fix the issue.
You can update graphics drivers,
- via Windows Update
- by downloading drivers according to your manufacturer’s website
- via a third-party driver updating software
4] Update Premiere Pro
Check if there are any updates available for Premiere Pro. Open Adobe Application Updater on your PC and click on the Update button beside Premiere Pro. It will check for the updates, download and install them automatically.
How do I fix error code 3 in Premiere?
Error code 3 in Premiere Pro can be fixed easily by disabling hardware accelerated preferences, updating graphics drivers, updating premiere pro, and setting the power management mode to the maximum.
How do I enable hardware encoding in Premiere Pro?
To enable hardware-accelerated encoding in Premiere Pro, click on Edit in the menu bar of Premiere Pro hover over to Preferences, and select Media. Then, check the button beside H264/HEVC hardware accelerated encoding (requires restart). Then, restart your PC.
Related read: How to stabilize Shaky Video Footage in Adobe Premiere Pro.

Guru Mandadi is a tech enthusiast and a movie buff who loves writing about computers and movies. He dreams of living a month devoid of all tech and modern-day advancements in a forest.
How to fix selector: 9 error code: 3 Error code 3 premiere pro-How to Fix Error Compiling Movie errors in Premiere Pro. selector: 9 error code: 3,error code 3 premiere pro reddit,error code 3 premiere pro mac,wraptor dcp error code 3,adobe premiere rush error code 3,adobe error code 3,error code 4 premiere pro,premiere pro error code
If these general steps did not work for you, you can inspect the Error Compiling Movie error dialog box more closely for clues on how to fix your issue.
How can I use the information in the error dialog box to find and fix the problematic clip or effect?
Reading the error dialog box from top to bottom helps discern essential details and potential causes of the issue. First, note which Error Compiling Movie export error classification is listed for your case at the top of the dialog box:
- Import error: the clip(s) you imported and edited are not supported for export. Transcoding might be necessary.
- GPU render error: the GPU you have installed cannot perform the GPU accelerated processes you applied
- Out of memory error: out of RAM for the export. Rebooting the computer may help.
- Export error: issue with an effect or other unknown error
- I/O error: not enough disk space or some other hardware limitation
- Accelerated render error: problem with hardware encoding or decoding and specific formats like H.264
- Render error: error with rendering video preview files or effects prior to encoding
How do I know which clip to fix?
Near the bottom of the Error Compiling Movie dialog box, there is a timecode value or timestamp where you can inspect that location on your Timeline for errors. This is where you should focus your efforts on potential fixes. Once you address these problematic items at the timecode location, you should now be able to export your movie.
What items need to be fixed?
Several things could be related to the item preventing the export. Error classifications can give you an idea of the general problem going on, and timecode timestamps can help you hone in on the location, but here are the things you may be faced with once you locate the issue:
- Corrupt clip: The clip is corrupt and not encoding well. Perhaps the footage came from an unusual source.
- Solution: transcode the clip in Media Encoder to a new format, like ProRes. If the clip has a variable frame rate, use Shutter Encoder to transcode. Replace the clip in question with a new copy of the clip.
- Media not supported: Clip format, frame rate, codec, etc., is not supported or is of poor quality.
- Solution: transcode the clip, as you did with the above. Replace the clip in question with a new copy of the clip.
- The third-party effect is unsupported: applied is an outdated or unsupported effect at that location.
- Solution: Update plug-ins; if unsupported, use an alternative effect. You can also remove the effect.
- Too many video effects and GPU intensive processes: were applied to a clip at that location.
- Solution: Remove effects or use less taxing alternative effects on the clip.
- Corrupt Render Files: The video preview (render) file is corrupt and needs to be deleted at that location.
- Solution: Remove preview files by deleting render files in the Sequence menu > Delete Render Files In to Out.
- Corrupt edit point: Roll the edit point by a frame at the Timecode value.
- Corrupt frame hold: add the frame hold at the Timecode value once more.
- Corrupt transition: remove the transition at the edit point and remove or replace it.
- Corrupt sequence: Copy and paste the existing sequence into a new sequence.
- Corrupt media cache:
- Solution: Delete media cache files.
- Corrupt preferences:
- Solution: Reset preferences
- Out of disk space:
- Solution: Delete files to allow room for the files.
What do I do if I keep getting the error at different locations in the Timeline?
If you’ve removed the effect or changed the clip in question and are still getting the same warning, but with a new timecode location, you likely have too many GPU effects and processes applied throughout the Timeline for a given GPU. Probably, overloading the bandwidth of the GPU is causing an overall failure of the operation. Potential Solutions:
- Software Encoding: Use Software Encoding in the Export Settings dialog box (note: slower exporting time than Hardware Encoding).
- Change to the Software Only Renderer: If the issue persists, change the renderer of the Mercury Playback Engine to Software Only.
- Choose File > Project Settings > General. The Project Settings dialog box opens.
- Choose Renderer > Mercury Playback Engine Software Only in the Video Rendering and Playback section.
Project Settings
- Fix a corrupt sequence: Copy and paste the existing sequence into a new sequence.
- Update drivers: Download and update video drivers for your GPU from the AMD or NVIDIA site (Windows) or update macOS.
- Remove effects: Remove GPU accelerated effects.
- Avoid the overuse of Adjustment Layers: Limit the number of adjustment layer stacks and duration of adjustment layers containing GPU accelerated effects, like Lumetri Color.
- Application of effects to long clips: Apply effects to shorter individual clips. Remove GPU accelerated effects from longer clips.
- Effect Settings: Change the setting of a GPU accelerated effect.
- Round-trip clips with heavy effects: Export clips containing heavy effects individually, then reimport them with the effects already baked in. Edit them back into the Timeline.
- Reduce GPU processes: Reduce or remove any unnecessary Mercury Playback Engine GPU accelerated processes like scaling, frame rate conversion, and blending modes. FYI: if you are using 4K footage in an HD sequence, you are scaling.
- Disable Hardware Decoding: For H.264 or HEVC exports, try switching off hardware decoding:
- Choose Preferences > Media and deselect Enable hardware-accelerated decoding (requires restart). After restarting, try encoding once more.
- Export the sequence to a different file format. For a list of supported file formats, see Formats exported directly from Premiere Pro. Tip: an export to ProRes 422 or ProRes LT can be used as a master file that you can use to create H.264 files and other formats for uploading to sites like YouTube. This is a very reliable way to export should you be having trouble otherwise.
-
Use a built-in export preset. If you’re using a custom export preset, change to a built-in preset in the Export Settings dialog box.
- Export via Media Encoder. Select Queue to open Media Encoder to export your project using Adobe Media Encoder.
- Smart rendering: Use the smart rendering process. This offloads any GPU effects export processes during the effects rendering process, so they are not tasked at export time.
- Buy a better GPU: Purchase a more powerful GPU for your desktop computer or a laptop that has a more powerful GPU.
Unable to export a specific sequence?
If you suspect that the issue could be with a specific sequence (Timeline), try exporting a different sequence and see if it works. If you can export other sequences, your existing sequence could have a problem rendering third-party plugins, transitions, or LUTs. To attempt a resolution for this issue, copy and paste the contents of the sequence into a new sequence in the same project. Still not working? Try importing the sequence into a new project and then exporting again.
Error Codes
What are Error codes and Selectors? Error codes and Selectors can also provide information to help you solve your issue. This info is located at the bottom of the Error Compiling Movie error dialog box.
Error codes are triggered for specific problems. The most common error code, by far, is “Error Code 3, Unknown Error.” In the following chart, you’ll see a few errors that Premiere assigns to something it simply does not know how to deal with. When an “Error Code” number is triggered as unknown, engineering cannot explain it explicitly in the error dialog box.
The following is a key to error codes that you may experience when experiencing issues with exporting your sequence. You’ll note that each error code gives a general idea of the issue in your sequence that triggered the error and timed out your export. See the list of error codes below if you have an unusual error code.
Editors need to do some investigation to solve the issue, unfortunately. The editor can use the essential details within the dialog box to find a fix that works.
There are other Error Compiling Movie errors, but these are known and say as much when the dialog box is triggered. It’s Error Code 3 that gives editors the most trouble because some investigation is usually involved.
Here are the error codes that I have compiled so far.
| Error Compiling Movie Code | Cause of Error | Potential Solution(s) |
| 0 | No error | |
| 1 | User aborted the export | |
| 2 | Export finished normally | |
| 3 | Unknown Error | Fix error or effect at timecode location indicated |
| 4 | Out of disk space error | Delete disk space or choose a drive with more space |
| 5 | Audio Buffer error | |
| 6 | Unknown Error | Choose File > Save As for the project file |
| 7 | Ran out of memory | |
| 8 | File not found | |
| 9 | Too many open files | |
| 10 | Permission violation | |
| 11 | Unable to open the file | |
| 12 | Drive isn’t valid | |
| 13 | Duplicate Filename | |
| 14 | File I/O error | Delete disk space or choose a drive with more space |
| 15 | File is in use | |
| 16 | Exporter Issue | |
| 17 | No more Exporters can be found | |
| 18 | Silent error code | |
| 19 | Video codec issue | |
| 20 | Exporter Error display issue | |
| 21 | Exporter Display warning issue | |
| 22 | Exporter setting issue | |
| 23 | Exporter – the job is too large | |
| 24 | Video codec issue | |
| 25 | Audio codec issue | |
| 26 | Audio channels issue | |
| 27 | Invalid codec issue | |
| 28 | Invalid preset issue | |
| 29 | User canceled export | |
| 30 | Exporter codec issue | |
| 31 | Exporter error related to video encoder | |
| 32 | Exporter error for the audio issue | |
| 33 | Exporter video codec configuration | |
| 34 | Exporter pixel format error | |
| 35 | Error for native encoder output buffer | |
| 36 | Queuing to encoder failure | |
| 37 | Audio codec failure | |
| 38 | Video codec failure | |
| 39 | Muxer failure error | |
| 40 | Versioning error | |
| 41 | Error with color space | |
| 42 | Error when an adaptor cannot be created | |
| 43 | Unknown Error | |
| 44 | Unknown Error | |
| 45 | Unknown Error | |
| 46 | Unknown Error | |
| 47 | Unknown Error | |
| 48 | Unknown Error | |
| 49 | Unknown Error | |
| 50 | Unknown Error | |
| 50 | Unknown Error | |
| -1609629695 | Unknown Error | User Voice Link |
| -1609629690 | Unknown Error |
Solution: Open task manager, close all the Adobe creative cloud services running in the background. Reopen the Premiere Pro project, and select CUDA or OpenCL in the project settings. It should work properly now. The issue was the Creative Cloud Coresync running in the background, just end all creative cloud services running in the background |
| -1610153867 | Unknown Error | |
| -1609760768 | Unknown Error | |
| -2174287036 | Unknown Error | |
| -1 | Unknown Error | |
| 512 | Unknown Error |
Selectors: From what I’ve seen, Selectors appear to refer to a subset of these error codes. I do need to get verification on engineering on specific Selector numbers. Right now, you see some common Selectors, and they can be grouped into cases and solutions for such cases.
-

baimyr
- Нуб

- Сообщения: 3
- Зарегистрирован: 01 июл 2019, 14:21


Ошибка при рендере -1609629695
Доброго времени суток!
Столкнулся на днях с такой проблемой, что при рендере как через энкодер, так и через ае выдаёт ошибку (-1609629695). Пробовал разные кодеки, разное разрешение, менял названия папок и файлов без кириллицы, менял место сохранения на рабочий стол и другие диски, пробовал переустанавливать QuickTime 2 раза и чистить кэш с реестром, пробовал даже видео драйвера, директ и ещё пару обновить (видимо от отчаиния), но ничего не помогает. Уже устал гуглить, потратил 3 дня и всё бестолку.. Что странно, на прошлой неделе рендерил видео и всё было в порядке, после того момента ни каких манипуляций с софтом не производилось, новые плагины и драйвера не ставил.
Не помню как, но при очередном неудачном рендере сохранился файл с логом
———————————-—
— Encoding Time: 00:06:08
06/27/2019 07:16:46 PM : Encoding Failed
———————————————————-—
Export Error
Error compiling movie.
Accelerated Renderer Error
Unable to produce frame.
Writing with exporter: H.264
Writing to file: \?C:UsersbaimyOneDriveDesktopUntitled Project_AMEComp 1.mp4
Writing file type: H264
Around timecode: 00:00:33:35
Rendering at offset: 33.400 seconds
Component: H.264 of type Exporter
Selector: 9
Error code: -1609629695
———————————————————-—
— Encoding Time: 00:06:56
06/28/2019 10:32:55 AM : Encoding Failed
———————————————————-—
Export Error
Error compiling movie.
Accelerated Renderer Error
Unable to produce frame.
Writing with exporter: H.264
Writing to file: \?C:UsersbaimyOneDriveDesktopUntitled Project_AMEComp 1.mp4
Writing file type: H264
Around timecode: 00:00:33:35
Rendering at offset: 33.400 seconds
Component: H.264 of type Exporter
Selector: 9
Error code: -1609629695
————————————————————
и скриншотик с энкодера

-

aeplug
- Санта
- Сообщения: 2801
- Зарегистрирован: 18 мар 2016, 23:20
- Откуда: С Ютуба
- Благодарил (а): 18 раз
- Поблагодарили: 274 раза
- Контактная информация:


Сообщение #2 aeplug » 01 июл 2019, 18:42
Ну значит дело в проекте, может памяти не хватает.
-
aeplug
- Санта
- Сообщения: 2801
- Зарегистрирован: 18 мар 2016, 23:20
- Откуда: С Ютуба
- Благодарил (а): 18 раз
- Поблагодарили: 274 раза
- Контактная информация:
Сообщение #4 aeplug » 01 июл 2019, 21:54
Обычной, надо смотреть забивается она или нет. Попробуй программу Process Hacker, понаблюдай что происходит на графиках.
https://images.techhive.com/images/article/2013/03/process-hacker-100030176-orig.jpg
А вообьще кто ж тебе скажет? Какой-то тяжелый плагин наверно отказывается.
Не надо никаких разных. Надо проверять на AVI без сжатия.
Отправлено спустя 4 минуты 47 секунд:
Around timecode: 00:00:33:35
что у тебя там? он меняется или каждый раз в одном месте?
-
baimyr
- Нуб
- Сообщения: 3
- Зарегистрирован: 01 июл 2019, 14:21
Сообщение #5 baimyr » 01 июл 2019, 23:24
Помониторил, всё как мне кажется ровно, во всяком случае всё так же как и при прошлом рендере который прошёл успешно.
Рендерю с таким пресетом

, в AVI тоже пробовал не получалось.
Around timecode: 00:00:33:35 да, всё время в этом месте, там ключей, переходов между слоями нету, в этом моменте 1 дорожка идёт.
Сейчас ещё попробовал повыключать плагины и зарендерить, результата не дало. Однако если создать новый проект и рендерить какой нибудь совершенно другое видео/картинку не относящуюся к рабочему проекту, то всё получается…
-
aeplug
- Санта
- Сообщения: 2801
- Зарегистрирован: 18 мар 2016, 23:20
- Откуда: С Ютуба
- Благодарил (а): 18 раз
- Поблагодарили: 274 раза
- Контактная информация:
Сообщение #6 aeplug » 01 июл 2019, 23:40
но что то же там делается
ну удали ее, может она бракованная (исходник)
Fix Error Code 3, Ошибка компиляции фильма, Ошибка экспорта в Premiere Pro для Windows 11/10
Published by IT Info on February 5, 2022
Adobe Premiere Pro — отличная программа для профессионального редактирования видео. Его используют миллионы пользователей вместе с After Effects по всему миру. Хотя это программное обеспечение премиум-класса с ежемесячной подпиской, пользователи никогда не разочаровываются, поскольку функции и возможности редактирования видео, которые оно дает вашей машине, нельзя упустить. При экспорте видео в Premiere Pro некоторые пользователи видят код ошибки 3, ошибка компиляции фильма, ошибка экспорта, ошибка завершения рендеринга на ПК с Windows 11/10. В этом руководстве у нас есть некоторые исправления.
Код ошибки 3 появляется на недавно установленных ПК, где параметры, необходимые для Premiere Pro, настроены неправильно. Эта ошибка в основном возникает, когда пользователь пытается отобразить видео в формате H264. Давайте посмотрим, как мы можем решить эту проблему.
Код ошибки 3, Ошибка компиляции фильма, Ошибка экспорта в Premiere Pro
Если вы не можете обработать видео в формате H264 и видите Код ошибки 3, ошибка компиляции фильма, ошибка экспорта, ошибка завершения рендеринга в Premiere Pro, следуйте приведенным ниже инструкциям.
Отключите настройки аппаратного кодирования, установите для режима управления питанием значение «Максимум»Обновите графические драйверыОбновите Premiere Pro
Давайте узнайте подробности о каждом методе.
1] Отключить настройки аппаратного кодирования
Это исправление, которое сработало лично для меня. Вам необходимо отключить настройки аппаратного кодирования. Чтобы отключить их,
откройте Premiere Pro, нажмите Изменить в строке меню и наведите указатель мыши на Настройки в нижней части списка. Затем выберите Медиа в настройках Снимите флажки рядом с кнопками Аппаратное ускорение декодирования H264/HEVC (требуется перезагрузка) и Аппаратное ускорение кодирования H264/HEVC (требуется перезагрузка) Нажмите ОК и закройте Premiere Pro. Затем перезагрузите компьютер.
Проверьте, помогло ли исправление устранить проблему.
2] Установите для режима управления питанием значение Максимум
Чтобы избавиться от этой проблемы, вам необходимо установить максимальное управление питанием на графическом процессоре. Вы можете сделать это с помощью панели управления NVIDIA или программного обеспечения AMD Radeon на своем ПК. Если вы являетесь пользователем NVIDIA,
щелкните правой кнопкой мыши на рабочем столе. Нажмите Показать дополнительные параметры. Выберите Панель управления NVIDIA в контекстном меню. Нажмите Управление настройками 3D. Найдите Режим управления питанием в разделе”Настройки”и установите для него максимальную производительность с помощью раскрывающегося меню.
3] Обновите графические драйверы
Некоторые пользователи видят эту ошибку из-за устаревших графических драйверов. Вам необходимо обновить графические драйверы на вашем ПК и устранить проблему.
Вы можете обновить графические драйверы,
4] Обновите Premiere Pro
Проверьте, есть ли доступны ли какие-либо обновления для Premiere Pro. Откройте Adobe Application Updater на своем ПК и нажмите кнопку «Обновить» рядом с Premiere Pro. Он проверит наличие обновлений, загрузит и установит их автоматически.
Как исправить код ошибки 3 в Premiere?
Код ошибки 3 в Premiere Pro можно легко исправить, отключив оборудование ускоренные настройки, обновление графических драйверов, обновление Premier Pro и установка режима управления питанием на максимум.
Как включить аппаратное кодирование в Premiere Pro?
Чтобы включить аппаратное ускорение кодирование в Premiere Pro, нажмите «Редактировать» в строке меню Premiere Pro, наведите указатель мыши на «Настройки» и выберите «Мультимедиа». Затем отметьте кнопку рядом с кодированием с аппаратным ускорением H264/HEVC (требуется перезагрузка). Затем перезагрузите компьютер.
По теме: Как стабилизировать дрожащие видеоматериалы в Adobe Premiere Pro.
Источник
How to fix selector: 9 error code: 3
How to fix selector: 9 error code: 3 Error code 3 premiere pro-How to Fix Error Compiling Movie errors in Premiere Pro. selector: 9 error code: 3,error code 3 premiere pro reddit,error code 3 premiere pro mac,wraptor dcp error code 3,adobe premiere rush error code 3,adobe error code 3,error code 4 premiere pro,premiere pro error code
How to Fix Error Compiling Movie errors in Premiere Pro
If these general steps did not work for you, you can inspect the Error Compiling Movie error dialog box more closely for clues on how to fix your issue.
Table of Contents
How can I use the information in the error dialog box to find and fix the problematic clip or effect?
Reading the error dialog box from top to bottom helps discern essential details and potential causes of the issue. First, note which Error Compiling Movie export error classification is listed for your case at the top of the dialog box:
- Import error: the clip(s) you imported and edited are not supported for export. Transcoding might be necessary.
- GPU render error: the GPU you have installed cannot perform the GPU accelerated processes you applied
- Out of memory error: out of RAM for the export. Rebooting the computer may help.
- Export error: issue with an effect or other unknown error
- I/O error: not enough disk space or some other hardware limitation
- Accelerated render error: problem with hardware encoding or decoding and specific formats like H.264
- Render error: error with rendering video preview files or effects prior to encoding
How do I know which clip to fix?
Near the bottom of the Error Compiling Movie dialog box, there is a timecode value or timestamp where you can inspect that location on your Timeline for errors. This is where you should focus your efforts on potential fixes. Once you address these problematic items at the timecode location, you should now be able to export your movie.
What items need to be fixed?
Several things could be related to the item preventing the export. Error classifications can give you an idea of the general problem going on, and timecode timestamps can help you hone in on the location, but here are the things you may be faced with once you locate the issue:
- Corrupt clip: The clip is corrupt and not encoding well. Perhaps the footage came from an unusual source.
- Solution: transcode the clip in Media Encoder to a new format, like ProRes. If the clip has a variable frame rate, use Shutter Encoder to transcode. Replace the clip in question with a new copy of the clip.
- Media not supported: Clip format, frame rate, codec, etc., is not supported or is of poor quality.
- Solution: transcode the clip, as you did with the above. Replace the clip in question with a new copy of the clip.
- The third-party effect is unsupported: applied is an outdated or unsupported effect at that location.
- Solution: Update plug-ins; if unsupported, use an alternative effect. You can also remove the effect.
- Too many video effects and GPU intensive processes: were applied to a clip at that location.
- Solution: Remove effects or use less taxing alternative effects on the clip.
- Corrupt Render Files: The video preview (render) file is corrupt and needs to be deleted at that location.
- Solution: Remove preview files by deleting render files in the Sequence menu > Delete Render Files In to Out.
- Corrupt edit point: Roll the edit point by a frame at the Timecode value.
- Corrupt frame hold: add the frame hold at the Timecode value once more.
- Corrupt transition: remove the transition at the edit point and remove or replace it.
- Corrupt sequence: Copy and paste the existing sequence into a new sequence.
- Corrupt media cache:
- Solution: Delete media cache files.
- Corrupt preferences:
- Solution: Reset preferences
- Out of disk space:
- Solution: Delete files to allow room for the files.
What do I do if I keep getting the error at different locations in the Timeline?
If you’ve removed the effect or changed the clip in question and are still getting the same warning, but with a new timecode location, you likely have too many GPU effects and processes applied throughout the Timeline for a given GPU. Probably, overloading the bandwidth of the GPU is causing an overall failure of the operation. Potential Solutions:
- Software Encoding: Use Software Encoding in the Export Settings dialog box (note: slower exporting time than Hardware Encoding).
- Change to the Software Only Renderer: If the issue persists, change the renderer of the Mercury Playback Engine to Software Only.
- Choose File > Project Settings > General . The Project Settings dialog box opens.
- Choose Renderer > Mercury Playback Engine Software Only in the Video Rendering and Playback section.
- Fix a corrupt sequence: Copy and paste the existing sequence into a new sequence.
- Update drivers: Download and update video drivers for your GPU from the AMD or NVIDIA site (Windows) or update macOS.
- Remove effects: Remove GPU accelerated effects.
- Avoid the overuse of Adjustment Layers: Limit the number of adjustment layer stacks and duration of adjustment layers containing GPU accelerated effects, like Lumetri Color.
- Application of effects to long clips: Apply effects to shorter individual clips. Remove GPU accelerated effects from longer clips.
- Effect Settings: Change the setting of a GPU accelerated effect.
- Round-trip clips with heavy effects: Export clips containing heavy effects individually, then reimport them with the effects already baked in. Edit them back into the Timeline.
- Reduce GPU processes: Reduce or remove any unnecessary Mercury Playback Engine GPU accelerated processes like scaling, frame rate conversion, and blending modes. FYI: if you are using 4K footage in an HD sequence, you are scaling.
- Disable Hardware Decoding: For H.264 or HEVC exports, try switching off hardware decoding:
- Choose Preferences > Media and d eselect Enable hardware-accelerated decoding (requires restart) . After restarting, try encoding once more.
- Export the sequence to a different file format. For a list of supported file formats, see Formats exported directly from Premiere Pro. Tip: an export to ProRes 422 or ProRes LT can be used as a master file that you can use to create H.264 files and other formats for uploading to sites like YouTube. This is a very reliable way to export should you be having trouble otherwise.
- Export via Media Encoder. Select Queue to open Media Encoder to export your project using Adobe Media Encoder.
- Smart rendering: Use the smart rendering process. This offloads any GPU effects export processes during the effects rendering process, so they are not tasked at export time.
- Buy a better GPU: Purchase a more powerful GPU for your desktop computer or a laptop that has a more powerful GPU.
Unable to export a specific sequence?
If you suspect that the issue could be with a specific sequence (Timeline), try exporting a different sequence and see if it works. If you can export other sequences, your existing sequence could have a problem rendering third-party plugins, transitions, or LUTs. To attempt a resolution for this issue, copy and paste the contents of the sequence into a new sequence in the same project. Still not working? Try importing the sequence into a new project and then exporting again.
What are Error codes and Selectors? Error codes and Selectors can also provide information to help you solve your issue. This info is located at the bottom of the Error Compiling Movie error dialog box.
Error codes are triggered for specific problems. The most common error code, by far, is “Error Code 3, Unknown Error.” In the following chart, you’ll see a few errors that Premiere assigns to something it simply does not know how to deal with. When an “Error Code” number is triggered as unknown, engineering cannot explain it explicitly in the error dialog box.
The following is a key to error codes that you may experience when experiencing issues with exporting your sequence. You’ll note that each error code gives a general idea of the issue in your sequence that triggered the error and timed out your export. See the list of error codes below if you have an unusual error code.
Editors need to do some investigation to solve the issue, unfortunately. The editor can use the essential details within the dialog box to find a fix that works.
There are other Error Compiling Movie errors, but these are known and say as much when the dialog box is triggered. It’s Error Code 3 that gives editors the most trouble because some investigation is usually involved.
Here are the error codes that I have compiled so far.
Solution: Open task manager, close all the Adobe creative cloud services running in the background. Reopen the Premiere Pro project, and select CUDA or OpenCL in the project settings. It should work properly now. The issue was the Creative Cloud Coresync running in the background, just end all creative cloud services running in the background
| Error Compiling Movie Code | Cause of Error | Potential Solution(s) |
| No error | ||
| 1 | User aborted the export | |
| 2 | Export finished normally | |
| 3 | Unknown Error | Fix error or effect at timecode location indicated |
| 4 | Out of disk space error | Delete disk space or choose a drive with more space |
| 5 | Audio Buffer error | |
| 6 | Unknown Error | Choose File > Save As for the project file |
| 7 | Ran out of memory | |
| 8 | File not found | |
| 9 | Too many open files | |
| 10 | Permission violation | |
| 11 | Unable to open the file | |
| 12 | Drive isn’t valid | |
| 13 | Duplicate Filename | |
| 14 | File I/O error | Delete disk space or choose a drive with more space |
| 15 | File is in use | |
| 16 | Exporter Issue | |
| 17 | No more Exporters can be found | |
| 18 | Silent error code | |
| 19 | Video codec issue | |
| 20 | Exporter Error display issue | |
| 21 | Exporter Display warning issue | |
| 22 | Exporter setting issue | |
| 23 | Exporter – the job is too large | |
| 24 | Video codec issue | |
| 25 | Audio codec issue | |
| 26 | Audio channels issue | |
| 27 | Invalid codec issue | |
| 28 | Invalid preset issue | |
| 29 | User canceled export | |
| 30 | Exporter codec issue | |
| 31 | Exporter error related to video encoder | |
| 32 | Exporter error for the audio issue | |
| 33 | Exporter video codec configuration | |
| 34 | Exporter pixel format error | |
| 35 | Error for native encoder output buffer | |
| 36 | Queuing to encoder failure | |
| 37 | Audio codec failure | |
| 38 | Video codec failure | |
| 39 | Muxer failure error | |
| 40 | Versioning error | |
| 41 | Error with color space | |
| 42 | Error when an adaptor cannot be created | |
| 43 | Unknown Error | |
| 44 | Unknown Error | |
| 45 | Unknown Error | |
| 46 | Unknown Error | |
| 47 | Unknown Error | |
| 48 | Unknown Error | |
| 49 | Unknown Error | |
| 50 | Unknown Error | |
| 50 | Unknown Error | |
| -1609629695 | Unknown Error | User Voice Link |
| -1609629690 | Unknown Error | |
| -1610153867 | Unknown Error | |
| -1609760768 | Unknown Error | |
| -2174287036 | Unknown Error | |
| -1 | Unknown Error | |
| 512 | Unknown Error |
Selectors: From what I’ve seen, Selectors appear to refer to a subset of these error codes. I do need to get verification on engineering on specific Selector numbers. Right now, you see some common Selectors, and they can be grouped into cases and solutions for such cases.
Источник