I’m in Kubuntu 14.04 , I want to create a virtualenv with python3.4. I did with python2.7 before in other folder. But when I try:
pyvenv-3.4 venv
I’ve got:
Error: Command '['/home/fmr/projects/ave/venv/bin/python3.4', '-Im', 'ensurepip', '--upgrade', '--default-pip']' returned non-zero exit status 1
asked Jun 9, 2014 at 15:06
![]()
2
You are missing the venv lib for python 3.4, just run:
$ apt-get install python3.4-dev python3.4-venv
And then create your virtualenv
python3.4 -m venv myVenv
![]()
answered Aug 14, 2017 at 10:27
![]()
GregoryGregory
5,9944 gold badges27 silver badges26 bronze badges
7
I got a solution installing python-virtualenv
sudo apt-get install python-virtualenv
and using
virtualenv --python=/usr/bin/python3.4 venv
answered Jun 9, 2014 at 15:18
![]()
kahonmlgkahonmlg
3,6013 gold badges17 silver badges21 bronze badges
4
Here is an O/S agnostic solution:
Both the pyvenv and python commands themselves include a --without-pip option that enable you to work around this issue; without resorting to setuptool or other headaches. Taking note of my inline comments below, here’s how to do it, and is very easy to understand:
user$ pyvenv --without-pip ./pyvenv.d          # Create virtual environment this way;
user$ python -m venv --without-pip ./pyvenv.d  # --OR-- this newer way. Both work.

user$ source ./pyvenv.d/bin/activate  # Now activate this new virtual environment.
(pyvenv.d) user$

# Within it, invoke this well-known script to manually install pip(1) into /pyvenv.d:
(pyvenv.d) user$ curl https://bootstrap.pypa.io/get-pip.py | python

(pyvenv.d) user$ deactivate           # Next, reactivate this virtual environment,
user$ source ./pyvenv.d/bin/activate  # which will now include the pip(1) command.
(pyvenv.d) user$

(pyvenv.d) user$ which pip            # Verify that pip(1) is indeed present.
/path/to/pyvenv.d/bin/pip

(pyvenv.d) user$ pip install --upgrade pip # And finally, upgrade pip(1) itself;
(pyvenv.d) user$                           # although it will likely be the
                                           # latest version. And that's it!
I hope this helps. (◠﹏◠)/
answered Jan 2, 2017 at 17:09
![]()
NYCeyesNYCeyes
5,0556 gold badges54 silver badges61 bronze badges
1
This is my solution for the error:
$ python3.6 -m venv venv
Failing command: [‘/venv/bin/python3.6’, ‘-Im’, ‘ensurepip’, ‘—upgrade’, ‘—default-pip’]
Solution:
$ rm -rf venv
$ apt install python3.6-venv
$ python3.6 -m venv venv
answered Jun 16, 2020 at 19:09
![]()
mascaimascai
9031 gold badge5 silver badges23 bronze badges
3
Same problem on Linux Mint 17 (which is basically Ubuntu 14.04). Installing python3.4-venv didn’t work, so I created virtualenv without pip and then installed pip manually.
-
Create virtualenv and activate it
python3 -m venv --without-pip foo source foo/bin/activate -
Download latest versions of
setuptoolsandpip:wget https://pypi.python.org/packages/source/s/setuptools/setuptools-7.0.tar.gz#md5=6245d6752e2ef803c365f560f7f2f940 wget https://pypi.python.org/packages/source/p/pip/pip-1.5.6.tar.gz#md5=01026f87978932060cc86c1dc527903e -
Unpack and install them
tar xf setuptools-7.0.tar.gz
tar xf pip-1.5.6.tar.gz
cd setuptools-7.0
python setup.py install
cd ../pip-1.5.6
python setup.py install
answered Dec 4, 2014 at 16:06
![]()
1
Pyvenv comes bundled with newer version of python 3 and is supposed to replace virtualenv, so it’s not quite the same thing.
There was some problem with the python 3.4 in the first release of Ubuntu 14.04 that caused this error.
Upgrading the distro solved this issue for me. I guess it probably works with Kubuntu as well.
sudo do-release-upgrade -d # this takes a while, and involves a reboot as well.
sudo apt-get install python3.4-venv
pyvenv-3.4 venv
Please read the docs for do-release-upgrade before running it. Using the -d flag will upgrade to latest devel release, which might include some unstable software.
You can’t undo do-release-upgrade
answered Sep 8, 2014 at 14:13
![]()
Håken LidHåken Lid
21.9k9 gold badges49 silver badges65 bronze badges
4
For Windows User coming to this post, follow these steps:-
You can make sure that pip is up-to-date by running:
python -m pip install --upgrade pip
Install virtualenv by running:
python -m pip install --user virtualenv
Finally create environment using
python -m virtualenv <your env name>
answered May 8, 2020 at 11:36
![]()
3
Just run the command:
$ apt-get install python3-venv
and then create your virtual environment by running:
$ python3.6 -m venv
![]()
ib.
27.2k10 gold badges79 silver badges100 bronze badges
answered Aug 22, 2020 at 19:17
![]()
Hayat KhanHayat Khan
1111 silver badge4 bronze badges
1
This worked for me in python 3.6 and OSX
$ python -m venv --without-pip my_dir
$ source my_dir/bin/activate
$ curl https://bootstrap.pypa.io/get-pip.py | python
$ deactivate
$ source my_dir/bin/activate
(my_dir) user$
answered Sep 28, 2017 at 5:28
![]()
Adarsh V CAdarsh V C
2,3121 gold badge20 silver badges37 bronze badges
0
On LMDE2 with :
- Python 3.4.2
- Debian_version : 8.11
It was the first time I use python on this machine and I encountered this problem:
freezed@machine ~/git/repo % python3 -m venv .venv
Error: Command '['/home/freezed/git/repo/.venv/bin/python3', '-Im', 'ensurepip', '--upgrade', '--default-pip']' returned non-zero exit status 1
zsh: exit 1     python3 -m venv .venv
I solved this problem with :
sudo apt-get install python3.4-venv
answered Jul 25, 2018 at 13:30
![]()
freezedfreezed
1,2191 gold badge17 silver badges34 bronze badges
Quite similar to @prismalytics.io but for those of you who don’t like running shell scripts from the web. You can, of course, use —no-index —find-links to point to local copies. Any recent pip wheel file will suffice, this just points to the current version on PyPI.
python3 -m venv --without-pip your_venv
source your_venv/bin/activate
curl 'https://pypi.python.org/packages/b6/ac/7015eb97dc749283ffdec1c3a88ddb8ae03b8fad0f0e611408f196358da3/pip-9.0.1-py2.py3-none-any.whl' > pip.whl
python -m zipfile -e pip.whl $VIRTUAL_ENV/lib/python3*/site-packages
python -m pip install --force-reinstall --upgrade pip
answered May 24, 2017 at 17:49
![]()
This is a wild edgecase, but if you have a file called csv.py in your work directory when you create the virtual environment with python3.9, ensurepip will fail.
Delete or rename the file and it should succeed
    $ touch csv.py
    $ python3.9 -m venv venv
    Error: Command '['/test/venv/bin/python3.9', '-Im', 'ensurepip', '--upgrade', '--default-pip']' returned non-zero exit status 1.
    $ rm -rf venv/
    $ rm csv.py
    $ python3.9 -m venv venv
    $ ls venv/
    bin/        include/    lib/        pyvenv.cfg
answered Jun 23, 2021 at 16:13
![]()
1
I had encountered this issue.
To investigate, I executed the same command as pyvenv did, and then I got «locale.Error: unsupported locale setting».
It finally fixed by configuring «LC_ALL=en_US.UTF-8».
answered Dec 22, 2016 at 3:35
![]()
The following worked for me on Ubuntu 13.10:
pyvenv-3.4 delme --without-pip
source delme/bin/activate
python -Im ensurepip --upgrade --default-pip
answered Feb 5, 2015 at 15:53
![]()
Matt RMatt R
9,4109 gold badges49 silver badges79 bronze badges
1
I was also facing the same issue.
[niraj@abc ~]$/python/v3.7.0/bin/python3 -m venv avd
Error: Command '['/home/niraj/avd/bin/python3', '-Im', 'ensurepip', '--upgrade', '--default-pip']' returned non-zero exit status 1.
After adding libffi3.3 on my LD_LIBRARY_PATH it works
setenv LD_LIBRARY_PATH /libffi/v3.3/lib64
![]()
Sinto
3,87911 gold badges40 silver badges68 bronze badges
answered Dec 11, 2018 at 3:45
![]()
1
I had below Issues with psutil installation in Ubuntu 16.04 :
Building wheel for psutil (setup.py) … error
These are my steps which worked:
check your Python version. (My Python version is 3.7)
then done this below addtitional step:
sudo apt-get install python3.7-dev
then
pip install psutil

source ./my_venv_dir/bin/activate

pip install --upgrade pip
![]()
Dharman♦
29.3k21 gold badges80 silver badges131 bronze badges
answered Jan 15, 2020 at 12:52
![]()
VizagVizag
3651 gold badge6 silver badges20 bronze badges
I encountered a very similar error caused by a very different issue. We use SLURM as the workload manager on a computer cluster. As such, we ‘helpfully’ set TMPDIR to ensure users don’t fill up the local file systems on the compute nodes.
In my case it boils down to an issue with venv:__init__.py:_setup_pip() spawning a separate subprocess. The error initially given is deceptive because the real error is lost when calling subprocess.
After encountering the error, and keeping the state of the failed virtual environment the same, you can be clever and run the failed command (i.e. the subprocess) in the debugger. In my case it was
python -m pdb -m ensurepip --upgrade --default-pip
From there you can step through the debugger and figure out what the real issue was. In my case it boils down to something in pip/_internal/utils/temp_dir.py (from the wheel file downloaded during install attempt) trying to create an adjacent directory, and it not quite working with our setting of TMPDIR. The solution was to set export TMPDIR=/tmp and it worked just fine.
Obviously, there is likely a whole subset of problems with very similar errors to that posted by @kahonmlg. Properly debugging the spawned process is the key to solving those problems. In my case the solution was just to set TMPDIR, but obviously your mileage may vary.
answered Jan 11, 2022 at 4:14
![]()
None of the solutions above worked. It came down to a python file within my directory named calendar.py. My guess is that there’s probably some conflict happening as the venv process thinks my calendar.py file is Python’s official calendar module.
Anyways, after renaming the file, the issue was resolved.
answered Jan 12, 2022 at 12:07
![]()
Scratch’N’PurrScratch’N’Purr
9,5062 gold badges33 silver badges50 bronze badges
Windows + Studio Code
I had the same problem running an Ubuntu from Windows (WSL) directly from VS Code (i.e. Ubuntu installed on WSL and Remote Developper extension to execute Ubuntu terminal directly from VS Code).
The solution to use —without-pip as offered by many here was also triggering an error.
It’s link to the fact that PATH did not referenced pip installation folder. I had to manualy set it in my WSL environment : export PATH=$PATH:/path/to/my/program
The PATH to pip should be something like : /home/[linuxuser]/.local/bin where [linuxuser] is your account name
You can check you PATH in Linux with the following command : echo $PATH
answered Aug 9, 2022 at 19:29
![]()
samuel guedonsamuel guedon
5351 gold badge7 silver badges20 bronze badges
Содержание
- Error: Command ‘[‘/path/to/env/bin/python3.7’, ‘-Im’, ‘ensurepip’, ‘—upgrade’, ‘—default-pip’]’ returned non-zero exit status 1
- 7 Answers 7
- Related
- Hot Network Questions
- Subscribe to RSS
- Command returned non-zero exit status 1 #199
- Comments
- returned non-zero exit status 1 Error #204
- Comments
Error: Command ‘[‘/path/to/env/bin/python3.7’, ‘-Im’, ‘ensurepip’, ‘—upgrade’, ‘—default-pip’]’ returned non-zero exit status 1
I just installed python3.7 on my 18.04LTS via the deadsnakes ppa:
Now I want to create a virtual environment with python3.7 -m venv env but I get
python3 -m venv env0 worked fine before.
Why does this happen?
What can I do to create a virtual environment for python3.7 on Ubuntu 18.04LTS?
7 Answers 7
I am using python3.9. The command below solved the issue for me:
I realised that python3.7 comes with bionic and removed ppa:deadsnakes/ppa as well as python3.7. After installing it regularly, I got the following:
python3-venv was already installed, but python3.7-venv wasn’t, and with that I could create the environment.
This worked for me (Thx Joseph..):
sudo apt-get install python3.10-dev
sudo apt-get install python3.10-venv
After this: python3.10 -m venv venv works fine!

Use this apt-get install python3.7-dev python3.7-venv to install python3.7-dev and python3.7-venv packages and you are good to go

On my machine I’ve noticed that while python -m venv does not work, this command does:
Edit:
There is a more modern version of this command these days. It should work on python3.7 and up.
As mentioned in the commands, this command should also work:

This error occurred to me in a very different scenario. Hope it ends up helping someone.
I was working on my ntfs drives and they were being auto-mounted at boot in /etc/fstab using ntfs-3g with root permissions by default.
When trying to create virtualenv it showed me the same error. This was fixed by adding uid and gid particular flags in /etc/fstab

Maybe it’s useful. Under WSL I had to:
Hot Network Questions
To subscribe to this RSS feed, copy and paste this URL into your RSS reader.
Site design / logo © 2023 Stack Exchange Inc; user contributions licensed under CC BY-SA . rev 2023.1.14.43159
By clicking “Accept all cookies”, you agree Stack Exchange can store cookies on your device and disclose information in accordance with our Cookie Policy.
Источник
Command returned non-zero exit status 1 #199
I tried Video2x with another .mkv file, this time with double audio and ass subtitles (opening of anime series episode). Here is whole command window:
1\AppData\Local\Temp\video2x\tmp08bsi2s3\0′, ‘—output_path’, ‘C:\Users\JUNGLI
1\AppData\Local\Temp\video2x\tmpxjj7l3ph’] Upscaling Progress: 100%|#########################################################9| 2152/2153 [54:08 #0:0 (png (native) -> h264 (libx264)) Press [q] to stop, [?] for help [libx264 @ 000002d9cc2792c0] using cpu capabilities: MMX2 SSE2Fast SSSE3 SSE4.2 AVX FMA3 BMI2 AVX2 [libx264 @ 000002d9cc2792c0] profile High, level 4.0, 4:2:0, 8-bit [libx264 @ 000002d9cc2792c0] 264 — core 159 — H.264/MPEG-4 AVC codec — Copyleft 2003-2019 — http://www.videolan.org/x264.html — options: cabac=1 ref=3 deblock=1:0:0 analyse=0x3:0x113 me=hex subme=7 psy=1 psy_rd=1.00:0.00 mixed_ref=1 me_range=16 chroma_me=1 trellis=1 8x8dct=1 cqm=0 deadzone=21,11 fast_pskip=1 chroma_qp_offset=-2 threads=12 lookahead_threads=2 sliced_threads=0 nr=0 decimate=1 interlaced=0 bluray_compat=0 constrained_intra=0 bframes=3 b_pyramid=2 b_adapt=1 b_bias=0 direct=1 weightb=1 open_gop=0 weightp=2 keyint=250 keyint_min=23 scenecut=40 intra_refresh=0 rc_lookahead=40 rc=crf mbtree=1 crf=17.0 qcomp=0.60 qpmin=0 qpmax=69 qpstep=4 ip_ratio=1.40 aq=1:1.00 Output #0, mp4, to ‘C:UsersJUNGLI
1AppDataLocalTempvideo2xtmpxjj7l3phno_audio.mp4′: Metadata: encoder : Lavf58.38.100 Stream #0:0: Video: h264 (libx264) (avc1 / 0x31637661), yuv420p, 1408×1152, q=-1—1, 23.98 fps, 24k tbn, 23.98 tbc Metadata: encoder : Lavc58.68.100 libx264 Side data: cpb: bitrate max/min/avg: 0/0/0 buffer size: 0 vbv_delay: N/A frame= 2153 fps= 27 q=-1.0 Lsize= 53515kB time=00:01:29.67 bitrate=4888.8kbits/s speed=1.12x video:53490kB audio:0kB subtitle:0kB other streams:0kB global headers:0kB muxing overhead: 0.047187% [libx264 @ 000002d9cc2792c0] frame I:64 Avg QP:13.50 size: 69977 [libx264 @ 000002d9cc2792c0] frame P:665 Avg QP:15.97 size: 39398 [libx264 @ 000002d9cc2792c0] frame B:1424 Avg QP:17.64 size: 16920 [libx264 @ 000002d9cc2792c0] consecutive B-frames: 10.3% 3.5% 2.9% 83.2% [libx264 @ 000002d9cc2792c0] mb I I16..4: 9.9% 60.6% 29.5% [libx264 @ 000002d9cc2792c0] mb P I16..4: 6.1% 27.9% 7.3% P16..4: 28.5% 16.5% 6.2% 0.0% 0.0% skip: 7.6% [libx264 @ 000002d9cc2792c0] mb B I16..4: 1.4% 3.6% 0.8% B16..8: 37.1% 10.6% 1.8% direct: 6.4% skip:38.3% L0:47.2% L1:44.5% BI: 8.3% [libx264 @ 000002d9cc2792c0] 8×8 transform intra:65.5% inter:79.2% [libx264 @ 000002d9cc2792c0] coded y,uvDC,uvAC intra: 44.0% 43.0% 14.7% inter: 20.0% 23.0% 0.2% [libx264 @ 000002d9cc2792c0] i16 v,h,dc,p: 35% 17% 5% 44% [libx264 @ 000002d9cc2792c0] i8 v,h,dc,ddl,ddr,vr,hd,vl,hu: 27% 15% 19% 5% 8% 10% 6% 5% 5% [libx264 @ 000002d9cc2792c0] i4 v,h,dc,ddl,ddr,vr,hd,vl,hu: 33% 17% 15% 5% 10% 8% 6% 5% 2% [libx264 @ 000002d9cc2792c0] i8c dc,h,v,p: 64% 16% 17% 3% [libx264 @ 000002d9cc2792c0] Weighted P-Frames: Y:11.9% UV:6.6% [libx264 @ 000002d9cc2792c0] ref P L0: 54.1% 7.8% 24.7% 13.0% 0.4% [libx264 @ 000002d9cc2792c0] ref B L0: 79.1% 16.2% 4.7% [libx264 @ 000002d9cc2792c0] ref B L1: 92.4% 7.6% [libx264 @ 000002d9cc2792c0] kb/s:4879.64 [+] INFO: Conversion completed [+] INFO: Migrating audio tracks and subtitles to upscaled video 2020-02-09 15:16:38.050421 [+] INFO: Executing: [‘C:\Users\Junglized\AppData\Local\video2x\ffmpeg-latest-win64-static\bin\ffmpeg.exe’, ‘-hwaccel’, ‘auto’, ‘-y’, ‘-i’, ‘C:\Users\JUNGLI
1\AppData\Local\Temp\video2x\tmpxjj7l3ph\no_audio.mp4′, ‘-i’, «D:\Opening.mkv», ‘-map’, ‘0:v:0?’, ‘-map’, ‘1?’, ‘-map’, ‘-1:v?’, ‘-c’, ‘copy’, ‘-pix_fmt’, ‘yuv420p’, «D:\Opening.mkv_output.mp4»] ffmpeg version git-2020-02-06-343ccfc Copyright (c) 2000-2020 the FFmpeg developers built with gcc 9.2.1 (GCC) 20200122 configuration: —enable-gpl —enable-version3 —enable-sdl2 —enable-fontconfig —enable-gnutls —enable-iconv —enable-libass —enable-libdav1d —enable-libbluray —enable-libfreetype —enable-libmp3lame —enable-libopencore-amrnb —enable-libopencore-amrwb —enable-libopenjpeg —enable-libopus —enable-libshine —enable-libsnappy —enable-libsoxr —enable-libtheora —enable-libtwolame —enable-libvpx —enable-libwavpack —enable-libwebp —enable-libx264 —enable-libx265 —enable-libxml2 —enable-libzimg —enable-lzma —enable-zlib —enable-gmp —enable-libvidstab —enable-libvorbis —enable-libvo-amrwbenc —enable-libmysofa —enable-libspeex —enable-libxvid —enable-libaom —enable-libmfx —enable-ffnvcodec —enable-cuvid —enable-d3d11va —enable-nvenc —enable-nvdec —enable-dxva2 —enable-avisynth —enable-libopenmpt —enable-amf libavutil 56. 39.100 / 56. 39.100 libavcodec 58. 68.100 / 58. 68.100 libavformat 58. 38.100 / 58. 38.100 libavdevice 58. 9.103 / 58. 9.103 libavfilter 7. 74.100 / 7. 74.100 libswscale 5. 6.100 / 5. 6.100 libswresample 3. 6.100 / 3. 6.100 libpostproc 55. 6.100 / 55. 6.100 Input #0, mov,mp4,m4a,3gp,3g2,mj2, from ‘C:UsersJUNGLI
1AppDataLocalTempvideo2xtmpxjj7l3phno_audio.mp4′: Metadata: major_brand : isom minor_version : 512 compatible_brands: isomiso2avc1mp41 encoder : Lavf58.38.100 Duration: 00:01:29.80, start: 0.000000, bitrate: 4881 kb/s Stream #0:0(und): Video: h264 (High) (avc1 / 0x31637661), yuv420p, 1408×1152, 4879 kb/s, 23.98 fps, 23.98 tbr, 24k tbn, 47.95 tbc (default) Metadata: handler_name : VideoHandler Input #1, matroska,webm, from ‘D:Opening.mkv’: Metadata: encoder : libebml v0.7.9 + libmatroska v0.8.1 creation_time : 2010-01-20T04:40:57.000000Z Duration: 00:01:30.16, start: 0.000000, bitrate: 4059 kb/s Stream #1:0: Video: h264 (High), yuv420p(progressive), 704×576, SAR 12:11 DAR 4:3, 23.98 fps, 23.98 tbr, 1k tbn, 47.95 tbc (default) Stream #1:1(eng): Subtitle: ass (default) Stream #1:2(eng): Subtitle: ass Metadata: title : Songs & Signs Stream #1:3(jpn): Audio: ac3, 48000 Hz, stereo, fltp, 192 kb/s (default) Stream #1:4(eng): Audio: ac3, 48000 Hz, 5.1(side), fltp, 448 kb/s [mp4 @ 000002a1692af780] Could not find tag for codec ass in stream #1, codec not currently supported in container Could not write header for output file #0 (incorrect codec parameters ?): Invalid argument Stream mapping: Stream #0:0 -> #0:0 (copy) Stream #1:1 -> #0:1 (copy) Stream #1:2 -> #0:2 (copy) Stream #1:3 -> #0:3 (copy) Stream #1:4 -> #0:4 (copy) Last message repeated 1 times Exception in thread Thread-1: Traceback (most recent call last): File «threading.py», line 917, in _bootstrap_inner File «threading.py», line 865, in run File «video2x_gui.py», line 321, in _upscale File «upscaler.py», line 369, in run File «ffmpeg.py», line 212, in migrate_audio_tracks_subtitles File «ffmpeg.py», line 287, in _execute File «subprocess.py», line 487, in run subprocess.CalledProcessError: Command ‘[‘C:\Users\Junglized\AppData\Local\video2x\ffmpeg-latest-win64-static\bin\ffmpeg.exe’, ‘-hwaccel’, ‘auto’, ‘-y’, ‘-i’, ‘C:\Users\JUNGLI
1\AppData\Local\Temp\video2x\tmpxjj7l3ph\no_audio.mp4′, ‘-i’, «D:\Opening.mkv», ‘-map’, ‘0:v:0?’, ‘-map’, ‘1?’, ‘-map’, ‘-1:v?’, ‘-c’, ‘copy’, ‘-pix_fmt’, ‘yuv420p’, «D:\Opening.mkv_output.mp4»]’ returned non-zero exit status 1.»>
The text was updated successfully, but these errors were encountered:
Источник
returned non-zero exit status 1 Error #204
I can run the following model in command line using the energyplus, but I get returned non-zero exit status 1 error in Eppy.
./energyplus-8.9.0 -i PreProcess/IDFVersionUpdater/V8-9-0-Energy+.idd -w USA_IL_Chicago-OHare.725300_TMY2.epw ExampleFiles/AirCooledElectricChiller.idf
which returns me:
and idf.run() returns:
The text was updated successfully, but these errors were encountered:
@oroojlooy does EnergyPlus create a .err file?
yes,
these are the list of the output when I directly run energyplus:
which the error file is empty.
Ok. So what’s in the .err file? That should give us a clue
That is empty. These are the results when I use ./energyplus-8.9.0 -i PreProcess/IDFVersionUpdater/V8-9-0-Energy+.idd -w USA_IL_Chicago-OHare.725300_TMY2.epw ExampleFiles/AirCooledElectricChiller.idf , which runs fine and as a result the .err file is empty.
When I call eppy, the same sqlite.err file is generated and it is also empty.
Sorry, I meant the eplusout.err file
When I run eppy, eplusout.err is not generated.
When I call directly energyplus , eplusout.err contains:
Ok. Can you check if all these paths/files actually exist on your system then? Usually if EnergyPlus doesn’t get as far as producing an eplusout.err file it’s because of some path error.
‘/usr/local/EnergyPlus-8-9-0/energyplus’
‘/home/afshin/Eplus’
‘/usr/local/EnergyPlus-8-9-0/USA_IL_Chicago-OHare.725300_TMY2.epw’
‘/home/afshin/Eplus/in.idf’
They exists.
I think I found the problem.
When I commented
it works fine. It is strange, since it gives error for this model file. For example if I select
«/usr/local/EnergyPlus-8-9-0/ExampleFiles/BasicsFiles/Exercise1A.idf» , it runs fine.
That is strange. I’ll see if I can reproduce the error this evening, and look into it further.
@oroojlooy I can’t reproduce this on my Windows machine. It runs fine. Could you post the IDF and EPW files you’re using when you hit the error?
Hey, I deleted the comment because I found a solution shortly after. The problem was that the schedule files I called in the idf were not in the current work directory of python.
Next time, add an additional comment saying that you found the solution. That will keep the comment trial on the issue clear. I spent some time thinking the the gihub issues code was broken 🙂
Dear @santoshphilip and @jamiebull1
the same error (returned non-zero exit status 1) I have encountered recently and I do not know what is its origin. The eppy module is updated and I am using EnergyPlus, Version 9.1.0-08d2e308bb.
These files are in the same directory (C:/Yahya/EP/Yahya Model):
1- Energy+.idd [copy and paste from C:EnergyPlusV9-1-0]
2- USA_CA_San_Francisco.epw [copy and paste from C:EnergyPlusV9-1-0WeatherData]
3- RoomVRF_Fanger.idf [this file is simulated without any error (attached file)]
RoomVRF_Fanger.err.txt]
and idf.run() results in this error message.
**FATAL:Errors occurred on processing input file. Preceding condition(s) cause termination.
EnergyPlus Run Time=00hr 00min 0.22sec
Program terminated: EnergyPlus Terminated—Error(s) Detected.
Traceback (most recent call last):
File «Yeppy-1.py», line 31, in
idf.run()
File «C:UsersyahyaAppDataLocalProgramsPythonPython36libsite-packageseppymodeleditor.py», line 1004, in run
run(self, self.epw, **kwargs)
File «C:UsersyahyaAppDataLocalProgramsPythonPython36libsite-packageseppyrunnerrun_functions.py», line 239, in run
check_call(cmd)
File «C:UsersyahyaAppDataLocalProgramsPythonPython36libsubprocess.py», line 291, in check_call
raise CalledProcessError(retcode, cmd)
subprocess.CalledProcessError: Command ‘[‘C:/EnergyPlusV9-1-0energyplus.exe’, ‘—output-directory’, ‘C:YahyaEPYahya Model’, ‘—weather’, ‘C:YahyaEPYahya ModelUSA_CA_San_Francisco.epw’, ‘C:YahyaEPYahya Modelin.idf’]’ returned non-zero exit status 1.
@yahyasheikhnejad Can you try running with the verbose option set? idf.run(verbose=»v»)
It looks like an error in the IDF though. Can you run it directly from EPLaunch?
It looks like an error in the IDF though. Can you run it directly from EP-Launch?
Dear @jamiebull1
First of all, I acknowledge your kindness to respond to me rapidly.
yes! with no error! I attached the error file generated by EP-Launch in the first comment.
Simulation Error Summary:
EnergyPlus Warmup Error Summary. During Warmup: 0 Warning; 0 Severe Errors.
************* EnergyPlus Sizing Error Summary. During Sizing: 3 Warning; 0 Severe Errors.
************* EnergyPlus Completed Successfully— 4 Warning; 0 Severe Errors;
@yahyasheikhnejad Can you try running with the verbose option set? idf.run(verbose=»v»)
import os
import sys
from eppy import *
from eppy import modeleditor
from eppy.modeleditor import IDF
os.chdir(«C:/Yahya/EP/Yahya Model»)
iddfile = «Energy+.idd»
IDF.setiddname(iddfile)
epwfile = «USA_VA_Sterling-Washington.Dulles.Intl.AP.724030_TMY3.epw»
fname = «RoomVRF_Fanger.idf»
idf = IDF(fname, epwfile)
idf.run(verbose=»v»)
cmd = [‘C:/EnergyPlusV9-1-0energyplus.exe’, ‘—output-directory’, ‘C:YahyaEPYahya Model’, ‘—weather’, ‘C:YahyaEPYahya ModelUSA_VA_Sterling-Washington.Dulles.Intl.AP.724030_TMY3.epw’, ‘C:YahyaEPYahya Modelin.idf’]
EnergyPlus Starting
EnergyPlus, Version 9.1.0-08d2e308bb, YMD=2019.06.24 14:28
**FATAL:Errors occurred on processing input file. Preceding condition(s) cause termination.
EnergyPlus Run Time=00hr 00min 0.22sec
Program terminated: EnergyPlus Terminated—Error(s) Detected.
Traceback (most recent call last):
File «Yeppy2.py», line 23, in
idf.run(verbose=»v»)
File «C:UsersyahyaAppDataLocalProgramsPythonPython36libsite-packageseppymodeleditor.py», line 1004, in run
run(self, self.epw, **kwargs)
File «C:UsersyahyaAppDataLocalProgramsPythonPython36libsite-packageseppyrunnerrun_functions.py», line 239, in run
check_call(cmd)
File «C:UsersyahyaAppDataLocalProgramsPythonPython36libsubprocess.py», line 291, in check_call
raise CalledProcessError(retcode, cmd)
subprocess.CalledProcessError: Command ‘[‘C:/EnergyPlusV9-1-0energyplus.exe’, ‘—output-directory’, ‘C:YahyaEPYahya Model’, ‘—weather’, ‘C:YahyaEPYahya ModelUSA_VA_Sterling-Washington.Dulles.Intl.AP.724030_TMY3.epw’, ‘C:YahyaEPYahya Modelin.idf’]’ returned non-zero exit status 1.
In fact, I do not understand the meaning of «returned non-zero exit status 1»
while all files are available in the specified directory and IDF file can be run without any fatal error, which kind of mistake can result in this error?
HTML result of simulation:
Y Building RUNPERIOD 1 __ Washington Dc Dulles IntL Ar VA USA TMY3 WMO#=724030 2019-06-24 14_52_13 — EnergyPlus.pdf
Could be related to postprocessing, or could be a bug in the IDF.run code. I can try to reproduce the error if you can share the input files.
Could be related to postprocessing, or could be a bug in the IDF.run code. I can try to reproduce the error if you can share the input files.
Dear @jamiebull1
of course, I can. How can I share these files? here .RAR file is not acceptable. I can send them via email.
is there any other way to share a bunch of files?
Источник
When trying to create a virtual environment using the included pyvenv-3.4 that comes with 14.04, it throws an error:
Error: Command '['/some/directories/bin/python3.4', '-Im', 'ensurepip', '--upgrade', '--default-pip']' returned non-zero exit status 1
How do I use pyvenv-3.4 with Ubuntu 14.04?
asked Jun 26, 2014 at 16:29
![]()
1
Unfortunately, 14.04 shipped with a broken pyvenv. According to this launchpad thread the issue will be resolved in the upcoming 14.04-1
Using this method you can install a Pyvenv environment without pip and then manually install pip after the fact.
pyvenv-3.4 --without-pip myvenv
source ./myvenv/bin/activate
wget https://pypi.python.org/packages/source/s/setuptools/setuptools-3.4.4.tar.gz
tar -vzxf setuptools-3.4.4.tar.gz
cd setuptools-3.4.4
python setup.py install
cd ..
wget https://pypi.python.org/packages/source/p/pip/pip-1.5.6.tar.gz
tar -vzxf pip-1.5.6.tar.gz
cd pip-1.5.6
python setup.py install
cd ..
deactivate
source ./myvenv/bin/activate
answered Jun 26, 2014 at 16:29
![]()
RyanRyan
1,4281 gold badge12 silver badges15 bronze badges
5
Reason: Both Ubuntu 14.04 and Debian have a broken pyvenv-3.4 tool. See Ubuntu bug 1290847 and Debian bug 732703.
Solution/workaround (shorter than the one from the other answer):
pyvenv-3.4 --without-pip venvdir
source venvdir/bin/activate
curl https://bootstrap.pypa.io/get-pip.py | python
deactivate
source venvdir/bin/activate
I’ve described this bug in my own Gist. The URL in this code is from the official pip installation instructions.
answered Sep 26, 2014 at 2:56
![]()
Denilson Sá MaiaDenilson Sá Maia
2,8291 gold badge23 silver badges20 bronze badges
4
This should work too:
sudo apt-get install python-virtualenv
virtualenv -p python3 myvenv
Or better yet:
sudo apt-get install python3-pip
sudo pip3 install virtualenv
virtualenv myvenv
answered Nov 12, 2014 at 16:28
![]()
Collin AndersonCollin Anderson
3,1061 gold badge16 silver badges12 bronze badges
You are missing the venv lib for python 3.4, just run:
$ apt-get install python3.4-dev python3.4-venv
answered Aug 14, 2017 at 10:27
![]()
The way I solved this is by running
$ python -m ensurepip
Which produced a stacktrace ending with this line:
FileNotFoundError: [Errno 2] No such file or directory: '/usr/lib64/python3.4/ensurepip/_bundled/setuptools-20.10.1-py2.py3-none-any.whl'
So I went to https://pypi.python.org/pypi/setuptools/20.10.1 and grabbed the wheel and put it in my directory (which I had to create with mkdir -p /usr/lib64/python3.4/ensurepip/_bundled/)
Then running python -m ensurepip again I was confronted with
No such file or directory: '/usr/lib64/python3.4/ensurepip/_bundled/pip-8.1.1-py2.py3-none-any.whl
So I went to https://pypi.python.org/pypi/pip/8.1.1, grabbed that wheel and stuck it in the directory.
Now I can create virtualenvs with python -m venv .venv. Success!
answered Jan 26, 2017 at 16:46
![]()
Wayne WernerWayne Werner
6,5949 gold badges29 silver badges38 bronze badges
Tested on Debian
$ python3.4 -m venv --without-pip env
$ cd env
$ source ./bin/activate # virtualenv activated

$ wget https://bootstrap.pypa.io/get-pip.py # get installation script for pip
$ python3.4 get-pip.py
$ deactivate
$ source venvdir/bin/activate

$ pip list # just to check that pip works!
answered Mar 7, 2017 at 8:34
![]()
3
I came across this error because I was missing the python3-venv package on my system.
![]()
Zanna♦
68.2k55 gold badges210 silver badges320 bronze badges
answered Jan 3, 2017 at 4:25
![]()
1
Earlier today I installed python3.6 on my debian machine. Python3.6 was made available in buster distribution. When I try to create a virtualenv with python3.6.
gives the following error.
The virtual environment was not created successfully because ensurepip is not available. On Debian/Ubuntu systems, you need to install the
python3-venvpackage using the following command.
apt-get install python3-venv
You may need to use sudo with that command. After installing the python3-venv
package, recreate your virtual environment.
Failing command: [‘/home/float/test/t/bin/python3.6’, ‘-Im’, ‘ensurepip’, ‘—upgrade’, ‘—default-pip’]
I do have python3-venv (3.5.3-1) installed. Why do I get this error? If I run the command
py3 -Im ensurepip --upgrade --default-pip
it says
/usr/bin/python3.6: No module named ensurepip
I don’t have trouble creating virtualenvs using the default python3 version (3.5.3).
Also , I noticed that I can create a virtualenv as follows:
virtualenv -p python3.6 venv
Last Updated: 2022-08-11
Linux systems come with Python install by default, but, they are usually not the latest. Python also cannot be updated by a typical apt upgrade command as well.
To check the version of Python installed on your system run
pythonkeyword is used for Python 2.x versions which has been deprecated
In this guide we will
- Update Python to the latest version
- Fix pip & other Python related issues
- While doing the above two, ensure your Ubuntu which is heavily dependent on Python does not break
Updating Python to the latest version
Ubuntu’s default repositories do not contain the latest version of Python, but an open source repository named deadsnakes does.
Python3.10 is not officially available on Ubuntu 20.04, ensure you backup your system before upgrading.
Step 1: Check if Python3.10 is available for install
sudo add-apt-repository ppa:deadsnakes/ppa
sudo apt update
Check if Python 3.10 is available by running
apt list | grep python3.10
This will produce the below result, if you see python3.10 it means you can install it

Step 2: Install Python 3.10
Now you can install Python 3.10 by running
sudo apt install python3.10
Now though Python 3.10 is installed, if you check the version of your python by running python3 --version you will still see an older version. This is because you have two versions of Python installed and you need to choose Python 3.10 as the default.
Step 3: Set Python 3.10 as default
Steps beyond here are tested on Ubuntu 20.04 in VM & WSL2, but are experimental , proceed at your own risk.
Changing the default alternatives for Python will break your Gnome terminal. To avoid this, you need to edit the gnome-terminal configuration file.
Open the terminal and run:
sudo nano /usr/bin/gnome-terminal
In first line, change #!/usr/bin/python3 to #!/usr/bin/python3.8. Press Ctrl +X followed by enter to save and exit.
Then save and close the file.
Next, update the default Python by adding both versions to an alternatives by running the below
sudo update-alternatives --install /usr/bin/python3 python3 /usr/bin/python3.9 1
sudo update-alternatives --install /usr/bin/python3 python3 /usr/bin/python3.10 2
Now run
sudo update-alternatives --config python3
Choose the selection corresponding to Python3.10 (if not selected by default). 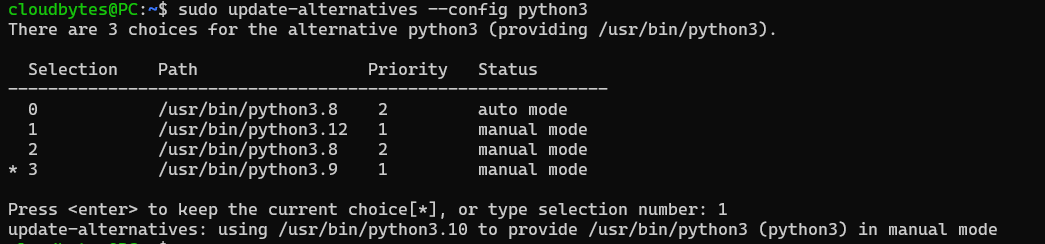
Now run python3 --version again and you should see the latest Python as the output.
Fix pip and disutils errors
Installing the new version of Python will break pip as the distutils for Python3.10 is not installed yet.
Fix Python3-apt
Running pip in terminal will not work, as the current pip is not compatible with Python3.10 and python3-apt will be broken, that will generate an error like
Traceback (most recent call last):
    File "/usr/lib/command-not-found", line 28, in <module>
        from CommandNotFound import CommandNotFound
    File "/usr/lib/python3/dist-packages/CommandNotFound/CommandNotFound.py", line 19, in <module>
        from CommandNotFound.db.db import SqliteDatabase
    File "/usr/lib/python3/dist-packages/CommandNotFound/db/db.py", line 5, in <module>
        import apt_pkg ModuleNotFoundError: No module named 'apt_pkg'
To fix this first remove the current version of python3-apt by running
sudo apt remove --purge python3-apt
Then do some cleanup
DO NOT RUN sudo apt autoremove as it will remove several packages that are required. This may break your system if you’re using GUI, if you’re on WSL2 you can proceed.
Finally, reinstall python3-apt by running
sudo apt install python3-apt
Install pip & distutils
Running pip will still throw an error pip: command not found. We need to install the latest version of pip compatible with Python 3.10.
Also, if try to manually install the latest version of pip, it will throw an error like
ImportError: cannot import name 'sysconfig' from 'distutils'
(/usr/lib/python3.10/distutils/__init__.py)
Or you might also see an error stating No module named 'distutils.util'. This is because the distutils module is not installed yet, to install run the below command
sudo apt install python3.10-distutils
Now you can install pip by running
curl https://bootstrap.pypa.io/get-pip.py -o get-pip.py
sudo python3.10 get-pip.py
If you get an error like
bash: curl: command not foundthen you need to install curl first by runningsudo apt install curl
Now you can run pip and you should see the output of pip --version
Fix pip-env errors when using venv
When you try to create a new virtual environment using python -m venv env, you may into the following error.
Error: Command '['/path/to/env/bin/python3', '-Im', 'ensurepip', '--upgrade', '--default-pip']' returned non-zero exit status 1
You can fix this by reinstalling venv by running
sudo apt install python3.10-venv
All should be done now. It is complicated, but this is how you update Python to latest version.
If you have oh-my-zsh installed, you can avoid typing out python3 by running
echo "alias py=/usr/bin/python3" >> ~/.zshrc
echo "alias python=/usr/bin/python3" >> ~/.zshrc
Now you can run your files with py or python.
Need Help? Open a discussion thread on GitHub.
Related Posts
Ubuntu 14.04’s Python 3.4 installation has a problem with ensurepip module, as described in this bug. So if you follow the steps mentioned in the official documentation, you would see an error message like this
➜  Python  python3 -m venv py3.4venv
Error: Command '['/home/thefourtheye//py34venv/bin/python3', '-Im', 'ensurepip', '--upgrade', '--default-pip']' returned non-zero exit status 1
To resolve this problem, first install the venv, without pip, like this
python3 -m venv py3.4venv --without-pip
And then if you install pip, like this, it will still fail
(py3.4venv) ➜  py3.4venv  python -m ensurepip --upgrade
/home/thefourtheye/Python/py3.4venv/bin/python: No module named ensurepip
(py3.4venv) ➜  py3.4venv  python
Python 3.4.0 (default, Apr 11 2014, 13:05:11)
[GCC 4.8.2] on linux
Type "help", "copyright", "credits" or "license" for more information.
...
So, you need to install, pip separately, like mentioned in the pip’s official documentation. So, the actual list of steps go like this
➜ Python python3 -m venv py3.4venv --without-pip
➜ Python cd py3.4venv
➜ py3.4venv source bin/activate
(py3.4venv) ➜ py3.4venv wget https://bootstrap.pypa.io/get-pip.py
--2014-12-30 14:35:34-- https://bootstrap.pypa.io/get-pip.py
Resolving bootstrap.pypa.io (bootstrap.pypa.io)... 103.245.222.175
Connecting to bootstrap.pypa.io (bootstrap.pypa.io)|103.245.222.175|:443... connected.
HTTP request sent, awaiting response... 200 OK
Length: 1581355 (1.5M) [text/x-python]
Saving to: ‘get-pip.py’100%[=====================================================================================================================>] 15,81,355 129KB/s in 8.9s
2014-12-30 14:35:43 (173 KB/s) - ‘get-pip.py’ saved [1581355/1581355]
(py3.4venv) ➜ py3.4venv python get-pip.py
Collecting pip
Downloading pip-6.0.3-py2.py3-none-any.whl (1.3MB)
100% |################################| 1.3MB 139kB/s
Collecting setuptools
Downloading setuptools-9.1-py2.py3-none-any.whl (552kB)
100% |################################| 552kB 180kB/s
Installing collected packages: setuptools, pipSuccessfully installed pip-6.0.3 setuptools-9.1
(py3.4venv) ➜ py3.4venv deactivate
➜ py3.4venv source bin/activate
(py3.4venv) ➜ py3.4venv pip install django
Collecting django
Using cached Django-1.7.1-py2.py3-none-any.whl
Installing collected packages: djangoSuccessfully installed django-1.7.1
(py3.4venv) ➜ py3.4venv which pip
/home/thefourtheye/Python/py3.4venv/bin/pip
(py3.4venv) ➜ py3.4venv