I am really struggling to get a successful response when doing a post request to the google recaptcha api. I am receiving the following response:
{
  "success": false,
  "error-codes": [
    "invalid-input-response",
    "invalid-input-secret"
  ]
}
I had a look at reCAPTCHA — error-codes: ‘missing-input-response’, ‘missing-input-secret’ when verifying user’s response (missing details on POST) and followed the answer as closely as possible but with no success.
Here is my file below:
var request = require('request');

module.exports = {
  verifyCaptcha: function(req, res) {

    var secret = 'SECRET_KEY';
    var response = JSON.stringify(req.body.response);
    request({
        url: 'https://www.google.com/recaptcha/api/siteverify',
        method: 'POST',
        headers: { "Content-Type": "application/x-www-form-urlencoded" },
        body: `secret=${secret}&response=${response}`,
    }, function (err, response, body) {
        if (err) {
            res.status(500).send({
                error: "Could not verify captcha"
            });
        } else {
            res.status(200).send({
                message: body
            });
        }
    });
  },
}
If anyone has a solution to this problem please let me know!
![]()
hong4rc
3,9494 gold badges20 silver badges40 bronze badges
asked Feb 14, 2019 at 16:36
![]()
You need to add the user remote IP address.
var user_ip = req.headers['x-forwarded-for'] || req.connection.remoteAddress;
request({
    url: 'https://www.google.com/recaptcha/api/siteverify',
    method: 'POST',
    headers: { "Content-Type": "application/x-www-form-urlencoded" },
    body: `secret=${secret}&response=${response}&remoteip=${user_ip}`}...
Another thing I see that you are not using template literal, you should change the quotes to ` instead of ‘.
OR, You should use a ready-made module for reCaptcha, like this one:
https://www.npmjs.com/package/recaptcha
answered Feb 14, 2019 at 16:42
![]()
arielbarielb
3823 silver badges10 bronze badges
7
For reCAPTCHA Enterprise, check the official docs: https://cloud.google.com/recaptcha-enterprise/docs/create-assessment.
In short, you need to use the library that Google provides:
const { RecaptchaEnterpriseServiceClient } =
        require('@google-cloud/recaptcha-enterprise');

const client = new RecaptchaEnterpriseServiceClient();
const [ response ] = await client.createAssessment({...});
RecaptchaEnterpriseServiceClient requires a service account to be created beforehand as described here. The key for that account with the right roles set can then be read by the app. Check the arguments of the constructor to see the available options to pass the data if the file cannot be retrieved automatically.
answered Jan 28, 2022 at 8:59
![]()
YuuhnYuuhn
13 bronze badges
var response = JSON.stringify(req.body.response);
The stringifying here is probably the cause of the invalid-input-response error.
If your body is something like {"g-recaptcha-response": "..."}, you need to pull out the response value and pass that directly in your post.
Regarding invalid-input-secret, if you have set up your key and secret through the classic interface at https://www.google.com/u/1/recaptcha/admin/create, then you shouldn’t have a problem.
However if you set up a key with recaptcha Enterprise on Google Cloud, then it requires that you do Oauth authentication to the Google Cloud API and then use the create.assessment endpoint to get back information on the validity of the user. As Yuuhn implied, the Google provided library makes interaction with recaptcha Enterprise easier, without a lot of documentation digging to find where your REST API calls need to go.
answered Apr 7, 2022 at 9:36
![]()
InfineightInfineight
4785 silver badges9 bronze badges
This page explains how to verify a user’s response to a reCAPTCHA challenge from your application’s
backend.
For web users, you can get the user’s response token in one of three ways:
g-recaptcha-responsePOST parameter when the user submits the form on your sitegrecaptcha.getResponse(opt_widget_id)after the user completes
the reCAPTCHA challenge- As a string argument to your callback function
ifdata-callbackis specified in either theg-recaptchatag attribute or
the callback parameter in thegrecaptcha.rendermethod
For Android library users, you can call the
SafetyNetApi.RecaptchaTokenResult.getTokenResult()
method to get response token if the status returns successful.
Token Restrictions
Each reCAPTCHA user response token is valid for two minutes, and can only be verified once to
prevent replay attacks. If you need a new token, you can re-run the reCAPTCHA verification.
After you get the response token, you need to verify it within two minutes with reCAPTCHA using the
following API to ensure the token is valid.
API Request
URL: https://www.google.com/recaptcha/api/siteverify
METHOD: POST
| POST Parameter | Description |
|---|---|
| secret | Required. The shared key between your site and reCAPTCHA. |
| response | Required. The user response token provided by the reCAPTCHA client-side integration on your site. |
| remoteip | Optional. The user’s IP address. |
API Response
The response is a JSON object:
{
  "success": true|false,
  "challenge_ts": timestamp,  // timestamp of the challenge load (ISO format yyyy-MM-dd'T'HH:mm:ssZZ)
  "hostname": string,         // the hostname of the site where the reCAPTCHA was solved
  "error-codes": [...]        // optional
}
For reCAPTCHA Android:
{
  "success": true|false,
  "challenge_ts": timestamp,  // timestamp of the challenge load (ISO format yyyy-MM-dd'T'HH:mm:ssZZ)
  "apk_package_name": string, // the package name of the app where the reCAPTCHA was solved
  "error-codes": [...]        // optional
}
Error code reference
| Error code | Description |
|---|---|
| missing-input-secret | The secret parameter is missing. |
| invalid-input-secret | The secret parameter is invalid or malformed. |
| missing-input-response | The response parameter is missing. |
| invalid-input-response | The response parameter is invalid or malformed. |
| bad-request | The request is invalid or malformed. |
| timeout-or-duplicate | The response is no longer valid: either is too old or has been used previously. |
To use Django REST framework reCAPTCHA within your project you’ll need to
import and add the ReCaptchaField serializer field into the wanted
serializer. For example:
from rest_framework import serializers
from rest_framework_recaptcha import ReCaptchaField


class MySerializer(serializers.Serializer):
    recaptcha = ReCaptchaField()
For you information, ReCaptchaField fields are defined as
write_only=True by default.
Once your serializer is configured with your ReCaptchaField you’ll be able to
send the client side generated reCAPTCHA response token and validate it
server side (cf. reCAPTCHA documentation).
Validation errors
During the validation process of the reCAPTCHA response token by the
verification API and according to the documentation, the following errors
may be raised:
| Error code | Message |
|---|---|
| missing-input-secret | The secret parameter is missing. |
| invalid-input-secret | The secret parameter is invalid or malformed. |
| missing-input-response | The response parameter is missing. |
| invalid-input-response | The response parameter is invalid or malformed. |
| bad-request | The request is invalid or malformed. |
| timeout-or-duplicate | The response parameter has timed out or has already been used. |
Each of these errors are handled by the ReCaptchaValidator. In case of an
unknown error the bad-request error will be raised.
Each error message can be replaced if needed. For this, you have two options:
- Create a custom
ReCaptchaFieldthat inherits fromReCaptchaField
while redefining thedefault_error_messagesattribute with a dictionary
which for each entry the key will match the code to override and the value
to the new message. Example:
from rest_framework import serializers
from rest_framework_recaptcha import ReCaptchaField


class MyReCaptchaField(ReCaptchaField):
    default_error_messages = {
        "invalid-input-response": "reCAPTCHA token is invalid.",
    }


class MySerializer(serializers.Serializer):
    recaptcha = MyReCaptchaField()
- When adding the
ReCaptchaFieldfield to your serializer you can pass the
optionalerror_messagesparameter with a dictionary which for each entry
the key will match the code to override and the value to the new message.
Example:
from rest_framework import serializers
from rest_framework_recaptcha import ReCaptchaField


class MySerializer(serializers.Serializer):
    recaptcha = ReCaptchaField(
        error_messages={
            "invalid-input-response": "reCAPTCHA token is invalid.",
        }
    )

Google’s reCaptcha v3 helps you detect abusive traffic on your website without user interaction. Instead of showing a challenge, it returns a score so you can choose the most appropriate action for your website.
In reCaptcha v1, every user was asked to pass a challenge by reading distorted text and typing into a box. To improve both user experience and security, Google introduced reCaptcha v2 and began to use many other signals to determine whether a request came from a human or bot. The reCaptcha v3 runs adaptive risk analysis in the background to alert you of suspicious traffic while letting your human users enjoy a frictionless experience on your site.
Since it doesn’t interrupt users, you can add reCaptcha v3 to multiple pages. In this way, the adaptive risk analysis engine can identify the pattern of attackers more accurately by looking at the activities across different pages on your website. In the admin console, you can get a full overview of score distribution and a breakdown for the stats of the top 10 actions on your site, to help you identify which exact pages are being targeted by bots and how suspicious the traffic was on those pages.
Score: You get a score that tells you how suspicious an interaction is. There are three potential ways you can use the score:
-
You can set a threshold that determines when a user is let through or when further verification needs to be done, for example, using two-factor authentication and phone verification.
-
You can combine the score with your own signals that reCaptcha can’t access such as user profiles or transaction histories.
-
You can use the reCaptcha score as one of the signals to train your machine learning model to fight abuse.
How to Add reCaptcha
The first step is to go to the reCAPTCHA website and login with a Google account. Then, register a new site. After registration, you will get a Site key and a Secret key.
1. Client Side Integration
Replace ‘RECAPTCHA_SITE_KEY’ with the key provided to you.
<script src="https://www.google.com/recaptcha/api.js?render=RECAPTCHA_SITE_KEY"></script>
<script>
 grecaptcha.ready(function () {
 grecaptcha.execute('RECAPTCHA_SITE_KEY', { action: 'contact' }).then(function (token) {
 var recaptchaResponse = document.getElementById('recaptchaResponse');
 recaptchaResponse.value = token;
 });
 });
 </script>
The grecaptcha.ready function runs when the service has fully loaded and created a token for the current user. The action should relate to the current page or operation being performed.
Next, you can use a hidden form input to pass the token through the value of the input.
<input type="hidden" name="recaptcha_response" id="recaptchaResponse">
Now, the code is analysing the user, then creating a token and assigning it to a hidden input. The reCaptcha returns a score from 0.0 to 1.0 where 1.0 is very likely a good interaction, 0.0 is very likely a bot. By default, you can use a threshold of 0.5.
2. Server Side Integration
Replace ‘RECAPTCHA_SECRET_KEY’ with the Secret key provided to you. Server side integration involves a request to a Google URL.
$recaptcha_url = 'https://www.google.com/recaptcha/api/siteverify';
 $recaptcha_secret = 'RECAPTCHA_SECRET_KEY';
 $recaptcha_response = $_POST['recaptcha_response'];
$recaptcha = file_get_contents($recaptcha_url . '?secret=' . $recaptcha_secret . '&response=' . $recaptcha_response);
The response is a JSON object.
$recaptcha = json_decode($recaptcha);
Next, you can take action based on the score:
if ($recaptcha->score >= 0.5) {
 // Verified - send email
 } else {
 // Not verified - show form error
 }
The reCaptcha Response
- The response (for example, $recaptcha->score) is a JSON object which returns the following:
- success: true|false, whether this request was a valid reCAPTCHA token for your site
- score: number, the score for this request (0.0 — 1.0)
- action: string, the action name for this request (important to verify)
- challenge_ts: timestamp of the challenge load (ISO format yyyy-MM-dd’T’HH:mm:ssZZ)
- hostname: string, the hostname of the site where the reCAPTCHA was solved
- error-codes: […] // optional
Error Codes
- missing-input-secret: The secret parameter is missing.
- invalid-input-secret: The secret parameter is invalid or malformed.
- missing-input-response: The response parameter is missing.
- invalid-input-response: The response parameter is invalid or malformed.
- bad-request: The request is invalid or malformed.
- timeout-or-duplicate: The response is no longer valid: either is too old or has been used previously.
There are quite a few snippets on Github and NuGet packages out there that try to implement server-side Google reCaptcha validation. Some of the NuGet packages will even cover the entire reCaptcha process—all the way from embedding the Google-provided reCaptcha script in a razor page to exposing a middleware to call in your request pipeline.
All of that is good and well, but there are a few problems. One problem is that some of these implementations aren’t maintained (or don’t even support reCatpcha V3), but worst of all some of them won’t scale, thus falling short of very basic requirements for a solid production build.
But why won’t they scale?
Usually it’s the misuse of HttpClient, or rather the lack of using HTTPClientFactory. Some code out there will instantiate an HttpClient on every incoming reCaptcha validation request! This can prove costly and fatal for a couple of reasons:
1) Each HttpClient gets its own connection pool.
2) Socket Exhaustion when a bunch are spawned.
Easter Egg 🥚
I got exposed to ASP.NET Core around the time 2.1 released, in which I remember reading an amazing article by Microsoft MVP Steve Gordan on the new
HttpClientFactorycoming to 2.1 and what problems it was solving. It has a lot of good detail pertaining to this feature.
Aside from that; however, I wanted to add reCaptcha functionality on the controller level, not just exposing it as a middleware in the pipeline. This would allow me to control what endpoints I explicitly need reCaptcha validation on. In addition, I am running a React SPA, so I didn’t necessarily need Razor functionality or any extra bloat that comes along with some of these packages. Just a simple and sweet reCaptcha server-side validation mechanism.
This can all be done with Dependency Injection (DI), an HttpClientFactory, built in JSON serialization, and of course some asynchronous flair.
Let’s get to it!
1. Pre-req’s
In addition to the basics, here are some high-level concepts/technologies to be familiar with (non-inclusive).
- Google reCaptcha
- ASP.NET Core 3.1+
- Dependency Injection
- Request Pipeline
- Web APIs
2. Process Overview
Here’s the «explain it like I’m 5» overview of the back-end process to hard validate a Google Captcha exchange:
- Your Server: Hey Google, there’s a dude that tells me that he’s not a robot. He says that you already verified that he’s a human, and he told me to give you this token as a proof of that.
- Google: Hmm… let me check this token… yes I remember this dude I gave him this token… yeah he’s made of flesh and bone let him through.
- Your Server: Hey Google, there’s another dude that tells me that he’s a human. He also gave me a token.
- Google: Hmm… I never issued this token… I’m pretty sure this guy is trying to fool you. Tell him to get off your site.
— courtesy of TheRueger on SO
Simple enough!
3. Some housekeeping
Now, before we move on, make sure you read over some of Google’s documentation. Regardless of where you are in development (whether you have embedded the reCaptcha script in your front-end yet or are just getting started), you will need to make sure you’re following the Google reCaptchaV3 tutorial, which contains info on front-end setup and registering your reCaptcha v3 keys.
For the purposes of this tutorial, you just need the Secret Key that is provided in the Admin Console under your site.

Easter Egg 🥚
It is good practice to have two key pairs (one for development and one for production. This way, you can add localhost to the domain inclusion list for dev).
4. First stop: appsettings.json
In this step, we are going to add our reCaptcha Secret Key to appsettings.json. We will be accessing it later on to pass to our custom Google reCaptcha service. This key (in addition to the token passed from our client) will help Google determine if the validation request and the Captcha is legitimate.
To stay semantically sound here, we are going to add a properties called «Secret» and «ApiUrl».
"GoogleRecaptchaV3": {
    "Secret": "yoursecretapikey",
    "ApiUrl": "https://www.google.com/recaptcha/api/siteverify"
}
Enter fullscreen mode
Exit fullscreen mode
After you’ve added the snippet, your appsettings.json might look something like below. You have logging, allowed hosts, etc, with the «Secret» and «ApiUrl» path properties conveniently added under «GoogleRecaptchaV3».
Of course if you have a different structure in mind or have to integrate with an existing setup that’s already built out, do it how you see fit. It will be fairly easy to access properties at any depth in the code. This example is just for the demo.
{
  "Logging": {
    "LogLevel": {
      "Default": "Information",
      "Microsoft": "Warning",
      "Microsoft.Hosting.Lifetime": "Information"
    }
  },
  "AllowedHosts": "*",
  "GoogleRecaptchaV3": {
    "Secret": "yoursecretapikey",
    "ApiUrl": "https://www.google.com/recaptcha/api/siteverify"
  }
}
Enter fullscreen mode
Exit fullscreen mode
You’ll probably also have your database connection string and your site key for Google reCaptcha in your appsettings.json, but for simplicity I am only including the property for my secret key. If you update your key and changes are not persisting, appsettings.json, make sure to completely restart your server.
Disclaimer ⚠️
Don’t forget to add
appsettings.jsonto your.gitignore. You don’t want your secrets to get on the web! This is the whole purpose of environment variables andappsettings.json.
Easter Egg 🥚
You can also look into using
appsettings.Development.jsonif you are using production and development keys separately (which is a good idea).
5. Building the Request and Response Models
To make our life easy, we will be creating a class that represents the request sent to Google and another class for the response. These classes make it straight forward to initialize a request and serialize the response content accordingly.
Remember, these are 1:1 request/response representations based on Google’s API spec.
For the demo, I am putting the models in a file called GHttpModels.cs. We will use these classes when we build the GoogleRecaptchaV3 service class.
using System;
using System.Runtime.Serialization;

namespace AspNetCoreRecaptchaV3ValidationDemo.Tooling
{

    public class GRequestModel
    {
        public string path { get; set; }
        public string secret { get; set; }
        public string response { get; set; }
        public string remoteip { get; set; }

        public GRequestModel(string res, string remip)
        {
            response = res;
            remoteip = remip;
            secret = Startup.Configuration["GoogleRecaptchaV3:Secret"];
            path = Startup.Configuration["GoogleRecaptchaV3:ApiUrl"];
            if(String.IsNullOrWhiteSpace(secret) || String.IsNullOrWhiteSpace(path))
            {
                //Invoke logger
                throw new Exception("Invalid 'Secret' or 'Path' properties in appsettings.json. Parent: GoogleRecaptchaV3.");
            }
        }
    }

    //Google's response property naming is
    //embarrassingly inconsistent, that's why we have to
    //use DataContract and DataMember attributes,
    //so we can bind the class from properties that have
    //naming where a C# variable by that name would be
    //against the language specifications... (i.e., '-').
    [DataContract]
    public class GResponseModel
    {
        [DataMember]
        public bool success { get; set; }
        [DataMember]
        public string challenge_ts { get; set; }
        [DataMember]
        public string hostname { get; set; }

        //Could create a child object for
        //error-codes
        [DataMember(Name = "error-codes")]
        public string[] error_codes { get; set; }
    }
}
Enter fullscreen mode
Exit fullscreen mode
If you are typing while following along, you will probably notice your linter complaining. Not to fear! This time, it’s expected.
The Startup.Configuration[...] lines are not valid because the Configuration property doesn’t exist in Startup.cs yet. Don’t worry, we will get to it and some other important things in Startup.cs after we finish developing the GoogleRecaptchaV3 service class.
Onward!
6. Creating the GoogleRecaptchaV3 Service
In case you missed out on it:
In software engineering, dependency injection is a technique in which an object receives other objects that it depends on. These other objects are called dependencies. In the typical «using» relationship the receiving object is called a client and the passed (that is, «injected») object is called a service. source
If you haven’t guessed it by now, we are building a DI service that we will add to the ASP.NET Core DI container!
In addition to our (not yet written) controller requiring a GoogleRecaptchaV3Service instance from the DI container, the GoogleRecaptchaV3Service itself also has a dependency: HttpClient.
Below, you can see we define an interface. Our service class inherits from that interface. This interface could be useful for further development of other features, although one could argue it is bloated OO syntactic sugar for now. (Passing around interfaces can also be useful to implement some very powerful testing functionality).
[breakdown below]
using System;
using System.Threading.Tasks;
using System.Text.Json;
using System.Web;
using System.Net.Http;
using System.IO;
using System.Text;
using System.Runtime.Serialization.Json;

namespace AspNetCoreRecaptchaV3ValidationDemo.Tooling
{
    public class CaptchaRequestException : Exception
    {
        public CaptchaRequestException()
        {
        }
        public CaptchaRequestException(string message)
            : base(message)
        {
        }
        public CaptchaRequestException(string message, Exception inner)
            : base(message, inner)
        {
        }
    }

    public interface IGoogleRecaptchaV3Service
    {
        HttpClient _httpClient { get; set; }
        GRequestModel Request { get; set; }
        GResponseModel Response { get; set; }
        void InitializeRequest(GRequestModel request);
        Task<bool> Execute();
    }

    public class GoogleRecaptchaV3Service : IGoogleRecaptchaV3Service
    {
        public HttpClient _httpClient { get; set; }

        public GRequestModel Request { get; set; }

        public GResponseModel Response { get; set; }

        public HttpRequestException HttpReqException { get; set; }

        public Exception GeneralException { get; set; }

        public GoogleRecaptchaV3Service(HttpClient httpClient)
        {
            _httpClient = httpClient;
        }

        public void InitializeRequest(GRequestModel request)
        {
            Request = request;
        }

        public async Task<bool> Execute()
        {
            // Notes on error handling:
            // Google will pass back a 200 Status Ok response if no network or server errors occur.
            // If there are errors in on the "business" level, they will be coded in an array;
            // CaptchaRequestException is for these types of errors.

            // CaptchaRequestException and multiple catches are used to help seperate the concerns of
            //  a) an HttpRequest 400+ status code
            //  b) an error at the "business" level
            //  c) an unpredicted error that can only be handled generically.

            // It might be worthwhile to implement a "user error message" property in this class so the
            // calling procedure can decide what, if anything besides a server error, to return to the
            // client and any client handling from there on.
            try
            {

                //Don't to forget to invoke any loggers in the logic below.

                //formulate request
                string builtURL = Request.path + '?' + HttpUtility.UrlPathEncode($"secret={Request.secret}&response={Request.response}&remoteip={Request.remoteip}");
                StringContent content = new StringContent(builtURL);

                Console.WriteLine($"Sent Request {builtURL}");

                //send request, await.
                HttpResponseMessage response = await _httpClient.PostAsync(builtURL, null);
                response.EnsureSuccessStatusCode();

                //read response
                byte[] res = await response.Content.ReadAsByteArrayAsync();

                string logres = await response.Content.ReadAsStringAsync();
                Console.WriteLine($"Retrieved Response: {logres}");

                //Serialize into GReponse type
                using (MemoryStream ms = new MemoryStream(res))
                {
                    DataContractJsonSerializer serializer = new DataContractJsonSerializer(typeof(GResponseModel));
                    Response = (GResponseModel)serializer.ReadObject(ms);
                }

                //check if business success
                if (!Response.success)
                {
                    throw new CaptchaRequestException();
                }

                //return bool.
                return true; //response.IsSuccessStatusCode; <- don't need this. EnsureSuccessStatusCode is now in play.
            }
            catch (HttpRequestException hre)
            {
                //handle http error code.
                HttpReqException = hre;

                //invoke logger accordingly

                //only returning bool. It is ultimately up to the calling procedure
                //to decide what data it wants from the Service.
                return false;
            }
            catch (CaptchaRequestException ex)
            {

                //Business-level error... values are accessible in error-codes array.
                //this catch block mainly serves for logging purposes.

                /*  Here are the possible "business" level codes:
                    missing-input-secret    The secret parameter is missing.
                    invalid-input-secret    The secret parameter is invalid or malformed.
                    missing-input-response  The response parameter is missing.
                    invalid-input-response  The response parameter is invalid or malformed.
                    bad-request             The request is invalid or malformed.
                    timeout-or-duplicate    The response is no longer valid: either is too old or has been used previously.
                */

                //invoke logger accordingly

                //only returning bool. It is ultimately up to the calling procedure
                //to decide what data it wants from the Service.
                return false;
            }
            catch (Exception ex)
            {
                // Generic unpredictable error
                GeneralException = ex;

                // invoke logger accordingly

                //only returning bool. It is ultimately up to the calling procedure
                //to decide what data it wants from the Service.
                return false;
            }
        }
    }
}
Enter fullscreen mode
Exit fullscreen mode
Let’s break the service class down…
Our service is comprised of two methods:Initialize and Execute.
Initialize takes a GRequestModel object as an argument. Normally you would see that parameter in the constructor, but since we want granular control over this at the controller scope, I separated it into another method. The reason for this is that the reCaptcha token from the client will likely be appended to request data. Let’s say you have a form that is submitted via an aJax request of some sort. When the submit button is clicked, you can programmatically trigger the front-end reCaptcha script to do it’s magic, communicate with Google, and give you back a token if the user passes the V3 robot test. Once you get that token in a callback, you will likely append that token to the JSON object that you previously collected your field values into.
Server-side, when the request hits the controller, it is binded to the model specified. From there, you will need to extract the pertinent reCaptcha information and pass it to the already instantiated (by DI) GoogleReCaptchaV3Service. Don’t worry if this doesn’t make sense yet, when you see the controller logic at the end it will all come together.
The execute function is an Task that manages all of our asynchronous code. This task formulates the request, sends it to Google, awaits, and de-serializes the response into a strongly typed, ready to grab GResponseModel object.
I am putting all this code in file called GoogleRecaptchaV3Service.cs, under the same generic «Tooling» namespace that our models are children to. Note the error handling and custom exception handler that I also snuck in there… more on that below.
That’s basically the entire service!
You will notice comments about the extensive error handling that is taking place. There are three possible types of errors that cover our error surface within the functionality of the service class. Note that I created a custom exception handler for separation of concerns, which is nothing but the stock exception handler under a different alias. It’s purpose is to separate an unpredictable generic error from the predictable error list that Google passes back to us if there is a «business-level» error (with a status code 200).
Note that more functionality could be added to the service. For example, adding a logger dependency! This would be especially useful if you wanted to perform unstructured or structured logging to an external data store or service like Azure Application Insights using Serilog.
7. Exposing the configuration in Startup.cs
The next step is to make sure we can access the configuration builder so we can get our reCaptcha secret from appsettings.json. This seems to be a highly opinionated topic out on the web, with people coming up with some crazy, bloated, bells-and-whistles-dependency-injection-jujitsu, but there is a VERY simple approach that will work just fine for our circumstances.
Since Asp.Net Core 2.0, the default initialization of WebHostBuilder (which can be found in program.cs) automatically adds an IConfiguration instance to the DI container (the proof is in the pudding).
This means that all we have to do is add IConfiguration as a dependency of our Startup class and set it as a property. Since most of our files are in the same namespace, we can just access it directly from pretty much anywhere (like we do in our GRequestModel: Startup.Configuration["GoogleRecaptchaV3:Secret"];)
using Microsoft.Extensions.Configuration;
using AspNetCoreRecaptchaV3ValidationDemo.Tooling;

public class Startup
{
   internal static IConfiguration Configuration { get; private set; }
   public Startup(IConfiguration configuration)
   {
       Configuration = configuration;
   }
}
Enter fullscreen mode
Exit fullscreen mode
8. Adding pertinent services to the DI container
Here we use ConfigureServices to add services to the DI container. If you don’t have the ConfigureServices method in your startup, you can just paste it in.
If you’re new to all this, make sure you understand the difference between ConfigureServices and Configure.
-
ConfigureServices: Where you configure the DI container. -
Configure: Where you configure the Http request pipeline.
public void ConfigureServices(IServiceCollection services)
{
    services.AddHttpClient<IGoogleRecaptchaV3Service,GoogleRecaptchaV3Service>();
    services.AddTransient<IGoogleRecaptchaV3Service,GoogleRecaptchaV3Service>();
    services.AddControllers();
}
Enter fullscreen mode
Exit fullscreen mode
I wasn’t going to include this part, but don’t forget to also configure UseEndpoints in your Http Request pipeline so your requests are routed to your controllers.
app.UseRouting();
app.UseEndpoints(endpoints =>
{
    endpoints.MapControllers();
});
Enter fullscreen mode
Exit fullscreen mode
9. Setting up a Controller to use our GoogleRecaptchaV3Service
Below, you can see a standard controller implementation that accepts some sign up form data from the body of the request (in the form of the SignUpModel, which contains the Recaptcha token).
As you can see, we added a constructor to our controller, specifying IGoogleRecaptchaV3Service as a dependency. We then set it as a property, to then later perform initialization and execution when a request hits the controller.
    public class SignUpModel
    {
        public string FirstName { get; set; }
        public string LastName { get; set; }
        public string Email { get; set; }
        public string RecaptchaToken { get; set; }
    }

    [ApiController]
    [Route("public/signup")]
    public class SignUp : ControllerBase
    {
        IGoogleRecaptchaV3Service _gService { get; set; }
        public SignUp(IGoogleRecaptchaV3Service gService)
        {
            _gService = gService;
        }

        [HttpPost]
        public async Task<IActionResult> Post([FromQuery] SignUpModel SignUpData)
        {

            GRequestModel rm = new GRequestModel(SignUpData.RecaptchaToken,
                                                 HttpContext.Connection.RemoteIpAddress.ToString());

            _gService.InitializeRequest(rm);

            if(!await _gService.Execute())
            {
                //return error codes string.
                return Ok(_gService.Response.error_codes);
            }

            //call Business layer

            //return result
            return Ok("Server-side Google reCaptcha validation successfull!");

        }
    }
Enter fullscreen mode
Exit fullscreen mode
Easter Egg 🥚
When using Entity Framework in this context, you can always use inheritance to create new types, that is if you have data you want to accept through your Web api which is not represented in your data model (i.e.,if it doesn’t need to be stored persistently).
10. Testing it out
Almost Done!
I created a very basic demo where you can see a more complete picture of the snippets in this article. If you want to run the code, you can to put your secret key in appsettings.json (or you could see what happens when there’s an invalid secret key in appsettings.json 😉).
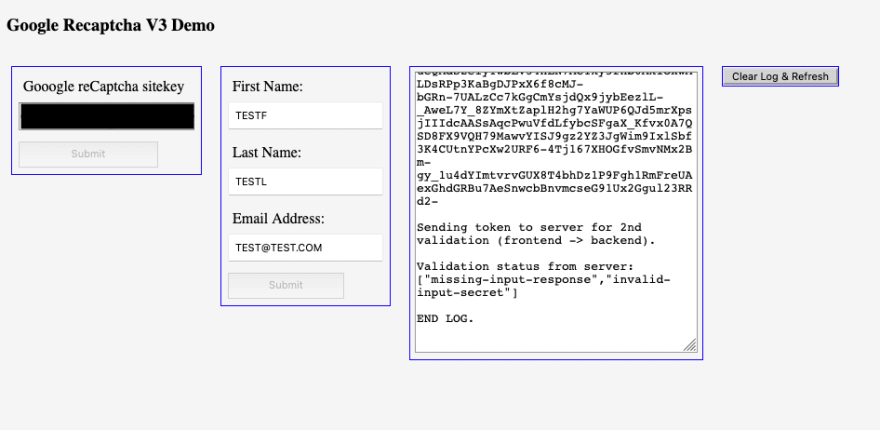
The example will allow you to insert your site key in-browser at the root path / and run an end-to-end mock of the entire process (I dynamically inject the Google reCaptcha script after you input your site key so you don’t have to dig around in the html. Alternatively, I could have used Razor Pages + appsettings.json). On that note I have not .gitignore‘d appsettings.json so feel free to view it in Github. Just be keen on where this code ends up if you include any secret keys.
Thanks for reading! If there are any typos or grammatical issues, just comment below so I can amend them.
Give me a follow on Dev.to, Github, or LinkedIn if you liked the article and want to see more! If you would like, you can also buy me a coffee. Any support is greatly appreciated!
> Connect with me
Enter fullscreen mode
Exit fullscreen mode
![]()
![]()
> Support me
Enter fullscreen mode
Exit fullscreen mode

> Support everybody
Enter fullscreen mode
Exit fullscreen mode
The ability to transfer money has been a long-standing omission from the web platform. As a result, the web suffers from a flood of advertising and corrupt business models. Web Monetization provides an open, native, efficient, and automatic way to compensate creators, pay for API calls, and support crucial web infrastructure. Learn More about how you can help change the web.
Q: Why not use dependency injection in attributes?
A: Dependency Injection in Attributes: don’t do it!
Q: Why not just build a «Perform Server-Side Recaptcha validation» endpoint?
A: This ultimately makes things more complex. By this philosophy, the front-end reCaptcha script communicates with Google, gives you back a token, you take that token and call this theoretical Server-Side Recaptcha validation api. That api either has to persist knowledge that it did indeed perform validation (by server-side storage, or by returning a token of its own—which adds payload and complexity). How else would the secondary call submitting, say the sign up information, prove to the server that it had indeed been server-side validated before? If you wanted to take this approach, might as well forget about REST. This is a good lesson on stateless protocols.
Q: Why didn’t you include the GRequest model in the DI container?
A: First, I will point you to this SO post. I will also add that adding GRequest as a dependency to GoogleRecaptchaV3Service would kill my intention of granularity at the controller level. If you are thinking about adding GRequest as a dependency at the controller’s constructor, that would mean extracting data upstream… you can see where that’s going…this should really be done in the controller in this circumstance. As for reading body data multiple times, it should probably only be done in special circumstances. I could go on, but I will stop here 
A CAPTCHA (Completely Automated Public Turing Test To Tell Computers and Humans Apart) is a way to determine whether a user of a website is a human or not. I’m sure everyone encountered these tests on the WWW here and there, where you have to type a text or select pictures. The goal is to prevent bots from spamming a website. For example, prevent bots from automatically adding comments on a blog, or prevent bots from registering thousands of accounts.
Maybe the most commonly used CAPTCHA library is reCAPTCHA from Google. But there are alternatives if you are not keen to send data to Google. In this blog, we take a loot at one of the alternative: hCaptcha
Another reason to take a look at this library is the announcement a month ago from Cloudflare. They switched from reCAPTCHA to hCaptcha.
Registration
Before you can use hCaptcha in your project, you have to create an account. Open the Sign Up page of hCaptcha and enter the required information.
The service is free according to the Plans section on the hCaptcha homepage. However, there is an enterprise plan for customers that need more control.
When you create the hCaptcha account, you initially get two keys. A site key and a secret key. The site key will be part of your web application and is therefore public. You can create multiple site keys, one for each of your websites. When you create a site key, you can specify the difficulty level of the CAPTCHA.
The secret key, on the other hand, is, as the name suggests, secret, and you should not make this key publicly available, for example, by committing it into a public Git repository.
Overview
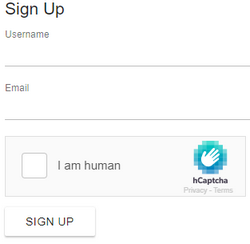
The demo application presents the following dialog to the user.
The user starts the CAPTCHA process by clicking on the I am human checkbox.
From there, the CAPTCHA process comprises these steps.
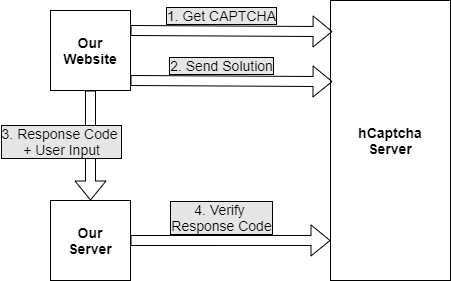
- Web application requests CAPTCHA from the hCaptcha server and displays it.
- User solves CAPTCHA. Application sends solution to hCaptcha for verification. If solution is correct, hCaptcha server sends back a response code.
- Web application sends response code together with user inputs to our server.
- Server sends response code to hCaptcha for verification.
Server
The example I present in this blog post is a trivial sign-up page with two input fields, username, and email. We start with the server implementation, which in this demo application is a Spring Boot application. You can use any server-side technology, all you need is a way to send HTTP requests from your server and a JSON parser.
When the server sends the response code to hCaptcha, he also needs to send the secret key. In this application, I externalized the configuration of the secret key, so I don’t need to hardcode the key into the application.
With the @Value annotation, you can inject application properties into a Spring application.
  @Value("${hCaptcha.secret.key}")
  private String hCaptchaSecretKey;
Application.java
With this, you can start the server and pass a command-line argument (--hCaptcha.secret.key=0xA0...). Or you add hCaptcha.secret.key=0xA0.... to a properties file.
The application then creates a Java 11 HTTP client and a Jackson ObjectMapper instance for parsing the response.
  private final ObjectMapper om = new ObjectMapper();

  Application() {
    this.httpClient = HttpClient.newBuilder().connectTimeout(Duration.ofSeconds(5))
        .build();
  }
Application.java
The POST endpoint that receives the sign-up request extracts the username, email, and the hCaptcha response code sent from our web application. To verify a CAPTCHA response, you need to send a POST request to https://hcaptcha.com/siteverify and pass the parameters response, the CAPTCHA response code from the client, and secret, the secret key.
  @PostMapping("/signup")
  public boolean signup(@RequestParam(name = "username", required = true) String username,
      @RequestParam(name = "email", required = true) String email,
      @RequestParam("h-captcha-response") String captchaResponse)
      throws IOException, InterruptedException {
    if (StringUtils.hasText(captchaResponse)) {

      var sb = new StringBuilder();
      sb.append("response=");
      sb.append(captchaResponse);
      sb.append("&secret=");
      sb.append(this.hCaptchaSecretKey);

      HttpRequest request = HttpRequest.newBuilder()
          .uri(URI.create("https://hcaptcha.com/siteverify"))
          .header("Content-Type", "application/x-www-form-urlencoded")
          .timeout(Duration.ofSeconds(10)).POST(BodyPublishers.ofString(sb.toString()))
          .build();

      HttpResponse<String> response = this.httpClient.send(request,
          BodyHandlers.ofString());

      System.out.println("http response status: " + response.statusCode());
      System.out.println("body: " + response.body());
Application.java
If everything is okay and the user solved the CAPTCHA correctly your server gets back this response
{
  "success":true,
  "challenge_ts":"2020-05-01T06:54:32",
  "hostname":"test.mydomain.com"
}
hCaptcha sends back a response like this, if something went wrong
{
  "success":false,
  "error-codes":["missing-input-secret"]
}
"error-codes" is an array of strings which contains one or multiple codes:
"missing-input-secret": Thesecretparameter is missing."invalid-input-secret": Thesecretparameter is invalid or malformed."missing-input-response": Theresponseparameter is missing."invalid-input-response": Theresponseparameter is invalid or malformed."bad-request": The request is invalid or malformed."invalid-or-already-seen-response": The response parameter has already been checked, or has another issue."sitekey-secret-mismatch": The site key is not registered with the provided secret.
The following two web applications use the same server.
Plain JavaScript / HTML
In a plain JavaScript/HTML project, you have to add two lines of code to enable hCaptcha.
First import the hCaptcha JavaScript library
<script src="https://hcaptcha.com/1/api.js" async defer></script>
index.html
Secondly, add an empty element to the body of your page. This can be any element; in this example, it’s a <div>. Important is that this element has a class of h-captcha and a data-sitekey attribute set to the site key.
<div class="h-captcha" data-sitekey="3f7f821f-05b7-486b-a3d9-21395609a73e"></div>
index.html
After the user successfully solved the CAPTCHA, a hidden input with the name "h-captcha-response" is added to the form.
The demo application sends the user input and response code with the following JavaScript code to the server
    async function submitForm() {
      const signUpForm = document.getElementById('signUpForm');
      const formData = new FormData(signUpForm);

      // Workaround, hCaptcha adds two keys with same value
      formData.delete('g-recaptcha-response');

      const response = await fetch('/signup', {
        method: 'POST',
        body: formData
      });

      const ok = await response.json();
      if (ok) {
        window.location.href = "ok.html";
      } else {
        console.log('something went wrong');
        window.location.href = "index.html";
      }

    }
index.html
In my tests, the hCaptcha library added two hidden input elements to the form with the same value ("h-captcha-response" and "g-recaptcha-response"). I assume to make migration from reCAPTCHA easier, so these projects don’t have to change the server code.
When you test this on your local computer, you have to keep two things in mind. Serving the site from file:// does not work, you have to serve the website from an HTTP server. Also, http://localhost and http://127.0.0.1 are not supported by the hCaptcha CORS settings. An easy solution for this problem is to add an entry to your hosts file.
127.0.0.1 test.mydomain.com
/etc/hostson Linux/private/etc/hostson macOSC:WindowsSystem32Driversetchostson Windows
With this entry in place, you access the local HTTP server with http://test.mydomain.com, and hCaptcha should work.
Angular
hCaptcha provides integration libraries for popular frameworks like Angular, Node, Express, ReactJS, and VueJS. In this section we take a look at the Angular integration.
This client is a simple Ionic / Angular application. It displays the same user interface that we saw in the previous section, a sign-up page with two input fields, username and email, and the CAPTCHA.
First, we have to install the library
npm install ng-hcaptcha
Then import the hCaptcha module into the Angular application and specify the public site key. Here I added the site key to the environments file and imported it into the module.
import {environment} from '../environments/environment';
import {NgHcaptchaModule} from 'ng-hcaptcha';
app.module.ts
    NgHcaptchaModule.forRoot({
      siteKey: environment.SITE_KEY
    }),
app.module.ts
And lastly, add the <ng-hcaptcha> component to your template.
<ng-hcaptcha name="captcha" ngModel></ng-hcaptcha>
app.component.html
After the user solved the CAPTCHA correctly, the library sets the hCaptcha response code to the value of the form field captcha.
Like in the example before, our application extracts the user inputs and response code from the form and sends them to the server for verification.
  submit(form: NgForm): void {
    const formData = new FormData();
    formData.append('email', form.value.email);
    formData.append('username', form.value.username);
    formData.append('h-captcha-response', form.value.captcha);

    this.httpClient.post<boolean>('/signup', formData).subscribe(
      ok => {
        if (ok) {
          this.toastController.create({
            message: 'Sign up successful.',
            duration: 4000
          }).then(toast => toast.present());
        } else {
          this.toastController.create({
            message: 'Something wrent wrong.',
            duration: 4000
          }).then(toast => toast.present());
        }
      }
    );
  }
app.component.ts
For more information check out the project site of ng-hcaptcha
That concludes this tutorial about integrating hCaptcha into web applications. Visit the homepage of hCaptcha to learn more about this project. If you are more interested in reCAPTCHA from Google, check out their home page.