I try to keep this FAQ as complete as possible. If you think that there is something missing, please contact me.
I get the error «Dropzone already attached.» when creating the Dropzone.
This is most likely due to the autoDiscover feature of Dropzone.
When Dropzone starts, it scans the whole document, and looks for elements with the dropzone class. It then creates an instance of Dropzone for every element found. If you, later on, create a Dropzone instance yourself, you’ll create a second Dropzone which causes this error.
So you can either:
- Turn off autoDiscover globally like this:
Dropzone.autoDiscover = false;, or - Turn off autoDiscover of specific elements like this:
Dropzone.options.myAwesomeDropzone = false;
You don’t have to create an instance of Dropzone programmatically in most situations! It’s recommended
to leave autoDiscover enabled, and configure your Dropzone in theinitoption of your configuration.
Why are large files not uploading?
There is a maxFilesize option in Dropzone which defaults to 256 (MB). Increase this to upload files bigger than that. If your files upload fine but aren’t stored on the server, then it’s due to your server configuration. Most servers limit the file upload size as well. Please check with the appropriate documentation.
Why are some image thumbnails not generated?
There is a maxThumbnailFilesize option in Dropzone which defaults to 10 (MB) to prevent the browser from downsizing images that are too big. Increase this to create thumbnails of bigger files.
How to get notified when all files finished uploading?
At the moment there isn’t a single event to do that, but you can listen to the complete event, which fires every time a file completed uploading, and see if there are still files in the queue or being processed.
There is a queuecomplete event now that fires when all files in the queue have been uploaded.
How to show an error returned by the server?
Very often you have to do some verification on the server to check if the file is actually valid. If you want Dropzone to display any error encountered on the server, all you have to do, is send back a proper HTTP status code in the range of 400 — 500.
In most frameworks those error codes are generated automatically when you send back an error to the client. In PHP (for example) you can set it with the header command.
Dropzone will then know that the file upload was invalid, and will display the returned text as error message.
If the Content-Type of your response is text/plain, you can just return the text without any further markup. If the Content-Type is application/json, Dropzone will use the error property of the provided object. Eg.: { "error": "File could not be saved." }
How to add a button to remove each file preview?
Starting with Dropzone version 3.5.0, there is an option that will handle all this for you: addRemoveLinks. This will add an <a class="dz-remove">Remove file</a> element to the file preview that will remove the file, and it will change to Cancel upload if the file is currently being uploaded (this will trigger a confirmation dialog).
You can change those sentences with the dictRemoveFile, dictCancelUpload and dictCancelUploadConfirmation options.
If you still want to create the button yourself, you can do so like this:
<form action="/target-url" id="my-dropzone" class="dropzone"></form>

<script>
  // myDropzone is the configuration for the element that has an id attribute
  // with the value my-dropzone (or myDropzone)
  Dropzone.options.myDropzone = {
    init: function() {
      this.on("addedfile", function(file) {

        // Create the remove button
        var removeButton = Dropzone.createElement("<button>Remove file</button>");


        // Capture the Dropzone instance as closure.
        var _this = this;

        // Listen to the click event
        removeButton.addEventListener("click", function(e) {
          // Make sure the button click doesn't submit the form:
          e.preventDefault();
          e.stopPropagation();

          // Remove the file preview.
          _this.removeFile(file);
          // If you want to the delete the file on the server as well,
          // you can do the AJAX request here.
        });

        // Add the button to the file preview element.
        file.previewElement.appendChild(removeButton);
      });
    }
  };
</script>
How to submit additional data along the file upload?
If your Dropzone element is a <form> element, all hidden input fields will automatically be submitted as POST data along with the file upload.
Example:
<form action="/" class="dropzone">
  <input type="hidden" name="additionaldata" value="1" />

  <!-- If you want control over the fallback form, just add it here: -->
  <div class="fallback"> <!-- This div will be removed if the fallback is not necessary -->
    <input type="file" name="youfilename" />
    etc...
  </div>
</form>
I want to display additional information after a file uploaded.
To use the information sent back from the server, use the success event, like this:
Dropzone.options.myDropzone = {
  init: function() {
    this.on("success", function(file, responseText) {
      // Handle the responseText here. For example, add the text to the preview element:
      file.previewTemplate.appendChild(document.createTextNode(responseText));
    });
  }
};
How to show an image created by the server after upload
If your server generates an image (for example, you render a PDF on the server after upload), you can display that image easily once it uploads like this:
Let’s say your server responds with JSON like this:
{ "imageUrl": "http://my.image/file.jpg" }
Dropzone.options.myDropzone = {
  init: function() {
    this.on("success", function(file, serverResponse) {
      // Called after the file successfully uploaded.

      // If the image is already a thumbnail:
      this.emit('thumbnail', file, serverResponse.imageUrl);

      // If it needs resizing:
      this.createThumbnailFromUrl(file, serverResponse.imageUrl);
    });
  }
};
How to show files already stored on server
Dropzone.options.myDropzone = {
  init: function() {
    let myDropzone = this;

    // If you only have access to the original image sizes on your server,
    // and want to resize them in the browser:
    let mockFile = { name: "Filename 2", size: 12345 };
    myDropzone.displayExistingFile(mockFile, "https://i.picsum.photos/id/959/600/600.jpg");

    // If the thumbnail is already in the right size on your server:
    let mockFile = { name: "Filename", size: 12345 };
    let callback = null; // Optional callback when it's done
    let crossOrigin = null; // Added to the `img` tag for crossOrigin handling
    let resizeThumbnail = false; // Tells Dropzone whether it should resize the image first
    myDropzone.displayExistingFile(mockFile, "https://i.picsum.photos/id/959/120/120.jpg", callback, crossOrigin, resizeThumbnail);

    // If you use the maxFiles option, make sure you adjust it to the
    // correct amount:
    let fileCountOnServer = 2; // The number of files already uploaded
    myDropzone.options.maxFiles = myDropzone.options.maxFiles - fileCountOnServer;
  }
};
Use own confirm implementation
If you are unhappy with the way Dropzone asks a user if she wants to cancel or remove a file, and want to use some other way (e.g.: bootstrap’s modal), you can simply overwrite the Dropzone.confirm function.
// accepted and rejected are functions to be called whenever the user response
// has been received.
// rejected is not mandatory! So make sure to check if it exists before
// calling it. Do nothing if it doesn't.
Dropzone.confirm = function(question, accepted, rejected) {
  // Do your thing, ask the user for confirmation or rejection, and call
  // accepted() if the user accepts, or rejected() otherwise. Make
  // sure that rejected is actually defined!
};
How can I limit the number of files
You’re in luck! Starting with 3.7.0 Dropzone supports the maxFiles option. Simply set it to the desired quantity and you’re good to go. If you don’t want the rejected files to be viewed, simply register for the maxfilesexceeded event, and remove the file immediately:
myDropzone.on("maxfilesexceeded", function(file) { this.removeFile(file); });
Provide a thumbnail for files
If you want to provide a thumbnail for files other than images, you can, by emitting the thumbnail event yourself.
myDropzone.on("addedfile", function(file) {
  if (!file.type.match(/image.*/)) {
    // This is not an image, so Dropzone doesn't create a thumbnail.
    // Set a default thumbnail:
    myDropzone.emit("thumbnail", file, "http://path/to/image");

    // You could of course generate another image yourself here,
    // and set it as a data url.
  }
});
Reject images based on image dimensions
This is a bit tricky. The «problem» is, that the image dimensions are only known after the thumbnail event fired, which could potentially happen after the file already uploaded since thumbnail creation is queued.
That’s why the accept function (which determines if the file should be rejected) is called before the dimensions are actually known.
Fortunately the accept function is asynchronous, and can «wait» for the thumbnail event. This is why you need to put the accept callback in the file object so you can reference it after the thumbnail has been generated:
var maxImageWidth = 800,
    maxImageHeight = 800;

Dropzone.options.myDropzone = {

  // Make sure only images are accepted
  acceptedFiles: "image/*",

  init: function() {
    // Register for the thumbnail callback.
    // When the thumbnail is created the image dimensions are set.
    this.on("thumbnail", function(file) {
      // Do the dimension checks you want to do
      if (file.width > maxImageWidth || file.height > maxImageHeight) {
        file.rejectDimensions()
      }
      else {
        file.acceptDimensions();
      }
    });
  },

  // Instead of directly accepting / rejecting the file, setup two
  // functions on the file that can be called later to accept / reject
  // the file.
  accept: function(file, done) {
    file.acceptDimensions = done;
    file.rejectDimensions = function() { done("Invalid dimension."); };
    // Of course you could also just put the `done` function in the file
    // and call it either with or without error in the `thumbnail` event
    // callback, but I think that this is cleaner.
  }
};
Chunked uploads
Dropzone offers the possibility to upload files in chunks. The relevant configuration options for this feature are:
-
chunkingwhich should be set totrue -
forceChunking, if true, will always send a file in chunks, even if it is only one chunk -
chunkSizein bytes -
parallelChunkUploads, if true, the chunks will be uploaded simultaneously -
retryChunks, if true, the library will retry to upload a chunk if it fails -
retryChunksLimitdefaults to3
Then there are two important callbacks. The first one is: params which can be a function, that receives files, xhr and chunk as the first argument. If chunking is enabled, you know that files only contains that one file, and chunk is the object holding all the information about the current chunk. Example:
var chunk = {
  file: file,
  index: 0,
  status: Dropzone.UPLOADING,
  progress: 0.4
}
See the documentation for that parameter for more information or look at the source code for the default implementation.
The second important callback is chunksUploaded, which gets the file that finished uploading and the done function as second argument. Do whatever you need to do in that function, to tell the server that the file finished uploading and invoke the done() function when ready.
With a Subscription, click any sentence in the script to jump to that part of the video!
Login
Subscribe
The AJAX upload finishes successfully… but the response is a redirect… which doesn’t break anything technically… but it’s weird. Our endpoint isn’t setup to be an API endpoint — it’s 100% traditional: we’re redirecting on error and success.
But now that we are using this as an API endpoint, let’s fix that! And… this kinda simplifies things. For the validation error, we can say return $this->json($violations, 400).
|
|
… lines 1 — 18 |
| class ArticleReferenceAdminController extends BaseController | |
| { | |
|
|
… lines 21 — 24 |
| public function uploadArticleReference(Article $article, Request $request, UploaderHelper $uploaderHelper, EntityManagerInterface $entityManager, ValidatorInterface $validator) | |
| { | |
|
|
… lines 27 — 51 |
| if ($violations->count() > 0) { | |
| return $this->json($violations, 400); | |
| } | |
|
|
… lines 55 — 66 |
| } | |
|
|
… lines 68 — 91 |
| } |
How nice is that? And at the bottom, we don’t really need to return anything yet, but it’s pretty standard to return the JSON of a resource after creating it. So, return $this->json($articleReference).
|
|
… lines 1 — 18 |
| class ArticleReferenceAdminController extends BaseController | |
| { | |
|
|
… lines 21 — 24 |
| public function uploadArticleReference(Article $article, Request $request, UploaderHelper $uploaderHelper, EntityManagerInterface $entityManager, ValidatorInterface $validator) | |
| { | |
|
|
… lines 27 — 64 |
| return $this->json($articleReference); | |
| } | |
|
|
… lines 68 — 91 |
| } |
Let’s try it! Move over, refresh… even though we don’t need to… and select astronaut.jpg. This time… it fails! Let’s see what the error looks like. Hmm, actually, better: click to open the profiler — you can always see the error there. Oh:
A circular reference has been detected when serializing object of class
Article.
This is a super common problem with the serializer, and we saw it earlier. We’re serializing ArticleReference. And, by default, that will serialize all the properties that have getter methods… including the article property. Then when it serializes the Article, it finds the $articleReferences property and tries to serialize the ArticleReference objects… in an endless loop.
The easiest way to fix this is to define a serialization group. In ArticleReference, above the id property, add @Groups and let’s invent one called main. Put this above all the fields that we actually want to serialize, how about $id, $filename, $originalFilename and $mimeType. We’re not actually using the JSON response yet so it doesn’t matter — but we will use it in a few minutes.
|
|
… lines 1 — 6 |
| use SymfonyComponentSerializerAnnotationGroups; | |
|
|
… lines 8 — 11 |
| class ArticleReference | |
| { | |
|
|
… lines 15 — 17 |
| private $id; | |
|
|
… lines 21 — 27 |
|
|
… line 29 |
| private $filename; | |
|
|
… line 33 |
|
|
… line 35 |
| private $originalFilename; | |
|
|
… line 39 |
|
|
… line 41 |
| private $mimeType; | |
|
|
… lines 45 — 100 |
| } |
Back in the controller, let’s break this onto multiple lines. The second argument is the status code and we should actually use 201 — that’s the proper status code when you’ve created a resource. Next is headers — we don’t need anything custom, and, for context, add an array with groups set to ['main'].
|
|
… lines 1 — 18 |
| class ArticleReferenceAdminController extends BaseController | |
| { | |
|
|
… lines 21 — 24 |
| public function uploadArticleReference(Article $article, Request $request, UploaderHelper $uploaderHelper, EntityManagerInterface $entityManager, ValidatorInterface $validator) | |
| { | |
|
|
… lines 27 — 65 |
| return $this->json( | |
| $articleReference, | |
| 201, | |
| [], | |
| [ | |
| ‘groups’ => [‘main’] | |
| ] | |
| ); | |
| } | |
|
|
… lines 75 — 98 |
| } |
Let’s see if that fixed things. Close the profiler and select «stars». Duh — I totally forgot — the stars file is too big — you can see it failed. But when you hover over it… object Object? That’s not a great error message… We’ll fix that in a minute.
Select Earth from the Moon.jpg and… nice! It works and the JSON response looks awesome!
Displaying Errors Correctly
Ok, let’s look back at what happened with stars. This failed validation and so the server returned a 400 status code. Dropzone did notice that — it knows it failed. But, by default, Dropzone expects the Response to be just a string with the error message, not a nice JSON structure with a detail key like we have.
No worries: we just need a little extra JavaScript to help this along. Back in admin_article_form.js, add another option called init and set that to a function.
|
|
… lines 1 — 31 |
| function initializeDropzone() { | |
|
|
… lines 33 — 37 |
| var dropzone = new Dropzone(formElement, { | |
|
|
… line 39 |
| init: function() { | |
|
|
… lines 41 — 45 |
| } | |
| }); | |
| } |
Dropzone calls this when it’s setting itself up, and it’s a great place to add extra behavior via events. For example, want to do something whenever there’s an error? Call this.on('error') and pass that a callback with two arguments: a file object that holds details about the file that was uploaded and data — the data sent back from the server.
|
|
… lines 1 — 31 |
| function initializeDropzone() { | |
|
|
… lines 33 — 37 |
| var dropzone = new Dropzone(formElement, { | |
|
|
… line 39 |
| init: function() { | |
| this.on(‘error’, function(file, data) { | |
|
|
… lines 42 — 44 |
| }); | |
| } | |
| }); | |
| } |
Because the real validation message lives on the detail key, we can say: if data.detail, this.emit('error') passing file and the actual error message string: data.detail.
|
|
… lines 1 — 31 |
| function initializeDropzone() { | |
|
|
… lines 33 — 37 |
| var dropzone = new Dropzone(formElement, { | |
|
|
… line 39 |
| init: function() { | |
| this.on(‘error’, function(file, data) { | |
| if (data.detail) { | |
| this.emit(‘error’, file, data.detail); | |
| } | |
| }); | |
| } | |
| }); | |
| } |
That’s it! Refresh the whole thing… and upload the stars file again. It failed… but when we hover on it! Nice! There’s our validation error.
Next: now that our files are automatically uploaded via AJAX, the reference list should also automatically update when each upload finishes. Let’s render that whole section with JavaScript.
If you already used dropzone or you are tring to implement it in your website you will notice that you can’t trigger error in the dropzone. In this tutorial I will show you how to trigger error messages in dropzone from your controller in php. For this example we will use the following dropzone html structure:
<div class="custom_dropzone loadDropzone" name="lightdata_document">
                          <div class="dz-message" data-dz-message><p>ADD YOUR FILES</p><span>You can load more than one file.</span></div>
                        </div>
As you can see I don’t use the class id dropzone because, if I do the dropzone will automatically init so I won’t have the control I need on scripts, so I need to init it using jquery using the following code:
jQuery('.loadDropzone').dropzone({
    paramName: 'files',
    url: link,
    dictDefaultMessage: "Insert your files",
    clickable: true,
    autoDiscover:false,
    uploadMultiple: false,
    addRemoveLinks: true,
    init: function(){
    	this.on("sending", function(file, xhr, formData){

    	});
        this.on("success", function(file, response){

        });
        this.on("error", function(file, message2){
        	alert(message2);
        });
    }
});
Using the above code you will init the dropzone and there you have main callbacks sending, success and error. Now we need to send those message from backend depending on what’s going on at upload process. So the upload function will look like this:
public function makeUpload($file, $project_id, $field_name, $step){
  if(!empty($file)){
    $success_files = array();
    $file_name = $file['name'];
    $rand_number = rand(0, 900);
    $temp = $file['tmp_name'];
    $file_object = array();
    $file_object['name'] = $file['name'];
    $file_object['type'] = $file['type'];
    $file_object['tmp_name'] = $file['tmp_name'];
    $file_object['error'] = $file['error'];
    $file_object['size'] = $file['size'];

    if ($error = ImageManager::validateUpload($file_object)) {
        header('HTTP/1.1 500 Internal Server Error');
      		header('Content-type: text/plain');
        exit($error);
    } else {
    		$ext = substr($file_name, strrpos($file_name, '.') + 1);
      $file_name = substr($file_name,0,strrpos($file_name,'.'));
        	$file_name = $file_name.'_'.$rand_number.'.'.$ext;
      if (!file_exists(_PS_MODULE_DIR_.'dashboard'.DIRECTORY_SEPARATOR.'files'.DIRECTORY_SEPARATOR.'project_'.$project_id)) {
          mkdir(_PS_MODULE_DIR_.'dashboard'.DIRECTORY_SEPARATOR.'files'.DIRECTORY_SEPARATOR.'project_'.$project_id, 0777, true);
      }
      if (!move_uploaded_file($temp, _PS_MODULE_DIR_.'dashboard'.DIRECTORY_SEPARATOR.'files'.DIRECTORY_SEPARATOR.'project_'.$project_id.DIRECTORY_SEPARATOR.$file_name)) {

        header('HTTP/1.1 500 Internal Server Error');
      		header('Content-type: text/plain');
        exit('An error occurred while attempting to upload the file.');
      }
      DB::getInstance()->insert('project_files', array(
        'id_project'       => (int)$project_id,
        'step'             => (int)$step,
        'file_name'        => pSQL($file_name),
        'input_field_name' => $field_name
      ));
      $success_files = array(
        'success' => true,
        'message' => 'Your File has been uploaded',
        'file_id' => Db::getInstance()->Insert_ID(),
        'file_name' => $file_name,
        'file_path' => $this->base_path().'/modules/dashboard/files/project_'.$project_id.'/'.$file_name
      );
      return json_encode($success_files);

    }
  }
}
In the above function you have all examples you need to implement this functionality, because I added an insert function and I send back to the client error messages but success one too. In order the error to reach the dropzone you need to send back a 500 error with a custom message, you can add what message you want, but is very important to send 500 Internal Server Error in order to dropzone to know that an error occured. I didn’t test with other errors but you can test it. For this example I have used Prestashop CMS but don’t worry the code should work on any CMS or framework. If you will use the above code don’t forget to delete extra parameters and change the uploaoded files path. This is one of the methods through which you can trigger an error in dropzone.
Let’s face it, nobody likes forms. Developers don’t like building them, designers don’t particularly enjoy styling them, and users certainly don’t like filling them in.
Of all the components that can make up a form, the file control could just be the most frustrating of the lot. It’s a real pain to style, it’s clunky and awkward to use, and uploading a file will slow down the submission process of any form.
That’s why a plugin to enhance them is always worth a look, and DropzoneJS is just one such option. It will make your file upload controls look better, make them more user-friendly, and by using AJAX to upload the file in the background, it will at the very least make the process seem quicker. It also makes it easier to validate files before they even reach your server, providing near-instantaneous feedback to the user.
We’re going to take a look at DropzoneJS in some detail. We’ll show how to implement it. and look at some of the ways in which it can be tweaked and customized. We’ll also implement a simple server-side upload mechanism using Node.js.
As ever, you can find the code for this tutorial on our GitHub repository.
This article was updated in 2020. For more on Node.js, read Node.js Web Development – Fourth Edition.
Introducing DropzoneJS
DropzoneJS allows users to upload files using drag and drop. Whilst the usability benefits could justifiably be debated, it’s an increasingly common approach and one which is in tune with the way a lot of people work with files on their desktop. It’s also pretty well supported across major browsers.
DropzoneJS isn’t simply a drag and drop based widget, however. Clicking the widget launches the more conventional file chooser dialog approach.
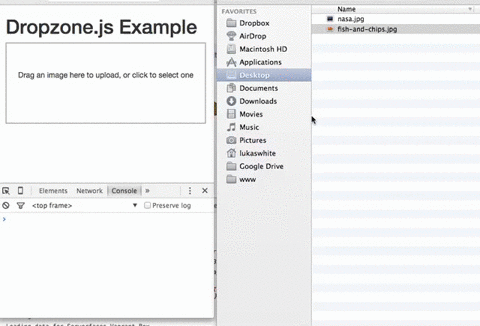
Here’s an animation of the widget in action:
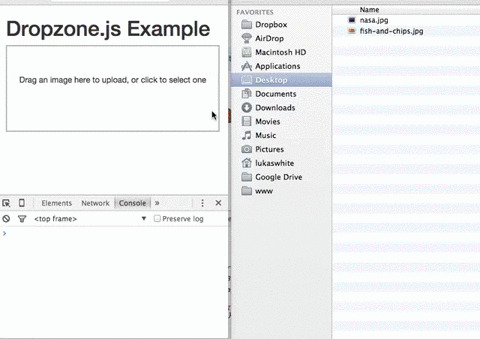
Alternatively, take a look at this most minimal of examples.
You can use DropzoneJS for any type of file, though the nice little thumbnail effect makes it ideally suited to uploading images in particular.
Features
To summarize some of the plugin’s features and characteristics, DropzoneJS:
- can be used with or without jQuery
- has drag and drop support
- generates thumbnail images
- supports multiple uploads, optionally in parallel
- includes a progress bar
- is fully themeable
- includes extensible file validation support
- is available as an AMD module or RequireJS module
- comes in at around 43KB when minified and 13KB when gzipped
Browser Support
Taken from the official documentation, browser support is as follows:
- Chrome 7+
- Firefox 4+
- IE 10+
- Opera 12+ (Version 12 for macOS is disabled because their API is buggy)
- Safari 6+
There are a couple of ways to handle fallbacks for when the plugin isn’t fully supported, which we’ll look at later.
Getting Set Up
The simplest way to get started with DropzoneJS is to include the latest version from a CDN. At the time of writing, this is version 5.5.1.
Alternatively, you can download the latest release from the project’s GitLab page. There’s also a third-party package providing support for ReactJS.
Then, make sure you include both the main JavaScript file and the CSS styles in your page. For example:
<!DOCTYPE html>
<html lang="en">
<head>
  <meta charset="UTF-8">
  <title>File Upload Example</title>
  <link
    rel="stylesheet"
    href="https://cdnjs.cloudflare.com/ajax/libs/dropzone/5.5.1/min/dropzone.min.css">
</head>
<body>

  <script src="https://cdnjs.cloudflare.com/ajax/libs/dropzone/5.5.1/min/dropzone.min.js"></script>
</body>
</html>
Note that the project supplies two CSS files — a basic.css file with some minimal styling, and a more extensive dropzone.css file. Minified versions of dropzone.css and dropzone.js are also available.
Basic Usage
The simplest way to implement the plugin is to attach it to a form, although you can use any HTML such as a <div>. Using a form, however, means fewer options to set — most notably the URL, which is the most important configuration property.
You can initialize it simply by adding the dropzone class. For example:
<form id="upload-widget" method="post" action="/upload" class="dropzone"></form>
Technically, that’s all you need to do, though in most cases you’ll want to set some additional options. The format for that is as follows:
Dropzone.options.WIDGET_ID = {
  //
};
To derive the widget ID for setting the options, take the ID you defined in your HTML and camel-case it. For example, upload-widget becomes uploadWidget:
Dropzone.options.uploadWidget = {
  //
};
You can also create an instance programmatically:
const uploader = new Dropzone('#upload-widget', options);
Next up, we’ll look at some of the available configuration options.
Basic Configuration Options
The url option defines the target for the upload form, and is the only required parameter. That said, if you’re attaching it to a form element then it’ll simply use the form’s action attribute, in which case you don’t even need to specify that.
The method option sets the HTTP method and again, it will take this from the form element if you use that approach, or else it’ll simply default to POST, which should suit most scenarios.
The paramName option is used to set the name of the parameter for the uploaded file. If you’re using a file upload form element, it will match the name attribute. If you don’t include it, it defaults to file.
maxFiles sets the maximum number of files a user can upload, if it’s not set to null.
By default, the widget will show a file dialog when it’s clicked, though you can use the clickable parameter to disable this by setting it to false, or alternatively you can provide an HTML element or CSS selector to customize the clickable element.
Those are the basic options, but let’s now look at some of the more advanced options.
Enforcing Maximum File Size
The maxFilesize property determines the maximum file size in megabytes. This defaults to a size of 1000 bytes, but using the filesizeBase property, you could set it to another value — for example, 1024 bytes. You may need to tweak this to ensure that your client and server code calculate any limits in precisely the same way.
Restricting to Certain File Types
The acceptedFiles parameter can be used to restrict the type of file you want to accept. This should be in the form of a comma-separated list of MIME types, although you can also use wildcards.
For example, to only accept images:
acceptedFiles: 'image/*',
Modifying the Size of the Thumbnail
By default, the thumbnail is generated at 120x120px. That is, it’s square. There are a couple of ways you can modify this behavior.
The first is to use the thumbnailWidth and/or the thumbnailHeight configuration options.
If you set both thumbnailWidth and thumbnailHeight to null, the thumbnail won’t be resized at all.
If you want to completely customize the thumbnail generation behavior, you can even override the resize function.
One important point about modifying the size of the thumbnail is that the dz-image class provided by the package sets the thumbnail size in the CSS, so you’ll need to modify that accordingly as well.
Additional File Checks
The accept option allows you to provide additional checks to determine whether a file is valid before it gets uploaded. You shouldn’t use this to check the number of files (maxFiles), file type (acceptedFiles), or file size (maxFilesize), but you can write custom code to perform other sorts of validation.
You’d use the accept option like this:
accept: function(file, done) {
  if (!someCheck()) {
    return done('This is invalid!');
  }
  return done();
}
As you can see, it’s asynchronous. You can call done() with no arguments and validation passes, or provide an error message and the file will be rejected, displaying the message alongside the file as a popover.
We’ll look at a more complex, real-world example later, when we look at how to enforce minimum or maximum image sizes.
Often you’ll need to attach additional headers to the uploader’s HTTP request.
As an example, one approach to CSRF (cross-site request forgery) protection is to output a token in the view, then have your POST/PUT/DELETE endpoints check the request headers for a valid token. Suppose you outputted your token like this:
<meta name="csrf-token" content="CL2tR2J4UHZXcR9BjRtSYOKzSmL8U1zTc7T8d6Jz">
Then, you could add this to the configuration:
headers: {
  'x-csrf-token': document.querySelector('meta[name=csrf-token]').getAttributeNode('content').value,
},
Alternatively, here’s the same example but using jQuery:
headers: {
  'x-csrf-token': $('meta[name="csrf-token"]').attr('content')
},
Your server should then verify the x-csrf-token header, perhaps using some middleware.
Handling Fallbacks
The simplest way to implement a fallback is to insert a <div> into your form containing input controls, setting the class name on the element to fallback. For example:
<form id="upload-widget" method="post" action="/upload" class="dropzone">
  <div class="fallback">
    <input name="file" type="file" />
  </div>
</form>
Alternatively, you can provide a function to be executed when the browser doesn’t support the plugin using the fallback configuration parameter.
You can force the widget to use the fallback behavior by setting forceFallback to true, which might help during development.
Handling Errors
You can customize the way the widget handles errors by providing a custom function using the error configuration parameter. The first argument is the file, the error message the second, and if the error occurred server-side, the third parameter will be an instance of XMLHttpRequest.
As always, client-side validation is only half the battle. You must also perform validation on the server. When we implement a simple server-side component later, we’ll look at the expected format of the error response, which when properly configured will be displayed in the same way as client-side errors (illustrated below).
Overriding Messages and Translation
There are a number of additional configuration properties which set the various messages displayed by the widget. You can use these to customize the displayed text, or to translate them into another language.
Most notably, dictDefaultMessage is used to set the text which appears in the middle of the dropzone, prior to someone selecting a file to upload.
You’ll find a complete list of the configurable string values — all of which begin with dict — in the documentation.
Events
There are a number of events you can listen to in order to customize or enhance the plugin.
There are two ways to listen to an event. The first is to create a listener within an initialization function:
Dropzone.options.uploadWidget = {
  init: function() {
    this.on('success', function(file, resp){
      ...
    });
  },
  ...
};
This is the alternative approach, which is useful if you decide to create the Dropzone instance programatically:
const uploader = new Dropzone('#upload-widget');
uploader.on('success', function(file, resp){
  ...
});
Perhaps the most notable aspect is the success event, which is fired when a file has been successfully uploaded. The success callback takes two arguments: the first a file object, and the second an instance of XMLHttpRequest.
Other useful events include addedfile and removedfile, for when a file has been added or removed from the upload list; thumbnail, which fires once the thumbnail has been generated; and uploadprogress, which you might use to implement your own progress meter.
There are also a bunch of events which take an event object as a parameter and which you could use to customize the behavior of the widget itself — drop, dragstart, dragend, dragenter, dragover and dragleave.
You’ll find a complete list of events in the relevant section of the documentation.
A More Complex Validation Example: Image Dimensions
Earlier we looked at the asynchronous accept() option, which you can use to run checks (validation) on files before they get uploaded.
A common requirement when you’re uploading images is to enforce minimum or maximum image dimensions. We can do this with DropzoneJS, although it’s slightly more complex.
Although the accept callback receives a file object, in order to check the image dimensions we need to wait until the thumbnail has been generated, at which point the dimensions will have been set on the file object. To do so, we need to listen to the thumbnail event.
Here’s the code. In this example, we’re checking that the image is at least 640x480px before we upload it:
init: function() {
  this.on('thumbnail', function(file) {
    if (file.accepted !== false) {
      if (file.width < 1024 || file.height < 768) {
        file.rejectDimensions();
      }
      else {
        file.acceptDimensions();
      }
    }
  });
},
accept: function(file, done) {
  file.acceptDimensions = done;
  file.rejectDimensions = function() {
    done('The image must be at least 1024 by 768 pixels in size');
  };
},
A Complete Example
Having gone through the options, events, and some slightly more advanced validation, let’s look at a complete and relatively comprehensive example. Obviously we’re not taking advantage of every available configuration option, since there are so many — making it incredibly flexible.
Here’s the HTML for the form:
<form id="upload-widget" method="post" action="/upload" class="dropzone">
  <div class="fallback">
    <input name="file" type="file" />
  </div>
</form>
If you’re implementing CSRF protection, you may want to add something like this to your layouts:
<head>
  <!-- -->
  <meta name="csrf-token" content="XYZ123">
</head>
Now the JavaScript. Notice we’re not using jQuery!
Dropzone.options.uploadWidget = {
  paramName: 'file',
  maxFilesize: 2, // MB
  maxFiles: 1,
  dictDefaultMessage: 'Drag an image here to upload, or click to select one',
  headers: {
    'x-csrf-token': document.querySelectorAll('meta[name=csrf-token]')[0].getAttributeNode('content').value,
  },
  acceptedFiles: 'image/*',
  init: function() {
    this.on('success', function(file, resp){
      console.log(file);
      console.log(resp);
    });
    this.on('thumbnail', function(file) {
      if (file.accepted !== false) {
        if (file.width < 640 || file.height < 480) {
          file.rejectDimensions();
        }
        else {
          file.acceptDimensions();
        }
      }
    });
  },
  accept: function(file, done) {
    file.acceptDimensions = done;
    file.rejectDimensions = function() {
      done('The image must be at least 640 x 480px')
    };
  }
};
A reminder that you’ll find the code for this example on our GitHub repository.
Hopefully this is enough to get you started for most scenarios. Check out the full documentation if you need anything more complex.
Theming
There are a number of ways to customize the look and feel of the widget, and indeed it’s possible to completely transform the way it looks.
As an example of just how customizable the appearance is, here’s a demo of the widget tweaked to look and feel exactly like the jQuery File Upload widget using Bootstrap.
Obviously the simplest way to change the widget’s appearance is to use CSS. The widget has a class of dropzone and its component elements have classes prefixed with dz- — for example, dz-clickable for the clickable area inside the dropzone, dz-message for the caption, dz-preview / dz-image-preview for wrapping the previews of each of the uploaded files, and so on. Take a look at the dropzone.css file for reference.
You may also wish to apply styles to the hover state — that is, when the user hovers a file over the dropzone before releasing their mouse button to initiate the upload. You can do this by styling the dz-drag-hover class, which gets added automatically by the plugin.
Beyond CSS tweaks, you can also customize the HTML that makes up the previews by setting the previewTemplate configuration property. Here’s what the default preview template looks like:
<div class="dz-preview dz-file-preview">
  <div class="dz-image">
    <img data-dz-thumbnail />
  </div>
  <div class="dz-details">
    <div class="dz-size">
      <span data-dz-size></span>
    </div>
    <div class="dz-filename">
      <span data-dz-name></span>
    </div>
  </div>
  <div class="dz-progress">
    <span class="dz-upload" data-dz-uploadprogress></span>
  </div>
  <div class="dz-error-message">
    <span data-dz-errormessage></span>
  </div>
  <div class="dz-success-mark">
    <svg>REMOVED FOR BREVITY</svg>
  </div>
  <div class="dz-error-mark">
    <svg>REMOVED FOR BREVITY</svg>
  </div>
</div>
As you can see, you get complete control over how files are rendered once they’ve been queued for upload, as well as success and failure states.
That concludes the section on using the DropzoneJS plugin. To round up, let’s look at how to get it working with server-side code.
A Simple Server-side Upload Handler with Node.js and Express
Naturally, you can use any server-side technology for handling uploaded files. In order to demonstrate how to integrate your server with the plugin, we’ll build a very simple example using Node.js and Express.
To handle the uploaded file itself, we’ll use Multer, a package that provides some Express middleware that makes it really easy. In fact, this easy:
const upload = multer({ dest: 'uploads/' });

app.post('/upload', upload.single('file'), (req, res, next) => {
  // Metadata about the uploaded file can now be found in req.file
});
Before we continue the implementation, the most obvious question to ask when dealing with a plugin like DropzoneJS, which makes requests for you behind the scenes, is: “what sort of responses does it expect?”
Handling Upload Success
If the upload process is successful, the only requirement, as far as your server-side code is concerned, is to return a 2xx response code. The content and format of your response is entirely up to you, and will probably depend on how you’re using it. For example, you might return a JSON object which contains a path to the uploaded file, or the path to an automatically generated thumbnail. For the purposes of this example, we’ll simply return the contents of the file object — that is, a bunch of metadata provided by Multer:
return res.status(200).send(req.file);
The response will look something like this:
{ fieldname: 'file',
  originalname: 'myfile.jpg',
  encoding: '7bit',
  mimetype: 'image/jpeg',
  destination: 'uploads/',
  filename: 'fbcc2ddbb0dd11858427d7f0bb2273f5',
  path: 'uploads/fbcc2ddbb0dd11858427d7f0bb2273f5',
  size: 15458 }
Handling Upload Errors
If your response is in JSON format — that is to say, your response type is set to application/json — then the DropzoneJS default error plugin expects the response to look like this:
{
  error: 'The error message'
}
If you aren’t using JSON, it’ll simply use the response body. For example:
return res.status(422).send('The error message');
Let’s demonstrate this by performing a couple of validation checks on the uploaded file. We’ll simply duplicate the checks we performed on the client. Remember, client-side validation is never sufficient on its own.
To verify that the file is an image, we’ll simply check that the MIME type starts with image/. ES6’s String.prototype.startsWith() is ideal for this.
Here’s how we might run that check and, if it fails, return the error in the format which Dropzone’s default error handler expects:
if (!req.file.mimetype.startsWith('image/')) {
  return res.status(422).json({
    error: 'The uploaded file must be an image'
  });
}
Note: I’m using HTTP Status Code 422, Unprocessable Entity, for validation failure, but 400 Bad Request is just as valid. Indeed, anything outside of the 2xx range will cause the plugin to report the error.
Let’s also check that the image is of a certain size. The image-size package makes it really straightforward to get the dimensions of an image. You can use it asynchronously or synchronously. We’ll use the latter to keep things simple:
const dimensions = sizeOf(req.file.path);

if ((dimensions.width < 640) || (dimensions.height < 480)) {
  return res.status(422).json({
    error: 'The image must be at least 640 x 480px'
  });
}
Let’s put all of it together in a complete (mini) application:
const express = require('express');
const multer = require('multer');
const upload = multer({ dest:'uploads/'});
const sizeOf = require('image-size');
const exphbs = require('express-handlebars');

const app = express();

app.use(express.static(__dirname +'/public'));

app.engine('.hbs', exphbs({ extname:'.hbs'}));
app.set('view engine','.hbs');

app.get('/', (req, res) => {
  return res.render('index', {layout: false});
});

app.post('/upload', upload.single('file'), (req, res) => {
  if (!req.file.mimetype.startsWith('image/')) {
    return res.status(422).json({
      error :'The uploaded file must be an image'
    });
  }

  const dimensions = sizeOf(req.file.path);

  if ((dimensions.width < 640) || (dimensions.height < 480)) {
    return res.status(422).json({
      error :'The image must be at least 640 x 480px'
    });
  }

  return res.status(200).send(req.file);
});

app.listen(8080, () => {
  console.log('Express server listening on port 8080');
});
Note: for brevity, this server-side code doesn’t implement CSRF protection. You might want to look at a package like CSURF for that.
You’ll find this code, along with the supporting assets such as the view, in the accompanying repository.
And if you’d like to learn more about working with forms in Node.js, please read Forms, File Uploads and Security with Node.js and Express.
Summary
DropzoneJS is a slick, powerful and highly customizable JavaScript plugin for supercharging your file upload controls and performing AJAX uploads. In this tutorial, we’ve taken a look at a number of the available options, at events, and how to go about customizing the plugin. There’s a lot more to it than can reasonably be covered in one tutorial, so check out the official website if you’d like to know more. But hopefully this is enough to get you started.
We’ve also built a really simple server-side component to handle file uploads, demonstrating how to get the two working in tandem.
dropzone.js is a Open Source under MIT Licience library that lets you upload files (images, pdfs, text files, docs e.t.c) to the server via simple drag-and-drop option.
This tutorial provides an example with PHP :
Steps :
Download the js dropzone-amd-module.js and css — dropzone.css from github : https://github.com/enyo/dropzone.
Create a HTML page that with file upload form :
Example: drag-drop-example.html
<html>

<head>
<title>Drag drop Images, PDF, Docs and other files Example : PHP + Dropzone.js</title>

<script src="js/dropzone.js"></script>

<style type="text/css">
/*
 * The MIT License
 * Copyright (c) 2012 Matias Meno <m@tias.me>
 */
.dropzone,.dropzone * {
	box-sizing: border-box;
}

.dropzone {
	position: relative;
}

.dropzone .dz-preview {
	position: relative;
	display: inline-block;
	width: 120px;
	margin: 0.5em;
}

.dropzone .dz-preview .dz-progress {
	display: block;
	height: 15px;
	border: 1px solid #aaa;
}

.dropzone .dz-preview .dz-progress .dz-upload {
	display: block;
	height: 100%;
	width: 0;
	background: green;
}

.dropzone .dz-preview .dz-error-message {
	color: red;
	display: none;
}

.dropzone .dz-preview.dz-error .dz-error-message,.dropzone .dz-preview.dz-error .dz-error-mark
	{
	display: block;
}

.dropzone .dz-preview.dz-success .dz-success-mark {
	display: block;
}

.dropzone .dz-preview .dz-error-mark,.dropzone .dz-preview .dz-success-mark
	{
	position: absolute;
	display: none;
	left: 30px;
	top: 30px;
	width: 54px;
	height: 58px;
	left: 50%;
	margin-left: -27px;
}


/* Custom decoration code */
.decoration {
	border: 1px dashed #999;
	background: #f2f2f2;
	padding: 20px;
}
</style>
</head>

<body>
<div>
<form action="upload-files.php" class="dropzone decoration"
id="my-awesome-dropzone"></form>


<script type="text/javascript">

Dropzone.options.myAwesomeDropzone = {
		  maxFilesize: 20, // Size in MB
		  addRemoveLinks: true,
		    removedfile: function(file) {
		      var fileRef;
		      return (fileRef = file.previewElement) != null ?
				      fileRef.parentNode.removeChild(file.previewElement) : void 0;
		    },

	success: function(file, response) {
		    	  alert(response);
		    	},

	error: function(file, response) {
			    	  alert(response);
			    }

};


</script></div>
</body>

</html>
Create a PHP page to upload files to the server :
<?php
//PHP code to upload file to server directory
if (!empty($_FILES)) {

	$temporaryFile = $_FILES['file']['tmp_name'];
	$targetFile =  "uploaded-file-dir-location". $_FILES['file']['name'];
	if(!move_uploaded_file($temporaryFile,$targetFile))  {
		echo "Error occurred while uploading the file to server!";
	}
}
?>У меня есть загрузчик, который отклоняет загрузку пользователей, когда они превышают свою квоту. Ответ находится в JSON, и он выглядит следующим образом:
{msg: "Upload limit reached", status: "error", code: "403"}
Параметры Dropzone JS следующие:
Dropzone.options.uploadDropzone = {
    paramName: "file1",
    maxFilesize: 200,
    maxThumbnailFilesize: 10,
    success: function(file, response){
      ????
  }
};
Что мне делать с ответом в success, чтобы показать ошибку моим пользователям в загрузчике?
29 нояб. 2013, в 11:04
Поделиться
Источник
4 ответа
в порядке, будет работать следующее: просто извлеките из источника:
success: function(file, response){
  if(response.code == 501){ // succeeded
    return file.previewElement.classList.add("dz-success"); // from source
  }else if (response.code == 403){  //  error
    // below is from the source code too
    var node, _i, _len, _ref, _results;
    var message = response.msg // modify it to your error message
    file.previewElement.classList.add("dz-error");
    _ref = file.previewElement.querySelectorAll("[data-dz-errormessage]");
    _results = [];
    for (_i = 0, _len = _ref.length; _i < _len; _i++) {
      node = _ref[_i];
      _results.push(node.textContent = message);
    }
    return _results;
  }
}
MK Yung
29 нояб. 2013, в 14:56
Поделиться
В Dropzone встроено обнаружение ошибок. Просто сделайте следующее:
mydropzone = new Dropzone("#mydropzone",{
    url: "/dropzone",
    addRemoveLinks : true,
    maxFilesize: 2.0,
    maxFiles: 100,
    error: function(file, response) {
        if($.type(response) === "string")
            var message = response; //dropzone sends it own error messages in string
        else
            var message = response.message;
        file.previewElement.classList.add("dz-error");
        _ref = file.previewElement.querySelectorAll("[data-dz-errormessage]");
        _results = [];
        for (_i = 0, _len = _ref.length; _i < _len; _i++) {
            node = _ref[_i];
            _results.push(node.textContent = message);
        }
        return _results;
    }
});
spitz
24 авг. 2014, в 02:06
Поделиться
Вы можете сделать это следующим образом:
success: function(file, response, action) {
    // PHP server response
    if(response == 'success') // Validate whatever you send from the server
    {
        this.defaultOptions.success(file);
    }
    else
    {
        this.defaultOptions.error(file, 'An error occurred!');
    }
}
CIRCLE
29 май 2016, в 02:29
Поделиться
на стороне PHP:
    header("HTTP/1.0 400 Bad Request");
    echo "Error uploading file";
и со стороны jQuery:
        error: function(response){
            alert(response.xhr.responseText);
        }
Wajdi Jurry
05 фев. 2016, в 23:36
Поделиться
Ещё вопросы
- 1Ошибка запуска localhost. npm Err Darwin 16.7.0
- 0Как получить адрес, который клиент вводит в адресной строке
- 0Угловые повторители руля и бирки <br />
- 1Java: показать курсор HAND и изменить шрифт части текста в строке JTable
- 0рисовать два объекта, используя openGL одновременно
- 1CKeditor не отображается на странице asp.net со скрытым div
- 1Python Datareader не может извлечь данные о запасах из Morningstar
- 1Как мы помещаем изображение в прямоугольник на холсте
- 0Перезагрузить страницу, чтобы показать вставленные элементы пользовательского интерфейса jQuery?
- 1XML десериализация в класс, добавить в список
- 1Получите приглашение брандмауэра Windows для консольного приложения, но не службы
- 0Содержание нижнего колонтитула HTML не центрировано
- 0как скрыть информацию о странице из всплывающего окна с подтверждением (phonegap, jquery, iPhone)
- 0Вставка выпадающего элемента между двумя элементами списка с использованием JavaScript
- 1Как лучше всего нарисовать плиточную карту с помощью qt (5)?
- 1Избегайте вызова BeginInvoke () из объектов ViewModel в многопоточном приложении c # MVVM
- 1SimpleCursorTreeAdapter — Как настроить дочерний макет
- 1Универсальный репозиторий с Moq
- 0Разбиение динамически размещенного массива без линейного копирования по времени
- 0как создать свертывающуюся строку для smarttable?
- 0Предикат лямбда-функции для использования для find_if, который сравнивает элемент карты составного типа
- 0OpenCV VideoCapture :: set () возвращает false, но успешно
- 0MySQL положить в дубликаты идентификаторов
- 1Ошибка при получении дочерних узлов упорядоченного списка
- 1невозможно загрузить ресурсный javascript с относительным путем $ {pageContext.request.contextPath}
- 1Показывать программную клавиатуру, когда действие начинается, когда нет текстового поля
- 0Затем Angularjs метод запроса $ http
- 0Изменение текста после фотографии с помощью jquery
- 1Android и HTML5 CACHE.MANIFEST
- 0доступ к коллекции внутри json объекта углового
- 0$ ionicHistory.clearHistory очищает историю, но переходит к предыдущему представлению, когда hardwareBackButton нажал на Android?
- 1Может ли Javascript прочитать размер шрифта текстового элемента SVG? [Дубликат]
- 0C ++ / QT / OpenMP: потоки, кажется, ждут, когда доступ к тому же экземпляру
- 1Попытка сохранить настройки компорта
- 1Как организовать макет используя PyQt
- 1Android: получение информации о владельце телефона
- 1Создание комплексного запроса к сайту (общественная транспортная компания) в C #
- 0Как установить фоновое изображение в HTML, который работает в Internet Explorer? [Дубликат]
- 1Подход для кэширования большого количества текстовых и аудиоданных в приложении Android
- 0Как я могу позволить пользователю загружать несколько текстовых файлов, затем сохранять их в строку и отображать их (в PHP)?
- 1Весенние бобы понимания
- 0Повторно примените стиль div, используя jQuery
- 1MethodInfo.GetMethodBody возвращает ноль
- 0Как проверить, существует ли пользователь в базе данных SQL
- 0Разбор данных для создания панели навигации
- 1Проект веб-службы C # для загрузки зависимых DLL
- 0Как заполнить Div на основе JavaScript <script>?
- 1Строка в Integer не работает
- 0Прокрутка в пределах одного div в Ionic
- 0как открыть оболочку mysql

Dropzone has built in error detection. Just do this:
mydropzone = new Dropzone("#mydropzone",{
    url: "/dropzone",
    addRemoveLinks : true,
    maxFilesize: 2.0,
    maxFiles: 100,
    error: function(file, response) {
        if($.type(response) === "string")
            var message = response; //dropzone sends it's own error messages in string
        else
            var message = response.message;
        file.previewElement.classList.add("dz-error");
        _ref = file.previewElement.querySelectorAll("[data-dz-errormessage]");
        _results = [];
        for (_i = 0, _len = _ref.length; _i < _len; _i++) {
            node = _ref[_i];
            _results.push(node.textContent = message);
        }
        return _results;
    }
});
okay the following would work, just extract from the source:
success: function(file, response){
  if(response.code == 501){ // succeeded
    return file.previewElement.classList.add("dz-success"); // from source
  }else if (response.code == 403){  //  error
    // below is from the source code too
    var node, _i, _len, _ref, _results;
    var message = response.msg // modify it to your error message
    file.previewElement.classList.add("dz-error");
    _ref = file.previewElement.querySelectorAll("[data-dz-errormessage]");
    _results = [];
    for (_i = 0, _len = _ref.length; _i < _len; _i++) {
      node = _ref[_i];
      _results.push(node.textContent = message);
    }
    return _results;
  }
}
Tags:
Javascript
Dropzone.Js
Related
Всем, кто попал сюда после поиска решения этой проблемы: есть довольно простой и элегантный способ справиться с этим, не залезая в внутренности Dropzone. Если проверка на стороне сервера не удалась, верните код состояния 400 (неверный запрос) и включите сообщение об ошибке в виде jsonResponse.
Затем вы можете обработать ответ с помощью следующего кода в конфигурации инициализации вашей зоны сброса (при условии, что вы отправляете сообщение об ошибке как «ValidationMessage»):
this.on("error", function (file, jsonResponse) {
    var errorMessage = "Could not upload document: ";
    if (jsonResponse["ValidationMessage"] != null) {
        errorMessage += jsonResponse["ValidationMessage"];
    } else {
        errorMessage += "unknown error";
    }
    alert(errorMessage);
});
Файл будет отмечен большим красным крестиком, как и при обычной неудачной загрузке Dropzone.
Это решение предназначено для одной загрузки, а не для нескольких, но одна и та же идея должна работать для нескольких.