
Пользователь
-
#4
what to do? everything is in the driver manager, but the program does not see it. all required drivers have been installed
I downloaded a troubleshooter and this is what I found:USB Controller
Checks your USB controllers for Kinect for Windows v2 compatibility
Result: No supported USB 3.0 port detected
Kinect Connected
Checks if your system can detect Kinect for Windows v2 sensor
Result: No Kinect for Windows v2 sensor detected
Verify Kinect Software Installed
Detects if required drivers and services are installed
Result: Required Kinect software not detected
y use Kinnect V2 app but you need Kinnect 360 app
Hey guys, I’ve recently gotten into VRChat and I’ve been learning a lot about all the things that can be done. Right now I am trying to incorporate Full-Body Tracking into my experience.
I own an Oculus Rift and I happened to have a Kinect 2.0 lying around. After some research, I learned that these two things could be combined with the Driver4VR download. However, now that I have everything hooked up, I am still having problems and I’m not exactly sure where to go from here.
When I start SteamVR, the Driver4VR program comes up as it should. Unfortunately, when I hit ‘Start Driver4VR’ nothing seems to work right. My Kinect comes up for a few seconds only to turn itself back off. When this happens, all of my monitors flash like a connection changed happened. This exact process repeats several times until SteamVR, Driver4VR, and my Kinect all shut down on their own until I go to start SteamVR again. I would also like to note the the ‘Kinect FPS’ is listed as ‘low’ and the ‘Driver4FPS’ is listed as ‘good’.
Does anyone have any idea what the problem might be? I’m pretty sure I have the drivers installed properly, but maybe not.
Edit: I think that the Driver4VR is interfering directly with my Oculus somehow. Oculus Home gets restarted again and again when I bring up Driver4VR by itself.
Edit2: I appreciate all of your responses very much. It does appear to be an issue with my USB connection, so I’m going to work on that. I’ll update again if I get it working. Thanks again.
Если вы так и не решились на покупку VR оборудования, а желание у вас осталось, то данная статья может помочь вам с решением.
Наш планируемый бюджет на покупку всего комплекта составит около 5-7к рублей, однако, если вы проживаете в отдалённых районах нашей страны или же, если вы готовы подождать свою гарнитуру с алиэкспресс, то цена может динамически изменяться как в меньшую сторону, так и в большую.
Подготовка
Первоначально нам необходим ПК с минимальными требования для VR, так как его стоимость не заложена в наш ценник. Будем ориентироваться на системные требования Half-Life: Alyx:
ОС: Windows 10
Процессор: Core i5-7500 / Ryzen 5 1600
Оперативная память: 12 GB ОЗУ
Видеокарта: GTX 1060 / RX 580 — 6GB VRAM
Вы можете обладать более слабым ПК и играть в простые игры, однако, ваш компьютер может очень быстро «упереться в потолок».
Помимо самого ПК, вам понадобится Bluetooth свисток для подключения контроллеров.
Закупка
Так как в нашем ценовом сегменте шлемы с полноценным экранном нам недоступны, то пройдемся по рынку шлемов для телефонов. Поскольку я обладатель IPhone 11, посмотрев на его характеристики, я понял на какие габариты телефона мне необходимо ориентироваться при покупке шлема. Сам IPhone обладает не самым лучшим экраном для очков, однако, это компенсируется наилучшей отзывчивостью гироскопа в сравнений с Meizu M3, но я уверен, что вы сможете найти достойные аналоги и на Android.
Важно выбрать шлем с изменяемым межзрачковым и межфокусным расстоянием, чтобы у вас не возникало никаких проблем с отображением картинки в виду особенностей вашего лица
Следующий этап — это покупка контроллеров. Я остановился на PS Move с PS Eye для их отслеживания. Выбрал я данную конфигурацию поскольку: Есть хорошо написанный софт, достойное отслеживание рук и доступная цена.
На Б/У рынке есть масса предложений с данной комплектацией на любой кошелёк. В среднем, за одну камеру просят 300-400 рублей, а за PS Move обычно дают 800-1200 рублей. Можно попробовать купить комплектом у одного продавца, но такие предложения быстро раскупают. Нам необходимо два контроллера Move и минимум две камеры, но вы можете приобрести сразу 4 для полного обзора в помещении.
Единственный и главный недостаток данного комплекта состоит в том, что сами контроллеры не обладают стиками для ходьбы, поэтому если вы обладаете/купите любые другие способы управления, то проблема уйдет. Да, ваши руки будут хуже отслеживаться (хотя это решаемо дальше), но вы не потратитесь на камеры и будете обладать аналоговым стиком для перемещения по локациям. Здесь могу посоветовать Joy-Con, они достаточно дороги, зато удобно лежат в руке и с хорошим трекером в пространстве.
И последнее, но не совсем обязательное — Kinect. Он нам необходим для точного отслеживания положения тела и рук в пространстве. Без него, наш «Аватар» будет в статике, а мы сможем только немного махать руками и головой.
Вам подойдёт самый простой от Xbox 360 или же от Xbox One, но он дороже, а функционал тот же. В среднем, Kinect от Xbox 360 отдают за 900-1100 рублей, но надо помнить, что вам ещё необходим адаптер для ПК, поскольку у него специфический разъём. Вы можете и сами спаять адаптер, но для этого вам нужно распаять два USB порта и в правильной пиновке их спаять в один, если вы обладаете необходимыми инструментами, то в интернете много картинок с правильной распиновкой.
Софт
Для передачи изображения со шлема на компьютер нам необходимо специальное приложение. Сейчас можно встретить три основные программы — Riftcat, TrinusVR и iVRy. Они все платные (600 рублей в среднем), но я остановился на iVRy поскольку, он прост в настройке и только это приложение, разработчики продолжают обновлять под iOS, выпуская постоянные патчи с улучшением стабильности и качества изображения. Также программа удобна тем, что она есть в стиме, где мы сможем сразу скачать необходимый драйвер вместе с необходимым софтом для контролеров. НО, наша программа способна работать только со SteamVR, TrinusVR же способен запустить любой формат изображений вне Steam, что для многих может представлять огромный плюс.
После скачивания и установки необходимого ПО, мы уже можем запускать любое приложение, но без возможности управления контроллерами. Для этого, нам необходимо скачать программу Zadig и заменить драйвер WinUSB на libusb-win32 для всех наших камер. Так наша система сможет правильно работать с PS Eye
После, необходимо запустить PSMoveSteamVRBridge, который располагается в папке с iVRy и провести необходимые калибровки контроллеров.
Теперь нам уже подвластны руки, но для полного контроля над своим персонажем, нам ещё необходим Kinect и Driver4VR. Первоначально следует скачать Kinect SDK, чтобы наш софт знал как работать с камерой. После всех установок, мы запускаем Driver4VR вместе уже со SteamVR и PSMoveSteamVRBridge. В настройках управления головы, тела и рук проставляем Kinect Skeleton, а в Tracker manager активируем наши PS Move и ассоциируем их с контроллерами программы.
И наконец, мы активируем Driver4VR и калибруем Kinect, а также наше первоначальное местоположение на игровой зоне в SteamVR
Конец
После выполнения всех этапов, вы можете начать осваивать всю площадку VR контента, в том числе и Half-Life: Alyx, когда игра станет доступна. Да, у нас будет не самое отзывчивое управление, которое мы могли бы получить на более дорогих гарнитурах от 25 тысяч рублей, но давайте подсчитаем во сколько обошелся нам весь комплект.
- Шлем — 800 рублей
- Две камеры и два контроллера — 2800
- Софт — 600 рублей без Driver4VR
- Софт — 1800 рублей вместе с Driver4VR для кинекта
- Kinect — 1000 рублей + адптер за 400 рублей
Итого: 6800 с кинектом и 4200 без него, причем, вы также можете всё заказать через алиэкспресс и сэкономить от 500 до 1500 тысяч рублей за весь комплект, а может у вас уже имеется часть оборудования, что также снизит итоговую стоимость.
На сегодняшний день, это самый дешёвый способ поиграть в полноценный VR у себя дома. Я лично потратил на него около 3.5к рублей, так как часть оборудования у меня уже была куплена, а на саму настройку у меня ушло около недели, поскольку сейчас нет хороших гайдов на новом софте.
Если вам понравился данный материал и у вас возникли вопросы по настройке, то я с радостью отвечу на них. Если статья соберёт большое количество вопросов, то я постараюсь составить поэтапную инструкцию с ответами на самые частые из них.
Спасибо тебе читатель, если ты смог сам дойти до сюда через мой корявый текст.
New issue
Have a question about this project? Sign up for a free GitHub account to open an issue and contact its maintainers and the community.
By clicking “Sign up for GitHub”, you agree to our terms of service and
privacy statement. We’ll occasionally send you account related emails.
Already on GitHub?
Sign in
to your account
Closed
Vininess opened this issue
Jan 2, 2018
· 38 comments
Closed
Wiimote + Kinect Using Driver4VR
#6
Vininess opened this issue
Jan 2, 2018
· 38 comments
Comments
![]()
Hi
After digging on the internet i found your code, it’s work, i can access home menu pressing the home button, but i don’t have de Leapmotion, also i have one question and one request
I’m using two wiiremote with wii motion plus, one of them is the newer version, both connect (vibrates to check) but the newer just blinking the lights, i don’t know if the controller is working, on the debug don’t show info about this controller
And i have a request, can you write a code on freepie, just for use this two wiiremotes, to send the Pitch, Yaw and row information, because i want to use the kinect with the driver4vr to track the spatial position
Thanks for the help and the code
![]()
Oooh that’s cool, I’ve heard of Driver4VR but I didn’t know they got their Kinect driver working.
You should be able to remove all leap motion dependencies by doing ctrl+f and deleting all lines mentioning leap motion.
I hope it works out for you. If it does, I would really like to hear how it works. My original plan was to do Wiimote + Kinect, but couldn’t figure out how to use Kinect in Freepie, and couldn’t figure out how the leap motion C++ plugin worked.
Good Luck!
![]()
Also, I think in one of the files, the orientation is pulled from the leap motion instead of the wiimote because the wiimote sometimes doesn’t send the orientation right to FreePIE. So, make sure you are not using that file
![]()
ajayyy
changed the title
Wiiremote question and request
Wiimote + Kinect Using Driver4VR
Jan 2, 2018
![]()
In response to the blinking lights, that could be an issue with your bluetooth adapter, maybe it doesn’t allow having multiple devices connected, or if you are using bluetooth headphones as well, maybe that is too many devices. One solution to that would be to maybe get a usb bluetooth adapter.
![]()
I got the test version of Driver4VR, because here in Brazil the kinect is the cheapest way to track, here i found the Leapmotion 10x the original price
I will try the files and the kinect on this month then i will send a feedback
For the blinking lights, i use a generic china dongle, and Windows shows me the two controllers, i try the newer controle alone and get the same results. for the older controller when the script is running only the one light shows, like when i use the controller normally on wiiu
![]()
I use the wiimote_leap_vive_2.py, delete the Leap part, but the FreePie can’t receive the info

As you can see, both controllers appears here to me

And another question, those codes uses the Wiimotion plus? if not, how i can use then?
Thanks again
![]()
So what you want is for the wiimote to trigger button presses, and maybe have the pitch and roll (since wiimotes do not track yaw). And then Driver4VR tracks the position of you and your hands?
![]()
I read on the internet, that the Wiiremote plus, can track yaw, same as the psmove, but the normal Wiimote you need to use the infrared (you can see an exemple in the legend of zelda skyward sword, you can control the pointer using just the giroscopes)
«… And then Driver4VR tracks the position of you and your hands?»
Yes thats is my idea, use the Wiiremote plus, to track the Yaw, Pitch and Row, and the Driver4VR to track the position X,Y,Z, as you can see in this video in a group on steam
https://steamcommunity.com/groups/WiionPC/discussions/0/348293292497283892/
![]()
Yes, it can track yaw that way.
So the way freepie works is that it tracks the positions for you and makes it easy for you to use the data. So my plugin takes wii button presses and emulates hydra button presses, which then emulates steamvr button presses with the razer hydra plugin
![]()
So your code or the freepie ‘can detects that i using the wiiremote plus? Or i have to change your code? If i have to change, can you help me?
Thanks a lot
![]()
My code just uses the wiimote[0] and wiimote[1] from FreePIE, so FreePIE handles all that. So, it should work with your Wii Motion Plus, because others said they got it working with Wii Motion Plus,
![]()
I made it work 
For the new wiimote plus (aka TR) i just change the driver of my generic china blutooth for this Toshiba Stack Blutooth driver, like in this tutorial http://www.wiinupro.com/tutorials/toshiba-stack
But i got some issues…
I try your «wiimote_leap_vive_2.py», i remove the leap part, but when i start the VR Room on Steam my camera apears below the floor and my hands far from me
I try the code from this guy https://www.youtube.com/watch?v=VJkkpdSatG4 i can see my hands, all the sensors works very fine, but he tries to emulate X,Y,Z with buttons and sensor and my right hand get some confused (i have to point back to get my shotgun pointed front in Skeet VR)
![]()
I looked at his files, did motionplus_rotation_only_v1.1.py work?
Also, I now think there might be an issue with using this and Driver4VR together. Do you know how Driver4VR works, what does it emulate to create controller positions? Because how would it work while there is a hydra emulation at the same time. Does it use hydra emulation, if so that would be good.
![]()
I tried motionplus_rotation_only_v1.1.py, works quite good, i notice these issues
Have no buttons (of course, is just que motion plus rotation)
If i Shakeit hard, the sensors need to recalibrate
If i rotate 360 degrees Yaw or Pitch, the virtual controller complet the circle
Also the sensors are pretty smooth, i think there is a code problem
For the Driver4VR, i saw some peoples using with the freepie, like an complement.
When you install he opens auto with SteamVR, and he shows what setup you using, he detects i using the Hydra, see below

![]()
Ok, check out my comment in issue #7
![]()
Can i take you code wiimote_vive_only_buttons.py and combine with the motionplus_rotation_only_v1.1.py, to get the buttons working with the giros?
![]()
Feel free, I would really like to see how that works out for you.
![]()
I simple copy and paste, the controller dont work on sixsense tester, and any of the controles apears on virtual space on steamVR, but i think thats motionplus_rotation_only_v1.1.py have the buttons working, i simple press «A» and apears to me the walking path, but none of the controllers
![]()
try putting my code at the bottom
![]()
and take out the last 6 lines of their code
![]()
it works, but i can’t see the controllers, on virtual space
Do you have any link, can i use to learn some basics to code the wiiremote on the freepie? using the Hydra Emulation
![]()
use wiimote[0] and wiimote[1] and if you add a dot, the program should give suggestions on possible variables.
for hydra use hydra[0] and hydra[1].
wiimote[1].buttons.button_down(WiimoteButtons.Home) checks if the second wiimote has the home button down.
You can set different hydra buttons like this hydra[1].one = true
It is in a python like syntax
![]()
I see
I think to modify the values of this code to get more precise orientation, but why can i map arrow key to move the controle in XYZ? For tests proposes only
![]()
Are you asking how you could map the arrowkeys to control position?
![]()
Yes, press the up arrow and the controller go up in the +x, when i press down the controller goes -x, same as the left and right.
Because i don’t get the kinect yet, and i need just to test the controllers
![]()
I’ll write that up for you, you’re welcome
![]()
Use:
hydra[1].x = 10
hydra[1].y = 10
hydra[1].z = 10
and set those coordinates to what you want.
You can get wii buttons with
wiimote[1].buttons.button_down(WiimoteButtons.DPadUp)
![]()
I’ll write that up for you, your welcome
Thanks a lot
Use:…
I will try
Thanks again
![]()
i put the code
hydra[1].x = 10
hydra[1].y = 10
hydra[1].z = 10
but i can’t change the position
i can use this code, changing the wiimote to keyboard arrow? i can control the position using the keyboard?
if wiimote[0].buttons.button_down(WiimoteButtons.DPadUp):
scale1 += 0.003
hydra[0].z = scale1*(math.sin(yaw1_rad — 0.5*math.pi)*300 — 150)
hydra[0].x = scale1*(-math.cos(yaw1_rad — 0.5*math.pi)*300 — 150)
![]()
Yes, that’s how you would do it. Though, I do not understand what yaw1_rad is from
![]()
i not at home now, but i can use something like this?
if keyboard.getKeyDown(Key.DownArrow):
scale1 += 10
hydra[0].x = scale1
![]()
i read some stuffs on the inter, saying that the wiiremote plus, can’t have the magnetometer to not to drift like in the psmove
Do you have any idea to avoid this?
![]()
Only way it can track yaw is using the sensor bar, and it will track it in relation to the sensor bar, which may be out of range when playing normally
![]()
I read the motion plus, can track the yaw, but the controller use the sensor bar to recalibrate the controller, if you don’t have the sensor bar, the control tends to drift and you have to manual recalibrate
I think it is another way to avoid this, like soldering a magnetometer on the wiiremote or puts various IR leds on the room
![]()
I turn on my wii and test the controller on The Legend of Zelda: Skyward Sword, and it is like i said, the game let me control the cursor without use the sensor bar but if i hard shake or shortly after the pointer get out of line with the controle, but when i pass in front or sensor bar or any IR, the control recalibrate
![]()
Woah that is really cool, I’ve never used the wii motion plus before.
![]()
The motion plus is awesome, i end a game called RedStell 2 and it have a good motion, the sensor of the motion plus is like the same in the psmove, but the psmove uses the mag to recalibrate and the wii uses the sensor bar
![]()
@ajayyy tell me one thing, can i use the kinect to trackthe head position, hands position and recalibrate the wiiremote? Can i use a code to do that, like put some lights in the controller? Do you have any idea?
![]()
Closing, conversation has moved to #7
2 participants
![]()
![]()
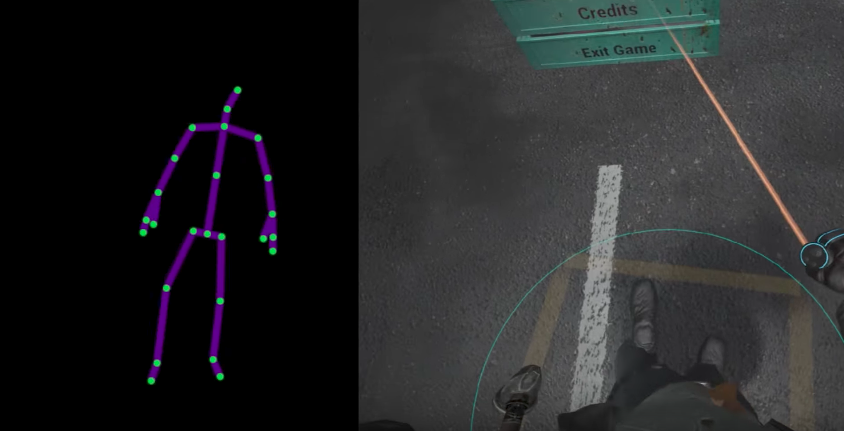
У меня БОМЖ VR, для эмуляции очков я использую IVRi, для трекинга использую XBOX 360 Kinect. Когда начинаю игру или просто в меню steamvr скелет или контроллеры смещяются дальше от меня то-есть не в моем теле.
-
Вопрос заданболее года назад
-
119 просмотров
Пригласить эксперта
Сделай калибровку головы в driver4vr.
Там типо рядом с настройкой головы где ты поставил Kinect skeleton и там кнопка calibrate(у самого была похожая проблема)И ПОМНИ:ПРИ КАЖДОЙ ПЕРЕСТАНОВКИ КИНЕКТА НАДО ДЕЛАТЬ КАЛИБРОВКУ!!!!
-
Показать ещё
Загружается…
09 февр. 2023, в 13:09
5000 руб./за проект
09 февр. 2023, в 13:08
1000 руб./за проект
09 февр. 2023, в 13:05
1000 руб./за проект
Минуточку внимания
Причины:
- Проблема с Bluetooth (неподдерживаемый адаптер или скорее всего драйвер)
- Установленная версия Windows 10 конфликтует с мувами
Решение:
Если соединение не всегда доходит до пунктов 4-7, например зависает на 1-2, а после повторной попытки сразу выдает ошибку, то скорее всего проблемы со стороны Bluetooth (драйвер или сам свисток). Ищите драйвер конкретно под свой свисток. Я так же настоятельно не рекомендую использовать специальные утилиты для автоматического поиска и установки драйверов, ибо зачастую они больше ломают чем чинят. Если соединение застревает на этапах 4-7, то независимо от вашей версий windows, делаем следующее: Скачиваем psmove_pair_fix.exe и запускаем, после чего запускаем настройку подключения мувов. Если не поможет, то вместе с этой программой прямо во время соединения заходим в Панель управленияОборудование и звукУстройства и принтеры (или Панель управленияВсе элементы панели управленияУстройства и принтеры). В уже определенных устройствах будет 2 Motion Controller (или 3 после добавления 1 контроллера): Один из них не будет иметь mac адреса:
 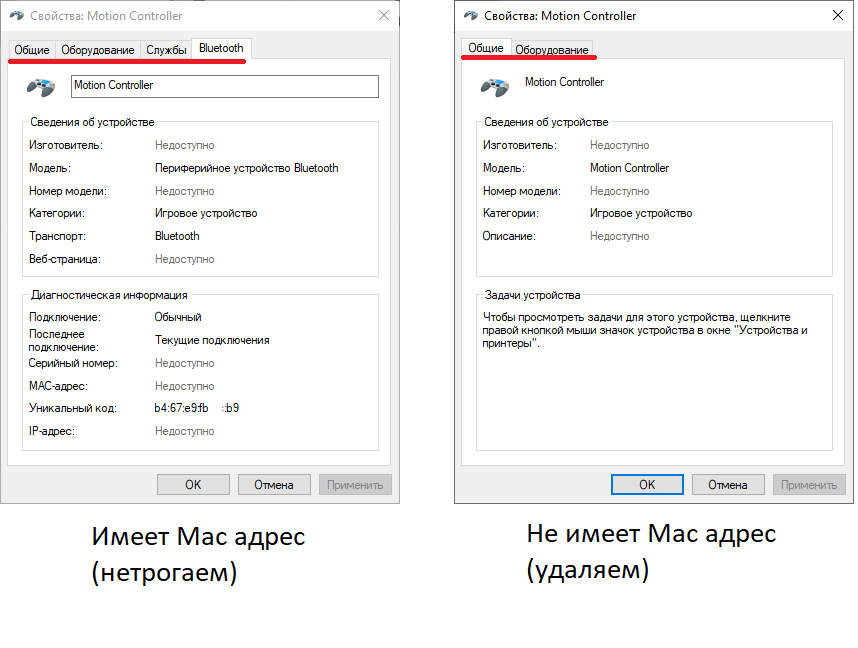 Тот девайс у которого нет mac адреса удаляем прямо во время сопряжения, и продолжаем нажимать кнопку PS. Если повезет, то с первого раза сопряжение выполнится и мув сохранится. Если же не повезло, то снова ждем появление в устройствах Motion Controller без mac адреса, после чего заново удаляем.
(у меня мув коннектился как с 1 раза, так и через 10 минут удаления устройств, зависимости пока не найдено).
Видеоинструкция:
В мае 2017 года разработчик Гжегож Беднарский (Grzegorz Bednarski) представил драйвер WalkinVR для полноценного использования виртуальной реальности людьми с ограниченными возможностями. Спустя несколько месяцев у него готово новое решение, на этот раз способное облегчить жизнь разработчикам — независимо от состояния их здоровья.
Новый Driver4VR позволяет отслеживать тело человека, эмулируя Vive Tracker на основе данных с Kinect. Это альтернатива обычному ВР-трекингу. Забрать драйвер с официального сайта можно совершенно бесплатно. Точнее, есть два варианта: зарегистрироваться и бесплатно скачать Driver4VR Friend, а также зарегистрироваться и скачать Driver4VR Gold за €14,40 (примерно 1000 рублей). После короткого тестового периода бесплатная версия потребует внести оплату. Каждый Vive Tracker в России обходится в 8990 рублей.
Kinect for Windows v2 уже снят с производства, но доступен у перекупщиков и на вторичном рынке. На замену ему предлагается Kinect для Xbox One (примерно 8000-10 000 рублей) с переходником для ПК и Xbox One S (4990 рублей). Cам разработчик Driver4VR рекомендует первый Kinect: он менее точный, зато его инфракрасный проектор не так сильно мешает системе трекинга SteamVR. Его цена сопоставима с ценой второй ревизии.
Да, бюджетным решение Беднарского назвать трудно, но это ещё один вариант для разработчиков виртуальной реальности со специфическими запросами. На данный момент Driver4VR имеет некоторые ограничения, так как эффективно работает, только если пользователь очень близко к датчику, а точность значительно ниже, чем при использовании трекеров Vive.
Беднарский планирует улучшить качество отслеживания, проверяет возможность использования переносных светодиодных полос для повышения точности, а также использования двух Kinect от Xbox 360.
Не пропускайте важнейшие новости о дополненной, смешанной и виртуальной реальности — подписывайтесь на Голографику в ВК, Twitter и Facebook!
Далее: Meta SDK теперь поддерживает SteamVR
А ещё у нас можно арендовать очки и аттракционы виртуальной и дополненной реальности.