Recently I was trying to install an application using the apt command on Ubuntu when I encountered the following error:
E: Could not get lock /var/lib/dpkg/lock – open (11: Resource temporarily unavailable)
E: Unable to lock the administration directory (/var/lib/dpkg/), is another process using it?
In fact, there is a similar error you may see:
E: Could not get lock /var/lib/apt/lists/lock – open (11: Resource temporarily unavailable)
E: Unable to lock directory /var/lib/apt/lists/
E: Could not get lock /var/lib/dpkg/lock – open (11: Resource temporarily unavailable)
E: Unable to lock the administration directory (/var/lib/dpkg/), is another process using it?
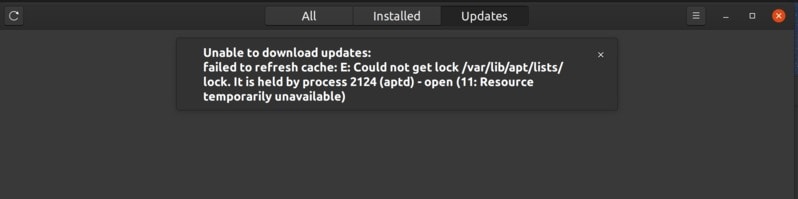
In some cases, you might see it while using the Software Center:
These errors are very similar to another common Ubuntu error, Unable to lock directory /var/cache/apt/archives/, and the interesting thing is that the fixes are similar as well.
Fixing “Unable to lock the administration directory (/var/lib/dpkg/)” error
You see this error because some other program is trying to update Ubuntu. When a command or application is updating the system or installing a new software, it locks the dpkg file (Debian package manager).
This locking is done so that two processes don’t change the content at the same time as it may lead to unwarranted situation and a possible broken system.
Let’s see what steps can you take to fix this issue of ‘unable to lock administration directory’.
Method 0:
The first thing you should do is to check if some other program could be running system update or installing a program.
If you are using command line, check if an application like Software Center, Software Updater, Synaptic package manager, Gdebi is running any update/installation. If that’s the case, please wait for the program to finish the running process.
If there is no such application running, please check all the open terminal windows and see if you are running an update or installing a program. If yes, wait for it to finish.
If none of the above is happening, check which other process is running the apt command (package manager for handling software). Use this command:
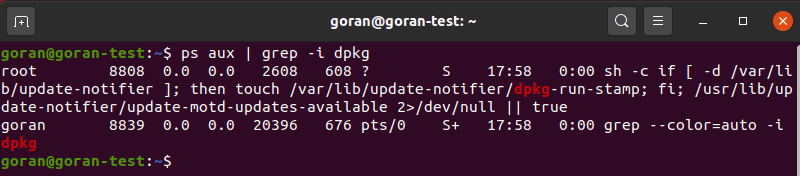
ps aux | grep -i aptFor me, it showed this output:
[email protected]:~$ ps aux | grep -i apt
root      1464  0.0  0.0   4624   772 ?        Ss   19:08   0:00 /bin/sh /usr/lib/apt/apt.systemd.daily update
root      1484  0.0  0.0   4624  1676 ?        S    19:08   0:00 /bin/sh /usr/lib/apt/apt.systemd.daily lock_is_held update
_apt      2836  0.8  0.1  96912  9432 ?        S    19:09   0:03 /usr/lib/apt/methods/http
abhishek  6172  0.0  0.0  21532  1152 pts/1    S+   19:16   0:00 grep --color=auto -i apt
If you see that apt is being used by a program like apt.systemd.daily update, you are in luck, my dear reader.
This is a daemon that runs in the background and check for system updates automatically when you start your system.
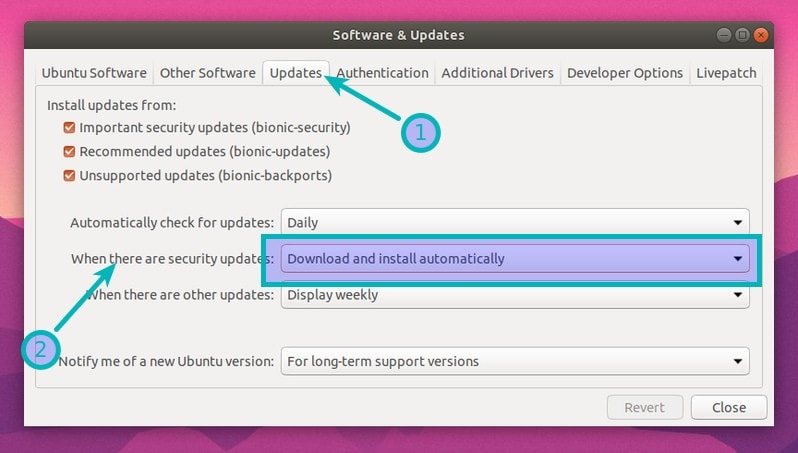
In Ubuntu 18.04 and higher versions, it may even try to download and install the important security updates on its own. At least this is what I see in the default settings in Software & Updates tool on the Ubuntu desktop.
If you are on Ubuntu server, you may check whether you have unattended upgrades enabled by checking the content of the file /etc/apt/apt.conf.d/20auto-upgrades.
So if you see apt.systemd.daily is using the apt process, all you have to do is to wait for a few minutes. When the automatic update finishes, you should be able to install your software as usual.
As a permanent solution, you may disable the check for automatic update and unattended upgrades altogether however I won’t advise that for security reasons.
Now, that was the simple scenario and it could be handled easily. But that might not always be the case. If some other program is using apt, you need to handle it differently.
Method 1:
Use the Linux command line to find and kill the running process. To do that, use the command below:
ps aux | grep -i aptThis will show you the id of the process running apt or apt-get. In the example below, the process id is 7343. You can ignore the last line containing ‘grep –color=auto’.

You can use the process id to terminate it by sending the SIGTERM signal. Replace the <process_id> with the number you got in the output of previous command.
sudo kill <process_id>Check if the process was killed by running the ‘ps aux | grep -i apt’ command. If it is still running, force kill it with SIGKILL signal:
sudo kill -9 <process_id>Another easier way would be to use the killall command. This will kill all the instances of a running program:
sudo killall apt apt-getMethod 2
The above method would fix the problem for you in most cases. But my case was a bit different. I was updating my system and accidentally closed the terminal. For that reason, there were no processes running apt, but it still showed me the error.
🚧
I would advise trying the above two methods or simply restarting your system first. If none of that works, then only you go for this option of removing the lock files.
In this case, the root cause is the lock file. As mentioned earlier, the lock files are used to prevent two or more processes from using the same data. When apt or apt-get commands are run, they create lock files in a few places. If the previous apt command was not terminated properly, the lock files are not deleted and hence they prevent any new instances of apt-get or apt commands.
To fix the problem, all you need to do is to remove the lock files. But before you do that, it would be a good idea to stop any process that is using the lock files.
Use the lsof command to get the process ID of the process holding the lock files. Check the error and see what lock files it is complaining about and get the id of the processes holding these lock files.
Run these commands one by one.
sudo lsof /var/lib/dpkg/lock
sudo lsof /var/lib/apt/lists/lock
sudo lsof /var/cache/apt/archives/lock
It’s possible that the commands don’t return anything, or return just one number. If they do return at least one number, use the number(s) and kill the processes like this (replace the <process_id> with the numbers you got from the above commands):
sudo kill -9 <process_id>You can now safely remove the lock files using the commands below:
sudo rm /var/lib/apt/lists/lock
sudo rm /var/cache/apt/archives/lock
sudo rm /var/lib/dpkg/lock
After that, reconfigure the packages:
sudo dpkg --configure -aNow if you run the sudo apt update command, everything should be fine.
Troubleshooting 1: “Unable to acquire the dpkg frontend lock”
If you see an error like this:
[email protected]:~$ sudo apt install grub-customizer
E: Could not get lock /var/lib/dpkg/lock-frontend - open (11: Resource temporarily unavailable)
E: Unable to acquire the dpkg frontend lock (/var/lib/dpkg/lock-frontend), is another process using it?
You should find out which process is holding the lock-frontend using the lsof command as discussed in previous sections:
sudo lsof /var/lib/dpkg/lock-frontendThis is what it showed for me:
[email protected]:~$ sudo lsof /var/lib/dpkg/lock-frontend
lsof: WARNING: can't stat() fuse.gvfsd-fuse file system /run/user/1000/gvfs
      Output information may be incomplete.
COMMAND    PID USER   FD   TYPE DEVICE SIZE/OFF   NODE NAME
unattende 2823 root    5uW  REG    8,2        0 145221 /var/lib/dpkg/lock-frontend
If you see ‘unattende‘ COMMAND column, this means unattended security upgrades are running. You should wait for the process to finish. Basically, this is what I discussed in method 0 but you probably skipped that.
If the COMMAND is something else, you may kill the process and then remove the lock file. You can see the process id under the PID column. Use this PID to kill the process. After that, remove the lock file and run the update command to see if it’s been fixed.
sudo kill -9 PID
sudo rm /var/lib/dpkg/lock-frontend
sudo apt update
What’s that lsof: warning can’t stat() fuse.gvfsd-fuse file system?
Note: If you see “lsof: warning can’t stat() fuse.gvfsd-fuse file system /run/user/1000/gvfs
Output information may be incomplete” lines after running the earlier mentioned lsof command, don’t panic.
That’s not an error. It’s just that lsof tries to look into mounted file systems as well and the warning is about those mounted systems.
The files are locked by the processes on your main filesystem so if it shows some warning and no output, this only means that there is no process using those lock files.
Troubleshooting 2: “dpkg: error: dpkg frontend is locked by another process”
If you see the error “dpkg frontend is locked by another process” while running the steps in method 2, you need to one additional step.
First, find out the id of the process that is holding the lock file.
sudo lsof /var/lib/dpkg/lock-frontendThe above command will give you the details of the processes using the lock files. Use the process ID to kill this program:
sudo kill -9 PIDNow you can remove the lock and reconfigure dpkg:
sudo rm /var/lib/dpkg/lock-frontend
sudo dpkg --configure -a
Did it work for you? Which method fixed it for you?

I hope this small tip helped you fix the “Could not get lock /var/lib/dpkg/lock” error. If yes, please let me know which method worked for you in the comments.
If you are still facing issues, let me know. I’ll try to help you out.
Any other suggestions are also welcome in the comments.
Recently I was trying to install an application using the apt command on Ubuntu when I encountered the following error:
E: Could not get lock /var/lib/dpkg/lock – open (11: Resource temporarily unavailable)
E: Unable to lock the administration directory (/var/lib/dpkg/), is another process using it?
In fact, there is a similar error you may see:
E: Could not get lock /var/lib/apt/lists/lock – open (11: Resource temporarily unavailable)
E: Unable to lock directory /var/lib/apt/lists/
E: Could not get lock /var/lib/dpkg/lock – open (11: Resource temporarily unavailable)
E: Unable to lock the administration directory (/var/lib/dpkg/), is another process using it?
In some cases, you might see it while using the Software Center:
These errors are very similar to another common Ubuntu error, Unable to lock directory /var/cache/apt/archives/, and the interesting thing is that the fixes are similar as well.
Fixing “Unable to lock the administration directory (/var/lib/dpkg/)” error
You see this error because some other program is trying to update Ubuntu. When a command or application is updating the system or installing a new software, it locks the dpkg file (Debian package manager).
This locking is done so that two processes don’t change the content at the same time as it may lead to unwarranted situation and a possible broken system.
Let’s see what steps can you take to fix this issue of ‘unable to lock administration directory’.
Method 0:
The first thing you should do is to check if some other program could be running system update or installing a program.
If you are using command line, check if an application like Software Center, Software Updater, Synaptic package manager, Gdebi is running any update/installation. If that’s the case, please wait for the program to finish the running process.
If there is no such application running, please check all the open terminal windows and see if you are running an update or installing a program. If yes, wait for it to finish.
If none of the above is happening, check which other process is running the apt command (package manager for handling software). Use this command:
ps aux | grep -i aptFor me, it showed this output:
[email protected]:~$ ps aux | grep -i apt
root      1464  0.0  0.0   4624   772 ?        Ss   19:08   0:00 /bin/sh /usr/lib/apt/apt.systemd.daily update
root      1484  0.0  0.0   4624  1676 ?        S    19:08   0:00 /bin/sh /usr/lib/apt/apt.systemd.daily lock_is_held update
_apt      2836  0.8  0.1  96912  9432 ?        S    19:09   0:03 /usr/lib/apt/methods/http
abhishek  6172  0.0  0.0  21532  1152 pts/1    S+   19:16   0:00 grep --color=auto -i apt
If you see that apt is being used by a program like apt.systemd.daily update, you are in luck, my dear reader.
This is a daemon that runs in the background and check for system updates automatically when you start your system.
In Ubuntu 18.04 and higher versions, it may even try to download and install the important security updates on its own. At least this is what I see in the default settings in Software & Updates tool on the Ubuntu desktop.
If you are on Ubuntu server, you may check whether you have unattended upgrades enabled by checking the content of the file /etc/apt/apt.conf.d/20auto-upgrades.
So if you see apt.systemd.daily is using the apt process, all you have to do is to wait for a few minutes. When the automatic update finishes, you should be able to install your software as usual.
As a permanent solution, you may disable the check for automatic update and unattended upgrades altogether however I won’t advise that for security reasons.
Now, that was the simple scenario and it could be handled easily. But that might not always be the case. If some other program is using apt, you need to handle it differently.
Method 1:
Use the Linux command line to find and kill the running process. To do that, use the command below:
ps aux | grep -i aptThis will show you the id of the process running apt or apt-get. In the example below, the process id is 7343. You can ignore the last line containing ‘grep –color=auto’.
You can use the process id to terminate it by sending the SIGTERM signal. Replace the <process_id> with the number you got in the output of previous command.
sudo kill <process_id>Check if the process was killed by running the ‘ps aux | grep -i apt’ command. If it is still running, force kill it with SIGKILL signal:
sudo kill -9 <process_id>Another easier way would be to use the killall command. This will kill all the instances of a running program:
sudo killall apt apt-getMethod 2
The above method would fix the problem for you in most cases. But my case was a bit different. I was updating my system and accidentally closed the terminal. For that reason, there were no processes running apt, but it still showed me the error.
🚧
I would advise trying the above two methods or simply restarting your system first. If none of that works, then only you go for this option of removing the lock files.
In this case, the root cause is the lock file. As mentioned earlier, the lock files are used to prevent two or more processes from using the same data. When apt or apt-get commands are run, they create lock files in a few places. If the previous apt command was not terminated properly, the lock files are not deleted and hence they prevent any new instances of apt-get or apt commands.
To fix the problem, all you need to do is to remove the lock files. But before you do that, it would be a good idea to stop any process that is using the lock files.
Use the lsof command to get the process ID of the process holding the lock files. Check the error and see what lock files it is complaining about and get the id of the processes holding these lock files.
Run these commands one by one.
sudo lsof /var/lib/dpkg/lock
sudo lsof /var/lib/apt/lists/lock
sudo lsof /var/cache/apt/archives/lock
It’s possible that the commands don’t return anything, or return just one number. If they do return at least one number, use the number(s) and kill the processes like this (replace the <process_id> with the numbers you got from the above commands):
sudo kill -9 <process_id>You can now safely remove the lock files using the commands below:
sudo rm /var/lib/apt/lists/lock
sudo rm /var/cache/apt/archives/lock
sudo rm /var/lib/dpkg/lock
After that, reconfigure the packages:
sudo dpkg --configure -aNow if you run the sudo apt update command, everything should be fine.
Troubleshooting 1: “Unable to acquire the dpkg frontend lock”
If you see an error like this:
[email protected]:~$ sudo apt install grub-customizer
E: Could not get lock /var/lib/dpkg/lock-frontend - open (11: Resource temporarily unavailable)
E: Unable to acquire the dpkg frontend lock (/var/lib/dpkg/lock-frontend), is another process using it?
You should find out which process is holding the lock-frontend using the lsof command as discussed in previous sections:
sudo lsof /var/lib/dpkg/lock-frontendThis is what it showed for me:
[email protected]:~$ sudo lsof /var/lib/dpkg/lock-frontend
lsof: WARNING: can't stat() fuse.gvfsd-fuse file system /run/user/1000/gvfs
      Output information may be incomplete.
COMMAND    PID USER   FD   TYPE DEVICE SIZE/OFF   NODE NAME
unattende 2823 root    5uW  REG    8,2        0 145221 /var/lib/dpkg/lock-frontend
If you see ‘unattende‘ COMMAND column, this means unattended security upgrades are running. You should wait for the process to finish. Basically, this is what I discussed in method 0 but you probably skipped that.
If the COMMAND is something else, you may kill the process and then remove the lock file. You can see the process id under the PID column. Use this PID to kill the process. After that, remove the lock file and run the update command to see if it’s been fixed.
sudo kill -9 PID
sudo rm /var/lib/dpkg/lock-frontend
sudo apt update
What’s that lsof: warning can’t stat() fuse.gvfsd-fuse file system?
Note: If you see “lsof: warning can’t stat() fuse.gvfsd-fuse file system /run/user/1000/gvfs
Output information may be incomplete” lines after running the earlier mentioned lsof command, don’t panic.
That’s not an error. It’s just that lsof tries to look into mounted file systems as well and the warning is about those mounted systems.
The files are locked by the processes on your main filesystem so if it shows some warning and no output, this only means that there is no process using those lock files.
Troubleshooting 2: “dpkg: error: dpkg frontend is locked by another process”
If you see the error “dpkg frontend is locked by another process” while running the steps in method 2, you need to one additional step.
First, find out the id of the process that is holding the lock file.
sudo lsof /var/lib/dpkg/lock-frontendThe above command will give you the details of the processes using the lock files. Use the process ID to kill this program:
sudo kill -9 PIDNow you can remove the lock and reconfigure dpkg:
sudo rm /var/lib/dpkg/lock-frontend
sudo dpkg --configure -a
Did it work for you? Which method fixed it for you?
I hope this small tip helped you fix the “Could not get lock /var/lib/dpkg/lock” error. If yes, please let me know which method worked for you in the comments.
If you are still facing issues, let me know. I’ll try to help you out.
Any other suggestions are also welcome in the comments.
Содержание
- Как исправить ошибку «E: Could not get lock /var/lib/dpkg/lock» в Ubuntu Linux
- Как исправить ошибку «Unable to lock the administration directory (/var/lib/dpkg/)»
- Метод 0:
- Метод 1:
- Метод 2:
- Устранение неполадки: «Unable to acquire the dpkg frontend lock»
- Устранение неполадки: «dpkg: error: dpkg frontend is locked by another process»
- Помогла ли вам статья? Какой из методов помог в вашем случае?
- How to Fix ‘E: Could not get lock /var/lib/dpkg/lock’ Error in Ubuntu Linux
- Fixing “Unable to lock the administration directory (/var/lib/dpkg/)” error
- Method 0:
- Method 1:
- Method 2
- Troubleshooting 1: “Unable to acquire the dpkg frontend lock”
- Troubleshooting 2: “dpkg: error: dpkg frontend is locked by another process”
Как исправить ошибку «E: Could not get lock /var/lib/dpkg/lock» в Ubuntu Linux

Недавно, устанавливая приложение с помощью команды apt в Ubuntu, я столкнулся со следующей ошибкой:
Если вы столкнётесь с какой-то из перечисленных ниже ошибок, знайте, фактически у вас та же ошибка, что и у меня:
В некоторых случаях подобные ошибки возникают при использовании Центра программного обеспечения.
И в целом, они напоминают еще одну распространенную ошибку:
Unable to lock directory/var/cache/apt/archives/ и, как говорится «подобное лечится подобно», а похожие ошибки и фиксятся похоже.
Как исправить ошибку «Unable to lock the administration directory (/var/lib/dpkg/)»
Вы видите эту ошибку, потому что какая-то другая программа обновляет Ubuntu прямо сейчас. Когда команда или приложение обновляют систему или устанавливают новое программное обеспечение, они блокируют файл dpkg (менеджер пакетов Debian).
Эта блокировка выполняется для того, чтобы два процесса не изменяли содержимое файла dpkgодновременно, так как это может привести к неоправданному риску поломки всей системы.
Давайте посмотрим, что мы можем сделать, чтобы решить проблему «unable to lock the administrator directory».
Метод 0:
Первое, что следует сделать, это проверить, может ли какая-то другая программа запускать обновление системы или устанавливать программу.
Если вы используете командную строку, проверьте, не запускает ли одно из следующих приложений: Software Center, Software Updater, менеджер пакетов Synaptic или Gdebi, какое-нибудь обновление / установку. В случае положительного ответа – просто подождите, пока программа завершит выполнение.
Если ни одно из этих приложений не запущено, проверьте все открытые окна терминала и посмотрите, не запустили ли вы самостоятельно какие-либо обновление или установки. Если да, дождитесь завершения этих процессов. (Совет странный, но помните, что все мы бываем невнимательны))
Если ничего из вышеперечисленного не происходит, проверьте, какой еще процесс выполняет команду apt (менеджер пакетов для работы с программным обеспечением). Используйте эту команду:
В моем случае команда вернула такой результат:

Если вы, как и я, видите, что apt используется такой программой, как apt.systemd.daily update, вам повезло, мой дорогой читатель.
Это «демон», который работает в фоновом режиме и автоматически проверяет наличие обновлений системы при запуске системы.
В Ubuntu 18.04 и более поздних версиях он может даже попытаться загрузить и установить важные обновления безопасности самостоятельно. По крайней мере, такие опции я увидел в дефолтных настройках в инструменте «Программное обеспечение и обновления» на рабочем столе Ubuntu.

Если вы находитесь на сервере Ubuntu, вы можете проверить, включены ли у вас автоматические обновления, проверив содержимое файла /etc/apt/apt.conf.d/20auto-upgrades.
Итак, если вы выяснили, что apt.systemd.daily использует процесс apt, все, что вам нужно сделать, это подождать несколько минут. Когда автоматическое обновление завершится, вы сможете установить свое программное обеспечение как обычно.
В качестве постоянного решения вы можете полностью отключить как автоматическую проверку наличия обновлений, так и сами автообновления, однако я бы не советовал, из соображений безопасности.
Это был самый простой и легко побеждаемый сценарий. К сожалению, он не единственный возможный. Если apt использует какая-то другая программа, то и решение будет другим.
Метод 1:
Используйте командную строку Linux, чтобы найти и остановить запущенный процесс. Для этого используйте команду ниже:
Эта команда покажет вам идентификатор процесса, выполняющего apt или apt-get. В приведенном ниже примере идентификатор процесса — 7343. Не обращайте внимания на последнюю строку, содержащую «grep –color = auto».

Вы можете использовать идентификатор процесса, чтобы завершить его, отправив команду SIGTERM. Замените
числом, которое вы получили в выводе предыдущей команды.
Проверьте, был ли процесс остановлен, запустив команду «ps aux | grep -i apt» еще раз. Если он все еще работает, принудительно уничтожьте его сигналом SIGKILL:
Другой, более простой способ — использовать команду killall, она убьет все экземпляры запущенной программы:
Метод 2:
Вышеупомянутый метод решит проблему в большинстве случаев. Но мой случай, по закону подлости, был немного другим. Я обновлял свою систему и случайно закрыл терминал. По этой причине не было процессов, использующих apt, но система все равно выдавала мне ошибку.
В таком случае основной причиной является файл блокировки. Как упоминалось ранее, файлы блокировки необходимы для предотвращения использования одних и тех же данных двумя или более процессами. Когда выполняются команды apt или apt-get, они создают файлы блокировки в нескольких местах. Если предыдущая команда apt не была завершена должным образом, файлы блокировки не удаляются и, следовательно, они будут блокировать любые новые вызовы команд apt-get или apt.
Чтобы решить эту проблему, все, что вам нужно сделать, это удалить файлы блокировки. Но, прежде чем вы это сделаете, было бы неплохо остановить любой процесс, использующий файлы блокировки.
Используйте команду lsof, чтобы получить идентификатор процесса, использующего файлы блокировки. Проверьте ошибку и посмотрите, на какие файлы блокировки она жалуется, и получите идентификатор процессов, содержащих эти файлы блокировки.
Последовательно запустите эти команды:
Возможно, команды ничего не будут возвращают или вернут только одно число. Но, если они возвращают хотя бы одно число, используйте его, чтобы завершить такие процессы (замените
числами, полученными из приведенных выше команд):
Теперь вы можете безопасно удалить файлы блокировки, используя следующие команды:
После этого переконфигурируйте пакеты:
Теперь, если вы запустите команду sudo apt update, все должно работать как надо.
Устранение неполадки: «Unable to acquire the dpkg frontend lock»
Если вы видите такую ошибку:
Вы должны выяснить, какой процесс удерживает интерфейс блокировки, используя команду lsof, как обсуждалось в предыдущих разделах:
В моем случае команда вернула:
Если вы видите значение «unattende» в столбце COMMAND, это значит, что выполняются автоматические обновления безопасности. Вам следует дождаться завершения процессов. По сути, это то, что я описывал в методе 0, но вы могли его пропустить.
Если значение COMMAND какое-то другое, вы можете убить процесс, а затем удалить файл блокировки. Идентификатор процесса вы найдете в столбце PID. Используйте этот PID, чтобы убить процесс. После этого удалите файл блокировки и запустите команду обновления, чтобы проверить, исправили ли вы проблему.
Устранение неполадки: «dpkg: error: dpkg frontend is locked by another process»
Если вы встретите ошибку «интерфейс dpkg заблокирован другим процессом» в процессе пошагового выполнения метода 2, вам понадобится выполнить еще одно действие.
Во-первых, узнайте идентификатор процесса, хранящего файл блокировки.
Эта команда предоставит вам подробную информацию о процессах и программах, использующих файлы блокировки. Используйте идентификатор процесса, чтобы убить эту программу:
Теперь вы можете снять блокировку и перенастроить dpkg:
Помогла ли вам статья? Какой из методов помог в вашем случае?
Надеюсь, этот небольшой пост помог вам исправить ошибки типа «Не удалось получить lock / var / lib / dpkg / lock». Если да – обязательно поделитесь в комментах, какой метод помог именно вам.
Если ни один из перечисленных способов так и не помог вам справиться с проблемой, опять же – дайте знать. Я постараюсь вам помочь.
Любые другие предложения также приветствуются в комментариях.
Источник
How to Fix ‘E: Could not get lock /var/lib/dpkg/lock’ Error in Ubuntu Linux
Recently I was trying to install an application using the apt command on Ubuntu when I encountered the following error:
E: Could not get lock /var/lib/dpkg/lock – open (11: Resource temporarily unavailable)
E: Unable to lock the administration directory (/var/lib/dpkg/), is another process using it?
In fact, there is a similar error you may see:
E: Could not get lock /var/lib/apt/lists/lock – open (11: Resource temporarily unavailable)
E: Unable to lock directory /var/lib/apt/lists/
E: Could not get lock /var/lib/dpkg/lock – open (11: Resource temporarily unavailable)
E: Unable to lock the administration directory (/var/lib/dpkg/), is another process using it?
In some cases, you might see it while using the Software Center:
Could Not Get Lock Error in Ubuntu Software Center
These errors are very similar to another common Ubuntu error, Unable to lock directory /var/cache/apt/archives/, and the interesting thing is that the fixes are similar as well.
Fixing “Unable to lock the administration directory (/var/lib/dpkg/)” error
You see this error because some other program is trying to update Ubuntu. When a command or application is updating the system or installing a new software, it locks the dpkg file (Debian package manager).
This locking is done so that two processes don’t change the content at the same time as it may lead to unwarranted situation and a possible broken system.
Let’s see what steps can you take to fix this issue of ‘unable to lock administration directory’.
Method 0:
The first thing you should do is to check if some other program could be running system update or installing a program.
If you are using command line, check if an application like Software Center, Software Updater, Synaptic package manager, Gdebi is running any update/installation. If that’s the case, please wait for the program to finish the running process.
If there is no such application running, please check all the open terminal windows and see if you are running an update or installing a program. If yes, wait for it to finish.
If none of the above is happening, check which other process is running the apt command (package manager for handling software). Use this command:
For me, it showed this output:
If you see that apt is being used by a program like apt.systemd.daily update, you are in luck, my dear reader.
This is a daemon that runs in the background and check for system updates automatically when you start your system.
In Ubuntu 18.04 and higher versions, it may even try to download and install the important security updates on its own. At least this is what I see in the default settings in Software & Updates tool on the Ubuntu desktop.
Ubuntu may install security updates in background
If you are on Ubuntu server, you may check whether you have unattended upgrades enabled by checking the content of the file /etc/apt/apt.conf.d/20auto-upgrades.
So if you see apt.systemd.daily is using the apt process, all you have to do is to wait for a few minutes. When the automatic update finishes, you should be able to install your software as usual.
As a permanent solution, you may disable the check for automatic update and unattended upgrades altogether however I won’t advise that for security reasons.
Now, that was the simple scenario and it could be handled easily. But that might not always be the case. If some other program is using apt, you need to handle it differently.
Method 1:
Use the Linux command line to find and kill the running process. To do that, use the command below:
This will show you the id of the process running apt or apt-get. In the example below, the process id is 7343. You can ignore the last line containing ‘grep –color=auto’.
You can use the process id to terminate it by sending the SIGTERM signal. Replace the
with the number you got in the output of previous command.
Check if the process was killed by running the ‘ps aux | grep -i apt’ command. If it is still running, force kill it with SIGKILL signal:
Another easier way would be to use the killall command. This will kill all the instances of a running program:
Method 2
The above method would fix the problem for you in most cases. But my case was a bit different. I was updating my system and accidentally closed the terminal. For that reason, there were no processes running apt, but it still showed me the error.
In this case, the root cause is the lock file. As mentioned earlier, the lock files are used to prevent two or more processes from using the same data. When apt or apt-get commands are run, they create lock files in a few places. If the previous apt command was not terminated properly, the lock files are not deleted and hence they prevent any new instances of apt-get or apt commands.
To fix the problem, all you need to do is to remove the lock files. But before you do that, it would be a good idea to stop any process that is using the lock files.
Use the lsof command to get the process ID of the process holding the lock files. Check the error and see what lock files it is complaining about and get the id of the processes holding these lock files.
Run these commands one by one.
It’s possible that the commands don’t return anything, or return just one number. If they do return at least one number, use the number(s) and kill the processes like this (replace the
with the numbers you got from the above commands):
You can now safely remove the lock files using the commands below:
After that, reconfigure the packages:
Now if you run the sudo apt update command, everything should be fine.
Troubleshooting 1: “Unable to acquire the dpkg frontend lock”
If you see an error like this:
You should find out which process is holding the lock-frontend using the lsof command as discussed in previous sections:
This is what it showed for me:
If you see ‘unattende‘ COMMAND column, this means unattended security upgrades are running. You should wait for the process to finish. Basically, this is what I discussed in method 0 but you probably skipped that.
If the COMMAND is something else, you may kill the process and then remove the lock file. You can see the process id under the PID column. Use this PID to kill the process. After that, remove the lock file and run the update command to see if it’s been fixed.
What’s that lsof: warning can’t stat() fuse.gvfsd-fuse file system?
Note: If you see “lsof: warning can’t stat() fuse.gvfsd-fuse file system /run/user/1000/gvfs
Output information may be incomplete” lines after running the earlier mentioned lsof command, don’t panic.
That’s not an error. It’s just that lsof tries to look into mounted file systems as well and the warning is about those mounted systems.
The files are locked by the processes on your main filesystem so if it shows some warning and no output, this only means that there is no process using those lock files.
Troubleshooting 2: “dpkg: error: dpkg frontend is locked by another process”
If you see the error “dpkg frontend is locked by another process” while running the steps in method 2, you need to one additional step.
First, find out the id of the process that is holding the lock file.
The above command will give you the details of the processes using the lock files. Use the process ID to kill this program:
Now you can remove the lock and reconfigure dpkg:
Did it work for you? Which method fixed it for you?
I hope this small tip helped you fix the “Could not get lock /var/lib/dpkg/lock” error. If yes, please let me know which method worked for you in the comments.
If you are still facing issues, let me know. I’ll try to help you out.
Any other suggestions are also welcome in the comments.
Источник
Описание проблемы. Ошибка
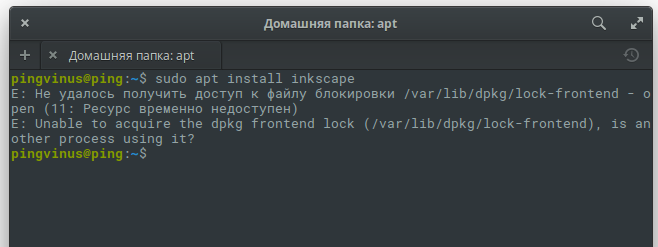
При выполнении в Ubuntu команды вида:
sudo apt install someprogramв терминале появляется ошибка:
E: Не удалось получить доступ к файлу блокировки /var/lib/dpkg/lock-frontend - open (11: Ресурс временно недоступен)
E: Unable to acquire the dpkg frontend lock (/var/lib/dpkg/lock-frontend), is another process using it?
Ошибка может появляться не только при выполнении apt install, но и при любых других действиях с apt или apt-get.
Сообщение об ошибке может немного отличаться в зависимости от различных условий. Например, могут появляться следующие ошибки:
E: Could not get lock /var/lib/dpkg/lock – open (11: Resource temporarily unavailable)
E: Unable to lock the administration directory (/var/lib/dpkg/), is another process using it?
E: Could not get lock /var/lib/apt/lists/lock – open (11: Resource temporarily unavailable)
E: Unable to lock directory /var/lib/apt/lists/
E: Could not get lock /var/lib/dpkg/lock – open (11: Resource temporarily unavailable)
E: Unable to lock the administration directory (/var/lib/dpkg/), is another process using it?
Как исправить
Данные ошибки появляются, когда программа apt-get (apt) не может получить доступ к файлу блокировки /var/lib/dpkg/lock*. Данный файл используется, чтобы запретить одновременное выполнение операций, связанных с управлением пакетами в системе, так как при одновременном изменении данных о пакетах будет нарушена целостность «пакетной базы».
Обычно существует две основные причины появления, описанных выше ошибок:
- В данный момент уже выполняется экземпляр программы apt-get (apt).
- Предыдущий вызов apt-get (apt) завершился некорректно.
Способ первый
Сначала нужно проверить, что уже не запущен другой экземпляр программы apt-get (apt). Выполним следующую команду, чтобы проверить есть ли apt в списке запущенных процессов:
ps aux | grep -i aptВывод команды может быть следующим:
root 9425 0.0 0.0 79516 3752 pts/1 S+ 10:31 0:00 sudo apt-get install inkscape
pingvin+ 9456 0.0 0.0 38892 944 pts/0 S+ 10:32 0:00 grep --color=auto -i apt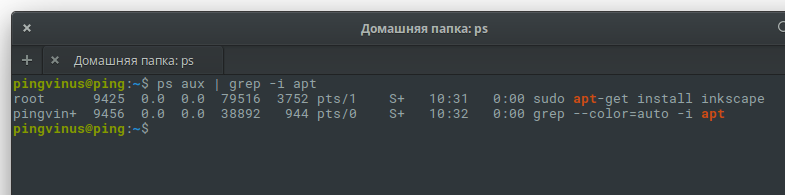
В первой строке мы видим, что уже есть работающий экземпляр программы apt-get, который имеет PID (идентификатор) 9425. Вторая строка относится к нашей команде grep, которую мы запустили с аргументом apt, поэтому она вывела саму себя. Итак, нас интересует только первая строка.
Если вы уверены, что не запускали программу apt-get сами, или она не запущена в фоновом режиме, например, выполняется автоматическое обновление системы, то нужно принудительно завершить ее выполнение. Для этого воспользуемся командой kill −9. Команде нужно указать числовой идентификатор процесса. В нашем случае это 9425. Выполняем команду:
sudo kill -9 9425После выполнения данной команды, процесс с идентификатором 9425 завершится.
Можно воспользоваться еще одним простым способом — это завершить все экземпляры программ apt и apt-get сразу. Для этого можно выполнить команду:
sudo killall apt apt-getСпособ второй
Если первый способ вам не помог, то рассмотрим еще один способ решения проблемы. Обычно он используется, когда нет работающих экземпляров программ apt или apt-get, а значит предыдущее их выполнение завершилось аварийно, и файлы блокировки остались закрытыми.
Нам нужно удалить все файлы блокировки. Для этого выполняем команды:
sudo rm /var/lib/apt/lists/lock
sudo rm /var/cache/apt/archives/lock
sudo rm /var/lib/dpkg/lock
sudo rm /var/lib/dpkg/lock-frontend
Если при выполнении каких-нибудь из этих команд появится сообщение: rm: невозможно удалить ’/var/../lock’: Нет такого файла или каталога, это нормально, не обращайте на него внимания.
После этого нужно выполнить переконфигурацию (донастройку) пакетов:
sudo dpkg --configure -aЗаключение
Мы рассмотрели два способа решения ошибок, связанных с доступом к файлу блокировки dpkg. Как правило, эти способы помогают. Если у вас остались какие-либо вопросы, оставляйте их в комментариях.
Недавно, устанавливая приложение с помощью команды apt в Ubuntu, я столкнулся со следующей ошибкой:
E: Could not get lock /var/lib/dpkg/lock – open (11: Resource
temporarily unavailable)
E: Unable to lock the administration directory (/var/lib/dpkg/), is another
process using it?
Если вы столкнётесь с какой-то из перечисленных ниже ошибок, знайте, фактически у вас та же ошибка, что и у меня:
E: Could not get lock /var/lib/apt/lists/lock – open (11: Resource
temporarily unavailable)
E: Unable to lock directory /var/lib/apt/lists/
E: Could not get lock /var/lib/dpkg/lock – open (11: Resource temporarily
unavailable)
E: Unable to lock the administration directory (/var/lib/dpkg/), is another
process using it?
В некоторых случаях подобные ошибки возникают при использовании Центра программного обеспечения.
И в целом, они напоминают еще одну распространенную ошибку:
Unable to lock directory/var/cache/apt/archives/ и, как говорится «подобное лечится подобно», а похожие ошибки и фиксятся похоже.
Как исправить ошибку «Unable to lock the administration directory (/var/lib/dpkg/)»
Вы видите эту ошибку, потому что какая-то другая программа обновляет Ubuntu прямо сейчас. Когда команда или приложение обновляют систему или устанавливают новое программное обеспечение, они блокируют файл dpkg (менеджер пакетов Debian).
Эта блокировка выполняется для того, чтобы два процесса не изменяли содержимое файла dpkgодновременно, так как это может привести к неоправданному риску поломки всей системы.
Давайте посмотрим, что мы можем сделать, чтобы решить проблему «unable to lock the administrator directory».
Метод 0:
Первое, что следует сделать, это проверить, может ли какая-то другая программа запускать обновление системы или устанавливать программу.
Если вы используете командную строку, проверьте, не запускает ли одно из следующих приложений: Software Center, Software Updater, менеджер пакетов Synaptic или Gdebi, какое-нибудь обновление / установку. В случае положительного ответа – просто подождите, пока программа завершит выполнение.
Если ни одно из этих приложений не запущено, проверьте все открытые окна терминала и посмотрите, не запустили ли вы самостоятельно какие-либо обновление или установки. Если да, дождитесь завершения этих процессов. (Совет странный, но помните, что все мы бываем невнимательны))
Если ничего из вышеперечисленного не происходит, проверьте, какой еще процесс выполняет команду apt (менеджер пакетов для работы с программным обеспечением). Используйте эту команду:
ps aux | grep -i apt
В моем случае команда вернула такой результат:
abhishek@nuc:~$ ps aux | grep -i apt
root 1464 0.0 0.0 4624 772 ? Ss 19:08 0:00
/bin/sh /usr/lib/apt/apt.systemd.daily update
root 1484 0.0 0.0 4624 1676 ? S 19:08 0:00
/bin/sh /usr/lib/apt/apt.systemd.daily lock_is_held update
_apt 2836 0.8 0.1 96912 9432 ? S 19:09 0:03
/usr/lib/apt/methods/http
abhishek 6172 0.0 0.0 21532 1152 pts/1 S+ 19:16 0:00
grep --color=auto -i apt
Если вы, как и я, видите, что apt используется такой программой, как apt.systemd.daily update, вам повезло, мой дорогой читатель.
Это «демон», который работает в фоновом режиме и автоматически проверяет наличие обновлений системы при запуске системы.
В Ubuntu 18.04 и более поздних версиях он может даже попытаться загрузить и установить важные обновления безопасности самостоятельно. По крайней мере, такие опции я увидел в дефолтных настройках в инструменте «Программное обеспечение и обновления» на рабочем столе Ubuntu.
Если вы находитесь на сервере Ubuntu, вы можете проверить, включены ли у вас автоматические обновления, проверив содержимое файла /etc/apt/apt.conf.d/20auto-upgrades.
Итак, если вы выяснили, что apt.systemd.daily использует процесс apt, все, что вам нужно сделать, это подождать несколько минут. Когда автоматическое обновление завершится, вы сможете установить свое программное обеспечение как обычно.
В качестве постоянного решения вы можете полностью отключить как автоматическую проверку наличия обновлений, так и сами автообновления, однако я бы не советовал, из соображений безопасности.
Это был самый простой и легко побеждаемый сценарий. К сожалению, он не единственный возможный. Если apt использует какая-то другая программа, то и решение будет другим.
Метод 1:
Используйте командную строку Linux, чтобы найти и остановить запущенный процесс. Для этого используйте команду ниже:
ps aux | grep -i apt
Эта команда покажет вам идентификатор процесса, выполняющего apt или apt-get. В приведенном ниже примере идентификатор процесса — 7343. Не обращайте внимания на последнюю строку, содержащую «grep –color = auto».
Вы можете использовать идентификатор процесса, чтобы завершить его, отправив команду SIGTERM. Замените <process_id> числом, которое вы получили в выводе предыдущей команды.
sudo kill < process_id >
Проверьте, был ли процесс остановлен, запустив команду «ps aux | grep -i apt» еще раз. Если он все еще работает, принудительно уничтожьте его сигналом SIGKILL:
sudo kill -9 < process_id >
Другой, более простой способ — использовать команду killall, она убьет все экземпляры запущенной программы:
sudo killall apt apt-get
Метод 2:
Вышеупомянутый метод решит проблему в большинстве случаев. Но мой случай, по закону подлости, был немного другим. Я обновлял свою систему и случайно закрыл терминал. По этой причине не было процессов, использующих apt, но система все равно выдавала мне ошибку.
В таком случае основной причиной является файл блокировки. Как упоминалось ранее, файлы блокировки необходимы для предотвращения использования одних и тех же данных двумя или более процессами. Когда выполняются команды apt или apt-get, они создают файлы блокировки в нескольких местах. Если предыдущая команда apt не была завершена должным образом, файлы блокировки не удаляются и, следовательно, они будут блокировать любые новые вызовы команд apt-get или apt.
Чтобы решить эту проблему, все, что вам нужно сделать, это удалить файлы блокировки. Но, прежде чем вы это сделаете, было бы неплохо остановить любой процесс, использующий файлы блокировки.
Используйте команду lsof, чтобы получить идентификатор процесса, использующего файлы блокировки. Проверьте ошибку и посмотрите, на какие файлы блокировки она жалуется, и получите идентификатор процессов, содержащих эти файлы блокировки.
Последовательно запустите эти команды:
sudo lsof /var/lib/dpkg/lock
sudo lsof /var/lib/apt/lists/lock
sudo lsof /var/cache/apt/archives/lock
Возможно, команды ничего не будут возвращают или вернут только одно число. Но, если они возвращают хотя бы одно число, используйте его, чтобы завершить такие процессы (замените <process_id> числами, полученными из приведенных выше команд):
sudo kill -9 < process_id >
Теперь вы можете безопасно удалить файлы блокировки, используя следующие команды:
sudo rm /var/lib/apt/lists/lock
sudo rm /var/cache/apt/archives/lock
sudo rm /var/lib/dpkg/lock
После этого переконфигурируйте пакеты:
sudo dpkg --configure -a
Теперь, если вы запустите команду sudo apt update, все должно работать как надо.
Устранение неполадки: «Unable to acquire the dpkg frontend lock»
Если вы видите такую ошибку:
abhishek@nuc:~$ sudo apt install grub-customizer
E: Could not get lock /var/lib/dpkg/lock-frontend - open (11: Resource
temporarily unavailable)
E: Unable to acquire the dpkg frontend lock (/var/lib/dpkg/lock-frontend),
is another process using it?
Вы должны выяснить, какой процесс удерживает интерфейс блокировки, используя команду lsof, как обсуждалось в предыдущих разделах:
sudo lsof /var/lib/dpkg/lock-frontend
В моем случае команда вернула:
abhishek@nuc:~$ sudo lsof /var/lib/dpkg/lock-frontend
lsof: WARNING: can't stat() fuse.gvfsd-fuse file system
/run/user/1000/gvfs
          Output information may be incomplete.
COMMAND   PID  USER FD  TYPE DEVICE  SIZE/OFF NODE NAME
unattende 2823 root 5uW REG  8,2 0   145221
/var/lib/dpkg/lock-frontend
Если вы видите значение «unattende» в столбце COMMAND, это значит, что выполняются автоматические обновления безопасности. Вам следует дождаться завершения процессов. По сути, это то, что я описывал в методе 0, но вы могли его пропустить.
Если значение COMMAND какое-то другое, вы можете убить процесс, а затем удалить файл блокировки. Идентификатор процесса вы найдете в столбце PID. Используйте этот PID, чтобы убить процесс. После этого удалите файл блокировки и запустите команду обновления, чтобы проверить, исправили ли вы проблему.
sudo kill -9 PID
sudo rm /var/lib/dpkg/lock-frontend
sudo apt update
Устранение неполадки: «dpkg: error: dpkg frontend is locked by another process»
Если вы встретите ошибку «интерфейс dpkg заблокирован другим процессом» в процессе пошагового выполнения метода 2, вам понадобится выполнить еще одно действие.
Во-первых, узнайте идентификатор процесса, хранящего файл блокировки.
sudo lsof /var/lib/dpkg/lock-frontend
Эта команда предоставит вам подробную информацию о процессах и программах, использующих файлы блокировки. Используйте идентификатор процесса, чтобы убить эту программу:
sudo kill -9 PID
Теперь вы можете снять блокировку и перенастроить dpkg:
sudo rm /var/lib/dpkg/lock-frontend
sudo dpkg --configure -a
Помогла ли вам статья? Какой из методов помог в вашем случае?
Надеюсь, этот небольшой пост помог вам исправить ошибки типа «Не удалось получить lock / var / lib / dpkg / lock». Если да – обязательно поделитесь в комментах, какой метод помог именно вам.
Если ни один из перечисленных способов так и не помог вам справиться с проблемой, опять же – дайте знать. Я постараюсь вам помочь.
Любые другие предложения также приветствуются в комментариях.
Introduction
In Ubuntu, you may sometimes encounter an error when attempting to run an apt command:
Could not get lock /var/lib/dpkg/lock – open (11: Resource temporarily unavailable)
E: Unable to lock the administration directory (/var/lib/dpkg/), is another process using it?
This message lets you know that dpkg, the Debian Package Manager service, is unavailable.
Use the options in this guide to resolve the Ubuntu «Could not get lock…» error.
Prerequisites
- Access to a terminal window / command line
- A user account with sudo or root privileges
By default, the update service launches when Ubuntu starts. The automatic updater uses dpkg to check and install updates.
The dpkg service locks itself so that two processes don’t update the content simultaneously. The service is locked to avoid potential corruptions in the system. However, it also means that the user cannot, for example, run a simple apt command.
1: Wait it Out or Reboot
Give the system up to 10 minutes after you see the error, then try your software installation again.
If you’re certain that nothing is being installed, you can reboot the machine and try again.
To adjust the settings for automatic updates:
1. Click Activites > Search.
2. Type Updates.
3. Click the icon for Software & Updates.
4. Use the check boxes and drop-down menus to select your preferred update schedule.
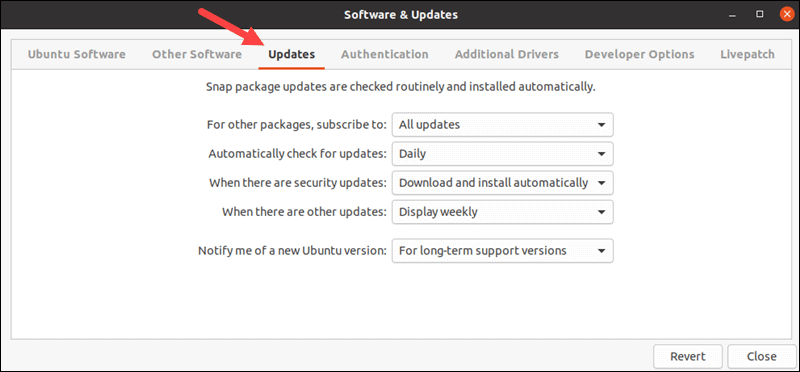
Note: We recommend keeping automatic updates turned on. Optionally, you can set them to be less frequent or to notify you instead of automatic downloading.
2: Examine the Running Processes
1. If you already tried waiting and rebooting the system, and you still get the error, use the following command to see which installation services are running:
ps aux | grep -i apt2. If there are any applications using apt, they will appear on the list. Look for an entry similar to:
/usr/lib/apt/apt.systemd.daily update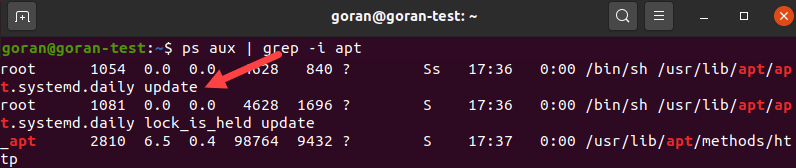
3. The daily update message means your system is running normal updates. You have to wait for this process to finish, but no other action is required.
You may have another apt process that’s running:
root 2810 0.0 0.0 72948 4312 pts/0 S+ 15:03 0:00 sudo apt-get remove logstashThe most important columns are the second column, which lists the PID (process ID), and the last column that displays the service that’s using apt.
4. Alternately, you may have a dpkg service that’s still running. To find it, use the following command:
ps aux | grep -i dpkgThe dpkg output will look similar to the apt output.
3: Address the Stuck Apt Service
1. If you have a mystery apt or dpkg service running, terminate it and see if that resolves your error. Use the following command:
sudo kill 88082. Replace 8808 with the actual process ID (PID) from Step 2. It should complete and return to a new command prompt line. If it doesn’t, force the process to stop by adding the -9 option:
sudo kill -9 8808This should have resolved the issue.
4: Delete Lock Files
The error message in Ubuntu may appear similar to the following:
/var/lib/dpkg/lock

/var/lib/dpkg/lock-frontend

/var/lib/apt/lists/lock

/var/cache/apt/archives/lock
These are lock files, which are created to prevent two instances of apt or dpkg from using the same files at the same time. This can happen if an installation is interrupted or did not complete. Remove the lock files at your own risk.
To delete the lock files, use the rm command:
sudo rm /var/lib/dpkg/lock

sudo rm /var/lib/apt/lists/lock

sudo rm /var/cache/apt/archives/lock
Removing these files should fix the error.
5: Reconfigure dpkg
1. Run the --configure command if you just deleted the lock files. Also, this command will help if you receive the following error:
“dpkg was interrupted, you must manually run ‘sudo dpkg –configure -a’ to correct the problem.”
2. Enter the command as displayed above:
sudo dpkg --configure -aOutput returns a new line and the command should resolve the issue.
Fix Could not get lock /var/lib/dpkg/lock-frontend Error
The steps for fixing this error follow the similar pattern in the methods we described above. The full error is:
E: Could not get lock /var/lib/dpkg/lock-frontend - open (11: Resource temporarily unavailable)

E: Unable to acquire the dpkg frontend lock (/var/lib/dpkg/lock-frontend), is another process using it?
1. Do not remove the lock files immediately. Before doing so, locate and kill all processes that may be using the files.
sudo lsof /var/lib/dpkg/lock-frontendNote: Check out our guide to learn more about lsof command in Linux.
2. The output returns a result similar to:
lsof: WARNING: can't stat() fuse.gvfsd-fuse file system /run/user/1000/gvfs
      Output information may be incomplete.
lsof: WARNING: can't stat() fuse file system /run/user/1000/doc
      Output information may be incomplete.
COMMAND    PID USER   FD   TYPE DEVICE SIZE/OFF   NODE NAME
unattende 1127 root    2oW  REG    7,2        0 165231 /var/lib/dpkg/lock-frontent
3. If you see unattended under the command column, your system is installing a security update. Wait for the process to complete.
4. Otherwise, note all process IDs and kill them with the force option:
sudo kill -9 process_id5. Once you do that, you can try removing the lock-frontend files.
sudo rm /var/lib/dpkg/lock-frontendThis should fix the error.
6. The last thing you can try after deleting the lock files is reconfiguring dpkg as we showed in the fifth section.
sudo dpkg --configure -aTo test if these steps fixed the error, run the update command:
sudo apt updateWhen the process completes successfully, that shows you fixed the “E: Could not get lock /var/lib/dpkg/lock” error.
Note: The error we tackled has multiple different forms, but the methods for fixing it are similar. Some of the variations of the “Could not get lock…” error are:
E: Could not get lock /var/lib/apt/lists/lock – open (11: Resource temporarily unavailable)
E: Unable to lock directory /var/lib/apt/lists/
and
E: Could not get lock /var/lib/dpkg/lock – open (11: Resource temporarily unavailable)
E: Unable to lock the administration directory (/var/lib/dpkg/), is another process using it?
Conclusion
This article explains five options to fix the “E: Could not get lock /var/lib/dpkg/lock” error on Ubuntu.
One of the options above will resolve the issue and chances are that the error will resolve itself upon rebooting the system.
Another common Ubuntu error message «Sub-process /usr/bin/dpkg returned an error code (1)» could indicate a problem with the package installer.
При использовании Linux вы можете столкнуться с различными ошибками. Одна из них может быть ошибкой «/var/lib/dpkg/lock». Это поправимо? Ну да! Это не паническая ошибка. Но прежде чем мы узнаем, как исправить эту ошибку, давайте разберемся, почему она возникает.
Почему возникает ошибка «/var/lib/dpkg/lock»
Эта ошибка обычно возникает, когда процесс обновляет систему, а вы пытаетесь получить доступ к системе для выполнения какой-либо другой операции. Например, система Ubuntu блокирует доступ «dpkg», чтобы операционная система не завершила процесс обновления. Это также может произойти из-за произвольного процесса, который постоянно работает в фоновом режиме и сохраняет задействованным «/var/lib/dpkg».
Эти процессы не позволяют вам устанавливать новые приложения или выполнять команды. Есть несколько способов решить эту проблему. Сначала тщательно диагностируйте проблемы, а затем приступайте к их исправлению. Давайте разберемся, как исправить эту проблему.
Стратегии решения ошибки «/var/lib/dpkg/»
Как обсуждалось выше, прежде чем приступить к исправлению, сначала убедитесь, что все в системе идеально. Затем убедитесь, что никакое приложение не устанавливается и не обновляет систему; если да, то дождитесь, пока приложение завершит установку. После этого вопросы будут автоматически решены.
Если очевидной проблемы нет, но вы все еще получаете эту ошибку, проверьте процесс, использующий диспетчер пакетов, введя команду ниже:
В нашем случае обновляется Ubuntu. Во время этого процесса «dpkg» заблокирован, и я не могу выполнять другие задачи, как показано на следующем изображении.
Чтобы исправить это, просто дождитесь завершения обновления. Если это не помогает, эту проблему также можно решить, убив процесс, который удерживал «dpkg» задействованным. Во-первых, определите процесс. Во многих случаях идентификатор процесса упоминается в сообщении об ошибке, или вы можете получить список процессов, используя «apt» с помощью указанной ниже команды:
Теперь, чтобы завершить процесс, используйте:
$ sudo kill [идентификатор процесса]
Если это не решит проблему, принудительно завершите процесс с помощью сигнала SIGKILL:
$ sudo kill -9 [идентификатор процесса]
Самый простой способ – убить все процессы, занимающие «apt» и «apt-get», как указано ниже:
$ sudo killall apt apt-get
Как исправить ошибку «/var/lib/dpkg/lock-frontend»
Вы можете столкнуться с более сложной ситуацией, и проблема может заключаться в «заблокированных» файлах. Файлы блокировки ограничивают доступ к системным файлам до тех пор, пока не будет выполнена определенная операция. По завершении процесса блокировка будет автоматически снята для выполнения дальнейших операций системы. Итак, чтобы решить эту проблему, вам необходимо удалить файлы блокировки. Во-первых, проверьте файл блокировки, используя:
$ sudo lsof /var/lib/dpkg/lock-frontend
Если вы видите что-то «автоматическое» в выводе, дождитесь завершения этого процесса, потому что система работает над обновлениями.
В противном случае получите идентификаторы процессов и завершите их с помощью:
$ sudo kill -9 [ идентификатор процесса ]
После этого вы можете удалить файл блокировки:
$ sudo rm /var/lib/dpkg/lock-frontend
Убедитесь, что вы перенастроили «dpkg» после удаления файла блокировки:
$ sudo dpkg --configure -a
Чтобы убедиться, что все в порядке и ошибка исправлена, запустите:
Заключение
Различные ошибки «/var/lib/dpkg» обычно возникают, когда система запрещает пользователю выполнять операцию, потому что другие ключевые процессы используют системные файлы. В этой статье мы обсудили различные стратегии избавления от этой ошибки. Более того, мы также узнали, как удалить ошибку «/var/lib/dpkg/lock-frontend».
Ошибка возникает из-за файлов блокировки, и безопасное удаление файлов блокировки может решить эту проблему. Хотя не рекомендуется удалять файлы блокировки, чтобы избежать каких-либо проблем, убедитесь, что вы используете правильный метод для удаления файла блокировки.
Если вы нашли ошибку, пожалуйста, выделите фрагмент текста и нажмите Ctrl+Enter.
Unable to acquire the dpkg frontend lock error is the most common error that happens with Linux systems, this can be solved easily. This error is being displayed because another programme is attempting to update Ubuntu. A command or application locks the dpkg file when upgrading the system or installing new software (Debian package manager).
The error “unable to acquire the dpkg frontend lock” happened due to various reasons and can be solved by understanding the cause of the problem.
We can run the following command to check the error log and take a look at the process ID and error message.
$ sudo lsof /var/lib/dpkg/lock-frontend

frontend-lock-log
So here are a few common causes and their fixes:-
1. Unprivileged access

sudo-error
$ apt install nano

E: Could not open lock file /var/lib/dpkg/lock-frontend - open (13: Permission denied)

E: Unable to acquire the dpkg frontend lock (/var/lib/dpkg/lock-frontend), are you root?
In this case, the user doesn’t have access to run the particular command without having root access so users must use sudo to run the command before running it.
2. Broken package
dpkg: error:

his package provides frequent translation

updates.': version string has embedded spaces

E: Sub-process /usr/bin/dpkg returned an error code (2)
sometimes when we try to install the app, the app can be broken due to connection loss and various other reasons, in this case, we can run the following command to fix this:-
$ sudo dpkg --configure -a
or
$ sudo apt install -f
3. Installing an app from unlisted repositories or missing repositories

add=ppa
$ sudo apt install grub-customizer

E: Could not get lock /var/lib/dpkg/lock-frontend - open (11: Resource temporarily unavailable)

E: Unable to acquire the dpkg frontend lock (/var/lib/dpkg/lock-frontend), is another process using it?

installed
Due to a typo or unavailability of apps in the repository it happens, in this case, you have to check the app ppa repository and add to the package repository, see in this thread for more details.
4. Frontend is locked by another process
Check if any process is running and using apt/dpkg
$ ps aux | grep -i apt
this is a dpkg error and finding the process id using the log command and by killing that PID will fix the issue
$ sudo kill -9 <PID>
or
$ sudo killall program_name

kill-example
5. Delete the lock file to fix the issue
This is a brute force method and you should use it carefully, although this also fixes the issue but system can be broken if you use this without understanding the error. Often restarting system can also fix the error so you must try restart before trying this step.
$ sudo rm /var/lib/apt/lists/lock
$ sudo rm /var/cache/apt/archives/lock
$ sudo rm /var/lib/dpkg/lock

delete-lock-file
I hope this article is helpful, give a like, happy learning.