HiveOS Hive OS — официальная тема поддержки
-
Автор темы
Hiveon
-
Дата начала
25 Апр 2018
-
-
Теги
-
hive os
hiveos
-
- Статус
- Закрыто для дальнейших ответов.
-
#12.741
Добрый день! Не могу обновить риг уже достаточно давно, с g-minera 1.54, выдает при апгрейде вот такое
selfupgrade —force && sreboot (failed, exitcode=100)
Нажми на эту надпись = увидишь почему, скорее всего места мало.
-
#12.742
Нажми на эту надпись = увидишь почему, скорее всего места мало.
Нажал, так и не понял, что он от меня хочет!)
> Current version: [email protected]
dpkg: error: dpkg frontend is locked by another process
> Reinstalling broken package hive-opt-algomap
WARNING: apt does not have a stable CLI interface. Use with caution in scripts.
E: Could not get lock /var/lib/dpkg/lock-frontend — open (11: Resource temporarily unavailable)
E: Unable to acquire the dpkg frontend lock (/var/lib/dpkg/lock-frontend), is another process using it?
Hit:1 http://download.hiveos.farm/repo/binary InRelease
Hit:2 http://download2.hiveos.farm/repo/binary InRelease
Reading package lists… ——————————————————
E: Could not get lock /var/lib/dpkg/lock-frontend — open (11: Resource temporarily unavailable)
E: Unable to acquire the dpkg frontend lock (/var/lib/dpkg/lock-frontend), is another process using it? (exitcode=100)
> Checking miners packages
E: Could not get lock /var/lib/dpkg/lock-frontend — open (11: Resource temporarily unavailable)
E: Unable to acquire the dpkg frontend lock (/var/lib/dpkg/lock-frontend), is another process using it? (exitcode=100)
> Checking miners version packages
E: Could not get lock /var/lib/dpkg/lock-frontend — open (11: Resource temporarily unavailable)
E: Unable to acquire the dpkg frontend lock (/var/lib/dpkg/lock-frontend), is another process using it? (exitcode=100)
-
#12.743
Нажал, так и не понял, что он от меня хочет!)
> Current version: [email protected]
dpkg: error: dpkg frontend is locked by another process
> Reinstalling broken package hive-opt-algomap
WARNING: apt does not have a stable CLI interface. Use with caution in scripts.
E: Could not get lock /var/lib/dpkg/lock-frontend — open (11: Resource temporarily unavailable)
E: Unable to acquire the dpkg frontend lock (/var/lib/dpkg/lock-frontend), is another process using it?
Hit:1 http://download.hiveos.farm/repo/binary InRelease
Hit:2 http://download2.hiveos.farm/repo/binary InRelease
Reading package lists… ——————————————————
E: Could not get lock /var/lib/dpkg/lock-frontend — open (11: Resource temporarily unavailable)
E: Unable to acquire the dpkg frontend lock (/var/lib/dpkg/lock-frontend), is another process using it? (exitcode=100)
> Checking miners packages
E: Could not get lock /var/lib/dpkg/lock-frontend — open (11: Resource temporarily unavailable)
E: Unable to acquire the dpkg frontend lock (/var/lib/dpkg/lock-frontend), is another process using it? (exitcode=100)
> Checking miners version packages
E: Could not get lock /var/lib/dpkg/lock-frontend — open (11: Resource temporarily unavailable)
E: Unable to acquire the dpkg frontend lock (/var/lib/dpkg/lock-frontend), is another process using it? (exitcode=100)
Система на флэшке?
-
#12.744
Да на флэшке. После 100-го раза каким то образом обновился хайв, но майнер теперь не устанавливается!!!
>Error installing hive-miners-gminer-2.59
Reading package lists…
E: Problem parsing dependency 21
E: Error occurred while processing libcompojure-clojure (NewVersion2)
E: Problem with MergeList /var/lib/apt/lists/archive.ubuntu.com_ubuntu_dists_bionic_universe_binary-amd64_Packages
E: The package lists or status file could not be parsed or opened.
-
#12.745
Возьми другую флэшку и залей новый образ.
-
#12.746
Возьми другую флэшку и залей новый образ.
Ну у меня нет другой флешки.. Как-то можно же вручную попробовать установить майнер?
-
#12.747
Ну у меня нет другой флешки.. Как-то можно же вручную попробовать установить майнер?
500р в любом переходе. лень матушка купи ссд уже денг хочу нечего делать не хочу
-
#12.748
Ну у меня нет другой флешки.. Как-то можно же вручную попробовать установить майнер?
Через консоль сделай: hive-repleace -y —stable И посмотри что будет. Если не сможет перезалить образ — точно плохая флэшка.
-
#12.749
500р в любом переходе. лень матушка купи ссд уже денг хочу нечего делать не хочу
При чём тут лень матушка то? Флэшку купил пару недель назад, лежит ссд с записаной виндой (т.к. иногда нужна) лишь бы написать что-нибудь!
Через консоль сделай: hive-repleace -y —stable И посмотри что будет. Если не сможет перезалить образ — точно плохая флэшка.
Ок, попробую, спс
-
#12.750
Флэшку купил пару недель назад
а две не мог купить?
(смартбай, небось…)
-
#12.751
если уж ты так не хочешь отказываться от флэшки то бери самы старый дешман USB 2.0 . Не 3.0 !!! а 2.0
Но мой тебе совет, сделай так.Инфа с форума хайва.
- Убедиться, что диск размечен в GPT. Если нет, то конвертировать его виндовой утилитой mbr2gpt. Самый простой способ сделать это — с установочной флешки Windows 10.
- Записать Hive OS на флешку (лучше Etcher, через Rufus у меня часто криво работает)
- В Paragon Partition Manager 15 отщипнуть от диска C: 7 ГБ (оноже парагон диск манагер) и я 6 гигов кусал, там места хватит. можно даже 4 =))
- В этой же программе поочередно скопировать все разделы флешки в неразмеченные 7 ГБ SSD. (вкладка вверху “Копирование и миграция”->“Копирование раздела”)
- PROFIT. Теперь можно загружать Hive OS с SSD. Для этого в биосе надо поставить загрузку с UEFI: название вашего SSD (вместо Windows Boot Manager), флешку можно вынуть.
- Из Hive OS обновляем grub, чтобы добавить в него Windows Boot Manager. В терминале пишем: update-grub — В моем случае я пару раз с флэхи грузился и груб уже поправлен был.
Вот то, что тебе поможет ^^^
лежит ссд с записаной виндой
-
#12.752
[email protected]
МАЙНЕРЫ
⛏ T-Rex v0.21.0 (добавлена поддержка алгоритма autolykos2 для майнинга ERGO, комиссия разработчика 2%; исправлено отображения общего потребления в случае если одна из карта не сообщала его)
 lolMiner: исправлена генерация конфигурации для алгоритма autolykos2
Последнее редактирование: 5 Июл 2021
-
#12.753
lolMiner: исправлена генерация конфигурации для алгоритма autolykos2
увы, не работает…. подождём.))
-
#12.754
[email protected]
МАЙНЕРЫ
⛏ T-Rex v0.21.0 (добавлена поддержка алгоритма autolykos2 для майнинга ERGO, комиссия разработчика 2%; исправлено отображения общего потребления в случае если одна из карта не сообщала его)
lolMiner: исправлена генерация конфигурации для алгоритма autolykos2
что-то поломали в тирексе, на 1080 картах больше не работает майнер:
t-rex exited (exitcode=127), waiting to cooldown a bit
Skipping miner log rotation due to execution time < 30sec
/hive/miners/t-rex/h-run.sh: line 18: t-rex: command not found
-
#12.755
увы, не работает…. подождём.))
Пора менять аватарку, отпусти Меньшова с миром, он вчера нас покинул.
-
#12.756
Пора менять аватарку, отпусти Меньшова с миром, он вчера нас покинул.
он жив, пока о нём помнят.
как и все мы.
-
#12.757
fixpstate
fixclk
Как в Hive OS прописать (установить) эти параметры?
-
#12.758
Привет! столкнувшись с такой проблемой, no log for miner #1. Проблема начась на ровном месте, до этого все работало. Подскажите пожалайста как исправить.
-
#12.759
что-то поломали в тирексе, на 1080 картах больше не работает майнер:
с новой обновой работает, довольно оперативно исправили, жаль что приходится сталкиваться с этим не на бета версии
-
#12.760
fixpstate
fixclkКак в Hive OS прописать (установить) эти параметры?
Присоединяюсь к вопросу, можно ли отключить на данный момент режим Р2 в Hive OS ?
- Статус
- Закрыто для дальнейших ответов.
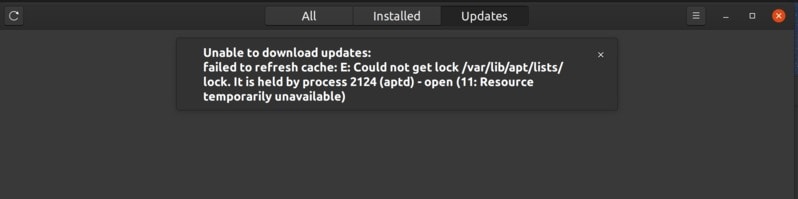
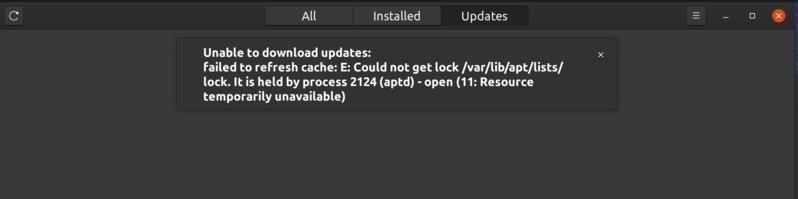
Recently I was trying to install an application using the apt command on Ubuntu when I encountered the following error:
E: Could not get lock /var/lib/dpkg/lock – open (11: Resource temporarily unavailable)
E: Unable to lock the administration directory (/var/lib/dpkg/), is another process using it?
In fact, there is a similar error you may see:
E: Could not get lock /var/lib/apt/lists/lock – open (11: Resource temporarily unavailable)
E: Unable to lock directory /var/lib/apt/lists/
E: Could not get lock /var/lib/dpkg/lock – open (11: Resource temporarily unavailable)
E: Unable to lock the administration directory (/var/lib/dpkg/), is another process using it?
In some cases, you might see it while using the Software Center:
These errors are very similar to another common Ubuntu error, Unable to lock directory /var/cache/apt/archives/, and the interesting thing is that the fixes are similar as well.
Fixing “Unable to lock the administration directory (/var/lib/dpkg/)” error
You see this error because some other program is trying to update Ubuntu. When a command or application is updating the system or installing a new software, it locks the dpkg file (Debian package manager).
This locking is done so that two processes don’t change the content at the same time as it may lead to unwarranted situation and a possible broken system.
Let’s see what steps can you take to fix this issue of ‘unable to lock administration directory’.
Method 0:
The first thing you should do is to check if some other program could be running system update or installing a program.
If you are using command line, check if an application like Software Center, Software Updater, Synaptic package manager, Gdebi is running any update/installation. If that’s the case, please wait for the program to finish the running process.
If there is no such application running, please check all the open terminal windows and see if you are running an update or installing a program. If yes, wait for it to finish.
If none of the above is happening, check which other process is running the apt command (package manager for handling software). Use this command:
ps aux | grep -i aptFor me, it showed this output:
[email protected]:~$ ps aux | grep -i apt
root      1464  0.0  0.0   4624   772 ?        Ss   19:08   0:00 /bin/sh /usr/lib/apt/apt.systemd.daily update
root      1484  0.0  0.0   4624  1676 ?        S    19:08   0:00 /bin/sh /usr/lib/apt/apt.systemd.daily lock_is_held update
_apt      2836  0.8  0.1  96912  9432 ?        S    19:09   0:03 /usr/lib/apt/methods/http
abhishek  6172  0.0  0.0  21532  1152 pts/1    S+   19:16   0:00 grep --color=auto -i apt
If you see that apt is being used by a program like apt.systemd.daily update, you are in luck, my dear reader.
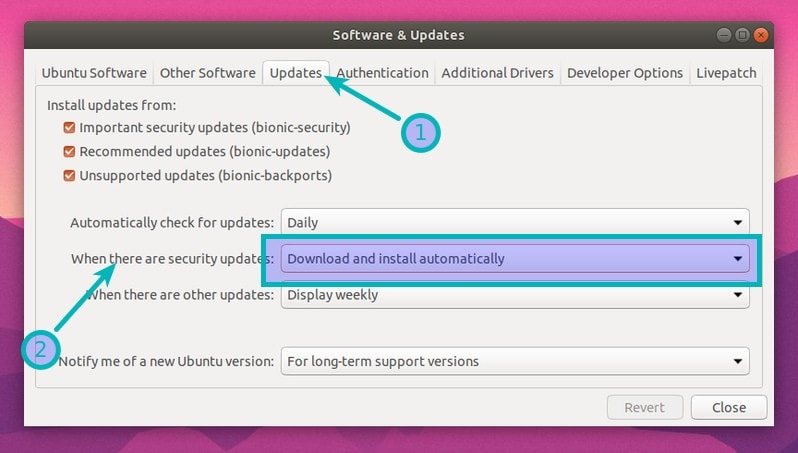
This is a daemon that runs in the background and check for system updates automatically when you start your system.
In Ubuntu 18.04 and higher versions, it may even try to download and install the important security updates on its own. At least this is what I see in the default settings in Software & Updates tool on the Ubuntu desktop.
If you are on Ubuntu server, you may check whether you have unattended upgrades enabled by checking the content of the file /etc/apt/apt.conf.d/20auto-upgrades.
So if you see apt.systemd.daily is using the apt process, all you have to do is to wait for a few minutes. When the automatic update finishes, you should be able to install your software as usual.
As a permanent solution, you may disable the check for automatic update and unattended upgrades altogether however I won’t advise that for security reasons.
Now, that was the simple scenario and it could be handled easily. But that might not always be the case. If some other program is using apt, you need to handle it differently.
Method 1:
Use the Linux command line to find and kill the running process. To do that, use the command below:
ps aux | grep -i aptThis will show you the id of the process running apt or apt-get. In the example below, the process id is 7343. You can ignore the last line containing ‘grep –color=auto’.

You can use the process id to terminate it by sending the SIGTERM signal. Replace the <process_id> with the number you got in the output of previous command.
sudo kill <process_id>Check if the process was killed by running the ‘ps aux | grep -i apt’ command. If it is still running, force kill it with SIGKILL signal:
sudo kill -9 <process_id>Another easier way would be to use the killall command. This will kill all the instances of a running program:
sudo killall apt apt-getMethod 2
The above method would fix the problem for you in most cases. But my case was a bit different. I was updating my system and accidentally closed the terminal. For that reason, there were no processes running apt, but it still showed me the error.
🚧
I would advise trying the above two methods or simply restarting your system first. If none of that works, then only you go for this option of removing the lock files.
In this case, the root cause is the lock file. As mentioned earlier, the lock files are used to prevent two or more processes from using the same data. When apt or apt-get commands are run, they create lock files in a few places. If the previous apt command was not terminated properly, the lock files are not deleted and hence they prevent any new instances of apt-get or apt commands.
To fix the problem, all you need to do is to remove the lock files. But before you do that, it would be a good idea to stop any process that is using the lock files.
Use the lsof command to get the process ID of the process holding the lock files. Check the error and see what lock files it is complaining about and get the id of the processes holding these lock files.
Run these commands one by one.
sudo lsof /var/lib/dpkg/lock
sudo lsof /var/lib/apt/lists/lock
sudo lsof /var/cache/apt/archives/lock
It’s possible that the commands don’t return anything, or return just one number. If they do return at least one number, use the number(s) and kill the processes like this (replace the <process_id> with the numbers you got from the above commands):
sudo kill -9 <process_id>You can now safely remove the lock files using the commands below:
sudo rm /var/lib/apt/lists/lock
sudo rm /var/cache/apt/archives/lock
sudo rm /var/lib/dpkg/lock
After that, reconfigure the packages:
sudo dpkg --configure -aNow if you run the sudo apt update command, everything should be fine.
Troubleshooting 1: “Unable to acquire the dpkg frontend lock”
If you see an error like this:
[email protected]:~$ sudo apt install grub-customizer
E: Could not get lock /var/lib/dpkg/lock-frontend - open (11: Resource temporarily unavailable)
E: Unable to acquire the dpkg frontend lock (/var/lib/dpkg/lock-frontend), is another process using it?
You should find out which process is holding the lock-frontend using the lsof command as discussed in previous sections:
sudo lsof /var/lib/dpkg/lock-frontendThis is what it showed for me:
[email protected]:~$ sudo lsof /var/lib/dpkg/lock-frontend
lsof: WARNING: can't stat() fuse.gvfsd-fuse file system /run/user/1000/gvfs
      Output information may be incomplete.
COMMAND    PID USER   FD   TYPE DEVICE SIZE/OFF   NODE NAME
unattende 2823 root    5uW  REG    8,2        0 145221 /var/lib/dpkg/lock-frontend
If you see ‘unattende‘ COMMAND column, this means unattended security upgrades are running. You should wait for the process to finish. Basically, this is what I discussed in method 0 but you probably skipped that.
If the COMMAND is something else, you may kill the process and then remove the lock file. You can see the process id under the PID column. Use this PID to kill the process. After that, remove the lock file and run the update command to see if it’s been fixed.
sudo kill -9 PID
sudo rm /var/lib/dpkg/lock-frontend
sudo apt update
What’s that lsof: warning can’t stat() fuse.gvfsd-fuse file system?
Note: If you see “lsof: warning can’t stat() fuse.gvfsd-fuse file system /run/user/1000/gvfs
Output information may be incomplete” lines after running the earlier mentioned lsof command, don’t panic.
That’s not an error. It’s just that lsof tries to look into mounted file systems as well and the warning is about those mounted systems.
The files are locked by the processes on your main filesystem so if it shows some warning and no output, this only means that there is no process using those lock files.
Troubleshooting 2: “dpkg: error: dpkg frontend is locked by another process”
If you see the error “dpkg frontend is locked by another process” while running the steps in method 2, you need to one additional step.
First, find out the id of the process that is holding the lock file.
sudo lsof /var/lib/dpkg/lock-frontendThe above command will give you the details of the processes using the lock files. Use the process ID to kill this program:
sudo kill -9 PIDNow you can remove the lock and reconfigure dpkg:
sudo rm /var/lib/dpkg/lock-frontend
sudo dpkg --configure -a
Did it work for you? Which method fixed it for you?

I hope this small tip helped you fix the “Could not get lock /var/lib/dpkg/lock” error. If yes, please let me know which method worked for you in the comments.
If you are still facing issues, let me know. I’ll try to help you out.
Any other suggestions are also welcome in the comments.
In this article we are going to learn ‘Fix dpkg: error: dpkg frontend lock is locked by another process’. Whenever we are installing software, an error occurs with ‘dpkg: error: dpkg frontend lock is locked by another process’. dpkg is a free operating system software at the bottom of the package management system in Debian and its numerous derivatives. dpkg is used to install, remove, and supply information about .deb packages.
The dpkg (Debian package) itself is a low-level tool. APT (Advanced Package Tool), a high-level tool, is more commonly used than dpkg because it can bring packages to remote locations and deal with complex package relationships such as dependency fixes. Frontends like Aptitude (NCRS) and Synaptic (GTK +) are used for their friendly interface for APT.
The Debian package “dpkg” provides the dpkg program, as well as many other programs required for the run-time operation of the packaging system, including DPKG-DEB, DPKG-Split, DPKG-Query, DPKG-Statoveride, DPKG-Diverse, and DPKG. Trigger.
This includes programs like Update-Option and Start-Stop-Demon. The install-info was used to include the program as well but was later removed because it has now been developed and distributed separately. The Debian package “DPKG-Dev” contains the numerous build tools described below.
Follow the below steps to Fix DPKG: Error: DPKG Frontend Lock is Locked By Another Process
If you find the “dpkg: error: dpkg frontend lock is locked by another process” error while running the procedure described above, you need to do an extra step. First, find the ID of the process that contains the lock file. You can do so using below command.
[email protected]:~$ lsof /var/lib/dpkg/lock
Then make sure the process is not running.
[email protected]:~$ ps cax | grep PID
PID TTY STAT TIME COMMAND
The above command will give you the process PID using lock files. Use this PID to kill the process.
[email protected]:~$ kill PID
bash: kill: PID: arguments must be process or job IDs

[email protected]:~$ kill -9 PID
bash: kill: PID: arguments must be process or job IDs
Also Read – A Guide to Kill, Pkill and Killall Commands to Stop the Process in Linux(Kill Process Linux)
That’s all, In this article, we have explained the Fix dpkg: error: dpkg frontend lock is locked by another process. I hope you enjoy this article. If you like this article, then just share it. If you have any questions about this article, please comment.

ITSmarttricks Team
This is Mangesh Dhulap the Founder and Editor of IT SMART TRICKS have 6+ years of Industrial Experience. We expect from our visitors to like, share, and comment on our posts.
Недавно, устанавливая приложение с помощью команды apt в Ubuntu, я столкнулся со следующей ошибкой:
E: Could not get lock /var/lib/dpkg/lock – open (11: Resource
temporarily unavailable)
E: Unable to lock the administration directory (/var/lib/dpkg/), is another
process using it?
Если вы столкнётесь с какой-то из перечисленных ниже ошибок, знайте, фактически у вас та же ошибка, что и у меня:
E: Could not get lock /var/lib/apt/lists/lock – open (11: Resource
temporarily unavailable)
E: Unable to lock directory /var/lib/apt/lists/
E: Could not get lock /var/lib/dpkg/lock – open (11: Resource temporarily
unavailable)
E: Unable to lock the administration directory (/var/lib/dpkg/), is another
process using it?
В некоторых случаях подобные ошибки возникают при использовании Центра программного обеспечения.
И в целом, они напоминают еще одну распространенную ошибку:
Unable to lock directory/var/cache/apt/archives/ и, как говорится «подобное лечится подобно», а похожие ошибки и фиксятся похоже.
Как исправить ошибку «Unable to lock the administration directory (/var/lib/dpkg/)»
Вы видите эту ошибку, потому что какая-то другая программа обновляет Ubuntu прямо сейчас. Когда команда или приложение обновляют систему или устанавливают новое программное обеспечение, они блокируют файл dpkg (менеджер пакетов Debian).
Эта блокировка выполняется для того, чтобы два процесса не изменяли содержимое файла dpkgодновременно, так как это может привести к неоправданному риску поломки всей системы.
Давайте посмотрим, что мы можем сделать, чтобы решить проблему «unable to lock the administrator directory».
Метод 0:
Первое, что следует сделать, это проверить, может ли какая-то другая программа запускать обновление системы или устанавливать программу.
Если вы используете командную строку, проверьте, не запускает ли одно из следующих приложений: Software Center, Software Updater, менеджер пакетов Synaptic или Gdebi, какое-нибудь обновление / установку. В случае положительного ответа – просто подождите, пока программа завершит выполнение.
Если ни одно из этих приложений не запущено, проверьте все открытые окна терминала и посмотрите, не запустили ли вы самостоятельно какие-либо обновление или установки. Если да, дождитесь завершения этих процессов. (Совет странный, но помните, что все мы бываем невнимательны))
Если ничего из вышеперечисленного не происходит, проверьте, какой еще процесс выполняет команду apt (менеджер пакетов для работы с программным обеспечением). Используйте эту команду:
ps aux | grep -i apt
В моем случае команда вернула такой результат:
abhishek@nuc:~$ ps aux | grep -i apt
root 1464 0.0 0.0 4624 772 ? Ss 19:08 0:00
/bin/sh /usr/lib/apt/apt.systemd.daily update
root 1484 0.0 0.0 4624 1676 ? S 19:08 0:00
/bin/sh /usr/lib/apt/apt.systemd.daily lock_is_held update
_apt 2836 0.8 0.1 96912 9432 ? S 19:09 0:03
/usr/lib/apt/methods/http
abhishek 6172 0.0 0.0 21532 1152 pts/1 S+ 19:16 0:00
grep --color=auto -i apt

Если вы, как и я, видите, что apt используется такой программой, как apt.systemd.daily update, вам повезло, мой дорогой читатель.
Это «демон», который работает в фоновом режиме и автоматически проверяет наличие обновлений системы при запуске системы.
В Ubuntu 18.04 и более поздних версиях он может даже попытаться загрузить и установить важные обновления безопасности самостоятельно. По крайней мере, такие опции я увидел в дефолтных настройках в инструменте «Программное обеспечение и обновления» на рабочем столе Ubuntu.

Если вы находитесь на сервере Ubuntu, вы можете проверить, включены ли у вас автоматические обновления, проверив содержимое файла /etc/apt/apt.conf.d/20auto-upgrades.
Итак, если вы выяснили, что apt.systemd.daily использует процесс apt, все, что вам нужно сделать, это подождать несколько минут. Когда автоматическое обновление завершится, вы сможете установить свое программное обеспечение как обычно.
В качестве постоянного решения вы можете полностью отключить как автоматическую проверку наличия обновлений, так и сами автообновления, однако я бы не советовал, из соображений безопасности.
Это был самый простой и легко побеждаемый сценарий. К сожалению, он не единственный возможный. Если apt использует какая-то другая программа, то и решение будет другим.
Метод 1:
Используйте командную строку Linux, чтобы найти и остановить запущенный процесс. Для этого используйте команду ниже:
ps aux | grep -i apt
Эта команда покажет вам идентификатор процесса, выполняющего apt или apt-get. В приведенном ниже примере идентификатор процесса — 7343. Не обращайте внимания на последнюю строку, содержащую «grep –color = auto».

Вы можете использовать идентификатор процесса, чтобы завершить его, отправив команду SIGTERM. Замените <process_id> числом, которое вы получили в выводе предыдущей команды.
sudo kill < process_id >
Проверьте, был ли процесс остановлен, запустив команду «ps aux | grep -i apt» еще раз. Если он все еще работает, принудительно уничтожьте его сигналом SIGKILL:
sudo kill -9 < process_id >
Другой, более простой способ — использовать команду killall, она убьет все экземпляры запущенной программы:
sudo killall apt apt-get
Метод 2:
Вышеупомянутый метод решит проблему в большинстве случаев. Но мой случай, по закону подлости, был немного другим. Я обновлял свою систему и случайно закрыл терминал. По этой причине не было процессов, использующих apt, но система все равно выдавала мне ошибку.
В таком случае основной причиной является файл блокировки. Как упоминалось ранее, файлы блокировки необходимы для предотвращения использования одних и тех же данных двумя или более процессами. Когда выполняются команды apt или apt-get, они создают файлы блокировки в нескольких местах. Если предыдущая команда apt не была завершена должным образом, файлы блокировки не удаляются и, следовательно, они будут блокировать любые новые вызовы команд apt-get или apt.
Чтобы решить эту проблему, все, что вам нужно сделать, это удалить файлы блокировки. Но, прежде чем вы это сделаете, было бы неплохо остановить любой процесс, использующий файлы блокировки.
Используйте команду lsof, чтобы получить идентификатор процесса, использующего файлы блокировки. Проверьте ошибку и посмотрите, на какие файлы блокировки она жалуется, и получите идентификатор процессов, содержащих эти файлы блокировки.
Последовательно запустите эти команды:
sudo lsof /var/lib/dpkg/lock
sudo lsof /var/lib/apt/lists/lock
sudo lsof /var/cache/apt/archives/lock
Возможно, команды ничего не будут возвращают или вернут только одно число. Но, если они возвращают хотя бы одно число, используйте его, чтобы завершить такие процессы (замените <process_id> числами, полученными из приведенных выше команд):
sudo kill -9 < process_id >
Теперь вы можете безопасно удалить файлы блокировки, используя следующие команды:
sudo rm /var/lib/apt/lists/lock
sudo rm /var/cache/apt/archives/lock
sudo rm /var/lib/dpkg/lock
После этого переконфигурируйте пакеты:
sudo dpkg --configure -a
Теперь, если вы запустите команду sudo apt update, все должно работать как надо.
Устранение неполадки: «Unable to acquire the dpkg frontend lock»
Если вы видите такую ошибку:
abhishek@nuc:~$ sudo apt install grub-customizer
E: Could not get lock /var/lib/dpkg/lock-frontend - open (11: Resource
temporarily unavailable)
E: Unable to acquire the dpkg frontend lock (/var/lib/dpkg/lock-frontend),
is another process using it?
Вы должны выяснить, какой процесс удерживает интерфейс блокировки, используя команду lsof, как обсуждалось в предыдущих разделах:
sudo lsof /var/lib/dpkg/lock-frontend
В моем случае команда вернула:
abhishek@nuc:~$ sudo lsof /var/lib/dpkg/lock-frontend
lsof: WARNING: can't stat() fuse.gvfsd-fuse file system
/run/user/1000/gvfs
          Output information may be incomplete.
COMMAND   PID  USER FD  TYPE DEVICE  SIZE/OFF NODE NAME
unattende 2823 root 5uW REG  8,2 0   145221
/var/lib/dpkg/lock-frontend
Если вы видите значение «unattende» в столбце COMMAND, это значит, что выполняются автоматические обновления безопасности. Вам следует дождаться завершения процессов. По сути, это то, что я описывал в методе 0, но вы могли его пропустить.
Если значение COMMAND какое-то другое, вы можете убить процесс, а затем удалить файл блокировки. Идентификатор процесса вы найдете в столбце PID. Используйте этот PID, чтобы убить процесс. После этого удалите файл блокировки и запустите команду обновления, чтобы проверить, исправили ли вы проблему.
sudo kill -9 PID
sudo rm /var/lib/dpkg/lock-frontend
sudo apt update
Устранение неполадки: «dpkg: error: dpkg frontend is locked by another process»
Если вы встретите ошибку «интерфейс dpkg заблокирован другим процессом» в процессе пошагового выполнения метода 2, вам понадобится выполнить еще одно действие.
Во-первых, узнайте идентификатор процесса, хранящего файл блокировки.
sudo lsof /var/lib/dpkg/lock-frontend
Эта команда предоставит вам подробную информацию о процессах и программах, использующих файлы блокировки. Используйте идентификатор процесса, чтобы убить эту программу:
sudo kill -9 PID
Теперь вы можете снять блокировку и перенастроить dpkg:
sudo rm /var/lib/dpkg/lock-frontend
sudo dpkg --configure -a
Помогла ли вам статья? Какой из методов помог в вашем случае?
Надеюсь, этот небольшой пост помог вам исправить ошибки типа «Не удалось получить lock / var / lib / dpkg / lock». Если да – обязательно поделитесь в комментах, какой метод помог именно вам.
Если ни один из перечисленных способов так и не помог вам справиться с проблемой, опять же – дайте знать. Я постараюсь вам помочь.
Любые другие предложения также приветствуются в комментариях.
Unable to acquire the dpkg frontend lock error is the most common error that happens with Linux systems, this can be solved easily. This error is being displayed because another programme is attempting to update Ubuntu. A command or application locks the dpkg file when upgrading the system or installing new software (Debian package manager).
The error “unable to acquire the dpkg frontend lock” happened due to various reasons and can be solved by understanding the cause of the problem.
We can run the following command to check the error log and take a look at the process ID and error message.
$ sudo lsof /var/lib/dpkg/lock-frontend

frontend-lock-log
So here are a few common causes and their fixes:-
1. Unprivileged access

sudo-error
$ apt install nano

E: Could not open lock file /var/lib/dpkg/lock-frontend - open (13: Permission denied)

E: Unable to acquire the dpkg frontend lock (/var/lib/dpkg/lock-frontend), are you root?
In this case, the user doesn’t have access to run the particular command without having root access so users must use sudo to run the command before running it.
2. Broken package
dpkg: error:

his package provides frequent translation

updates.': version string has embedded spaces

E: Sub-process /usr/bin/dpkg returned an error code (2)
sometimes when we try to install the app, the app can be broken due to connection loss and various other reasons, in this case, we can run the following command to fix this:-
$ sudo dpkg --configure -a
or
$ sudo apt install -f
3. Installing an app from unlisted repositories or missing repositories

add=ppa
$ sudo apt install grub-customizer

E: Could not get lock /var/lib/dpkg/lock-frontend - open (11: Resource temporarily unavailable)

E: Unable to acquire the dpkg frontend lock (/var/lib/dpkg/lock-frontend), is another process using it?

installed
Due to a typo or unavailability of apps in the repository it happens, in this case, you have to check the app ppa repository and add to the package repository, see in this thread for more details.
4. Frontend is locked by another process
Check if any process is running and using apt/dpkg
$ ps aux | grep -i apt
this is a dpkg error and finding the process id using the log command and by killing that PID will fix the issue
$ sudo kill -9 <PID>
or
$ sudo killall program_name

kill-example
5. Delete the lock file to fix the issue
This is a brute force method and you should use it carefully, although this also fixes the issue but system can be broken if you use this without understanding the error. Often restarting system can also fix the error so you must try restart before trying this step.
$ sudo rm /var/lib/apt/lists/lock
$ sudo rm /var/cache/apt/archives/lock
$ sudo rm /var/lib/dpkg/lock

delete-lock-file
I hope this article is helpful, give a like, happy learning.
Basically, I upgrade the software in the Ubuntu operating system after I am trying another software to update.
While I am entering Sudo apt-get update command getting below error in the terminal:
Error:
Unable to acquire the dpkg frontend lock in the terminal, here is the full error :
sreekanth@sreekanth-Inspiron-5537:~$ sudo apt-get install python3.7
E: Could not get lock /var/lib/dpkg/lock-frontend - open (11: Resource temporarily unavailable)
E: Unable to acquire the dpkg frontend lock (/var/lib/dpkg/lock-frontend), is another process using it?
I tried to install python latest version using apt-get command, at the I am getting error like below snapshot.

Solution1:
Step 1: You can delete the lock file using below command:
sudo rm /var/lib/apt/lists/lock
sudo rm /var/cache/apt/archives/lock
sudo rm /var/lib/dpkg/lock
Like the below screenshot. I executed the below commands.

Then try to use apt-get command, if it is working fine then ok. Otherwise getting the same error then proceed with another solution. We will provide a simple solution for this type of issue [Solution 2].
Solution 2:
Here we will kill the process number then try to install the software simply.
Step 1: Getting process id from the terminal using below command:
pgrep -a apt
![]()
Step 2: Using kill command then kill that process id.
sudo kill -9 10799
After killed the upgrade process id then it’s working for me.

In Linux/Ubuntu operating system some of the users using Sudo apt-get command for installation, upgrading the software. At the time, we are facing the same error in the terminal. This type of error only forcefully stop the process while installing, upgrading the software, unfortunately, closed the machine while updating anything. At the time “unable to lock the administrator directory is another process already using it.” So here we will provide different types of solutions for this type of errors. The above solutions are enough for this type of error in the Linux/Ubuntu.