
A Server is used for playing with multiple people in the same world. Servers can be hosted by yourself, as well as by a server hosting company.
How to host a server[]
Serverconfig.xml[]
This is a table for the serverconfig.xml file that comes with 7 Days to Die as of A20.6.
Only change the data in the «value=» part of the file, otherwise, it will not work.
| Option | Default Value | Description |
|---|---|---|
| Server representation | GENERAL SERVER SETTINGS | |
| ServerName | My Game Host | Whatever you want the name of the server to be. |
| ServerDescription | A 7 Days to Die server | Whatever you want the server description to be, will be shown in the server browser. |
| ServerWebsiteURL | Website URL for the server, will be shown in the serverbrowser as a clickable link | |
| ServerPassword | Password to gain entry to the server | |
| ServerLoginConfirmationText | If set the user will see the message during joining the server and has to confirm it before continuing. For more complex changes to this window you can change the «serverjoinrulesdialog» window in XUi | |
| Region | NorthAmericaEast | The region this server is in. Values: NorthAmericaEast, NorthAmericaWest, CentralAmerica, SouthAmerica, Europe, Russia, Asia, MiddleEast, Africa, Oceania |
| Language | English | Primary language for players on this server. Values: Use any language name that you would users expect to search for. Should be the English name of the language, e.g. not «Deutsch» but «German» |
| Networking | ||
| ServerPort | 26900 | Port you want the server to listen on. Keep it in the ranges 26900 to 26905 or 27015 to 27020 if you want PCs on the same LAN to find it as a LAN server. |
| ServerVisibility | 2 | Visibility of this server: 2 = public, 1 = only shown to friends, 0 = not listed. As you are never friend of a dedicated server setting this to «1» will only work when the first player connects manually by IP. |
| ServerDisabledNetworkProtocols | SteamNetworking | Networking protocols that should not be used. Separated by comma. Possible values: LiteNetLib, SteamNetworking. Dedicated servers should disable SteamNetworking if there is no NAT router in between your users and the server or when port-forwarding is set up correctly. |
| ServerMaxWorldTransferSpeedKiBs | 512 | Maximum (!) speed in kiB/s the world is transferred at to a client on first connect if it does not have the world yet. Maximum is about 1300 kiB/s, even if you set a higher value. |
| Slots | ||
| ServerMaxPlayerCount | 8 | Maximum Concurrent Players (8 is the maximum supported player count. Anything over 30 will cause corrupted save data.) |
| ServerReservedSlots | 0 | Out of the MaxPlayerCount this many slots can only be used by players with a specific permission level. |
| ServerReservedSlotsPermission | 100 | Required permission level to use reserved slots above |
| ServerAdminSlots | 0 | This many admins can still join even if the server has reached MaxPlayerCount |
| ServerAdminSlotsPermission | 0 | Required permission level to use the admin slots above |
| Admin interfaces | ||
| ControlPanelEnabled | false | Enable/Disable the web control panel |
| ControlPanelPort | 8080 | Port of the control panel webpage |
| ControlPanelPassword | CHANGEME | Password to gain entry to the control panel |
| TelnetEnabled | true | Enable/Disable the telnet |
| TelnetPort | 8081 | Port of the telnet server |
| TelnetPassword | Password to gain entry to telnet interface. If no password is set the server will only listen on the local loopback interface | |
| TelnetFailedLoginLimit | 10 | After this many wrong passwords from a single remote client the client will be blocked from connecting to the Telnet interface |
| TelnetFailedLoginsBlocktime | 10 | How long will the block persist (in seconds) |
| TerminalWindowEnabled | true | Show a terminal window for log output / command input (Windows only) |
| Folder and file locations | ||
| AdminFileName | serveradmin.xml | Server admin file name. Path relative to the SaveGameFolder |
| UserDataFolder | absolute path | Use this to override where the server stores all generated data, including RWG generated worlds. Do not forget to uncomment the entry! |
| SaveGameFolder | absolute path | Use this to only override the save game path. Do not forget to uncomment the entry! |
| Other technical settings | ||
| EACEnabled | true | Enables/Disables EasyAntiCheat |
| HideCommandExecutionLog | 0 | Hide logging of command execution. 0 = show everything, 1 = hide only from Telnet/ControlPanel, 2 = also hide from remote game clients, 3 = hide everything |
| MaxUncoveredMapChunksPerPlayer | 131072 | Override how many chunks can be uncovered on the ingame map by each player. Resulting max map file size limit per player is (x * 512 Bytes), uncovered area is (x * 256 m²). Default 131072 means max 32 km² can be uncovered at any time. Setting this too large will corrupt player data. |
| PersistentPlayerProfiles | false | If disabled a player can join with any selected profile. If true they will join with the last profile they joined with |
| World | GAMEPLAY | |
| GameWorld | Navezgane | «RWG» (see WorldGenSeed and WorldGenSize options below) or any already existing world name in the Worlds folder (currently shipping with e.g. «Navezgane», «PREGEN01», …) |
| WorldGenSeed | asdf | If RWG this is the seed for the generation of the new world. If a world with the resulting name already exists it will simply load it |
| WorldGenSize | 6144 | If RWG this controls the width and height of the created world. It is also used in combination with WorldGenSeed to create the internal RWG seed thus also creating a unique map name even if using the same WorldGenSeed. Has to be a multiple of 2048 between 2048 and 16384, though large map sizes will take long to generate / download / load |
| GameName | My Game | Whatever you want the game name to be. This affects the save game name as well as the seed used when placing decoration (trees etc) in the world. It does not control the generic layout of the world if creating an RWG world |
| GameMode | GameModeSurvival | GameModeSurvival (This is a depreciated option, but it still remains in the config.) |
| Difficulty | ||
| GameDifficulty | 2 | 0 — 5, 0=easiest, 5=hardest |
| BlockDamagePlayer | 100 | How much damage do players to blocks (percentage in whole numbers) |
| BlockDamageAI | 100 | How much damage do AIs to blocks (percentage in whole numbers) |
| BlockDamageAIBM | 100 | How much damage do AIs during blood moons to blocks (percentage in whole numbers) |
| XPMultiplier | 250 | XP gain multiplier (percentage in whole numbers) |
| PlayerSafeZoneLevel | 5 | If a player is less or equal this level he will create a safe zone (no enemies) when spawned |
| PlayerSafeZoneHours | 5 | Hours in world time this safe zone exists |
| BuildCreate | false | cheat mode on/off |
| DayNightLength | 60 | real time minutes per in game day: 60 minutes |
| DayLightLength | 18 | in game hours the sun shines per day: 18 hours day light per in game day |
| DropOnDeath | 0 | 0 = nothing, 1 = everything, 2 = toolbelt only, 3 = backpack only, 4 = delete all |
| DropOnQuit | 0 | 0 = nothing, 1 = everything, 2 = toolbelt only, 3 = backpack only |
| BedrollDeadZoneSize | 15 | Size (box «radius», so a box with 2 times the given value for each side’s length) of bedroll deadzone, no zombies will spawn inside this area, and any cleared sleeper volumes that touch a bedroll deadzone will not spawn after they’ve been cleared. |
| BedrollExpiryTime | 45 | Number of days a bedroll stays active after owner was last online |
| Performance related | ||
| MaxSpawnedZombies | 64 | This setting covers the entire map. There can only be this many zombies on the entire map at one time. Changing this setting has a huge impact on performance. Anything over 90 will tank performance. |
| MaxSpawnedAnimals | 50 | If your server has a large number of players you can increase this limit to add more wildlife. Animals don’t consume as much CPU as zombies.
NOTE: That this doesn't cause more animals to spawn arbitrarily: The biome spawning system only spawns a certain number of animals in a given area, but if you have lots of players that are all spread out then you may be hitting the limit and can increase it. |
| ServerMaxAllowedViewDistance | 12 | Max viewdistance a client may request (6 — 12). High impact on memory usage and performance. |
| Zombie settings | ||
| EnemySpawnMode | true | Enable/Disable enemy spawning |
| EnemyDifficulty | 0 | 0 = Normal, 1 = Feral |
| ZombieFeralSense | 0 | 0-3 (Off, Day, Night, All) |
| ZombieMove | 0 | 0-4 (walk, jog, run, sprint, nightmare) |
| ZombieMoveNight | 3 | 0-4 (walk, jog, run, sprint, nightmare) |
| ZombieFeralMove | 3 | 0-4 (walk, jog, run, sprint, nightmare) |
| ZombieBMMove | 3 | 0-4 (walk, jog, run, sprint, nightmare) |
| BloodMoonFrequency | 7 | What frequency (in days) should a blood moon take place. Set to «0» for no blood moons |
| BloodMoonRange | 0 | How many days can the actual blood moon day randomly deviate from the above setting. Setting this to 0 makes blood moons happen exactly each Nth day as specified in BloodMoonFrequency |
| BloodMoonWarning | 8 | The Hour number that the red day number begins on a blood moon day. Setting this to -1 makes the red never show. |
| BloodMoonEnemyCount | 8 | This is the number of zombies that can be alive (spawned at the same time) at any time PER PLAYER during a blood moon horde, however, MaxSpawnedZombies overrides this number in multiplayer games. Also note that your game stage sets the max number of zombies PER PARTY. Low game stage values can result in lower number of zombies than the BloodMoonEnemyCount setting. Changing this setting has a huge impact on performance. |
| Loot | ||
| LootAbundance | 250 | percentage in whole numbers NOTE: This only affects stack sizes. It does not affect the chance for loot to drop. |
| LootRespawnDays | 1 | days in whole numbers |
| AirDropFrequency | 24 | How often airdrop occur in game-hours, 0 == never |
| AirDropMarker | true | Sets if a marker is added to map/compass for air drops. |
| Multiplayer | ||
| PartySharedKillRange | 100 | The distance you must be within to receive party shared kill xp and quest party kill objective credit. |
| PlayerKillingMode | 3 | Player Killing Settings (0 = No Killing, 1 = Kill Allies Only, 2 = Kill Strangers Only, 3 = Kill Everyone) |
| Land claim options | ||
| LandClaimCount | 1 | Maximum allowed land claims per player. |
| LandClaimSize | 41 | Size in blocks that is protected by a keystone. Must be an odd number |
| LandClaimDeadZone | 30 | Keystones must be this many blocks apart (unless you are friends with the other player) |
| LandClaimExpiryTime | 7 | The number of days a player can be offline before their claims expire and are no longer protected |
| LandClaimDecayMode | 0 | Controls how offline players land claims decay. 0=Slow (Linear) , 1=Fast (Exponential), 2=None (Full protection until claim is expired). |
| LandClaimOnlineDurabilityModifier | 4 | How much protected claim area block hardness is increased when a player is online. 0 means infinite (no damage will ever be taken). Default is 4x |
| LandClaimOfflineDurabilityModifier | 4 | How much protected claim area block hardness is increased when a player is offline. 0 means infinite (no damage will ever be taken). Default is 4x |
| LandClaimOfflineDelay | 0 | The number of minutes after a player logs out that the land claim area hardness transitions from online to offline. Default is 0 |
| Dynamic Mesh | ||
| DynamicMeshEnabled | true | Is Dynamic Mesh system enabled |
| DynamicMeshLandClaimOnly | true | Is Dynamic Mesh system only active in player LCB areas |
| DynamicMeshLandClaimBuffer | 3 | Dynamic Mesh LCB chunk radius |
| DynamicMeshMaxItemCache | 3 | How many items can be processed concurrently, higher values use more RAM |
| Twitch Integration | ||
| TwitchServerPermission | 90 | Required permission level to use twitch integration on the server |
| TwitchBloodMoonAllowed | false | If the server allows twitch actions during a blood moon. This could cause server lag with extra zombies being spawned during blood moon. |
To host a server just edit the startdedicated.bat file and the serverconfig.xml using notepad or notepad++. You shouldn’t need to edit the startdedicated.bat. In the batch file you will see the following text:
startdedicated.bat
@echo off

rem
rem Starts a dedicated server
rem
rem -quit, -batchmode, -nographics: Unity commands
rem -configfile			  : Allows server settings to be set up in an xml config file. Use no path if in same dir or full path.
rem -dedicated                    : Has to be the last option to start the dedicated server.

echo|set /p="251570" > steam_appid.txt

start 7daystodie -quit -batchmode -nographics -configfile=serverconfig.xml -dedicated

echo Wait until game started
timeout 15

echo.
echo Connect to the service interface. use 'shutdown' to stop the server
echo.
if exist "Tools/bin/putty.exe" (
     "Tools/bin/putty.exe" -raw localhost 8081
) else (
     telnet localhost 8081
)

echo.
echo Server is running in background, you can close this window
echo.

pause
Finding your Public IP[]
To find your Public IP Address which your friends need to use to connect to your dedicated server search «my ip» in any major search engine. Send it to your friends and they should be able to join if you have already finished Port Forwarding.
Looking for servers[]
If you are looking for a server to play on, you can find one on the the server browser on your game client.
- For computers on the same local network as the server you can connect to it by using its LAN IP address, simply enter this and the chosen port number into the two boxes at the bottom of the games server browser screen.
- To find the LAN IP address «Go to start, click run or search, type cmd. In the window that opens type ipconfig. You’ll see a list of information. You’re looking for the IP address.»
Example:
Ethernet adapter Local Area Connection:
  Connection-specific DNS Suffix. : home
     IPv4 Address. . . . . . . . . . . : 192.168.1.102
  Subnet Mask . . . . . . . . . . . : 255.255.255.0
  Default Gateway . . . . . . . . . : 192.168.1.1
Where mine says 192.168.1.100 that’s the IP your server has.
- If your client and server are running on the same machine it is possible to use the loopback IP address, which is either accessed via «localhost» or 127.0.0.1
Renting a server[]
There are several companies/websites that allow you to rent a server from them. This rented server will reside in a data center and hosted by them.
These servers are mostly 24/7 servers. This is useful because you won’t need to keep your computer running 24/7. You can rent servers to many different specifications, some may not be powerful enough to host a server. Generally, network connections at a datacenter far exceed what is available to residential ISPs, which will cut down on latency that you might experience hosting at home.
Dedicated Server Providers
Managing a server[]
Before setting up a server manager, it is strongly recommended to install Alloc’s Server Fixes. Website
Then you have a large selection of tools to choose from for managing your server.
- Botman — Website — Forum thread
- Notes: Website says it’s A20 compatible, and still has A16-A19 compatibility available
- CSMM — Cloud hosted server manager — Website — Forum thread
- Notes: A20 compatible as of v1.27.0 [1]
- RAT Server Manager — Website — Forum thread
- Notes: A20 compatible as of RAT 3
- ServerTools- Website — Forum thread
- Notes: As of Version 20.5.2, it is compatible with A20 [2]
Video Tutorials[]
How to set a server up through the Steam Application:
Video walkthrough of using a Hosted (game server hosting company) Server, how to select options and get it up and running!
How do you Admin your server? Here’s how to manage it on a Hosted Platform:
Below video walks through setting up a dedicated 7 Days to Die server using steamcmd.
The video below walks through setting up the 7D2D RAT — Remote Admin tool, a Server Manager tool.
See also[]
- Linux Server
- OSX Server
- Server: serveradmin.xml
- Server: serverconfig.xml
- Dedicated Server Providers
References[]
- ↑ CSMM Github Release Notes
- ↑ Server Tools Forum Thread
A Server is used for playing with multiple people in the same world. Servers can be hosted by yourself, as well as by a server hosting company.
How to host a server[]
Serverconfig.xml[]
This is a table for the serverconfig.xml file that comes with 7 Days to Die as of A20.6.
Only change the data in the «value=» part of the file, otherwise, it will not work.
| Option | Default Value | Description |
|---|---|---|
| Server representation | GENERAL SERVER SETTINGS | |
| ServerName | My Game Host | Whatever you want the name of the server to be. |
| ServerDescription | A 7 Days to Die server | Whatever you want the server description to be, will be shown in the server browser. |
| ServerWebsiteURL | Website URL for the server, will be shown in the serverbrowser as a clickable link | |
| ServerPassword | Password to gain entry to the server | |
| ServerLoginConfirmationText | If set the user will see the message during joining the server and has to confirm it before continuing. For more complex changes to this window you can change the «serverjoinrulesdialog» window in XUi | |
| Region | NorthAmericaEast | The region this server is in. Values: NorthAmericaEast, NorthAmericaWest, CentralAmerica, SouthAmerica, Europe, Russia, Asia, MiddleEast, Africa, Oceania |
| Language | English | Primary language for players on this server. Values: Use any language name that you would users expect to search for. Should be the English name of the language, e.g. not «Deutsch» but «German» |
| Networking | ||
| ServerPort | 26900 | Port you want the server to listen on. Keep it in the ranges 26900 to 26905 or 27015 to 27020 if you want PCs on the same LAN to find it as a LAN server. |
| ServerVisibility | 2 | Visibility of this server: 2 = public, 1 = only shown to friends, 0 = not listed. As you are never friend of a dedicated server setting this to «1» will only work when the first player connects manually by IP. |
| ServerDisabledNetworkProtocols | SteamNetworking | Networking protocols that should not be used. Separated by comma. Possible values: LiteNetLib, SteamNetworking. Dedicated servers should disable SteamNetworking if there is no NAT router in between your users and the server or when port-forwarding is set up correctly. |
| ServerMaxWorldTransferSpeedKiBs | 512 | Maximum (!) speed in kiB/s the world is transferred at to a client on first connect if it does not have the world yet. Maximum is about 1300 kiB/s, even if you set a higher value. |
| Slots | ||
| ServerMaxPlayerCount | 8 | Maximum Concurrent Players (8 is the maximum supported player count. Anything over 30 will cause corrupted save data.) |
| ServerReservedSlots | 0 | Out of the MaxPlayerCount this many slots can only be used by players with a specific permission level. |
| ServerReservedSlotsPermission | 100 | Required permission level to use reserved slots above |
| ServerAdminSlots | 0 | This many admins can still join even if the server has reached MaxPlayerCount |
| ServerAdminSlotsPermission | 0 | Required permission level to use the admin slots above |
| Admin interfaces | ||
| ControlPanelEnabled | false | Enable/Disable the web control panel |
| ControlPanelPort | 8080 | Port of the control panel webpage |
| ControlPanelPassword | CHANGEME | Password to gain entry to the control panel |
| TelnetEnabled | true | Enable/Disable the telnet |
| TelnetPort | 8081 | Port of the telnet server |
| TelnetPassword | Password to gain entry to telnet interface. If no password is set the server will only listen on the local loopback interface | |
| TelnetFailedLoginLimit | 10 | After this many wrong passwords from a single remote client the client will be blocked from connecting to the Telnet interface |
| TelnetFailedLoginsBlocktime | 10 | How long will the block persist (in seconds) |
| TerminalWindowEnabled | true | Show a terminal window for log output / command input (Windows only) |
| Folder and file locations | ||
| AdminFileName | serveradmin.xml | Server admin file name. Path relative to the SaveGameFolder |
| UserDataFolder | absolute path | Use this to override where the server stores all generated data, including RWG generated worlds. Do not forget to uncomment the entry! |
| SaveGameFolder | absolute path | Use this to only override the save game path. Do not forget to uncomment the entry! |
| Other technical settings | ||
| EACEnabled | true | Enables/Disables EasyAntiCheat |
| HideCommandExecutionLog | 0 | Hide logging of command execution. 0 = show everything, 1 = hide only from Telnet/ControlPanel, 2 = also hide from remote game clients, 3 = hide everything |
| MaxUncoveredMapChunksPerPlayer | 131072 | Override how many chunks can be uncovered on the ingame map by each player. Resulting max map file size limit per player is (x * 512 Bytes), uncovered area is (x * 256 m²). Default 131072 means max 32 km² can be uncovered at any time. Setting this too large will corrupt player data. |
| PersistentPlayerProfiles | false | If disabled a player can join with any selected profile. If true they will join with the last profile they joined with |
| World | GAMEPLAY | |
| GameWorld | Navezgane | «RWG» (see WorldGenSeed and WorldGenSize options below) or any already existing world name in the Worlds folder (currently shipping with e.g. «Navezgane», «PREGEN01», …) |
| WorldGenSeed | asdf | If RWG this is the seed for the generation of the new world. If a world with the resulting name already exists it will simply load it |
| WorldGenSize | 6144 | If RWG this controls the width and height of the created world. It is also used in combination with WorldGenSeed to create the internal RWG seed thus also creating a unique map name even if using the same WorldGenSeed. Has to be a multiple of 2048 between 2048 and 16384, though large map sizes will take long to generate / download / load |
| GameName | My Game | Whatever you want the game name to be. This affects the save game name as well as the seed used when placing decoration (trees etc) in the world. It does not control the generic layout of the world if creating an RWG world |
| GameMode | GameModeSurvival | GameModeSurvival (This is a depreciated option, but it still remains in the config.) |
| Difficulty | ||
| GameDifficulty | 2 | 0 — 5, 0=easiest, 5=hardest |
| BlockDamagePlayer | 100 | How much damage do players to blocks (percentage in whole numbers) |
| BlockDamageAI | 100 | How much damage do AIs to blocks (percentage in whole numbers) |
| BlockDamageAIBM | 100 | How much damage do AIs during blood moons to blocks (percentage in whole numbers) |
| XPMultiplier | 250 | XP gain multiplier (percentage in whole numbers) |
| PlayerSafeZoneLevel | 5 | If a player is less or equal this level he will create a safe zone (no enemies) when spawned |
| PlayerSafeZoneHours | 5 | Hours in world time this safe zone exists |
| BuildCreate | false | cheat mode on/off |
| DayNightLength | 60 | real time minutes per in game day: 60 minutes |
| DayLightLength | 18 | in game hours the sun shines per day: 18 hours day light per in game day |
| DropOnDeath | 0 | 0 = nothing, 1 = everything, 2 = toolbelt only, 3 = backpack only, 4 = delete all |
| DropOnQuit | 0 | 0 = nothing, 1 = everything, 2 = toolbelt only, 3 = backpack only |
| BedrollDeadZoneSize | 15 | Size (box «radius», so a box with 2 times the given value for each side’s length) of bedroll deadzone, no zombies will spawn inside this area, and any cleared sleeper volumes that touch a bedroll deadzone will not spawn after they’ve been cleared. |
| BedrollExpiryTime | 45 | Number of days a bedroll stays active after owner was last online |
| Performance related | ||
| MaxSpawnedZombies | 64 | This setting covers the entire map. There can only be this many zombies on the entire map at one time. Changing this setting has a huge impact on performance. Anything over 90 will tank performance. |
| MaxSpawnedAnimals | 50 | If your server has a large number of players you can increase this limit to add more wildlife. Animals don’t consume as much CPU as zombies.
NOTE: That this doesn't cause more animals to spawn arbitrarily: The biome spawning system only spawns a certain number of animals in a given area, but if you have lots of players that are all spread out then you may be hitting the limit and can increase it. |
| ServerMaxAllowedViewDistance | 12 | Max viewdistance a client may request (6 — 12). High impact on memory usage and performance. |
| Zombie settings | ||
| EnemySpawnMode | true | Enable/Disable enemy spawning |
| EnemyDifficulty | 0 | 0 = Normal, 1 = Feral |
| ZombieFeralSense | 0 | 0-3 (Off, Day, Night, All) |
| ZombieMove | 0 | 0-4 (walk, jog, run, sprint, nightmare) |
| ZombieMoveNight | 3 | 0-4 (walk, jog, run, sprint, nightmare) |
| ZombieFeralMove | 3 | 0-4 (walk, jog, run, sprint, nightmare) |
| ZombieBMMove | 3 | 0-4 (walk, jog, run, sprint, nightmare) |
| BloodMoonFrequency | 7 | What frequency (in days) should a blood moon take place. Set to «0» for no blood moons |
| BloodMoonRange | 0 | How many days can the actual blood moon day randomly deviate from the above setting. Setting this to 0 makes blood moons happen exactly each Nth day as specified in BloodMoonFrequency |
| BloodMoonWarning | 8 | The Hour number that the red day number begins on a blood moon day. Setting this to -1 makes the red never show. |
| BloodMoonEnemyCount | 8 | This is the number of zombies that can be alive (spawned at the same time) at any time PER PLAYER during a blood moon horde, however, MaxSpawnedZombies overrides this number in multiplayer games. Also note that your game stage sets the max number of zombies PER PARTY. Low game stage values can result in lower number of zombies than the BloodMoonEnemyCount setting. Changing this setting has a huge impact on performance. |
| Loot | ||
| LootAbundance | 250 | percentage in whole numbers NOTE: This only affects stack sizes. It does not affect the chance for loot to drop. |
| LootRespawnDays | 1 | days in whole numbers |
| AirDropFrequency | 24 | How often airdrop occur in game-hours, 0 == never |
| AirDropMarker | true | Sets if a marker is added to map/compass for air drops. |
| Multiplayer | ||
| PartySharedKillRange | 100 | The distance you must be within to receive party shared kill xp and quest party kill objective credit. |
| PlayerKillingMode | 3 | Player Killing Settings (0 = No Killing, 1 = Kill Allies Only, 2 = Kill Strangers Only, 3 = Kill Everyone) |
| Land claim options | ||
| LandClaimCount | 1 | Maximum allowed land claims per player. |
| LandClaimSize | 41 | Size in blocks that is protected by a keystone. Must be an odd number |
| LandClaimDeadZone | 30 | Keystones must be this many blocks apart (unless you are friends with the other player) |
| LandClaimExpiryTime | 7 | The number of days a player can be offline before their claims expire and are no longer protected |
| LandClaimDecayMode | 0 | Controls how offline players land claims decay. 0=Slow (Linear) , 1=Fast (Exponential), 2=None (Full protection until claim is expired). |
| LandClaimOnlineDurabilityModifier | 4 | How much protected claim area block hardness is increased when a player is online. 0 means infinite (no damage will ever be taken). Default is 4x |
| LandClaimOfflineDurabilityModifier | 4 | How much protected claim area block hardness is increased when a player is offline. 0 means infinite (no damage will ever be taken). Default is 4x |
| LandClaimOfflineDelay | 0 | The number of minutes after a player logs out that the land claim area hardness transitions from online to offline. Default is 0 |
| Dynamic Mesh | ||
| DynamicMeshEnabled | true | Is Dynamic Mesh system enabled |
| DynamicMeshLandClaimOnly | true | Is Dynamic Mesh system only active in player LCB areas |
| DynamicMeshLandClaimBuffer | 3 | Dynamic Mesh LCB chunk radius |
| DynamicMeshMaxItemCache | 3 | How many items can be processed concurrently, higher values use more RAM |
| Twitch Integration | ||
| TwitchServerPermission | 90 | Required permission level to use twitch integration on the server |
| TwitchBloodMoonAllowed | false | If the server allows twitch actions during a blood moon. This could cause server lag with extra zombies being spawned during blood moon. |
To host a server just edit the startdedicated.bat file and the serverconfig.xml using notepad or notepad++. You shouldn’t need to edit the startdedicated.bat. In the batch file you will see the following text:
startdedicated.bat
@echo off

rem
rem Starts a dedicated server
rem
rem -quit, -batchmode, -nographics: Unity commands
rem -configfile			  : Allows server settings to be set up in an xml config file. Use no path if in same dir or full path.
rem -dedicated                    : Has to be the last option to start the dedicated server.

echo|set /p="251570" > steam_appid.txt

start 7daystodie -quit -batchmode -nographics -configfile=serverconfig.xml -dedicated

echo Wait until game started
timeout 15

echo.
echo Connect to the service interface. use 'shutdown' to stop the server
echo.
if exist "Tools/bin/putty.exe" (
     "Tools/bin/putty.exe" -raw localhost 8081
) else (
     telnet localhost 8081
)

echo.
echo Server is running in background, you can close this window
echo.

pause
Finding your Public IP[]
To find your Public IP Address which your friends need to use to connect to your dedicated server search «my ip» in any major search engine. Send it to your friends and they should be able to join if you have already finished Port Forwarding.
Looking for servers[]
If you are looking for a server to play on, you can find one on the the server browser on your game client.
- For computers on the same local network as the server you can connect to it by using its LAN IP address, simply enter this and the chosen port number into the two boxes at the bottom of the games server browser screen.
- To find the LAN IP address «Go to start, click run or search, type cmd. In the window that opens type ipconfig. You’ll see a list of information. You’re looking for the IP address.»
Example:
Ethernet adapter Local Area Connection:
  Connection-specific DNS Suffix. : home
     IPv4 Address. . . . . . . . . . . : 192.168.1.102
  Subnet Mask . . . . . . . . . . . : 255.255.255.0
  Default Gateway . . . . . . . . . : 192.168.1.1
Where mine says 192.168.1.100 that’s the IP your server has.
- If your client and server are running on the same machine it is possible to use the loopback IP address, which is either accessed via «localhost» or 127.0.0.1
Renting a server[]
There are several companies/websites that allow you to rent a server from them. This rented server will reside in a data center and hosted by them.
These servers are mostly 24/7 servers. This is useful because you won’t need to keep your computer running 24/7. You can rent servers to many different specifications, some may not be powerful enough to host a server. Generally, network connections at a datacenter far exceed what is available to residential ISPs, which will cut down on latency that you might experience hosting at home.
Dedicated Server Providers
Managing a server[]
Before setting up a server manager, it is strongly recommended to install Alloc’s Server Fixes. Website
Then you have a large selection of tools to choose from for managing your server.
- Botman — Website — Forum thread
- Notes: Website says it’s A20 compatible, and still has A16-A19 compatibility available
- CSMM — Cloud hosted server manager — Website — Forum thread
- Notes: A20 compatible as of v1.27.0 [1]
- RAT Server Manager — Website — Forum thread
- Notes: A20 compatible as of RAT 3
- ServerTools- Website — Forum thread
- Notes: As of Version 20.5.2, it is compatible with A20 [2]
Video Tutorials[]
How to set a server up through the Steam Application:
Video walkthrough of using a Hosted (game server hosting company) Server, how to select options and get it up and running!
How do you Admin your server? Here’s how to manage it on a Hosted Platform:
Below video walks through setting up a dedicated 7 Days to Die server using steamcmd.
The video below walks through setting up the 7D2D RAT — Remote Admin tool, a Server Manager tool.
See also[]
- Linux Server
- OSX Server
- Server: serveradmin.xml
- Server: serverconfig.xml
- Dedicated Server Providers
References[]
- ↑ CSMM Github Release Notes
- ↑ Server Tools Forum Thread
Содержание
- Установка сервера 7 Days to Die на Linux
- Содержание
- Первичная настройка Linux
- Установка сервера 7 Days to Die
- Настройка сервера 7 Days to Die
- Лог консоли сервера
- Проверка обновлений и автоматический перезапуск игрового сервера после падения или перезапуска VDS
- Важные файлы сервера
- 7 Days to Die Dedicated Server
- Contents
- Dedicated server
- Windows Requirement
- Installation
- Serverconfig.xml
- Server Representation
- Networking
- Slots
- Admin interfaces
- Folder and file locations
- Other technical settings
- World
- Difficulty
- Unnamed
- Performance related
- Zombie settings
- Multiplayer
- Land claim options
- Starting the Server
- Firewall Ports
- Port Forwarding
- Finding your own External IP
- Looking for servers
- Renting a server
Установка сервера 7 Days to Die на Linux

В данной инструкции мы расскажем как установить сервер игры 7 Days to Die на ОС Linux Debian 10
Минимальная характеристика сервера для игры 7 Days to Die до 8 игроков.
- Тариф: Medium
- Процессор: от 2.6 GHz
- Количество потоков: 2
- Оперативная память: 8 Gb
- Сервер занимает: 12 Gb
Содержание
Первичная настройка Linux
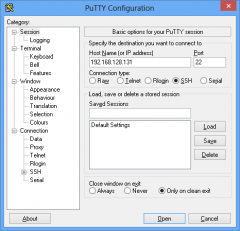
Вы заказали на сайте MyArena виртуальный сервер, выбрали и установили операционную систему, что же делать дальше? Прежде чем перейти к установке сервера игры, нам потребуется провести предварительную настройку Linux.
1. Скачиваем и устанавливаем программу PuTTY себе на компьютер, что бы подключиться к серверу.
- Запускаем программу, открываем вкладку Window, переходим в Translation и в меню Remote character set выбираем UTF-8.
- Возвращаемся во вкладку Session.
- В Host Name указываем IP адрес вашего сервера, порт 22, ниже в Saved Sessions придумайте имя для подключения и нажмите на кнопку Save.
- Выделяем название сервер и нажимаем на кнопку Open.
- У вас откроется черное окно терминала в котором вам потребуется указать логин и пароль от вашего сервера.
2. Установка дополнительных библиотек, при использование 64 битной операционной системы
3. Установка дополнительных программ.
4. Устанавливаем редактор Nano для пользователя root по умолчанию.
Установка сервера 7 Days to Die
1. Создаем нового пользователя с паролем, например gameserver.
Все последующие шаги выполняются под созданным пользователем. Выйти из него можно командой ‘exit’.
2. Переключаемся на пользователя gameserver.
3. Устанавливаем редактор Nano для пользователя gameserver по умолчанию.
4. Создаем и переходим в папку, куда будем загружать steamcmd.
5. Скачиваем архив steamcmd и разархивируем его.
6. Запускаем steamcmd.sh. Важно: нужно находиться в папке steamcmd.
7. Загрузка и установка сервера
8. Запуск сервера. После загрузки сервера выходим из steamcmd введя команду ‘quit’
Теперь проверим, запускаем сервер, для этого пропишите в консоли команду
После этих действий сервер начнет запускаться, вы сможете зайти на него указав ip адрес и порт, например 37.230.228.208:26900
Завершить процесс и выключить игровой сервер нажатием клавиш ctrl+c.

Настройка сервера 7 Days to Die
1. Чтобы в будущем избежать правок конфигурационного файла serverconfig.xml при обновлении сервера, следует создать его копию.
Находясь в директории /7dtd, прописываем данную команду.
Данная команда скопирует файл serverconfig.xml и создаст его копию с названием server_config.xml.
2. Открываем конфиг сервера server_config.xml командой
Список самых важных переменных:
| Переменные | Стандартное значение | Описание |
|---|---|---|
| ServerName | My Game Host | Название сервера. |
| ServerPort | 26900 | Игровой порт сервера. |
| ServerVisibility | 2 | Видимость сервера в интернете: 2 = Виден в интернете, в поиске серверов, 1 = Виден только друзьям, 0 = отсутствует в списке. 1 — Это значит, что сервер станет виден всем друзьям игрока, который подключился к серверу. |
| ServerPassword | Пароль сервера, который будет требоваться при подключении. | |
| ServerMaxPlayerCount | 8 | Максимальное количество игроков. |
| ServerDescription | A 7 Days to Die server | Описание сервера. |
| EACEnabled | true | Включает или отключает античит EasyAntiCheat. |
| GameWorld | Navezgane | Карты сервера. Можно установить значение «RWG» для случайной карты. |
| GameName | My Game | Названия игры, должно быть написано Латиницей. Не используйте «:» и прочие специфические символы. |
| WorldGenSeed | asdf | Если выбрали RWG, нужно указать семя (пример: asdf) для создания новой случайной карты. Если карта с таким именем уже существует, она просто будет загружена. |
| WorldGenSize | 4096 | Если выбрали RWG, нужно указать ширину и высоту для новой карты (пример: 4096). Размер карты должен быть от 2048 до 16384, создание новой карты может занять очень много времени. |
| DayNightLength | 60 | Длительность суток в игре. |
| LootRespawnDays | 30 | Через какое количество игровых дней будет происходить респаун лута. |
| PlayerKillingMode | 3 | Настройки PVP режима. (0 = PVP запрещен для всех, 1 = можно убивать только союзников, 2 = можно убивать только незнакомцев, 3 = PVP включен для всех |
3. Сохраняем результат нажатием одновременно ctrl+x, у вас попросят подтвердить действия, нажимаем на Y и enter.
4. Проверим сервер, запустим startserver.sh командой
После этих действий сервер начнет запускаться. Завершить процесс и выключить игровой сервер нажатием клавиш ctrl+c.
Лог консоли сервера
После того, как вы запустили сервер, будет создан output_log.txt в папке 7DaysToDieServer_Data.
В нем вы можете посмотреть полностью лог консоли сервера, запуск сервера, ошибки, подключениеотключение игроков, информацию по работе античита и многое другое.
Проверка обновлений и автоматический перезапуск игрового сервера после падения или перезапуска VDS
1. Находясь в директории /7dtd, создадим дополнительный файл start_7dtd_server.sh для запуска сервера.
2. Проверка обновлений. В этот файл прописываем данные параметры.
3. Автоматический запуск сервера. Ниже прописываем данные параметры, после этого сохраняем результат нажатием одновременно ctrl+x, у вас попросят подтвердить действия, нажимаем на Y и enter.
4. Добавляем права на файл start_7dtd_server.sh, командой.
5. Под пользователем gameserver прописываем команду crontab -e и указываем эти данные.
- После этого нажимаем на сочетание клавиш ctrl+x и сохраняем результат
- Чтобы посмотреть, что запущено в скрине наберите screen -ls
- Чтобы посмотреть отдельный скрин screen -x название скрина или его номер.
- Чтобы выйти из выбранного скрина нажмите ctrl+a затем d.
- Чтобы убить запущенный процесс пропишите команду kill и номер процесса.

6. Перезапуск сервера в час ночи.
Выходим из под пользователя gameserver командой exit обратно под root, прописываем вновь crontab -e и указываем эти данные.
Теперь каждый день, в час ночи игровой сервер будет перезапущен.
Важные файлы сервера
1. Расположение папки с картами сервера. Если у вас есть своя карта, то её нужна закачать в данную папку.
2. После запуска сервера, будет создан новый каталог.
Сервер сохраняет данные игры в «скрытую» директорию учетной записи gameserver, каталог называется .local (с точкой).
Тут вы найдете игроков, админов, информацию по открытым регионам и многое другое.
Вы можете изменять инвентарь игроков, переносить его между серверами, даже части карты можно перенести, достаточно скопировать соответствующие файлы в другой каталог для сохранения.
Источник
7 Days to Die Dedicated Server
A 7 Days to Die Dedicated Server is used for playing with multiple people in the same world. Servers can be hosted by yourself, as well as by a company. Servers used to only allow up to 4 people, but that was changed as of Alpha 1.1 Official site Currently only 8-player Co-op is supported.
Contents
Dedicated server
Windows Requirement
Installation
You need to install the lastest
- Start SteamCMD
- Select install folder: force_install_dir c:SteamCMD7_Days_to_Die_server (You do not have to use this exact folder)
- Login with a Steam account (Subject to the availability of the game on the accounts). login [username] [password] (You can also use login anonymous)
- Run: app_update 294420 to download the latest 7 Days to Die Dedicated Server Alpha stable build.
- Run: app_update 294420 -beta latest_experimental instead if you want the latest experimental build.
Serverconfig.xml
This is a table of the up-to-date Alpha 19 (B178) serverconfig.xml file that comes with 7 Days to Die.
Only change the data in the «value=» part of the file, otherwise it will not work.
Server Representation
| Option | Values | Description |
|---|---|---|
| ServerName | My Game Host | Whatever you want the name of the server to be. |
| ServerDescription | A 7 Days to Die server | Whatever you want the server description to be, will be shown in the server browser. |
| ServerWebsiteURL | Website URL for the server, will be shown in the serverbrowser as a clickable link | |
| ServerPassword | Password to gain entry to the server | |
| ServerLoginConfirmationText | If set the user will see the message during joining the server and has to confirm it before continuing. For more complex changes to this window you can change the «serverjoinrulesdialog» window in XUi |
Networking
| Option | Values | Description |
|---|---|---|
| ServerPort | 26900 | Port you want the server to listen on. Keep it in the ranges 26900 to 26905 or 27015 to 27020 if you want PCs on the same LAN to find it as a LAN server. |
| ServerVisibility | 2 | Visibility of this server: 2 = public, 1 = only shown to friends, 0 = not listed. As you are never friend of a dedicated server setting this to «1» will only work when the first player connects manually by IP. |
| ServerDisabledNetworkProtocols | SteamNetworking | Networking protocols that should NOT be used. Separated by comma. Possible values: LiteNetLib, SteamNetworking. Dedicated servers should disable SteamNetworking if there is no NAT router in between your users and the server or when port-forwarding is set up correctly |
| ServerMaxWorldTransferSpeedKiBs | 512 | Maximum (!) speed in kiB/s the world is transferred at to a client on first connect if it does not have the world yet. Maximum is about 1300 kiB/s, even if you set a higher value |
Slots
| Option | Values | Description |
|---|---|---|
| ServerMaxPlayerCount | 8 | Maximum Concurrent Players |
| ServerReservedSlots | Out of the MaxPlayerCount this many slots can only be used by players with a specific permission level | |
| ServerReservedSlotsPermission | 100 | Required permission level to use reserved slots above |
| ServerAdminSlots | This many admins can still join even if the server has reached MaxPlayerCount | |
| ServerAdminSlotsPermission | Required permission level to use the admin slots above |
Admin interfaces
| Option | Values | Description |
|---|---|---|
| ControlPanelEnabled | false | Enable/Disable the web control panel |
| ControlPanelPort | 8080 | Enable/Disable the web control panel |
| ControlPanelPassword | CHANGEME | Enable/Disable the web control panel |
| TelnetEnabled | true | Enable/Disable the telnet |
| TelnetPort | 8081 | Port of the telnet server |
| TelnetPassword | Password to gain entry to telnet interface. If no password is set the server will only listen on the local loopback interface | |
| TelnetFailedLoginLimit | 10 | After this many wrong passwords from a single remote client the client will be blocked from connecting to the Telnet interface |
| TelnetFailedLoginsBlocktime | 10 | How long will the block persist (in seconds) |
| TerminalWindowEnabled | true | Show a terminal window for log output / command input (Windows only) |
Folder and file locations
| Option | Values | Description |
|---|---|---|
| AdminFileName | serveradmin.xml | Server admin file name. Path relative to the SaveGameFolder |
| UserDataFolder | absolute path | Use this to override where the server stores all generated data, including RWG generated worlds. Do not forget to uncomment the entry! |
| SaveGameFolder | absolute path | Use this to only override the save game path. Do not forget to uncomment the entry! |
Other technical settings
| Option | Values | Description |
|---|---|---|
| EACEnabled | true | Enables/Disables EasyAntiCheat |
| HideCommandExecutionLog | Hide logging of command execution. 0 = show everything, 1 = hide only from Telnet/ControlPanel, 2 = also hide from remote game clients, 3 = hide everything | |
| MaxUncoveredMapChunksPerPlayer | 131072 | Override how many chunks can be uncovered on the ingame map by each player. Resulting max map file size limit per player is (x * 512 Bytes), uncovered area is (x * 256 m²). Default 131072 means max 32 km² can be uncovered at any time |
| PersistentPlayerProfiles | false | If disabled a player can join with any selected profile. If true they will join with the last profile they joined with |
World
| Option | Values | Description |
|---|---|---|
| GameWorld | Navezgane | «RWG» (see WorldGenSeed and WorldGenSize options below) or any already existing world name in the Worlds folder (currently shipping with e.g. «Navezgane», «PREGEN01», . ) |
| WorldGenSeed | asdf | If RWG this is the seed for the generation of the new world. If a world with the resulting name already exists it will simply load it |
| WorldGenSize | 4096 | If RWG this controls the width and height of the created world. It is also used in combination with WorldGenSeed to create the internal RWG seed thus also creating a unique map name even if using the same WorldGenSeed. Has to be between 2048 and 16384, though large map sizes will take long to generate / download / load |
| GameName | My Game | Whatever you want the game name to be. This affects the save game name as well as the seed used when placing decoration (trees etc) in the world. It does not control the generic layout of the world if creating an RWG world |
| GameMode | GameModeSurvival | GameModeSurvival |
Difficulty
| Option | Values | Description |
|---|---|---|
| GameDifficulty | 2 | 0 — 5, 0=easiest, 5=hardest |
| BlockDamagePlayer | 100 | How much damage do players to blocks (percentage in whole numbers) |
| BlockDamageAI | 100 | How much damage do AIs to blocks (percentage in whole numbers) |
| BlockDamageAIBM | 100 | How much damage do AIs during blood moons to blocks (percentage in whole numbers) |
| XPMultiplier | 100 | XP gain multiplier (percentage in whole numbers) |
| PlayerSafeZoneLevel | 5 | If a player is less than or equal to this level he will create a safe zone (no enemies) when spawned |
| PlayerSafeZoneHours | 5 | Hours in world time this safe zone exists |
Unnamed
| Option | Values | Description |
|---|---|---|
| BuildCreate | false | cheat mode on/off |
| DayNightLength | 60 | real time minutes per in game day: 60 minutes |
| DayLightLength | 18 | in game hours the sun shines per day: 18 hours day light per in game day |
| DropOnDeath | 1 | 0 = nothing, 1 = everything, 2 = toolbelt only, 3 = backpack only, 4 = delete all |
| DropOnQuit | 0 = nothing, 1 = everything, 2 = toolbelt only, 3 = backpack only | |
| BedrollDeadZoneSize | 15 | Size (box «radius», so a box with 2 times the given value for each side’s length) of bedroll deadzone, no zombies will spawn inside this area, and any cleared sleeper volumes that touch a bedroll deadzone will not spawn after they’ve been cleared. |
| BedrollExpiryTime | 45 | Number of days a bedroll stays active after owner was last online |
| Option | Values | Description |
|---|---|---|
| MaxSpawnedZombies | 64 | This setting covers the entire map. There can only be this many zombies on the entire map at one time. Changing this setting has a huge impact on performance. |
| MaxSpawnedAnimals | 50 | If your server has a large number of players you can increase this limit to add more wildlife. Animals don’t consume as much CPU as zombies. NOTE: That this doesn’t cause more animals to spawn arbitrarily: The biome spawning system only spawns a certain number of animals in a given area, but if you have lots of players that are all spread out then you may be hitting the limit and can increase it. |
| ServerMaxAllowedViewDistance | 12 | Max viewdistance a client may request (6 — 12). High impact on memory usage and performance. |
Zombie settings
| Option | Values | Description |
|---|---|---|
| EnemySpawnMode | true | Enable/Disable enemy spawning |
| EnemyDifficulty | 0 = Normal, 1 = Feral | |
| ZombieMove | 0-4 (walk, jog, run, sprint, nightmare) | |
| ZombieMoveNight | 3 | 0-4 (walk, jog, run, sprint, nightmare) |
| ZombieFeralMove | 3 | 0-4 (walk, jog, run, sprint, nightmare) |
| ZombieBMMove | 3 | 0-4 (walk, jog, run, sprint, nightmare) |
| BloodMoonFrequency | 7 | What frequency (in days) should a blood moon take place. Set to «0» for no blood moons |
| BloodMoonRange | How many days can the actual blood moon day randomly deviate from the above setting. Setting this to 0 makes blood moons happen exactly each Nth day as specified in BloodMoonFrequency | |
| BloodMoonWarning | 8 | The Hour number that the red day number begins on a blood moon day. Setting this to -1 makes the red never show. |
| BloodMoonEnemyCount | 8 | This is the number of zombies that can be alive (spawned at the same time) at any time PER PLAYER during a blood moon horde, however, MaxSpawnedZombies overrides this number in multiplayer games. Also note that your game stage sets the max number of zombies PER PARTY. Low game stage values can result in lower number of zombies than the BloodMoonEnemyCount setting. Changing this setting has a huge impact on performance. —> |
| Option | Values | Description |
|---|---|---|
| LootAbundance | 100 | percentage in whole numbers |
| LootRespawnDays | 30 | days in whole numbers |
| AirDropFrequency | 72 | How often airdrop occur in game-hours, 0=never |
| AirDropMarker | False | Sets if a marker is added to map/compass for air drops |
Multiplayer
| Option | Values | Description |
|---|---|---|
| PartySharedKillRange | 100 | The distance you must be within to receive party shared kill xp and quest party kill objective credit. |
| PartyKillingMode | 3 | Player Killing Settings (0 = No Killing, 1 = Kill Allies Only, 2 = Kill Strangers Only, 3 = Kill Everyone) |
Land claim options
| Option | Values | Description |
|---|---|---|
| LandClaimCount | 1 | Maximum allowed land claims per player |
| LandClaimSize | 41 | Size in blocks that is protected by a land claim block |
| LandClaimDeadZone | 30 | Land claim blocks must be this many blocks apart (unless you are friends with the other player) |
| LandClaimExpiryTime | 7 | The number of days a player can be offline before their claims expire and are no longer protected |
| LandClaimDecayMode | Controls how offline players land claims decay. 0=Slow (Linear) , 1=Fast (Exponential), 2=None (Full protection until claim is expired). | |
| LandClaimOnlineDurabilityModifier | 4 | How much protected claim area block hardness is increased when a player is online. 0 means infinite (no damage will ever be taken). Default is 4x |
| LandClaimOfflineDurabilityModifier | 4 | How much protected claim area block hardness is increased when a player is offline. 0 means infinite (no damage will ever be taken). Default is 4x |
| LandClaimOfflineDelay | The number of minutes after a player logs out that the land claim area hardness transitions from online to offline. Default is 0 |
Starting the Server
To host a server just edit the startdedicated.bat file and the serverconfig.xml using TextPad or notepad++. You shouldn’t need to edit the startdedicated.bat. In the batch file you will see the following text:
Firewall Ports
You will need to open the following ports on your PC’s firewall in order for people to be able to see and connect to your server.
- 8080-8081 (ONLY if you plan to administer your server remotely AND do not change the ports in the serverconfig.)
- 8082 (If you are using Alloc’s mods, this is the control panel port +2. If you use 8080 then you need 8082.)
- 26900 (This is the port designated in the serverconfig)
Port Forwarding
If you are behind a router, you will need to tell your router that an incoming connection is meant for your server. This is called forwarding a port. You will need to port forward ports 26900-26902 so that others may join.
If router support UPnP — you can use this http://upnp-portmapper.sourceforge.net/
Don’t know how to port forward? follow these instructions:
- Go to this Site
- Select your router brand
- Select your router version (if your version is not there, pick the one closest to your version.)
- Select 7 Days to Die
- Follow the instructions on the site
If you have completed these steps correctly, your friends should now be able to join.
Finding your own External IP
To find the IP which your friends need to use go to this Site. There you will find your External IP. Send it to your friends and they should be able to join if you have already finished Port Forwarding (steps above) your router.
Looking for servers
If you are looking for a server to play on, you can find one on the current top servers list for 7 Days To Die here 7daystodie-servers.com or use the server browser on your game client.
For computers on the same local network as the server you can connect to it by using its internal IP, simply enter this and the chosen port number into the two boxes at the bottom of the games server browser screen. If you are hosting the server on the same computer you intend to play from you can use 127.0.0.1 (localhost) as the connection IP. In all other cases you’ll need to determine the servers IP address or domain name (if used) in order to make a connection. Windows users should open start, click run or search, type cmd. In the window that opens type ipconfig. You’ll see a list of information. You’re looking for IP address.
Example: Ethernet adapter Local Area Connection:
Where mine says 192.168.1.100 that’s the IP your server has.
Renting a server
There are several companies/websites that allow you to rent a server from them. This rented server will reside in a datacenter and hosted by them.
These servers are mostly 24/7 servers. This is useful because you won’t need to keep your computer running 24/7. You can rent servers to many different specifications, some may not be powerful enough to host a server. Generally, network connections at a datacenter far exceed what is available to residential ISPs, which will cut down on latency that you might experience hosting at home.
You can use a Server Manager to setup and manage the server. Please look through this forum post for alternative server management tools
Источник
В данной инструкции мы расскажем как установить сервер игры 7 Days to Die на ОС Linux Debian 10
Минимальная характеристика сервера для игры 7 Days to Die до 8 игроков.
- Тариф: Medium
- Процессор: от 2.6 GHz
- Количество потоков: 2
- Оперативная память: 8 Gb
- Сервер занимает: 12 Gb
Содержание
- 1 Первичная настройка Linux
- 2 Установка сервера 7 Days to Die
- 3 Настройка сервера 7 Days to Die
- 4 Лог консоли сервера
- 5 Проверка обновлений и автоматический перезапуск игрового сервера после падения или перезапуска VDS
- 6 Важные файлы сервера
- 7 Полный список переменных сервера
- 8 Ссылки
Первичная настройка Linux
Вы заказали на сайте MyArena виртуальный сервер, выбрали и установили операционную систему, что же делать дальше? Прежде чем перейти к установке сервера игры, нам потребуется провести предварительную настройку Linux.
1. Скачиваем и устанавливаем программу PuTTY себе на компьютер, что бы подключиться к серверу.
- Запускаем программу, открываем вкладку Window, переходим в Translation и в меню Remote character set выбираем UTF-8.
- Возвращаемся во вкладку Session.
- В Host Name указываем IP адрес вашего сервера, порт 22, ниже в Saved Sessions придумайте имя для подключения и нажмите на кнопку Save.
- Выделяем название сервер и нажимаем на кнопку Open.
- У вас откроется черное окно терминала в котором вам потребуется указать логин и пароль от вашего сервера.
2. Установка дополнительных библиотек, при использование 64 битной операционной системы
apt install lib32gcc1
apt install lib32stdc++6
apt install libsdl2-2.0-0
dpkg --add-architecture i386
apt update
apt install libsdl2-2.0-0:i386
3. Установка дополнительных программ.
apt install curl
apt install mc
apt install htop
apt install screen
4. Устанавливаем редактор Nano для пользователя root по умолчанию.
echo 'export EDITOR=nano' >> ~/.bashrc
Установка сервера 7 Days to Die
1. Создаем нового пользователя с паролем, например gameserver.
Все последующие шаги выполняются под созданным пользователем. Выйти из него можно командой ‘exit’.
# Создаем пользователя и его домашнюю директорию
useradd gameserver -s /bin/bash -m

# Добавляем пароль, вас попросят указать пароль дважды
passwd gameserver
2. Переключаемся на пользователя gameserver.
su gameserver -l
3. Устанавливаем редактор Nano для пользователя gameserver по умолчанию.
echo 'export EDITOR=nano' >> ~/.bashrc
4. Создаем и переходим в папку, куда будем загружать steamcmd.
mkdir steamcmd
cd steamcmd
5. Скачиваем архив steamcmd и разархивируем его.
wget https://steamcdn-a.akamaihd.net/client/installer/steamcmd_linux.tar.gz
tar -xvzf steamcmd_linux.tar.gz
6. Запускаем steamcmd.sh. Важно: нужно находиться в папке steamcmd.
./steamcmd.sh
7. Загрузка и установка сервера
# Указываем логин, аноним
login anonymous

# Указываем путь куда будет загружен сервер игры 7 Days to Die.
# Пример расположения: /home/gameserver/7dtd/
force_install_dir /home/gameserver/7dtd/

# Загружаем сервер игры
app_update 294420
8. Запуск сервера. После загрузки сервера выходим из steamcmd введя команду ‘quit’
# Выходим из папки steamcmd
cd

# Переходим в папку 7dtd
cd 7dtd
Теперь проверим, запускаем сервер, для этого пропишите в консоли команду
./startserver.sh -configfile=serverconfig.xml
После этих действий сервер начнет запускаться, вы сможете зайти на него указав ip адрес и порт, например 37.230.228.208:26900
Завершить процесс и выключить игровой сервер нажатием клавиш ctrl+c.
Эта строчка означает, что сервер запущен.
Настройка сервера 7 Days to Die
1. Чтобы в будущем избежать правок конфигурационного файла serverconfig.xml при обновлении сервера, следует создать его копию.
Находясь в директории /7dtd, прописываем данную команду.
cp serverconfig.xml server_config.xml
Данная команда скопирует файл serverconfig.xml и создаст его копию с названием server_config.xml.
2. Открываем конфиг сервера server_config.xml командой
nano server_config.xml
Список самых важных переменных:
| Переменные | Стандартное значение | Описание |
|---|---|---|
| ServerName | My Game Host | Название сервера. |
| ServerPort | 26900 | Игровой порт сервера. |
| ServerVisibility | 2 | Видимость сервера в интернете: 2 = Виден в интернете, в поиске серверов, 1 = Виден только друзьям, 0 = отсутствует в списке. 1 — Это значит, что сервер станет виден всем друзьям игрока, который подключился к серверу. |
| ServerPassword | Пароль сервера, который будет требоваться при подключении. | |
| ServerMaxPlayerCount | 8 | Максимальное количество игроков. |
| ServerDescription | A 7 Days to Die server | Описание сервера. |
| EACEnabled | true | Включает или отключает античит EasyAntiCheat. |
| GameWorld | Navezgane | Карты сервера. Можно установить значение «RWG» для случайной карты. |
| GameName | My Game | Названия игры, должно быть написано Латиницей. Не используйте «:» и прочие специфические символы. |
| WorldGenSeed | asdf | Если выбрали RWG, нужно указать семя (пример: asdf) для создания новой случайной карты. Если карта с таким именем уже существует, она просто будет загружена. |
| WorldGenSize | 4096 | Если выбрали RWG, нужно указать ширину и высоту для новой карты (пример: 4096). Размер карты должен быть от 2048 до 16384, создание новой карты может занять очень много времени. |
| DayNightLength | 60 | Длительность суток в игре. |
| LootRespawnDays | 30 | Через какое количество игровых дней будет происходить респаун лута. |
| PlayerKillingMode | 3 | Настройки PVP режима. (0 = PVP запрещен для всех, 1 = можно убивать только союзников, 2 = можно убивать только незнакомцев, 3 = PVP включен для всех |
3. Сохраняем результат нажатием одновременно ctrl+x, у вас попросят подтвердить действия, нажимаем на Y и enter.
4. Проверим сервер, запустим startserver.sh командой
./startserver.sh -configfile=server_config.xml
После этих действий сервер начнет запускаться. Завершить процесс и выключить игровой сервер нажатием клавиш ctrl+c.
Лог консоли сервера
После того, как вы запустили сервер, будет создан output_log.txt в папке 7DaysToDieServer_Data.
В нем вы можете посмотреть полностью лог консоли сервера, запуск сервера, ошибки, подключениеотключение игроков, информацию по работе античита и многое другое.
Проверка обновлений и автоматический перезапуск игрового сервера после падения или перезапуска VDS
1. Находясь в директории /7dtd, создадим дополнительный файл start_7dtd_server.sh для запуска сервера.
nano start_7dtd_server.sh
2. Проверка обновлений. В этот файл прописываем данные параметры.
#!/bin/bash
cd /home/gameserver/steamcmd
/home/gameserver/steamcmd/steamcmd.sh +login anonymous +force_install_dir /home/gameserver/7dtd +app_update 294420 +quit
3. Автоматический запуск сервера. Ниже прописываем данные параметры, после этого сохраняем результат нажатием одновременно ctrl+x, у вас попросят подтвердить действия, нажимаем на Y и enter.
cd /home/gameserver/7dtd
screen -AmdS run_7dtd bash -c 'while [ true ]; do /home/gameserver/7dtd/startserver.sh -configfile=server_config.xml; echo "CRASH - RESTART"; sleep 1; done'
4. Добавляем права на файл start_7dtd_server.sh, командой.
chmod +x start_7dtd_server.sh
5. Под пользователем gameserver прописываем команду crontab -e и указываем эти данные.
@reboot /home/gameserver/7dtd/start_7dtd_server.sh
- После этого нажимаем на сочетание клавиш ctrl+x и сохраняем результат
- Чтобы посмотреть, что запущено в скрине наберите screen -ls
- Чтобы посмотреть отдельный скрин screen -x название скрина или его номер.
- Чтобы выйти из выбранного скрина нажмите ctrl+a затем d.
- Чтобы убить запущенный процесс пропишите команду kill и номер процесса.
Номер запущенного процесса.
6. Перезапуск сервера в час ночи.
Выходим из под пользователя gameserver командой exit обратно под root, прописываем вновь crontab -e и указываем эти данные.
0 1 * * * pkill -9 -U gameserver; su gameserver -c /home/gameserver/7dtd/start_7dtd_server.sh
Теперь каждый день, в час ночи игровой сервер будет перезапущен.
Важные файлы сервера
1. Расположение папки с картами сервера. Если у вас есть своя карта, то её нужна закачать в данную папку.
# Путь папки с картами
/Data/Worlds
2. После запуска сервера, будет создан новый каталог.
Сервер сохраняет данные игры в «скрытую» директорию учетной записи gameserver, каталог называется .local (с точкой).
# Путь до папки с сохранением игры
/gameserver/.local/share/7DaysToDie/Saves
Тут вы найдете игроков, админов, информацию по открытым регионам и многое другое.
Вы можете изменять инвентарь игроков, переносить его между серверами, даже части карты можно перенести, достаточно скопировать соответствующие файлы в другой каталог для сохранения.
3. Редактирование файла serveradmin.xml. В данный файл добавляются администраторы сервера
Найдите строку:
<!-- <user steamID="76561198021925107" name="Hint on who this user is" permission_level="0" /> -->
Сразу после нее добавьте новую строку со своим Steam 64 ID. Узнать его можно на сайте http://steamid.io. Пример строки:
<user steamID="Ваш_Steam_64_ID" permission_level="0" />
После этого перезапустите сервер.
Полный список переменных сервера
| Переменные | Стандартное значение | Описание |
|---|---|---|
| ServerName | My Game Host | Название сервера. |
| ServerDescription | A 7 Days to Die server | Описание сервера. |
| ServerWebsiteURL | Тут вы можете указать сайт вашего проектасервера. | |
| ServerPassword | Пароль сервера, который будет требоваться при подключении. | |
| ServerLoginConfirmationText | Текст который увидят пользователи во время подключения к серверу и должны будут его подтвердить. | |
| ServerPort | 26900 | Порт игрового сервера. |
| ServerVisibility | 2 | Видимость сервера в интернете: 2 = Виден в интернете, в поиске серверов, 1 = Виден только друзьям, 0 = отсутствует в списке. 1 — Это значит, что сервер станет виден всем друзьям игрока, который подключился к серверу. |
| ServerDisabledNetworkProtocols | SteamNetworking | Сетевые протоколы, которые не следует использовать. Через запятую. Возможные значения: LiteNetLib, SteamNetworking. Выделенные сервера должны отключить SteamNetworking, если между вашими пользователями и сервером нет NAT-маршрутизатора или если перенаправление портов настроено правильно. |
| ServerMaxWorldTransferSpeedKiBs | 512 | Максимальная скорость в кБ/с, с которой передается игровой мир клиенту при первом подключении, если у него еще нет мира. Максимальная скорость около 1300 кБ/с. |
| ServerMaxPlayerCount | 8 | Максимальное количество игроков. |
| ServerReservedSlots | 0 | Кол-во резервных слотов. |
| ServerReservedSlotsPermission | 100 | Permission для резервного слота. |
| ServerAdminSlots | 0 | Кол-во Резервных слотов для администрации. |
| ServerAdminSlotsPermission | 0 | Permission для резервного слота администрации. |
| ControlPanelEnabled | false | Включение / отключение веб-панели управления. |
| ControlPanelPort | 8080 | Порт веб-панели управления. |
| ControlPanelPassword | Пароль веб-панели управления. | |
| TelnetEnabled | true | Включение / отключение Telnet. |
| TelnetPort | 8081 | Порт Telnet. |
| TelnetPassword | 8081 | Пароль Telnet (Если пароль не установлен, сервер будет прослушивать только локальный канал) |
| TelnetFailedLoginLimit | 10 | Кол-во неправильных вводов паролей от одного клиента, после 10 попыток клиент будет заблокирован для подключения к интерфейсу Telnet. |
| TelnetFailedLoginsBlocktime | 10 | На сколько будет заблокирован клиент к Telnet (в секундах) |
| TerminalWindowEnabled | true | Показать окно терминала для вывода журнала / ввода команд (только для Windows) |
| AdminFileName | serveradmin.xml | Название файла списка администраторов сервера. |
| UserDataFolder | absolute path | Путь где сервер будет хранить все сгенерированные данные, включая созданные RWG миры. Не забывайте раскомментировать запись! |
| SaveGameFolder | absolute path | Путь где сервер будет хранить записыватьсохранять мир. Не забываем раскомментировать запись! |
| SaveGameFolder | absolute path | Путь где сервер будет хранить записыватьсохранять мир. Не забываем раскомментировать запись! |
| EACEnabled | true | Включает или отключает античит EasyAntiCheat. |
| HideCommandExecutionLog | 0 | Скрывать журнал выполнения команд. 0 = показать все, 1 = скрыть только от Telnet / ControlPanel, 2 = также скрыть от удаленных игровых клиентов, 3 = скрыть все |
| MaxUncoveredMapChunksPerPlayer | 131072 | Укажите, сколько чанков может быть открыто на игровой карте каждым игроком. В результате максимальный размер файла карты для игрока составляет (x*512 байт), открытая область (x*256 м²). По умолчанию 131072 означает, что в любой момент может быть обнаружено не более 32 км². |
| PersistentPlayerProfiles | false | Если отключено, игрок может присоединиться к любому выбранному профилю. Если включено, игрок подключиться к последнему созданному профилю. |
| GameWorld | Navezgane | Карты сервера. Можно установить значение «RWG» для случайной карты. |
| WorldGenSeed | asdf | Если выбрали RWG, нужно указать семя (пример: asdf) для создания новой случайной карты. Если карта с таким именем уже существует, она просто будет загружена. |
| WorldGenSize | 4096 | Если выбрали RWG, нужно указать ширину и высоту для новой карты (пример: 4096). Размер карты должен быть от 2048 до 16384, создание новой карты может занять очень много времени. |
| GameName | My Game | Названия игры, должно быть написано Латиницей. Не используйте «:» и прочие специфические символы. |
| GameMode | GameModeSurvival | Режим выживания. |
| GameDifficulty | 2 | Значения от 0 до 5 (0 = самый простой, 5 = самый сложный). |
| BlockDamagePlayer | 100 | Какое количество урона игроки наносят блокам (в процентах или в целых числах). |
| BlockDamageAI | 100 | Какое количество урона наносят ИИ блокам (в процентах или в целых числах). |
| BlockDamageAIBM | 100 | Какое количество урона наносят ИИ блокам во время кровавой луны (в процентах или в целых числах). |
| XPMultiplier | 100 | Множитель получаемого опыта (в процентах или в целых числах). |
| PlayerSafeZoneLevel | 5 | Если игрок ниже или равен этому уровню, он создаст безопасную зону (без врагов) при появлении. |
| PlayerSafeZoneHours | 5 | Время действия безопасной зоны, в часах по игровому времени. |
| BuildCreate | false | Включение / Отключение чит-режима |
| DayNightLength | 60 | Длительность суток в игре. |
| DayLightLength | 18 | Длительность одного игрового дня. |
| DropOnDeath | 1 | Будут ли выпадать вещи после смерти. 0 = Нет, 1 = Да, 2 = Только предметы на поясе, 3 = Только предметы в рюкзаке, 4 = Удаление всех предметов |
| DropOnQuit | 0 | Будут ли выпадать вещи при выходе с сервера. 0 = Нет, 1 = Да, 2 = Только предметы на поясе, 3 = Только предметы в рюкзаке, 4 = Удаление всех предметов |
| BedrollDeadZoneSize | 15 | Расстояние от спальника при котором зомби не будет спавница. |
| BedrollExpiryTime | 45 | Количество дней на которое сохраняется спальник, после последнего подключения к серверу. |
| MaxSpawnedZombies | 64 | Максимальное количество зомби на карте. Этот параметр сильно влияет на производительность всего сервера. |
| MaxSpawnedAnimals | 50 | Максимальное количество животных на карте. Этот параметр не так сильно влияет на производительность всего сервера как зомби! |
| ServerMaxAllowedViewDistance | 12 | Максимальное видимое расстояние игроком на сервере (6 — 12). Этот параметр сильно влияет на использование памяти. |
| EnemySpawnMode | true | Включение / Отключение появления врагов. |
| EnemyDifficulty | 0 | 0 = Нормальный, 1 = Дикий. |
| ZombieMove | 0 | Скорость зомби 0-4 0 — Ходьба, 1- Пробежка, 2 — Бег, 3 — Спринт, 4 — Кошмар. |
| ZombieMoveNight | 3 | Скорость зомби 0-4 0 — Ходьба, 1- Пробежка, 2 — Бег, 3 — Спринт, 4 — Кошмар. |
| ZombieFeralMove | 3 | Скорость зомби 0-4 0 — Ходьба, 1- Пробежка, 2 — Бег, 3 — Спринт, 4 — Кошмар. |
| ZombieBMMove | 3 | Скорость зомби 0-4 0 — Ходьба, 1- Пробежка, 2 — Бег, 3 — Спринт, 4 — Кошмар. |
| BloodMoonFrequency | 7 | Через какое количество дней должна наступать кровавая луна. 0 — Отключить |
| BloodMoonRange | 0 | На какое количество дней может отклоняться наступление кровавой луны, это рандомный параметр, отклонение может произойти, а может нет. 0 — наступление кровавых луны будет происходить ровно каждый N-й день, как указано в BloodMoonFrequency. |
| BloodMoonWarning | 8 | В какое игровое время наступает кровавая луна. -1 — не будет показывать информацию о наступлении данного события. |
| BloodMoonEnemyCount | 8 | Количество зомби которое будет появляться рядом с игроком во время кровавой луны. Этот параметр сильно влияет на производительность всего сервера. |
| LootAbundance | 100 | Спавн лута в процентах. |
| LootRespawnDays | 30 | Через какое количество игровых дней будет происходить респаун лута. |
| AirDropFrequency | 72 | Сброс «AirDrop» каждые 72 часа игрового времени. |
| AirDropMarker | false | Если включить, то на карту будет добавлен маркер места сброса «AirDrop». |
| PartySharedKillRange | 100 | Расстояние, в пределах которого вы должны находиться, чтобы получить очки опыта за убийство в группе и за убийство в квестовой группе. |
| PartySharedKillRange | 100 | Расстояние, в пределах которого вы должны находиться, чтобы получить очки опыта за убийство в группе и за убийство в квестовой группе. |
| PlayerKillingMode | 3 | Настройки PVP режима. 0 = PVP запрещен для всех, 1 = можно убивать только союзников, 2 = можно убивать только незнакомцев, 3 = PVP включен для всех. |
| LandClaimCount | 1 | Максимальное кол-во территорий на одного игрока. |
| LandClaimSize | 41 | Размер безопасной зоны вокруг одного блока. |
| LandClaimDeadZone | 30 | Расстояние на котором могут строить друг от друга недружественные игроки. |
| LandClaimExpiryTime | 7 | Количество дней, который игрок может находиться в оффлайне, после чего безопасная зона игрока исчезнет. |
| LandClaimDecayMode | 0 | С какой скоростью портятся постройки игрока, когда игрок в оффлайне. 0 = Линейный 1 = Экспоненциальный 2 = Не портятся. |
| LandClaimOnlineDurabilityModifier | 4 | Прочность построек игроков, которые в онлайне. По умолчанию их в 32 раза труднее уничтожить. 0 — Невозможно уничтожить. |
| LandClaimOfflineDurabilityModifier | 4 | Прочность построек игроков, которые сейчас офлайн. По умолчанию их в 32 раза труднее уничтожить. 0 — Невозможно уничтожить. |
| LandClaimOfflineDelay | 0 | Количество минут после выхода игрока из игры, в течение которого уровень территории переходит из онлайн в офлайн. |
Ссылки
- Заказать виртуальный сервер
- Заказать выделенный сервер